


目录
环境:安装node.js
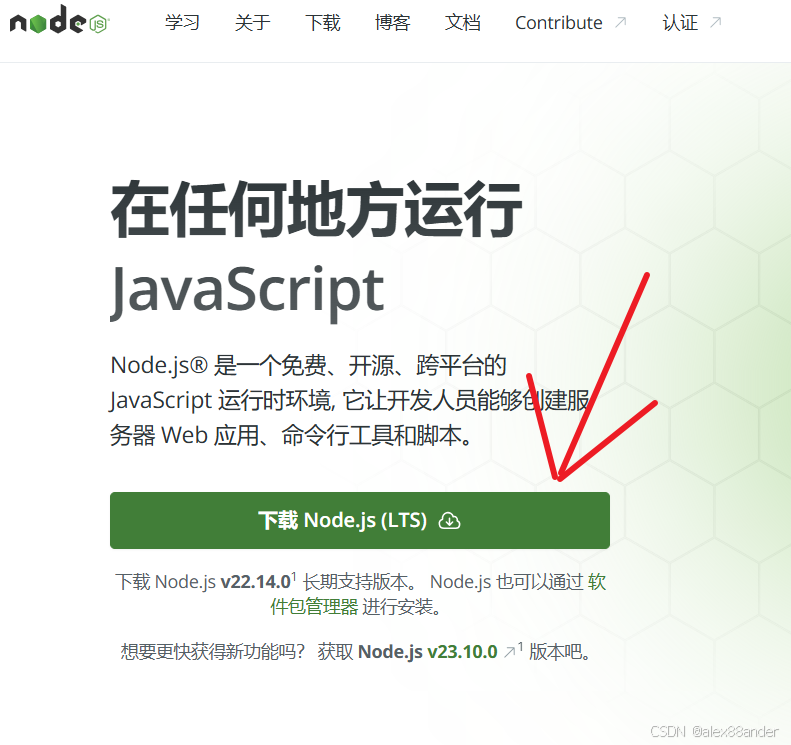
下载后运行安装程序,更改安装路径为d盘,一路next,
遇到 add to path点击,这帮助创建node的环境变量
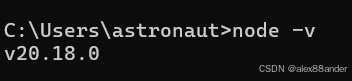
输入node -v 出现版本号即可
更改镜像网站,提高安装速度
cmd输入命令:
npm config set registry https://registry.npmmirror.com/安装脚手架和vue,快速起高楼(项目)
跳转到d盘
cd /d d:脚手架安装
npm install -g @vue/cli安装vue
npm install vue -g创建项目
vue create 项目名,这里就创建一个project项目,选择一下manually手动安装vue3.x
vue create project三次space空格键选中 Babel,Routerx,vuex ;再次按space空格键取消选中Linter(代码规范不熟练容易报错)
运行项目
跳转到项目根路径,运行项目
cd projectnpm run serve浏览器输入localhost:8080访问即可

项目设置
vscode下载vue插件高亮显示代码,方便阅读
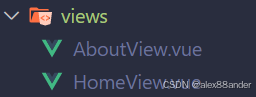
删除项目自带home和about文件,删除index.js页面与路由绑定的代码
App.vue模板标签仅仅保留<router-view/>
下载矢量图标,保存到本地项目静态文件夹
图标素材库下载png素材

底部导航栏有五个图标,五个png素材拷贝到assets\icon静态资源文件夹,其它图标相同操作
路由配置
首先页面统一渲染在App.vue的<router-view/>标签中
通过标签点击或浏览器输入路径 来跳转页面
标签点击就是再导航栏中的路由链接
   <nav>
    <router-link to="/my">My.vue</router-link>
   </nav>
<router-view/>
浏览器输入路径就是在index.js中,先导入页面,再定义页面的路由
import Test from '@/views/Test.vue'


const routes = [
{
    path: '/test',
    name: 'test',
    component : Test,
},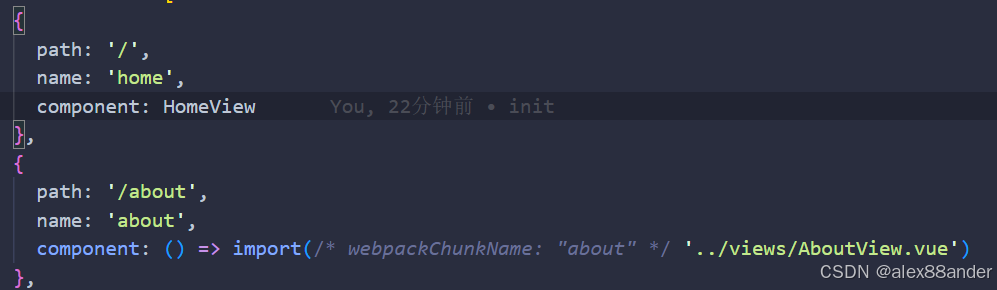
]路由懒加载,只有访问特定路由时才加载该组件;
const routes = [
{
    path : '/test',
    name : 'test',
    component : Test,
    // component : () => import("../component/Test.vue")
    // 方法二动态加载
}

]
由于创建项目时安装配置了vue-router,因此直接在index.js中使用import()来实现懒加载
index.js文件
//导入依赖
import { createRouter, createWebHistory } from 'vue-router'
import My from '../views/My.vue'

//定义路由
const routes = [
  {
    path: '/my',
    name: 'my',
    component: My
  },
]
//创建路由实例
const router = createRouter({
  history: createWebHistory(process.env.BASE_URL),
  routes,
})
//导出路由实例
export default router
createWebHistory表示路由不会通过hash(#)进行导航,而是改为默认的URL(如:/test)进行导航;
routes表示路由懒加载的数组;
组件化开发
导入组件有两种方式:
动态导入适合大组件
import 组件名 from '../组件名.vue'
component : 组件名静态导入适合常用小组件
component : () => import (../组件名.vue)创建组件,循环遍历图片并显示
components组件文件夹下创建BottomNav.vue组件
定义js变量接收图片路径
v-for循环遍历渲染图标
alt描述图片内容 [{src: ''},{src:''}]是包含多个对象的json数组
@表示src根路径 require()导入本地静态资源文件
props参数关键字 需要指明对象的类型
App.vue是主组件,在App.vue中引入的组件会一直显示,适用场景:导航栏
导入组件,复用组件标签
<script>标签中导入组件,通过自定义标签使用组件
<script>
import Test from '@/components/Test.vue'
//假设Test是要导入的组件 @表示项目根目录
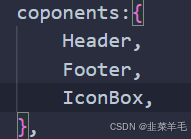
export default{
components:{
Test,
}
}
//定义组件后 即可用<Test>标签复用组件
</script>编写首页
利用配置好的index.js路由和组件开发流程 编写简洁首页
创建三个组件header,footer,IconBox分别表示页头,页脚,图标盒子
创建My.vue首页并引用组件,起到组件的复用性
页头header.vue

<template>
  <header class="header">
    <div class="avatar">
        <img :src="avatarUrl" alt="头像" class="avatar-img"> <!--alt描述图片内容-->
    </div>
    <div class="user-id">
        <span class="user-id-text">{{ userId }}</span>
    </div>
    <div class="settings">
        <img :src="settingsIcon" alt="图标" class="settings-icon">
    </div>
  </header>
</template>

<script>
export default {
    name: 'Header',
    props:{
        avatarUrl:String,
        userId:String,
        settingsIcon:String,
    },
    // data(){
    //     return{
    //         avatarUrl : require('@/assets/icon/avatar.png'),
    //         userId : '用户测试名称',
    //         settingsIcon: require('@/assets/icon/settings.png'),
    //     }
    // },
}
</script>
<style scoped>
.header {
  display: flex;
  justify-content: space-between;
  align-items: center;
  padding: 16px;
  background-color: #fff;
}

.avatar-img {
  width: 50px;
  height: 50px;
  border-radius: 50%;
}

.user-id-text {
  font-size: 24px;
  font-weight: bold;
  margin-right: 800px;
}

.settings-icon {
  width: 30px;
  height: 30px;
}
</style>
页脚footer.vue
v-for标签会遍历icons数组,取出每一个icon子元素和其对应的index索引
key作为唯一标识符避免渲染错误,且提高了渲染性能;index是数组的索引
:src动态绑定src属性,确保每一个icon正确显示

<template>
  <footer class="footer">
    <div class="footer-box" v-for="(icon,index) in icons" :key="index" >
        <img :src="icon"  class="footer-icon" alt="图片">
    </div>
  </footer>
</template>

<script>
export default {
    name:'Footer',
    props:{
        icons:Array
    },
    // data(){
    //     return{
    //         icons:[
    //             require('@/assets/icon/bill.png'),
    //             require('@/assets/icon/favorite.png'),
    //             require('@/assets/icon/message.png'),
    //             require('@/assets/icon/friendZone.png'),
    //             require('@/assets/icon/index.png'),
    //         ]
    //     }
    // }
}
</script>

<style scoped>
.footer {
  display: flex;
  justify-content: space-around;
  padding: 16px;
  background-color: #f8f8f8;
}

.footer-box {
  text-align: center;
}

.footer-icon {
  width: 40px;
  height: 40px;
}
</style>
图标盒子IconBox.vue
IconBox用于显示带有标签的图标,和Footer的区别就是只展示一个图标,多了一个label标签,即图标底部的字体 应用该组件时再通过v-for遍历传入的数组
首页引入组件
导入外部组件

注册组件,在当前组件中注册子组件以便在模板template中使用
data()中返回要展示的静态资源路径对应图标
先引用Header组件,观察需要头像图标路径,文本,设置图标路径,于是绑定并返回数据
带for循环的组件其数据是包含对象的js数组,其对象包含属性
不带for循环的组件其数据是一个包含字符串(图片路径)的数组
遍历数组的每一个对象,传递对象的每一个属性
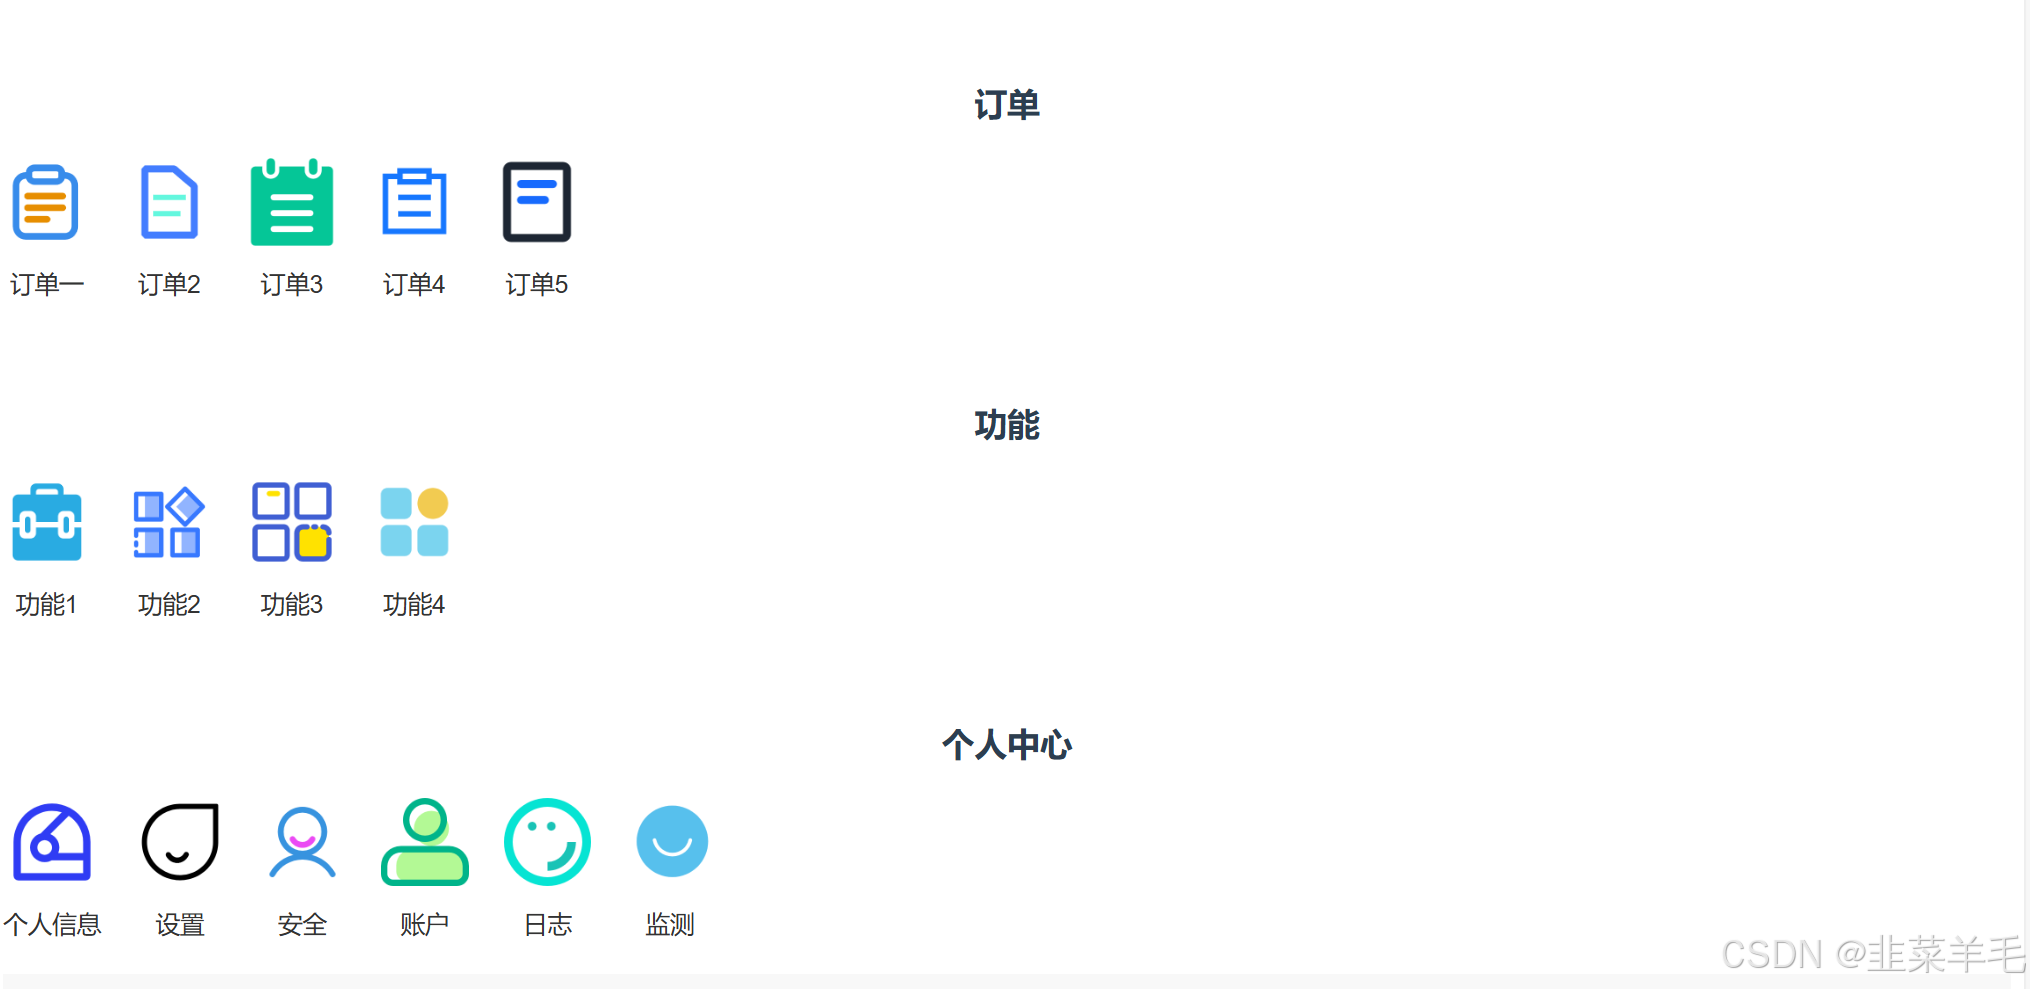
这里想要每行最多展示五个图标且均匀排列,超出的下一行展示,确保每个图标都有一致的宽度。这样,超出五个图标的部分会直接排到下一行的左边,而不是居中
<template>
    <div class="my-page">
        <Header :avatarUrl = "avatarUrl" :userId = "userId" :settingsIcon = "settingsIcon"/>

        <div class="section">
            <h3>订单</h3>
            <div class="icon-group">
                <IconBox v-for="(icon,index) in orderIcons" :key="index" :icon="icon.src" :label="icon.label"></IconBox>
            </div>
        </div>

        <div class="section">
      <h3>功能</h3>
      <div class="icon-group">
        <IconBox v-for="(icon, index) in functionIcons" :key="index" :icon="icon.src" :label="icon.label" />
      </div>
    </div>

    <div class="section">
      <h3>个人中心</h3>
      <div class="icon-group">
        <IconBox v-for="(icon, index) in profileIcons" :key="index" :icon="icon.src" :label="icon.label" />
      </div>
    </div>


        <Footer :icons = "icons"/>
    </div>
</template>

<script>
import Header from '@/components/Header.vue'
import Footer from '@/components/Footer.vue'
import IconBox from '@/components/IconBox.vue'

export default {
    name: 'My',
    components:{
        Header,
        Footer,
        IconBox,
    },
    data(){
        return{
            avatarUrl: require("@/assets/icon/avatar.png"),
            userId : '测试用户名称',
            settingsIcon: require("@/assets/icon/settings.png"),

            orderIcons:[
                {src:require("@/assets/icon/order1.png"),label:"订单一"},
                { src: require('@/assets/icon/order2.png'), label: '订单2' },
                { src: require('@/assets/icon/order3.png'), label: '订单3' },
                { src: require('@/assets/icon/order4.png'), label: '订单4' },
                { src: require('@/assets/icon/order5.png'), label: '订单5' }
            ],

            functionIcons: [
        { src: require('@/assets/icon/function1.png'), label: '功能1' },
        { src: require('@/assets/icon/function2.png'), label: '功能2' },
        { src: require('@/assets/icon/function3.png'), label: '功能3' },
        { src: require('@/assets/icon/function4.png'), label: '功能4' }
      ],

      profileIcons: [
        { src: require('@/assets/icon/profile1.png'), label: '个人信息' },
        { src: require('@/assets/icon/profile2.png'), label: '设置' },
        { src: require('@/assets/icon/profile3.png'), label: '安全' },
        { src: require('@/assets/icon/profile4.png'), label: '账户' },
        { src: require('@/assets/icon/profile5.png'), label: '日志' },
        { src: require('@/assets/icon/profile6.png'), label: '监测' },
      ],


            icons:[
                require('@/assets/icon/bill.png'),
                require('@/assets/icon/favorite.png'),
                require('@/assets/icon/message.png'),
                require('@/assets/icon/friendZone.png'),
                require('@/assets/icon/index.png'),
            ]
        }
    },
    methods:{

    },
}
</script>

<style scoped>
.my-page {
  display: flex;
  flex-direction: column;
}

.section {
  margin: 20px 0;
}

.icon-group {
  display: flex;
  flex-wrap: wrap;
  gap: 20px;
  justify-content: flex-start;  /* 确保第二行的图标从左边开始 */
}

.icon-group > div{
    flex : 1 1 calc(20% - 20px);
    max-width: calc(20% - 20px);
}

h3 {
  font-size: 20px;
  margin-bottom: 10px;
}
</style>
页面编写成功
现在要保留页脚,并实现点击页脚图标切换路由;
type指定数据类型 required表示属性必须要传递,未传递vue会给出警告;
路由导航<router-link :to="路由路径"> routes[index].path 对应每个图标的路径;
展示与路由关联的组件<router-view/>
由于底部页脚导航栏没有在App.vue主页面定义,因此点击图标路由跳转时底部导航栏不会持续显示。定义一个布尔变量isBottomNav为页头,订单,功能,个人中心做v-if判断,当点击的图标属于['/test1','/test2','/test3','/test4']数组中时,isBottomNav置为true,!isBottomNav就是false,只显示导航栏和跳转页面
watch监听数据或属性变化,$route即监听路由对象的变化
点击底部图标路由变化时watch触发回调函数
to是要进入路由对象,form是要离开的路由对象
watch:{
 $route(to,from){
    this.isBottomNav = ['/test1','/test2','/test3','/test4'].includes(to.path);
    }
}
如果要进入的页面路由 被自定义的数组包含;则isBottomNav=true 表示显示导航栏 隐藏其他标签;
<div v-if="!isBottomNav" > {
path: '/',
name: 'my',
component: My,
children: [
{
path: '/test1',
name: 'test1',
component: () => import('@/views/Test1.vue')
},
{
path: '/test2',
name: 'test2',
component: () => import('@/views/Test2.vue')
},
{
path: '/test3',
name: 'test3',
component: () => import('@/views/Test3.vue')
},
{
path: '/test4',
name: 'test4',
component: () => import('@/views/Test4.vue')
},
{
path: '/test5',
name: 'test5',
component: () => import('@/views/Test5.vue')
},
]
},将导航栏前四个图标对应路由改为第五个图标路由的子路由;
固定导航栏不随页面滚动而变化position:fixed固定位置;bottom:0确保页脚紧贴页面底部;
.footer {
display: flex;
justify-content: space-around;
padding: 16px;
background-color: #f8f8f8;
position: fixed; /* 使用固定定位 */
bottom: 0; /* 距离底部为0 */
left: 0; /* 使页脚从页面的左边开始 */
width: 100%; /* 使宽度占满整个页面 */
box-sizing: border-box; /* 包括内边距和边框在内的宽度计算 */
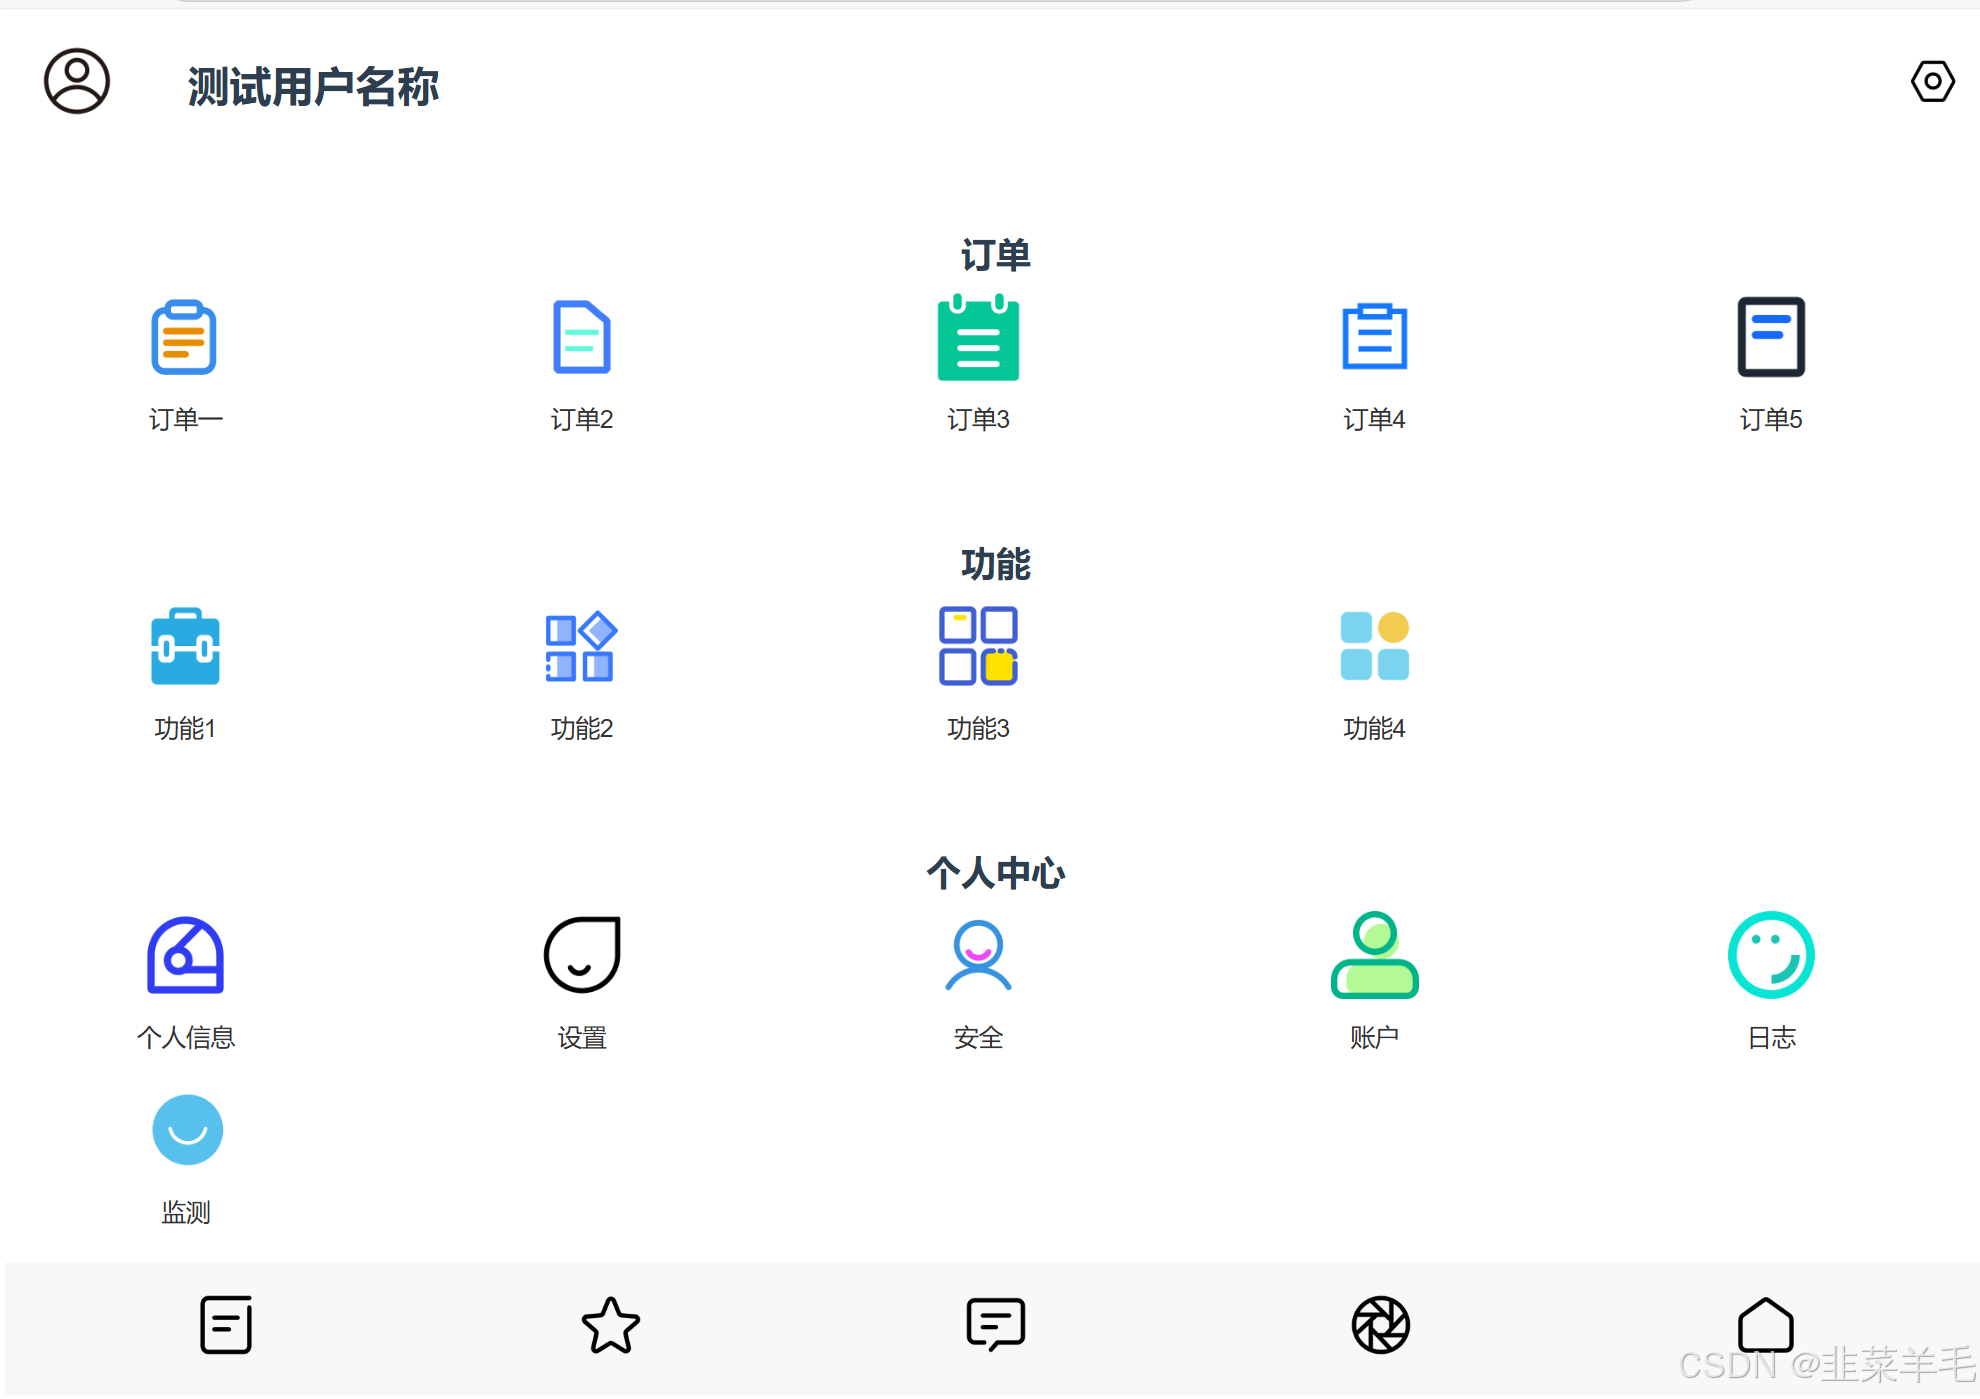
}点击第一个图标跳转Test1.vue;
数据获取与处理
前后端分离就是将一个单体应用分离为两个独立的应用,前端应用和后端应用,前后端数据交互统一采用JSON数据格式
编写Test1.vue界面,创建表单发送post请求给后端,并发送json数据来注册用户
| 请求方式 | 请求路径 | 发送数据 |
| post | { "username":"test10", "password":"abc123", "email":"15522333322@163.com", "phone":"15522333322", "full_name":"alexAnder", "date_of_birth":"2002-03-22" } |
安装axios,这是一个发送http请求的库
npm install axios
简单创建Springboot项目可以参考文章:速通SpringBoot+Vue之数据访问层/业务逻辑层/控制器层;mybatis模糊分页动态sql,redis缓存,jwt用户认证,定时任务,事务管理,异常处理,日志记录-优快云博客
创建三个包Controller Service Mapper 静态资源Resource下创建包Mapper 写动态sql判断是否为空
![]()
还要解决前后端之间端口不一致的跨域CORS问题,新建WebConfig类,
放行前端8080端口和增删改查方法
package com.example.demo.config;

import org.springframework.context.annotation.Configuration;
import org.springframework.web.servlet.config.annotation.CorsRegistry;
import org.springframework.web.servlet.config.annotation.WebMvcConfigurer;

@Configuration
public class WebConfig implements WebMvcConfigurer {
    @Override
    public void addCorsMappings(CorsRegistry registry){
        registry.addMapping("/**")
                .allowedOrigins("http://localhost:8080")
                .allowedMethods("GET","POST","PUT","DELETE","OPTIONS")
                .allowedHeaders("*");
    }
}
回到vscode,编写Registry.vue表单页面并绑定到/registry路由下
创建表单
表单要包含用户名,密码,邮箱,电话,姓名,出生日期;data()中也要定义user对象;
数据绑定
表单中的每个字段都要通过v-model和user对象中的属性互相绑定;
监听表单提交事件来触发方法有两种方式
| @submit.prevent="方法名" | v-on:submit="方法名" |
| 简洁,阻止了默认的页面刷新行为 | 触发方法后,页面默认刷新 |
Axios请求
导入axios包,使用axios.post发送异步请求,传递this.user作为请求体
异步async操作是指前端利用axios.post发送请求后,会等待请求完成和后端返回响应数据之后再调用await后续行的代码;
响应处理
根据后端返回的数据,更新responseMessage,responseClass,显示响应消息Success or Failed
代码如下:
<template>
    <div>
        <h1>用户注册</h1>

        <form @submit.prevent="registry" class="registration-form">
            <div>
                <label for="username">用户名:</label>
                <input type="text" v-model="user.username" required/>
            </div>

            <div>
                <label for="password">密码:</label>
                <input type="password" v-model="user.password" required/>
            </div>

            <div>
                <label for="email">邮箱:</label>
                <input type="email" v-model="user.email"/>
            </div>

            <div>
                <label for="phone">电话号码:</label>
                <input type="text" v-model="user.phone"/>
            </div>

            <div>
                <label for="full_name">姓名:</label>
                <input type="text" v-model="user.full_name"/>
            </div>

            <div>
                <label for="date_of_birth">出生日期:</label>
                <input type="date" v-model="user.date_of_birth"/>
            </div>

            <button type="submit">注册</button>
        </form>

        <p v-if="responseMessage" :class="responseClass">{{ responseMessage }}</p>
    </div>
</template>

<script>
import axios from  'axios'
export default{
    name: 'Registry',
    data(){
        return{
            user:{
                "username":'',
                "password":'',
                "email":'',
                "phone":'',
                "full_name":'',
                "date_of_birth":'',
            },
            responseMessage:'',
            responseClass:'',
        }
    },
    methods:{
        async registry(){
            try{
                const response = await axios.post('http://localhost:9090/user/add',this.user);
                this.responseMessage = '用户注册成功';
                this.responseClass = 'success';
            }catch(error){
                this.responseMessage = '用户注册失败';
                this.responseClass = 'error';
            }
        }
    }

}
</script>

<style scoped>
/* 样式部分可以根据需要进行调整 */
.registration-form {
  max-width: 400px;
  margin: 0 auto;
  padding: 20px;
  border: 1px solid #ccc;
  border-radius: 8px;
  background-color: #f9f9f9;
}

form div {
  margin-bottom: 15px;
}

form label {
  display: block;
  margin-bottom: 5px;
}

form input {
  width: 100%;
  padding: 8px;
  border-radius: 4px;
  border: 1px solid #ccc;
}

button {
  background-color: #4CAF50;
  color: white;
  border: none;
  padding: 10px 20px;
  border-radius: 4px;
  cursor: pointer;
}

button:hover {
  background-color: #45a049;
}

.success {
  color: green;
  margin-top: 10px;
}

.error {
  color: red;
  margin-top: 10px;
}
</style>
数据库中也插入了一条记录:

Vue 3.0 的响应式原理
reactive 和 ref 来实现响应式数据 Proxy 实现的响应式系统
利用reactive创建js嵌套对象,当对象.属性值发生变化时,vue会更新与之绑定的dom数据
const userInfo =  reactive({
    name: 'John Doe',
    age: 30
})利用ref创建基本类型对象(字符串,整型数), ref返回的创建的对象,当你修改对象.value时,Vue 会自动更新绑定该值的 DOM
const message = ref('欢迎使用Vue3.0');无论是修改嵌套对象数据还是基本类型对象的数据,数据变化后 dom视窗都会发生变化;
Proxy是js原生对象,可以对创建的js对象数据变化进行监控;
new Proxy(,) 这里第一个参数是要代理的对象,第二个参数是定义了拦截器的对象;
get拦截数据的读取操作,set拦截数据的写入操作
Reflect.get(...arguments)
arguments包含了get或set里的全部参数 target, prop 或 target, prop,value
Reflect.set(target, prop, value) 代表设置目标对象target的属性prop的值为value;
代码如下:
<template>
<div>
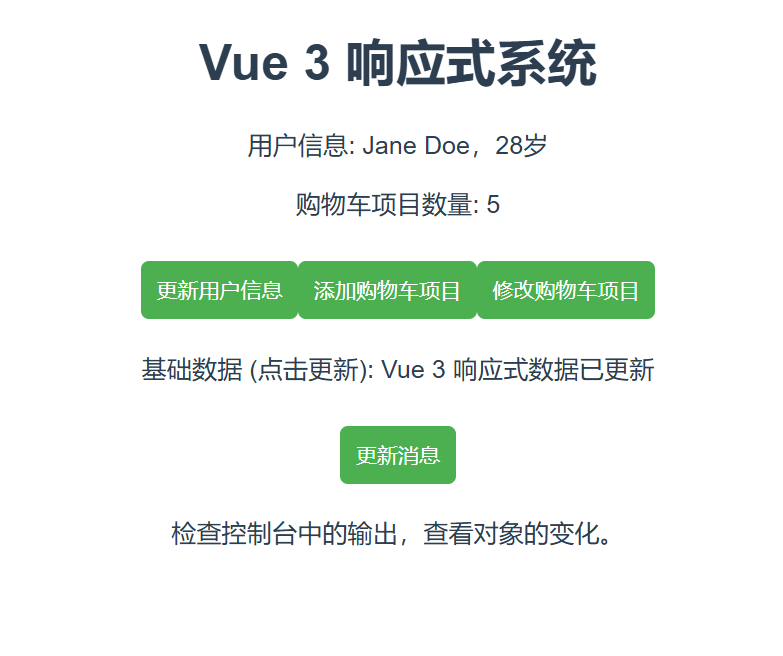
<h1>Vue 3 响应式系统 </h1>
<!-- 展示嵌套对象的响应式更新 -->
<div>
<p>用户信息: {{ userInfo.name }},{{ userInfo.age }}岁</p>
<p>购物车项目数量: {{ cart.length }}</p>
<button @click="updateUserInfo">更新用户信息</button>
<button @click="addCartItem">添加购物车项目</button>
<button @click="updateCartItem">修改购物车项目</button>
</div>
<!-- 使用 ref 来处理基础类型 -->
<div>
<p>基础数据 (点击更新): {{ message }}</p>
<button @click="updateMessage">更新消息</button>
</div>
<!-- 控制台会显示 Proxy 操作 -->
<p>检查控制台中的输出,查看对象的变化。</p>
</div>
</template>
<script>
import { reactive, ref } from 'vue';
export default {
name: 'ReactiveDemo',
setup() {
// 创建嵌套对象和数组的响应式数据
const userInfo = reactive({
name:'John Doe',
age: 30
});
const cart = reactive([
{ id: 1, name: '手机', price: 999 },
{ id: 2, name: '耳机', price: 199 }
]);
// 使用 ref 处理基础类型数据
const message = ref('欢迎使用 Vue 3');
// 更新嵌套对象的数据
const updateUserInfo = () => {
userInfo.name = 'Jane Doe';
userInfo.age = 28;
};
// 向购物车添加新项目
const addCartItem = () => {
cart.push({ id: 3, name: '笔记本', price: 4999 });
};
// 修改购物车的现有项目
const updateCartItem = () => {
cart[0].name = '智能手机'; // 修改第一个项目名称
cart[1].price = 179; // 修改第二个项目的价格
};
// 更新基础数据
const updateMessage = () => {
message.value = 'Vue 3 响应式数据已更新';
};
const proxyUserInfo = new Proxy(userInfo, {
get(target, prop) {
console.log(`访问属性: ${prop}`);
return Reflect.get(...arguments);
},
set(target, prop, value) {
console.log(`设置属性: ${prop},新值: ${value}`);
return Reflect.set(...arguments);
}
});
const proxyCart = new Proxy(cart, {
get(target, prop) {
console.log(`访问属性: ${prop}`);
return Reflect.get(...arguments);
},
set(target, prop, value) {
console.log(`设置属性: ${prop},新值: ${value}`);
return Reflect.set(...arguments);
}
});
console.log(proxyUserInfo); // 观察 UserInfo 数据
console.log(proxyCart); // 观察 Cart 数据
return {
userInfo,
cart,
message,
updateUserInfo,
addCartItem,
updateCartItem,
updateMessage
};
}
};
</script>
<style scoped>
div {
margin-bottom: 20px;
}
button {
padding: 10px;
margin-top: 10px;
background-color: #4CAF50;
color: white;
border: none;
border-radius: 5px;
cursor: pointer;
}
button:hover {
background-color: #45a049;
}
</style>
生命周期钩子
这里解释常用的钩子:onMounted、onUpdated、onUnmounted
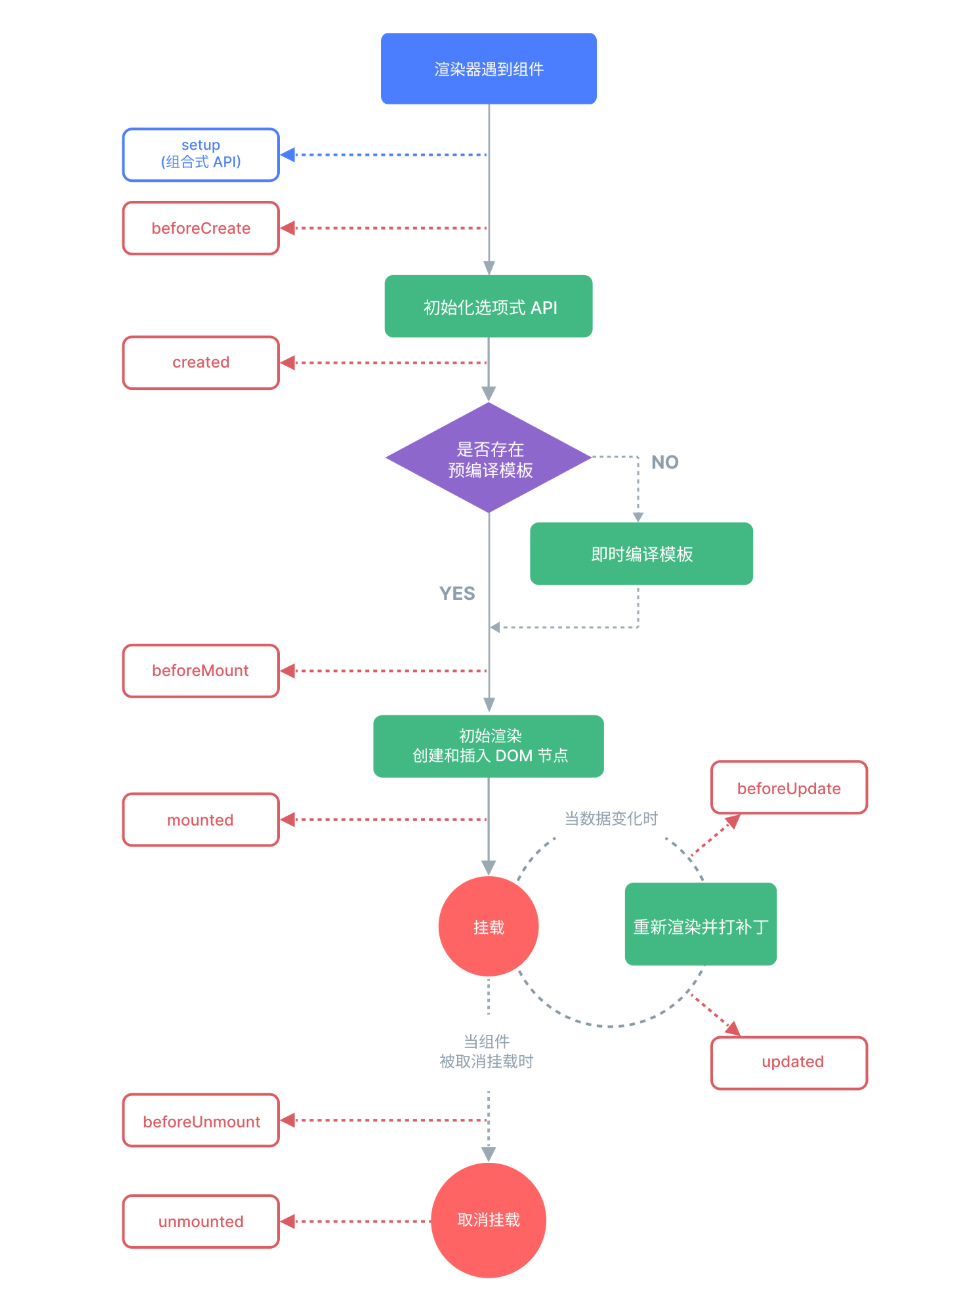
onMounted在组件挂载时触发;onUpated在响应式数据变化时触发(刷新页面触发);onUnmounted在组件卸载时触发(导航到其他页面时触发);
Vue 3 中,使用 <script setup> 语法时不需要显式地指定 name,因为它默认会使用文件的名称作为组件的名称
代码如下:
<template>
<div>
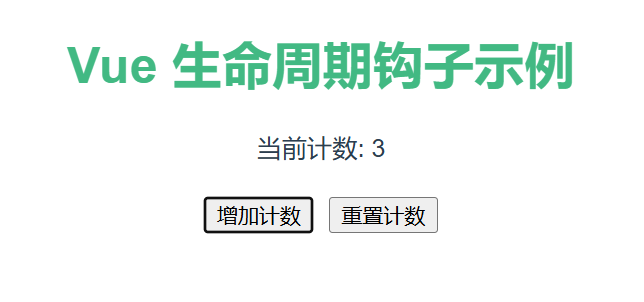
<h1>Vue 生命周期钩子示例</h1>
<p>当前计数: {{ count }}</p>
<button @click="incrementCount">增加计数</button>
<button @click="resetCount">重置计数</button>
</div>
</template>
<script setup>
import { ref, onMounted, onUpdated, onUnmounted } from 'vue';
// 定义一个响应式的计数变量
const count = ref(0);
// 增加计数
const incrementCount = () => {
count.value++;
};
// 重置计数
const resetCount = () => {
count.value = 0;
};
// onMounted:在组件挂载时触发
onMounted(() => {
console.log('组件已挂载');
console.log(`当前计数: ${count.value}`);
});
// onUpdated:当组件的响应式数据更新时触发
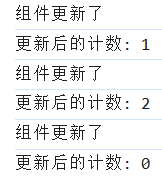
onUpdated(() => {
console.log('组件更新了');
console.log(`更新后的计数: ${count.value}`);
});
// onUnmounted:在组件卸载时触发
onUnmounted(() => {
console.log('组件已卸载');
});
</script>
<style scoped>
/* 可以添加一些样式来美化界面 */
h1 {
color: #42b983;
}
button {
margin: 5px;
}
</style>
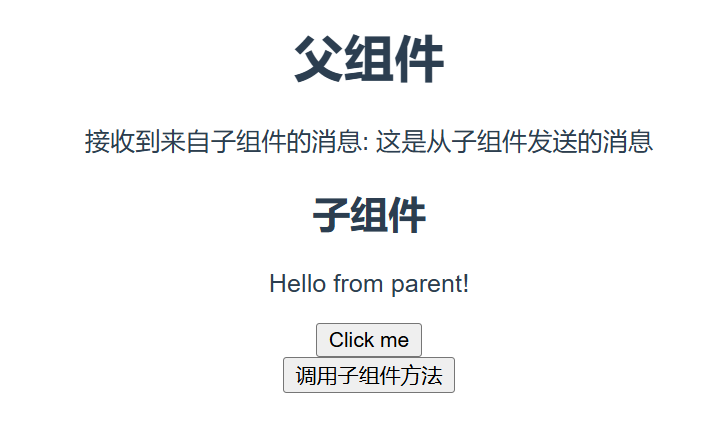
事件绑定与自定义事件
v-bind 将父组件的属性动态绑定到子组件的 props 上。通过这种方式,父组件可以传递数据到子组件 <Child :parentMessage="parentMessage" :buttonText="buttonText" @自定义事件名称="定义方法接收子组件数据" ref="childComponent"> ref="childComponent" 绑定引用子组件;
this.$refs.childComponent.子组件方法(); 访问子组件的方法
自定义emit事件 this.$emit("自定义事件名称",'发送给父组件的数据');
通过 emit 在子组件中触发自定义事件,并在父组件中捕获
总结:
v-bind 用于动态绑定属性,允许父组件将数据传递给子组件。
v-on 用于监听事件,子组件可以使用 $emit 触发自定义事件,父组件通过 v-on 监听并处理这些事件。
$refs 可以让父组件直接访问子组件的实例,调用子组件的方法或访问子组件的 DOM 元素
代码如下:
<template>
    <div>
      <h1>父组件</h1>
      <p>接收到来自子组件的消息: {{ message }}</p>

      <!-- 使用v-bind动态绑定属性 -->
      <Child
        :parentMessage="parentMessage"
        :buttonText="buttonText"
        ref="childComponent"
        @customEvent="handleCustomEvent"
      />

      <button @click="callChildMethod">调用子组件方法</button>
    </div>
  </template>

  <script>
  import Child from './Child.vue';

  export default {
    components: {
      Child,
    },
    data() {
      return {
        message: '', // 存储从子组件接收到的消息
        parentMessage: 'Hello from parent!', // 传递给子组件的消息
        buttonText: 'Click me', // 动态传递给子组件按钮文字
      };
    },
    methods: {
      handleCustomEvent(payload) {
        this.message = payload; // 接收到子组件的自定义事件数据
      },
      callChildMethod() {
        // 使用$refs调用子组件的方法
        this.$refs.childComponent.showMessage();
      },
    },
  };
  </script>
<template>
    <div>
      <h2>子组件</h2>
      <p>{{ parentMessage }}</p>
      <button @click="sendMessage">{{ buttonText }}</button>
    </div>
  </template>

  <script>
  export default {
    props: {
      parentMessage: String,  // 接收父组件传递过来的消息
      buttonText: String,     // 接收父组件动态传递的按钮文字
    },
    methods: {
      sendMessage() {
        // 使用$emit触发自定义事件并向父组件发送数据
        this.$emit('customEvent', '这是从子组件发送的消息');
      },
      showMessage() {
        console.log('子组件的方法被调用');
      },
    },
  };
  </script>
常见指令
v-model 是用来实现双向数据绑定,<input v-model="message"> <div>{{message}}</div>
v-on 是用来处理事件监听,<button v-on:click="doSomeThing"/> 点击触发doSomeThing方法
v-bind 是用来动态绑定属性, <img v-bind:src="imageUrl"> imageUrl会动态更新img标签的路径属性

代码如下:
<template>
    <div id="app">
      <h1>Vue.js 常见指令案例</h1>

      <!-- v-model: 双向数据绑定 -->
      <label for="message">输入消息:</label>
      <input id="message" v-model="message" placeholder="请输入内容">
      <p>你输入的内容是: {{ message }}</p>

      <!-- v-on: 事件监听 -->
      <button v-on:click="changeMessage">点击我修改消息</button>
      <p>{{ modifiedMessage }}</p>

      <!-- v-bind: 动态绑定属性 -->
      <h2>动态绑定图片</h2>
      <img v-bind:src="imageUrl" alt="Vue Logo" width="200">
      <button v-on:click="changeImageUrl">点击更换图片</button>
    </div>
  </template>

  <script>
  export default {
    name:'Instruct',
    data() {
      return {
        message: '',            // 双向绑定的消息
        modifiedMessage: '',    // 按钮点击后修改的消息
        imageUrl: 'https://vuejs.org/images/logo.png',  // 图片路径
      };
    },
    methods: {
      changeMessage() {
        this.modifiedMessage = '你点击了按钮,消息被修改了!';
      },
      changeImageUrl() {
        // 更换图片路径
        this.imageUrl = 'https://vuejs.org/images/logo-2.png';
      },
    },
  };
  </script>

  <style scoped>
  #app {
    font-family: Avenir, Helvetica, Arial, sans-serif;
    text-align: center;
    color: #2c3e50;
    margin-top: 60px;
  }
  button {
    padding: 10px 20px;
    background-color: #42b983;
    color: white;
    border: none;
    border-radius: 5px;
    cursor: pointer;
    margin-top: 10px;
  }
  button:hover {
    background-color: #35495e;
  }
  </style>
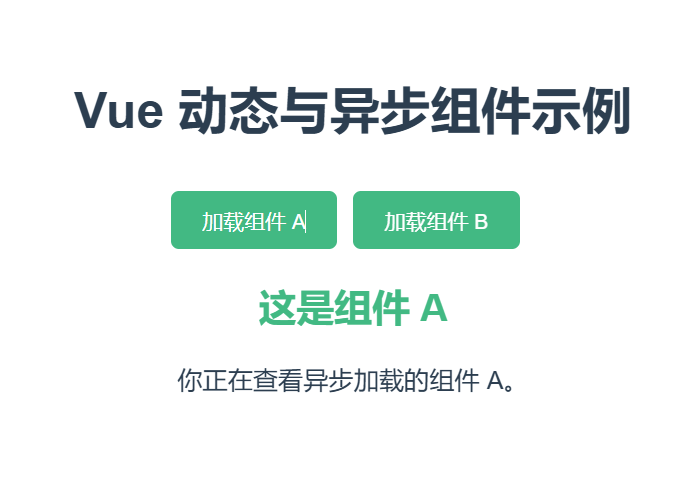
动态组件与异步组件
<component :is="componentName"> 来动态渲染不同的组件
通过异步加载组件来优化性能,减少初次加载时的包大小
通过判断传入的组件名,来动态渲染对应的组件
渲染位置:<component :is="currentComponent" />
代码如下:
<template>
    <div id="app">
      <h1>Vue 动态与异步组件示例</h1>

      <div>
        <button @click="loadComponent('ComponentA')">加载组件 A</button>
        <button @click="loadComponent('ComponentB')">加载组件 B</button>
      </div>

      <!-- 使用 :is 动态渲染组件 -->
      <component :is="currentComponent" />
    </div>
  </template>

  <script>
  import { defineAsyncComponent } from 'vue';

  // 使用 defineAsyncComponent 来包装异步加载的组件
  const AsyncComponentA = defineAsyncComponent(() => import('../components/ComponentA.vue'));
  const AsyncComponentB = defineAsyncComponent(() => import('../components/ComponentB.vue'));

  export default {
    data() {
      return {
        currentComponent: null, // 动态切换的组件
      };
    },
    methods: {
      loadComponent(componentName) {
        // 动态加载不同的组件
        if (componentName === 'ComponentA') {
          this.currentComponent = AsyncComponentA;
        } else if (componentName === 'ComponentB') {
          this.currentComponent = AsyncComponentB;
        }
      },
    },
  };
  </script>

  <style scoped>
  #app {
    font-family: Avenir, Helvetica, Arial, sans-serif;
    text-align: center;
    color: #2c3e50;
    margin-top: 60px;
  }
  button {
    padding: 10px 20px;
    background-color: #42b983;
    color: white;
    border: none;
    border-radius: 5px;
    cursor: pointer;
    margin-top: 10px;
    margin-right: 10px;
  }
  button:hover {
    background-color: #35495e;
  }
  </style>
<template>
    <div>
      <h2>这是组件 A</h2>
      <p>你正在查看异步加载的组件 A。</p>
    </div>
  </template>

  <script>
  export default {
    name: 'ComponentA',
  };
  </script>

  <style scoped>
  h2 {
    color: #42b983;
  }
  </style>
<template>
    <div>
      <h2>这是组件 B</h2>
      <p>你正在查看异步加载的组件 B。</p>
    </div>
  </template>

  <script>
  export default {
    name: 'ComponentB',
  };
  </script>

  <style scoped>
  h2 {
    color: #35495e;
  }
  </style>
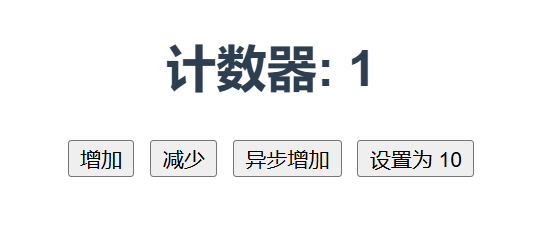
状态管理
使用 Vuex 管理状态:通过 state 存储状态,mutations 修改状态,actions 处理异步操作,getters 用于获取状态。
通过 this.$store 访问和修改 Vuex 中的状态
this.$store.状态('状态内定义的方法名');
state里定义记录计数器值的变量
getter返回值 state.属性;
这里修改数据(增加,减少,设置为10)都是通过mutation里的方法修改的;
异步增加是在actions中的方法;利用setTimeout(()=>{},1000)过一秒后计数器加一
代码如下:
// src/store/index.js
import { createStore } from 'vuex';

const store = createStore({
  state() {
    return {
      count: 0,  // 一个简单的状态变量,用于存储计数器的值
    };
  },
  mutations: {
    increment(state) {
      state.count++;  // 增加 count 的值
    },
    decrement(state) {
      state.count--;  // 减少 count 的值
    },
    setCount(state, value) {
      state.count = value;  // 设置 count 为指定的值
    },
  },
  actions: {
    incrementAsync({ commit }) {
      setTimeout(() => {
        commit('increment');
      }, 1000);  // 异步增加 count 的值
    },
  },
  getters: {
    getCount(state) {
      return state.count;  // 获取 count 的值
    },
  },
});

export default store;
<template>
    <div>
      <h1>计数器: {{ count }}</h1>
      <button @click="increment">增加</button>
      <button @click="decrement">减少</button>
      <button @click="incrementAsync">异步增加</button>
      <button @click="setCount">设置为 10</button>
    </div>
  </template>

  <script>
  export default {
    name:'Statement',
    computed: {
      // 使用 Vuex 的 getters 来获取 count 的值
      count() {
        return this.$store.getters.getCount;
      },
    },
    methods: {
      // 提交 mutations 来修改状态
      increment() {
        this.$store.commit('increment');
      },
      decrement() {
        this.$store.commit('decrement');
      },
      incrementAsync() {
        this.$store.dispatch('incrementAsync');
      },
      setCount() {
        this.$store.commit('setCount', 10);
      },
    },
  };
  </script>

  <style scoped>
  button {
    margin: 5px;
  }
  </style>
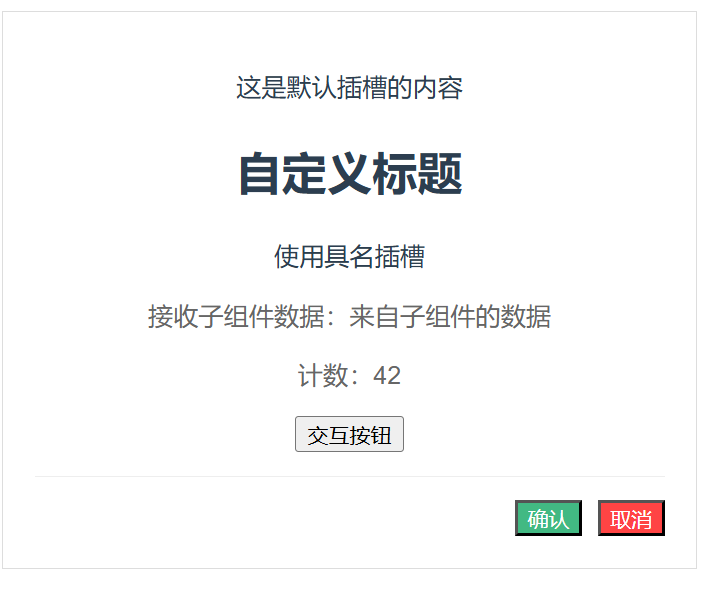
组件插槽
| 类型 | 语法 | 使用场景 | 数据传递方向 |
|---|---|---|---|
| 默认插槽 | <slot> | 基础内容分发 | 父 → 子 |
| 具名插槽 | <slot name="xxx"> | 多个内容分发点 | 父 → 子 |
| 作用域插槽 | <slot :data="data"> | 子组件向父组件传递数据 | 子 → 父 |
| 动态插槽名 | <slot :name="var"> | 根据条件动态选择插槽 | 双向 |
插槽(slots)功能来传递动态内容到子组件中
代码如下:
<template>
    <ChildComponent>
      <!-- 默认插槽内容 -->
      <p>这是默认插槽的内容</p>

      <!-- 具名插槽内容 -->
      <template #header>
        <h2>自定义标题</h2>
        <small>使用具名插槽</small>
      </template>

      <!-- 作用域插槽 -->
      <template #content="slotProps">
        <div>
          <p>接收子组件数据:{{ slotProps.data.message }}</p>
          <p>计数:{{ slotProps.data.count }}</p>
          <button @click="handleClick(slotProps.data)">
            交互按钮
          </button>
        </div>
      </template>

      <!-- 覆盖默认插槽 -->
      <template #footer>
        <div class="custom-footer">
          <button class="confirm-btn">确认</button>
          <button class="cancel-btn">取消</button>
        </div>
      </template>
    </ChildComponent>
  </template>

  <script setup>
  import ChildComponent from '@/components/ChildComponent.vue'

  const handleClick = (data) => {
    console.log('子组件数据:', data)
    alert(`收到计数: ${data.count}`)
  }
  </script>

  <style scoped>
  .confirm-btn {
    background: #42b983;
    color: white;
    margin-right: 10px;
  }
  .cancel-btn {
    background: #ff4444;
    color: white;
  }
  .custom-footer {
    display: flex;
    justify-content: flex-end;
  }
  </style>
<!-- 子组件 -->
<template>
<div class="card">
<!-- 默认插槽 -->
<slot></slot>
<!-- 具名插槽 -->
<div class="header">
<slot name="header"></slot>
</div>
<!-- 作用域插槽 -->
<div class="content">
<slot name="content" :data="slotData"></slot>
</div>
<!-- 带默认内容的插槽 -->
<div class="footer">
<slot name="footer">
<button class="default-btn">默认按钮</button>
</slot>
</div>
</div>
</template>
<script setup>
import { ref } from 'vue'
const slotData = ref({
message: '来自子组件的数据',
count: 42
})
</script>
<style scoped>
.card {
border: 1px solid #ddd;
padding: 20px;
margin: 20px;
max-width: 400px;
}
.header {
font-size: 1.2em;
margin-bottom: 15px;
}
.content {
color: #666;
margin: 15px 0;
}
.footer {
border-top: 1px solid #eee;
padding-top: 15px;
}
.default-btn {
background: #f0f0f0;
padding: 8px 16px;
}
</style>计算属性与侦听器
computed:{} 介绍计算属性如何提高性能
// 当 firstName 或 lastName 变化时才会重新计算
const fullName = computed(() => {
  return `${firstName.value} ${lastName.value}`
})
watch:{} 如何使用 watch API 来监听数据变化并做出反应
// 监听单个 ref
watch(price, (newVal) => {
  console.log('价格变化:', newVal)
})

// 监听计算属性
watch(calculateTotal, updateDiscount)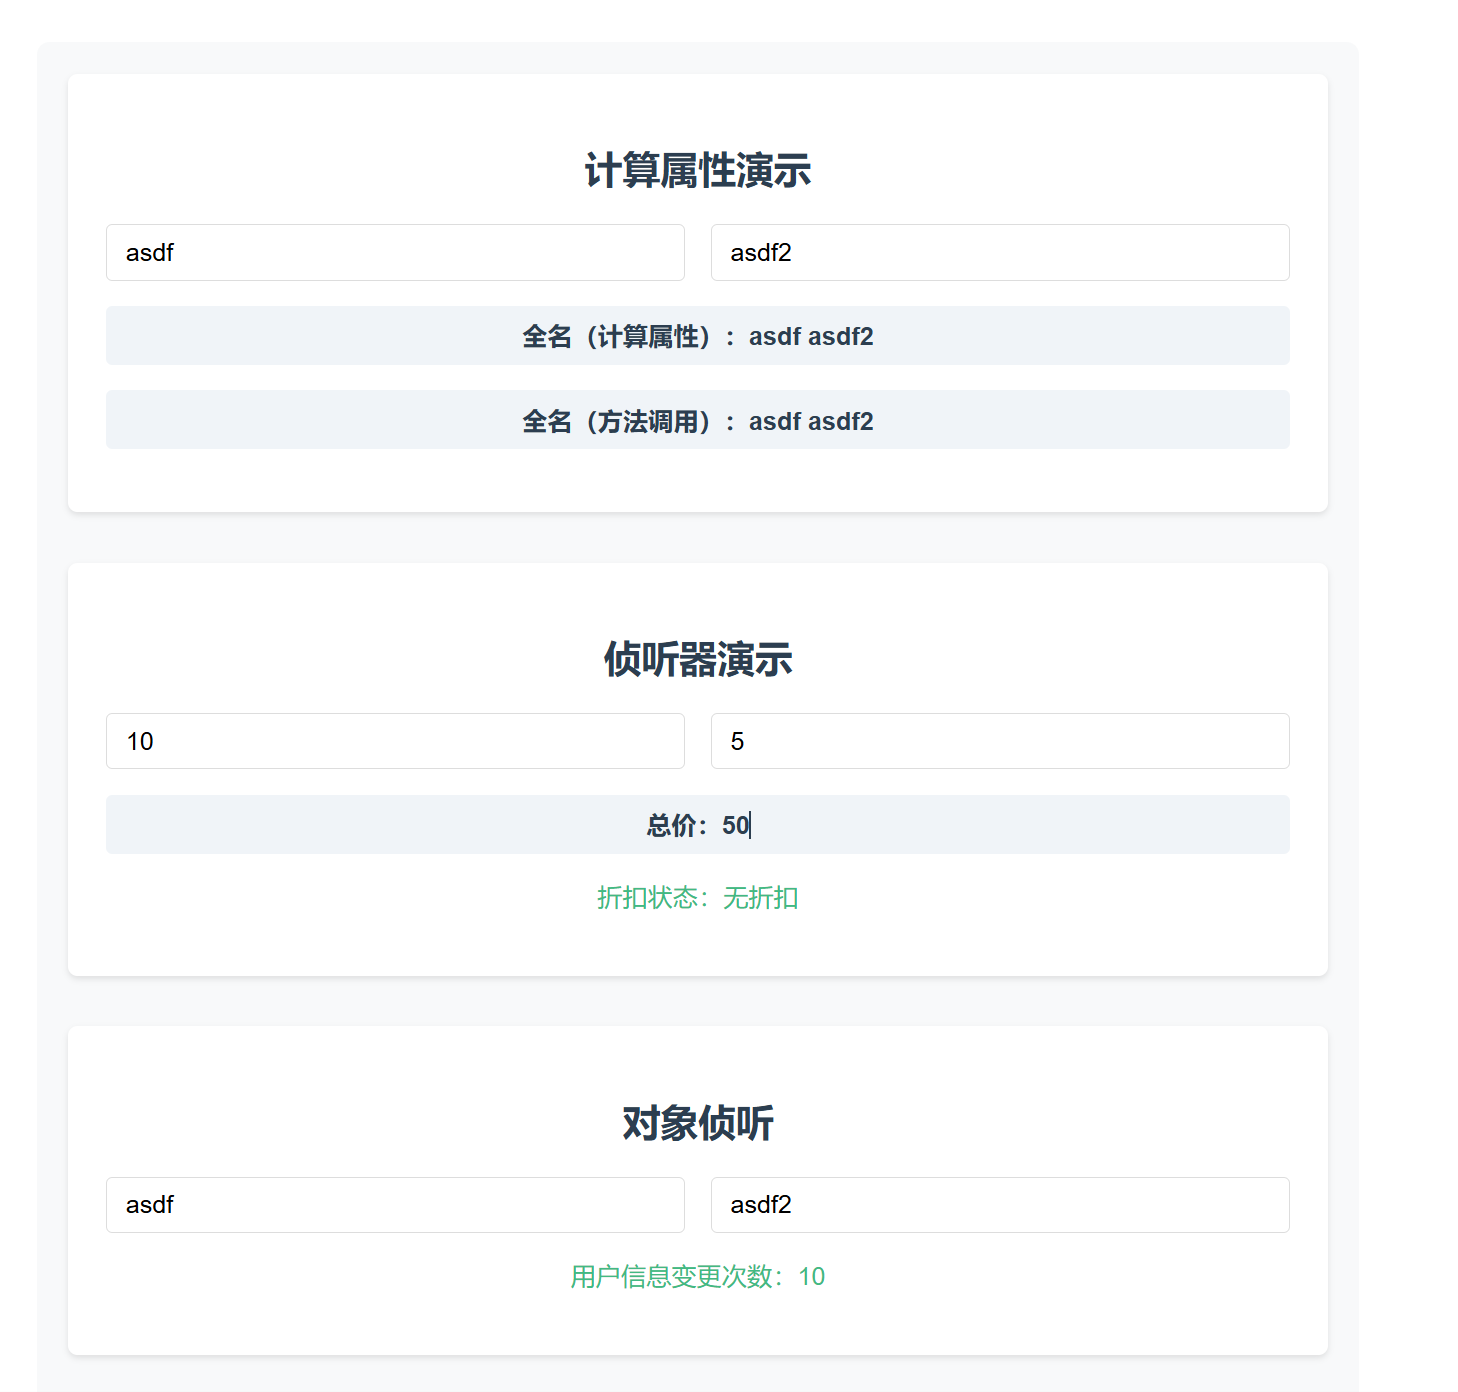
代码如下:
<template>
    <div class="demo-container">
      <!-- 计算属性演示 -->
      <div class="section">
        <h2>计算属性演示</h2>
        <div class="input-group">
          <input v-model="firstName" placeholder="名字">
          <input v-model="lastName" placeholder="姓氏">
        </div>
        <p class="result">全名(计算属性):{{ fullName }}</p>
        <p class="result">全名(方法调用):{{ getFullName() }}</p>
      </div>

      <!-- 侦听器演示 -->
      <div class="section">
        <h2>侦听器演示</h2>
        <div class="input-group">
          <input type="number" v-model="price" placeholder="价格">
          <input type="number" v-model="quantity" placeholder="数量">
        </div>
        <p class="result">总价:{{ totalPrice }}</p>
        <p class="status">折扣状态:{{ discountStatus }}</p>
      </div>

      <!-- 深度侦听对象 -->
      <div class="section">
        <h2>对象侦听</h2>
        <div class="input-group">
          <input v-model="userInfo.name" placeholder="用户名">
          <input type="email" v-model="userInfo.email" placeholder="邮箱">
        </div>
        <p class="status">用户信息变更次数:{{ changeCount }}</p>
      </div>
    </div>
  </template>

  <script setup>
  import { ref, reactive, computed, watch } from 'vue'

  // 计算属性部分
  const firstName = ref('')
  const lastName = ref('')

  // 计算属性(带缓存)
  const fullName = computed(() => {
    console.log('计算属性执行')
    return `${firstName.value} ${lastName.value}`.trim()
  })

  // 普通方法(无缓存)
  const getFullName = () => {
    console.log('方法执行')
    return `${firstName.value} ${lastName.value}`.trim()
  }

  // 侦听器部分
  const price = ref(0)
  const quantity = ref(0)
  const discountStatus = ref('无折扣')
  const totalPrice = ref(0)

  // 计算总价(自动更新)
  const calculateTotal = computed(() => {
    return price.value * quantity.value
  })

  // 监听总价变化
  watch(calculateTotal, (newVal) => {
    totalPrice.value = newVal
    if (newVal > 1000) {
      discountStatus.value = '已激活9折优惠'
    } else {
      discountStatus.value = '无折扣'
    }
  })

  // 深度侦听对象
  const userInfo = reactive({
    name: '',
    email: ''
  })
  const changeCount = ref(0)

  watch(
    () => userInfo,
    (newVal, oldVal) => {
      changeCount.value++
      console.log('用户信息变更:', newVal)
    },
    { deep: true, immediate: true }
  )
  </script>

  <style scoped>
  .demo-container {
    max-width: 800px;
    margin: 2rem auto;
    padding: 20px;
    background: #f8f9fa;
    border-radius: 8px;
  }

  .section {
    margin-bottom: 2rem;
    padding: 1.5rem;
    background: white;
    border-radius: 6px;
    box-shadow: 0 2px 4px rgba(0,0,0,0.1);
  }

  .input-group {
    display: grid;
    grid-template-columns: 1fr 1fr;
    gap: 1rem;
    margin: 1rem 0;
  }

  input {
    padding: 8px 12px;
    border: 1px solid #ddd;
    border-radius: 4px;
    font-size: 16px;
  }

  .result {
    color: #2c3e50;
    font-weight: bold;
    margin: 1rem 0;
    padding: 8px;
    background: #f0f4f8;
    border-radius: 4px;
  }

  .status {
    color: #42b983;
    font-weight: 500;
  }
  </style>


 1097
1097

 被折叠的 条评论
为什么被折叠?
被折叠的 条评论
为什么被折叠?
 到【灌水乐园】发言


