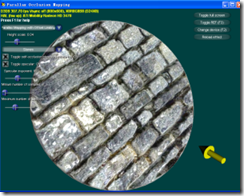
This program is ParallaxOcclusionMapping Sample from D3D samples. I touch this technology because I found some one use DXT5 format as normal maps. DXT5 means the texture still keep full range of alpha channel. As I deeper into the code, I found they use the alpha channel as the parallax mapping. This will will make the normal map effect and details on the flattened surface become more obvious. Low polygon mesh could show some high polygon effect with less vertex data triangles, and textures.
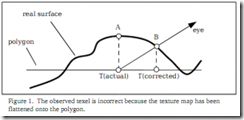
 The Basics When a texture map representing an uneven surface is applied to a flattened polygon, the surface appears to get flattened. In Figure 1 you can see that when viewing the polygon along the depicted eye vector, you will see point A of the surface. However, if you were viewing the actual surface instead of a texture mapping polygon, you would see point B. If the texture coordinate corresponding to point A could be corrected, then you could view point B instead. By offsetting all the texture coordinates individually, high areas of the surface would shift toward the eye and lows areas of the surface would shift away from the eye(This original words is like this: high areas of the surface would shift always the eye and low areas of the surface would shift toward the eye. As you see from the Figure 1, A locates the high area, it’s corrected position is B, B is more closer than A. So I think high areas should shift toward the eye instead of shifting away from the eye). The process of parallax mapping requires that, for each pixel drawn, a texture coordinate, used to index one or more texture maps, be corrected by some displacement.
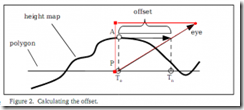
 To compute an offset texture coordinate for a pixel, 3 components are required: a starting texture coordinates, a value of the surface height, and a tangent space vector pointing from the pixel to the eye point. An application programmer must supply a tangent, bi-normall, and normal at each vertex. These can be used to create a rotation matrix which will transform vectors from the global coordinate system to tangent space.
A standard height map or one channel (usually the alpha channel) in texture is used to represent the varying height of the surface. The height map correlates to the surface’s regular texture map and stores one height value per Texel. These values are in the range[0.0, 1.0]. You could use following function to remap other range to range [0, 1].
And you could use the following function to calculate the corrected texture coordinate.
Here are some implementation details in the shader:
To create the tangent world space:
float3 vNormalWS   = mul( vInNormalOS,   (float3x3) g_mWorld );
float3 vTangentWS  = mul( vInTangentOS,  (float3x3) g_mWorld );
float3 vBinormalWS = mul( vInBinormalOS, (float3x3) g_mWorld );

vNormalWS   = normalize( vNormalWS );
vTangentWS  = normalize( vTangentWS );
vBinormalWS = normalize( vBinormalWS );

// Compute position in world space:
float4 vPositionWS = mul( inPositionOS, g_mWorld );

// Normalize the light and view vectors and transform it to the tangent space:
float3x3 mWorldToTangent = float3x3( vTangentWS, vBinormalWS, vNormalWS );
To calculate the corrected coordinate:
// Propagate the view and the light vectors (in tangent space):
Out.vLightTS = mul( vLightWS, mWorldToTangent );   //
Out.vViewTS  = mul( mWorldToTangent, vViewWS  );  //

// Compute initial parallax displacement direction:
float2 vParallaxDirection = normalize(  Out.vViewTS.xy );

// The length of this vector determines the furthest amount of displacement:
float fLength         = length( Out.vViewTS );
float fParallaxLength = sqrt( fLength * fLength – Out.vViewTS.z * Out.vViewTS.z ) / Out.vViewTS.z;

// Compute the actual reverse parallax displacement vector:
Out.vParallaxOffsetTS = vParallaxDirection * fParallaxLength;
Here, there are still several thing make me a bit confused. Why we need to use mul(matrix, vector) instead of mul(vector, matrix) when calculate the view direction in the tangent space? I tried to modify the code, replaced mul(matrix, vector) with mul(vector, matrix), but some artifact appear as the angle between camera view and polygon surface become very small. Another thing is the the Parallax occlusion mapping have some better effect than Parallax Mapping, but I did not check how it works.
At first, I wanted to ship this sample into my d3d framework. That means I will re-do the whole process again with my own code. But why should I keep ask a VisualStudio IDE under Ubuntu OS system when I could use VS under windows XP at all? If it works, we should use it, no matter whether it was created by ourselves or not. We know it and know how to apply it that is enough. The wheels should not be re-build again and again.
The full source code could be downloaded from here.


 本文深入探讨了Parallax Occlusion Mapping技术,解释了如何通过调整纹理坐标来增强平坦表面的细节表现,使得低多边形网格能够展现出高多边形效果。文中详细介绍了该过程所需的三个组件:起始纹理坐标、表面高度值和指向眼睛点的切线空间向量。


 706
706

 被折叠的 条评论
为什么被折叠?


