


 本文介绍了Spring Boot框架,它基于Spring,轻量级且易上手。阐述了依赖管理,如引入‘spring-boot-starter-parent’可简化版本声明;自动配置依赖‘spring-boot-starter-web’,内置Tomcat等容器;还提到启动类的目录结构需和controller、service等包在同一目录。
springboot概念:
springboot是一个非常轻量级,并且可以快速上手、开发的一个框架,它的基础是Spring,所以它依赖于spring,但是只需要引入spring的一点配置即可。
依赖管理
我们使用spring一般需要引入两个依赖,第一个是‘spring-boot-starter-parent’:
<parent>
   <groupId>org.springframework.boot</groupId>
   <artifactId>spring-boot-starter-parent</artifactId>
   <version>2.3.5.RELEASE</version>
   <relativePath/>
 </parent>
该依赖包含了springboot的父项目里面的所有依赖,在这里指定了springboot的版本,上面版本为 2.3.5.RELEASE,这也就意味着接下来再引入Spring的jar包时,不需要再声明版本号,减轻工作量。
然后点进入看一看 ‘spring-boot-starter-parent’ 里面有哪些依赖:
<?xml version="1.0" encoding="UTF-8"?>
<project xmlns="http://maven.apache.org/POM/4.0.0" xsi:schemaLocation="http://maven.apache.org/POM/4.0.0 http://maven.apache.org/xsd/maven-4.0.0.xsd" xmlns:xsi="http://www.w3.org/2001/XMLSchema-instance">
  <modelVersion>4.0.0</modelVersion>
  <parent>
    <groupId>org.springframework.boot</groupId>
    <artifactId>spring-boot-dependencies</artifactId>
    <version>2.3.5.RELEASE</version>
  </parent>
  <artifactId>spring-boot-starter-parent</artifactId>
  <packaging>pom</packaging>
  <name>spring-boot-starter-parent</name>
  <description>Parent pom providing dependency and plugin management for applications built with Maven</description>
  <properties>
    <java.version>1.8</java.version>
    <resource.delimiter>@</resource.delimiter>
    <maven.compiler.source>${java.version}</maven.compiler.source>
    <maven.compiler.target>${java.version}</maven.compiler.target>
    <project.build.sourceEncoding>UTF-8</project.build.sourceEncoding>
    <project.reporting.outputEncoding>UTF-8</project.reporting.outputEncoding>
  </properties>
  <url>https://spring.io/projects/spring-boot</url>
  <licenses>
    <license>
      <name>Apache License, Version 2.0</name>
      <url>https://www.apache.org/licenses/LICENSE-2.0</url>
    </license>
  </licenses>
  <developers>
    <developer>
      <name>Pivotal</name>
      <email>info@pivotal.io</email>
      <organization>Pivotal Software, Inc.</organization>
      <organizationUrl>https://www.spring.io</organizationUrl>
    </developer>
  </developers>
  <scm>
    <url>https://github.com/spring-projects/spring-boot</url>
  </scm>
  <build>
    <resources>
      <resource>
        <directory>${basedir}/src/main/resources</directory>
        <filtering>true</filtering>
        <includes>
          <include>**/application*.yml</include>
          <include>**/application*.yaml</include>
          <include>**/application*.properties</include>
        </includes>
      </resource>
      <resource>
        <directory>${basedir}/src/main/resources</directory>
        <excludes>
          <exclude>**/application*.yml</exclude>
          <exclude>**/application*.yaml</exclude>
          <exclude>**/application*.properties</exclude>
        </excludes>
      </resource>
      下面的省略·········
点进去发现最上面还是引入了一个依赖:‘spring-boot-dependencies’;然后其他引入的项大部分是配置、插件的内容,比如java的版本号信息、maven的信息、配置文件的信息。然后点进入‘spring-boot-dependencies’:
<properties>
    <activemq.version>5.15.13</activemq.version>
    <antlr2.version>2.7.7</antlr2.version>
    <appengine-sdk.version>1.9.82</appengine-sdk.version>
    <artemis.version>2.12.0</artemis.version>
    <aspectj.version>1.9.6</aspectj.version>
    <assertj.version>3.16.1</assertj.version>
    <atomikos.version>4.0.6</atomikos.version>
    <awaitility.version>4.0.3</awaitility.version>
    <bitronix.version>2.1.4</bitronix.version>
    <build-helper-maven-plugin.version>3.1.0</build-helper-maven-plugin.version>
    <byte-buddy.version>1.10.17</byte-buddy.version>
    <caffeine.version>2.8.6</caffeine.version>
    <cassandra-driver.version>4.6.1</cassandra-driver.version>
    <classmate.version>1.5.1</classmate.version>
    <commons-codec.version>1.14</commons-codec.version>
    <commons-dbcp2.version>2.7.0</commons-dbcp2.version>
    <commons-lang3.version>3.10</commons-lang3.version>
    <commons-pool.version>1.6</commons-pool.version>
    <commons-pool2.version>2.8.1</commons-pool2.version>
    <couchbase-client.version>3.0.9</couchbase-client.version>
    <db2-jdbc.version>11.5.4.0</db2-jdbc.version>
    <dependency-management-plugin.version>1.0.10.RELEASE</dependency-management-plugin.version>
    <derby.version>10.14.2.0</derby.version>
    <dropwizard-metrics.version>4.1.14</dropwizard-metrics.version>
    <ehcache.version>2.10.6</ehcache.version>
    <ehcache3.version>3.8.1</ehcache3.version>
    <elasticsearch.version>7.6.2</elasticsearch.version>
    <embedded-mongo.version>2.2.0</embedded-mongo.version>
    <exec-maven-plugin.version>1.6.0</exec-maven-plugin.version>
    <flatten-maven-plugin.version>1.2.5</flatten-maven-plugin.version>
    <flyway.version>6.4.4</flyway.version>
    <freemarker.version>2.3.30</freemarker.version>
    <git-commit-id-plugin.version>3.0.1</git-commit-id-plugin.version>
    <glassfish-el.version>3.0.3</glassfish-el.version>
    <glassfish-jaxb.version>2.3.3</glassfish-jaxb.version>
    <groovy.version>2.5.13</groovy.version>
    <gson.version>2.8.6</gson.version>
    <h2.version>1.4.200</h2.version>
    <hamcrest.version>2.2</hamcrest.version>
    <hazelcast.version>3.12.10</hazelcast.version>
    <hazelcast-hibernate5.version>1.3.2</hazelcast-hibernate5.version>
    <hibernate.version>5.4.22.Final</hibernate.version>
    <hibernate-validator.version>6.1.6.Final</hibernate-vali
    省略下面··········
这里面放的就是我们实际开发过程中需要的jar包。也就是说当我们在自己的项目中引入‘spring-boot-starter-parent’依赖后,这里面又包含了两部分,一部分是有关插件配置的信息,另外一部分是开发中用到的jar包。
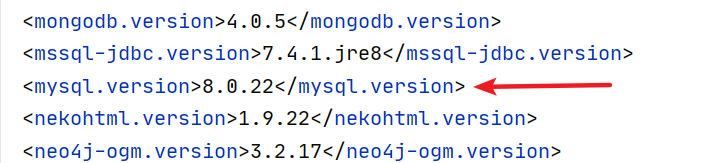
上面说Spring里面声明了版本号,但是里面的jar包不是我们想要的版本怎么办?比如spring里面的mysql是 8.0版本的,但是我只想用5.0版本的,这就需要重新声明jar包的版本号。
spring-boot-dependencies 里面的mysql版本:
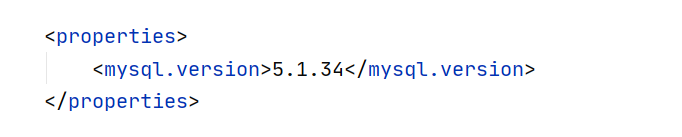
重新声明版本号的方法,在自己项目的pom文件声明properties即可:
自动配置
springboot 的依赖管理依赖的是“spring-boot-starter-parent”,自动配置依赖的是“spring-boot-starter-web”。
如果想要使用springboot,除了需要引入上面的“spring-boot-starter-parent”,还需要引入一个依赖:“spring-boot-starter-web”
 <dependencies>
   <dependency>
      <groupId>org.springframework.boot</groupId>
      <artifactId>spring-boot-starter-web</artifactId>
   </dependency>
 </dependencies>
“spring-boot-starter-web”里面内置了Tomcat等web容器,简化了我们的开发,所以我们不用引入mvc等依赖,十分的简洁。点进去看一看里面都有什么:
<?xml version="1.0" encoding="UTF-8"?>
<project xsi:schemaLocation="http://maven.apache.org/POM/4.0.0 http://maven.apache.org/xsd/maven-4.0.0.xsd" xmlns="http://maven.apache.org/POM/4.0.0"
    xmlns:xsi="http://www.w3.org/2001/XMLSchema-instance">
  <!-- This module was also published with a richer model, Gradle metadata,  -->
  <!-- which should be used instead. Do not delete the following line which  -->
  <!-- is to indicate to Gradle or any Gradle module metadata file consumer  -->
  <!-- that they should prefer consuming it instead. -->
  <!-- do_not_remove: published-with-gradle-metadata -->
  <modelVersion>4.0.0</modelVersion>
  <groupId>org.springframework.boot</groupId>
  <artifactId>spring-boot-starter-web</artifactId>
  <version>2.3.5.RELEASE</version>
  <name>spring-boot-starter-web</name>
  <description>Starter for building web, including RESTful, applications using Spring MVC. Uses Tomcat as the default embedded container</description>
  <url>https://spring.io/projects/spring-boot</url>
  <organization>
    <name>Pivotal Software, Inc.</name>
    <url>https://spring.io</url>
  </organization>
  <licenses>
    <license>
      <name>Apache License, Version 2.0</name>
      <url>https://www.apache.org/licenses/LICENSE-2.0</url>
    </license>
  </licenses>
  <developers>
    <developer>
      <name>Pivotal</name>
      <email>info@pivotal.io</email>
      <organization>Pivotal Software, Inc.</organization>
      <organizationUrl>https://www.spring.io</organizationUrl>
    </developer>
  </developers>
  <scm>
    <connection>scm:git:git://github.com/spring-projects/spring-boot.git</connection>
    <developerConnection>scm:git:ssh://git@github.com/spring-projects/spring-boot.git</developerConnection>
    <url>https://github.com/spring-projects/spring-boot</url>
  </scm>
  <issueManagement>
    <system>GitHub</system>
    <url>https://github.com/spring-projects/spring-boot/issues</url>
  </issueManagement>
  <dependencies>
    <dependency>
      <groupId>org.springframework.boot</groupId>
      <artifactId>spring-boot-starter</artifactId>
      <version>2.3.5.RELEASE</version>
      <scope>compile</scope>
    </dependency>
    <dependency>
      <groupId>org.springframework.boot</groupId>
      <artifactId>spring-boot-starter-json</artifactId>
      <version>2.3.5.RELEASE</version>
      <scope>compile</scope>
    </dependency>
    <dependency>
      <groupId>org.springframework.boot</groupId>
      <artifactId>spring-boot-starter-tomcat</artifactId>
      <version>2.3.5.RELEASE</version>
      <scope>compile</scope>
    </dependency>
    <dependency>
      <groupId>org.springframework</groupId>
      <artifactId>spring-web</artifactId>
      <version>5.2.10.RELEASE</version>
      <scope>compile</scope>
    </dependency>
    <dependency>
      <groupId>org.springframework</groupId>
      <artifactId>spring-webmvc</artifactId>
      <version>5.2.10.RELEASE</version>
      <scope>compile</scope>
    </dependency>
  </dependencies>
</project>
里面除了有“spring-boot-starter”依赖之外,剩下的就是Tomcat、MVC等与web相关的依赖。“spring-boot-starter” 里面放的是springboot启动配置的核心内容,包括自动配置的支持、日志文件和YAML文件的配置。
除了在我们的项目中引入“spring-boot-starter-web”之外,还可以引入任意的starter,固定的模板就是“spring-boot-starter-其他内容”,“其他内容”是一种特殊类型的应用程序,可以是web、parent等。部分starter如下:详细请参考官网

那么如何查看自动配置好的springboot里面有哪些bean呢?方法如下:
@SpringBootApplication
public class SpringbootApplicationTest {
    public static void main(String[] args) {
        ConfigurableApplicationContext run = SpringApplication.run(SpringbootApplicationTest.class, args);
        String[] beanDefinitionNames = run.getBeanDefinitionNames();
        for (String beanDefinitionName : beanDefinitionNames) {
            System.out.println(beanDefinitionName);
        }
    }
}
目录结构
上面的启动类不能随便放置,下面是官网放置的要求:
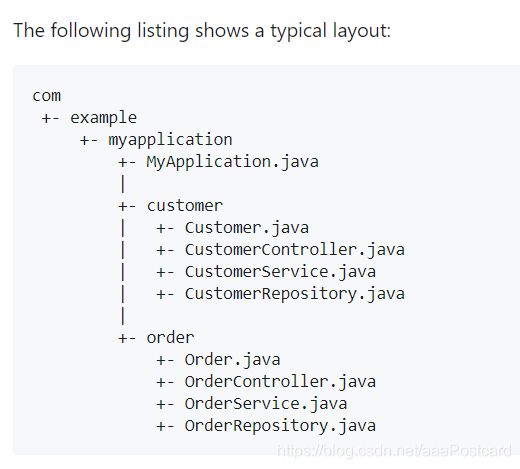
也就是说启动类一定要和controller、service等包在同一目录结构。


 1675
1675


 到【灌水乐园】发言


