


 本文介绍了一个基于Maven的SSM框架搭建过程,包括数据库环境搭建、项目构建、Spring与MyBatis整合、SpringMVC配置及测试。
目录
2-3-1、创建实体类(cn.henu.domain.Item)
2-3-2、持久层 mapper 接口编写(cn.henu.mapper.ItemMapper)
2-3-3、Mapper 映射文件编写(cn/henu/mapper/ItemMapper.xml)
2-3-5、spring 配置文件(跟持久层相关的配置文件) applicationContext-mapper.xml 的编写(applicationContext-mapper.xml)
2-3-7、编写一个测试类,测试前面 Spring 和 mybatis 的整合是否成功(cn.henu.test.SpringMybatisTest)
2-4-1、表现层 Controller 的编写(cn.henu.controller.ItemController)
2-4-2、spring-mvc.xml 文件编写(src/main/resources/spring-mvc.xml)
2-4-4、配置 web.xml 文件(src/main/webapp/WEB-INF/web.xml)
3-1、地址栏中输入:http://localhost:8080/save.jsp 用于测试添加数据
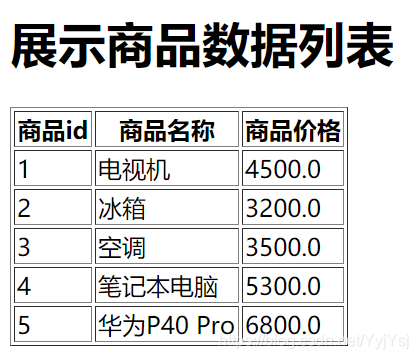
3-2、地址栏中输入:http://localhost:8080/item/findAll 用于测试展示商品信息
1、搭建数据库环境
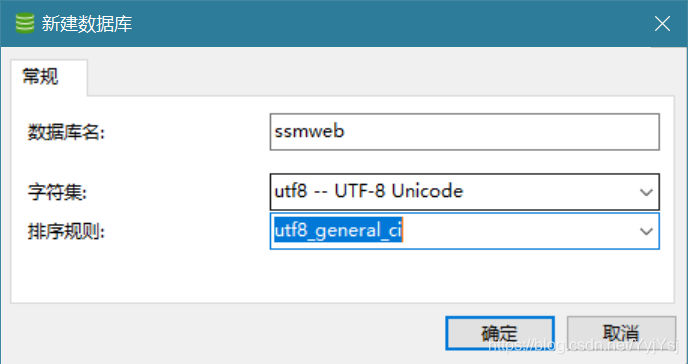
1-1、创建数据库 ssmweb
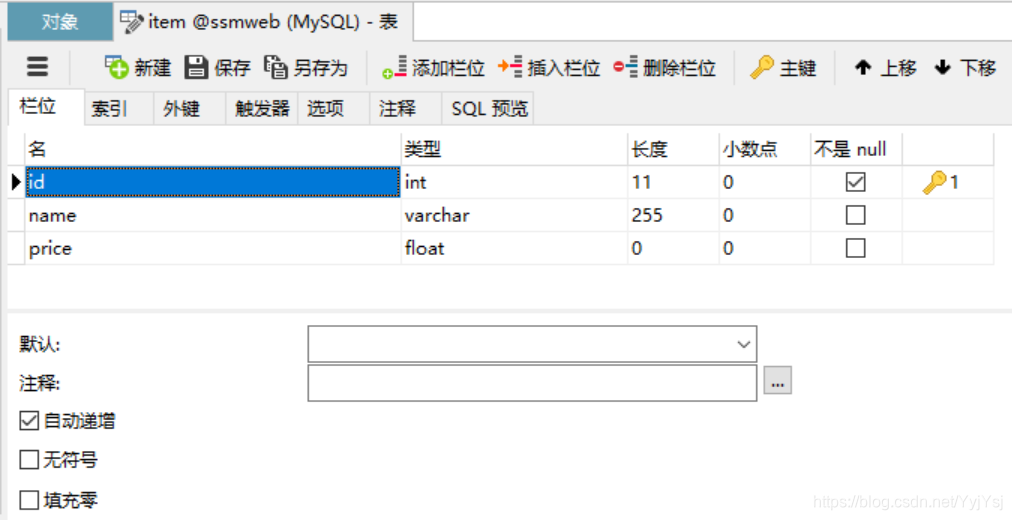
1-2、创建商品表 item
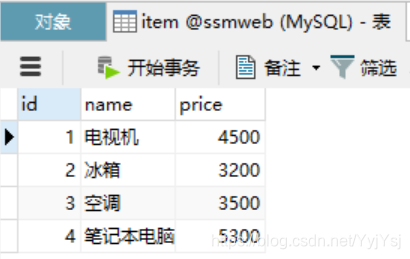
1-3、插入几条数据,用于后续测试使用
SQL 语句:
create table item(
id int not null auto_increment,
name VARCHAR(255) DEFAULT null,
price FLOAT DEFAULT NULL,
PRIMARY KEY(id)
);
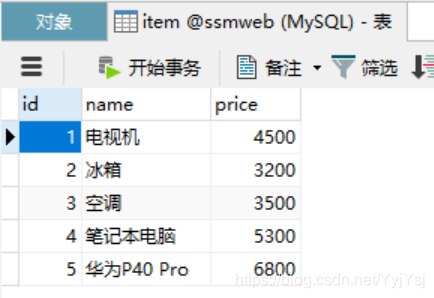
INSERT into item values('1','电视机','4500');
INSERT into item values('2','冰箱','3200');
INSERT into item values('3','空调','3500');
INSERT into item values('4','笔记本电脑','5300');2、构建 maven 项目
2-1、创建 maven web 项目
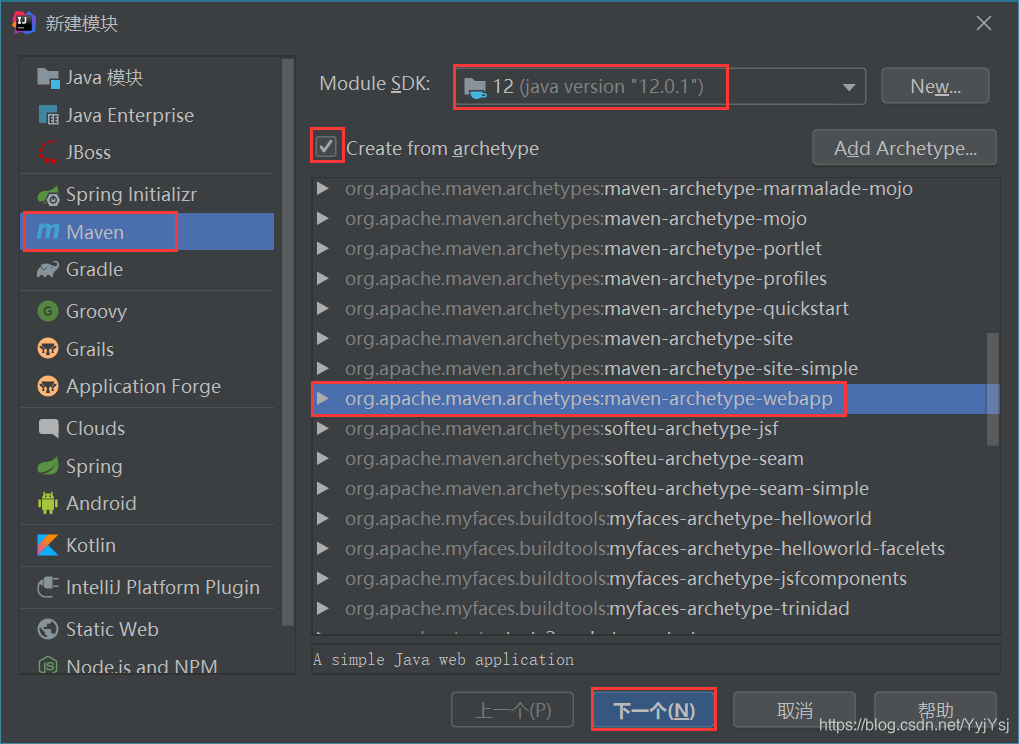
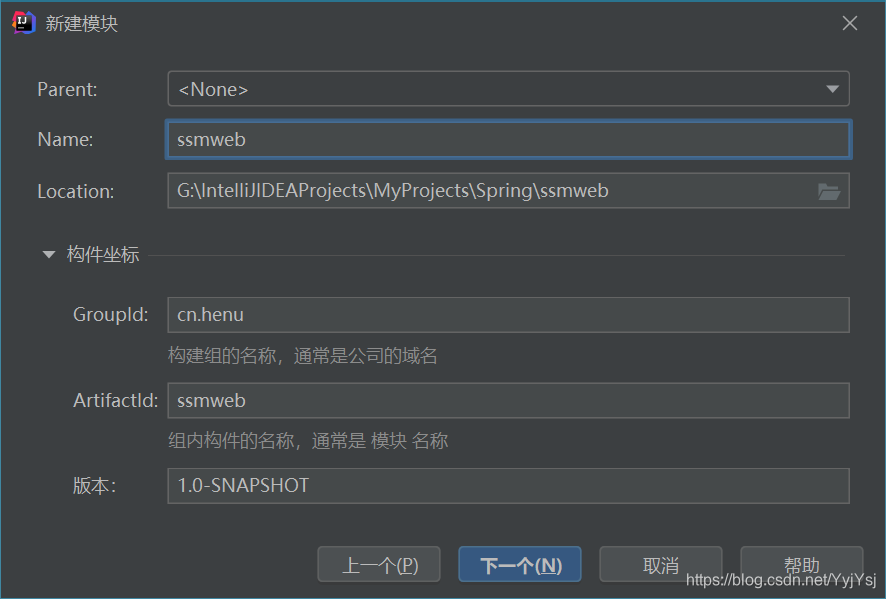
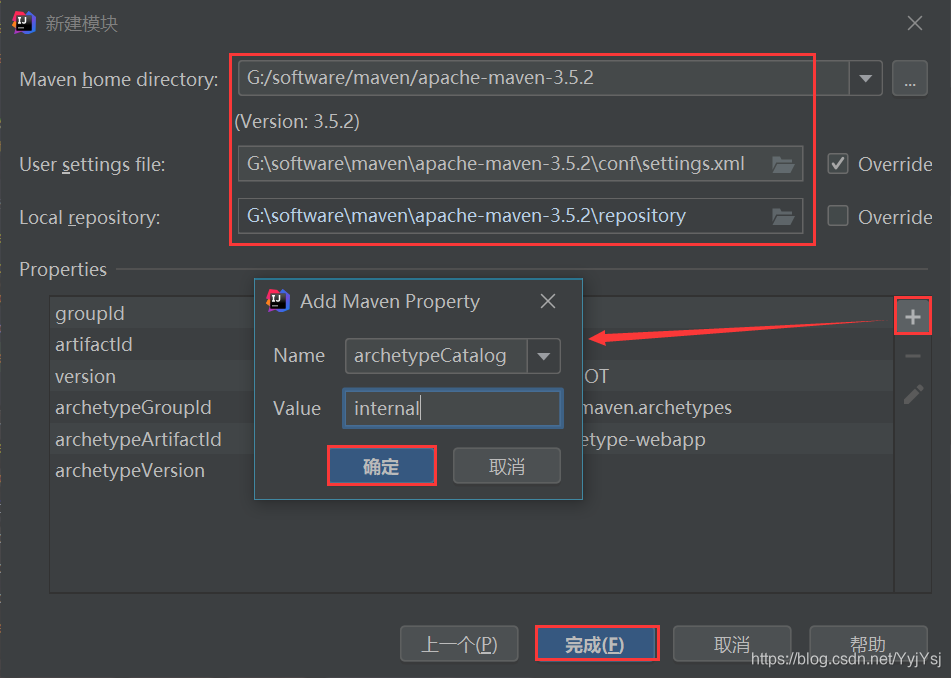
注意:这一步一般会添加一个参数,如果不添加也能够创建成功,但是不添加的话,当点击完成创建工程时,它会自动从maven的中央仓库下载很多插件,这其实是有点费时间的,如果添加了这个参数,就能够使用本地的maven仓库中的插件,这样就会节省一些时间。(不加这个参数也可以)
2-2、配置 pom.xml 文件(pom.xml)
<?xml version="1.0" encoding="UTF-8"?>

<project xmlns="http://maven.apache.org/POM/4.0.0" xmlns:xsi="http://www.w3.org/2001/XMLSchema-instance"
         xsi:schemaLocation="http://maven.apache.org/POM/4.0.0 http://maven.apache.org/xsd/maven-4.0.0.xsd">
    <modelVersion>4.0.0</modelVersion>

    <groupId>cn.henu</groupId>
    <artifactId>ssmweb</artifactId>
    <version>1.0-SNAPSHOT</version>
    <packaging>war</packaging>

    <name>ssmweb Maven Webapp</name>
    <!-- FIXME change it to the project's website -->
    <url>http://www.example.com</url>

    <properties>
        <spring.version>5.2.9.RELEASE</spring.version>
        <springmvc.version>5.2.9.RELEASE</springmvc.version>
        <mybatis.version>3.4.5</mybatis.version>
    </properties>

    <!--锁定jar版本-->
    <dependencyManagement>
        <dependencies>
            <!-- Mybatis -->
            <dependency>
                <groupId>org.mybatis</groupId>
                <artifactId>mybatis</artifactId>
                <version>${mybatis.version}</version>
            </dependency>
            <!-- springMVC -->
            <dependency>
                <groupId>org.springframework</groupId>
                <artifactId>spring-webmvc</artifactId>
                <version>${springmvc.version}</version>
            </dependency>
            <!-- spring -->
            <dependency>
                <groupId>org.springframework</groupId>
                <artifactId>spring-context</artifactId>
                <version>${spring.version}</version>
            </dependency>
            <dependency>
                <groupId>org.springframework</groupId>
                <artifactId>spring-core</artifactId>
                <version>${spring.version}</version>
            </dependency>
            <dependency>
                <groupId>org.springframework</groupId>
                <artifactId>spring-aop</artifactId>
                <version>${spring.version}</version>
            </dependency>
            <dependency>
                <groupId>org.springframework</groupId>
                <artifactId>spring-web</artifactId>
                <version>${spring.version}</version>
            </dependency>
            <dependency>
                <groupId>org.springframework</groupId>
                <artifactId>spring-expression</artifactId>
                <version>${spring.version}</version>
            </dependency>
            <dependency>
                <groupId>org.springframework</groupId>
                <artifactId>spring-beans</artifactId>
                <version>${spring.version}</version>
            </dependency>
            <dependency>
                <groupId>org.springframework</groupId>
                <artifactId>spring-aspects</artifactId>
                <version>${spring.version}</version>
            </dependency>
            <dependency>
                <groupId>org.springframework</groupId>
                <artifactId>spring-context-support</artifactId>
                <version>${spring.version}</version>
            </dependency>
            <dependency>
                <groupId>org.springframework</groupId>
                <artifactId>spring-test</artifactId>
                <version>${spring.version}</version>
            </dependency>
            <dependency>
                <groupId>org.springframework</groupId>
                <artifactId>spring-jdbc</artifactId>
                <version>${spring.version}</version>
            </dependency>
            <dependency>
                <groupId>org.springframework</groupId>
                <artifactId>spring-tx</artifactId>
                <version>${spring.version}</version>
            </dependency>
        </dependencies>
    </dependencyManagement>

    <dependencies>
        <!-- Mybatis和mybatis与spring的整合 -->
        <dependency>
            <groupId>org.mybatis</groupId>
            <artifactId>mybatis</artifactId>
        </dependency>
        <dependency>
            <groupId>org.mybatis</groupId>
            <artifactId>mybatis-spring</artifactId>
            <version>2.0.5</version>
        </dependency>
        <!-- MySql驱动 -->
        <dependency>
            <groupId>mysql</groupId>
            <artifactId>mysql-connector-java</artifactId>
            <version>5.1.49</version>
            <scope>runtime</scope>
        </dependency>
        <!-- druid数据库连接池 -->
        <dependency>
            <groupId>com.alibaba</groupId>
            <artifactId>druid</artifactId>
            <version>1.1.24</version>
        </dependency>
        <!-- springMVC核心-->
        <dependency>
            <groupId>org.springframework</groupId>
            <artifactId>spring-webmvc</artifactId>
        </dependency>
        <!-- spring相关 -->
        <dependency>
            <groupId>org.springframework</groupId>
            <artifactId>spring-context</artifactId>
        </dependency>
        <dependency>
            <groupId>org.springframework</groupId>
            <artifactId>spring-core</artifactId>
        </dependency>
        <dependency>
            <groupId>org.springframework</groupId>
            <artifactId>spring-aop</artifactId>
        </dependency>
        <dependency>
            <groupId>org.springframework</groupId>
            <artifactId>spring-web</artifactId>
        </dependency>
        <dependency>
            <groupId>org.springframework</groupId>
            <artifactId>spring-expression</artifactId>
        </dependency>
        <dependency>
            <groupId>org.springframework</groupId>
            <artifactId>spring-beans</artifactId>
        </dependency>
        <dependency>
            <groupId>org.springframework</groupId>
            <artifactId>spring-aspects</artifactId>
        </dependency>
        <dependency>
            <groupId>org.springframework</groupId>
            <artifactId>spring-context-support</artifactId>
        </dependency>
        <dependency>
            <groupId>org.springframework</groupId>
            <artifactId>spring-test</artifactId>
        </dependency>
        <dependency>
            <groupId>org.springframework</groupId>
            <artifactId>spring-jdbc</artifactId>
        </dependency>
        <dependency>
            <groupId>org.springframework</groupId>
            <artifactId>spring-tx</artifactId>
        </dependency>
        <!-- junit测试 -->
        <dependency>
            <groupId>junit</groupId>
            <artifactId>junit</artifactId>
            <version>4.13.1</version>
            <scope>test</scope>
        </dependency>
        <!--servlet和jsp-->
        <dependency>
            <groupId>javax.servlet</groupId>
            <artifactId>javax.servlet-api</artifactId>
            <version>4.0.1</version>
            <scope>provided</scope>
        </dependency>
        <dependency>
            <groupId>javax.servlet.jsp</groupId>
            <artifactId>javax.servlet.jsp-api</artifactId>
            <version>2.3.3</version>
            <scope>provided</scope>
        </dependency>
        <!-- jstl -->
        <dependency>
            <groupId>javax.servlet</groupId>
            <artifactId>jstl</artifactId>
            <version>1.2</version>
        </dependency>
    </dependencies>
    <build>
        <plugins>
            <plugin>
                <groupId>org.apache.maven.plugins</groupId>
                <artifactId>maven-compiler-plugin</artifactId>
                <version>3.8.1</version>
                <configuration>
                <!--根据个人需要自己修改-->
                    <source>9</source>
                    <target>9</target>
                    <encoding>UTF-8</encoding>
                </configuration>
            </plugin>
        </plugins>
    </build>
</project>
2-3、实现 spring+mybatis 整合
2-3-1、创建实体类(cn.henu.domain.Item)
package cn.henu.domain;

public class Item {
    private int id;
    private String name;
    private float price;
    //get和set方法自己生成即可
    //toString方法也可以自己生成
}
2-3-2、持久层 mapper 接口编写(cn.henu.mapper.ItemMapper)
package cn.henu.mapper;

import cn.henu.domain.Item;
import java.util.List;

public interface ItemMapper {
    //保存
    public void save(Item item);
    //查询商品信息
    public List<Item> findAll();
}
2-3-3、Mapper 映射文件编写(cn/henu/mapper/ItemMapper.xml)
<?xml version="1.0" encoding="UTF-8" ?>
<!DOCTYPE mapper PUBLIC "-//mybatis.org//DTD Mapper 3.0//EN" "http://mybatis.org/dtd/mybatis-3-mapper.dtd">
<mapper namespace="cn.henu.mapper.ItemMapper">
    <insert id="save" parameterType="item">
        insert into item values (#{id},#{name},#{price})
    </insert>
    <select id="findAll" resultType="item">
        select * from item
    </select>
</mapper>
2-3-4、业务层 Service 的编写
首先编写 Service 接口(cn.henu.service.ItemService)
package cn.henu.service;

import cn.henu.domain.Item;
import java.util.List;

public interface ItemService {
    public void save(Item item);
    public List<Item> findAll();
}
再编写 Service 的实现类,用于实现接口中的方法(cn.henu.service.impl.ItemServiceImpl)
package cn.henu.service.impl;

import cn.henu.domain.Item;
import cn.henu.mapper.ItemMapper;
import cn.henu.service.ItemService;
import org.springframework.beans.factory.annotation.Autowired;
import org.springframework.stereotype.Service;
import org.springframework.transaction.annotation.Transactional;
import java.util.List;

@Service("ItemService")//由spring框架将ItemServiceImpl扫描进去为我们自动创建对象
@Transactional//控制事务
public class ItemServiceImpl implements ItemService {
    @Autowired//注入,注入之后可以调用mapper的代理对象
    private ItemMapper itemMapper;

    @Override
    public void save(Item item) {
        itemMapper.save(item);
    }

    @Override
    public List<Item> findAll() {
        return itemMapper.findAll();
    }
}
2-3-5、spring 配置文件(跟持久层相关的配置文件) applicationContext-mapper.xml 的编写(applicationContext-mapper.xml)
<?xml version="1.0" encoding="UTF-8"?>
<beans xmlns="http://www.springframework.org/schema/beans"
       xmlns:xsi="http://www.w3.org/2001/XMLSchema-instance"
       xmlns:context="http://www.springframework.org/schema/context"
       xsi:schemaLocation="http://www.springframework.org/schema/beans http://www.springframework.org/schema/beans/spring-beans.xsd
http://www.springframework.org/schema/context http://www.springframework.org/schema/context/spring-context.xsd">

    <!--mapper扫描器,扫描mapper所在的包,产生mapper的代理对象-->
    <context:component-scan base-package="cn.henu.mapper"></context:component-scan>
    <!--扫描mapper所在的包,为mapper创建实现类-->
    <bean class="org.mybatis.spring.mapper.MapperScannerConfigurer">
        <property name="basePackage" value="cn.henu.mapper"></property>
    </bean>

    <!--加载外部的properties文件-->
    <context:property-placeholder location="classpath:jdbc.properties"></context:property-placeholder>
    <!--配置数据源信息,使用druid连接池-->
    <bean id="dataSource" class="com.alibaba.druid.pool.DruidDataSource">
        <property name="driverClassName" value="${jdbc.driver}"></property>
        <property name="url" value="${jdbc.url}"></property>
        <property name="username" value="${jdbc.username}"></property>
        <property name="password" value="${jdbc.password}"></property>
    </bean>

    <!--配置spring整合mybatis框架的SqlSessionFactoryBean(最核心)-->
    <bean id="sqlSessionFactory" class="org.mybatis.spring.SqlSessionFactoryBean">
        <!--注入数据源-->
        <property name="dataSource" ref="dataSource"></property>
        <!--扫描domain包,为实体类创建别名(批量创建别名)-->
        <property name="typeAliasesPackage" value="cn.henu.domain"></property>
    </bean>

</beans>
2-3-6、spring 配置文件(跟 service 层相关的配置文件) applicationContext-service.xml 的编写(applicationContext-service.xml)
<?xml version="1.0" encoding="UTF-8"?>
<beans xmlns="http://www.springframework.org/schema/beans"
       xmlns:xsi="http://www.w3.org/2001/XMLSchema-instance"
       xmlns:context="http://www.springframework.org/schema/context"
       xmlns:tx="http://www.springframework.org/schema/tx"
       xsi:schemaLocation="http://www.springframework.org/schema/beans http://www.springframework.org/schema/beans/spring-beans.xsd
http://www.springframework.org/schema/context http://www.springframework.org/schema/context/spring-context.xsd
    http://www.springframework.org/schema/tx http://www.springframework.org/schema/tx/spring-tx.xsd">

    <!--配置扫描器,扫描Service-->
    <context:component-scan base-package="cn.henu.service"></context:component-scan>
    <!--配置事务管理器-->
    <bean id="transactionManager" class="org.springframework.jdbc.datasource.DataSourceTransactionManager">
        <property name="dataSource" ref="dataSource"></property>
    </bean>
    <!--配置事务的注解驱动-->
    <tx:annotation-driven transaction-manager="transactionManager"></tx:annotation-driven>
</beans>
2-3-7、编写一个测试类,测试前面 Spring 和 mybatis 的整合是否成功(cn.henu.test.SpringMybatisTest)
package cn.henu.test;

import cn.henu.domain.Item;
import cn.henu.service.ItemService;
import org.junit.Test;
import org.junit.runner.RunWith;
import org.springframework.beans.factory.annotation.Autowired;
import org.springframework.test.context.ContextConfiguration;
import org.springframework.test.context.junit4.SpringJUnit4ClassRunner;

import java.util.List;

@RunWith(SpringJUnit4ClassRunner.class)//基于Spring+Junit的整合来做单元测试
@ContextConfiguration(locations = {"classpath:applicationContext-mapper.xml","classpath:applicationContext-service.xml"})
public class SpringMybatisTest {
    @Autowired
    private ItemService itemService;

    @Test
    public void test1(){
        List<Item> itemList = itemService.findAll();
        System.out.println(itemList);
    }
}

运行结果:
[Item{id=1, name='电视机', price=4500.0}, Item{id=2, name='冰箱', price=3200.0}, Item{id=3, name='空调', price=3500.0}, Item{id=4, name='笔记本电脑', price=5300.0}]
2-4、加入 springmvc 相关配置
2-4-1、表现层 Controller 的编写(cn.henu.controller.ItemController)
package cn.henu.controller;

import cn.henu.domain.Item;
import cn.henu.service.ItemService;
import org.springframework.beans.factory.annotation.Autowired;
import org.springframework.stereotype.Controller;
import org.springframework.web.bind.annotation.RequestMapping;
import org.springframework.web.bind.annotation.ResponseBody;
import org.springframework.web.servlet.ModelAndView;
import java.util.List;

@Controller//加上这个注解,由spring来管理
@RequestMapping("/item")//表名是item模块的
public class ItemController {
    @Autowired
    private ItemService itemService;

    //保存
    @RequestMapping(value = "/save",produces = "text/html;charset=UTF-8")
    @ResponseBody
    public String save(Item item){
        itemService.save(item);
        return "保存成功";
    }

    //查询
    @RequestMapping("/findAll")
    public ModelAndView findAll(){
        List<Item> itemList = itemService.findAll();
        ModelAndView modelAndView = new ModelAndView();
        modelAndView.addObject("itemList",itemList);
        modelAndView.setViewName("item");
        return modelAndView;
    }
}
2-4-2、spring-mvc.xml 文件编写(src/main/resources/spring-mvc.xml)
<?xml version="1.0" encoding="UTF-8"?>
<beans xmlns="http://www.springframework.org/schema/beans"
       xmlns:xsi="http://www.w3.org/2001/XMLSchema-instance"
       xmlns:context="http://www.springframework.org/schema/context"
       xmlns:mvc="http://www.springframework.org/schema/mvc"
       xsi:schemaLocation="http://www.springframework.org/schema/beans http://www.springframework.org/schema/beans/spring-beans.xsd
http://www.springframework.org/schema/context http://www.springframework.org/schema/context/spring-context.xsd
    http://www.springframework.org/schema/mvc http://www.springframework.org/schema/mvc/spring-mvc.xsd">

    <!--配置Controller的组件扫描器,扫描Controller-->
    <context:component-scan base-package="cn.henu.controller"></context:component-scan>

    <!--MVC注解驱动-->
    <!--以后配置时,先把下面这个配置写上-->
    <mvc:annotation-driven></mvc:annotation-driven>

    <!--配置视图解析器-->
    <bean class="org.springframework.web.servlet.view.InternalResourceViewResolver">
        <property name="prefix" value="/WEB-INF/pages/"></property>
        <property name="suffix" value=".jsp"></property>
    </bean>

    <!--开放静态资源访问权限-->
    <mvc:default-servlet-handler></mvc:default-servlet-handler>
</beans>
2-4-3、jsp 页面编写
编写 save.jsp 用于保存数据(src/main/webapp/save.jsp)
<%@ page contentType="text/html;charset=UTF-8" language="java" %>
<html>
<head>
<title>Title</title>
</head>
<body>
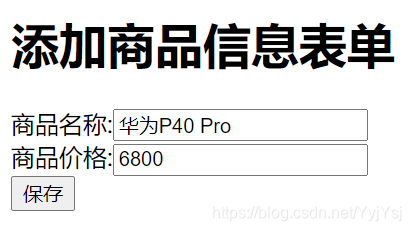
<h1>添加商品信息表单</h1>
<form name="accountForm" action="${pageContext.request.contextPath}/item/save" method="post">
商品名称:<input type="text" name="name"><br>
商品价格:<input type="text" name="price"><br>
<input type="submit" value="保存"><br>
</form>
</body>
</html>编写 item.jsp 用于展示商品信息 (src/main/webapp/WEB-INF/pages/item.jsp)
<%@ page contentType="text/html;charset=UTF-8" isELIgnored="false" language="java" %>
<%@ taglib prefix="c" uri="http://java.sun.com/jsp/jstl/core" %>
<html>
<head>
    <title>Title</title>
</head>
<body>
<h1>展示商品数据列表</h1>
<table border="1">
    <tr>
        <th>商品id</th>
        <th>商品名称</th>
        <th>商品价格</th>
    </tr>

    <c:forEach items="${itemList}" var="item">
        <tr>
            <td>${item.id}</td>
            <td>${item.name}</td>
            <td>${item.price}</td>
        </tr>
    </c:forEach>
</table>
</body>
</html>
2-4-4、配置 web.xml 文件(src/main/webapp/WEB-INF/web.xml)
<?xml version="1.0" encoding="UTF-8"?>
<web-app version="3.0" xmlns="http://java.sun.com/xml/ns/javaee"
         xmlns:xsi="http://www.w3.org/2001/XMLSchema-instance"
         xsi:schemaLocation="http://java.sun.com/xml/ns/javaee http://java.sun.com/xml/ns/javaee/web-app_3_0.xsd">

    <!-- 解决乱码的过滤器-->
    <filter>
        <filter-name>CharacterEncodingFilter</filter-name>
        <filter-class>org.springframework.web.filter.CharacterEncodingFilter</filter-class>
        <init-param>
            <param-name>encoding</param-name>
            <param-value>UTF-8</param-value>
        </init-param>
    </filter>
    <filter-mapping>
        <filter-name>CharacterEncodingFilter</filter-name>
        <url-pattern>/*</url-pattern>
    </filter-mapping>

    <!--全局的初始化参数,指定Spring配置文件的位置-->
    <context-param>
        <param-name>contextConfigLocation</param-name>
        <param-value>classpath:applicationContext*.xml</param-value>
    </context-param>

    <!--配置Spring框架启动时使用的监听器-->
    <listener>
        <listener-class>org.springframework.web.context.ContextLoaderListener</listener-class>
    </listener>

    <!--配置SpringMVC的前端控制器-->
    <servlet>
        <servlet-name>DispatcherServlet</servlet-name>
        <servlet-class>org.springframework.web.servlet.DispatcherServlet</servlet-class>
        <!--指定SpringMVC配置文件的位置-->
        <init-param>
            <param-name>contextConfigLocation</param-name>
            <param-value>classpath:spring-mvc.xml</param-value>
        </init-param>
        <!--服务器启动时就启动此控制器-->
        <load-on-startup>1</load-on-startup>
    </servlet>
    <servlet-mapping>
        <servlet-name>DispatcherServlet</servlet-name>
        <url-pattern>/</url-pattern>
    </servlet-mapping>
</web-app>
3、部署项目,测试结果
3-1、地址栏中输入:http://localhost:8080/save.jsp 用于测试添加数据
查看数据库信息:
3-2、地址栏中输入:http://localhost:8080/item/findAll 用于测试展示商品信息
至此,基于 maven 的整个SSM框架就搭建完成了。
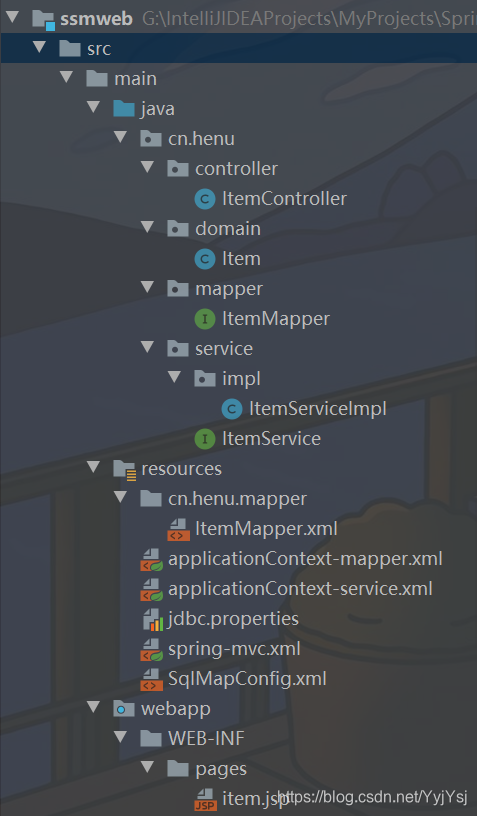
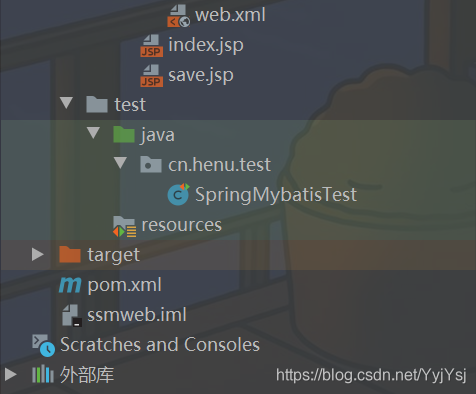
4、整个项目的目录结构


 2522
2522

 被折叠的 条评论
为什么被折叠?
被折叠的 条评论
为什么被折叠?
 到【灌水乐园】发言


