


目录
2.Mybatis整合Spring(比原始开发改变的相关东西)
2.2.Spring配置文件:applicationContext.xml
2.3.MyBatis核心配置文件:sqlMapConfig.xml
1.原始方式整合准备工作
1.1.原始方式整合
CREATE TABLE account(
    id int NOT NULL PRIMARY KEY AUTO_INCREMENT,
    name VARCHAR(100),
    money DOUBLE(7,2)
) DEFAULT CHARSET UTF8 COMMENT '';
1.2.创建maven工程
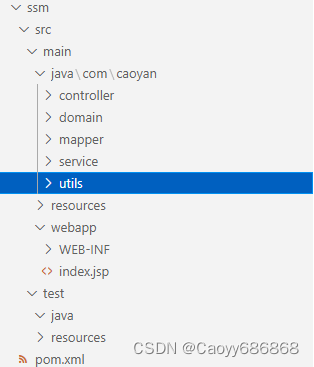
1.3.导入Maven坐标
<dependencies>
    <!--spring相关-->
    <dependency>
      <groupId>org.springframework</groupId>
      <artifactId>spring-context</artifactId>
      <version>5.3.20</version>
    </dependency>
    <dependency>
      <groupId>org.aspectj</groupId>
      <artifactId>aspectjweaver</artifactId>
      <version>1.8.7</version>
    </dependency>
    <dependency>
      <groupId>org.springframework</groupId>
      <artifactId>spring-jdbc</artifactId>
      <version>5.3.20</version>
    </dependency>
    <dependency>
      <groupId>org.springframework</groupId>
      <artifactId>spring-tx</artifactId>
      <version>5.3.20</version>
    </dependency>
    <dependency>
      <groupId>org.springframework</groupId>
      <artifactId>spring-test</artifactId>
      <version>5.3.20</version>
    </dependency>
    <dependency>
      <groupId>org.springframework</groupId>
      <artifactId>spring-webmvc</artifactId>
      <version>5.3.20</version>
    </dependency>

    <!--servlet和jsp-->
    <dependency>
      <groupId>javax.servlet</groupId>
      <artifactId>servlet-api</artifactId>
      <version>2.5</version>
    </dependency>
    <dependency>
      <groupId>javax.servlet.jsp</groupId>
      <artifactId>jsp-api</artifactId>
      <version>2.0</version>
    </dependency>

    <!--mybatis相关-->
    <dependency>
      <groupId>org.mybatis</groupId>
      <artifactId>mybatis</artifactId>
      <version>3.5.8</version>
    </dependency>
    <dependency>
      <groupId>org.mybatis</groupId>
      <artifactId>mybatis-spring</artifactId>
      <version>1.3.1</version>
    </dependency>
    <dependency>
      <groupId>mysql</groupId>
      <artifactId>mysql-connector-java</artifactId>
      <version>8.0.29</version>
    </dependency>
    <dependency>
      <groupId>c3p0</groupId>
      <artifactId>c3p0</artifactId>
      <version>0.9.1.2</version>
    </dependency>

    <dependency>
      <groupId>junit</groupId>
      <artifactId>junit</artifactId>
      <version>4.13.1</version>
    </dependency>
    <dependency>
      <groupId>jstl</groupId>
      <artifactId>jstl</artifactId>
      <version>1.2</version>
    </dependency>

  </dependencies>
1.4.编写实体类
package com.caoyan.domain;

public class Account {
    private Integer id;
    private String name;
    private double money;

    public Integer getId() {
        return this.id;
    }

    public void setId(Integer id) {
        this.id = id;
    }

    public String getName() {
        return this.name;
    }

    public void setName(String name) {
        this.name = name;
    }

    public double getMoney() {
        return this.money;
    }

    public void setMoney(double money) {
        this.money = money;
    }

}
1.5.编写Mapper接口
package com.caoyan.mapper;

import java.util.List;

import com.caoyan.domain.Account;

public interface AccountMapper {
    // 保存账户数据
    public void save(Account account);

    // 查询账户数据
    public List<Account> findAll();
}
1.6.编写Service接口
package com.caoyan.service;

import java.util.List;

import com.caoyan.domain.Account;

public interface AccountService {
    // 保存账户数据
    public void save(Account account);

    // 查询账户数据
    public List<Account> findAll();
}
1.7.编写Service接口实现
package com.caoyan.service.impl;

import java.io.IOException;
import java.io.InputStream;
import java.util.List;

import com.caoyan.domain.Account;
import com.caoyan.mapper.AccountMapper;
import com.caoyan.service.AccountService;

import org.apache.ibatis.io.Resources;
import org.apache.ibatis.session.SqlSession;
import org.apache.ibatis.session.SqlSessionFactory;
import org.apache.ibatis.session.SqlSessionFactoryBuilder;
import org.springframework.stereotype.Service;

@Service("accountService")
public class AccountServiceImpl implements AccountService {

    @Override
    public void save(Account account) {
        // 保存
        try {
            InputStream resourceAsStream = Resources.getResourceAsStream("sqlMapConfig.xml");
            SqlSessionFactory sqlSessionFactory = new SqlSessionFactoryBuilder().build(resourceAsStream);
            SqlSession sqlSession = sqlSessionFactory.openSession();
            AccountMapper accountMapper = sqlSession.getMapper(AccountMapper.class);
            accountMapper.save(account);
            sqlSession.commit();
            sqlSession.close();
        } catch (IOException e) {
            e.printStackTrace();
        }

    }

    @Override
    public List<Account> findAll() {
        // 查询
        InputStream resourceAsStream;
        try {
            resourceAsStream = Resources.getResourceAsStream("sqlMapConfig.xml");
            SqlSessionFactory sqlSessionFactory = new SqlSessionFactoryBuilder().build(resourceAsStream);
            SqlSession sqlSession = sqlSessionFactory.openSession();
            AccountMapper accountMapper = sqlSession.getMapper(AccountMapper.class);
            List<Account> accountList = accountMapper.findAll();
            sqlSession.close();
            return accountList;
        } catch (IOException e) {
            e.printStackTrace();
        }

        return null;
    }

}
1.8.编写Controller
package com.caoyan.controller;

import java.util.List;

import com.caoyan.domain.Account;
import com.caoyan.service.AccountService;

import org.springframework.beans.factory.annotation.Autowired;
import org.springframework.stereotype.Controller;
import org.springframework.web.bind.annotation.RequestMapping;
import org.springframework.web.bind.annotation.ResponseBody;
import org.springframework.web.servlet.ModelAndView;

@Controller
@RequestMapping("/account")
public class AccountController {
    @Autowired
    private AccountService accountService;

    // 保存
    @RequestMapping(value = "/save", produces = "text/html;charset=UTF-8")
    @ResponseBody
    public String save(Account account) {
        accountService.save(account);
        return "保存成功!";
    }

    // 查询
    @RequestMapping("/findAll")
    public ModelAndView findAll() {
        List<Account> accountList = accountService.findAll();
        ModelAndView modelAndView = new ModelAndView();
        modelAndView.addObject("accountList", accountList);
        modelAndView.setViewName("accountList");
        return modelAndView;
    }
}
1.9.编写添加页面
<%@ page contentType="text/html;charset=UTF-8" language="java" %>
<html>
    <head>
        <title>个人账户信息</title>
    </head>
    <body>
        <h1>保存账户信息表单</h1>
        <form action="${pageContext.request.contextPath}/account/save" method="post">
            用户名称:<input type="text" name="name"><br/>
            账户金额:<input type="text" name="money"><br/>
            <input type="submit" value="保存"><br/>
        </form>
    </body>
</html>
1.10.编写列表页面
<%@ page contentType="text/html;charset=UTF-8" language="java" %>
<%@ taglib prefix="c" uri="http://java.sun.com/jsp/jstl/core" %>
<html>
<head>
    <title>Title</title>
</head>
<body>
    <h1>展示账户数据列表</h1>
    <table border="1">
        <tr>
            <th>账户id</th>
            <th>账户名称</th>
            <th>账户金额</th>
        </tr>

        <c:forEach items="${accountList}" var="account">
            <tr>
                <td>${account.id}</td>
                <td>${account.name}</td>
                <td>${account.money}</td>
            </tr>
        </c:forEach>

    </table>
</body>
</html>
1.11.编写相应配置文件
- Spring配置文件:applicationContext.xml(第三步)
<?xml version="1.0" encoding="UTF-8" ?>
<beans xmlns="http://www.springframework.org/schema/beans"
       xmlns:xsi="http://www.w3.org/2001/XMLSchema-instance"
       xmlns:aop="http://www.springframework.org/schema/aop"
       xmlns:tx="http://www.springframework.org/schema/tx"
       xmlns:context="http://www.springframework.org/schema/context"
       xsi:schemaLocation="http://www.springframework.org/schema/beans
http://www.springframework.org/schema/beans/spring-beans.xsd
http://www.springframework.org/schema/tx
http://www.springframework.org/schema/tx/spring-tx.xsd
http://www.springframework.org/schema/aop
http://www.springframework.org/schema/aop/spring-aop.xsd
http://www.springframework.org/schema/context
http://www.springframework.org/schema/context/spring-context.xsd">
    <!-- 组件扫描 扫描service和mapper -->
    <context:component-scan base-package="com.caoyan">
    <!-- 排除controller的扫描 -->
        <context:exclude-filter type="annotation" expression="org.springframework.stereotype.Controller" />
    </context:component-scan>
</beans>- SpringMVC配置文件:spring-mvc.xml(第四步)
<?xml version="1.0" encoding="UTF-8" ?>
<beans xmlns="http://www.springframework.org/schema/beans"
       xmlns:mvc="http://www.springframework.org/schema/mvc"
       xmlns:context="http://www.springframework.org/schema/context"
       xmlns:xsi="http://www.w3.org/2001/XMLSchema-instance"
       xsi:schemaLocation="http://www.springframework.org/schema/beans
http://www.springframework.org/schema/beans/spring-beans.xsd
http://www.springframework.org/schema/mvc
http://www.springframework.org/schema/mvc/spring-mvc.xsd
http://www.springframework.org/schema/context
http://www.springframework.org/schema/context/spring-context.xsd">
    <!-- 组件扫描 主要扫描controller -->
    <context:component-scan base-package="com.caoyan.controller"/>
    <!-- 配置mvc注解驱动 -->
    <mvc:annotation-driven/>
    <!-- 内部资源视图解析器 -->
    <bean id="resourceViewResolver" class="org.springframework.web.servlet.view.InternalResourceViewResolver">
        <property name="prefix" value="/WEB-INF/pages/"/>
        <property name="suffix" value=".jsp"/>
    </bean>
    <!-- 开放静态资源访问权限 -->
    <mvc:default-servlet-handler />
</beans>- MyBatis映射文件:AccountMapper.xml(第一步)
<?xml version="1.0" encoding="UTF-8" ?>
<!DOCTYPE mapper
        PUBLIC "-//mybatis.org//DTD Mapper 3.0//EN"
        "http://mybatis.org/dtd/mybatis-3-mapper.dtd">
<mapper namespace="com.caoyan.mapper.AccountMapper">
    <insert id="save" parameterType="account">
        insert into account values(#{id},#{name},#{money})
    </insert>
    <select id="findAll" resultType="account">
        select * from account
    </select>
</mapper>- MyBatis核心文件:sqlMapConfig.xml(第二步)
<?xml version="1.0" encoding="UTF-8" ?>
<!DOCTYPE configuration
        PUBLIC "-//mybatis.org//DTD Config 3.0//EN"
        "http://mybatis.org/dtd/mybatis-3-config.dtd">
<configuration>
    <!-- 加载properties文件 -->
    <properties resource="jdbc.properties"></properties>
    <!-- 起别名 -->
    <typeAliases>
        <!-- <typeAlias type="com.caoyan.domain.Account" alias="account" /> -->
        <package name="com.caoyan.domain" />
    </typeAliases>
    <!-- 环境 -->
    <environments default="development">
        <environment id="development">
            <transactionManager type="JDBC"></transactionManager>
            <dataSource type="POOLED">
                <property name="driver" value="${jdbc.driver}" />
                <property name="url" value="${jdbc.url}" />
                <property name="username" value="${jdbc.username}" />
                <property name="password" value="${jdbc.password}" />
            </dataSource>
        </environment>
    </environments>
    <!-- 加载映射 -->
    <mappers>
        <!-- <mapper resource="com/caoyan/mapper/AccountMapper.xml"/> -->
        <package name="com.caoyan.mapper" />
    </mappers>

</configuration>- 数据库连接信息文件:jdbc.properties
jdbc.driver=com.mysql.jdbc.Driver
jdbc.url=jdbc:mysql://localhost:3306/ssm
jdbc.username=root
jdbc.password=123456- Web.xml文件:web.xml(第五步)
<!DOCTYPE web-app PUBLIC
 "-//Sun Microsystems, Inc.//DTD Web Application 2.3//EN"
 "http://java.sun.com/dtd/web-app_2_3.dtd" >

<web-app>
  <!-- spring监听器 -->
  <context-param>
    <param-name>contextConfigLocation</param-name>
    <param-value>classpath:applicationContext.xml</param-value>
  </context-param>

  <!-- 乱码过滤器 -->
  <filter>
    <filter-name>CharacterEncodingFilter</filter-name>
    <filter-class>org.springframework.web.filter.CharacterEncodingFilter</filter-class>
    <init-param>
      <param-name>encoding</param-name>
      <param-value>UTF-8</param-value>
    </init-param>
  </filter>
  <filter-mapping>
    <filter-name>CharacterEncodingFilter</filter-name>
    <url-pattern>/*</url-pattern>
  </filter-mapping>

  <listener>
    <listener-class>org.springframework.web.context.ContextLoaderListener</listener-class>
  </listener>

  <!-- spring前端控制器 -->
  <servlet>
    <servlet-name>DispatcherServlet</servlet-name>
    <servlet-class>org.springframework.web.servlet.DispatcherServlet</servlet-class>
    <init-param>
      <param-name>contextConfigLocation</param-name>
      <param-value>classpath:spring-mvc.xml</param-value>
    </init-param>
    <load-on-startup>1</load-on-startup>
  </servlet>
  <servlet-mapping>
    <servlet-name>DispatcherServlet</servlet-name>
    <url-pattern>/</url-pattern>
  </servlet-mapping>
</web-app>
1.12.测试添加账户

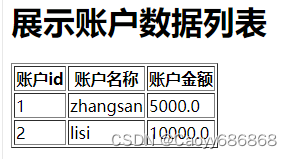
1.13.测试账户列表
2.Mybatis整合Spring(比原始开发改变的相关东西)
2.1.service接口实现
package com.caoyan.service.impl;

import java.util.List;

import com.caoyan.domain.Account;
import com.caoyan.mapper.AccountMapper;
import com.caoyan.service.AccountService;

import org.springframework.beans.factory.annotation.Autowired;
import org.springframework.stereotype.Service;

@Service("accountService")
public class AccountServiceImpl implements AccountService {
    @Autowired
    private AccountMapper accountMapper;

    @Override
    public void save(Account account) {
        accountMapper.save(account);
    }

    @Override
    public List<Account> findAll() {
        return accountMapper.findAll();
    }

}
2.2.Spring配置文件:applicationContext.xml
<?xml version="1.0" encoding="UTF-8" ?>
<beans xmlns="http://www.springframework.org/schema/beans"
       xmlns:xsi="http://www.w3.org/2001/XMLSchema-instance"
       xmlns:aop="http://www.springframework.org/schema/aop"
       xmlns:tx="http://www.springframework.org/schema/tx"
       xmlns:context="http://www.springframework.org/schema/context"
       xsi:schemaLocation="http://www.springframework.org/schema/beans
http://www.springframework.org/schema/beans/spring-beans.xsd
http://www.springframework.org/schema/tx
http://www.springframework.org/schema/tx/spring-tx.xsd
http://www.springframework.org/schema/aop
http://www.springframework.org/schema/aop/spring-aop.xsd
http://www.springframework.org/schema/context
http://www.springframework.org/schema/context/spring-context.xsd">

    <!-- 组件扫描 扫描service和mapper -->
    <context:component-scan base-package="com.caoyan">
        <!-- 排除controller的扫描 -->
        <context:exclude-filter type="annotation" expression="org.springframework.stereotype.Controller" />
    </context:component-scan>
    <!-- 加载properties文件 -->
    <context:property-placeholder location="classpath:jdbc.properties"/>
    <!-- 配置数据源信息 -->
    <bean id="dataSource" class="com.mchange.v2.c3p0.ComboPooledDataSource">
        <property name="driverClass" value="${jdbc.driver}"></property>
        <property name="jdbcUrl" value="${jdbc.url}"></property>
        <property name="user" value="${jdbc.username}"></property>
        <property name="password" value="${jdbc.password}"></property>
    </bean>
    <!-- 配置sessionFactory -->
    <bean id="sqlSessionFactory" class="org.mybatis.spring.SqlSessionFactoryBean">
        <property name="dataSource" ref="dataSource"></property>
        <!-- 加载mybatis核心文件 -->
        <property name="configLocation" value="classpath:sqlMapConfig-spring.xml"></property>
    </bean>
    <!-- 扫描mapper所在的包为mapper创建实现类 -->
    <bean class="org.mybatis.spring.mapper.MapperScannerConfigurer">
        <property name="basePackage" value="com.caoyan.mapper"></property>
    </bean>
    <!-- 声明式事务控制 -->
    <!-- 平台事务管理器 -->
    <bean id="transactionManager" class="org.springframework.jdbc.datasource.DataSourceTransactionManager">
        <property name="dataSource" ref="dataSource"></property>
    </bean>
    <!-- 配置事务增强 -->
    <tx:advice id="txAdvice">
        <tx:attributes>
            <tx:method name="*" />
        </tx:attributes>
    </tx:advice>
    <!-- 事务的aop织入 -->
    <aop:config>
        <aop:advisor advice-ref="txAdvice" pointcut="execution(* com.caoyan.service.impl.*.*(..))" />
    </aop:config>
</beans>
2.3.MyBatis核心配置文件:sqlMapConfig.xml
<?xml version="1.0" encoding="UTF-8" ?>
<!DOCTYPE configuration
        PUBLIC "-//mybatis.org//DTD Config 3.0//EN"
        "http://mybatis.org/dtd/mybatis-3-config.dtd">
<configuration>

    <!--定义别名-->
    <typeAliases>
        <!--<typeAlias type="com.caoyan.domain.Account" alias="account"></typeAlias>-->
        <package name="com.caoyan.domain"></package>
    </typeAliases>

</configuration>
 2184


 扫一扫


 被折叠的 条评论
为什么被折叠?
 到【灌水乐园】发言


