


 本文深入探讨了SpringMVC项目与Tomcat的关系,包括Tomcat的服务器结构解析,虚拟主机加载Web应用的顺序,Context启动入口,以及请求如何定位到Servlet。同时,介绍了Web应用的相关概念如ServletContext和ServletConfig。文章还提到了web.xml文件在Web项目和Spring MVC项目中的作用。
一、SpringMVC项目与Tomcat
1.1、Tomcat
1.1.1、Tomcat服务器结构解析
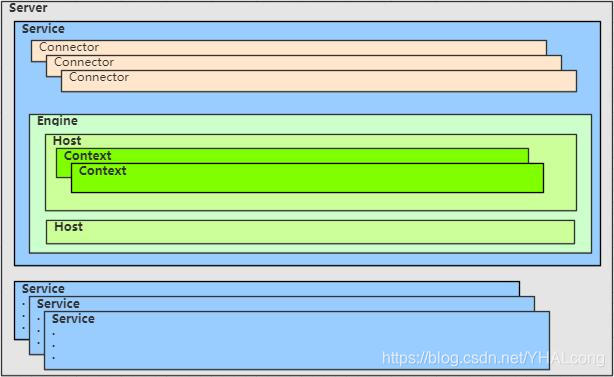
<!-- 代表整个Tomcat服务器 -->
<!-- 关闭Server的指令为SHUTDOWN,接收shutdown指令的端口为8006 -->
<Server port="8006" shutdown="SHUTDOWN">

  <!-- 将Connect和Engine组合在一起,对外提供服务 -->
  <Service name="Catalina">

    <!-- 接收来自客户端的请求,创建Request和Response对象用于和客户端进行数据交互,然后分配线程让Engine来处理请求,并将Request和Response对象传递给Engine -->
    <!-- 客户端通过port使用protocal协议访问Tomcat,如连接超时时间为connectionTimeout -->
    <Connector connectionTimeout="20000" port="9118" protocol="HTTP/1.1" redirectPort="8443"/>

    <Connector port="8010" protocol="AJP/1.3" redirectPort="8443"/>

    <!-- 请求处理组件,从Connector中接收请求并处理,并将完成的响应返回给Connextor,最终传递给客户端 -->
    <!-- defaultHost指定默认host,当请求指定的host不存在时,一律由defaultHost来处理 -->
    <Engine defaultHost="localhost" name="Catalina">

      <!-- Engine中的一个虚拟主机,运行Web应用 -->
      <!-- unpackWARs是否将代表Web应用的war解压 -->
        -- autoDeploy/deployOnStartup和Web应用的自动部署相关,autoDeploy定期检查/更新Web应用,deployOnStartupTomcat启动时检查Web应用
        -- appBase指定Web应用所在的文件夹,相对路径,tomcat根目录下的文件夹;xmlBase指定Web应用的xml配置文件所在位置 -->
      <Host appBase="webapps" autoDeploy="true" name="localhost" unpackWARs="true">

      <!-- 一个Web应用 -->
      <!-- docBase指定Web应用使用的war包路径/应用目录,
        -- path指定web应用的路径
        -- reloadable指示是否需要监控web应用WEB-INF/classes和WEB-INF/lib目录下class文件的改动,是的话文件改的后会触发Web应用的重新加载 -->
      <Context docBase="cmp-web-ifly" path="/cms" reloadable="true" source="org.eclipse.jst.jee.server:cmp-web-ifly"/></Host>

    </Engine>
  </Service>
</Server>
1.1.2、虚拟主机加载哪些Web应用?
Tomcat按照如下的顺序进行扫描,来检查应用更新:
A、扫描虚拟主机指定的xmlBase下的XML配置文件;
B、扫描虚拟主机指定的appBase下的WAR文件;
C、扫描虚拟主机指定的appBase下的应用目录
1.1.3、Context启动入口?
Context在创建的时候将根据配置文件CATALINAHOME/conf/web.xml和CATALINA_HOME/conf/web.xml和CATALINAHOME/conf/web.xml和WEBAPP_HOME/WEB-INF/web.xml读取配置,并启动Web项目。
1.1.4、请求如何定位到Servlet?
当请求被发送到Tomcat所在的主机时,如何确定最终哪个Web应用来处理该请求呢?
1、根据协议和端口号选定Service和Engine
2、根据域名或IP地址选定Host
3、根据URL匹配path,选Web应用
4、当Context获得请求时,将在自己的映射表(mapping table)中寻找相匹配的Servlet类,如果找到,则执行该类,获得请求的回应,并返回(映射表由Web应用的web.xml文件中的和标签参数对应,后面会介绍)
1.1.3、Web应用相关概念
1、ServletContext
Tomcat容器会为每个Web应用创建一个ServletContext对象,保存了web应用的一些配置/参数信息。
2、ServletConfig
每个Servlet被实例化后,都会有一个与其关联的ServletConfig对象,保存了Servlet相关的一些配置信息,以及拥有对其所在Web应用的ServletContext对象的引用。
1.2、Web项目
1.2.1、web.xml文件
启动Web项目时,容器会先读取web.xml配置文件。
1、为该Web项目创建ServletContext对象
2、Web容器(Tomcat)读取标签,为Key、为Value,存入ServletContext
3、Web容器(Tomcat)读取标签,以创建监听器实例
4、Web容器(Tomcat)读取标签,以创建过滤器实例
5、Web容器(Tomcat)读取标签,如果标签值为1,则创建该Servlet(容器启动时加载Servlet),否则延迟至请求发生时创建
<?xml version="1.0" encoding="UTF-8"?>
<web-app xmlns="http://xmlns.jcp.org/xml/ns/javaee"
  xmlns:xsi="http://www.w3.org/2001/XMLSchema-instance"
  xsi:schemaLocation="http://xmlns.jcp.org/xml/ns/javaee
                      http://xmlns.jcp.org/xml/ns/javaee/web-app_4_0.xsd"
  version="4.0"
  metadata-complete="true">

    <description>Servlet and JSP Examples.</description>
    <display-name>Servlet and JSP Examples</display-name>

    <request-character-encoding>UTF-8</request-character-encoding>

    <filter>
        <filter-name>Timing Filter</filter-name>
        <filter-class>filters.ExampleFilter</filter-class>
        <init-param>
            <param-name>attribute</param-name>
            <param-value>filters.ExampleFilter</param-value>
        </init-param>
    </filter>

    <filter>
        <filter-name>Request Dumper Filter</filter-name>
        <filter-class>org.apache.catalina.filters.RequestDumperFilter</filter-class>
    </filter>

    <context-param>
		<param-name>webAppRootKey</param-name>
		<param-value>cmp.web.root</param-value>
	</context-param>

	<context-param>
		<param-name>contextConfigLocation</param-name>
		<param-value>classpath*:spring.xml</param-value>
	</context-param>

    <listener>
        <listener-class>listeners.ContextListener</listener-class>
    </listener>
    <listener>
        <listener-class>listeners.SessionListener</listener-class>
    </listener>

    <servlet>
        <servlet-name>HelloWorldExample</servlet-name>
        <servlet-class>HelloWorldExample</servlet-class>
    </servlet>
    <servlet>
        <servlet-name>RequestInfoExample</servlet-name>
        <servlet-class>RequestInfoExample</servlet-class>
    </servlet>

    <!-- xxx-class在Web项目中的位置:1、WEB-INF/classes;2、WEB-INF/lib -->

    <servlet-mapping>
        <servlet-name>HelloWorldExample</servlet-name>
        <url-pattern>/servlets/servlet/HelloWorldExample</url-pattern>
    </servlet-mapping>
    <servlet-mapping>
        <servlet-name>RequestInfoExample</servlet-name>
        <url-pattern>/servlets/servlet/RequestInfoExample/*</url-pattern>
    </servlet-mapping>

    <welcome-file-list>
        <welcome-file>index.html</welcome-file>
        <welcome-file>index.xhtml</welcome-file>
        <welcome-file>index.htm</welcome-file>
        <welcome-file>index.jsp</welcome-file>
    </welcome-file-list>

    <!-- 返回特定HTTP状态代码时,或者特定类型的异常被抛出时,能够制定将要显示的页面 -->
    <error-page>
        <error-code>401</error-code>
        <location>/WEB-INF/jsp/401.jsp</location>
    </error-page>
    <error-page>
        <error-code>403</error-code>
        <location>/WEB-INF/jsp/403.jsp</location>
    </error-page>
    <error-page>
        <error-code>404</error-code>
        <location>/WEB-INF/jsp/404.jsp</location>
    </error-page>

</web-app>
1.3、Spring MVC项目
Spring MVC项目一般被打成war包,部署至Tomcat服务器。
1.3.1、web.xml文件
<?xml version="1.0" encoding="UTF-8"?>
<web-app xmlns:xsi="http://www.w3.org/2001/XMLSchema-instance" xmlns="http://java.sun.com/xml/ns/javaee" xsi:schemaLocation="http://java.sun.com/xml/ns/javaee http://java.sun.com/xml/ns/javaee/web-app_2_5.xsd" version="2.5">
	<display-name>demo</display-name>

	<listener>
		<listener-class>org.springframework.web.context.ContextLoaderListener</listener-class>
	</listener>

    <servlet>
        <servlet-name>Spring MVC</servlet-name>
        <servlet-class>org.springframework.web.servlet.DispatcherServlet</servlet-class>
        <init-param>
            <param-name>contextConfigLocation</param-name>
            <param-value>classpath:spring-mvc.xml</param-value>
        </init-param>
        <load-on-startup>1</load-on-startup>
    </servlet>
    <servlet-mapping>
        <servlet-name>Spring MVC</servlet-name>
        <url-pattern>/</url-pattern>
    </servlet-mapping>

    <!-- Spring IOC容器加载可以利用ServletContextListener实现,也可以采用load-on-startup的Servlet实现
      -- 但是,当filter需要使用bean时,由于servlet还未加载(加载顺序:listener > filter > servlet),bean为null
      -- 所有,如果filter中需要用到bean,应该采用listener的方式来加载 -->
</web-app>
以上如有不当之处欢迎指正,不胜感激。


 3829
3829

 被折叠的 条评论
为什么被折叠?
被折叠的 条评论
为什么被折叠?
 到【灌水乐园】发言


