


 本文介绍了如何使用vite搭建Vue3项目,包括vite.config.js配置、vue-router的安装与应用、less预处理器的安装及注意事项,以及axios在Vue3中的使用。同时,对比了Vue3与Vue2在组件、响应式系统等方面的不同。
一.使用vite搭建vue3项目:
1.安装vite前端构架工具---比脚手架cli更快捷
npm install -g create-vite-app2.创建一个项目名称为
vue3-DOME的项目:create-vite-app vue3-demo省略第1步和第2步骤直接创建可选择是否使用路由,tapescript等:
npm init vue@latest3.安装node-modous然后运行
cnpm install4.vite.config.js配置:(vite创建的项目需要在根目录创建一个vite.config.js文件进行项目配置,和vue2版本的vue.config.js文件类似)---我的理解是替换webpack打包
import {resolve} from 'path'

module.exports = {
  alias: {  //配置别名
    '/@/': resolve(__dirname, './src')
  },
  hostname: 'localhost', // 默认是 localhost
  port: '8000', // 默认是 3000 端口
  open: false, // 浏览器自动打开
  https: false, // 是否开启 https
  ssr: false, // 服务端渲染
  base: './', // 生产环境下的公共路径
  outDir: 'dist', // 打包构建输出路径,默认 dist ,如果路径存在,构建之前会被删除
  proxy: { // 本地开发环境通过代理实现跨域,生产环境使用 nginx 转发
    '/api': {
      target: 'http://127.0.0.1:7001', // 后端服务实际地址
      changeOrigin: true,
      rewrite: path => path.replace(/^\/api/, '')
    }
  }
}
二.使用路由vue-router
1.安装router
npm install vue-router@4.0.32.安装完成后,在src文件夹下创建router文件夹,router文件夹创建index.js文件,并在src下面创建views文件夹下创建自己的页面以及内容
import { createRouter, createWebHistory } from 'vue-router'

// 开启历史模式
// vue2中使用 mode: history 实现
const routerHistory = createWebHistory();

const router = createRouter({
    history: routerHistory,
    routes: [
        {
            path: '/',
            redirect: '/home'
        },
        {
            path: '/home',
            component: () => import('../views/home.vue')
        },
        {
            path: '/about',
            component: () => import('../views/about.vue')
        }
    ]
})

export default router
3.在main.js里面引入注册
import { createApp } from 'vue'
import App from './App.vue'
import router from './router' //引入router
import './index.css'

const app = createApp(App)
app.use(router)
app.mount('#app') //注意注册app实例要放在最后一行
4.在App.vue使用<router-view></router-view>
<template>
   <!-- 使用router -->
  <router-view></router-view>
</template>

<script>

export default {
  name: 'App',
  components: {
  }
}
</script>
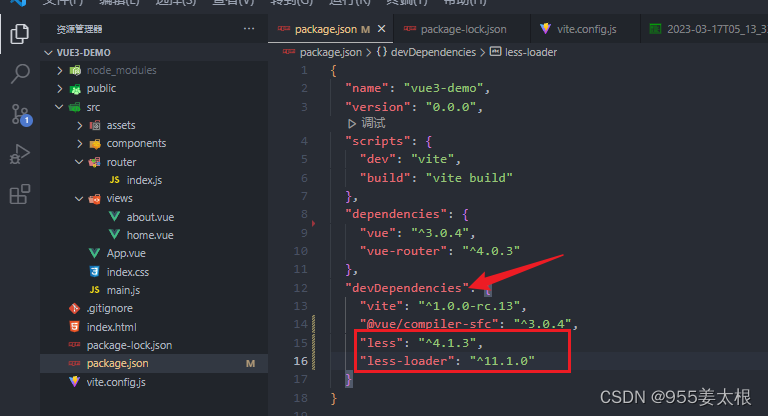
三.vue3使用css预处理器less
1.安装less以及less-loader
npm install less less-loader --save2.注意:less 和 less-loader 需要写到 package.json 文件中的 devDependencies 里面,否则项目运行会报错。
1
1
四.vue3使用axios和后端数据交互(和vue2相同)
1.安装axios
npm install axios2.二次封装axios请求request.js,在src下创建utils文件夹里面创建request.js里面的代码如下:
3.在src下创建api文件夹里面创建一个api.js
4.在.vue中使用
五.vue3使用fetch和后端数据交互
1.安装fetch
2.
二.vue3和vue2的区别(proxy,segment,api,hooks,slot,emit)
1.
template中可以有多个根节点:,vue2只能有一个根节点2.vue3也是使用axios,vuex,吗?
axios | fetch, pinia | vuex41
1
1
1
1
1
1
1
1
vue3响应式返回代理对象的是proxy不是对象{ },只有代理对象才是响应式的
vue3使用组件:
1.vue3使用组件只需引入不需要注册
<template>
  <div>
      <topBar></topBar>
  </div>
</template>

<script setup>
import { ref } from 'vue'
import topBar from '../../components/topBar.vue';

</script>

<style scoped>

</style>
2.父传子参数(在子组件中用 defineProps 宏 来声明)
- 在父组件中定义并传值(用于单组件引用--只引用一个组件)
<template>
  <div>
      <topBar :topList="topRef.topList"></topBar>
  </div>
</template>

<script setup>
import { ref } from 'vue'
import topBar from '../../components/topBar.vue';

const topRef = ref({
    topList:[
        {name:'flex布局'},{name:'全局api'}
    ]
})

</script>

<style scoped>

</style>
- 多组件引用
- 在子组件中接收:
<template>
    <div class="content">
        <div v-for="(item,index) in topList" :key="index">{{ item.name }}</div>
    </div>
</template>

<script setup>
import { ref } from 'vue'

defineProps(['topList'])

</script>

<style scoped>
.content{
    width: 100%;
    display: flex;
    flex-direction: column;
}
</style>


 2000
2000


 到【灌水乐园】发言


