


 本文介绍了Spring框架中两种上下文加载方式:ClassPathXmlApplicationContext和AnnotationConfigApplicationContext。前者用于加载XML配置文件,后者用于加载注解配置。文章详细解析了它们的构造函数、核心方法及其实现原理。
文章目录
ClassPathXmlApplicationContext是用来加载xml配置文件的Context,而AnnotationConfigApplicationContext是用来加载注解配置的Context。虽然直接父类不同,但是都有一个共同的祖先类AbstractApplicationContext。以及同样有一个组合对象BeanFactory提供容器作用。
一、ClassPathXmlApplicationContext
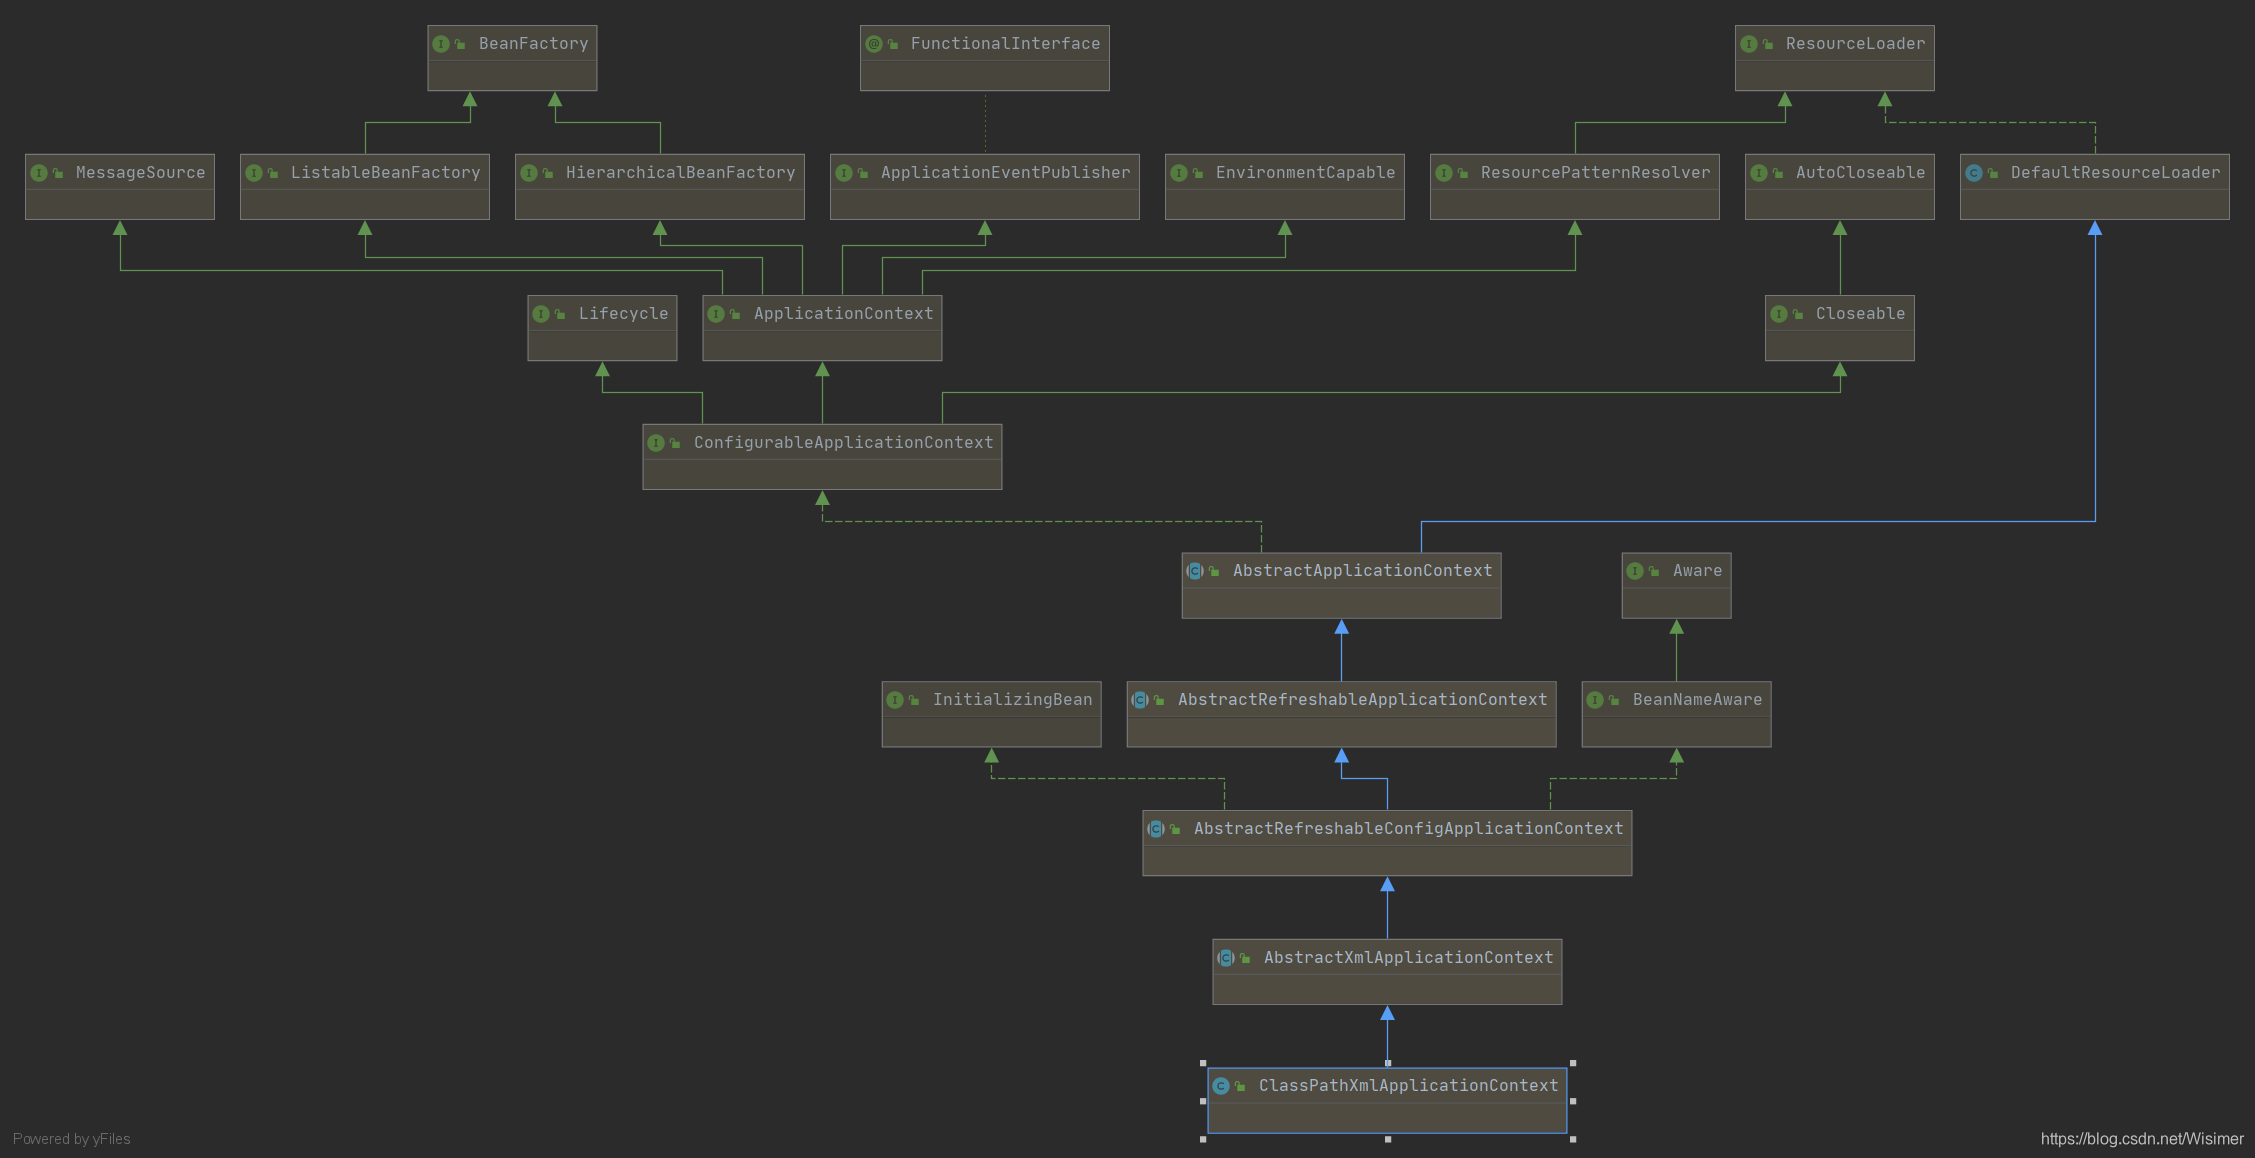
ClassPathXmlApplicationContext继承关系图:
ClassPathXmlApplicationContext 构造器源码:
public ClassPathXmlApplicationContext(String[] configLocations, boolean refresh, ApplicationContext 	         parent) {
    //null
    super(parent);
    setConfigLocations(configLocations);
    //默认true
    if (refresh) {
        refresh();
    }
}
1.构造器
首先调用super方法,所以看父类构造器,沿着继承体系一直向上调用,直到AbstractApplicationContext:
public AbstractApplicationContext() {
    this.resourcePatternResolver = getResourcePatternResolver();
}

public AbstractApplicationContext(ApplicationContext parent) {
    this();
    setParent(parent);
}
默认的无参构造函数中调用getResourcePatternResolver()方法设置配置文件路径:
protected ResourcePatternResolver getResourcePatternResolver() {
    return new PathMatchingResourcePatternResolver(this);
}
PathMatchingResourcePatternResolver支持Ant风格的路径解析。
2. 设置配置文件路径
调用setConfigLocations方法设置配置文件路径,即AbstractRefreshableConfigApplicationContext.setConfigLocations()
public void setConfigLocations(String... locations) {
    if (locations != null) {
        Assert.noNullElements(locations, "Config locations must not be null");
        this.configLocations = new String[locations.length];
        for (int i = 0; i < locations.length; i++) {
            this.configLocations[i] = resolvePath(locations[i]).trim();
        }
    } else {
        this.configLocations = null;
    }
}
2.1resolvePath() 方法:
protected String resolvePath(String path) {
    return getEnvironment().resolveRequiredPlaceholders(path);
}
此方法的目的在于将占位符(placeholder)解析成实际的地址。比如可以这么写: new ClassPathXmlApplicationContext(“classpath:config.xml”);那么classpath:就是需要被解析的。
2.2 getEnvironment()方法
getEnvironment()方法来自于ConfigurableApplicationContext接口,源码很简单,如果为空就调用createEnvironment创建一个。AbstractApplicationContext.createEnvironment():
protected ConfigurableEnvironment createEnvironment() {
    return new StandardEnvironment();
}
2.3 resolveRequiredPlaceholders()方法
resolveRequiredPlaceholders()用来处理路径Placeholder:
@Override
public String resolveRequiredPlaceholders(String text) throws IllegalArgumentException {
    //text即配置文件路径,比如classpath:config.xml
    return this.propertyResolver.resolveRequiredPlaceholders(text);
}
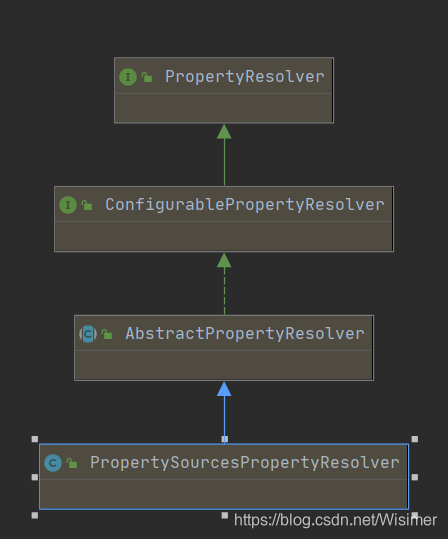
propertyResolver成员变量是一个PropertySourcesPropertyResolver对象:
private final ConfigurablePropertyResolver propertyResolver =
            new PropertySourcesPropertyResolver(this.propertySources);
PropertySourcesPropertyResolver关系继承图:
PropertyResolver这个接口就是用来解析PropertyResource的。
3. Environment接口
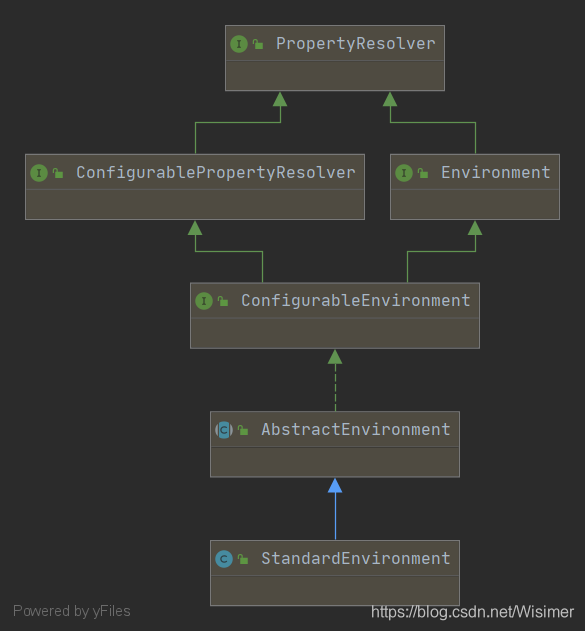
StandardEnvironment 继承关系图:
Environmen接口代表了当前应用所处的环境。从此接口的方法可以看出,其主要和profile、Property相关:
public interface Environment extends PropertyResolver {
	String[] getActiveProfiles();
	String[] getDefaultProfiles();
	boolean acceptsProfiles(String... profiles);
	boolean acceptsProfiles(Profiles profiles);
}
AbstractEnvironment构造器:
private final MutablePropertySources propertySources = new MutablePropertySources(this.logger);
public AbstractEnvironment() {
    customizePropertySources(this.propertySources);
}
StandardEnvironment.customizePropertySources()方法:
/** System environment property source name: {@value} */
public static final String SYSTEM_ENVIRONMENT_PROPERTY_SOURCE_NAME = "systemEnvironment";
/** JVM system properties property source name: {@value} */
public static final String SYSTEM_PROPERTIES_PROPERTY_SOURCE_NAME = "systemProperties";
@Override
protected void customizePropertySources(MutablePropertySources propertySources) {
    propertySources.addLast(new MapPropertySource
        (SYSTEM_PROPERTIES_PROPERTY_SOURCE_NAME, getSystemProperties()));
    propertySources.addLast(new SystemEnvironmentPropertySource
        (SYSTEM_ENVIRONMENT_PROPERTY_SOURCE_NAME, getSystemEnvironment()));
}
4. PropertySource和PropertySources
这里的Property指的是程序运行时的一些参数,引用注释:
properties files, JVM system properties, system environment variables, JNDI, servlet context parameters, ad-hoc Properties objects,Maps, and so on.
(1)MutablePropertySources 继承关系图:
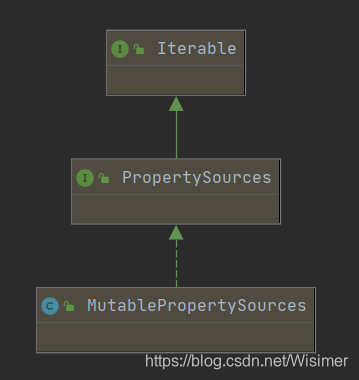
默认的MutablePropertySources实现内部含有一个CopyOnWriteArrayList作为存储载体,所以PropertySources其实是作为一个容器保存了多个PropertySource。
(2)PropertySource
PropertySource代表了键值对的Property来源。PropertySource继承关系图:
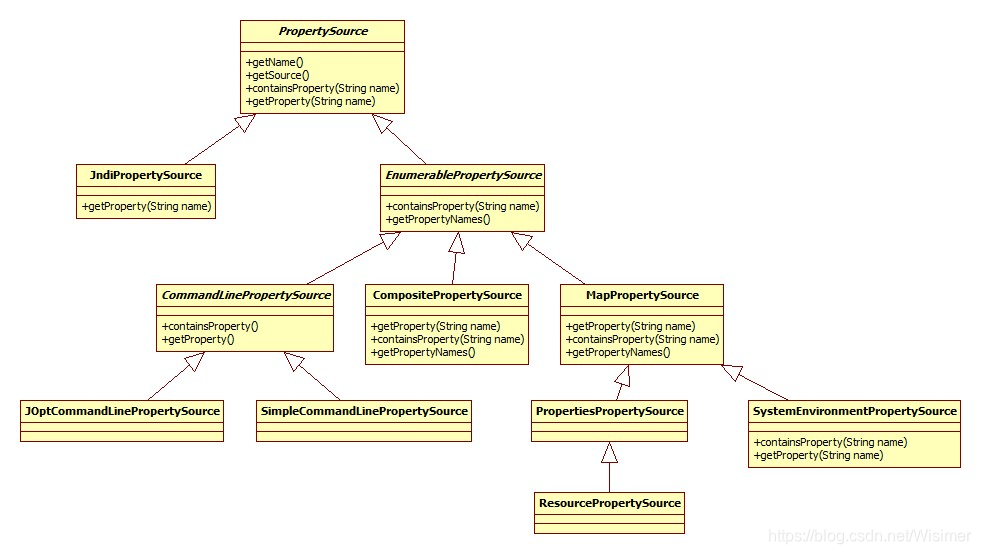
在StandardEnvironment.customizePropertySources()方法中向propertySources容器中添加了MapPropertySource和SystemEnvironmentPropertySource两种PropertySource。
- MapPropertySource通过
AbstractEnvironment.getSystemProperties()获取:
@Override
public Map<String, Object> getSystemProperties() {
    try {
        return (Map) System.getProperties();
    }
    catch (AccessControlException ex) {
        return (Map) new ReadOnlySystemAttributesMap() {
            @Override
            protected String getSystemAttribute(String attributeName) {
                try {
                    return System.getProperty(attributeName);
                }
                catch (AccessControlException ex) {
                    if (logger.isInfoEnabled()) {
                        logger.info(format("Caught AccessControlException when accessing system " +
                                "property [%s]; its value will be returned [null]. Reason: %s",
                                attributeName, ex.getMessage()));
                    }
                    return null;
                }
            }
        };
    }
}
这里的实现很有意思,如果安全管理器阻止获取全部的系统属性,那么会尝试获取单个属性的可能性,如果还不行就抛异常了。
- SystemEnvironmentPropertySource通过
AbstractEnvironment.getSystemEnvironment()获取:
getSystemEnvironment方法也是一个套路,不过最终调用的是System.getenv,可以获取jvm和OS的一些版本信息。
4. Profile
Spring Profile特性是从3.1开始的,其主要是为了解决这样一种问题: 线上环境和测试环境使用不同的配置或是数据库或是其它。有了Profile便可以在 不同环境之间无缝切换。Spring容器管理的所有bean都是和一个profile绑定在一起的。使用了Profile的配置文件示例:
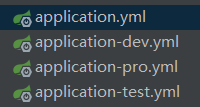
application.yml:
spring:
    # 环境 dev|test|pro
    profiles:
        active: dev
二、AnnotationConfigApplicationContext
AnnotationConfigApplicationContext继承关系图:
1. 构造函数:
用来注册内部处理器类
public AnnotationConfigApplicationContext() {
	StartupStep createAnnotatedBeanDefReader = this.getApplicationStartup().start("spring.context.annotated-bean-reader.create");
	this.reader = new AnnotatedBeanDefinitionReader(this);
	createAnnotatedBeanDefReader.end();
	this.scanner = new ClassPathBeanDefinitionScanner(this);
}

public AnnotationConfigApplicationContext(Class<?>... componentClasses) {
	this();
	register(componentClasses);
	refresh();
}
默认的构造函数中StartupStep实际是记录性能用的,可以不看,AnnotatedBeanDefinitionReader和ClassPathBeanDefinitionScanner两个类的实例化其实是完成了Spring内部定义的BeanFactory后处理器的注册以及初始化注解bean定义解析器和类路径bean定义扫描器。
2. register()方法
注册Java配置类
@Override
public void register(Class<?>... componentClasses) {
	StartupStep registerComponentClass = this.getApplicationStartup().start("spring.context.component-classes.register")
			.tag("classes", () -> Arrays.toString(componentClasses));
	this.reader.register(componentClasses);
	registerComponentClass.end();
}
register方法是通过注解bean读取器AnnotatedBeanDefinitionReader来实现的。
reader.register()方法按指定的配置bean注册信息:
public void register(Class<?>... componentClasses) {
	for (Class<?> componentClass : componentClasses) {
		registerBean(componentClass);
	}
}
registerBean()内部实际调用doRegisterBean()方法:
<T> void doRegisterBean(Class<T> annotatedClass, @Nullable Supplier<T> instanceSupplier, @Nullable String name,
        @Nullable Class<? extends Annotation>[] qualifiers, BeanDefinitionCustomizer... definitionCustomizers) {
    // 其实就是创建BeanDefinition了,只是多了一个注解的属性metadata
    AnnotatedGenericBeanDefinition abd = new AnnotatedGenericBeanDefinition(annotatedClass);
    // @Conditional注解的判断在这里,如果不符合条件,就不注册了
    if (this.conditionEvaluator.shouldSkip(abd.getMetadata())) {
        return;
    }
    // 回调用的
    abd.setInstanceSupplier(instanceSupplier);
    // 解析bean的作用域,scope,没有设置默认单例
    ScopeMetadata scopeMetadata = this.scopeMetadataResolver.resolveScopeMetadata(abd);
    abd.setScope(scopeMetadata.getScopeName());
    // 解析bean的名称
    String beanName = (name != null ? name : this.beanNameGenerator.generateBeanName(abd, this.registry));
    // 设置abd的Lazy, primary DependsOn, Role ,Description这五个属性
    AnnotationConfigUtils.processCommonDefinitionAnnotations(abd);
    // 特定限定符处理
    if (qualifiers != null) {
        for (Class<? extends Annotation> qualifier : qualifiers) {
            if (Primary.class == qualifier) {
                abd.setPrimary(true);
            }
            else if (Lazy.class == qualifier) {
                abd.setLazyInit(true);
            }
            else {
                abd.addQualifier(new AutowireCandidateQualifier(qualifier));
            }
        }
    }
    for (BeanDefinitionCustomizer customizer : definitionCustomizers) {
        customizer.customize(abd);
    }
    // 定义一个BeanDefinitionHolder,就是beanName和BeanDefinition的映射
    BeanDefinitionHolder definitionHolder = new BeanDefinitionHolder(abd, beanName);
    // 是否有代理
    definitionHolder = AnnotationConfigUtils.applyScopedProxyMode(scopeMetadata, definitionHolder, this.registry);
    // 往容器注册BeanDefinition,同时注册别名
    BeanDefinitionReaderUtils.registerBeanDefinition(definitionHolder, this.registry);
}
BeanDefinitionReaderUtils.registerBeanDefinition()方法实现:
public static void registerBeanDefinition(BeanDefinitionHolder definitionHolder, BeanDefinitionRegistry registry) throws BeanDefinitionStoreException {
   // 根据主名称注册bean定义信息
   String beanName = definitionHolder.getBeanName();
   /**
    * GenericApplicationContext类实现了BeanDefinitionRegistry接口,
    * 并且在 GenericApplicationContext类中维护了一个DefaultListableBeanFactory beanFactory  (卧槽, 终于见到bean工厂了)
    *
    * 该步骤实际调用的是GenericApplicationContext类中的registerBeanDefinition()方法
    *{@link org.springframework.context.support.GenericApplicationContext#registerBeanDefinition(String,BeanDefinition)}
    */
   registry.registerBeanDefinition(beanName, definitionHolder.getBeanDefinition());
   // 如果该bean有别名的话, 为bean名称注册别名
   String[] aliases = definitionHolder.getAliases();
   if (aliases != null) {
      for (String alias : aliases) {
         registry.registerAlias(beanName, alias);
      }
   }
}
3. refresh()方法用来刷新上下文
注册普通BeanDefinition
解析请看https://blog.youkuaiyun.com/Wisimer/article/details/110949420
THE END.


 2699
2699

 被折叠的 条评论
为什么被折叠?
被折叠的 条评论
为什么被折叠?
 到【灌水乐园】发言


