


 本文详细介绍了Spring框架,包括它为解决代码耦合度高和事务管理繁琐的问题而引入的IoC和DI思想。文章涵盖Spring的核心组件、优势、产品,以及从HelloWorld到对象生命周期的实践,如getBean的三种签名、基本配置、测试框架、IoC容器和对象的作用域。通过实例解析Spring如何实例化对象,并讨论了不同作用域的影响。
1.解决什么问题
2.Spring简介
3.IoC和DI思想
4.HelloWorld
5.getBean的三种签名
6.Spring的基本配置
7.Spring的测试框架
8.Spring的IoC容器
9.Spring实例化对象
10.对象的作用域
11.对象的生命周期
一、解决什么问题
Spring出现之前,存在的问题:
1.代码耦合度比较高

此时如果把IEmployeeDAO的实现类换成EmployeeDAOMyBatisImpl,此时需要修改EmployeeServiceImpl的源代码,不符合开闭原则
开闭原则:对外扩展是开放的,对于修改是关闭的
解决方案:使用Spring的IoC,将对象的创建和属性的赋值交给框架动态的完成。
2.控制事务繁琐

对于事务操作,代码冗余,必须在所有需要控制事务的地方,手动调用代码完成几乎完全相同的事务控制逻辑,开发效率低下,并且的难以方便的处理事务嵌套需求。
如何消除重复的代码,同时又让业务方法在执行过程中有控制事务的功能
解决方法:使用Spring的AOP,将处理业务的方法在单独的类中,然后将其织入需要控制事务的方法当中
二、Spring简介
1.什么是Spring
Spring是一个轻量级的控制反转(IoC/DI)和面向切面编程(AOP)的开源容器框架,致力于构建轻量级的JavaEE应用,简化应用开发,本身涵盖了传统应用开发,还拓展到移动端,大数据等领域。
什么是容器(Container):从程序设计角度看就是装对象的的对象,因为存在放入、拿出等操作,所以容器还要管理对象的生命周期,如Tomcat就是Servlet和JSP的容器。
Spring提供了JavaEE每一层的解决方案(full stack)。

框架:

Spring框架包:
1.使用maven下载
2.访问url下载:http://repo.spring.io/libs-release-local/org/springframework/spring/


spring-framework-x.x.x.RELEASE(Spring的核心包):
docs:Spring开发的帮助文档
libs:Spring核心组件的jar包,源代码,文档
schema:Spring配置文件的schema约束文件
2.Spring的优势:
Spring除了不能帮我们写业务逻辑,其余的几乎什么都能帮助我们简化开发。
①.Spring能帮我们低侵入/低耦合地根据配置文件创建及组装对象之间的依赖关系。
②.Spring 面向切面编程能帮助我们无耦合的实现日志记录,性能统计,安全控制等。
③.Spring能非常简单的且强大的声明式事务管理。
④.Spring提供了与第三方数据访问框架(如Hibernate、Mybatis)无缝集成,且自己也提供了一套JDBC模板来方便数据库访问。
⑤.Spring提供与第三方Web(如Struts1/2、JSF)框架无缝集成,且自己也提供了一套Spring MVC框架,来方便Web层搭建。
⑥.Spring能方便的与如Java Mail、任务调度、缓存框架等技术整合,降低开发难度。
3.Spring的产品
Spring FrameWork:Spring帝国之核心,其他Spring其他产品都是基于Spring框架而来。
Spring Boot 是由Pivotal团队提供的全新框架,其设计目的是用来简化新Spring应用的初始搭建以及开发过程。该框架使用了特定的方式来进行配置,从而使开发人员不再需要定义样板化的配置。
Spring Cloud 微服务框架,为开发者提供了在分布式系统(配置管理,服务发现,熔断,路由,微代理,控制总线,一次性token,全居琐,leader选举,分布式session,集群状态)中快速构建的工具,使用Spring Cloud的开发者可以快速的启动服务或构建应用、同时能够快速和云平台资源进行对接。
Spring Cloud Data Flow 简化了专注于数据流处理的应用程序的开发和部署。通过SpringBoot启动应用,采用Spring Cloud Stream、Spring Cloud Task完成微服务构建。
Spring Data用于简化数据库访问,并支持云服务的开源框架。旨在统一和简化对各类型持久化存储, 而不拘泥是关系型数据库还是NoSQL数据存储。
Spring Batch: 专门针对企业级系统中的日常批处理任务的轻量级框架,能够帮助开发者方便地开发出强壮、高效的批处理应用程序。
Spring Integration为Spring 编程模型提供了一个支持企业集成模式(Enterprise Integration Patterns)的扩展,在应用程序中提供轻量级的消息机制,可以通过声明式的适配器与外部系统进行集成。
Spring Security早期称为Acegi,基于Spring的企业应用系统提供声明式的安全访问控制解决方案的安全框架;。
三、IoC和DI思想
IoC:Inverse of Control(控制反转):读作“反转控制”,更好理解,不是什么技术,而是一种设计思想,好比于MVC。就是将原本在程序中手动创建对象的控制权,交由Spring框架来管理。
正控:若调用者需要使用某个对象,其自身就得负责该对象的创建。
反控:调用者只管负责从Spring容器中获取需要使用的对象,不关心对象的创建过程,也就是把创建和管理对象的控制权反转给了Spring框架。
DI:Dependency Injection(依赖注入)
从字面上分析:IoC:指将对象的创建权,反转给了Spring容器;
DI :指Spring创建对象的过程中,将对象依赖的属性(简单值,集合,对象)通过配置的方式进行设值。
IoC和DI其实是同一个概念的不同角度描述,DI相对IoC而言,明确描述了被管理的对象中,依赖的属性也应该由Spring容器自动注入。
四、HelloWorld

1、在pom.xml导入依赖的jar包:
<?xml version="1.0" encoding="UTF-8"?>
<project xmlns="http://maven.apache.org/POM/4.0.0"
         xmlns:xsi="http://www.w3.org/2001/XMLSchema-instance"
         xsi:schemaLocation="http://maven.apache.org/POM/4.0.0 http://maven.apache.org/xsd/maven-4.0.0.xsd">
    <modelVersion>4.0.0</modelVersion>

    <groupId>com.xj</groupId>
    <artifactId>Spring01</artifactId>
    <version>1.0.0</version>


    <dependencies>
        <!--Spring-core-->
        <dependency>
            <groupId>org.springframework</groupId>
            <artifactId>spring-core</artifactId>
            <version>5.0.0.RELEASE</version>
        </dependency>
        <!--Spring-beans-->
        <dependency>
            <groupId>org.springframework</groupId>
            <artifactId>spring-beans</artifactId>
            <version>5.0.0.RELEASE</version>
        </dependency>
        <!--junit-->
        <dependency>
            <groupId>junit</groupId>
            <artifactId>junit</artifactId>
            <version>4.12</version>
        </dependency>
    </dependencies>

</project>
2、完成HelloWorld实体类的开发
package com.xj._01helloworld;

/**
 * Created by Administrator on 2019/12/25 0025.
 */
public class HelloWorld {
    private String name;
    private Integer age;

    public void setName(String name) {
        this.name = name;
    }
    public void setAge(Integer age) {
        this.age = age;
    }

    @Override
    public String toString() {
        return "HelloWorld{" +
                "name='" + name + '\'' +
                ", age=" + age +
                '}';
    }
}
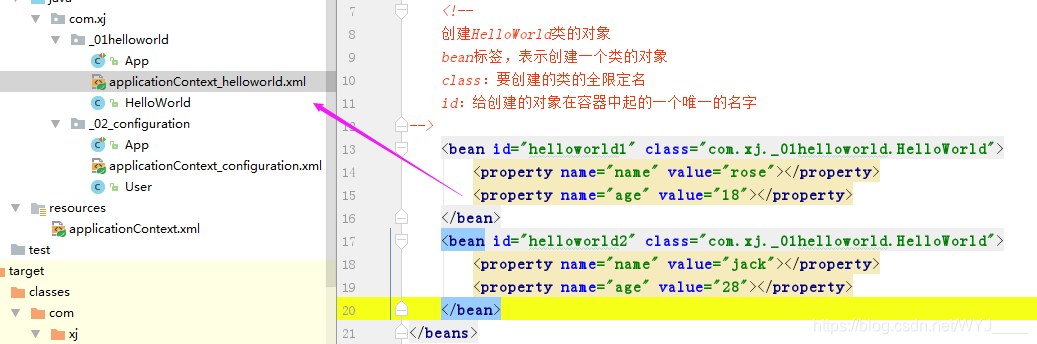
3、在applicationContext.xml中完成配置
<?xml version="1.0" encoding="UTF-8"?>
<beans xmlns="http://www.springframework.org/schema/beans"
       xmlns:xsi="http://www.w3.org/2001/XMLSchema-instance"
       xsi:schemaLocation="http://www.springframework.org/schema/beans http://www.springframework.org/schema/beans/spring-beans.xsd">


    <!--
        创建HelloWorld类的对象
        bean标签,表示创建一个类的对象
        class:要创建的类的全限定名
        id:给创建的对象在容器中起的一个唯一的名字
    -->
    <bean id="helloworld" class="com.xj._01helloworld.HelloWorld">
        <property name="name" value="rose"></property>
        <property name="age" value="18"></property>
    </bean>
</beans>
4、启动容器
package com.xj._01helloworld;
import org.junit.Test;
import org.springframework.beans.factory.BeanFactory;
import org.springframework.beans.factory.xml.XmlBeanFactory;
import org.springframework.core.io.ClassPathResource;
import org.springframework.core.io.Resource;
/**
* Created by Administrator on 2019/12/25 0025.
*/
public class App {
@Test
public void testHelloWorld(){
//利用配置文件创建资源对象
Resource resource = new ClassPathResource("applicationContext.xml");
//创建Spring容器
BeanFactory factory = new XmlBeanFactory(resource);
//获取对象
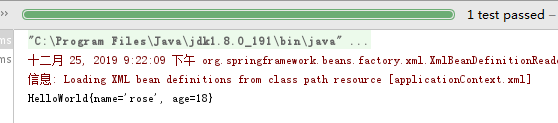
HelloWorld helloWorld = (HelloWorld) factory.getBean("helloworld");
System.out.println(helloWorld);
}
}
5、结果
Spring管理Bean的原理:
什么是BeanFactory:Spring最基本的接口,表示Spring容器——生产bean对象的工厂,负责配置,创建和管理bean。
备注:bean是Spring管理的单位,在Spring中一切都是bean
深入Spring管理bean的原理:
1、通过Resource对象加载配置文件;applicationContext.xml
2、解析配置文件,管理配置中的bean元素
3、使用反射把各个bean元素转化为对应的bean对象,调用每个属性的setter方法为属性赋值,并将创建完成的对象和对应的id一起存放(便于后期通过id获取到bean对象)
五、getBean的三种签名
1.通过对象的名字获取,需要类型转换
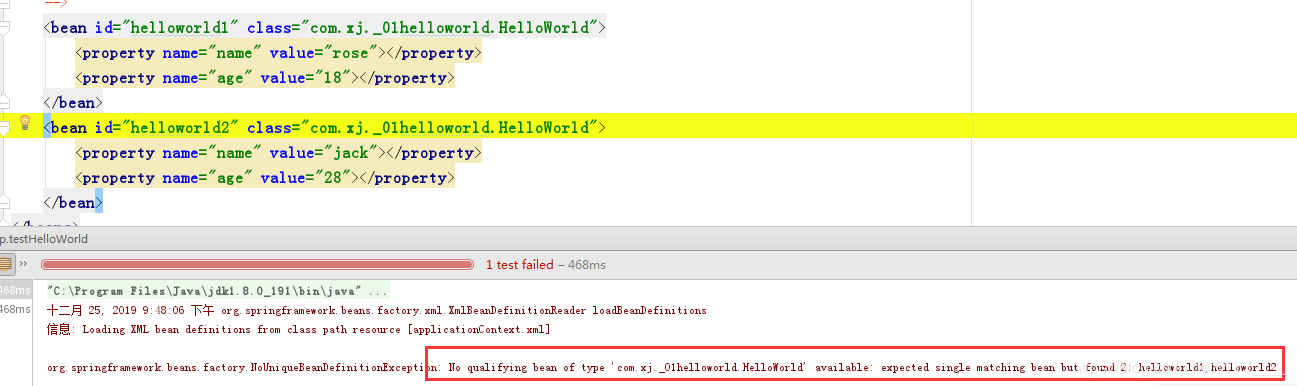
HelloWorld helloWorld = (HelloWorld) factory.getBean("helloworld");2.通过类型获取,当存在多个类型一样的对象时,会产生异常
HelloWorld helloWorld = factory.getBean(HelloWorld.class);注:如果存在多个对象,如下面的,就会报错
3.通过类型和名字共同获取(推荐使用)
HelloWorld helloWorld = factory.getBean("helloworld1", HelloWorld.class);六、Spring的基本配置
1.id和name标签
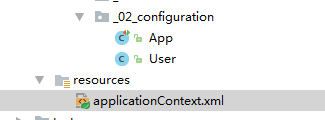
public class User {
    private String name;
}
<bean id="user" class="com.xj._02_configuration.User"></bean>public class App {
@Test
public void test(){
Resource resource = new ClassPathResource("applicationContext.xml");
BeanFactory factory = new XmlBeanFactory (resource);
User user = (User)factory.getBean("user");
System.out.println(user);
}
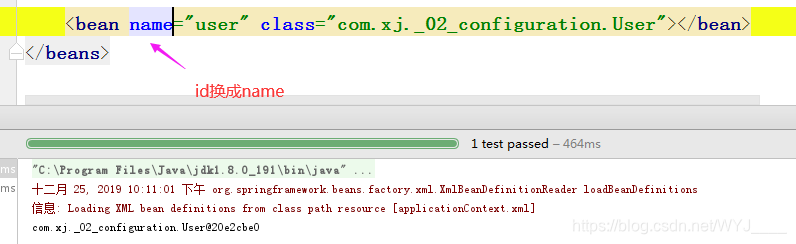
在Spring配置中,id和name属性都可以定义bean元素的名称,
不同的是:
id属性,遵守XML语法ID约束。必须以字母开始,可以使用字母、数字、连字符、下划线、句话、冒号,不能以“/”开头。
name属性,就可以使用很多特殊字符,比如在Spring和Struts1或Spring MVC的整合中,就得使用name属性来定义bean的名称。
<bean name="/login" class="xx.web.action.LoginAction" />
注意:从Spring3.1开始,id属性不再是ID类型了,而是String类型,也就是说id属性也可以使用“/”开头了,而bean元素的id的唯一性由容器负责检查。
<bean id="/login" class="xx.pss.web.action.LoginAction" />
当然也可以使用name属性为<bean/>元素起多个别名,多个别名之间使用逗号或空格隔开,在代码中依然使用BeanFactory对象.getBean(...)方法获取。
<bean name="hello,hi" class="xx.day1._01_hello.HelloWorld"/> 或
<bean name="hello hi" class="xx.day1._01_hello.HelloWorld"/>
建议:bean起名尽量规范,尽量使用id。
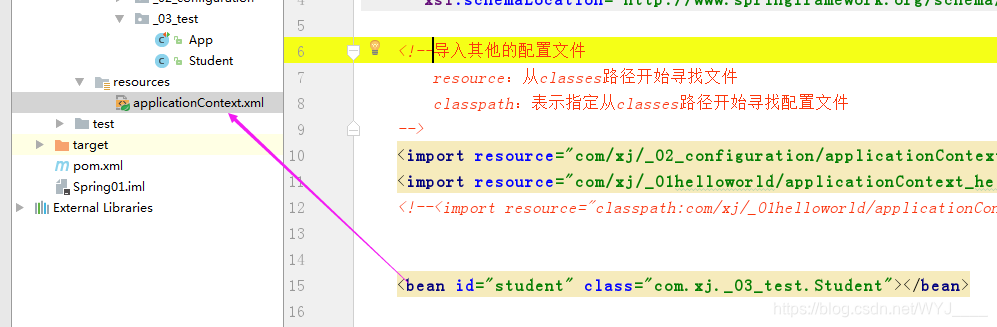
2.import标签
在实际开发中,随着应用规模的增加,系统中<bean>元素配置的数量也会大量增加,导致applicationContext.xml配置文件变得非常臃肿。 为了避免applicationContext.xml文件过于庞大、臃肿,为提高其可读性,我们可以将一个applicationContext.xml文件分解成多个配置文件,然后在applicationContext.xml文件中包含其他配置文件即可。 使用import元素引入其他的配置文件
准备数据:添加依赖
    <build>
        <!--从哪个地方加载配置文件-->
        <resources>
            <resource>
                <directory>src/main/java</directory>
                <includes>
                    <include>**/*.properties</include>
                    <include>**/*.xml</include>
                </includes>
            </resource>
            <resource>
                <directory>src/main/resources</directory>
                <includes>
                    <include>**/*.properties</include>
                    <include>**/*.xml</include>
                </includes>
            </resource>
        </resources>
    </build>
将之前在applicationContext.xml中的配置,拷贝到各自的配置文件中

使用import在applicationContext.xml中导入其他配置文件

分别进行测试,都能够得到对象
使用import元素注意:
1、默认情况下,从classpath的跟路径寻找。
2、可以使用前缀来定位文件的基础位置:
①:[classpath:]:后面的文件从classpath路径开始找(推荐);
②:[file:]:后面的文件使用文件系统的路径开始找;
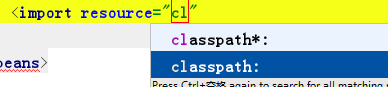
注:classpath只能寻找到自己项目中配置的文件;classpath*既包含我们自己写的classes路径下的配置文件,也包含其他第三方jar包当中的Spring配置文件
七、Spring的测试框架
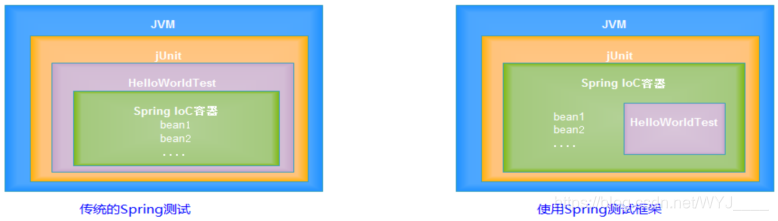
传统的测试和使用Spring的测试框架的区别:
传统测试存在问题:
1,每个测试都要重新启动Spring容器,启动容器的开销大,测试效率低下。
2,不应该是测试代码管理Spring容器,应该是Spring容器在管理测试代码。
1、在pom.xml中导入相关的依赖(在前面的基础上进行添加)
    <properties>
        <!--定义全局变量,变量名为:project.spring.version-->
        <project.spring.version>5.0.0.RELEASE</project.spring.version>
    </properties>

        <!--Spring-test-->
        <dependency>
            <groupId>org.springframework</groupId>
            <artifactId>spring-test</artifactId>
            <version>${project.spring.version}</version>
        </dependency>
        <!--Spring-expression-->
        <dependency>
            <groupId>org.springframework</groupId>
            <artifactId>spring-expression</artifactId>
            <version>${project.spring.version}</version>
        </dependency>
        <!--Spring-context-->
        <dependency>
            <groupId>org.springframework</groupId>
            <artifactId>spring-context</artifactId>
            <version>${project.spring.version}</version>
        </dependency>
        <!--Spring-aop-->
        <dependency>
            <groupId>org.springframework</groupId>
            <artifactId>spring-aop</artifactId>
            <version>${project.spring.version}</version>
        </dependency>
2、创建实体类

3、在applicationContext中完成配置
4、编写测试类
//RunWith:使当前类以Spring测试的方式运行
@RunWith(SpringJUnit4ClassRunner.class)
//ContextConfiguration:读取配置文件,默认情况下也是从classes路径开始读取配置文件
@ContextConfiguration("classpath:applicationContext.xml")
public class App {

    @Autowired
    private Student student;

    @Test
    public void testStudent(){
        System.out.println(student);
    }

}
5、执行结果

还可以注入一个BeanFactory对象,然后就可以调用getBean方法
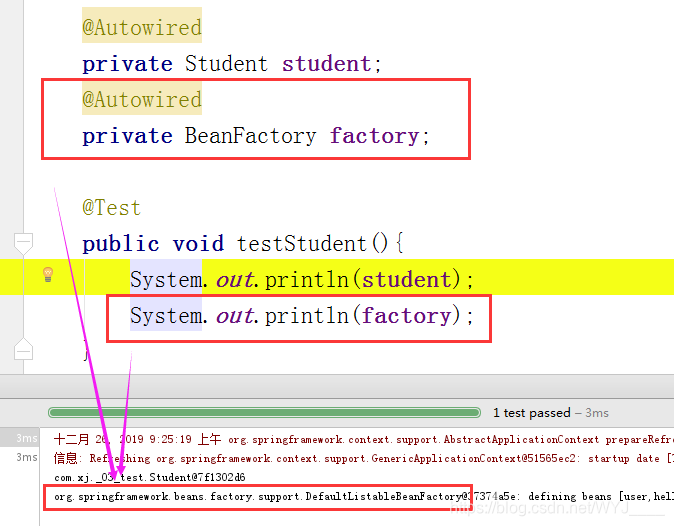
简化操作

但是运行的时候会报错。因为它会在测试类同一个文件夹下寻找一个默认的配置文件,但是并没有写,所以需要加上。
进行配置
<bean id="student" class="com.xj._03_test.Student"></bean>在进行测试,同前面测试出来的结果一样
小结: 使用spring测试框架的步骤
1)添加依赖的jar包
2)在测试类中添加@RunWith(SpringJUnit4ClassRunner.class)注解,表示:测试类以Spring测试的方式执行.
3)测试类添加@ContextConfiguration("classpath:applicationContext.xml")注解,表示:执行测试方法时,在classpath路径 中按照applicationContext.xml配置文件中的配置创建对象.
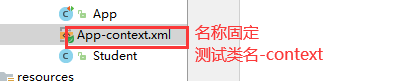
当只添加@ContextConfiguration注解时,测试对象会按照默认的配置文件创建对象.默认的配置文件为:测试类同一目录中,名字为"测试类名-context.xml"的配置文件.
八、Spring的IoC容器
Spring的容器对象:BeanFactory和ApplicationContext对象.
BeanFactory:是Spring中最底层的接口,只提供了最简单的IoC功能,负责配置,创建和管理bean。
在实际开发中,一般不使用BeanFactory,而推荐使用ApplicationContext(应用上下文),原因如下。
1、ApplicationContext继承了BeanFactory,拥有了基本的IoC功能;
2、除此之外,ApplicationContext还提供了以下的功能:
①、支持国际化;
②、支持消息机制;
③、支持统一的资源加载;
④、支持AOP功能;
ApplicationContext常见实现类:ClassPathXmlApplicationContext:读取classpath中的资源.
使用BeanFactory和ApplicationContext
创建一个测试类(直接使用上面在applicationContext.xml中配置的Student类)
public class App {

    @Test
    public void testBeanFactory(){
        Resource resource = new ClassPathResource("applicationContext.xml");
        BeanFactory beanFactory = new XmlBeanFactory(resource);
        Student student = beanFactory.getBean(Student.class);
        System.out.println(student);
    }

    @Test
    public void testApplicationContext(){
        ApplicationContext context = new ClassPathXmlApplicationContext("applicationContext.xml");
        Student student = context.getBean(Student.class);
        System.out.println(student);
    }
}bean的创建时机:
1.BeanFactory需要等到拿bean的时候才会创建bean
2.ApplicationContext在加载的时候就会创建所有的bean(Web应用建议),在启动Tomcat时,创建好所有的bean对象.
如果想手动定义是否延迟创建,可以添加一个标签lazy-init,这个只针对当前bean,如果想全部的话,可以在文件的头文件里面添加default-lazy-init标签
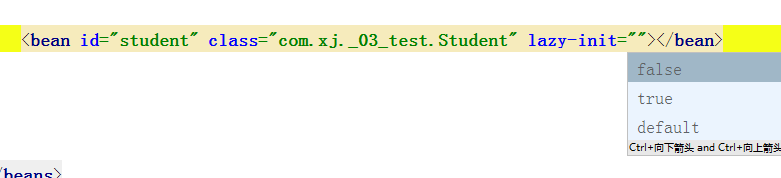
false:不延迟
true:延迟
default:使用哪个容器,就默认哪个容器的默认行为
小结:
1.在开发中,通常使用ApplicationContext作为容器对象使用
2.ApplicationContext在加载配置文件时,就会创建出多有的对象.
3.可对ApplicationContext对象创建对象的时机进行延迟配置).
九、Spring实例化对象
bean的实例化方式:
①.构造器实例化(无参数构造器,与构造器的访问权限无关),最标准,使用最多。
②.静态工厂方法实例化:
③.实例工厂方法实例化:
④.实现FactoryBean接口实例化:实例工厂变种:集成其他框架使用:SqlSessionFactoryBean
1.第一种方式
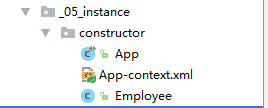
public class Employee {
    public Employee(){
        System.out.println("构造函数的实例化方式");
    }
}
<bean id="employee" class="com.xj._05_instance.constructor.Employee"></bean>@RunWith(SpringJUnit4ClassRunner.class)
@ContextConfiguration
public class App {
@Autowired
private ApplicationContext context;
@Test
public void testConstructor(){
Employee employee = context.getBean(Employee.class);
System.out.println(employee);
}
}
注:1.一定是无参构造,有参构造会报错;2.跟构造函数的访问权限无关
2.第二种方式
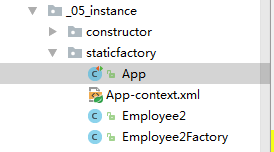
public class Employee2 {
}
public class Employee2Factory {
public static Employee2 getObject(){
System.out.println("静态工厂实例化对象");
return new Employee2();
}
} <bean id="employee2" class="com.xj._05_instance.staticfactory.Employee2Factory"
factory-method="getObject"></bean>@RunWith(SpringJUnit4ClassRunner.class)
@ContextConfiguration
public class App {
@Autowired
private ApplicationContext context;
@Test
public void testStaticfactory(){
Employee2 employee2 = context.getBean(Employee2.class);
System.out.println(employee2);
}
}
3.第三种方式
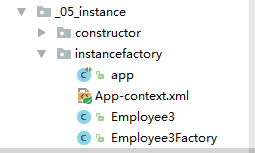
public class Employee3 {
}
public class Employee3Factory {
    public Employee3 getObject(){
        System.out.println("实例工厂方式创建对象");
        return new Employee3();
    }
}
<bean id="factory" class="com.xj._05_instance.instancefactory.Employee3Factory"></bean>
<bean id="employee3" factory-method="getObject" factory-bean="factory"></bean>@RunWith(SpringJUnit4ClassRunner.class)
@ContextConfiguration
public class app {
@Autowired
private ApplicationContext context;
@Test
public void testInstancefactory(){
Employee3 employee3 = context.getBean(Employee3.class);
System.out.println(employee3);
}
}![]()
4.第四种方式
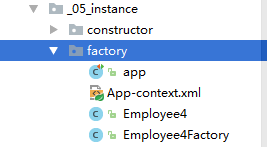
public class Employee4 {
}
public class Employee4Factory implements FactoryBean{
    public Employee4 getObject(){
        System.out.println("实现了FactoryBean接口的创建对方式");
        return new Employee4();
    }

    public Class<?> getObjectType() {
        return Employee4.class;
    }
}
<bean id="employee4" class="com.xj._05_instance.factory.Employee4Factory"></bean>@RunWith(SpringJUnit4ClassRunner.class)
@ContextConfiguration
public class app {
@Autowired
private ApplicationContext context;
@Test
public void testFactory(){
Employee4 employee4 = context.getBean(Employee4.class);
System.out.println(employee4);
}
}小结:
1.bean实例化的四种方式当中,必须掌握的是使用构造器的方式创建对象.该方式也是使用最多的一种方式
2.其次需要掌握实现FactoryBean接口的实例化方式,该方式在开发与Spring集成的桥梁框架时使用较多,例如在mybatis与Spring继承的桥梁框架中.
3.剩余的两种方式,作为了解.在开发中几乎不会遇到.
4.BeanFactory和FactoryBean 的区别:
BeanFactory:Spring的容器对象,本质是一个factory,是Spring管理对象的工厂
FactoryBean:是Spring框架的一个接口,本质是一个bean,用来约束创建对象的工厂的的行为.
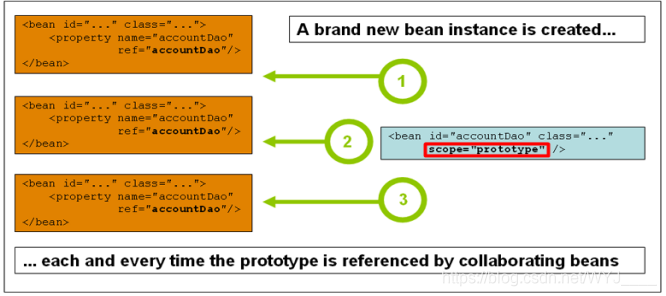
十、对象的作用域
bean的作用域:指的是一个bean对象可以存活多久,通过bean元素的scope属性来指定.
<bean id="" class="" scope="作用域"/>
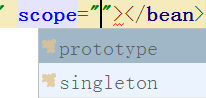
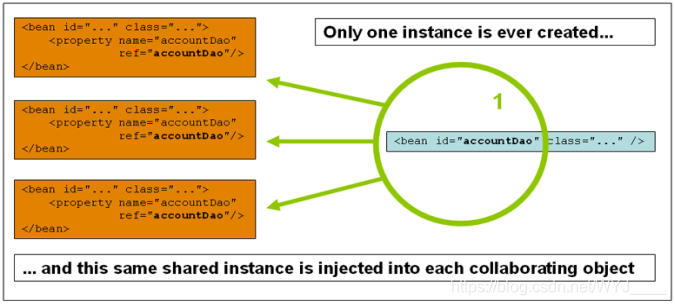
singleton: 单例 ,在Spring IoC容器中仅存在一个Bean实例 (默认的scope)
prototype: 多例 ,每次从容器中调用Bean时,都返回一个新的实例,即每次调用getBean()时 ,相当于执行new
示例
public class SomeBean {
}
1、使用单例
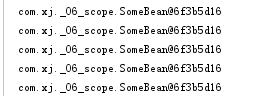
<bean id="somebean" class="com.xj._06_scope.SomeBean" scope="singleton"></bean>@RunWith(SpringJUnit4ClassRunner.class)
@ContextConfiguration
public class App {
@Autowired
private ApplicationContext context;
@Test
public void testScope(){
System.out.println(context.getBean(SomeBean.class));
System.out.println(context.getBean(SomeBean.class));
System.out.println(context.getBean(SomeBean.class));
System.out.println(context.getBean(SomeBean.class));
System.out.println(context.getBean(SomeBean.class));
}
}
2、使用多例
<bean id="somebean" class="com.xj._06_scope.SomeBean" scope="prototype"></bean>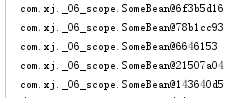
小结:
1.scope属性用于表示Spring创建出的对象的作用域.
2.只需要掌握scope值为"singleton"和"prototype"两种情况.分别表示Spring创建出的对象为"单例"和"多例"
3.Scope的默认值为单例
4.在Struts2框架中,Action对象应创建为多例.
十一、对象的生命周期
public class SomeBean {
    public SomeBean(){
        System.out.println("对象创建了.....");
    }
    public void init(){
        System.out.println("对象初始化.....");
    }
    public void  work(){
        System.out.println("对象的正常工作.....");
    }
    public void  destory(){
        System.out.println("对象销毁.....");
    }
}
<bean id="somebean" class="com.xj._07_lifecycle.SomeBean"></bean>@RunWith(SpringJUnit4ClassRunner.class)
@ContextConfiguration
public class App {
@Autowired
private ApplicationContext context;
@Test
public void testLifecycle(){
SomeBean someBean = context.getBean(SomeBean.class);
someBean.work();
}
}
init-method:bean生命周期初始化方法,对象创建后就进行调用
destroy-method:容器被销毁的时候,如果bean被容器管理,会调用该方法。
default-init-method,default-destroy-method.配置文件中所有的bean元素的初始化方法和销毁方法
    <bean id="somebean" class="com.xj._07_lifecycle.SomeBean"
           init-method="init" destroy-method="destory"></bean>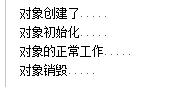
如果bean的scope="prototype",那么容器只负责创建和初始化,销毁方法它并不会被spring容器管理。交给用户自己调用. 当bean的scope="prototype"时,Spring容器在启动时,并不会将创建出来的对象放在容器当中.而是在每次获取对象时,都来创建一个新的对象.因此,在容器销毁的时候,并不知道要销毁该对象.因此就不会调用对象的销毁方法.
    <bean id="somebean" class="com.xj._07_lifecycle.SomeBean"
           init-method="init" destroy-method="destory"
           scope="prototype"></bean>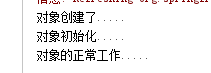


 25万+
25万+

 被折叠的 条评论
为什么被折叠?
被折叠的 条评论
为什么被折叠?
 到【灌水乐园】发言


