


项目实践:图像分类
学习目标
本课程将引导你通过构建一个图像分类模型来深入理解TensorFlow的使用。你将学习如何处理复杂的图像数据集,如CIFAR-10,以及如何使用TensorFlow构建、训练和评估模型。
相关知识点
- 图像分类
学习内容
1 图像分类
1.1 TensorFlow基础
在开始构建图像分类模型之前,了解TensorFlow的基本概念和操作是至关重要的。TensorFlow是一个开源的机器学习框架,它允许开发者构建和训练各种类型的机器学习模型。TensorFlow的核心是计算图,它定义了数据流和计算过程。在TensorFlow中,所有的计算都是通过计算图来完成的,计算图中的节点表示计算操作,边表示数据流。
TensorFlow支持多种编程语言,但最常用的是Python。在Python中,你可以使用TensorFlow库来定义计算图、执行计算、管理数据等。TensorFlow还提供了高级API,如Keras,它简化了模型的构建和训练过程。
安装TensorFlow
在开始之前,确保你的环境中已经安装了TensorFlow。你可以使用以下命令来安装TensorFlow:
%pip install tensorflow
创建计算图
在TensorFlow中,计算图是通过定义张量(Tensor)和操作(Operation)来构建的。张量是TensorFlow中的基本数据结构,可以理解为多维数组。操作则是对张量进行的计算。
import tensorflow as tf

# 创建一个常量张量
a = tf.constant(2)
b = tf.constant(3)

# 定义一个加法操作
c = a + b

# 直接获取结果并打印
print(c.numpy())  # 输出 5
1.2 图像数据集处理
处理图像数据集是图像分类任务中的重要步骤。我们将使用CIFAR-10数据集,它包含60,000张32x32的彩色图像,分为10个类别,每个类别6,000张图像。我们将学习如何加载、预处理和增强这些图像数据。
下载并加载CIFAR-10数据集
!wget https://model-community-picture.obs.cn-north-4.myhuaweicloud.com/ascend-zone/notebook_datasets/038ae1b2313311f0800cfa163edcddae/cifar-10-python.tar.gz
!tar -xzf cifar-10-python.tar.gz
import numpy as np
import pickle
import os

def unpickle(file):
    """加载 CIFAR-10 数据集的单个文件"""
    with open(file, 'rb') as fo:
        dict = pickle.load(fo, encoding='bytes')
    return dict

def load_cifar10_data(data_dir):
    """加载 CIFAR-10 数据集"""
    train_data = []
    train_labels = []
    for i in range(1, 6):
        file_path = os.path.join(data_dir, 'data_batch_{}'.format(i))
        data_dict = unpickle(file_path)
        train_data.append(data_dict[b'data'])
        train_labels.extend(data_dict[b'labels'])

    train_data = np.concatenate(train_data, axis=0)
    train_labels = np.array(train_labels)

    test_data_dict = unpickle(os.path.join(data_dir, 'test_batch'))
    test_data = test_data_dict[b'data']
    test_labels = np.array(test_data_dict[b'labels'])

    # 调整数据形状
    train_data = train_data.reshape(-1, 3, 32, 32).transpose(0, 2, 3, 1)
    test_data = test_data.reshape(-1, 3, 32, 32).transpose(0, 2, 3, 1)

    return (train_data, train_labels), (test_data, test_labels)

# 指定数据集的本地路径
data_dir = './cifar-10-batches-py'

# 加载数据集
(x_train, y_train), (x_test, y_test) = load_cifar10_data(data_dir)

# 计算前50%数据的索引
num_train_samples = x_train.shape[0]
num_test_samples = x_test.shape[0]

train_split_idx = int(num_train_samples * 0.5)
test_split_idx = int(num_test_samples * 0.5)

# 只取前50%的数据
x_train = x_train[:train_split_idx]
y_train = y_train[:train_split_idx]

x_test = x_test[:test_split_idx]
y_test = y_test[:test_split_idx]

# 查看数据集的形状
print("Subset training data shape:", x_train.shape)
print("Subset test data shape:", x_test.shape)
数据预处理
在训练模型之前,我们需要对数据进行预处理,包括归一化和标签编码。归一化可以将像素值缩放到0到1之间,标签编码则是将类别标签转换为独热编码(One-Hot Encoding)。
# 归一化
x_train = x_train / 255.0
x_test = x_test / 255.0

# 标签编码
from tensorflow.keras.utils import to_categorical

y_train = to_categorical(y_train, 10)
y_test = to_categorical(y_test, 10)
数据增强
数据增强是一种通过生成额外的训练数据来提高模型泛化能力的技术。我们可以使用tf.keras.preprocessing.image.ImageDataGenerator来实现数据增强。
from tensorflow.keras.preprocessing.image import ImageDataGenerator

# 创建数据增强生成器
datagen = ImageDataGenerator(
    rotation_range=15,
    width_shift_range=0.1,
    height_shift_range=0.1,
    horizontal_flip=True
)

# 拟合训练数据
datagen.fit(x_train)
1.3 模型构建与训练
在处理好数据之后,接下来我们将构建一个卷积神经网络(CNN)模型,并使用CIFAR-10数据集进行训练。我们将使用Keras API来构建模型,Keras提供了简单易用的接口来定义和训练模型。
构建模型
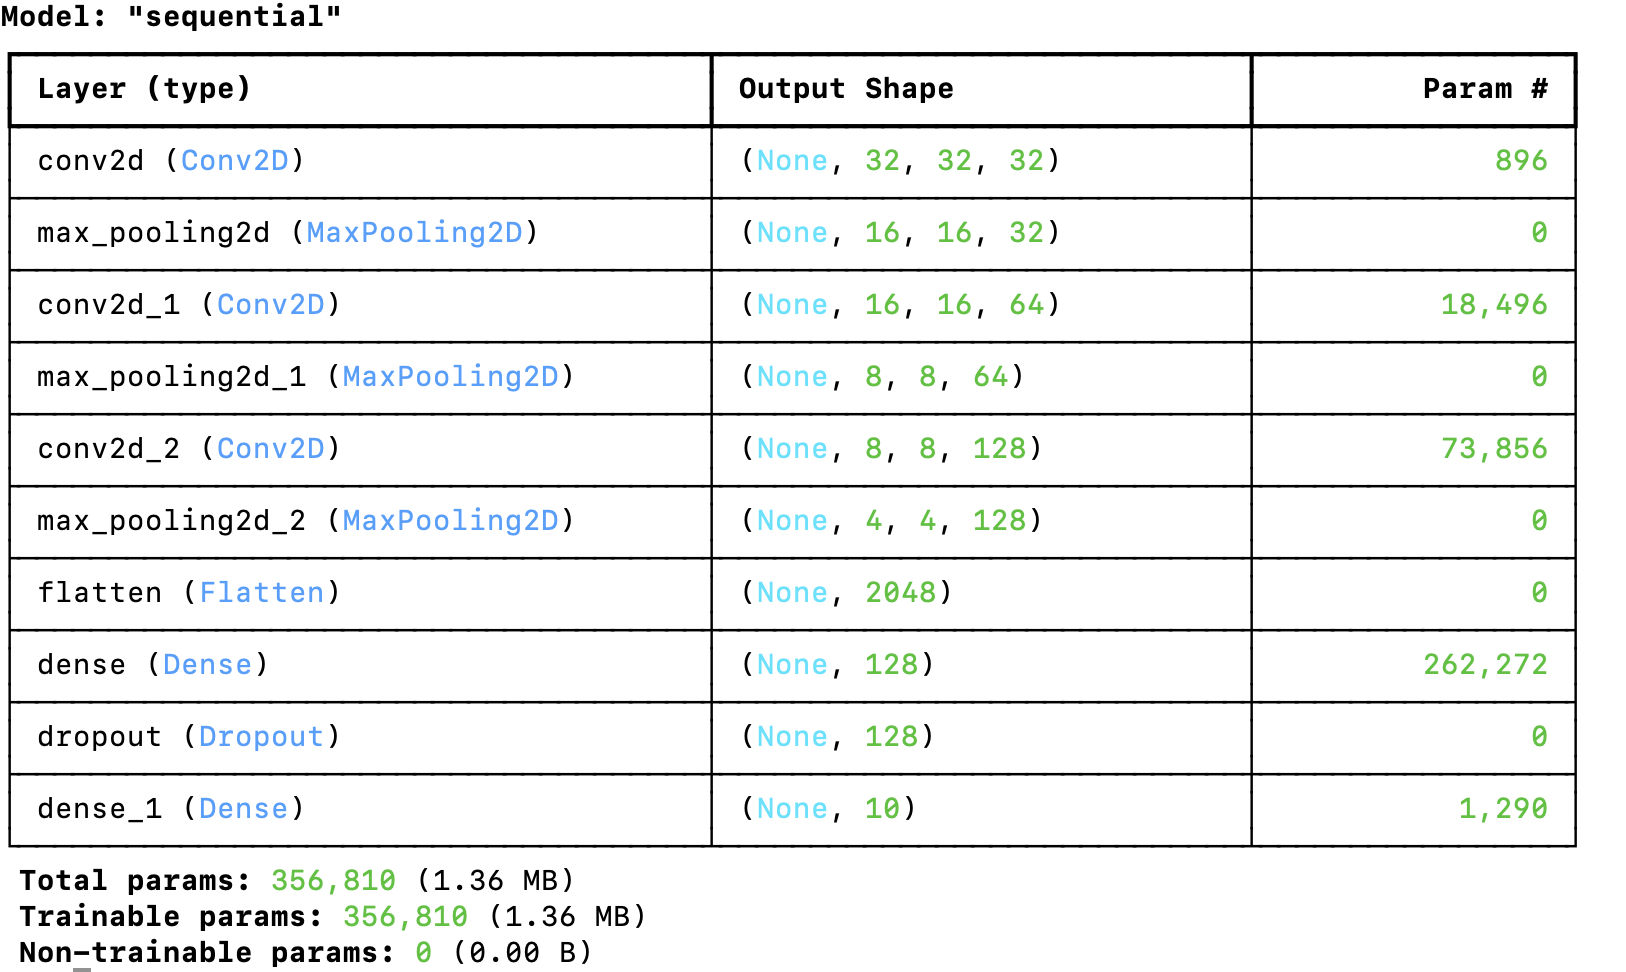
我们将构建一个简单的CNN模型,包括几个卷积层、池化层和全连接层。
from tensorflow.keras.models import Sequential
from tensorflow.keras.layers import Conv2D, MaxPooling2D, Flatten, Dense, Dropout

# 定义模型
model = Sequential([
    Conv2D(32, (3, 3), activation='relu', padding='same', input_shape=(32, 32, 3)),
    MaxPooling2D((2, 2)),
    Conv2D(64, (3, 3), activation='relu', padding='same'),
    MaxPooling2D((2, 2)),
    Conv2D(128, (3, 3), activation='relu', padding='same'),
    MaxPooling2D((2, 2)),
    Flatten(),
    Dense(128, activation='relu'),
    Dropout(0.5),
    Dense(10, activation='softmax')
])

# 编译模型
model.compile(optimizer='adam', loss='categorical_crossentropy', metrics=['accuracy'])

# 查看模型结构
model.summary()
训练模型
使用数据增强生成器来训练模型,可以提高模型的泛化能力。
# 训练模型
history = model.fit(datagen.flow(x_train, y_train, batch_size=64),
                    epochs=5,
                    validation_data=(x_test, y_test))
评估模型
训练完成后,我们需要评估模型在测试集上的性能。
# 评估模型
test_loss, test_acc = model.evaluate(x_test, y_test)
print("Test accuracy:", test_acc)


 968
968

 被折叠的 条评论
为什么被折叠?
被折叠的 条评论
为什么被折叠?
 到【灌水乐园】发言


