


学习参考UP主 我是土堆
文章目录
1. 目标检测含义
目标检测:位置+类别
主流的目标检测:矩阵框形式输出
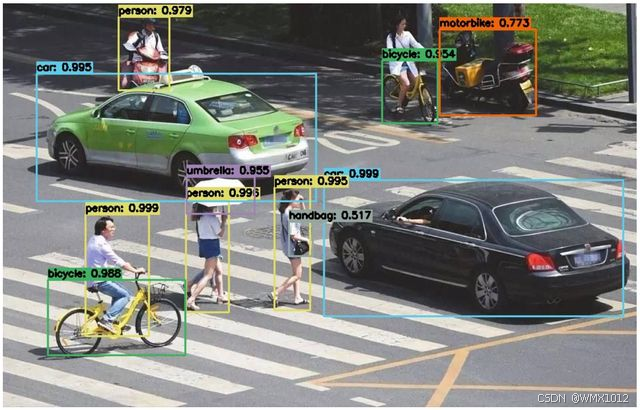
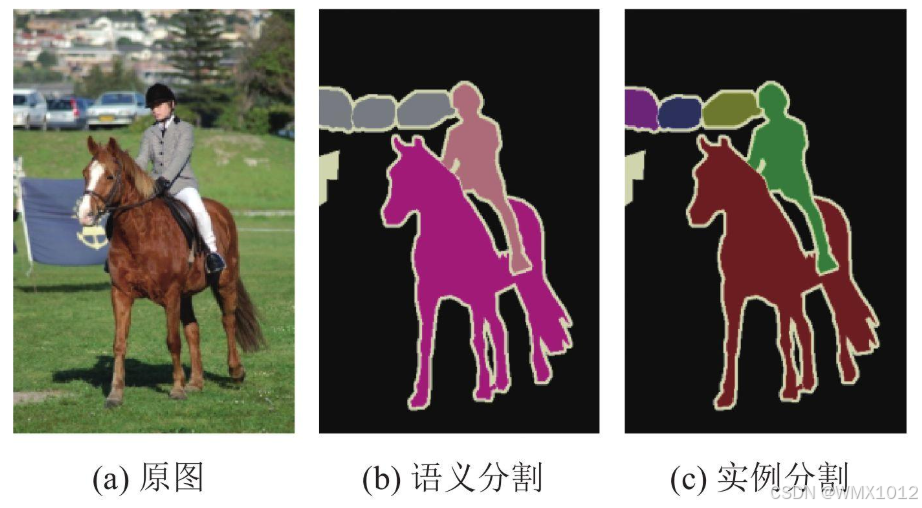
精度更高:
语义分割:区别类别
实例分割:区别个体
2. 数据集
2.1 VOC数据集
2.1.1 数据集下载
方法一:官网下载
VOC数据集官网
2007和2012比较常用

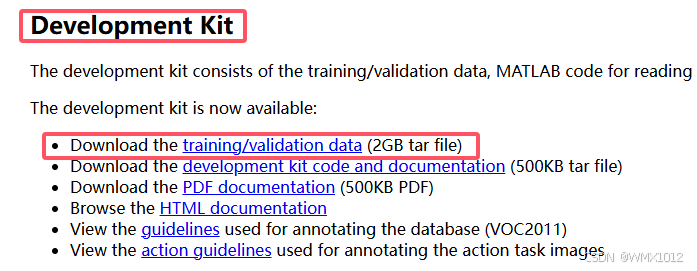
打开某一年的文件,找到Development Kit
方法二:pytorch下载
pytorch官网上查看想要的数据集
具体方法见6.1下载数据集
2.1.2 数据集说明
图片在线查看工具
https://www.gifgit.com/image/rectangle-tool
VOC数据集说明:
Annotations:包含了xmI文件,描述了图片的各种信
息,特别是目标的位置坐标,左上角坐标和右下角坐标
ImageSets:主要关注Main文件夹的内容,里面的文
件包含了不同类别目标的训练/验证数据集图片名称
JPEGImages:原图片
SegmentationClass/Object:用于语义分割
2.2 COCO数据集
2.2.1 数据集下载
COCO数据集官网
常用数据集是2017
训练集train2017
训练集train2017:http://images.cocodataset.org/zips/train2017.zip
训练集标注train2017 annotations:http://images.cocodataset.org/annotations/annotations_trainval2017.zip
验证集val2017
val2017:http://images.cocodataset.org/zips/val2017.zip
val2017 annotations:http://images.cocodataset.org/annotations/stuff_annotations_trainval2017.zip
测试集test2017
test2017:http://images.cocodataset.org/zips/test2017.zip
test2017 info:http://images.cocodataset.org/annotations/image_info_test2017.zip
2.2.2 数据集说明
Annotations:包含了json文件,描述了图片的各种信
息
将json文件拖入pycharm界面,按两下shift,选择Actions,搜索Reformats Code,点击后格式就清晰了
重要信息如下:
1)图片部分
id与标注部分image id一致
images[
{"id”: 242287
"license":4,
"coco url":"http://images.cocodataset.org/val2017/088008242287 .jpg",
"flickr url":
"http://farm3.staticflickr.com/2626/4072194513 edbбacfb2b z.jpg"
"width": 426,
"height": 648,
"file name": “e08000242287.jpg"
"date captured":"2013-11-15 82:41:42
}
]
2)标注部分
"annotations": [
{"id": 125686,
//类别为2
"category_id":2,
//单个对象
"iscrowd": 0,
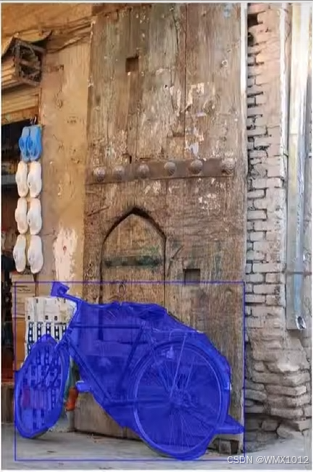
"segmentation":
//自行车蓝色框边缘的坐标(这行太长,只有部分内容)
[[164,164.81,417.51,164.81,417,51,159.31,409.27,159.31,409.27.155.19,409,27,155.19,418.64,152.45,413.39,144.21,413.39,140.09,413.39,137.34,413.39,134.59,414...]]
"image id": 242287,
// 自行车蓝色框区域像素大小
"area: 42061.80348808801,
// 自行车蓝色矩形框,左上角坐标,宽度,长度
"bbox”:[19.23,383.18,314.5,244.46]
}
{"id": 902288245915
"category_id": 22,
//群体
"iscrowd":1,
segmentation":{
"size":[333,500],
//每行扫描,记录不关心的像素长度和关心的像素长度(这行太长,只有部分内容)
"counts”:[26454,2,651,3,13,1,313
},
"image id": 245915,
"area”: 3188,
"bbox”:[79,127,140,57]
}
]
图片大小:64*64
"counts”:[147,3,1…]
3)类别
categories":[
{"supercategory": "vehicle"
“id”:2,
"name": "bicycle”
}
]
2.3 标注数据集
网页在线标注:
https://www.makesense.ai/
https://www.cvat.ai/(导出数据类型较多,较为推荐)
软件本地标注:
精灵标注助手(可以导出VOC数据格式,无COCO数据格式)
3. 加载数据集
3.1 pytorch查看COCO数据集
pytorch官网上查看数据集代码
classtorchvision.datasets.CocoDetection(root: Union[str, Path], annFile: str, transform: Optional[Callable] = None, target_transform: Optional[Callable] = None, transforms: Optional[Callable] = None)
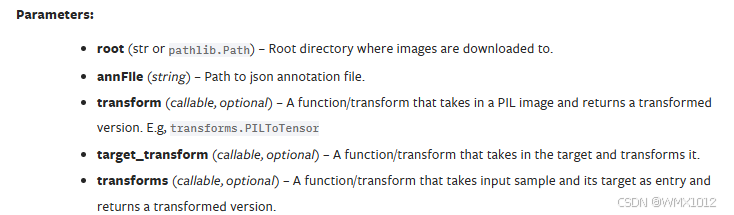
前提条件:
1)已配置好pytorch环境
2)熟悉数组,列表,字典
3)已安装pycocotools包
pip install pycocotools
安装失败可参考博文里的前提条件
查看数据集代码如下:
import torchvision
from PIL import ImageDraw


# root=数据集图片文件夹路径,annFile=数据集标注json文件路径,transform=torchvision.transforms.ToTensor()将图片PIL类型转为tensor类型


coco_dataset = torchvision.datasets.CocoDetection(root=r"C:\Users\PC\Downloads\val2017",
                                                annFile=r"C:\Users\PC\Downloads\annotations_trainval2017\annotations\instances_val2017.json")


print(coco_dataset[0])
image,info =coco_dataset[0]
image.show()    #原始图片

image_handler=ImageDraw.ImageDraw(image)    #PIL库提供的ImageDraw画出图片标注
for annotation in info:
    x_min,y_min,width,height =annotation['bbox']
    # 'bbox'对应的值是list数组 [x_min,y_min,width,height]
    image_handler.rectangle(((x_min, y_min), (x_min + width, y_min + height)))

image.show()    #带有目标标注框的图片
3.2 Pytorch读取自己标注的数据集
1)按照上述标注数据集的方式,标注好图片
2)将自己数据集的原始图片文件夹路径与标注路径替换上述代码路径即可


 800
800

 被折叠的 条评论
为什么被折叠?
被折叠的 条评论
为什么被折叠?
 到【灌水乐园】发言


