 LabVIEW调用OpenCV实现AI生图实战


文章目录
前言
- 需要下载安装OpenCV工具包的朋友,请前往 此处 ;
- 系统要求:Windows系统,LabVIEW>=2018,兼容32位和64位。
一、背景介绍
- 据说现在 AIGC 很火,那么我也来凑凑热闹吧,就以 Stable Diffusion v1-5 的文生图为例;
- 但实话实说,OpenCV 实非做大语言模型的首选工具。因为在整个 AI 生图过程中,OpenCV 能够提供的便利仅仅是 dnn 推理的 API,而与之配套的外围算法:分词器、调度器等,都需要自己手动实现。这就需要对 SD1.5 的底层逻辑有一定程度的了解;
- 如果您是第一次接触 Stable Diffusion 的 AI 生图,推荐您先阅读下面这篇博文,作为基础;
【番外】03:Python 实现基于 Stable Diffusion 的 AI 生图 - 硬件环境:32GB 内存 + 6~8GB 显存;
- 软件环境:LabVIEW + OpenCV工具包,并且推荐改造为 CUDA 加速版,详见 教程(21);
- 准备好,接下来我要讲一个很长很长的故事。如果您没有耐心看完,可以直接从下面的网盘链接获取最终的成果。
https://pan.baidu.com/s/1WVoZx0B6FmEGdd1p5O-krg?pwd=btag
二、模型转换
首要的任务,就是将 Stable Diffusion 各个模块转换成 ONNX 格式,以便使用 OpenCV 的 dnn 模块进行推理。需要转换的模型有三个:Text Encoder、UNet、VAE。另外还有一个 Safety Checker,由于是非必须模块,本例将其省略。
需要注意的是,OpenCV 的 dnn::readNetFromONNX 接口比较 “另类”,并非适用于所有的 ONNX 模型。为了能够与之适配,本例在做 ONNX 转换时,采取了一些 非常规手段。
转换环境: Python >= 3.8 + PyTorch >= 2.0 + 安装如下模块
pip install diffusers transformers onnx -i https://mirrors.aliyun.com/pypi/simple/
1. 载入模型
从 SD1.5 模型中,分离出 Text Encoder、UNet、VAE 三个模块,有两种方法。
其一,先完整载入整个 pipeline,然后再进行分离。代码如下:
import torch
from diffusers import StableDiffusionPipeline

repo_id = "stable-diffusion-v1-5/stable-diffusion-v1-5"
pipe = StableDiffusionPipeline.from_pretrained(repo_id, cache_dir="D:/myCache/")

text_model = pipe.text_encoder
vae_model  = pipe.vae
unet_model = pipe.unet
其二,从各个模块的本地文件夹路径,分别独立载入。代码如下:
from transformers import  CLIPTextModel
from diffusers import AutoencoderKL, UNet2DConditionModel

text_model_path = "D:/myCache/models--stable-diffusion-v1-5--stable-diffusion-v1-5/snapshots/451f4fe16113bff5a5d2269ed5ad43b0592e9a14/text_encoder"
text_model = CLIPTextModel.from_pretrained(text_model_path)

vae_model_path = "D:/myCache/models--stable-diffusion-v1-5--stable-diffusion-v1-5/snapshots/451f4fe16113bff5a5d2269ed5ad43b0592e9a14/vae"
vae_model = AutoencoderKL.from_pretrained(vae_model_path)

unet_model_path = "D:/myCache/models--stable-diffusion-v1-5--stable-diffusion-v1-5/snapshots/451f4fe16113bff5a5d2269ed5ad43b0592e9a14/unet"
unet_model = UNet2DConditionModel.from_pretrained(unet_model_path)
完成载入后,下面分别进行 ONNX 格式转化。
2. Text Encoder 转 ONNX
- 输入输出
| 输入 | shape | 类型 | 含义 |
|---|---|---|---|
| input_ids | [1 x 77] | int | 由 Tokenizer 返回的字符串 id 序列。 |
| attention_mask | [1 x 77] | int | 注意力掩码,与 input_ids 逐个对应,用 “1” 代表有效位,用 “0” 代表填充位。 如果 attention_mask 设为 None,代表所有位均是有效位,即相当于输入77个 “1” 。 |
| 输出 | shape | 类型 | 含义 |
| last_hidden_state | [1 x 77 x 768] | float | 最后一层隐藏状态矩阵,也就是 Unet 所需的提示词向量 prompt_embeds。 |
| pooler_output | [1 x 768] | float | 由 last_hidden_state 经过池化得到,用于代表整个句子的语义。 |
- 转换代码(默认采用独立载入模块的方式,下同)
import torch
from transformers import CLIPTextModel

text_model_path = "D:/myCache/models--stable-diffusion-v1-5--stable-diffusion-v1-5/snapshots/451f4fe16113bff5a5d2269ed5ad43b0592e9a14/text_encoder"
text_model = CLIPTextModel.from_pretrained(text_model_path)

class TextModel_Wrapper(torch.nn.Module):
    def __init__(self, model):
        super().__init__()
        self.model = model

    def forward(self, input_ids, attention_mask):
        out = self.model.forward(input_ids, attention_mask)
        last_hidden_state = out.last_hidden_state
        # pooler_output = out.pooler_output
        return last_hidden_state

text_model_wrapper = TextModel_Wrapper(text_model)
text_model_wrapper.eval()

input_ids = torch.randint(0, 49408, size=(1,77), dtype=torch.int32)
attention_mask = torch.randint(0, 2, size=(1,77), dtype=torch.int32)

torch.onnx.export(text_model_wrapper,
                  (input_ids, attention_mask),
                  "text_encoder.onnx",
                  opset_version=14,
                  do_constant_folding=True,
                  input_names = ['input_ids', 'attention_mask'],
                  output_names = ['last_hidden_state']
                  )
-
避坑提醒
(1)本例创建了一个新的类 TextModel_Wrapper,用于对 text_model 进行再封装。这是一种通常的手法,当原类的 forward 方法的输入输出不符合实际需要时,就可以通过封装来自定义新的 forward 方法;
(2)在封装类的 forward 中,我们直接舍弃了 pooler_output 这个输出量。之所以这么做,一是因为这个输出量在 SD1.5 的后续模块中并没有被使用;二是因为原类在计算 pooler_output 时用到了 ArgMax 方法,而目前 cuDNN 库中没有与之对应的层,这将导致 OpenCV 在 CUDA 模式下的推理报错。总而言之,舍弃 pooler_output 是必行之策;
(3)作为网络的输入,input_ids 与 attention_mask 要以 “可变张量” 的形式送入模型(比如本例采取了随机数的方式),切不可以设置成常量。输入张量仅仅提供尺寸与类型给 ONNX 转换器作为参考,而其具体的初始值没有任何作用;
(4)OpenCV 不支持动态 batch_size,所有输入输出的张量的 batch_size 都应该为常数,比如 “1” 。在调用 torch.onnx.export() 时,也不应该设置 dynamic_axes 参数。下文其他模型转换也同理。 -
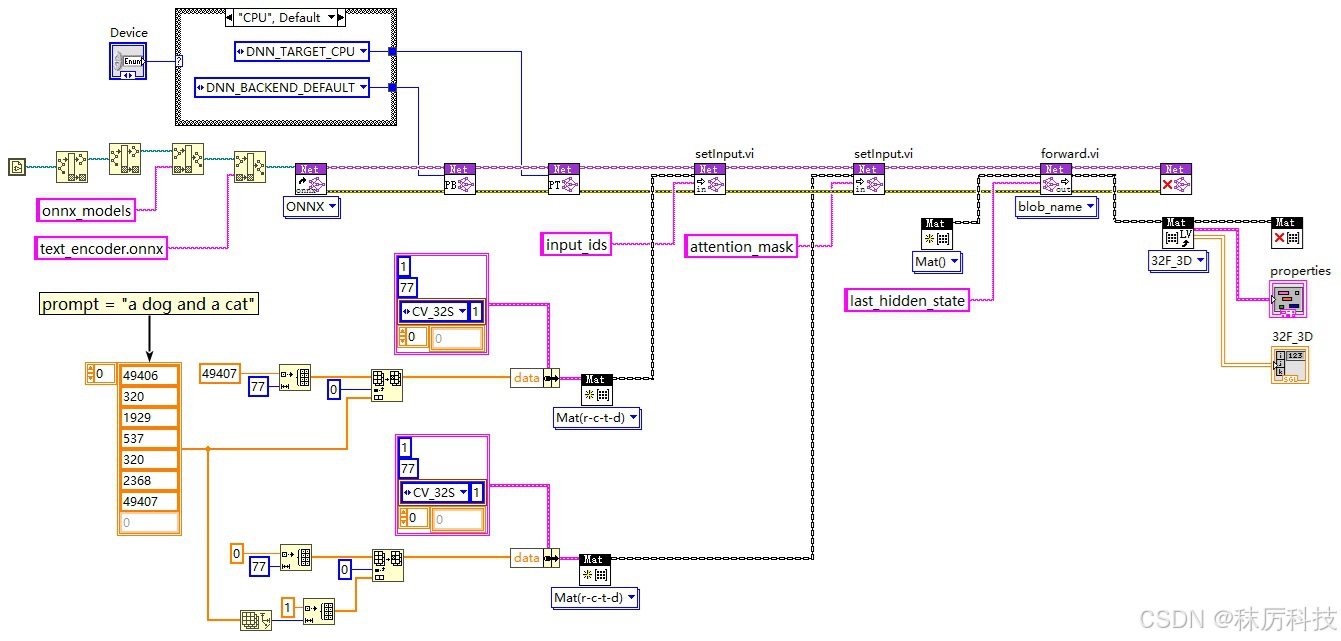
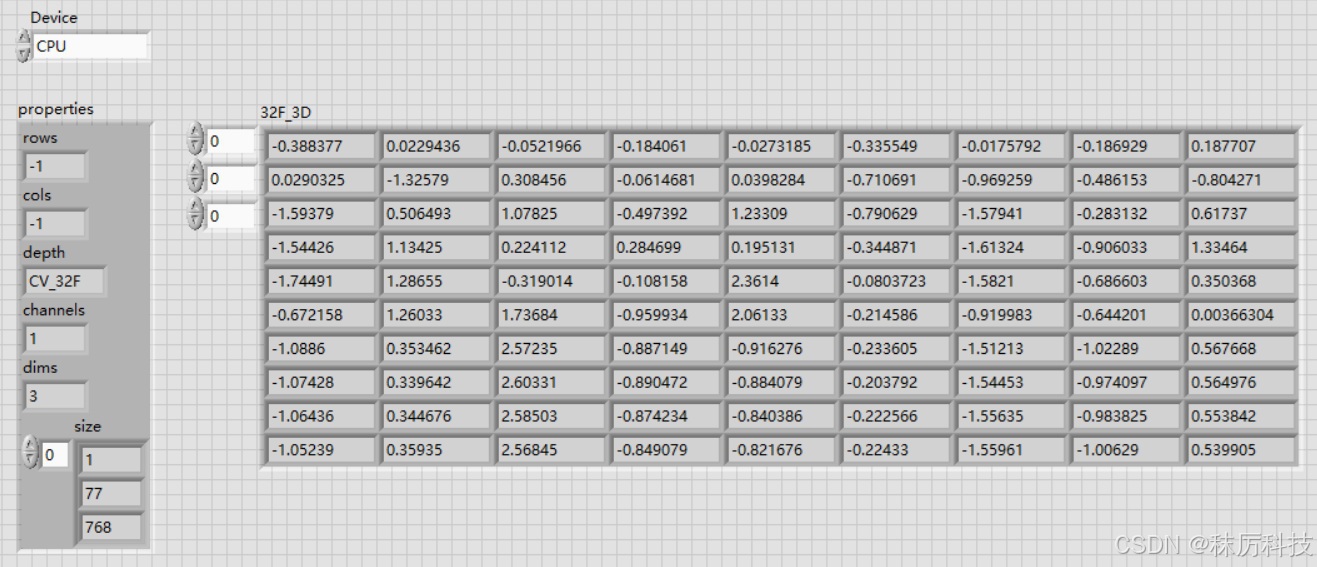
LabVIEW 测试
使用 OpenCV 的 API,对转换的 ONNX 模型进行推理测试,程序框图与运行结果如下:
3. VAE 转 ONNX
VAE 包括两部分:编码器(Encoder)与解码器(Decoder),二者的输入输出互为镜像。
- Encoder 输入输出
| 输入 | shape | 类型 | 含义 |
|---|---|---|---|
| image | [1 x 3 x 512 x 512] | float | 归一化的 RGB 图片,范围 [-1, 1] |
| 输出 | shape | 类型 | 含义 |
| latent | [1 x 4 x 64 x 64] | float | “潜在层图像” |
- Decoder 输入输出
| 输入 | shape | 类型 | 含义 |
|---|---|---|---|
| latent | [1 x 4 x 64 x 64] | float | “潜在层图像” |
| 输出 | shape | 类型 | 含义 |
| image | [1 x 3 x 512 x 512] | float | 归一化的 RGB 图片,范围 [-1, 1] |
- 转换代码
vae_model 自带的 forward 方法,是将输入图片先编码,再直接解码输出,这明显不符合我们的需要。于是我们封装两个新的模型类,分别在自定义的 forward 中单独使用 VAE 的编码和解码功能,相当于将 VAE 切割成了两个模型,编码解码彼此分离。最后再将这两个模型分别转换成 ONNX 格式。
import torch
from diffusers import AutoencoderKL

vae_model_path = "D:/myCache/models--stable-diffusion-v1-5--stable-diffusion-v1-5/snapshots/451f4fe16113bff5a5d2269ed5ad43b0592e9a14/vae"
vae_model = AutoencoderKL.from_pretrained(vae_model_path)

class VAE_Encoder_Model(torch.nn.Module):
    def __init__(self, model):
        super().__init__()
        self.model = model

    def forward(self, image):
        latent = self.model.encode(image).latent_dist.mode()
        return latent

class VAE_Decoder_Model(torch.nn.Module):
    def __init__(self, model):
        super().__init__()
        self.model = model

    def forward(self, latent):
        image = self.model.decode(latent).sample
        return image

image = torch.rand(size=[1,3,512,512],dtype=torch.float32)
latent = torch.rand(size=[1,4,64,64],dtype=torch.float32)

# export the encoder
vae_encoder = VAE_Encoder_Model(vae_model)
vae_encoder.eval()

torch.onnx.export(vae_encoder,
                  image,
                  "vae_encoder.onnx",
                  opset_version=14,
                  do_constant_folding=True,
                  input_names = ['image'],
                  output_names = ['latent']
                  )

# export the decoder
vae_decoder = VAE_Decoder_Model(vae_model)
vae_decoder.eval()

torch.onnx.export(vae_decoder,
                  latent,
                  "vae_decoder.onnx",
                  opset_version=14,
                  do_constant_folding=True,
                  input_names = ['latent'],
                  output_names = ['image']
                  )
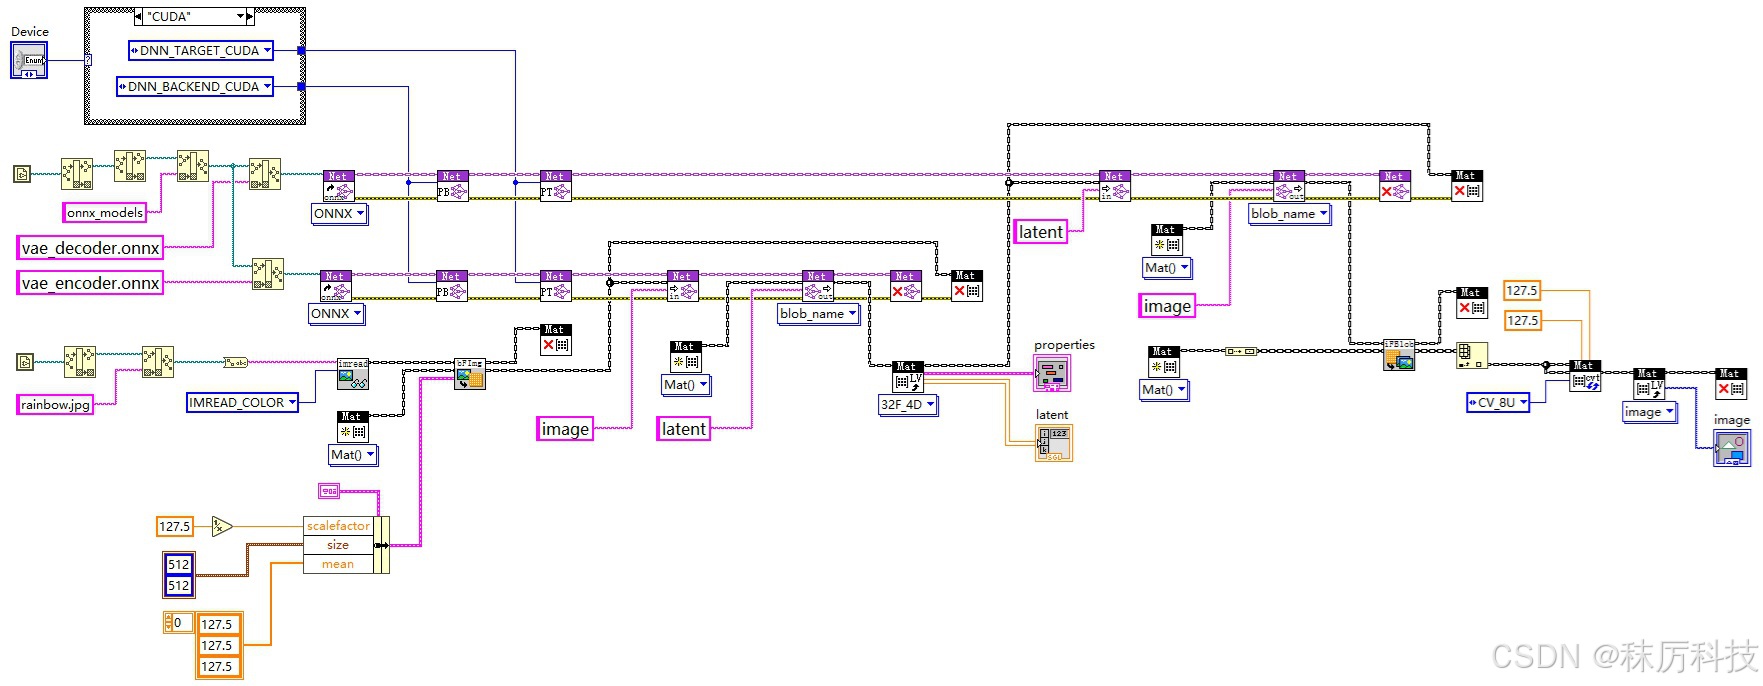
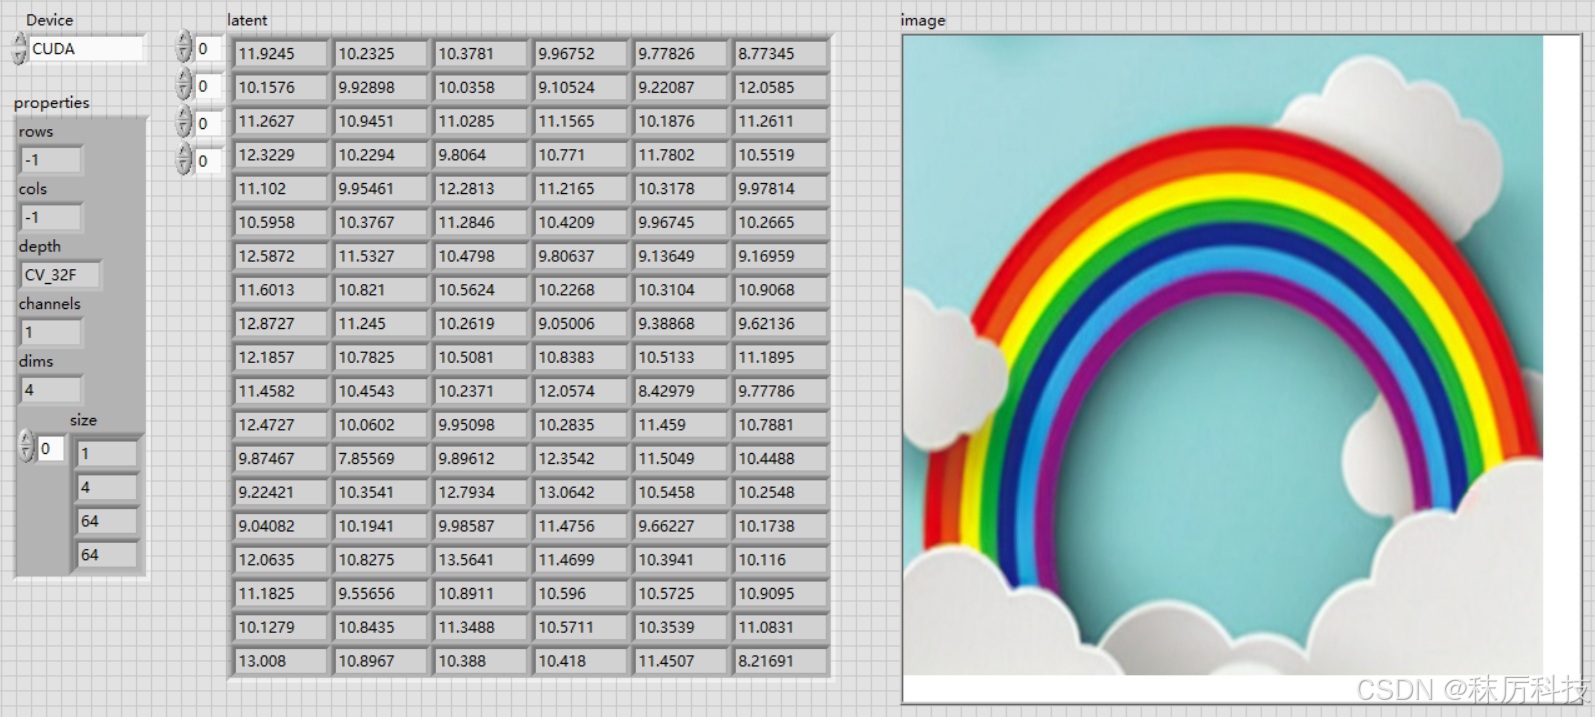
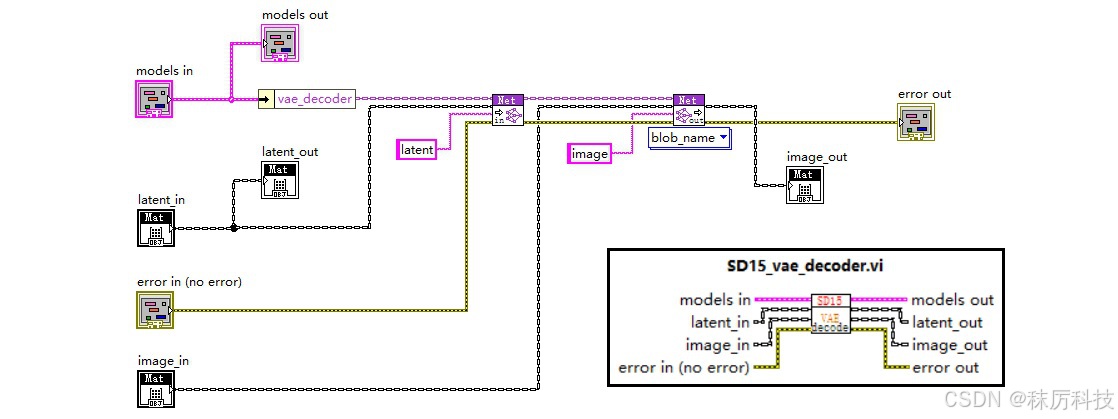
- LabVIEW 测试
使用 OpenCV 的 API,测试 ONNX 格式的 VAE 编码、解码模型,程序框图与运行结果如下:
(后面我们会知道,SD1.5 实际上只用到了 VAE 解码器。)
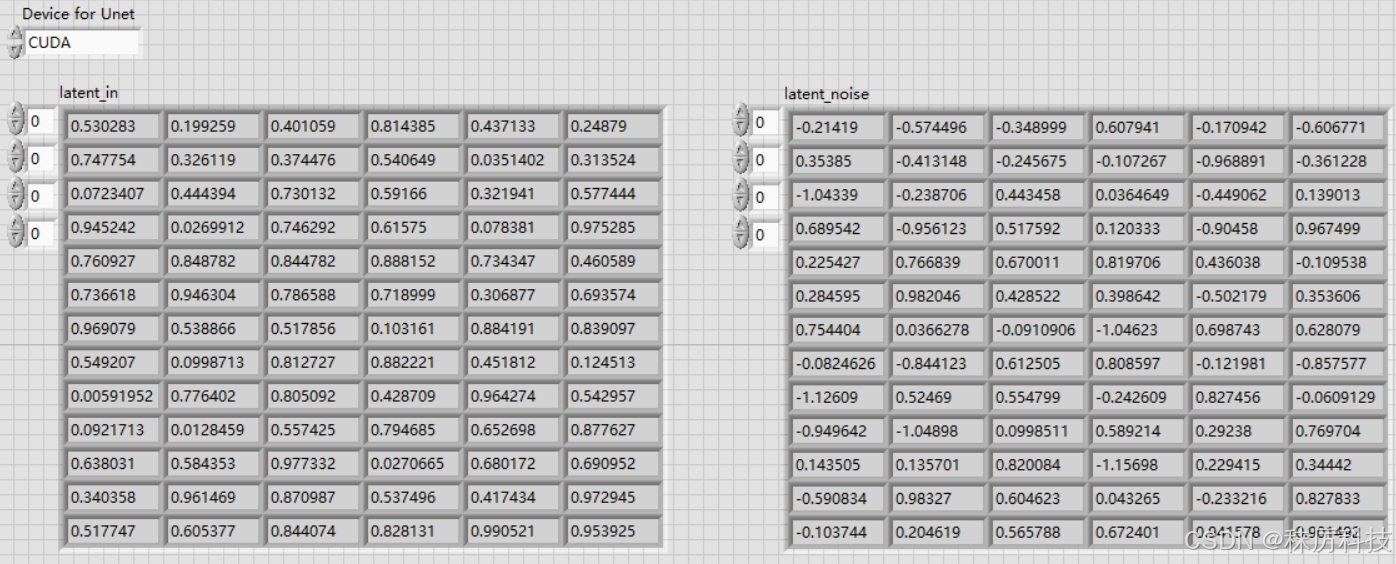
4. UNet 转 ONNX
这是所有模型转换中最困难的,主要是因为模型太大了,超过了 OpenCV 能处理的极限(2GB)。
- 输入输出
| 输入 | shape | 类型 | 含义 |
|---|---|---|---|
| latent_in | [1 x 4 x 64 x 64] | float | 输入的 “潜在层图像” |
| timestep | [1] | int 或 float | 一个整型数或浮点数,代表本次降噪的时间步长 |
| encoder_hidden_states | [1 x 77 x 768] | float | 编码的隐藏状态,等同于 prompt_embeds , 也即上文 Text Encoder 输出的 last_hidden_state |
| 输出 | shape | 类型 | 含义 |
| latent_noise | [1 x 4 x 64 x 64] | float | 预测出输入 “潜在层图像” 中的噪声成分 |
- 常规转换方法
注意,这种方法不适用于 OpenCV!原因有二:
(1)参数 timestep 在 Unet 中经历了一维运算,而 OpenCV 能处理的矩阵至少是二维;
(2)模型超过 2GB,转换的结果会以 “多文件” 的形式存在,而 OpenCV 无法载入这种 “多文件” 的 ONNX 模型。即便我们可以通过某些方法,将 “多文件” 合并成一个完整的 ONNX 文件,但由于其超过 2GB 的限制,仍然无法适用于 OpenCV。
import torch
from diffusers import UNet2DConditionModel

unet_model_path = "D:/myCache/models--stable-diffusion-v1-5--stable-diffusion-v1-5/snapshots/451f4fe16113bff5a5d2269ed5ad43b0592e9a14/unet"
unet_model = UNet2DConditionModel.from_pretrained(unet_model_path)

class UNetModel_Wrapper(torch.nn.Module):
    def __init__(self, model):
        super().__init__()
        self.model = model

    def forward(self, latent_in, timestep, encoder_hidden_states):
        out = self.model.forward(latent_in, timestep, encoder_hidden_states)
        latent_noise = out.sample
        return latent_noise

latent_in = torch.rand(size=[1,4,64,64],dtype=torch.float32)
timestep = torch.randint(0,1000,size=[1])
encoder_hidden_states = torch.rand(size=[1,77,768],dtype=torch.float32)

unet_model_wrapper = UNetModel_Wrapper(unet_model)
unet_model_wrapper.eval()

import os
os.makedirs("./unet", exist_ok=True)

torch.onnx.export(unet_model_wrapper,
                  (latent_in, timestep, encoder_hidden_states),
                  "unet/unet_model.onnx",
                  opset_version=14,
                  do_constant_folding=True,
                  input_names = ['latent_in', 'timestep', 'encoder_hidden_states'],
                  output_names = ['latent_noise']
                  )
- 非常规转换方法
为了做适配 OpenCV 的模型转换,我们需要解决上述的两个问题。
一是将 timestep 的一维运算从 Unet 中剔除,将来在外围算法中用 LabVIEW 替代实现;
二是解决模型超过 2GB 的问题,解决的方案是模型分割!SD1.5 的 Unet 模型大小是 3.2GB 左右,那么我们只要在 “中间层” 切一刀,分成两个模型就可以了。(据说更高版本的 SD 的 Unet 甚至超过 10GB 呢… 唉,到时候再说吧~~)
下面介绍具体做法:
(1)修改源码 …/diffusers/models/unets/unet_2d_condition.py
在 UNet2DConditionModel 类中,将其自带的 forward 函数拷贝两份,一份更名为 forward_1,另一份更名为 forward_2。原来的 forward 也保留,以免影响 Unet 的原始功能。
在 forward_1 中,将输入参数 timestep 直接改为 t_emb 张量,并把下面给 t_emb 赋值的那一行注释掉。另外,forward_1 仅处理 Unet 的前半部分(down与mid),把 up 及之后的部分全部删除,然后直接 return 中间过渡变量 (sample, down_block_res_samples, emb)。
在 forward_2 中,删除输入参数 timestep,并在原位置插入两项参数:down_block_res_samples 和 emb,用于承接 forward_1 的过渡变量。forward_2 将继续 up 及之后的运算,up 之前的大多数代码都可以删除,但需要保留一些必要的常量。
forward_1 与 forward_2 代码如下:(基于 diffusers 0.34.0 版本)
    def forward_1(
        self,
        sample: torch.Tensor,
        t_emb: torch.Tensor,
        encoder_hidden_states: torch.Tensor,
        class_labels: Optional[torch.Tensor] = None,
        timestep_cond: Optional[torch.Tensor] = None,
        attention_mask: Optional[torch.Tensor] = None,
        cross_attention_kwargs: Optional[Dict[str, Any]] = None,
        added_cond_kwargs: Optional[Dict[str, torch.Tensor]] = None,
        down_block_additional_residuals: Optional[Tuple[torch.Tensor]] = None,
        mid_block_additional_residual: Optional[torch.Tensor] = None,
        down_intrablock_additional_residuals: Optional[Tuple[torch.Tensor]] = None,
        encoder_attention_mask: Optional[torch.Tensor] = None,
        return_dict: bool = True,
    ) -> Union[UNet2DConditionOutput, Tuple]:

        # By default samples have to be AT least a multiple of the overall upsampling factor.
        # The overall upsampling factor is equal to 2 ** (# num of upsampling layers).
        # However, the upsampling interpolation output size can be forced to fit any upsampling size
        # on the fly if necessary.
        default_overall_up_factor = 2**self.num_upsamplers

        # upsample size should be forwarded when sample is not a multiple of `default_overall_up_factor`
        forward_upsample_size = False
        upsample_size = None

        for dim in sample.shape[-2:]:
            if dim % default_overall_up_factor != 0:
                # Forward upsample size to force interpolation output size.
                forward_upsample_size = True
                break

        # ensure attention_mask is a bias, and give it a singleton query_tokens dimension
        # expects mask of shape:
        #   [batch, key_tokens]
        # adds singleton query_tokens dimension:
        #   [batch,                    1, key_tokens]
        # this helps to broadcast it as a bias over attention scores, which will be in one of the following shapes:
        #   [batch,  heads, query_tokens, key_tokens] (e.g. torch sdp attn)
        #   [batch * heads, query_tokens, key_tokens] (e.g. xformers or classic attn)
        if attention_mask is not None:
            # assume that mask is expressed as:
            #   (1 = keep,      0 = discard)
            # convert mask into a bias that can be added to attention scores:
            #       (keep = +0,     discard = -10000.0)
            attention_mask = (1 - attention_mask.to(sample.dtype)) * -10000.0
            attention_mask = attention_mask.unsqueeze(1)

        # convert encoder_attention_mask to a bias the same way we do for attention_mask
        if encoder_attention_mask is not None:
            encoder_attention_mask = (1 - encoder_attention_mask.to(sample.dtype)) * -10000.0
            encoder_attention_mask = encoder_attention_mask.unsqueeze(1)

        # 0. center input if necessary
        if self.config.center_input_sample:
            sample = 2 * sample - 1.0

        # 1. time
        #t_emb = self.get_time_embed(sample=sample, timestep=timestep)
        emb = self.time_embedding(t_emb, timestep_cond)

        class_emb = self.get_class_embed(sample=sample, class_labels=class_labels)
        if class_emb is not None:
            if self.config.class_embeddings_concat:
                emb = torch.cat([emb, class_emb], dim=-1)
            else:
                emb = emb + class_emb

        aug_emb = self.get_aug_embed(
            emb=emb, encoder_hidden_states=encoder_hidden_states, added_cond_kwargs=added_cond_kwargs
        )
        if self.config.addition_embed_type == "image_hint":
            aug_emb, hint = aug_emb
            sample = torch.cat([sample, hint], dim=1)

        emb = emb + aug_emb if aug_emb is not None else emb

        if self.time_embed_act is not None:
            emb = self.time_embed_act(emb)

        encoder_hidden_states = self.process_encoder_hidden_states(
            encoder_hidden_states=encoder_hidden_states, added_cond_kwargs=added_cond_kwargs
        )

        # 2. pre-process
        sample = self.conv_in(sample)

        # 2.5 GLIGEN position net
        if cross_attention_kwargs is not None and cross_attention_kwargs.get("gligen", None) is not None:
            cross_attention_kwargs = cross_attention_kwargs.copy()
            gligen_args = cross_attention_kwargs.pop("gligen")
            cross_attention_kwargs["gligen"] = {"objs": self.position_net(**gligen_args)}

        # 3. down
        # we're popping the `scale` instead of getting it because otherwise `scale` will be propagated
        # to the internal blocks and will raise deprecation warnings. this will be confusing for our users.
        if cross_attention_kwargs is not None:
            cross_attention_kwargs = cross_attention_kwargs.copy()
            lora_scale = cross_attention_kwargs.pop("scale", 1.0)
        else:
            lora_scale = 1.0

        if USE_PEFT_BACKEND:
            # weight the lora layers by setting `lora_scale` for each PEFT layer
            scale_lora_layers(self, lora_scale)

        is_controlnet = mid_block_additional_residual is not None and down_block_additional_residuals is not None
        # using new arg down_intrablock_additional_residuals for T2I-Adapters, to distinguish from controlnets
        is_adapter = down_intrablock_additional_residuals is not None
        # maintain backward compatibility for legacy usage, where
        #       T2I-Adapter and ControlNet both use down_block_additional_residuals arg
        #       but can only use one or the other
        if not is_adapter and mid_block_additional_residual is None and down_block_additional_residuals is not None:
            deprecate(
                "T2I should not use down_block_additional_residuals",
                "1.3.0",
                "Passing intrablock residual connections with `down_block_additional_residuals` is deprecated \
                       and will be removed in diffusers 1.3.0.  `down_block_additional_residuals` should only be used \
                       for ControlNet. Please make sure use `down_intrablock_additional_residuals` instead. ",
                standard_warn=False,
            )
            down_intrablock_additional_residuals = down_block_additional_residuals
            is_adapter = True

        down_block_res_samples = (sample,)
        for downsample_block in self.down_blocks:
            if hasattr(downsample_block, "has_cross_attention") and downsample_block.has_cross_attention:
                # For t2i-adapter CrossAttnDownBlock2D
                additional_residuals = {}
                if is_adapter and len(down_intrablock_additional_residuals) > 0:
                    additional_residuals["additional_residuals"] = down_intrablock_additional_residuals.pop(0)

                sample, res_samples = downsample_block(
                    hidden_states=sample,
                    temb=emb,
                    encoder_hidden_states=encoder_hidden_states,
                    attention_mask=attention_mask,
                    cross_attention_kwargs=cross_attention_kwargs,
                    encoder_attention_mask=encoder_attention_mask,
                    **additional_residuals,
                )
            else:
                sample, res_samples = downsample_block(hidden_states=sample, temb=emb)
                if is_adapter and len(down_intrablock_additional_residuals) > 0:
                    sample += down_intrablock_additional_residuals.pop(0)

            down_block_res_samples += res_samples

        if is_controlnet:
            new_down_block_res_samples = ()

            for down_block_res_sample, down_block_additional_residual in zip(
                down_block_res_samples, down_block_additional_residuals
            ):
                down_block_res_sample = down_block_res_sample + down_block_additional_residual
                new_down_block_res_samples = new_down_block_res_samples + (down_block_res_sample,)

            down_block_res_samples = new_down_block_res_samples

        # 4. mid
        if self.mid_block is not None:
            if hasattr(self.mid_block, "has_cross_attention") and self.mid_block.has_cross_attention:
                sample = self.mid_block(
                    sample,
                    emb,
                    encoder_hidden_states=encoder_hidden_states,
                    attention_mask=attention_mask,
                    cross_attention_kwargs=cross_attention_kwargs,
                    encoder_attention_mask=encoder_attention_mask,
                )
            else:
                sample = self.mid_block(sample, emb)

            # To support T2I-Adapter-XL
            if (
                is_adapter
                and len(down_intrablock_additional_residuals) > 0
                and sample.shape == down_intrablock_additional_residuals[0].shape
            ):
                sample += down_intrablock_additional_residuals.pop(0)

        if is_controlnet:
            sample = sample + mid_block_additional_residual

        return (sample, down_block_res_samples, emb)

    def forward_2(
        self,
        sample: torch.Tensor,
        down_block_res_samples: Tuple[torch.Tensor],
        emb: torch.Tensor,
        encoder_hidden_states: torch.Tensor,
        class_labels: Optional[torch.Tensor] = None,
        timestep_cond: Optional[torch.Tensor] = None,
        attention_mask: Optional[torch.Tensor] = None,
        cross_attention_kwargs: Optional[Dict[str, Any]] = None,
        added_cond_kwargs: Optional[Dict[str, torch.Tensor]] = None,
        down_block_additional_residuals: Optional[Tuple[torch.Tensor]] = None,
        mid_block_additional_residual: Optional[torch.Tensor] = None,
        down_intrablock_additional_residuals: Optional[Tuple[torch.Tensor]] = None,
        encoder_attention_mask: Optional[torch.Tensor] = None,
        return_dict: bool = True,
    ) -> Union[UNet2DConditionOutput, Tuple]:


        forward_upsample_size = False
        upsample_size = None
        lora_scale = 1.0

        if USE_PEFT_BACKEND:
            # weight the lora layers by setting `lora_scale` for each PEFT layer
            scale_lora_layers(self, lora_scale)

        # 5. up
        for i, upsample_block in enumerate(self.up_blocks):
            is_final_block = i == len(self.up_blocks) - 1

            res_samples = down_block_res_samples[-len(upsample_block.resnets) :]
            down_block_res_samples = down_block_res_samples[: -len(upsample_block.resnets)]

            # if we have not reached the final block and need to forward the
            # upsample size, we do it here
            if not is_final_block and forward_upsample_size:
                upsample_size = down_block_res_samples[-1].shape[2:]

            if hasattr(upsample_block, "has_cross_attention") and upsample_block.has_cross_attention:
                sample = upsample_block(
                    hidden_states=sample,
                    temb=emb,
                    res_hidden_states_tuple=res_samples,
                    encoder_hidden_states=encoder_hidden_states,
                    cross_attention_kwargs=cross_attention_kwargs,
                    upsample_size=upsample_size,
                    attention_mask=attention_mask,
                    encoder_attention_mask=encoder_attention_mask,
                )
            else:
                sample = upsample_block(
                    hidden_states=sample,
                    temb=emb,
                    res_hidden_states_tuple=res_samples,
                    upsample_size=upsample_size,
                )

        # 6. post-process
        if self.conv_norm_out:
            sample = self.conv_norm_out(sample)
            sample = self.conv_act(sample)
        sample = self.conv_out(sample)

        if USE_PEFT_BACKEND:
            # remove `lora_scale` from each PEFT layer
            unscale_lora_layers(self, lora_scale)

        if not return_dict:
            return (sample,)

        return UNet2DConditionOutput(sample=sample)
(2)分割网络的输入输出
forward_1 的输入输出
| 输入 | shape | 类型 | 含义 |
|---|---|---|---|
| latent_in | [1 x 4 x 64 x 64] | float | 输入的 “潜在层图像” |
| t_emb | [1 x 320] | float | 由 timestep 经过初步编码的时间向量 |
| encoder_hidden_states | [1 x 77 x 768] | float | 编码的隐藏状态,等同于 prompt_embeds , 也即上文 Text Encoder 输出的 last_hidden_state |
| 输出 | shape | 类型 | 含义 |
| sample | [1 x 1280 x 8 x 8] | float | 经过下采样、中间层后的样本 |
| down_block_res_samples | [1 x 320 x 64 x 64] [1 x 320 x 64 x 64] [1 x 320 x 64 x 64] [1 x 320 x 32 x 32] [1 x 640 x 32 x 32] [1 x 640 x 32 x 32] [1 x 640 x 16 x 16] [1 x 1280 x 16 x 16] [1 x 1280 x 16 x 16] [1 x 1280 x 8 x 8] [1 x 1280 x 8 x 8] [1 x 1280 x 8 x 8] | Tuple | 由12个张量构成的元组,记录了下采样过程的残差 |
| emb | [1 x 1280] | float | 由 t_emb 经过再次编码的时间向量 |
forward_2 的输入输出
| 输入 | shape | 类型 | 含义 |
|---|---|---|---|
| sample | [1 x 1280 x 8 x 8] | float | 经过下采样、中间层后的样本 |
| down_block_res_samples | 同上 | Tuple | 由12个张量构成的元组,记录了下采样过程的残差 |
| emb | [1 x 1280] | float | 由 t_emb 经过再次编码的时间向量 |
| encoder_hidden_states | [1 x 77 x 768] | float | 同上,与 forward_1 的输入没有区别 |
| 输出 | shape | 类型 | 含义 |
| latent_noise | [1 x 4 x 64 x 64] | float | 预测出输入 “潜在层图像” 中的噪声成分 |
(3)分割网络的转换代码
封装 UNet_Model_1 类,调用 forward_1 方法,将前半个网络导出成 unet_model_1.onnx 。
为了方便 OpenCV 调用,将 down_block_res_samples 元组拆开成 12 个张量,分别命名。
代码如下:
import torch
from diffusers import UNet2DConditionModel

unet_model_path = 'D:/myCache/models--stable-diffusion-v1-5--stable-diffusion-v1-5/snapshots/451f4fe16113bff5a5d2269ed5ad43b0592e9a14/unet'
unet_model = UNet2DConditionModel.from_pretrained(unet_model_path)

class UNet_Model_1(torch.nn.Module):
    def __init__(self, model):
        super().__init__()
        self.model = model

    def forward(self, latent_in, t_emb, encoder_hidden_states):
        sample, down_block_res_samples, emb = self.model.forward_1(latent_in, t_emb, encoder_hidden_states)

        res0 = down_block_res_samples[0]
        res1 = down_block_res_samples[1]
        res2 = down_block_res_samples[2]
        res3 = down_block_res_samples[3]
        res4 = down_block_res_samples[4]
        res5 = down_block_res_samples[5]
        res6 = down_block_res_samples[6]
        res7 = down_block_res_samples[7]
        res8 = down_block_res_samples[8]
        res9 = down_block_res_samples[9]
        res10 = down_block_res_samples[10]
        res11 = down_block_res_samples[11]

        return (sample, res0, res1, res2, res3, res4, res5, res6, res7, res8, res9, res10, res11, emb)

latent_in = torch.rand(size=[1,4,64,64],dtype=torch.float32)
t_emb = torch.rand(size=[1,320], dtype=torch.float32)
encoder_hidden_states = torch.rand(size=[1,77,768],dtype=torch.float32)

unet_model_1 = UNet_Model_1(unet_model)
unet_model_1.eval()

import os
os.makedirs("./unet", exist_ok=True)

torch.onnx.export(unet_model_1,
                  (latent_in, t_emb, encoder_hidden_states),
                  "unet/unet_model_1.onnx",
                  opset_version=14,
                  do_constant_folding=True,
                  input_names = ['latent_in', 't_emb', 'encoder_hidden_states'],
                  output_names = ['sample', 'res0', 'res1', 'res2', 'res3', 'res4', 'res5', 'res6', 'res7', 'res8', 'res9', 'res10', 'res11', 'emb']
                  )
封装 UNet_Model_2 类,调用 forward_2 方法,将后半个网络导出成 unet_model_2.onnx 。
代码如下:
import torch
from diffusers import UNet2DConditionModel

unet_model_path = 'D:/myCache/models--stable-diffusion-v1-5--stable-diffusion-v1-5/snapshots/451f4fe16113bff5a5d2269ed5ad43b0592e9a14/unet'
unet_model = UNet2DConditionModel.from_pretrained(unet_model_path)

class UNet_Model_2(torch.nn.Module):
    def __init__(self, model):
        super().__init__()
        self.model = model

    def forward(self, sample, res0, res1, res2, res3, res4, res5, res6, res7, res8, res9, res10, res11, emb, encoder_hidden_states):

        down_block_res_samples = (res0, res1, res2, res3, res4, res5, res6, res7, res8, res9, res10, res11)

        latent_noise = self.model.forward_2(sample, down_block_res_samples, emb, encoder_hidden_states, return_dict=False)[0]

        return latent_noise

sample = torch.rand(size=[1,1280,8,8],dtype=torch.float32)

res0 = torch.rand(size=[1,320,64,64],dtype=torch.float32)
res1 = torch.rand(size=[1,320,64,64],dtype=torch.float32)
res2 = torch.rand(size=[1,320,64,64],dtype=torch.float32)

res3 = torch.rand(size=[1,320,32,32],dtype=torch.float32)
res4 = torch.rand(size=[1,640,32,32],dtype=torch.float32)
res5 = torch.rand(size=[1,640,32,32],dtype=torch.float32)

res6 = torch.rand(size=[1,640,16,16],dtype=torch.float32)
res7 = torch.rand(size=[1,1280,16,16],dtype=torch.float32)
res8 = torch.rand(size=[1,1280,16,16],dtype=torch.float32)

res9 = torch.rand(size=[1,1280,8,8],dtype=torch.float32)
res10 = torch.rand(size=[1,1280,8,8],dtype=torch.float32)
res11 = torch.rand(size=[1,1280,8,8],dtype=torch.float32)

emb = torch.rand(size=[1,1280],dtype=torch.float32)

encoder_hidden_states = torch.rand(size=[1,77,768],dtype=torch.float32)

unet_model_2 = UNet_Model_2(unet_model)
unet_model_2.eval()

import os
os.makedirs("./unet", exist_ok=True)

torch.onnx.export(unet_model_2,
                  (sample, res0, res1, res2, res3, res4, res5, res6, res7, res8, res9, res10, res11, emb, encoder_hidden_states),
                  "unet/unet_model_2.onnx",
                  opset_version=14,
                  do_constant_folding=True,
                  input_names = ['sample', 'res0', 'res1', 'res2', 'res3', 'res4', 'res5', 'res6', 'res7', 'res8', 'res9', 'res10', 'res11', 'emb', 'encoder_hidden_states'],
                  output_names = ['latent_noise']
                  )
- LabVIEW 测试
使用 OpenCV 的 API,同时创建2个Net对象,分别载入 unet_model_1.onnx 与 unet_model_2.onnx,二者通过类似 “接力” 的方式,完成一次完整的 Unet 过程。如下图。

三、外围算法
1. 分词器-Tokenizer
分词器的作用,是将字符串格式的正、反提示词转化为整数 id 序列,以便将来送入 Text Encoder 进行编码。
SD1.5 采用的分词器是 CLIPTokenizer,其在 Python 下的使用范例如下:
from transformers import CLIPTokenizer

tokenizer_path = "D:/myCache/models--stable-diffusion-v1-5--stable-diffusion-v1-5/snapshots/451f4fe16113bff5a5d2269ed5ad43b0592e9a14/tokenizer"
tokenizer = CLIPTokenizer.from_pretrained(tokenizer_path)

token = tokenizer(text="A dog and a cat.",
                  padding="max_length",
                  max_length=77,
                  truncation=True,
                  return_tensors="pt"
                  )

input_ids = token.input_ids
attention_mask = token.attention_mask
print(input_ids)
print(attention_mask)
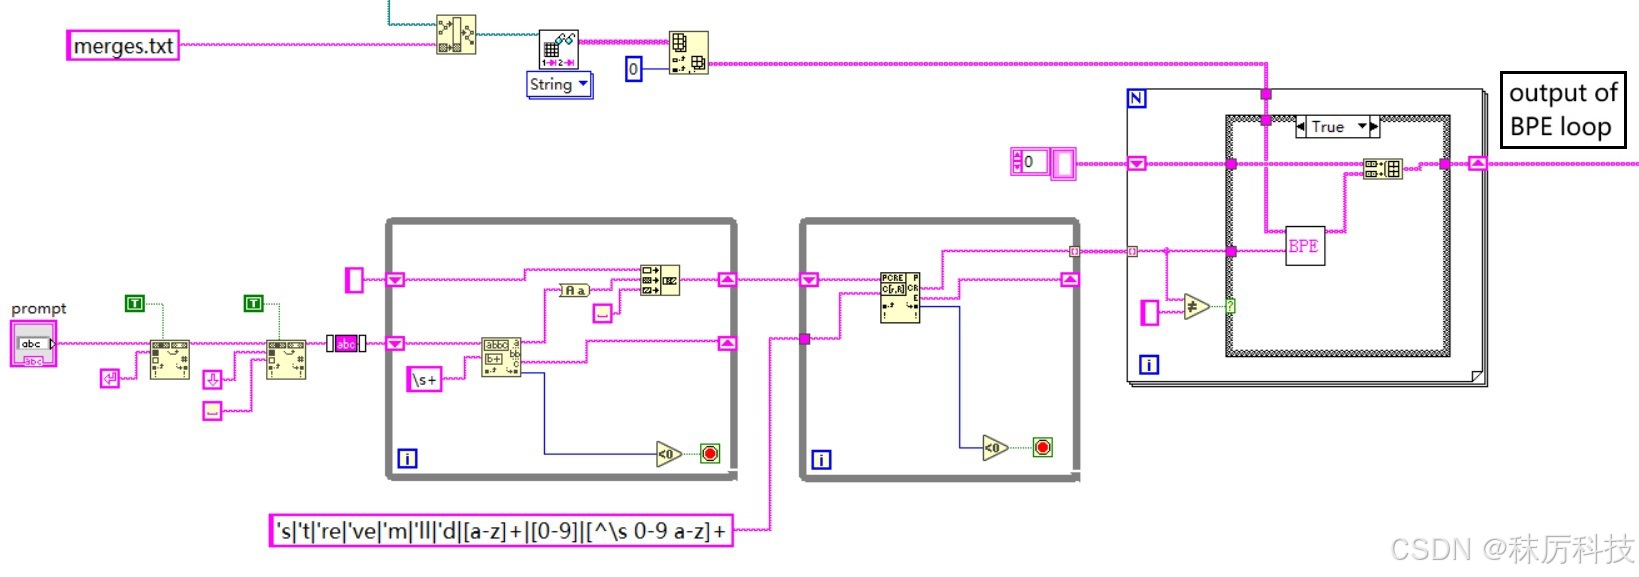
下面用 LabVIEW 简单实现分词器过程。
(1)首先删除字符串中的换行符、两端的空白等无效字符,并全部转换为小写;
(2)使用正则匹配,按照 “单引号缩写 > 连续字母 > 单个数字 > 其他字符” 的优先级,将句子分割成更基本的单位;(注意,LabVIEW 的正则语法与其他编程语言的有一些区别。)
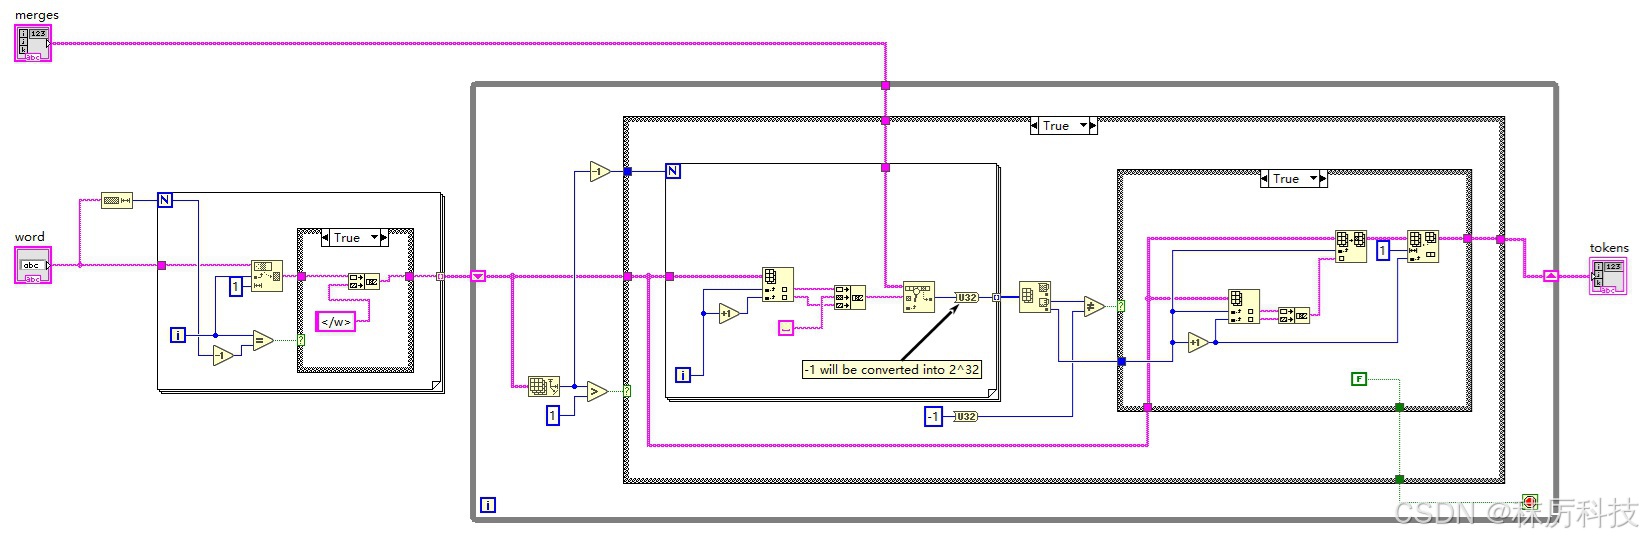
(3)上述的每一个基本单位(单词),都要再经过 BPE 算法,进行融合性评估;
具体为:将单词拆开成单个字符,最后一个字符与</w>组合,通过查询 tokenizer 目录下的 merges.txt 文件,判断相邻字符的融合性,将融合性最高的(在 merges.txt 中出现最早的)相邻字符组合在一次。然后重复上述融合过程,已经融合的字符要以 “组合” 的形式与相邻字符进行评估。如此循环,直到最终融合成一个单词,或多个无法再相融的片段。
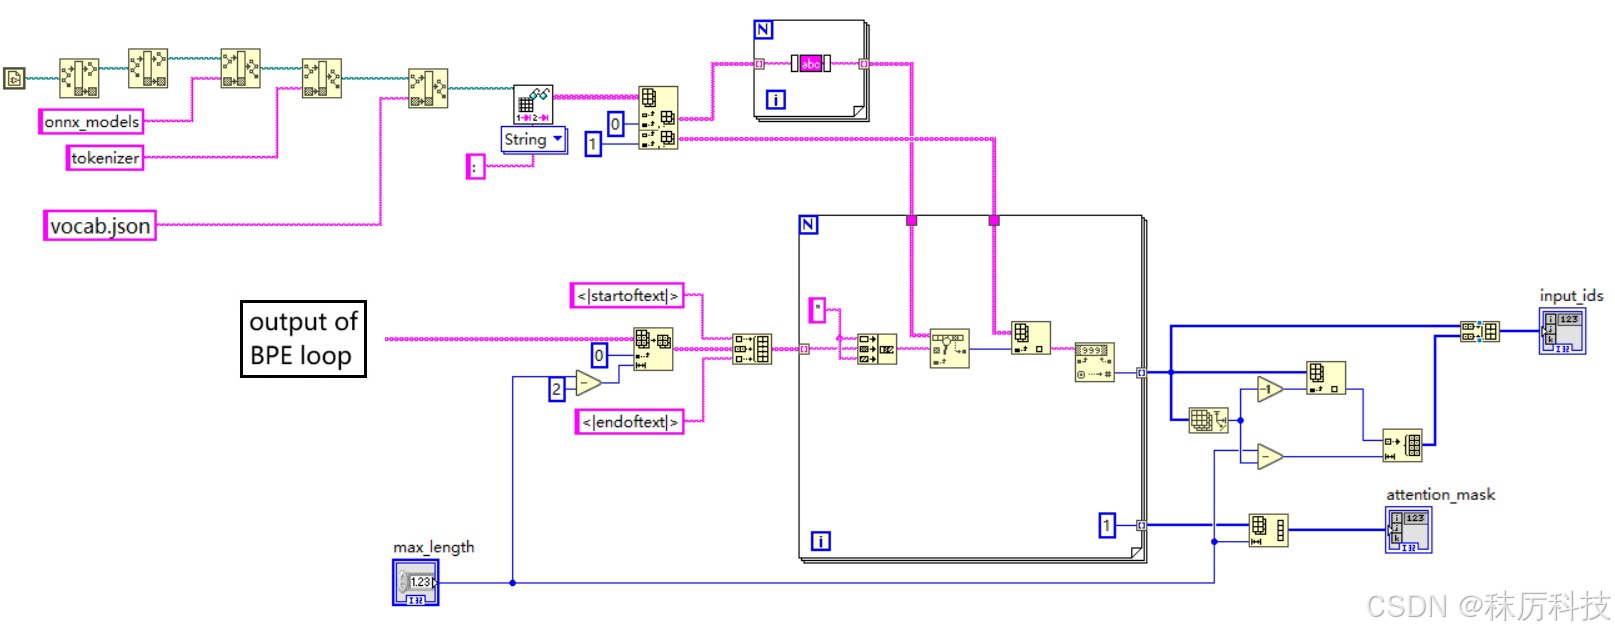
(4)将经过 BPE 输出的单词或片段按顺序拼接起来,并在前后分别插入句首 <|startoftext|> 和句尾 <|endoftext|> 标识。然后查询 tokenizer 目录下的 vocab.json 词汇表,按顺序逐个转换成整数 id;
(5)序列太短时,在末尾用 <|endoftext|> 对应的 id 进行填充,使总长度等于 max_length(77)。同理,如果太长,则删除一些位于 <|endoftext|> 之前的单词或片段。最终得到的结果就是 input_ids;
(6)注意力掩码 attention_mask 与 input_ids 逐一对应,从 <|startoftext|> 到 首个 <|endoftext|> 均标记为 “1”,填充位标记为 “0”。
- clip_tokenizer 前半部分
- clip_tokenizer 后半部分
- BPE 内部算法
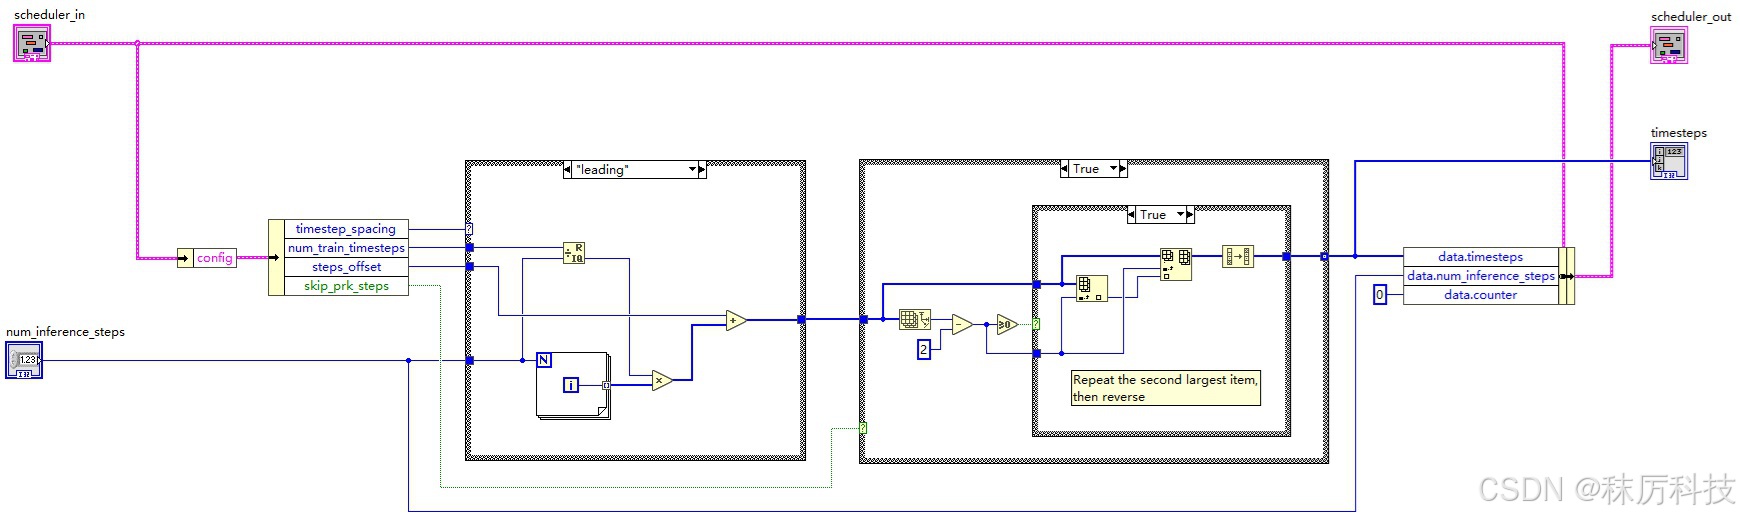
2. 时间步-Timesteps
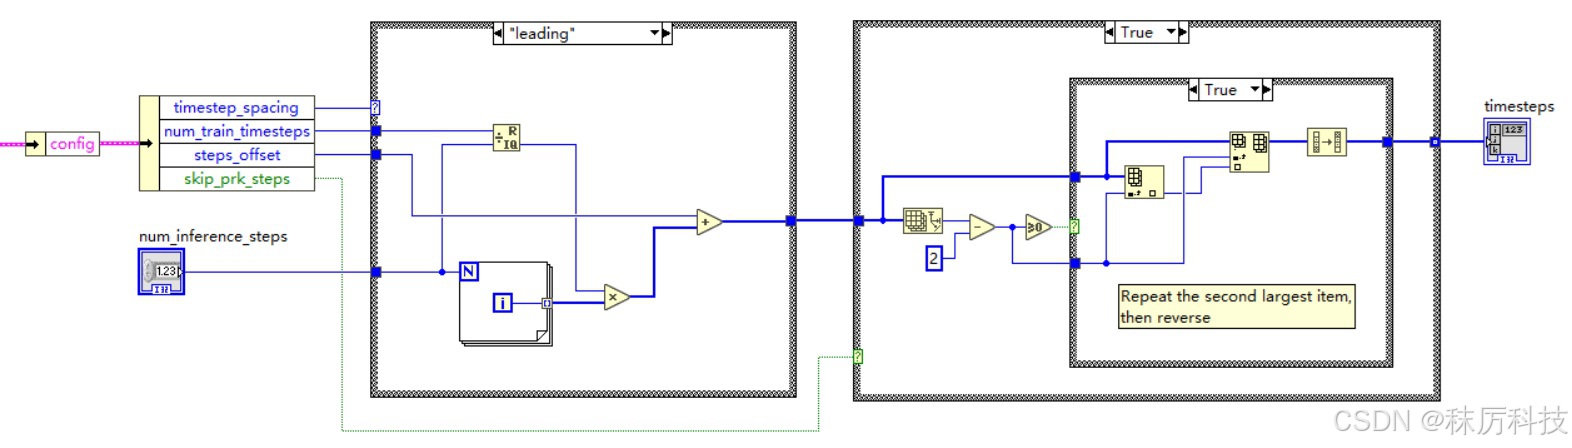
(1)生成 timesteps
生成 timesteps 有多种模式,但总体来说,都是按降序生成从 num_train_timesteps 到 0 的等差数列。每种模式在端点、公差、取整规则上略有不同。数列初始长度为 num_inference_steps,然后 “次高位” 复制一次,最终 timesteps 长度为 num_inference_steps + 1。
SD1.5 默认采用 leading 模式,训练总步长 num_train_timesteps = 1000,偏移量 steps_offset = 1。
那么,推理10步(num_inference_steps=10)对应的 timesteps 应该等于:
[ 901, 801, 801, 701, 601, 501, 401, 301, 201, 101, 1 ]
具体 LabVIEW 算法如下:
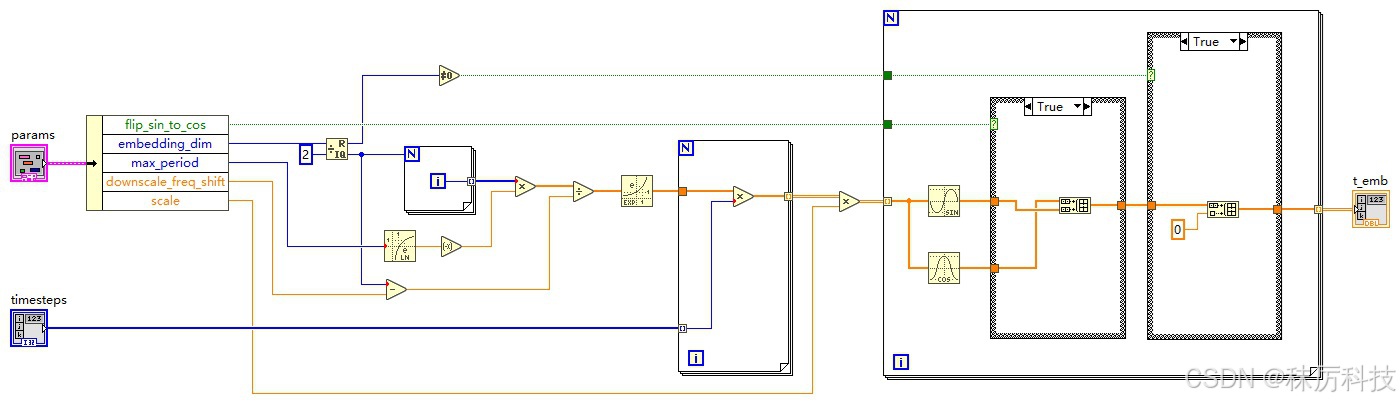
(2)由 timestep 初步编码 t_emb
此部分就是上文从 Unet 中剔除的一维运算。
调度器 Scheduler 将遍历 timesteps 序列中的每一项,记作 timestep,再由 timestep 初步编码得到 t_emb,送入 Unet 的输入端。
编码的算法,参考源码:…/diffusers/models/embeddings.py 中的 get_timestep_embedding 函数。
(SD1.5 默认 embedding_dim = 320,flip_sin_to_cos = True,downscale_freq_shift = 0,scale = 1,max_period = 10000)
def get_timestep_embedding(
    timesteps: torch.Tensor,
    embedding_dim: int,
    flip_sin_to_cos: bool = False,
    downscale_freq_shift: float = 1,
    scale: float = 1,
    max_period: int = 10000,
) -> torch.Tensor:

    assert len(timesteps.shape) == 1, "Timesteps should be a 1d-array"

    half_dim = embedding_dim // 2
    exponent = -math.log(max_period) * torch.arange(
        start=0, end=half_dim, dtype=torch.float32, device=timesteps.device
    )
    exponent = exponent / (half_dim - downscale_freq_shift)

    emb = torch.exp(exponent)
    emb = timesteps[:, None].float() * emb[None, :]

    # scale embeddings
    emb = scale * emb

    # concat sine and cosine embeddings
    emb = torch.cat([torch.sin(emb), torch.cos(emb)], dim=-1)

    # flip sine and cosine embeddings
    if flip_sin_to_cos:
        emb = torch.cat([emb[:, half_dim:], emb[:, :half_dim]], dim=-1)

    # zero pad
    if embedding_dim % 2 == 1:
        emb = torch.nn.functional.pad(emb, (0, 1, 0, 0))
    return emb
根据 get_timestep_embedding 源码,写出等效的 LabVIEW 算法如下:
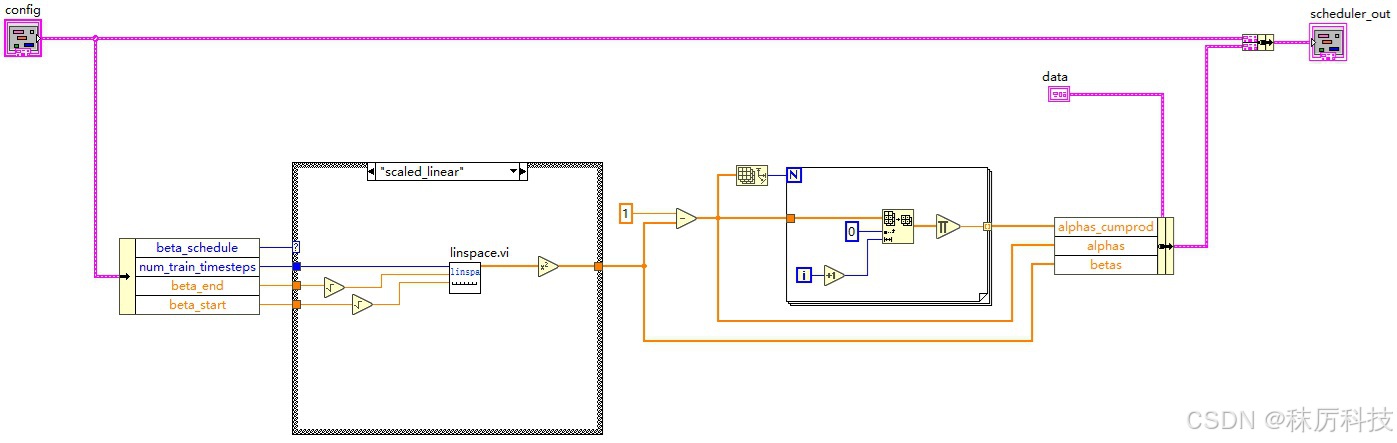
3. 调度器-Scheduler
(1)Scheduler 初始化
SD1.5 采用的调度器是 PNDMScheduler 类,其基本的初始化参数如下:
{
  "_class_name": "PNDMScheduler",
  "_diffusers_version": "0.6.0",
  "beta_end": 0.012,
  "beta_schedule": "scaled_linear",
  "beta_start": 0.00085,
  "num_train_timesteps": 1000,
  "set_alpha_to_one": false,
  "skip_prk_steps": true,
  "steps_offset": 1,
  "trained_betas": null,
  "clip_sample": false
}
根据以上参数,生成相关系数 betas、alphas、alphas_cumprod,以供将来的降噪算法使用。
参考源码:…/diffusers/schedulers/scheduling_pndm.py 中 PNDMScheduler 类的构造函数。
我们提取其中 beta_schedule == “scaled_linear” 的分支,简述算法如下:
self.betas = torch.linspace(beta_start**0.5, beta_end**0.5, num_train_timesteps, dtype=torch.float32) ** 2
self.alphas = 1.0 - self.betas
self.alphas_cumprod = torch.cumprod(self.alphas, dim=0)
等效的 LabVIEW 算法如下:(其中的 linspace.vi 是自己封装的子VI)
我们将调度器的 config 参数,以及产生的相关数据 data 都捆绑成簇,以便将来在循环中传递使用。
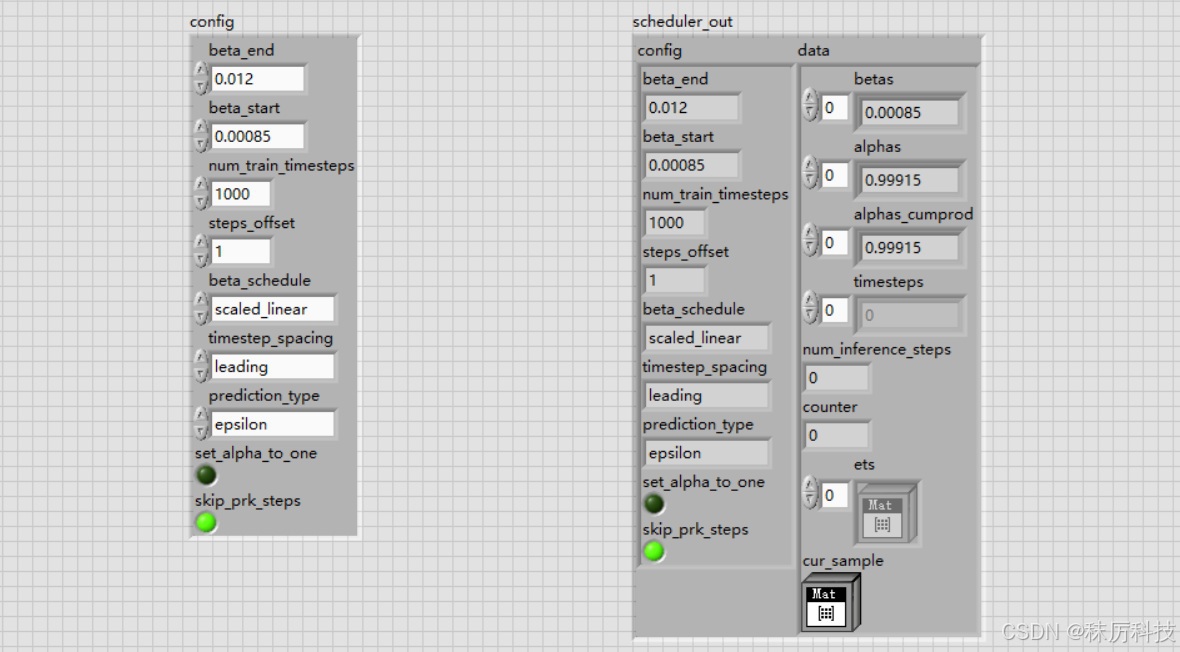
(2)Scheduler 设置 timesteps
将上文生成 timesteps 的代码融合到 Scheduler 中来,结果填充到簇成员 data.timesteps 中。
(3)Scheduler 执行去噪(step_plms)
调度器的 step_plms 主要做了两件事情:一是对噪声进行平滑处理,二是获取去噪后的 latent 图像。
- 平滑噪声
Scheduler 将记录最近(至多)四次 step_plms 的输入噪声 noise,存储到 data.ets 数组中。然后按照一定的滤波公式,计算得到平滑后的噪声,作为真正的噪声参与后面的去噪算法。当 data.ets 数组长度不同时,滤波公式也不同。
特别注意: 为了配合 timesteps 的 “次高位” 复制 机制,当第二次执行 step_plms 时,即调度计数器 data.counter==1 时,本算法内部需要进行一次 “原地踏步”:不记录本次输入噪声到 data.ets 数组,同时沿用上一个时间步的 latent 与 降噪系数。
参考源码:…/diffusers/schedulers/scheduling_pndm.py 中 PNDMScheduler 类的 step_plms 成员函数。
(源码中的 model_output 对应我们上文所说的 noise;sample 对应 latent。)
    def step_plms(
        self,
        model_output: torch.Tensor,
        timestep: int,
        sample: torch.Tensor,
        return_dict: bool = True,
    ) -> Union[SchedulerOutput, Tuple]:

		# Skip some lines here......

        prev_timestep = timestep - self.config.num_train_timesteps // self.num_inference_steps

        if self.counter != 1:
            self.ets = self.ets[-3:]
            self.ets.append(model_output)
        else:
            prev_timestep = timestep
            timestep = timestep + self.config.num_train_timesteps // self.num_inference_steps

        if len(self.ets) == 1 and self.counter == 0:
            model_output = model_output
            self.cur_sample = sample
        elif len(self.ets) == 1 and self.counter == 1:
            model_output = (model_output + self.ets[-1]) / 2
            sample = self.cur_sample
            self.cur_sample = None
        elif len(self.ets) == 2:
            model_output = (3 * self.ets[-1] - self.ets[-2]) / 2
        elif len(self.ets) == 3:
            model_output = (23 * self.ets[-1] - 16 * self.ets[-2] + 5 * self.ets[-3]) / 12
        else:
            model_output = (1 / 24) * (55 * self.ets[-1] - 59 * self.ets[-2] + 37 * self.ets[-3] - 9 * self.ets[-4])

        prev_sample = self._get_prev_sample(sample, timestep, prev_timestep, model_output)
        self.counter += 1

        if not return_dict:
            return (prev_sample,)

        return SchedulerOutput(prev_sample=prev_sample)
- latent 去噪
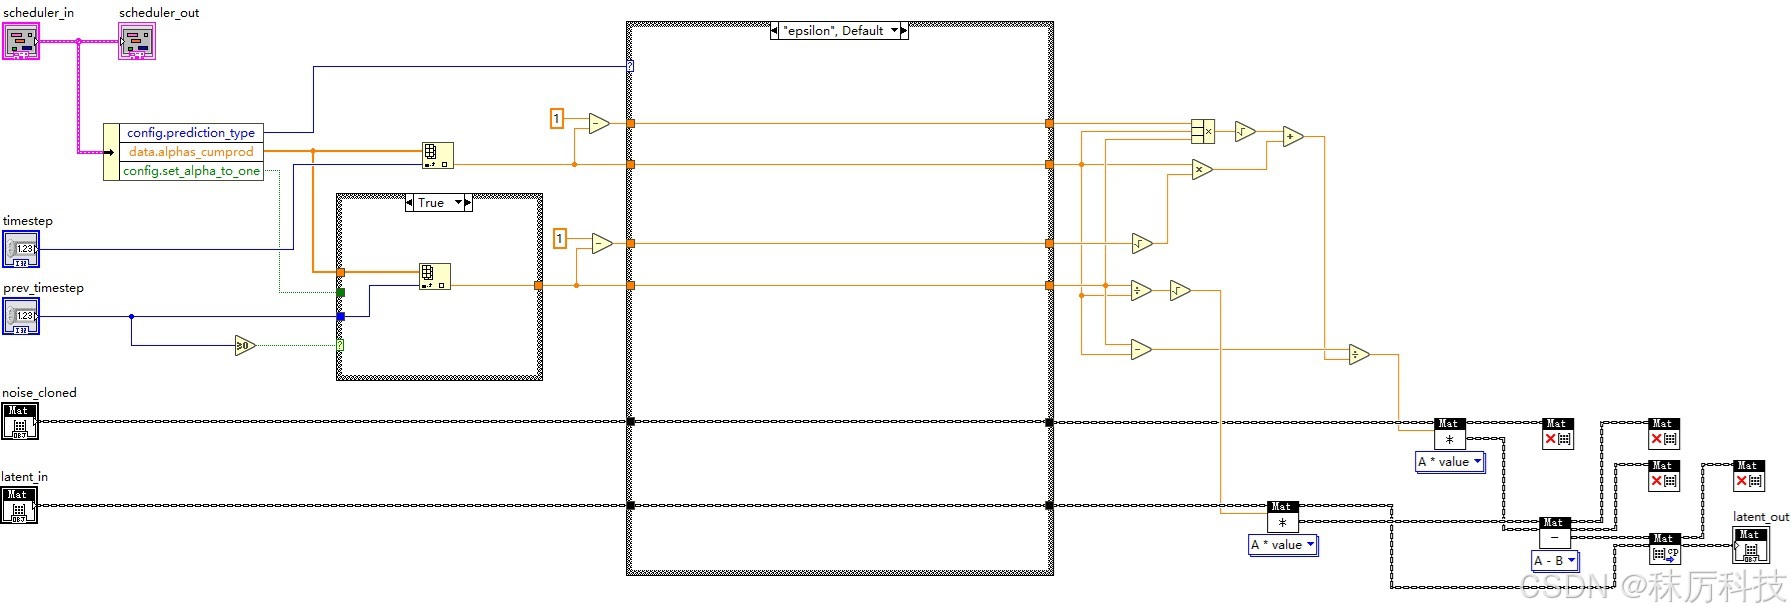
在 step_plms 函数的最后,将平滑后的noise、图像latent、时间步timestep、前一个时间步prev_timestep送入 _get_prev_sample 方法进行去噪,并输出去噪后的 latent。去噪所用的系数,是以 timestep 和 prev_timestep 为索引取出的 alphas_cumprod 数组元素。
参考源码:…/diffusers/schedulers/scheduling_pndm.py 中 PNDMScheduler 类的 _get_prev_sample 成员函数。
(源码中的 model_output 对应我们上文所说的 noise;sample 对应 latent。)
	def _get_prev_sample(self, sample, timestep, prev_timestep, model_output):
        alpha_prod_t = self.alphas_cumprod[timestep]
        alpha_prod_t_prev = self.alphas_cumprod[prev_timestep] if prev_timestep >= 0 else self.final_alpha_cumprod
        beta_prod_t = 1 - alpha_prod_t
        beta_prod_t_prev = 1 - alpha_prod_t_prev

        if self.config.prediction_type == "v_prediction":
            model_output = (alpha_prod_t**0.5) * model_output + (beta_prod_t**0.5) * sample
        elif self.config.prediction_type != "epsilon":
            raise ValueError(
                f"prediction_type given as {self.config.prediction_type} must be one of `epsilon` or `v_prediction`"
            )

        sample_coeff = (alpha_prod_t_prev / alpha_prod_t) ** (0.5)

        model_output_denom_coeff = alpha_prod_t * beta_prod_t_prev ** (0.5) + (
            alpha_prod_t * beta_prod_t * alpha_prod_t_prev
        ) ** (0.5)

        prev_sample = (
            sample_coeff * sample - (alpha_prod_t_prev - alpha_prod_t) * model_output / model_output_denom_coeff
        )

        return prev_sample
- LabVIEW 实现调度器的 step_plms 方法
(注意,LabVIEW 没有类似 Python 那样的内存自动回收机制。因此,如果计算过程中产生的 Mat 变量不再被使用,一定要及时 release 掉,以免反复调用 VI 时造成内存泄漏。所有 VI 设计均同此理。)
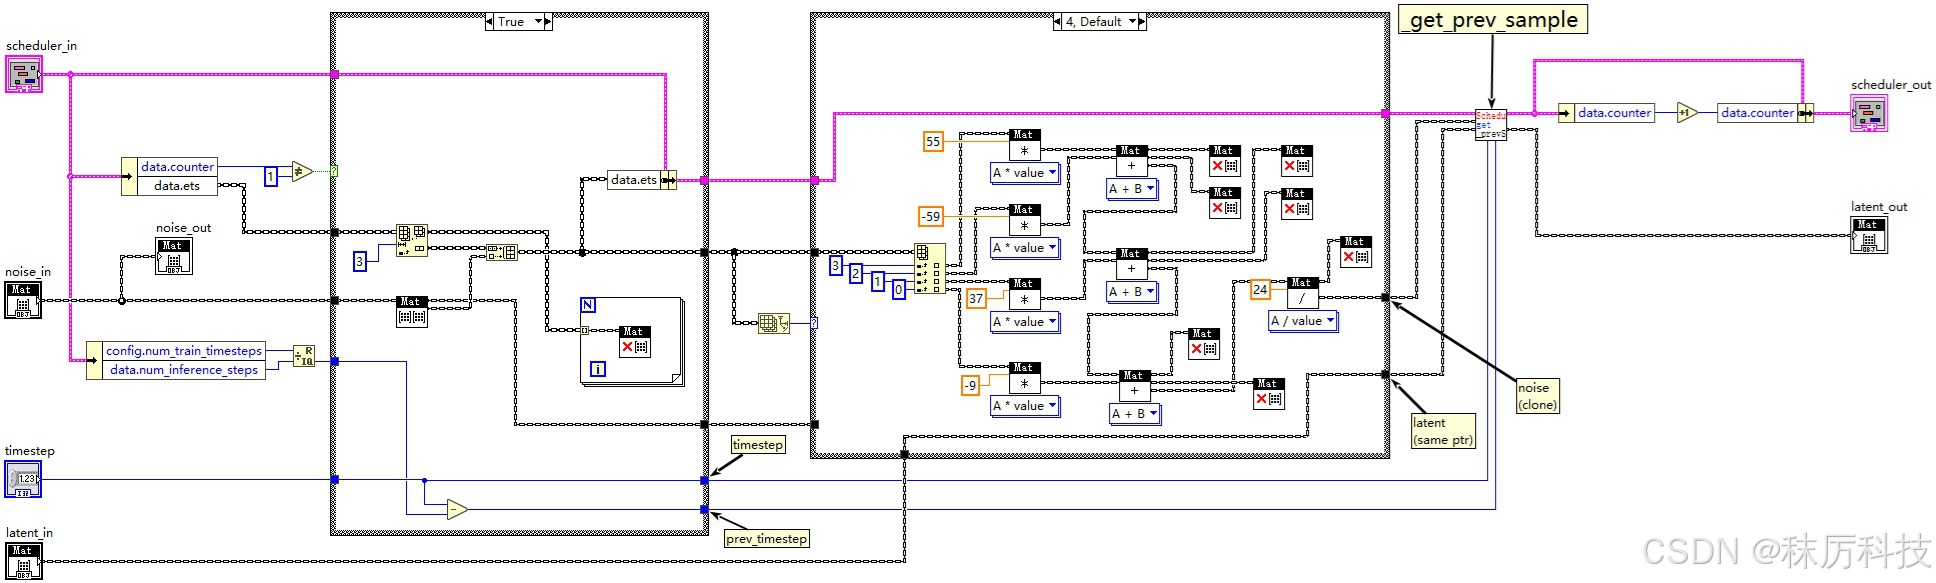
- LabVIEW 实现 _get_prev_sample 子 VI
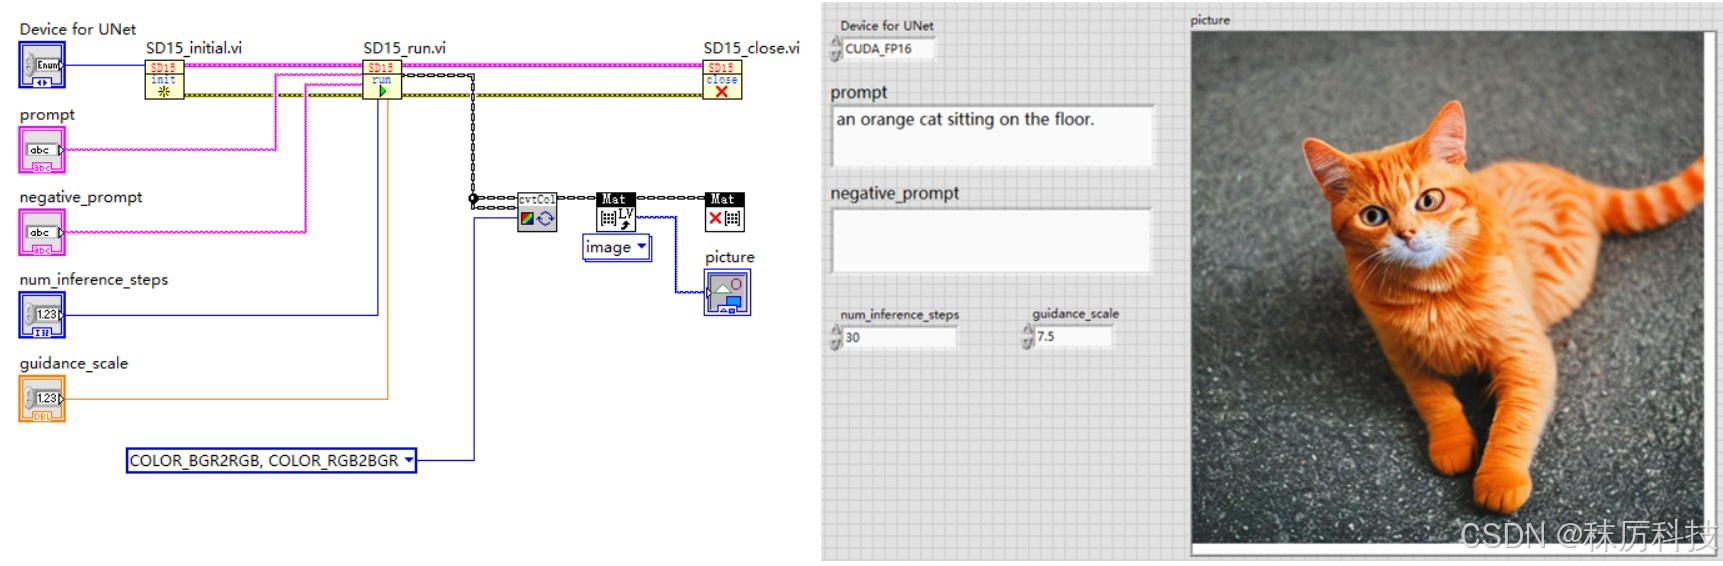
四、功能整合
1. 整体框架
下图为主 VI 的设计结构,按照 “初始化 - 运行 - 关闭” 三个步骤进行。
2. 初始化与关闭步骤
在初始化 VI 中,使用 dnn::readNetFromONNX 载入所有 SD1.5 所需的模型,并设置每种模型的推理设备(CPU 或 CUDA等),最后将各个模型对应的 Net 对象捆绑成簇,以供后续 VI 按需取用。
为了节约显存,本例将 text_encoder 和 vae_decoder 的推理设备固定设为 CPU,毕竟它们在一次生图过程中只推理1~2次。而 Unet 模型需要循环多次推理,将其设备接线端引出,供用户选择。当然,如果您的显存十分富余,也可以采取其他方案。
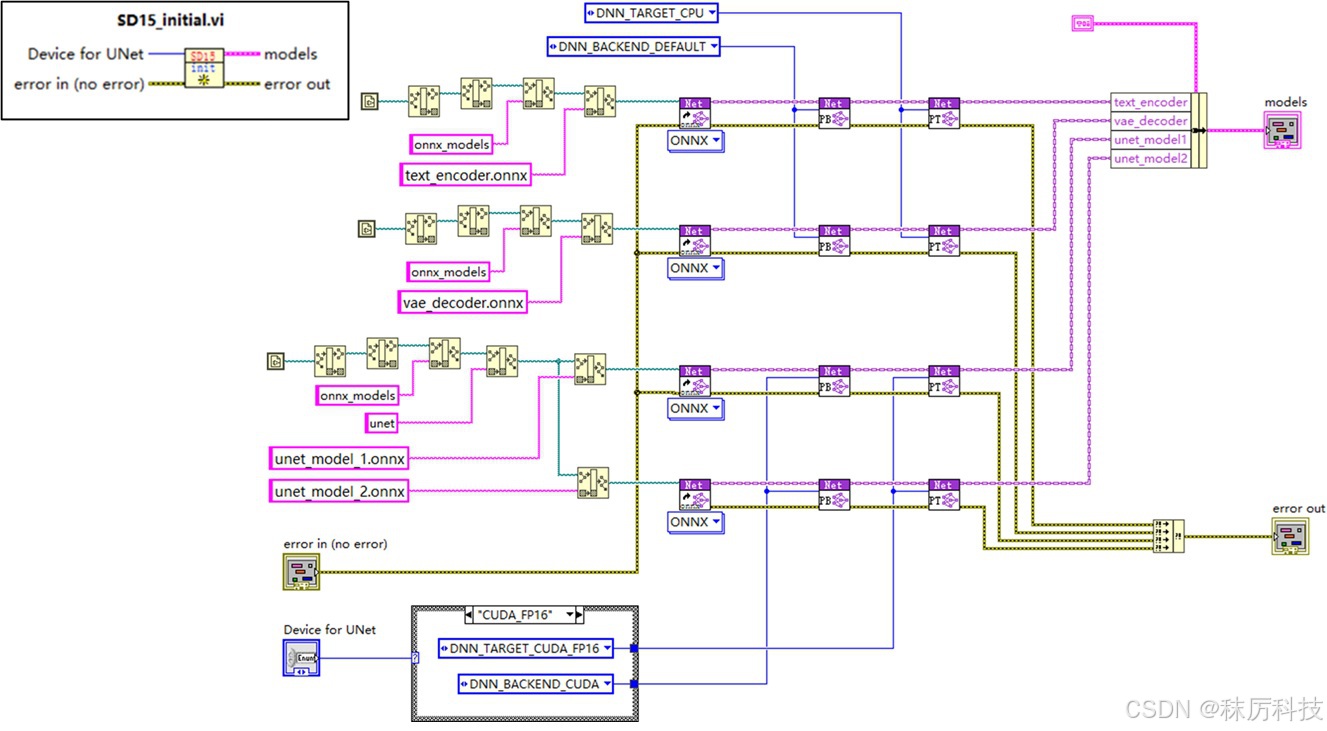
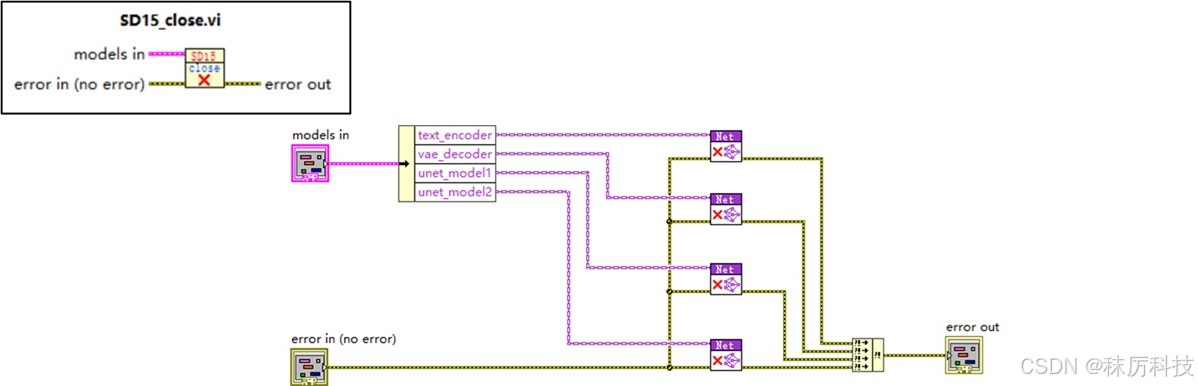
关闭步骤十分简单,就是将所有 Net 对象释放掉,框图如下。
注意:不可重复释放 Net 对象! 本例采取了最后统一释放所有 Net 的方案,因此在 “运行” 步骤中,只可以调用 Net 进行推理,切不可以 delete 任何 Net 对象,否则将引起严重的内存错误。
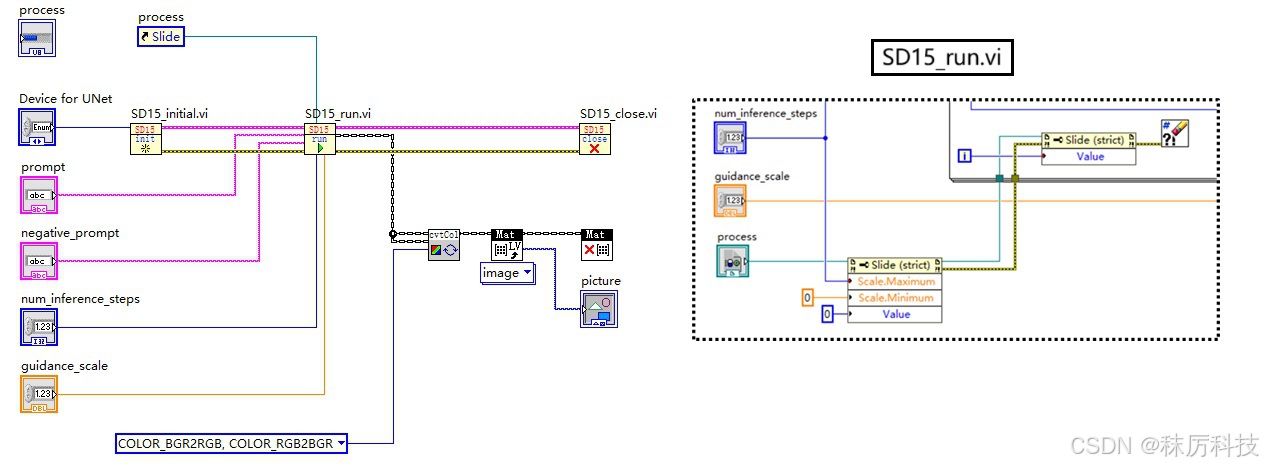
3. 运行步骤
运行步骤主要由 SD15_run.vi 完成,其内部框图如下:

- 简述运行过程:
(1)在循环之前,进行两次 Text Encoder (内部含 Tokenizer 模块)推理,分别将正、反提示词 prompt 与 negative_prompt 编码成词向量 prompt_embeds 与 negative_prompt_embeds,同时生成随机 latent 作为初始量,完成调度器 Scheduler 的初始化并生成 timesteps;
(2)以遍历 timesteps 的机制开启 For 循环,每次循环进行两次 Unet 推理,分别以 prompt_embeds 与 negative_prompt_embeds 作为隐藏状态,在相同的 t_emb 下,对相同的输入 latent 做噪声预测,得到 “正、反噪声”。正、反噪声再通过 guidance_noise 算法,即 neg_noise + guidance_scale * (noise - neg_noise) ,得到真正的噪声,输入到调度器的 step_plms 中进行去噪,最终得到去噪后的 latent,再作为下一次循环的输入 latent ;
(3)循环结束后,经过多次去噪的 latent ,先除以一个系数(vae_scaling_factor=0.18215,经查询源码得到),再通过 VAE Decoder 解码成 RGB 图像。
特别注意! 上述出现了 “连续两次推理” 的用法,为了能够同时保留两次推理的结果,您必须先将第一次的结果 clone 一份,再进行第二次推理,否则第一次的结果将被覆盖。也不要妄想 new 两个独立的 Mat 分别承接两次推理的结果,那样做仍然会被覆盖。这是 OpenCV 的 Net 对象的特性!
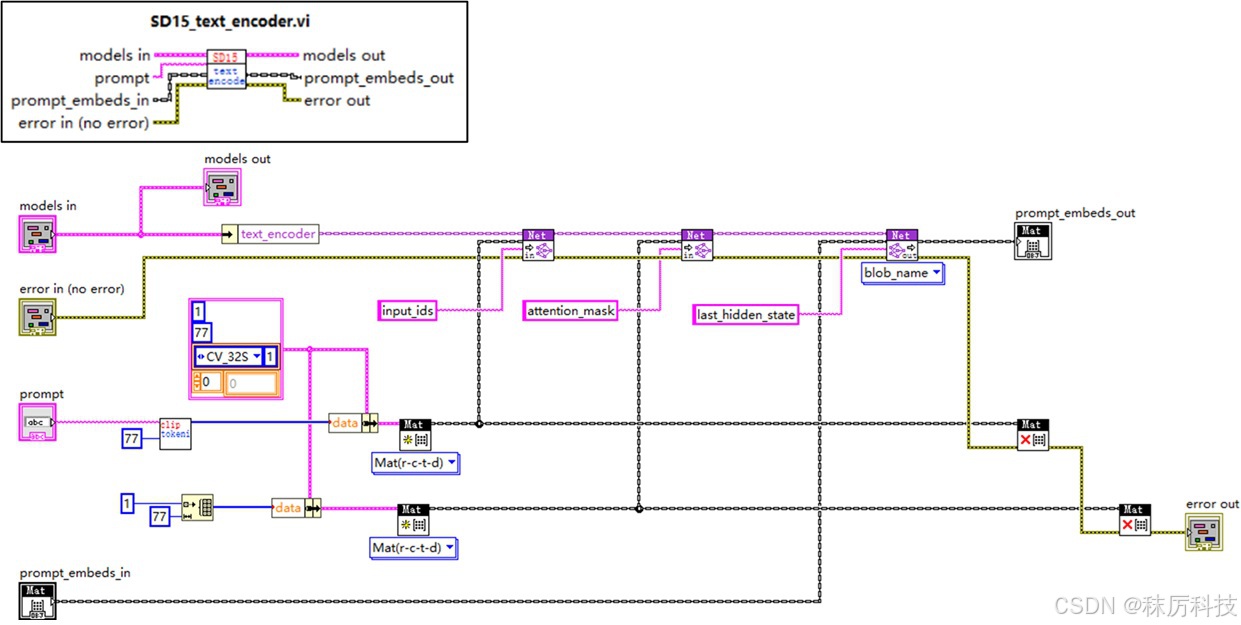
- Text Encoder 内部框图
如下图所示,从 models 簇中取出对应 Net 对象,设置输入,并执行 forward。
此 VI 已经融合了分词器 Tokenizer 的功能,通过调用 clip_tokenizer.vi 将字符串转换成 input_ids。但注意,SD1.5 默认采用 attention_mask = None,因此不要使用 clip_tokenizer.vi 输出的 attention_mask 作为 Net 的对应输入,而应该使用 77 个 “1”。
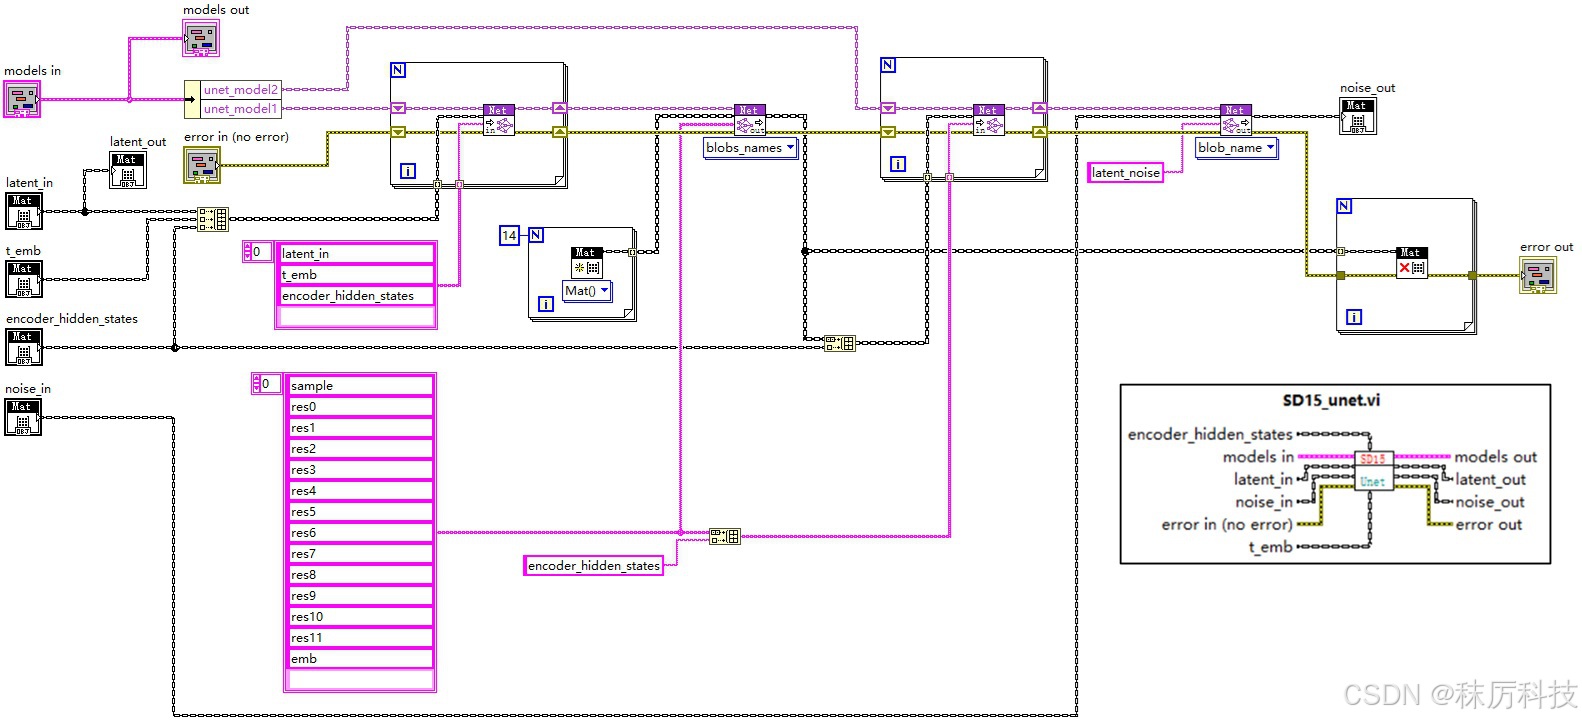
- UNet 内部框图
下图为 Unet 模块,如前文描述,我们已经将 UNet 模型分割成了两部分,通过 unet_model_1 与 unet_model_2 接力的方式,实现一次完整的 Unet 过程。
- VAE Decoder 内部框图
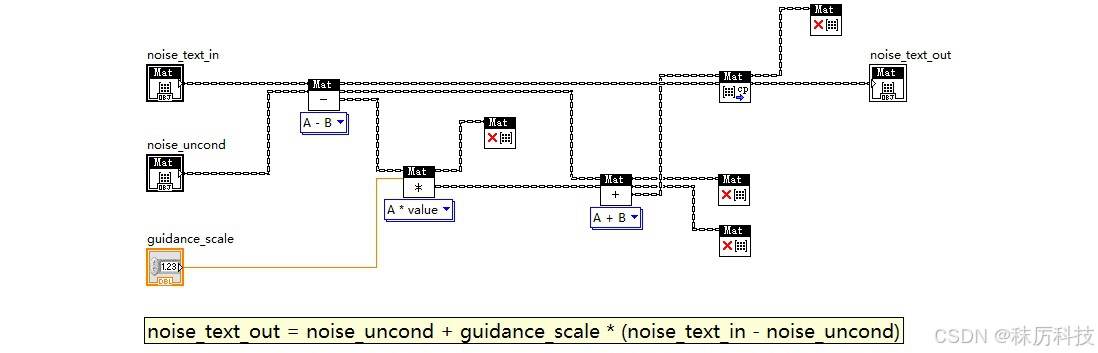
- guidance_noise
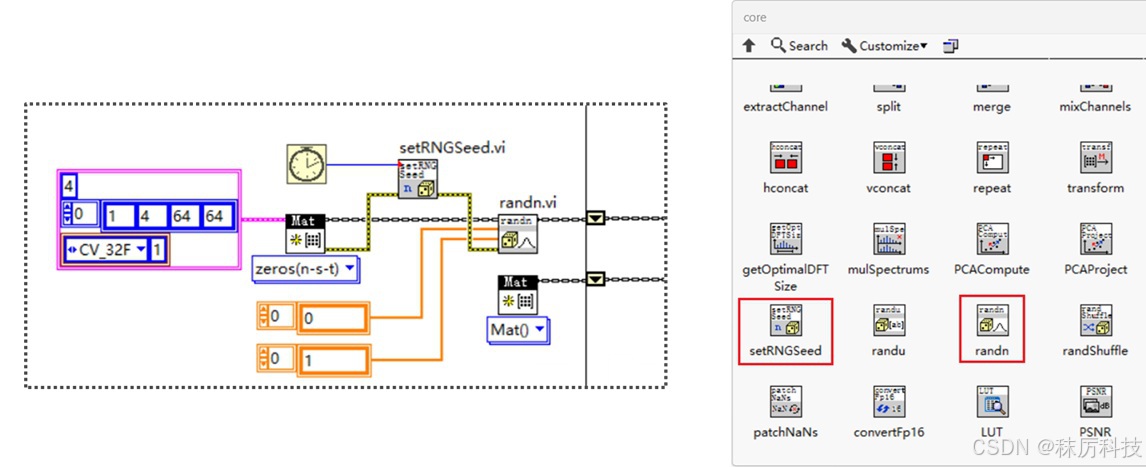
- 随机生成 latent
使用的 API 位于 OpenCV 的 core 选板。首先按照要求的维度尺寸,生成一个全0的 latent。然后调用 randn 函数,将 latent 填充为正态分布的随机数。为了掩盖 “伪随机” 的系统缺陷,我们用 LabVIEW 的毫秒计数器来生成 Seed,送入 setRNGSeed 函数中。
五、优化改进
-
batch_size 问题
由于正、反提示词引导机制,SD1.5 每个循环都要进行 2个 batch 的推理。
那么,是否可以在转 ONNX 格式的时候,就把 batch_size 改成 2,从而使模型一次推理就能处理 2个 batch 呢?
我看不必了。
毕竟个人电脑的显存有限,多 batch 并行计算容易溢出。我宁愿做 2次 batch=1 的推理,也不想做 1次 batch=2 的推理。 -
显存释放问题
每个模型的 Net 对象,会在首次 forward 时分配内存或显存,直到 delete 时才会释放资源。
本例采取的方案是所有 Net 统一初始化,最后再统一释放。如果在中间运行过程中,出现显存不足的问题,您可以考虑改成 “分批释放” 的方案,让已经完成任务的 Net 提前释放,从而将显存留给其他 Net 使用。
另外,如果程序异常中止,从而没有正常 delete 掉所有 Net,将会导致显存一直不释放。这时,只需彻底关闭 LabVIEW 就能恢复。 -
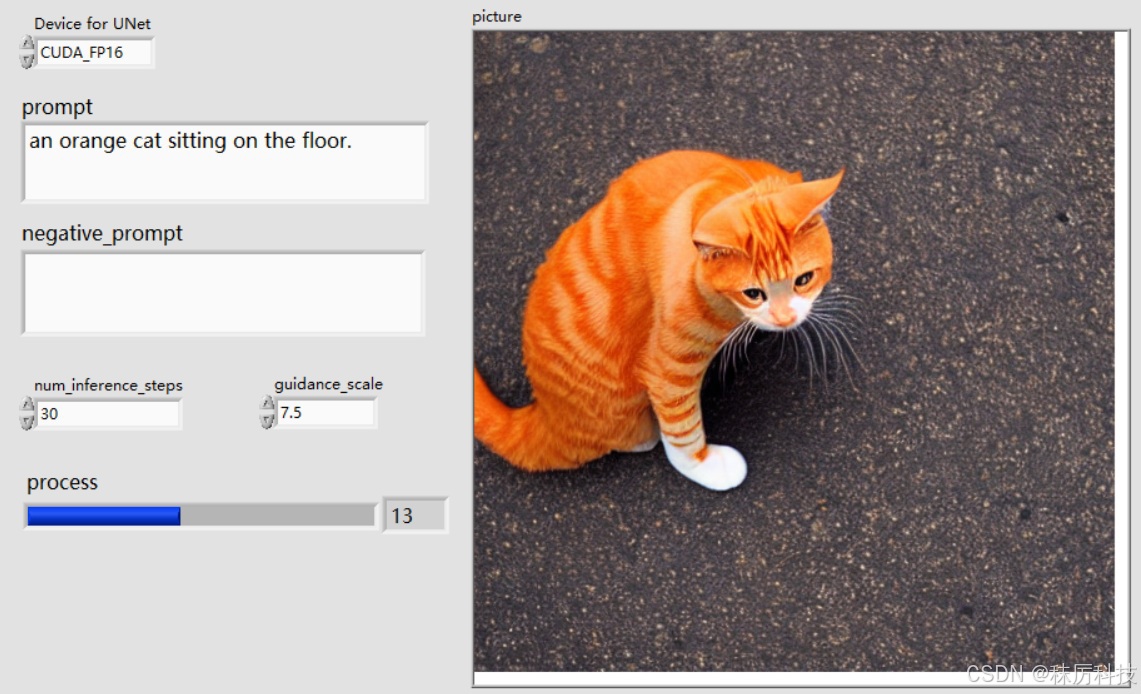
进度条显示
如何在主 VI 界面添加一个进度条,让用户能直观地感受生图的进度和速度呢?
我们可以用子 VI — SD15_run.vi 中 For 循环进行的次数来代表生图进度。但问题是,子 VI 在运行结束前,无法向调用方传递任何值。如何打破这个限制呢?全局变量?可以,但不优雅。我们这里介绍一种 “控件引用+属性节点” 的方案。
在主 VI 插入一个数值控件,类型为 “水平进度条”,然后对其点右键—Create—Reference,将创建的控件引用通过接线端传入 SD15_run.vi 中,在 SD15_run.vi 内部,通过属性节点对进度条的范围与数值进行实时修改,从而实现预期的功能。
总结
- 本系列博文作为LabVIEW工具包—OpenCV的教程,将以专栏的形式陆续发布和更新。
- 对工具包感兴趣的朋友,欢迎下载试用:秣厉科技 - LabVIEW工具包 - OpenCV
- 各位看官有什么想法、建议、吐槽、批评,或新奇的需求,也欢迎留言讨论。


 1617
1617

 被折叠的 条评论
为什么被折叠?
被折叠的 条评论
为什么被折叠?
 到【灌水乐园】发言


