


 文章详细描述了在一个网络环境中,如何配置路由器R1、R2、R3和R4的IP地址、PPP认证方式(PAP和CHAP)、NAT转换以及使用MGRE实现私网通信,并通过RIP协议实现多路由器之间的路由互通。
实验要求:

第一步,基本的IP地址配置
R1:
[R1]int g0/0/1
[R1-GigabitEthernet0/0/1]ip add 192.168.1.1 24      #配置PC的网关
[R1]int Serial 4/0/0
[R1-Serial4/0/0]link-protocol hdlc                  #R1和R2之间采用hdlc封装
[R1-Serial4/0/0]ip add 12.1.1.1 24
R2:
[ISP]int Serial 4/0/1
[ISP-Serial4/0/1]link-protocol hdlc      R1和R2之间采用hdlc
[ISP-Serial4/0/1]ip add 12.1.1.2 24

[ISP]int Serial 3/0/0
[ISP-Serial3/0/0]ip add 23.1.1.1 24       #这里R2和R3、R4之间采用PPP,由于这接口本来就是PPP,所以不用设置
[ISP]int Serial 3/0/1
[ISP-Serial3/0/1]ip add 24.1.1.1 24
[ISP]int lo 0                             #创建环回
[ISP-LoopBack0]ip  add 2.2.2.2 24
R3:
[R3]int g0/0/1
[R3-GigabitEthernet0/0/1]ip  add 192.168.2.1 24
[R3]int Serial 4/0/1
[R3-Serial4/0/1]ip add 23.1.1.2 24
R4:
[R4]int g0/0/1
[R4-GigabitEthernet0/0/1]ip add 192.168.3.1 24
[R4]int Serial 4/0/1
[R4-Serial4/0/1]ip add 24.1.1.2 24
第二步,写上对应的认证:
R2
[ISP]aaa
[ISP-aaa]local-user tmg password cipher 123      #创建认证用户
Info: Add a new user.
[ISP-aaa]local-user tmg service-type ppp          #设置服务类型为PPP
[ISP-aaa]q
[ISP]int Serial 3/0/0
[ISP-Serial3/0/0]ppp authentication-mode pap      #R2和R3之间用PAP
[ISP-Serial3/0/0]q
[ISP]int Serial 3/0/1
[ISP-Serial3/0/1]ppp  authentication-mode chap     #R2和R4之间使用CHAP
R3
[R3]int Serial 4/0/1
[R3-Serial4/0/1]ppp pap local-user tmg password cipher 123
R4
[R4]int Serial 4/0/1
[R4-Serial4/0/1]ppp chap user tmg
[R4-Serial4/0/1]ppp chap password cipher 123
第三步,所有PC都可以访问R2的环回
R1
[R1]ip route-static 0.0.0.0 0 12.1.1.2
[R1]acl 2000
[R1-acl-basic-2000]rule permit source any     #这时的PC相当于私网,通过NAT技术访问R2
[R1-acl-basic-2000]q
[R1]int Serial 4/0/0
[R1-Serial4/0/0]nat outbound 2000             #NAT接口调用
R3
[R3]ip route-static 0.0.0.0 0 23.1.1.1
[R3]acl 2000
[R3-acl-basic-2000]rule permit source any
[R3-acl-basic-2000]q
[R3]int Serial 4/0/1
[R3-Serial4/0/1]nat outbound 2000
R4
[R4]ip route-static 0.0.0.0 0 24.1.1.1
[R4]acl 2000
[R4-acl-basic-2000]rule permit source any
[R4-acl-basic-2000]q
[R4]int Serial 4/0/1
[R4-Serial4/0/1]nat outbound 2000
这时PC就可以访问2.2.2.2R2的环回。
第四步,建立MGRE
R1
[R1]int Tunnel 0/0/0
[R1-Tunnel0/0/0]ip add 10.1.1.1 24
[R1-Tunnel0/0/0]tunnel-protocol gre p2mp
[R1-Tunnel0/0/0]source 12.1.1.1
Jan 22 2024 21:36:00-08:00 R1 %%01IFNET/4/LINK_STATE(l)[0]:The line protocol IP
on the interface Tunnel0/0/0 has entered the UP state.

[R1-Tunnel0/0/0]nhrp entry multicast dynamic
[R1-Tunnel0/0/0]nhrp network-id 100
R3
[R3]int Tunnel 0/0/0
[R3-Tunnel0/0/0]ip add 10.1.1.2 24
[R3-Tunnel0/0/0]tunnel-protocol gre p2mp
[R3-Tunnel0/0/0]source Serial 4/0/1
Jan 22 2024 21:38:20-08:00 R3 %%01IFNET/4/LINK_STATE(l)[0]:The line protocol IP
on the interface Tunnel0/0/0 has entered the UP state.

[R3-Tunnel0/0/0]nhrp entry 10.1.1.1 12.1.1.1 register
[R3-Tunnel0/0/0]nhrp network-id 100
R4
[R4]int Tunnel 0/0/0
[R4-Tunnel0/0/0]ip add 10.1.1.3 24
[R4-Tunnel0/0/0]tunnel-protocol gre p2mp
[R4-Tunnel0/0/0]source Serial 4/0/1
Jan 22 2024 21:40:26-08:00 R4 %%01IFNET/4/LINK_STATE(l)[0]:The line protocol IP
on the interface Tunnel0/0/0 has entered the UP state.

[R4-Tunnel0/0/0]nhrp entry 10.1.1.1 12.1.1.1 register
[R4-Tunnel0/0/0]nhrp network-id 100
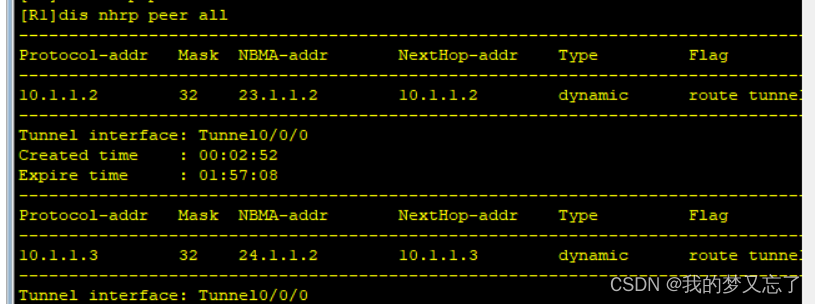
在R1上查看连个节点都注册成功
第五步,通过RIP达到私网的互通
R1
[R1]rip 1
[R1-rip-1]version 2
[R1-rip-1]net 192.168.1.0
[R1-rip-1]net 10.0.0.0
R3
[R3]rip 1
[R3-rip-1]version 2
[R3-rip-1]net 192.168.2.0
[R3-rip-1]net 10.0.0.0
R4
[R4]rip 1
[R4-rip-1]version 2
[R4-rip-1]net 192.168.3.0
[R4-rip-1]net 10.0.0.0
关闭中心接口上的水平分割机制R1
[R1]int Tunnel 0/0/0
[R1-Tunnel0/0/0]undo rip split-horizon


 473
473

 被折叠的 条评论
为什么被折叠?
被折叠的 条评论
为什么被折叠?
 到【灌水乐园】发言


