


 这篇博客介绍了Flask框架的一些关键实践,包括将应用设置为允许外部访问,前端登录密码的JavaScript验证,日志记录到文件的实现,以及在开发环境中避免使用app.run()而改用WSGI服务器(如gevent.wsgi)的建议。文章还探讨了如何自定义日志格式和配置日志记录器。
**1.**外部访问:
app.run(host=“0.0.0.0”) 将run里面参数设置成“0.0.0.0”,在相同网络内访问:ip地址+端口 即可。
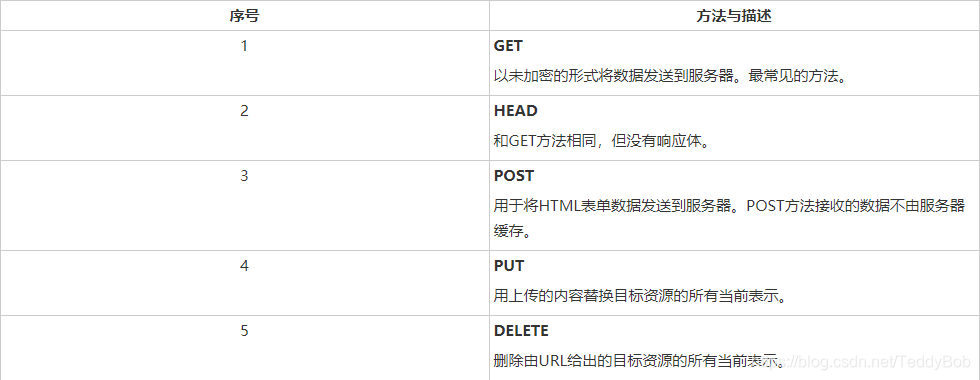
2.Flask HTTP方法
3.前端登录密码判断
前端登录界面,如果只有一个密码判断可以用js写在前端。JS代码如下:
    <script type="text/javascript">
		function val(){
			var name=window.document.getElementById("user").value;
			var password=window.document.getElementById("password").value;
			if (name == ""||password ==""){
				window.alert("用户名或密码不能为空!");
				return false;
			}

			 if(name!="yunda"||password!="yunda"){
				window.alert("用户名或密码错误!");
				return false;
			}
			return true;
		}
	</script>
将其放在里面,下面在表单里写,其中action="form"表示跳转界面为/form,Flask函数需要用method=[“get”,“post”]
<form action="form" method="post" onsubmit="return val()" target="_blank">
其中.getElementById(“user”)里的“user”是通过下方Html代码中设置的
<input name="user" type="text" placeholder="请输入账号" id="user">
4.Flask中将日志写入文件并存入
from flask import Flask
import logging

app = Flask(__name__)


@app.route('/')
def root():
    app.logger.info('info log')
    app.logger.warning('warning log')
    return 'hello'

if __name__ == '__main__':
    app.debug = True
    handler = logging.FileHandler('flask.log', encoding='UTF-8')
    handler.setLevel(logging.DEBUG)
    logging_format = logging.Formatter(
        '%(asctime)s - %(levelname)s - %(filename)s - %(funcName)s - %(lineno)s - %(message)s')
    handler.setFormatter(logging_format)
    app.logger.addHandler(handler)
    app.run()
记录到flask.log中内容为:
2015-08-29 10:12:48,004 - INFO - test.py - root - 9 - info log
2015-08-29 10:12:48,004 - WARNING - test.py - root - 10 - warning log
logging_format = logging.Formatter(
    '%(asctime)s - %(levelname)s - %(filename)s - %(funcName)s - %(lineno)s - %(message)s')
handler.setFormatter(logging_format)
这两句用来控制日志记录格式,效果如上述记录内容;在Python参考文档中有更详细的说明,这里简单介绍一下:
%(asctime)s 即日志记录时间,精确到毫秒
%(levelname)s 即此条日志级别
%(filename)s 即触发日志记录的python文件名
%(funcName)s 即触发日志记录的函数名
%(lineno)s 即触发日志记录代码的行号
%(message)s 这项即调用如app.logger.info(‘info log’)中的参数,即message
该条转载原链接
或者
import logging
logging.basicConfig(level=logging.DEBUG,#控制台打印的日志级别
                    filename='log_new.log',  # 将日志写入log_new.log文件中
                    filemode='a',##模式,有w和a,w就是写模式,每次都会重新写日志,覆盖之前的日志
                    #a是追加模式,默认如果不写的话,就是追加模式
                    format=
                    '%(asctime)s - %(pathname)s[line:%(lineno)d] - %(levelname)s: %(message)s'
                    #日志格式
                    )
以上代码放入flask框架的manage.py文件中即可!
5.执行程序的时候,存在警告waring: 这是开发环境,不要再开发环境执行。
自带app.run()作为路由可能存在少许问题(未深入),建议使用WSGI进行执行。代码如下:
if __name__ == "__main__":
	#app.run(host="0.0.0.0",port=222,threaded=True)  #原本写法
	from gevent import pywsgi
	server = pywsgi.WSGIserver(("0.0.0.0",2222),app)
	server.serve_forever()
6.flask增加日志功能
def log_config():
    # 设置日志的的登记
    logging.basicConfig(level=logging.DEBUG)

    # 日志输出目录
    # log_path = os.path.join(get_cwd(),'flask.log')
    # 创建日志记录器,设置日志的保存路径和每个日志的大小和日志的总大小
    isexit("./cor_log")
    file_log_handler = handlers.TimedRotatingFileHandler("./cor_log/cor.log", when='D', interval=1, encoding="utf-8")
    # 创建日志记录格式,日志等级,输出日志的文件名 行数 日志信息
    # formatter = logging.Formatter("%(levelname)s %(asctime)s [%(filename)s]: %(lineno)s - %(funcName)s - %(message)s")
    formatter = logging.Formatter("%(levelname)s %(asctime)s [%(filename)s]: %(lineno)s - %(funcName)s - %(message)s")
    # 为日志记录器设置记录格式
    file_log_handler.setFormatter(formatter)
    # 为全局的日志工具对象(flaks app使用的)加载日志记录器
    logging.getLogger().addHandler(file_log_handler)
    #方案二
    # logger = logging.getLogger()
    # # format = logging.Formatter('%(asctime)s - %(filename)s[line:%(lineno)d] - %(levelname)s: %(message)s')
    # format = logging.Formatter("%(asctime)s - %(filename)s[line:%(lineno)d] - %(levelname)s: %(message)s")
    # isexit("./cor_log")
    # rotahandler = handlers.TimedRotatingFileHandler("./cor_log/cor.log", when='D', interval=1, encoding="utf-8")
    # rotahandler.setLevel(logging.INFO)
    # rotahandler.setFormatter(format)
    # logger.addHandler(rotahandler)

    #老方案

    # LOG_FORMAT = "%(asctime)s - %(levelname)s - %(message)s"
    # DATE_FORMAT = "%Y/%m/%d %H:%M:%S"
    # isexit("./cor_log")
    # dd = str(datetime.datetime.now()).split(" ")[0]
    # logging.basicConfig(filename='cor.log', level=logging.DEBUG, format=LOG_FORMAT, datefmt=DATE_FORMAT)
    # logging.basicConfig(filename='./cor_log/cor.log', level=logging.DEBUG, format=LOG_FORMAT, datefmt=DATE_FORMAT)

log_config()

app = Flask(__name__)

logging.info("程序开始")  #会存入日志中


 1287
1287

 被折叠的 条评论
为什么被折叠?
被折叠的 条评论
为什么被折叠?
 到【灌水乐园】发言


