


观看《Java并发编程的艺术》所做笔记
Java并发容器和框架
ConcurrentHashMap的实现原理
为什么要使用ConcurrentHashMap
- 在并发中HashMap是线程不安全的
- HashTable虽然线程安全但是在竞争锁激烈的情况下,效率低
- 而ConcurrentHashMap使用分段锁技术一段数据配一把锁,既保证了安全又使效率不低
JDK7ConcurrentHashMap结构
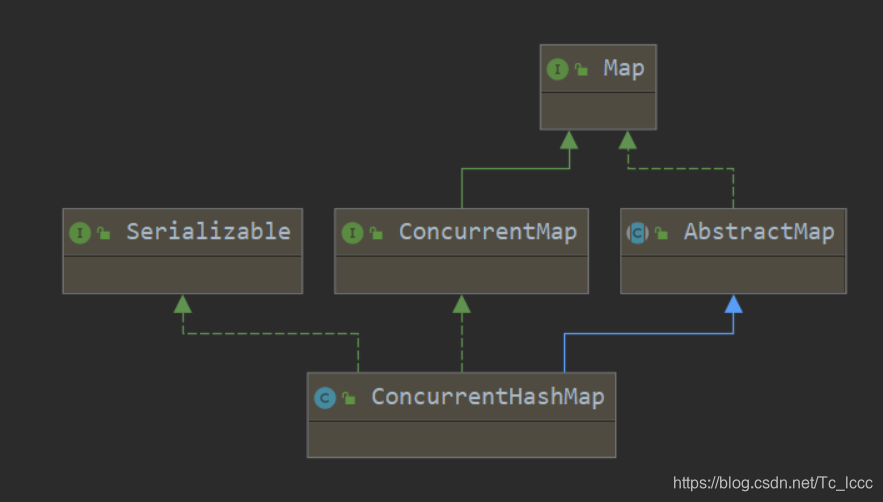
public class ConcurrentHashMap<K,V> extends AbstractMap<K,V>
    implements ConcurrentMap<K,V>, Serializable {
ConcurrentHashMap继承自AbstractMap 实现了ConcurrentMap接口和可序列化接口
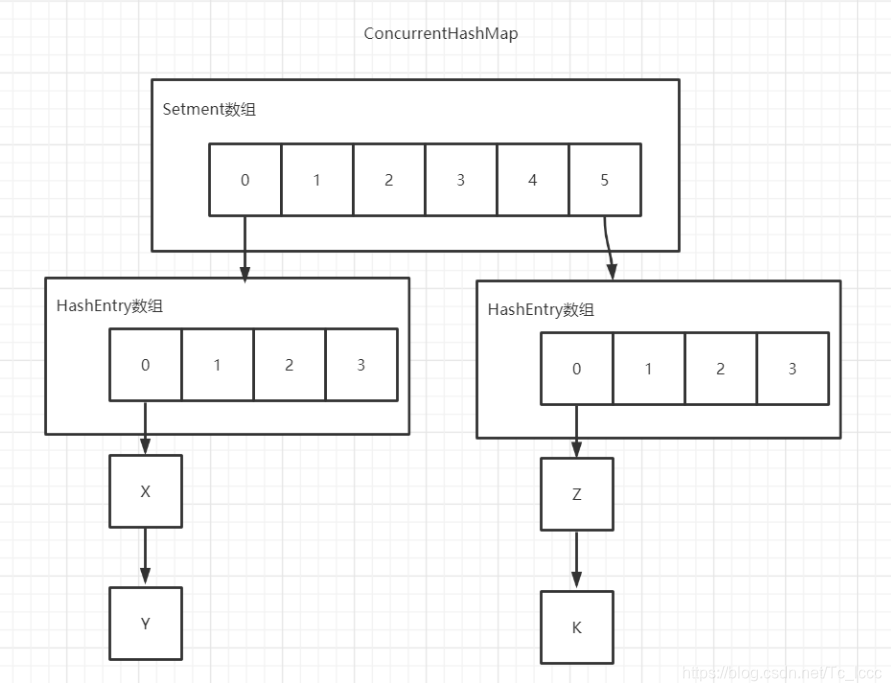
ConcurrentHashMap由Setment数组和HashEntry数组组成
-
HashEntry用来存储键值对 链表
-
在Setment数组中的每个元素都包含一个HashEntry 数组+链表 (Setment继承了ReentrantLock,所以要修改HashEntry上的键值对时需要获得HashEntry对应的Setment上的锁)
ConcurrentHashMap图
JDK7ConcurrentHashMap初始化
查看ConcurrentHashMap(int,int,int)构造器源码
//调用无参构造时:初始化容量initialCapacity=16,负载因子loadFactor=0.75F,并发级别concurrencyLevel=16
public ConcurrentHashMap(int initialCapacity,
                         float loadFactor, int concurrencyLevel) {
    //如果三个参数不符合规范抛出非法参数异常
    if (!(loadFactor > 0) || initialCapacity < 0 || concurrencyLevel <= 0)
        throw new IllegalArgumentException();
    //如果并发级别高于最大值就将并发级别设置为最大值1 << 16(2的16次方)
    if (concurrencyLevel > MAX_SEGMENTS)
        concurrencyLevel = MAX_SEGMENTS;
    //sshift记录ssize左移次数
    int sshift = 0;
    //ssize是Setment数组长度
    int ssize = 1;
    //ssize小于并发级别就左移1位,并且sshift记录左移次数
    while (ssize < concurrencyLevel) {
        ++sshift;
        ssize <<= 1;
    }
    //segmentShift:用于定位参与散列计算的位数
    this.segmentShift = 32 - sshift;
    //segmentMask:散列运算的掩码
    this.segmentMask = ssize - 1;
    //如果初始容量大于最大容量1 << 30(2的30次方)就把初始容量设置为最大容量
    if (initialCapacity > MAXIMUM_CAPACITY)
        initialCapacity = MAXIMUM_CAPACITY;
    //c=初始容量/setment数组长度
    int c = initialCapacity / ssize;
    //对c进行向上取整
    if (c * ssize < initialCapacity)
        ++c;
    //HashEntry长度cap:初始化为最小HashEntry长度MIN_SEGMENT_TABLE_CAPACITY = 2;
    int cap = MIN_SEGMENT_TABLE_CAPACITY;
    //如果cap小于c就左移1位 说明HashEntry长度不是2就是2的n次方
    while (cap < c)
        cap <<= 1;
    //创建下标0的segment
    Segment<K,V> s0 =
        new Segment<K,V>(loadFactor, (int)(cap * loadFactor),
                         (HashEntry<K,V>[])new HashEntry[cap]);
    //创建长度为ssize的segment数组
    Segment<K,V>[] ss = (Segment<K,V>[])new Segment[ssize];
    //将下标0的segment加入segment数组中
    UNSAFE.putOrderedObject(ss, SBASE, s0); // ordered write of segments[0]
    this.segments = ss;
}
通过源码得出的结论:
Segment数组长度
segment数组长度(ssize)由concurrentLevel并发级别求出
sszie总是比concurrentLevel大,且是2的n次方(比如concurrentLevel为:17或20或30时,ssize都是32)
将segment数组长度设为2的n次方是为了使用位运算取代模运算,提高效率
concurrentLevel最大值为2的16次方所以segment数组长度(ssize)最大为2的16次方
默认下concurrentLevel为16,所以segment数组长度默认为16
segmentShift和segmentMask定位segment
如果散列表中节点分布不均匀,很多元素都在同一个segment上,那分段锁就失去了意义,所以要让元素在segment上分布均匀
添加,删除,获取元素时,需要通过散列运算定位到segment,而散列运算需要segmentShift和segmentMask来进行充分的散列,确保每位数据都散开,减少哈希冲突
private int hash(Object k) {
    int h = hashSeed;

    if ((0 != h) && (k instanceof String)) {
        return sun.misc.Hashing.stringHash32((String) k);
    }

    h ^= k.hashCode();
    // Spread bits to regularize both segment and index locations,
    // using variant of single-word Wang/Jenkins hash.
    h += (h <<  15) ^ 0xffffcd7d;
    h ^= (h >>> 10);
    h += (h <<   3);
    h ^= (h >>>  6);
    h += (h <<   2) + (h << 14);
    return h ^ (h >>> 16);
}
使用Wang/Jenkins hash算法将哈希码进行再散列,目的使元素能够均匀的分布在不同的segment中为了减少哈希冲突
如果segmentForHash(int)定位segment
//h = 哈希码
private Segment<K,V> segmentForHash(int h) {
    long u = (((h >>> segmentShift) & segmentMask) << SSHIFT) + SBASE;
    return (Segment<K,V>) UNSAFE.getObjectVolatile(segments, u);
}
- segmentShift用于定位参与散列运算的位数
- segmentShift=32-sshift(ssize左移次数)
- segmentMask是散列运算的掩码
- segmentMask=ssize - 1
默认情况下,ssize=16,sshift=4,segmentShift=28,segmentMask=15
(h >>> segmentShift) & segmentMask : 让哈希码无符号右移28位,让高4位参与到散列计算中
HashEntry数组长度
c:先求出每个segment中应该存放多少个键值对
c = 初始化容量 / ssize (需要对c进行向上取整) 默认情况下c = 16/16=1
cap: HashEntry的长度 (最小为2,如果小于c就左移) 默认情况下c=1,cap=2
初始化segment
//lf:负载因子默认0.75F
//threshold:是否需要扩容的阈值 threshold=(int)cap*lf(HashEntry数组长度*负载因子) 默认(int)2*0.75=1
//tab:创建的HashEntry 默认创建长度为cap=2的HashEntry
Segment(float lf, int threshold, HashEntry<K,V>[] tab) {
    this.loadFactor = lf;
    this.threshold = threshold;
    this.table = tab;
}
JDK7ConcurrentHashMap的操作
get操作
public V get(Object key) {
    Segment<K,V> s; // manually integrate access methods to reduce overhead
    HashEntry<K,V>[] tab;
    //哈希码进行扩散
    int h = hash(key);
    //定位segment的哈希算法:(((h >>> segmentShift) & segmentMask) << SSHIFT) + SBASE
    long u = (((h >>> segmentShift) & segmentMask) << SSHIFT) + SBASE;
    //定位到的segment不为空且segment的HashEntry不为空
    if ((s = (Segment<K,V>)UNSAFE.getObjectVolatile(segments, u)) != null &&
        (tab = s.table) != null) {
        //循环定位HashEntry
        //定位HashEntry的哈希算法:(((tab.length - 1) & h)) << TSHIFT) + TBASE
        for (HashEntry<K,V> e = (HashEntry<K,V>) UNSAFE.getObjectVolatile
                 (tab, ((long)(((tab.length - 1) & h)) << TSHIFT) + TBASE);
             e != null; e = e.next) {
            K k;
            //找到了Key 返回
            if ((k = e.key) == key || (e.hash == h && key.equals(k)))
                return e.value;
        }
    }
    return null;
}
1. 对哈希码进行扩散
2. 定位segment
3. 定位HashEntry
4. 在HashEntry链表上寻找Key 找到返回Value 没找到返回null
定位segment哈希算法使用哈希码再扩散的高位计算
定位hash entry哈希算法使用哈希码在扩散的值直接计算
get操作是典型的读操作,get操作未使用锁,get操作中通过volatile修饰共享变量,保证内存数据的可见性,即使有其他线程对共享变量进行写操作,那这个线程也会去主内存中重新读取这个共享变量的新值,不会出现脏读
这是volatile代替锁的经典场景
put操作
public V put(K key, V value) {
    Segment<K,V> s;
    //Value不能为空
    if (value == null)
        throw new NullPointerException();
    //哈希码再扩散
    int hash = hash(key);
    //定位segment
    int j = (hash >>> segmentShift) & segmentMask;
    if ((s = (Segment<K,V>)UNSAFE.getObject          // nonvolatile; recheck
         (segments, (j << SSHIFT) + SBASE)) == null) //  in ensureSegment
        s = ensureSegment(j);
    	//去定位到的segment中添加(替换)键值对
    return s.put(key, hash, value, false);
}

	final V put(K key, int hash, V value, boolean onlyIfAbsent) {
        	//尝试获取锁 成功则node为null,失败则进入scanAndLockForPut中循环尝试获取锁,次数过多挂起线程
            HashEntry<K,V> node = tryLock() ? null :
                scanAndLockForPut(key, hash, value);
            V oldValue;
            try {
                //定位hashentry
                HashEntry<K,V>[] tab = table;
                int index = (tab.length - 1) & hash;
                HashEntry<K,V> first = entryAt(tab, index);
                //遍历链表hashentry,判断操作是添加还是替换
                for (HashEntry<K,V> e = first;;) {
                    //当前节点(hashentry)不为空判断是否有重复Key有则替换退出循环,没有则查看下一个节点
                    if (e != null) {
                        K k;
                        //如果有重复的Key则替换
                        if ((k = e.key) == key ||
                            (e.hash == hash && key.equals(k))) {
                            oldValue = e.value;
                            if (!onlyIfAbsent) {
                                e.value = value;
                                ++modCount;
                            }
                            break;
                        }
                        e = e.next;
                    }
                    //当前节点(hashentry)为空,说明要进行的操作是添加而不是替换
                    else {
                        if (node != null)
                            node.setNext(first);
                        else
                            node = new HashEntry<K,V>(hash, key, value, first);
                        int c = count + 1;
                        //节点数量超过阈值 并且 hashentry数组小于最大容量 则进行扩容添加元素否则直接添加元素
                        if (c > threshold && tab.length < MAXIMUM_CAPACITY)
                            rehash(node);
                        else
                            setEntryAt(tab, index, node);
                        ++modCount;
                        count = c;
                        oldValue = null;
                        break;
                    }
                }
            } finally {
                //解锁唤醒其他线程
                unlock();
            }
            return oldValue;
        }
-
定位segment
-
尝试获取锁
2.1 获取锁失败,进入scanAndLockForPut(key, hash, value)重复获取锁,次数太多挂起线程
2.2 获取锁成功,定位hashentry
-
遍历hashentry链表,判断操作是添加还是替换
3.1 如果当前节点(hashentry)不为空,且Key相同则是替换,替换完Value后退出
3.2 如果当前节点(hash entry)为空,则是添加操作
3.21 判断是否要扩容,需要扩容则扩容后添加元素,不需要则直接添加元素
-
添加/替换操作完之后解锁,唤醒其他线程
因为put操作是写操作,所以在多线程中需要加锁ReentrantLock
是否需要扩容
int c = count + 1;
if (c > threshold && tab.length < MAXIMUM_CAPACITY)
                            rehash(node);
- count是否超过阈值 count是该segment中的所有元素数量
- hashentry数组长度是否小于最大值
如何扩容
private void rehash(HashEntry<K,V> node) {
    HashEntry<K,V>[] oldTable = table;
    int oldCapacity = oldTable.length;
    int newCapacity = oldCapacity << 1;
    threshold = (int)(newCapacity * loadFactor);
    HashEntry<K,V>[] newTable =
        (HashEntry<K,V>[]) new HashEntry[newCapacity];
    int sizeMask = newCapacity - 1;
    for (int i = 0; i < oldCapacity ; i++) {
        HashEntry<K,V> e = oldTable[i];
        if (e != null) {
            HashEntry<K,V> next = e.next;
            int idx = e.hash & sizeMask;
            if (next == null)   //  Single node on list
                newTable[idx] = e;
            else { // Reuse consecutive sequence at same slot
                HashEntry<K,V> lastRun = e;
                int lastIdx = idx;
                for (HashEntry<K,V> last = next;
                     last != null;
                     last = last.next) {
                    int k = last.hash & sizeMask;
                    if (k != lastIdx) {
                        lastIdx = k;
                        lastRun = last;
                    }
                }
                newTable[lastIdx] = lastRun;
                // Clone remaining nodes
                for (HashEntry<K,V> p = e; p != lastRun; p = p.next) {
                    V v = p.value;
                    int h = p.hash;
                    int k = h & sizeMask;
                    HashEntry<K,V> n = newTable[k];
                    newTable[k] = new HashEntry<K,V>(h, p.key, v, n);
                }
            }
        }
    }
    int nodeIndex = node.hash & sizeMask; // add the new node
    node.setNext(newTable[nodeIndex]);
    newTable[nodeIndex] = node;
    table = newTable;
}
创建容量为原来容量2倍的Hashentry数组
将原数组中的元素进行再散列后插入新数组
只会对某个segment扩容,而不会对所有segment扩容
size操作
public int size() {
    // Try a few times to get accurate count. On failure due to
    // continuous async changes in table, resort to locking.
    final Segment<K,V>[] segments = this.segments;
    int size;
    boolean overflow; // 判断是否溢出
    long sum;         // 统计modCount
    long last = 0L;   // 上一次统计的modCount
    int retries = -1; // 为2时,将segment全锁住来统计size
    try {
        for (;;) {
            //RETRIES_BEFORE_LOCK=2
            //如果retries为2时,会把concurrentHashMap下的所有segment全部锁住来统计size
            if (retries++ == RETRIES_BEFORE_LOCK) {
                for (int j = 0; j < segments.length; ++j)
                    ensureSegment(j).lock(); // force creation
            }
            sum = 0L;
            size = 0;
            overflow = false;
            //遍历segment 统计modCount和count
            for (int j = 0; j < segments.length; ++j) {
                Segment<K,V> seg = segmentAt(segments, j);
                if (seg != null) {
                    sum += seg.modCount;
                    int c = seg.count;
                    //size累加统计的count 并判断是否溢出
                    if (c < 0 || (size += c) < 0)
                        overflow = true;
                }
            }
            //如果该次统计modCount数与上次一致,说明这2次统计间没有写操作,这个size是正确的
            if (sum == last)
                break;
            last = sum;
        }
    } finally {
        //如果retries >2需要解锁所有segment
        if (retries > RETRIES_BEFORE_LOCK) {
            for (int j = 0; j < segments.length; ++j)
                segmentAt(segments, j).unlock();
        }
    }
    return overflow ? Integer.MAX_VALUE : size;
}
要得到size就要把segment数组中的所有segment的count相加,在这期间有可能发生写操作(添加元素或删除元素)
最安全的方法: 把所有segment全锁起来统计count,效率低
JDK7ConcurrentHashMap的做法: 先不加锁尝试3次(retries = -1,0,1时)统计count和modCount(在发生写操作put,remove,clean时会改变modCount的值),如果前后2次统计的modCount相同说明没发生写操作,这个size是正确的,如果前后2次modCount值不同说明发生了写操作,size的值不一定正确,超过3次后则使用最安全的方法
ConcurrentLinkedQueue的实现原理
ConcurrentLinkedQueue采用CAS+失败重试的方式实现非阻塞式的线程安全队列
ConcurrentLinkedQueue结构
public class ConcurrentLinkedQueue<E> extends AbstractQueue<E>
        implements Queue<E>, java.io.Serializable {
ConcurrentLinked继承自AbstractQueue抽象队列,实现了Queue队列接口和可序列化接口
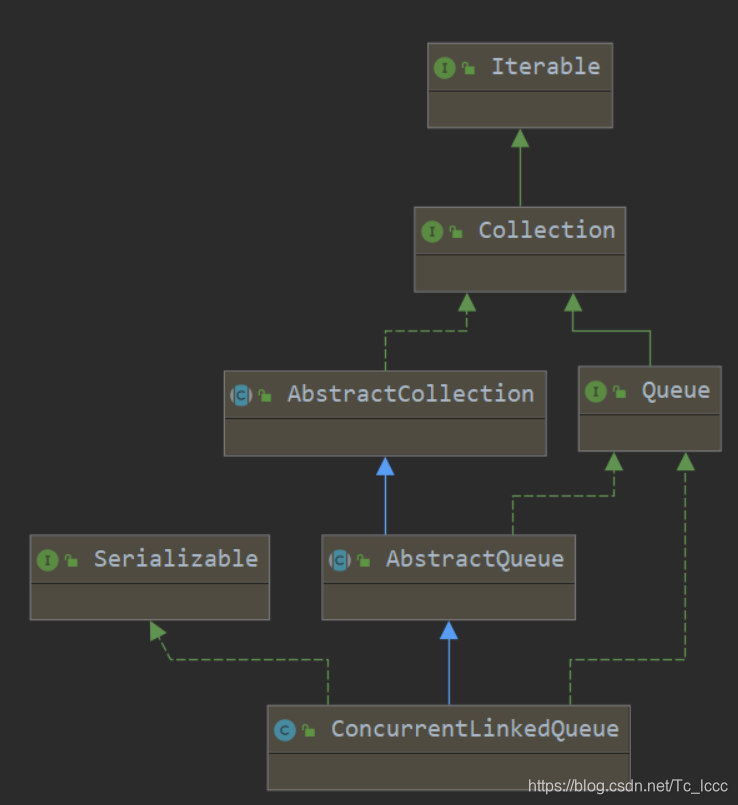
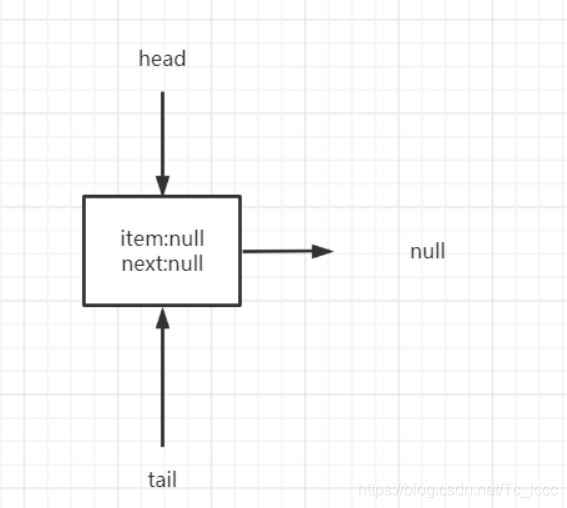
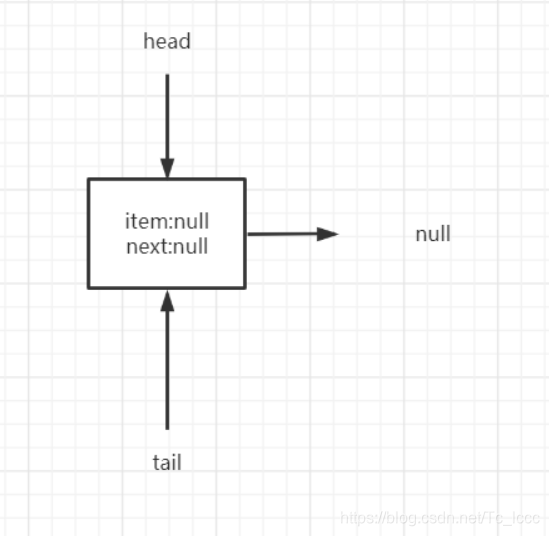
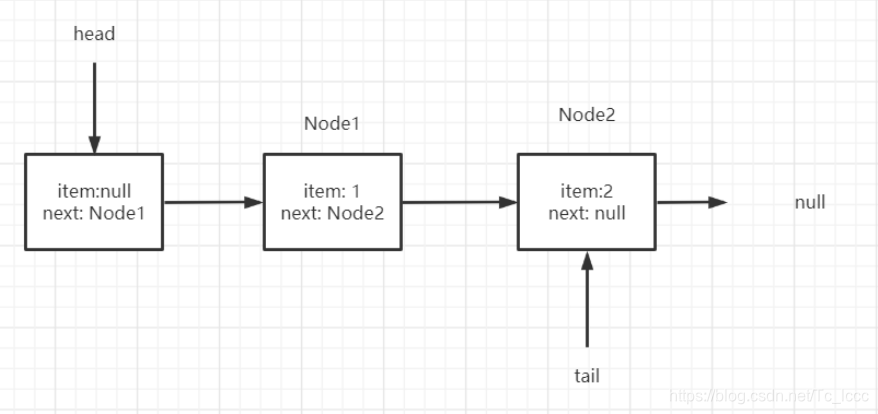
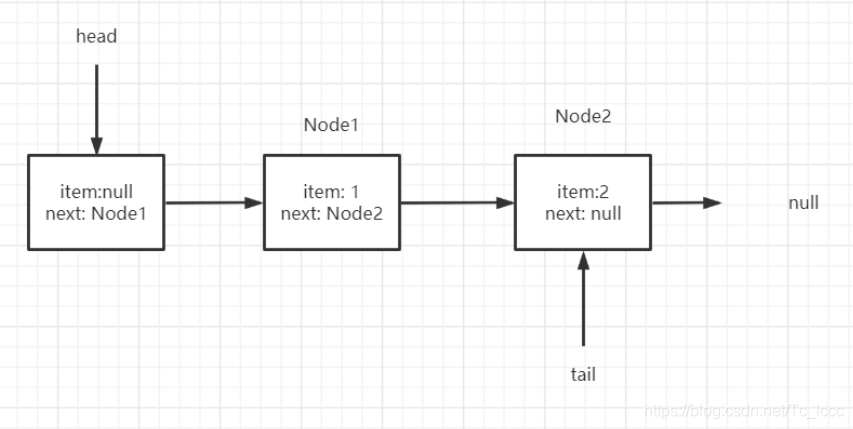
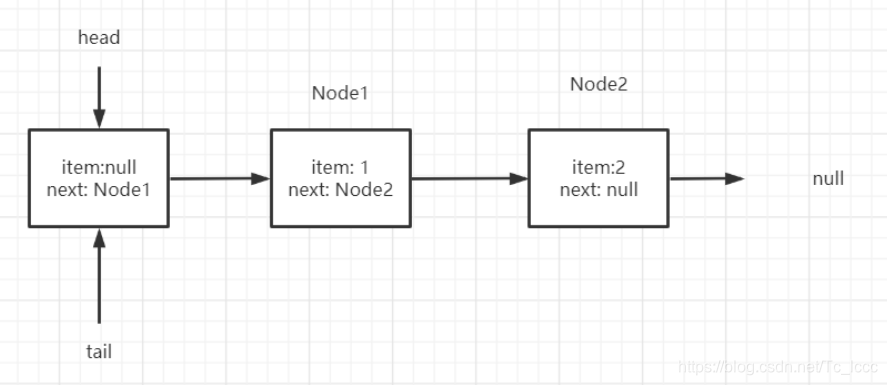
ConcurrentLinkedQueue由head,tail节点组成
每个节点由==数据域: 节点元素(item)和指针域: 指向下一个节点的引用(next)==组成

ConcurrentLinkedQueue初始化
查看ConcurrentLinkedQueue的无参构造
public ConcurrentLinkedQueue() {
    head = tail = new Node<E>(null);
}
查看构造可以知道ConcurrentLinkedQueue初始化时,头尾节点是同一个节点且这个节点元素为null(next也为null)
ConcurrentLinkedQueue操作
如果使用Idea debug ConcurrentLinkedQueue (巨坑)
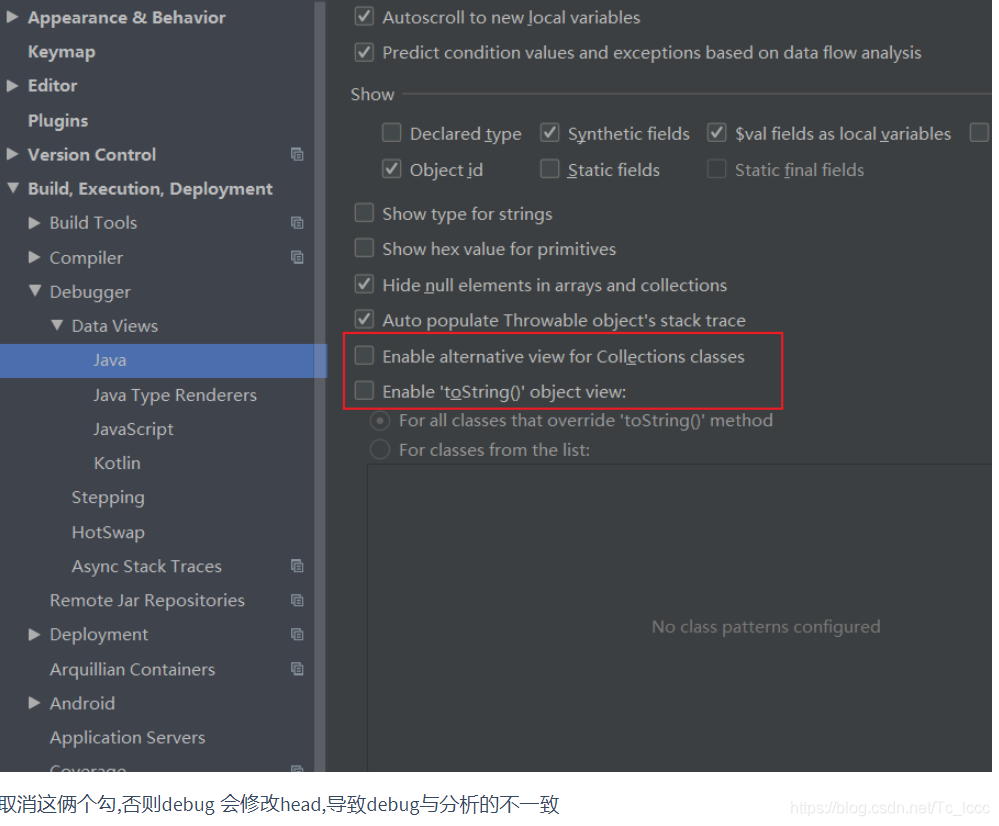
取消这俩个勾,否则debug 会修改head,导致debug与分析的不一致
队列的主要操作由:入队,出队
入队操作
入队:就是将新元素加入队列的尾部
ConcurrentLinkedQueue中采用HOPS设计: ConcurretnLinkedQueue中的首尾节点head,tail并不一定是队列中真正的首尾节点,因为内部实现时,并不是每次入队,出队操作都会CAS的更新首尾节点,因为每次入队,出队操作都CAS更新首尾节点效率不高
HOPS延迟更新首尾节点的设计,减少CAS更新次数,提高效率
虽然这会导致tail与真正的尾节点之间有一段距离,但这只需要再循环定位真正的尾节点就可以了
查看offer()源码
源码很难看懂,建议先看后面的流程和总结,最后看源码
情况A: p是真正尾节点(它的后继节点为空),CAS设置p的后继节点为新节点,然后判断tail是否为真正尾节点,不是则CAS更新tail为真正尾节点
情况B: p==p.next 说明poll的时候,当前节点被构建为哨兵节点(自己的后继节点是自己)
情况C: 定位真正的尾节点p
public boolean offer(E e) {
    //检查入队元素是否为空,为空抛出空指针异常
    checkNotNull(e);
    //构建数据域为e的新节点
    final Node<E> newNode = new Node<E>(e);
    //循环(失败重试) t:当前的尾节点 p:真正的尾节点
    for (Node<E> t = tail, p = t;;) {
        //q:p的下一个节点
        Node<E> q = p.next;
        //情况A:
        //如果q为空(p的下一个节点为空),说明p就是尾节点
        if (q == null) {
            //CAS操作设置尾节点p的next指向新节点
            //更新失败则说明有其他线程入队了元素,使得期望值null比较不对导致更新失败
            if (p.casNext(null, newNode)) {
                //如果p(真正的尾节点)不等于t(tail)则CAS的更新tail为新节点(也就是p的下一个节点)
                //更新失败说明其他线程已经更新了tail
                if (p != t)
                    casTail(t, newNode);
                return true;
            }
        }
        //情况B:
        //如果p==q说明 有其他线程指向过poll将next指向了自己(在poll中可能会将原头节点自己指向自己构建为哨兵节点)
       	//在并发中遇到这种情况时,tail不在队列上了,需要跳转到head上
        else if (p == q)
            //t != (t = tail):原来的tail(t)与现在的tail不同,说明tail被修改过
            //tail被修改过,让p=修改过的tail
            //tail未被修改过,让p=head
            p = (t != (t = tail)) ? t : head;
        //情况C:定位真正的尾节点
        //说明此时的p不是真正的尾节点,要去定位真正的尾节点
        else
            //p != t:p不等于原来的tail
            //t != (t = tail):说明tail被修改过
            //p不是原来的tail且tail被修改过则让p=被修改过的tail
            //否则让p=q(p的下一个节点)
            p = (p != t && t != (t = tail)) ? t : q;
    }
}
offer入队主要做的事情
- 定位真正的尾节点
- 添加新节点: 使用CAS将入队的新节点设置为尾节点的next节点 (根据tail是否等于尾节点判断,是否要更新tail)
如果tail就是真正的尾节点,那么会CAS更新尾节点的next节点为新节点,且不会CAS更新tail
如果tail不是真正的尾节点,那么会先定位到真正的尾节点,再CAS更新尾节点的next节点为新节点,再CAS更新tail
入队方法只会返回true,所以不要通过返回值判断是否入队成功
出队操作
出队:就是将队列头部第一个有效节点出队
查看出队poll源码
源码很难看懂,建议先看后面的流程和总结,最后看源码
public E poll() {
    restartFromHead:
    for (;;) {
        //head不一定是真正头节点 p:真正头节点
        for (Node<E> h = head, p = h, q;;) {
            //拿到p的数据域
            E item = p.item;
			//如果p的数据域不为空 则 CAS将数据域更新为null
            if (item != null && p.casItem(item, null)) {
                //如果head不是真正头节点时 更改头节点
                if (p != h)
                    updateHead(h, ((q = p.next) != null) ? q : p);
                //返回p的数据域
                return item;
            }
            //如果p的数据域为空且下一个节点为空 说明是空队列 更改头节点 返回null
            else if ((q = p.next) == null) {
                updateHead(h, p);
                return null;
            }
            //如果 p==p.next(哨兵节点) 进入下一次循环
            else if (p == q)
                continue restartFromHead;
            //p=q:用当前节点的下一个节点去下一轮循环查看数据域是否为空
            else
                p = q;
        }
    }
}

//h:head p:真正头节点
final void updateHead(Node<E> h, Node<E> p) {
    	//如果head不为真正头节点才CAS更新head
        if (h != p && casHead(h, p))
            //更新完head后,h不为head,h自己指向自己(构建哨兵节点)
            h.lazySetNext(h);
}
poll操作主要做的事
- 定位真正的头节点
- 删除头节点 : 数据域设置为null (根据head节点是不是真正的头节点判断要不要CAS更新head并构建新节点)
当head节点中有数据域时,说明head节点是真正头节点是待删除的,CSA更新数据域为null,不会更新head
当head节点中没数据域时,说明head节点不是真正头节点,先寻找真正头节点(p=q=p.next),找到后再CAS更新数据域为null,再调用updateHead更新head和构造哨兵节点
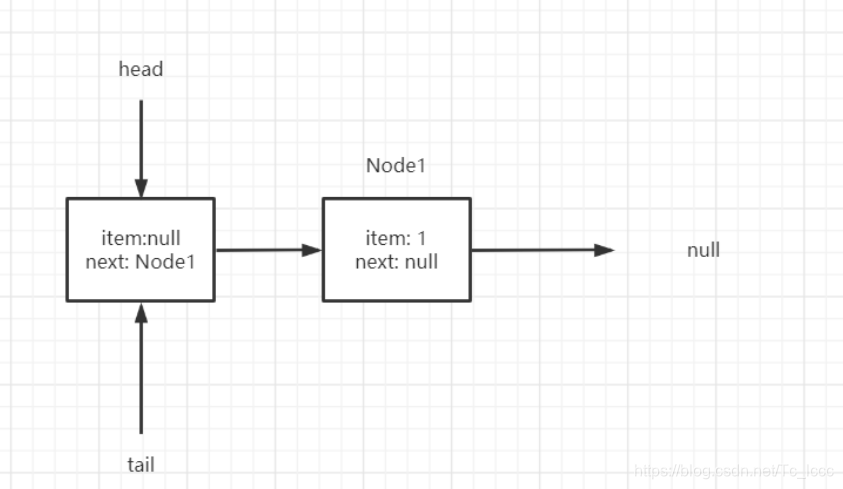
单线程情况下的入队
在IDEA下Debug第一次offerCAS加入新节点后,会出现1、tail.next 指向了tail本身 2、head 指向了newNode 3、p.next 也指向了tail本身的错误信息
ConcurrentLinkedQueue<Integer> queue = new ConcurrentLinkedQueue<>();
queue.add(1);
queue.add(2);
初始化
第一次入队
第一次入队时,t=tail,p=t,q=p.next
此时的p就是真正的尾节点,q为空,符合情况A
先CAS设置 尾节点.next = 新节点
因为此时的 p==t 所以不更新tail
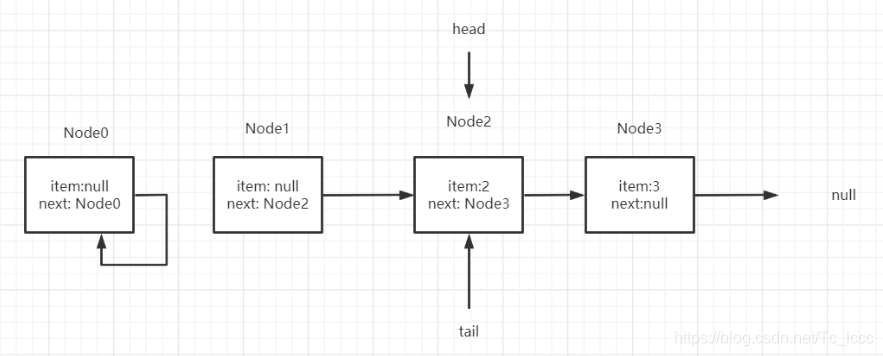
第二次入队
此时t=tail,p=t,q=p.next
q为Node1,不为空,所以不会进入情况A
q也不等于p,所以不会进入情况B
所以进入情况C,定位真正尾节点后此时p = q = Node1
再次循环
q = p.next = null
符合情况A,CAS操作p.next = 新节点
因为 p != t 说明tail此时不是真正的尾节点,CSA更新tail为真正尾节点
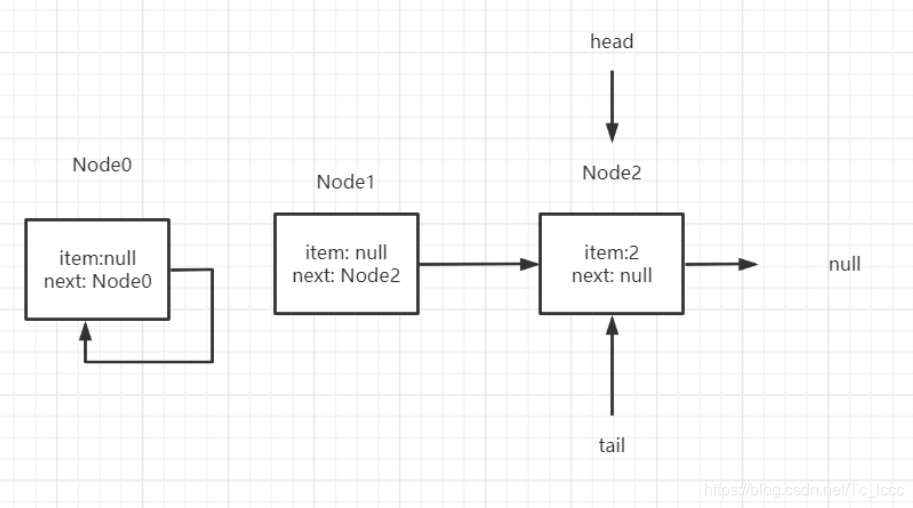
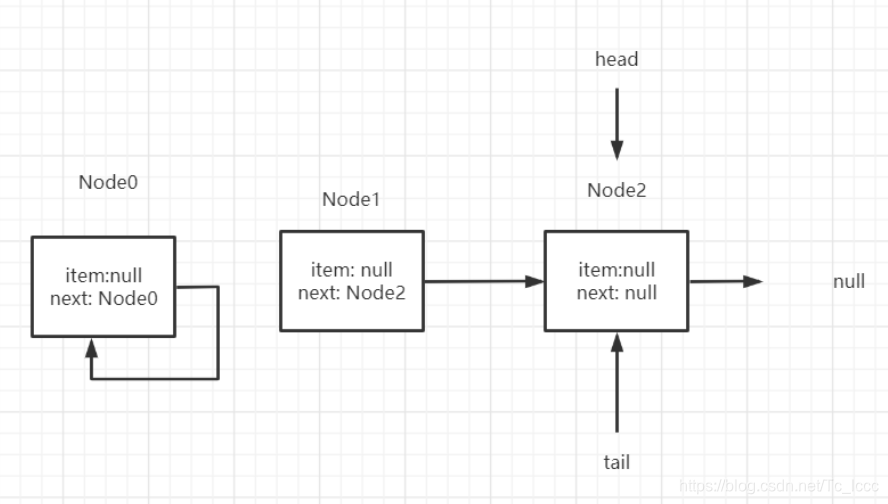
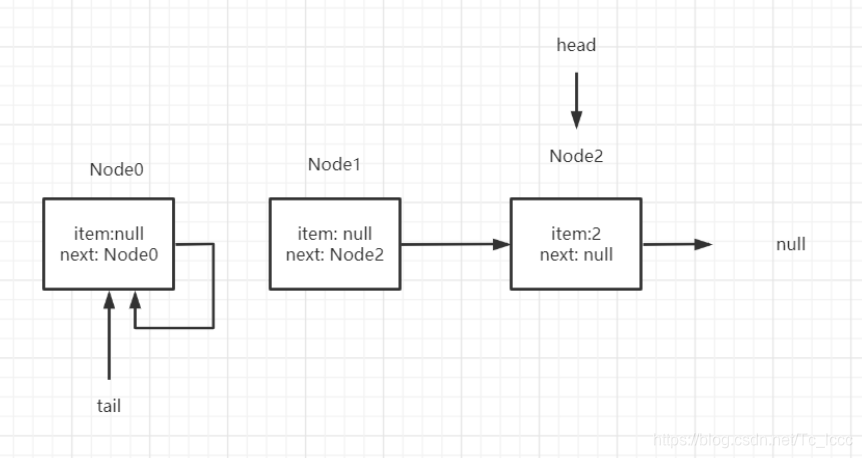
单线程情况下的出队
初始情况
第一次出队
第一轮循环: head数据域为空,不是真正头节点,p=q(q=p.next),下一个节点试探
第二轮循环: p数据域为非空,CAS设置p数据域为null,因为p!=h(head不是真正的头节点),所以要更新head ,构建哨兵节点
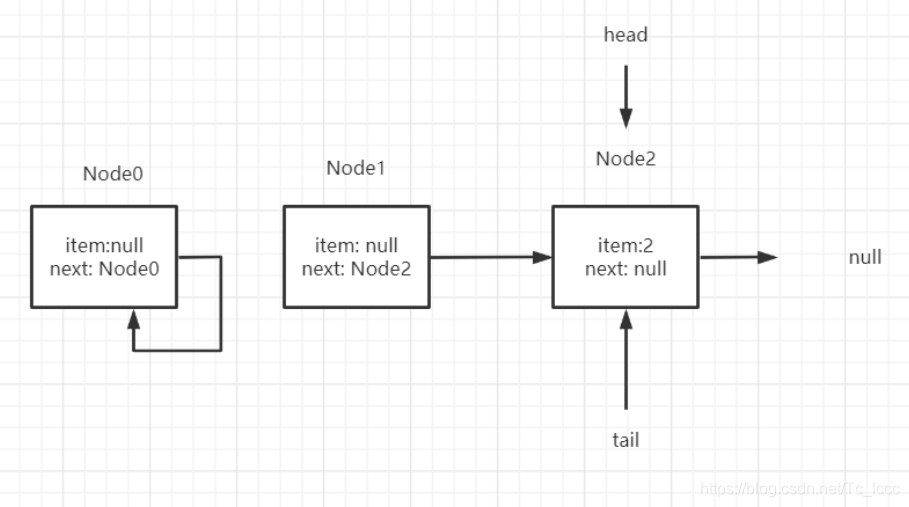
第二次出队
head数据域非空,CAS更新为null
多线程的入队出队
offer-poll
线程A 进行offer 操作 ,线程B进行poll操作
线程A发现q=p.next不为空, 线程B发现head数据域为空更新head构建哨兵节点 线程B执行完
线程A 此时的p是哨兵节点 p=q=p.next
if (p == q)
    p = (t != (t = tail)) ? t : head;
发现 t == (t = tail) tail未被修改过 于是 p = head
下一轮循环发现q=p.next=null 当前p是真正尾节点,添加新节点返回
总结
ConcurrentLinkedQueue 是采用 CAS+失败重试 实现非阻塞式的线程安全队列
-
入队
- 先定位到真正的尾节点
- 再使用CAS操作设置添加的新节点
- 根据本次入队的tail是否是真正的尾节点判断是否要更新tail
- tail是真正尾节点 则不更新
- tail不是真正尾节点 则更新
-
出队
-
先定位到真正头节点
-
再使用CAS操作设置真正头节点的数据域(item)为null
-
根据本次出队的head是否是真正头节点判断是否要更新head,创建哨兵节点(原来的head自己指向自己变为哨兵节点)
- head是真正头节点,不更新head,不创建哨兵节点
- head不是真正头节点,更新head,创建哨兵节点
创建哨兵节点是为了并发中的offer时能够定位到真正尾节点
-
Java中的阻塞队列
阻塞队列的4种处理方法
API介绍
| 方法名 | 抛出异常 | 特殊返回值 | 阻塞等待 | 定时阻塞等待 |
|---|---|---|---|---|
| 添加 | add(Object) | offer(Object) | put(Object) | offer(Object,long,TimeUnit) |
| 删除 | remove() | poll() | take() | poll(long,TimeUnit) |
| 查看对头元素 | element() | peek() |
使用方式
使用4种处理方式
/**
     * 测试阻塞队列抛出异常的处理方式add,remove
     * 队满add 抛出异常IllegalStateException
     * 队空remove 抛出异常NoSuchElementException
     */
    @Test
    public void test1(){
        ArrayBlockingQueue<Integer> abq = new ArrayBlockingQueue(3);
        abq.add(1);
        abq.add(2);
        abq.add(3);
        //抛出异常 java.lang.IllegalStateException: Queue full
        //abq.add(4);
        System.out.println(abq.remove());//1
        System.out.println(abq.remove());//2
        System.out.println(abq.remove());//3
        //抛出异常 java.util.NoSuchElementException
        //System.out.println(abq.remove());
    }

    /**
     * 测试阻塞队列处理方式offer,poll
     * 队满offer 返回false
     * 队空poll  返回null
     */
    @Test
    public void test2()  {
        LinkedBlockingQueue<Integer> lbq = new LinkedBlockingQueue<>(3);
        System.out.println(lbq.offer(1));//true
        System.out.println(lbq.offer(2));//true
        System.out.println(lbq.offer(3));//true
        System.out.println(lbq.offer(4));//false
        System.out.println(lbq.poll());//1
        System.out.println(lbq.poll());//2
        System.out.println(lbq.poll());//3
        System.out.println(lbq.poll());//null
    }

    /**
     * 测试阻塞队列处理方式put,take
     * 队满put阻塞
     * 队空take阻塞
     * @throws InterruptedException
     */
    @Test
    public void test3() throws InterruptedException {
        LinkedBlockingQueue<Integer> lbq = new LinkedBlockingQueue<>(3);
        lbq.put(1);
        lbq.put(1);
        lbq.put(1);
//        队满阻塞
//        lbq.put(1);
        lbq.take();
        lbq.take();
        lbq.take();
//        队空阻塞
//        lbq.take();
    }

    /**
     * 测试阻塞队列处理方式offer(e,timeout,TimeUnit),poll(timeout,TimeUnit)
     * 队满offer阻塞n时间
     * 队空poll阻塞n时间
     * @throws InterruptedException
     */
    @Test
    public void test4() throws InterruptedException {
        LinkedBlockingQueue<Integer> lbq = new LinkedBlockingQueue<>(3);
        System.out.println(lbq.offer(1, 2, TimeUnit.SECONDS));//true
        System.out.println(lbq.offer(1, 2, TimeUnit.SECONDS));//true
        System.out.println(lbq.offer(1, 2, TimeUnit.SECONDS));//true
        //队满阻塞2秒
        System.out.println(lbq.offer(1, 2, TimeUnit.SECONDS));//false

        System.out.println(lbq.poll(1, TimeUnit.SECONDS));//1
        System.out.println(lbq.poll(1, TimeUnit.SECONDS));//1
        System.out.println(lbq.poll(1, TimeUnit.SECONDS));//1
        //队空阻塞2秒
        System.out.println(lbq.poll(1, TimeUnit.SECONDS));//null
    }
总结
- 抛出异常:队满add 抛出异常
IllegalStateExceptio队空remove 抛出异常NoSuchElementException - 特殊返回值: 队满offer返回false,队空poll返回null
- 阻塞等待: 队满时put会阻塞线程 或 队空时take会阻塞线程
- 超时阻塞等待: 在阻塞等待的基础上超时退出(使用的是offer,poll)
阻塞队列
公平与不公平
公平指的是阻塞的线程按照先后顺序访问队列
如果该阻塞队列满了,还阻塞了很多线程,这些阻塞的线程按照先后顺序来访问阻塞队列
不公平就是阻塞的线程竞争访问队列
如果该阻塞队列满了,还阻塞了很多线程,这些阻塞的线程争抢访问阻塞队列
ArrayBlockingQueue
ArrayBlockingQueue是数组实现默认不公平的有界阻塞队列,阻塞队列中按照FIFO进行排序
查看ArrayBlockingQueue构造器源码
public ArrayBlockingQueue(int capacity) {
    this(capacity, false);
}

	public ArrayBlockingQueue(int capacity, boolean fair) {
        if (capacity <= 0)
            throw new IllegalArgumentException();
        this.items = new Object[capacity];
        //锁是否为公平锁
        lock = new ReentrantLock(fair);
        notEmpty = lock.newCondition();
        notFull =  lock.newCondition();
    }
ArrayBlockingQueue的公平性是由ReentrantLock来实现的
LinkedBlockingQueue
LinkedBlockingQueue是链表实现的有界阻塞队列,阻塞队列按照FIFO进行排序
PriorityBlockingQueue
PriorityBlockingQueue是优先级排序的无界阻塞队列,阻塞队列按照优先级进行排序
优先级排序
-
默认: 自然顺序升序
-
构造器中指定比较器
Comparator根据比较器规则排序public PriorityQueue(int initialCapacity) { this(initialCapacity, null); } public PriorityQueue(int initialCapacity, Comparator<? super E> comparator) { // Note: This restriction of at least one is not actually needed, // but continues for 1.5 compatibility if (initialCapacity < 1) throw new IllegalArgumentException(); this.queue = new Object[initialCapacity]; this.comparator = comparator; } -
阻塞队列中的元素类实现
Comparable接口重写compareTo()方法 根据compareTo方法规则排序
相同优先级无法保证顺序
DelayQueue
Delay是一个延时获取元素的无界阻塞队列 延时最长排在队尾
public class DelayQueue<E extends Delayed> extends AbstractQueue<E>
    implements BlockingQueue<E> {
Delay队列元素实现Delayed接口指定延时时间
DelayQueue应用场景
- 缓存系统的设计: DelayQueue存放缓存有效期,当可以获取到元素时,说明缓存过期
- 定时任务调度: 将定时任务的时间设置为延时时间,一旦可以获取到任务就开始执行
实现Delay接口
public interface Delayed extends Comparable<Delayed> {
    long getDelay(TimeUnit unit);
}
以ScheduledThreadPoolExecutor的ScheduledFutureTask为例子
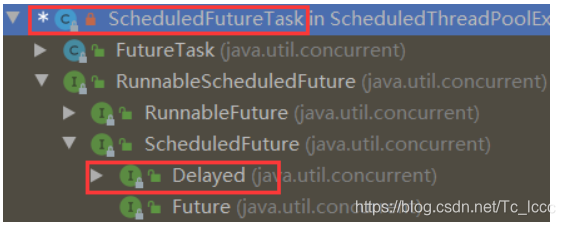
-
创建对象时,初始化数据
ScheduledFutureTask(Runnable r, V result, long ns, long period) { super(r, result); //time记录当前对象延迟到什么时候可以使用,单位是纳秒 this.time = ns; this.period = period; //sequenceNumber记录元素在队列中先后顺序 sequencer原子自增 //AtomicLong sequencer = new AtomicLong(); this.sequenceNumber = sequencer.getAndIncrement(); } -
实现Delayed接口的getDelay方法 返回当前元素还要延时多久
public long getDelay(TimeUnit unit) { return unit.convert(time - now(), NANOSECONDS); } -
Delay接口继承了Comparable接口,目的是要实现compareTo方法来继续排序 延时最长的元素排队尾
		public int compareTo(Delayed other) {
            if (other == this) // compare zero if same object
                return 0;
            if (other instanceof ScheduledFutureTask) {
                ScheduledFutureTask<?> x = (ScheduledFutureTask<?>)other;
                long diff = time - x.time;
                if (diff < 0)
                    return -1;
                else if (diff > 0)
                    return 1;
                else if (sequenceNumber < x.sequenceNumber)
                    return -1;
                else
                    return 1;
            }
            long diff = getDelay(NANOSECONDS) - other.getDelay(NANOSECONDS);
            return (diff < 0) ? -1 : (diff > 0) ? 1 : 0;
        }
实现延时阻塞队列
当消费者去延时阻塞队列中获取元素时,如果元素没有到延时时间就阻塞线程
SynchronousQueue
SynchrinousQueue是一个默认下支持非公平不存储元素的阻塞队列
每个put操作要等待一个take操作,否则不能继续添加元素会阻塞
使用公平锁
@Test
    public void test() throws InterruptedException {
        final SynchronousQueue<Integer> queue = new SynchronousQueue<Integer>(true);
        new Thread(() -> {
            try {
                queue.put(1);
                queue.put(2);
            } catch (InterruptedException e) {
                e.printStackTrace();
            }
        }, "put12线程").start();

        new Thread(() -> {
            try {
                queue.put(3);
                queue.put(4);
            } catch (InterruptedException e) {
                e.printStackTrace();
            }
        }, "put34线程").start();

        TimeUnit.SECONDS.sleep(1);
        System.out.println(Thread.currentThread().getName() + "拿出" + queue.take());
        TimeUnit.SECONDS.sleep(1);
        System.out.println(Thread.currentThread().getName() + "拿出" + queue.take());
        TimeUnit.SECONDS.sleep(1);
        System.out.println(Thread.currentThread().getName() + "拿出" + queue.take());
        TimeUnit.SECONDS.sleep(1);
        System.out.println(Thread.currentThread().getName() + "拿出" + queue.take());
    }
/*
main拿出1
main拿出3
main拿出2
main拿出4
*/
SynchronousQueue队列本身不存储元素,负责把生产者的数据传递给消费者,适合传递性的场景,在该场景下吞吐量会比ArrayBlockingQueue,LinkedBlockingQueue高
LinkedTransferQueue
LinkedTransferQueue是一个链表组成的无界阻塞队列,拥有transfer()和tryTransfer()方法
-
transfer()如果有消费者在等待接收元素,transfer(e)会把元素e传输给消费者
如果没有消费者在等待接收元素,transfer(e)会将元素e存放在队尾,直到有消费者获取了才返回
@Test public void test() throws InterruptedException { LinkedTransferQueue queue = new LinkedTransferQueue(); new Thread(()->{ try { queue.transfer(1); System.out.println(Thread.currentThread().getName()+"放入的1被取走了"); } catch (InterruptedException e) { e.printStackTrace(); } },"生产者").start(); TimeUnit.SECONDS.sleep(3); System.out.println(Thread.currentThread().getName()+"取出队列中的元素"); queue.poll(); } /* main取出队列中的元素 生产者放入的1被取走了 */ -
tryTransfer()无论消费者是否消费都直接返回
@Test public void testTryTransfer() throws InterruptedException { LinkedTransferQueue<Integer> queue = new LinkedTransferQueue<>(); System.out.println(queue.tryTransfer(1));//false System.out.println(queue.poll());//null new Thread(()->{ try { System.out.println(Thread.currentThread().getName()+"取出"+queue.poll(2, TimeUnit.SECONDS));//消费者取出2 } catch (InterruptedException e) { e.printStackTrace(); } },"消费者").start(); TimeUnit.SECONDS.sleep(1); System.out.println(queue.tryTransfer(2));//true } /* false null true 消费者取出2 */ -
tryTransfer(long,TimeUnit)在超时时间内消费者消费元素返回true,反之返回false
LinkedBlockingDeque
LinkedBlockingDeque是链表组成的双向阻塞队列
与其他阻塞队列不同的地方是: 它是双向的,支持在队头或队尾进行添加或删除
一系列带有First是对队头进行操作的方法,一系列带有Las是对队尾进行操作的方法
从添加来看add,offer都是从队尾添加,而take从队首添加
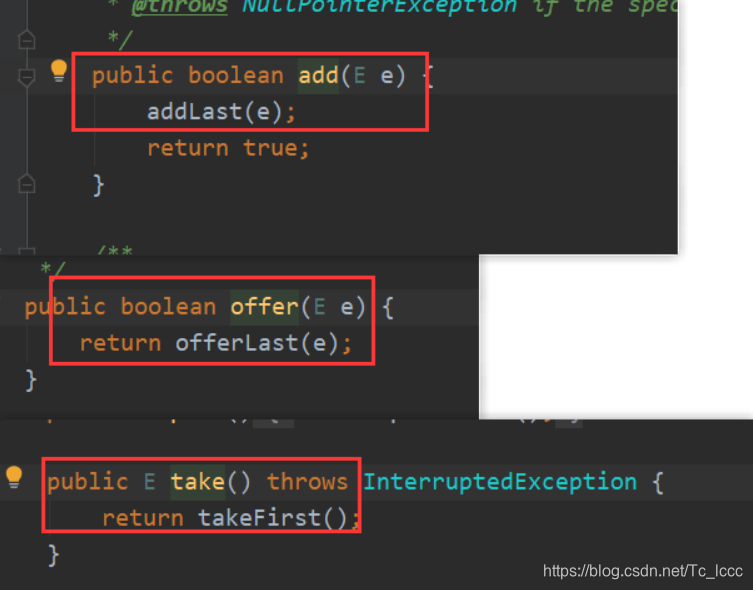
所以使用LinkedBlockingDeque时还是使用带First和Last方法比较好
LinkedBlockingDeque因为多了一个操作队列的入口,所以被用来实现工作窃取算法目的是可以减少线程的竞争
阻塞队列实现原理
通知模式实现阻塞队列
- 生产者
- 如果阻塞队列满了,生产者线程等待(等待消费者唤醒)
- 如果阻塞队列没满就生产,生产元素加入队列,唤醒消费者消费
- 消费者
- 如果阻塞队列空了,消费者就等待(等待生产者唤醒)
- 如果阻塞队列没空就消费,从队列中取出元素,唤醒生产者生产
查看ArrayBlockingQueue源码
使用Condition实现通知模式
/** Condition for waiting takes 作用于take方法*/
private final Condition notEmpty;

/** Condition for waiting puts 作用于put方法 */
private final Condition notFull;

public ArrayBlockingQueue(int capacity, boolean fair) {
        if (capacity <= 0)
            throw new IllegalArgumentException();
        this.items = new Object[capacity];
        lock = new ReentrantLock(fair);
        notEmpty = lock.newCondition();
        notFull =  lock.newCondition();
}
查看put
public void put(E e) throws InterruptedException {
    checkNotNull(e);
    final ReentrantLock lock = this.lock;
    //尝试获取锁
    lock.lockInterruptibly();
    try {
        //如果队列满了 线程等待进入notFull等待队列中
        while (count == items.length)
            notFull.await();
        //队列没满 或者 被消费者唤醒后执行enqueue
        enqueue(e);
    } finally {
        //释放锁
        lock.unlock();
    }
}

	private void enqueue(E x) {
        // assert lock.getHoldCount() == 1;
        // assert items[putIndex] == null;
        final Object[] items = this.items;
        //将元素加入队列
        items[putIndex] = x;
        //如果下标为队列长度更新为0 (从头开始)
        if (++putIndex == items.length)
            putIndex = 0;
        //更新元素个数
        count++;
        //唤醒 notEmpty中等待队列中的消费者线程
        notEmpty.signal();
    }
查看take方法
	public E take() throws InterruptedException {
        final ReentrantLock lock = this.lock;
        //尝试获取锁
        lock.lockInterruptibly();
        try {
            //如果队列为空(没有元素) 消费者线程等待 进入notEmpty等待队列中
            while (count == 0)
                notEmpty.await();
            //队列不为空  或 被生产者线程唤醒后 执行dequeue
            return dequeue();
        } finally {
            //释放锁
            lock.unlock();
        }
    }

	private E dequeue() {
        // assert lock.getHoldCount() == 1;
        // assert items[takeIndex] != null;
        final Object[] items = this.items;
        @SuppressWarnings("unchecked")
        //取出元素
        E x = (E) items[takeIndex];
        items[takeIndex] = null;
        ////如果下标为队列长度更新为0 (从头开始)
        if (++takeIndex == items.length)
            takeIndex = 0;
        //更新元素个数
        count--;
        if (itrs != null)
            //等待队列中代表该线程的节点出队
            itrs.elementDequeued();
        //唤醒notFull等待队列中的生产者线程
        notFull.signal();
        return x;
    }
查看condition的await 这里的condition是AQS下的ConditionObject
public final void await() throws InterruptedException {
    if (Thread.interrupted())
        throw new InterruptedException();
    Node node = addConditionWaiter();
    int savedState = fullyRelease(node);
    int interruptMode = 0;
    while (!isOnSyncQueue(node)) {
        LockSupport.park(this);
        if ((interruptMode = checkInterruptWhileWaiting(node)) != 0)
            break;
    }
    if (acquireQueued(node, savedState) && interruptMode != THROW_IE)
        interruptMode = REINTERRUPT;
    if (node.nextWaiter != null) // clean up if cancelled
        unlinkCancelledWaiters();
    if (interruptMode != 0)
        reportInterruptAfterWait(interruptMode);
}
使用LockSupport工具类阻塞线程(线程进入等待状态 )
查看LockSupport的park方法
public static void park(Object blocker) {
    Thread t = Thread.currentThread();
    setBlocker(t, blocker);
    UNSAFE.park(false, 0L);
    setBlocker(t, null);
}
先使用setBlocker保存要阻塞的线程,调用UNSAFE.park阻塞当前线程
//var2: 是延迟时间
public native void park(boolean var1, long var2);
park方法返回的情况:
- 与park对应的unpark执行
- 线程被中断
- 等待完指定的var2毫秒
- 发生异常
Fork/Join框架
了解For/Join框架
什么是Fork/Join框架
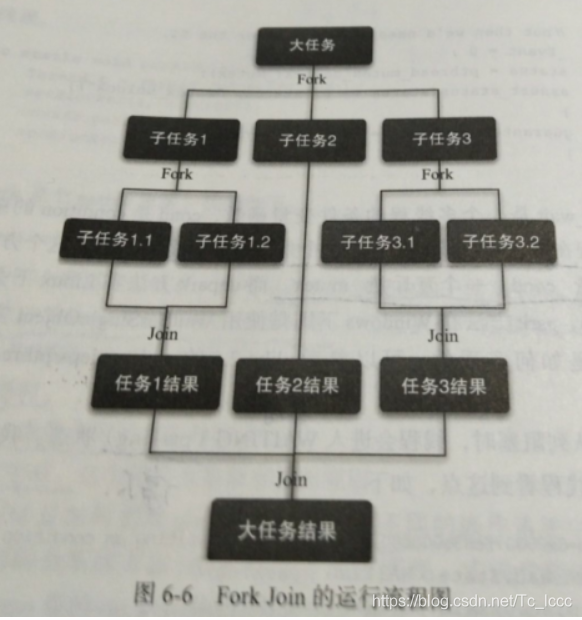
Java 7 提供 并发执行任务的框架 先分割(Fork)再合并(Join)
- 将一个任务分割为多个子任务,子任务再分割,直到分割达到阈值(自己设置阈值),不能分割为止
- 执行任务,任务完成合并结果
工作流程
工作窃取算法
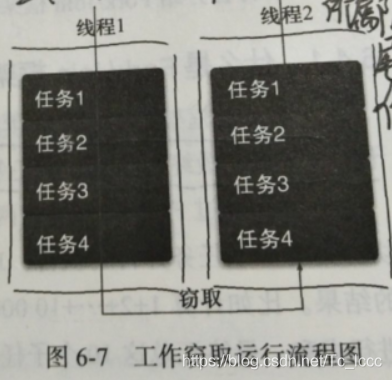
将任务分割为互不依赖的子任务,将子任务分别放到不同队列中,每个队列都创建一个单独线程来执行队列中的任务 线程和队列一一对应
当线程A执行完队列A中的所有任务时,为了提高吞吐量不会让线程A闲下来,于是工作窃取算法让线程A去隔壁还有任务的队列窃取一个工作
为了减少线程竞争任务,队列可以采用双端队列,被窃取线程从队列头部获取任务,窃取线程去其他队列尾部窃取任务 只有队列中一个任务时才可能发生竞争
- 优点: 充分利用线程并行计算,减少线程间的竞争
- 缺点: 队列中只有一个任务时还是可能发生竞争, 创建双端队列消耗更多空间资源
使用Fork/Join框架
使用说明
使用ForkJoin框架需要创建ForkJoin任务(ForkJoinTask),ForkJoinTask提供在任务中执行fork(),join()的机制
一般不用直接继承ForkJoinTask,而是继承它的子类RecursiveAction或RecursiveTask
RecursiveTask:用于有返回结果的任务RecursiveAction:用于无返回结果的任务
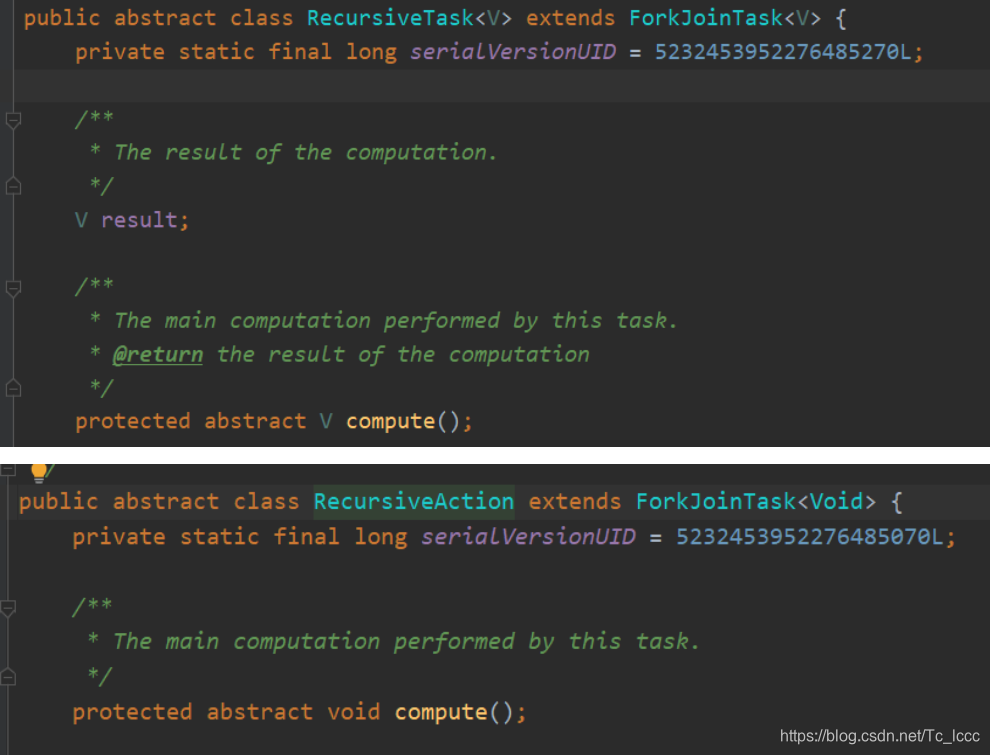
它们都是抽象类,继承它们去实现compute()方法
compute()方法中就是处理任务的逻辑(根据自己的需求去实现)
ForkJoinTask需要通过ForkJoinPool来执行
使用过程
/**
 * @author Tc.l
 * @Date 2020/12/27
 * @Description:
 * 从1累加到1w
 */
public class ForkJoinTest extends RecursiveTask<Integer> {
    private int start;
    private int end;

    public ForkJoinTest(int start, int end) {
        this.start = start;
        this.end = end;
    }

	//继承有返回值结果的任务RecursiveTask 实现compute方法
    @Override
    protected Integer compute() {
        boolean flag = (end - start) <= 100;
        int temp = 0;
        //当任务范围在100之外时,分割任务
        //递归的思路一直分割到任务范围符合时再执行任务返回结果,最后合并返回
        if (!flag) {
            temp = (end + start) >> 1;
            ForkJoinTest left = new ForkJoinTest(start, temp);
            ForkJoinTest right = new ForkJoinTest(temp + 1, end);
            left.fork();
            right.fork();
            return left.join() + right.join();
        } else {
        //当任务范围在100之内时,执行任务
            for (int i = start; i <= end; i++) {
                temp += i;
            }
            return temp;
        }
    }

    public static void main(String[] args) {
        ForkJoinTest test = new ForkJoinTest(1, 10000);
        ForkJoinPool pool = new ForkJoinPool();
        //创建ForkJoinPool,把ForkJoinTask放入池中执行
        ForkJoinTask result = pool.submit(test);
        //isCompletedAbnormally():判断任务是否被取消或抛出异常 如果有则返回true
        if (test.isCompletedAbnormally()){
            //getException(): 任务被取消则返回null 抛出异常则返回异常名
            System.out.println(test.getException());
        }
        try {
            //获得任务结果值
            System.out.println(result.get());
        } catch (InterruptedException e) {
            e.printStackTrace();
        } catch (ExecutionException e) {
            e.printStackTrace();
        }
    }
}

// 50005000
isCompletedAbnormally()可以判断该任务是否被取消或者抛出了异常getException(): 1. 任务被取消时返回null 2.抛出异常时返回异常名
Fork/Join框架实现原理
ForkJoinPool由 存放ForkJoin任务的数组 和执行任务的ForkJoinWorkerThread数组组成
查看fork源码
public final ForkJoinTask<V> fork() {
    Thread t;
    if ((t = Thread.currentThread()) instanceof ForkJoinWorkerThread)
        //如果当前线程是工作线程则调用工作线程的push方法
        ((ForkJoinWorkerThread)t).workQueue.push(this);
    else
        //如果当前线程不是工作线程则把任务放在静态池里
        ForkJoinPool.common.externalPush(this);
    return this;
}
查看push方法
		final void push(ForkJoinTask<?> task) {
            ForkJoinTask<?>[] a; ForkJoinPool p;
            int b = base, s = top, n;
        	//ForkJoinTask<?>[] array :存放任务的数组
        	//WorkQueue[] workQueues :执行任务的数组
            if ((a = array) != null) {    // ignore if queue removed
                int m = a.length - 1;     // fenced write for task visibility
                //将任务加入存放任务的数组array中
                U.putOrderedObject(a, ((m & s) << ASHIFT) + ABASE, task);
                U.putOrderedInt(this, QTOP, s + 1);
                if ((n = s - b) <= 1) {
                    if ((p = pool) != null)
                        //唤醒(创建)一个工作线程去执行任务
                        p.signalWork(p.workQueues, this);
                }
                else if (n >= m)
                    growArray();
            }
        }
查看join源码
任务运行状态
/** The run status of this task */
volatile int status; // accessed directly by pool and workers
static final int DONE_MASK   = 0xf0000000;  // mask out non-completion bits
//已完成
static final int NORMAL      = 0xf0000000;  // must be negative
//被取消
static final int CANCELLED   = 0xc0000000;  // must be < NORMAL
//发生异常
static final int EXCEPTIONAL = 0x80000000;  // must be < CANCELLED
//信号
static final int SIGNAL      = 0x00010000;  // must be >= 1 << 16
static final int SMASK       = 0x0000ffff;  // short bits for tags
查看join方法
	public final V join() {
        int s;
        //根据任务状态
        if ((s = doJoin() & DONE_MASK) != NORMAL)
            //状态不是已完成则根据情况抛出异常
            reportException(s);
        //状态是已完成则返回结果
        return getRawResult();
    }

	private void reportException(int s) {
        //任务状态是被取消则抛出CancellationException
        if (s == CANCELLED)
            throw new CancellationException();
        //任务状态是发生异常则抛出相应异常
        if (s == EXCEPTIONAL)
            rethrow(getThrowableException());
    }
查看doJoin方法
private int doJoin() {
    int s; Thread t; ForkJoinWorkerThread wt; ForkJoinPool.WorkQueue w;
    //状态小于0说明已完成 直接返回
    return (s = status) < 0 ? s :
        ((t = Thread.currentThread()) instanceof ForkJoinWorkerThread) ?
        (w = (wt = (ForkJoinWorkerThread)t).workQueue).
        tryUnpush(this) && (s = doExec()) < 0 ? s :
        wt.pool.awaitJoin(w, this, 0L) :
    	//阻塞当前线程直到完成
        externalAwaitDone();
}
- 先查看任务状态,如果是已完成则直接退出
- 没执行完则从任务数组中取出任务并执行
- 执行完任务则设置状态,发生异常也要设置任务状态
- 阻塞当前线程直到任务完成或发生异常返回


 被折叠的 条评论
为什么被折叠?
被折叠的 条评论
为什么被折叠?
 到【灌水乐园】发言


