 Springfox Swagger2 访问404问题解决与配置解析


 本文档详细记录了解决Springfox Swagger2在3.0.0版本中访问404的问题。问题源于访问路径和资源映射的改变,解决方案是引入springfox-boot-starter依赖或手动配置WebMvcConfigurer以适配新的访问方式。通过配置正确的访问路径和资源映射,最终可以成功访问Swagger UI。
错误复盘:
1、导入jar包
<dependency>
     <groupId>io.springfox</groupId>
     <artifactId>springfox-swagger2</artifactId>
     <version>3.0.0</version>
</dependency>
<dependency>
     <groupId>io.springfox</groupId>
     <artifactId>springfox-swagger-ui</artifactId>
     <version>3.0.0</version>
</dependency>
2、配置Swagger
package com.lpf.tools;

import org.springframework.context.annotation.Bean;
import org.springframework.context.annotation.ComponentScan;
import org.springframework.context.annotation.Configuration;
import springfox.documentation.builders.ApiInfoBuilder;
import springfox.documentation.builders.PathSelectors;
import springfox.documentation.builders.RequestHandlerSelectors;
import springfox.documentation.service.ApiInfo;
import springfox.documentation.service.Contact;
import springfox.documentation.spi.DocumentationType;
import springfox.documentation.spring.web.plugins.Docket;
import springfox.documentation.swagger2.annotations.EnableSwagger2;

/**
 * swagger配置类
 */
@Configuration
@EnableSwagger2
@ComponentScan(basePackages = "com.lpf.controller")
public class MyAPIConfig {

    @Bean
    public Docket docket(){
        return new Docket(DocumentationType.SWAGGER_2)
                .apiInfo(apiInfo())
                .select()
                .apis(RequestHandlerSelectors.any())
                .paths(PathSelectors.any())
                .build();

    }

    private ApiInfo apiInfo(){
        Contact contact = new Contact("个人", "localhost:8082", "xxxx@qq.com");
        return new ApiInfoBuilder()
                .title("文档标题")
                .description("文档描述")
                .contact(contact)
                .build();
    }
}
上面两步没错
3、直接访问localhost:8080/项目名(如果配置了的话)/swagger-ui.html
出现404错误
解决方案:
404:要么地址错误,要么文件不存在
地址错误情况:由于访问的是swagger-ui.html,如果你看的是教学视频,大概是访问这个链接,暂时认为是正确的。
文件不存在情况:查看swagger的ui包,如下
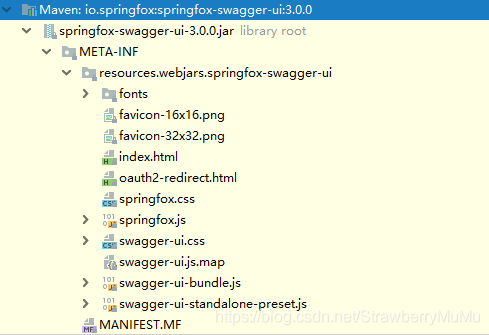
并不存在swagger.html这个文件,所以暂时认为是版本较高导致与之前的访问方式不一致。
4、在网上找原因查找了一会,发现一个包
<dependency>
     <groupId>io.springfox</groupId>
     <artifactId>springfox-boot-starter</artifactId>
     <version>3.0.0</version>
</dependency>
导包后,查看
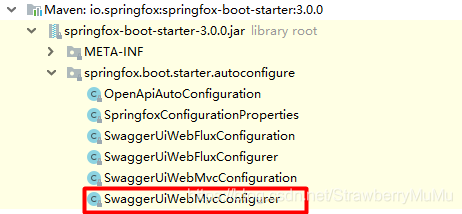
public void addResourceHandlers(ResourceHandlerRegistry registry) {
        String baseUrl = StringUtils.trimTrailingCharacter(this.baseUrl, '/');
        registry.addResourceHandler(new String[]{baseUrl + "/swagger-ui/**"}).addResourceLocations(new String[]{"classpath:/META-INF/resources/webjars/springfox-swagger-ui/"}).resourceChain(false);
    }

    public void addViewControllers(ViewControllerRegistry registry) {
        registry.addViewController(this.baseUrl + "/swagger-ui/").setViewName("forward:" + this.baseUrl + "/swagger-ui/index.html");
    }
通过这段代码可以知道,swagger访问方式发生了改变,不再是之前版本的swagger-ui.html;我们访问/swagger-ui/xx的资源,才会转到访问/META-INF/resources/webjars/springfox-swagger-ui/文件夹下的资源!,这个文件帮我们在mvc中加了静态资源的过滤。
正确的访问连接应该是:localhost:8080/项目名(如果配置了的话)/swagger-ui/index.html
自此访问swagger成功。
404的原因是访问路径改变和访问的文件名也与之前版本不一致!
根本原因是我们需要配置正确的访问方式和资源映射方式:
回归到之前导入两个包的情况,没有了starter帮我们配置访问路径额和资源映射:
那我们需要自己配置一下mvc
package com.lpf.tools;

import org.springframework.context.annotation.Bean;
import org.springframework.context.annotation.Configuration;
import org.springframework.web.servlet.LocaleResolver;
import org.springframework.web.servlet.config.annotation.InterceptorRegistry;
import org.springframework.web.servlet.config.annotation.ResourceHandlerRegistry;
import org.springframework.web.servlet.config.annotation.ViewControllerRegistry;
import org.springframework.web.servlet.config.annotation.WebMvcConfigurer;

import java.util.ArrayList;
import java.util.List;

/**
 * mvc配置文件
 *
 */
@Configuration
public class MyMvcConfig implements WebMvcConfigurer {

    /**
     *
     * 页面路由功能
     * @param registry
     */
    @Override
    public void addViewControllers(ViewControllerRegistry registry) {
        //此处也可以不配置,直接访问index.html
        registry.addViewController("/swagger-ui/swagger.html").setViewName("forward:/swagger-ui/index.html");
    }


    @Override
    public void addResourceHandlers(ResourceHandlerRegistry registry) {
        registry.addResourceHandler("/swagger-ui/**")
                .addResourceLocations("classpath:/META-INF/resources/webjars/springfox-swagger-ui/");
    }
}
这样我们也能通过localhost:8080/项目名(如果配置了的话)/swagger-ui/index.html访问swagger
注意:路径中必须存在/swagger-ui/ 不然会导致swagger页面空白!
通过浏览器的Console窗口发现,原因是在swagger的js文件中设置了基本的路径中必须存在/swagger-ui/
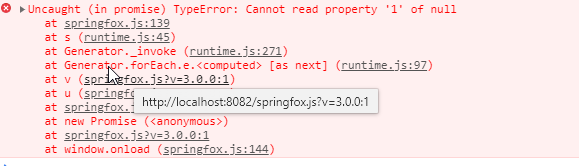
必须存在该路径


 1882
1882


 到【灌水乐园】发言


