


一、概要
结合Halcon的阈值分割,仿写X-AnyLabeling标注文件*.json的自动生成
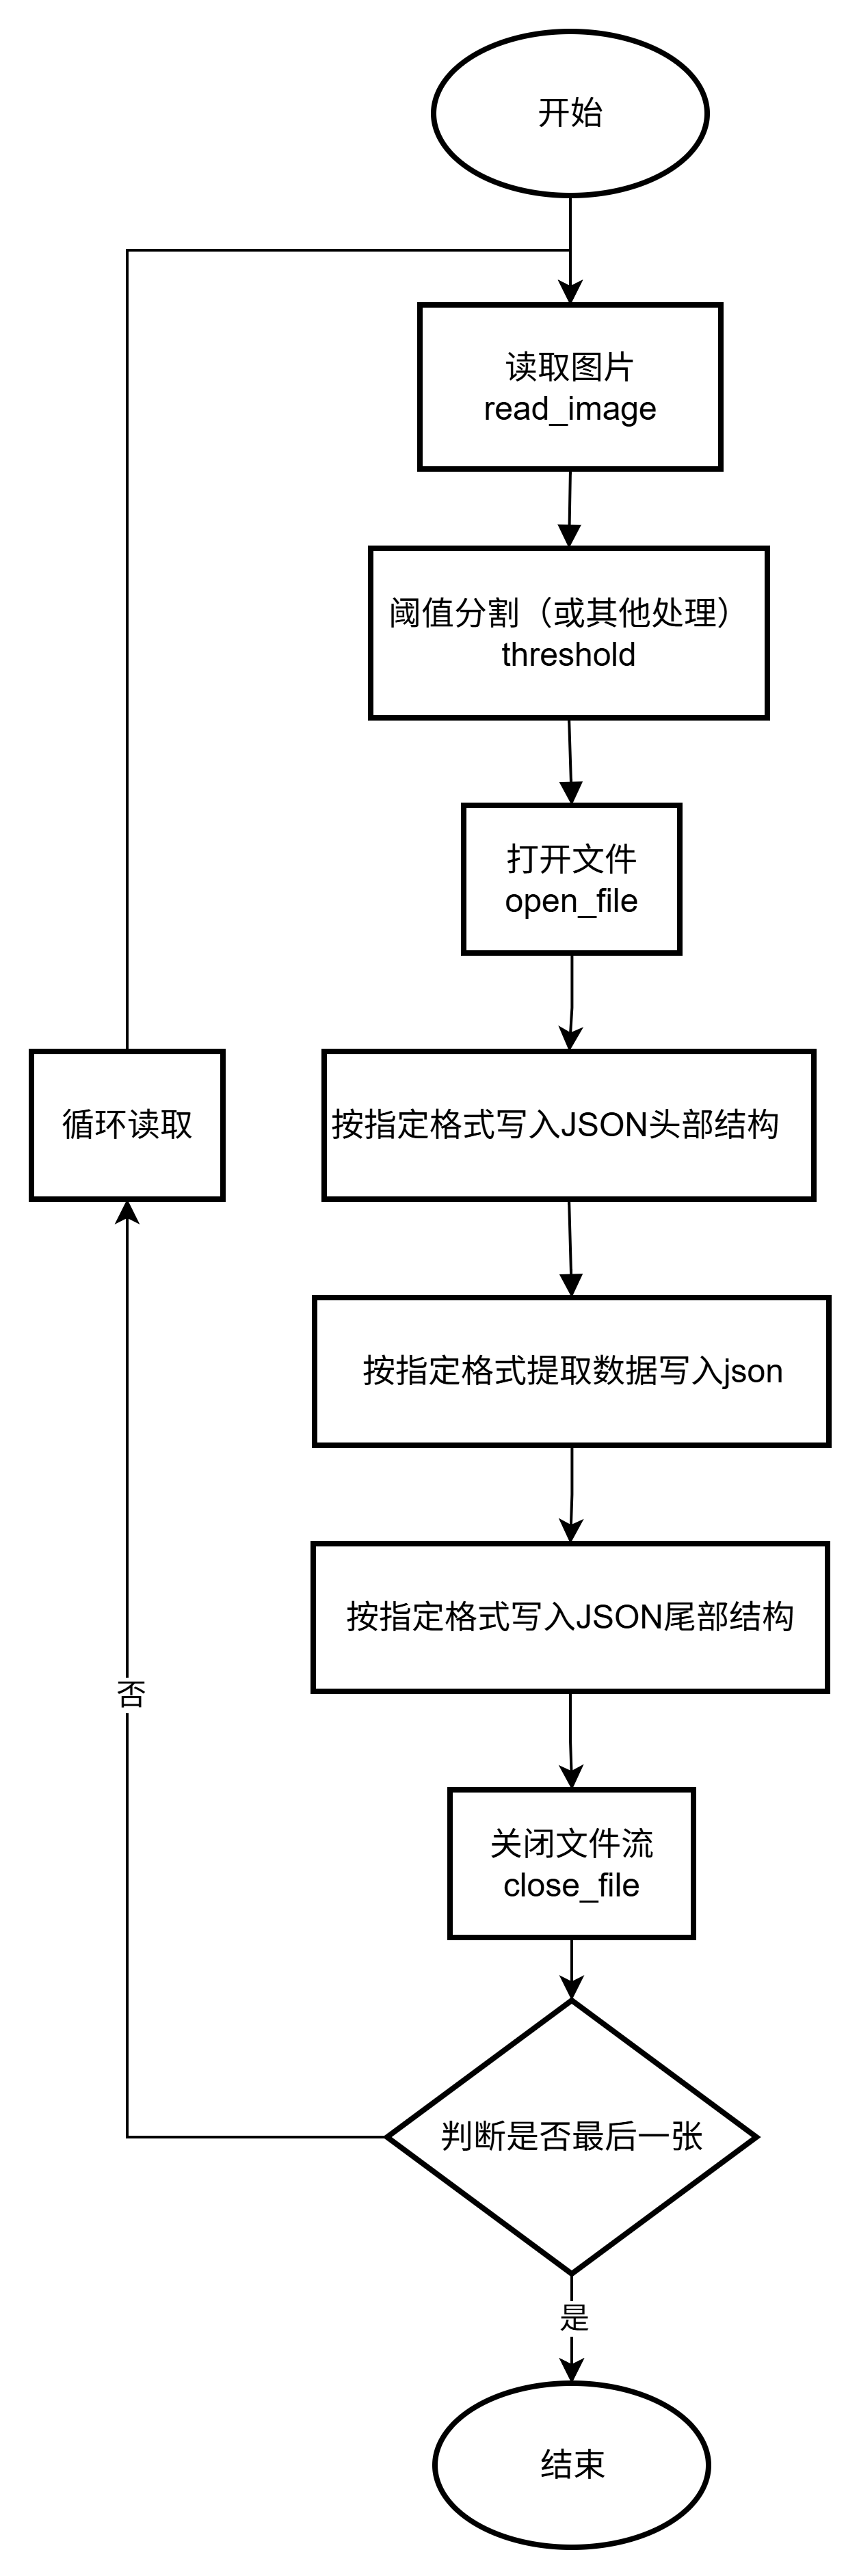
二、整体架构流程
Halcon整体结构框架
三、X-AnyLabeling
X-AnyLabeling 是一款专为深度学习模型训练设计的开源工业级数据标注工具,基于 AnyLabeling 和 Labelme 深度优化,集成了多种前沿 AI 技术,支持图像、视频、文本等多模态数据的自动化标注,尤其适合目标检测、语义分割、OCR 识别、姿态估计等复杂任务。其核心优势在于通过 SOTA 模型(如 Grounding-DINO、SAM、YOLO 系列)实现高效智能标注,显著降低人工成本,提升数据标注效率。

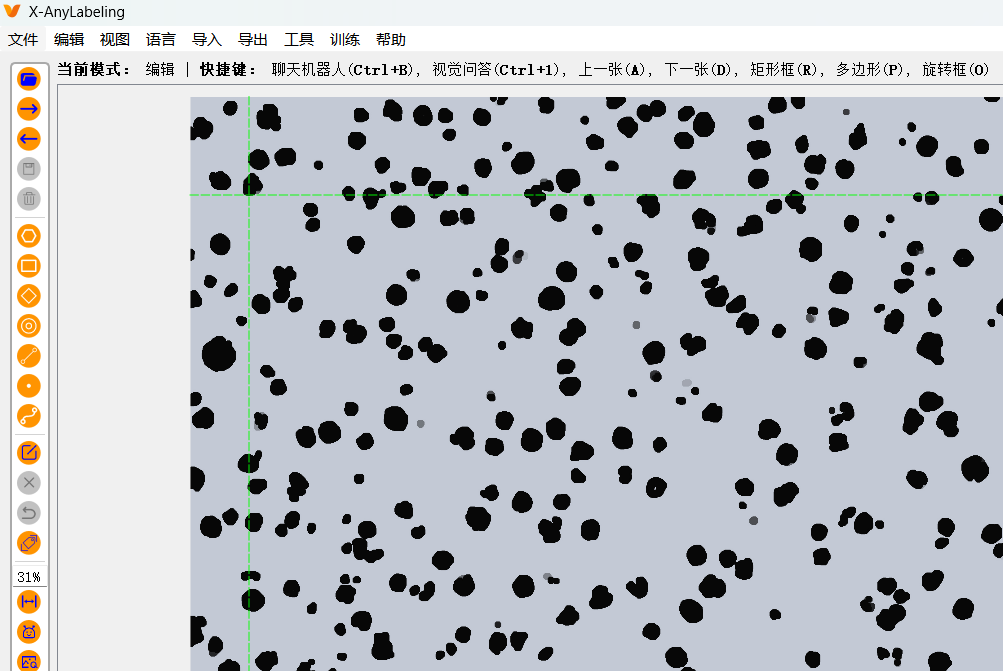
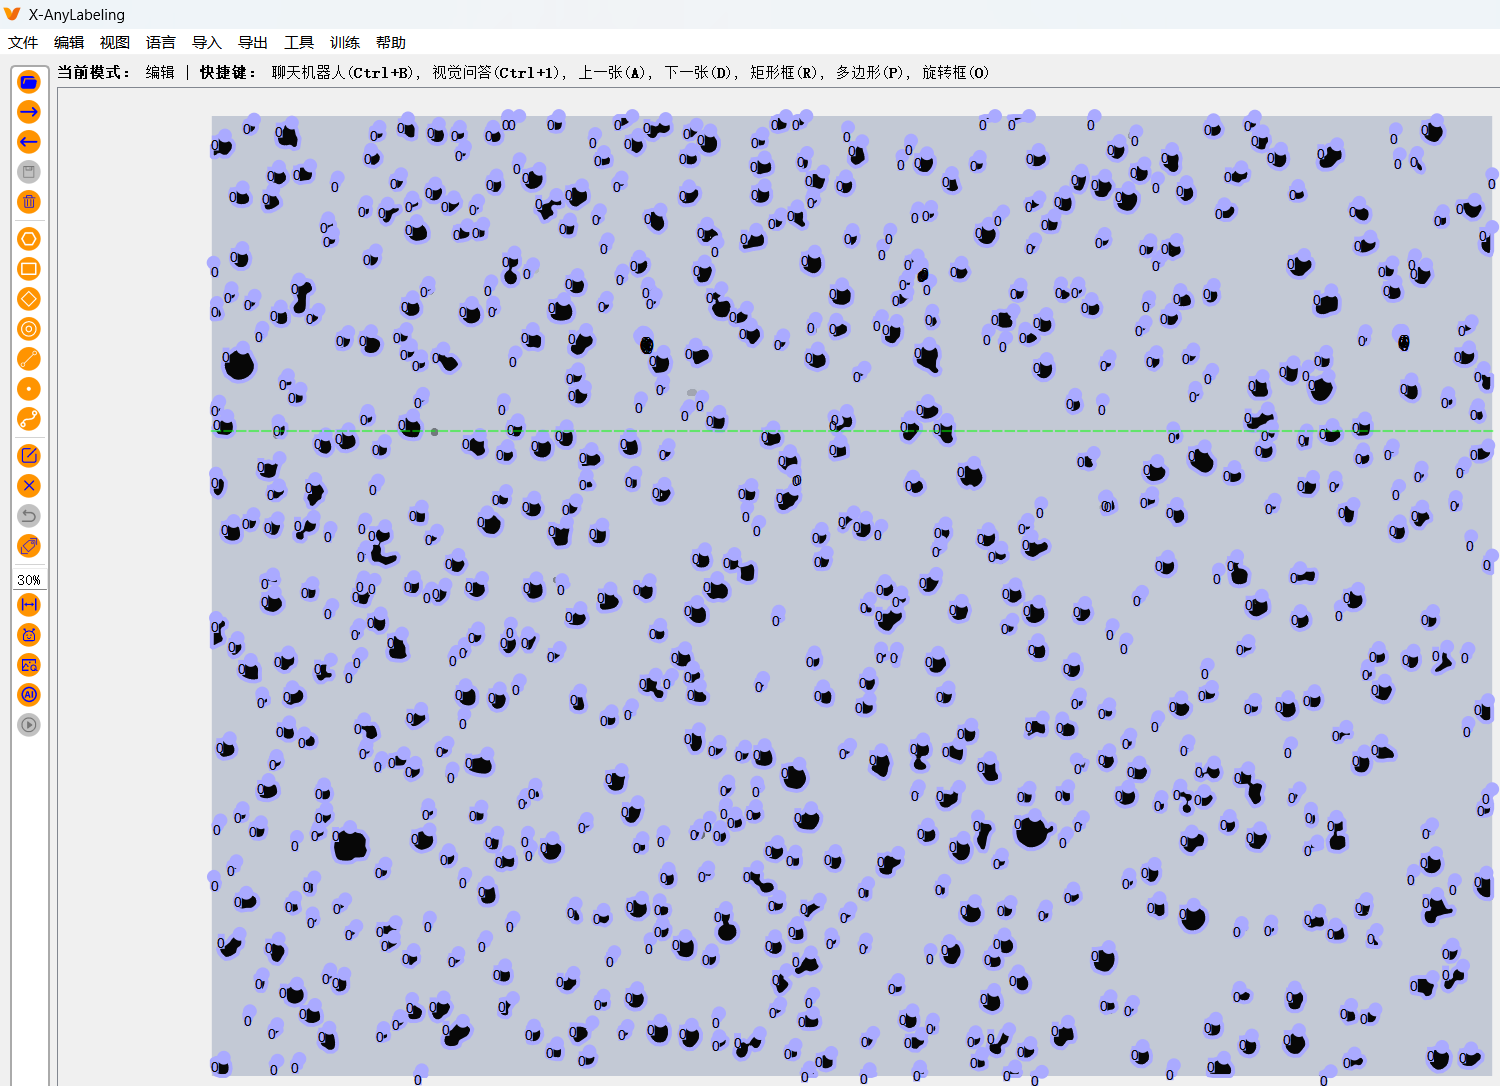
X-AnyLabeling将下图中的黑色轮廓单个标注出来如下图:
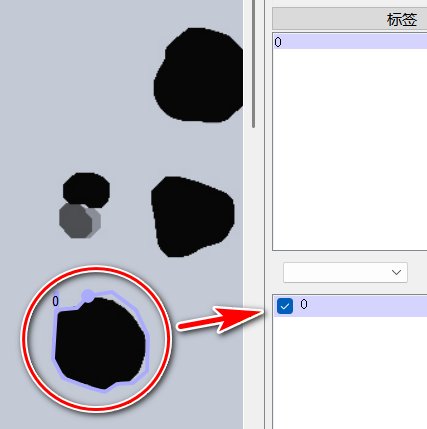
上图标注单个点图片的json文件内容为:
{
  "version": "3.2.2",
  "flags": {},
  "shapes": [
    {
      "label": "0",
      "score": null,
      "points": [
        [
          2007.8095238095239,
          773.8095238095239
        ],
        [
          1999.079365079365,
          783.3333333333334
        ],
        [
          1982.4126984126983,
          784.9206349206349
        ],
        [
          1980.031746031746,
          823.8095238095239
        ],
        [
          1987.968253968254,
          838.8888888888889
        ],
        [
          2009.3968253968253,
          846.8253968253969
        ],
        [
          2021.3015873015872,
          850.0
        ],
        [
          2030.8253968253969,
          843.6507936507936
        ],
        [
          2043.5238095238096,
          842.8571428571429
        ],
        [
          2054.6349206349205,
          833.3333333333334
        ],
        [
          2055.4285714285716,
          805.5555555555555
        ],
        [
          2045.904761904762,
          784.9206349206349
        ],
        [
          2026.857142857143,
          770.6349206349206
        ]
      ],
      "group_id": null,
      "description": "",
      "difficult": false,
      "shape_type": "polygon",
      "flags": {},
      "attributes": {},
      "kie_linking": []
    }
  ],
  "imagePath": "标记.jpg",
  "imageData": null,
  "imageHeight": 3200,
  "imageWidth": 4268
}
四、全部标注后效果图
五、json规律
json以下列内容作为开头
{
  "version": "3.2.2",
  "flags": {},
  "shapes": [
json以下列内容作为结尾
其中imagePath为图片名称,imageHeight和imageWidth为当前图片大小
],
  "imagePath": "标记.jpg",
  "imageData": null,
  "imageHeight": 3200,
  "imageWidth": 4268
}
中间内容为:
*********此处省略*********:为中间点,此处省略,每个区域对应一组这样的
{
      "label": "0",
      "score": null,
      "points": [
        [
          2007.8095238095239,
          773.8095238095239
        ],

        *********此处省略*********

        [
          2026.857142857143,
          770.6349206349206
        ]
      ],
      "group_id": null,
      "description": "",
      "difficult": false,
      "shape_type": "polygon",
      "flags": {},
      "attributes": {},
      "kie_linking": []
    },
六、Halcon实现技术细节源码:
结合上述json规律,阈值分割后仿写json文件,实现自动化生成
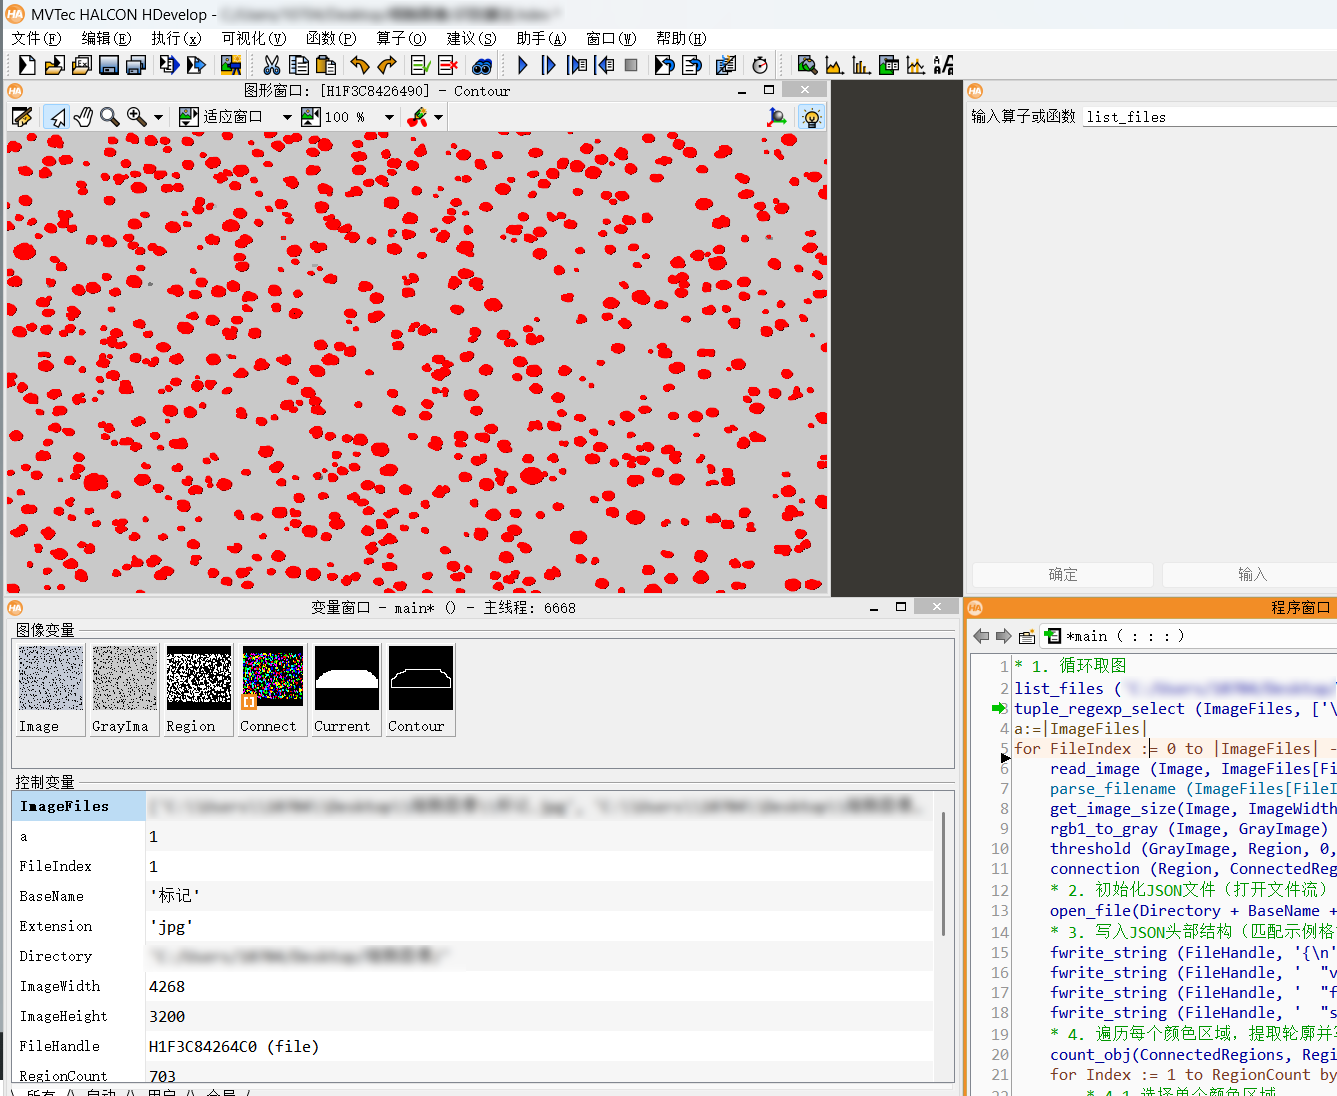
halcon源码:
* 1. 循环取图
list_files ('****你的图片路径****', ['files','follow_links'], ImageFiles)
tuple_regexp_select (ImageFiles, ['\\.(jpg|png|bmp)$','ignore_case'], ImageFiles)
a:=|ImageFiles|
for FileIndex := 0 to |ImageFiles| - 1 by 1
    read_image (Image, ImageFiles[FileIndex])
    parse_filename (ImageFiles[FileIndex], BaseName, Extension, Directory)
    get_image_size(Image, ImageWidth, ImageHeight)
    rgb1_to_gray (Image, GrayImage)
    threshold (GrayImage, Region, 0, 100)
    connection (Region, ConnectedRegions)
    * 2. 初始化JSON文件(打开文件流)
    open_file(Directory + BaseName + '.json', 'output', FileHandle)
    * 3. 写入JSON头部结构(匹配示例格式)
    fwrite_string (FileHandle, '{\n')
    fwrite_string (FileHandle, '  "version": "3.2.2",\n')
    fwrite_string (FileHandle, '  "flags": {},\n')
    fwrite_string (FileHandle, '  "shapes": [\n')
    * 4. 遍历每个颜色区域,提取轮廓并写入JSON
    count_obj(ConnectedRegions, RegionCount)
    for Index := 1 to RegionCount by 1
        * 4.1 选择单个颜色区域
        select_obj(ConnectedRegions, CurrentRegion, Index)
        * 4.2 生成区域的边界轮廓(XLD格式,'border'表示区域边界)
        gen_contour_region_xld(CurrentRegion, Contour, 'border')
        * 4.3 获取轮廓的点坐标(Row=行/垂直方向,Col=列/水平方向)
        get_contour_xld(Contour, Row, Col)
        PointCount := |Row|  // 轮廓点数量
        * 4.4 写入单个shape对象(匹配示例字段)
        fwrite_string (FileHandle, '    {\n')
        fwrite_string (FileHandle, '      "label": "0",\n')
        fwrite_string (FileHandle, '      "score": null,\n')
        fwrite_string (FileHandle, '      "points": [\n')
        * 4.5 写入轮廓点坐标(转换为[Col, Row],匹配JSON的[x,y]格式)
        for PointIdx := 0 to PointCount - 1 by 1
            ColVal := Col[PointIdx]+0.5  // X轴(水平方向)
            RowVal := Row[PointIdx]+0.5  // Y轴(垂直方向)
            * 处理最后一个点,避免多余逗号
            if (PointIdx == PointCount - 1)
                fwrite_string (FileHandle,'        [\n')
                fwrite_string (FileHandle,'          '+ColVal+'.0,\n')
                fwrite_string (FileHandle,'          '+RowVal+'.0\n')
                fwrite_string (FileHandle,'        ]\n')
            else
                tuple_mod (PointIdx, 20, Mod)
                if(Mod==0)
                    fwrite_string (FileHandle,'        [\n')
                    fwrite_string (FileHandle,'          '+ColVal+'.0,\n')
                    fwrite_string (FileHandle,'          '+RowVal+'.0\n')
                    fwrite_string (FileHandle,'        ],\n')
                endif
            endif
        endfor
        * 4.6 写入shape对象剩余字段
        fwrite_string (FileHandle, '      ],\n')
        fwrite_string (FileHandle, '      "group_id": null,\n')
        fwrite_string (FileHandle, '      "description": "",\n')
        fwrite_string (FileHandle, '      "difficult": false,\n')
        fwrite_string (FileHandle, '      "shape_type": "polygon",\n')
        fwrite_string (FileHandle, '      "flags": {},\n')
        fwrite_string (FileHandle, '      "attributes": {},\n')
        fwrite_string (FileHandle, '      "kie_linking": []\n')
        * 4.7 处理最后一个shape对象,避免多余逗号
        if (Index == RegionCount)
            fwrite_string (FileHandle, '    }\n')
        else
            fwrite_string (FileHandle, '    },\n')
        endif
    endfor
    * 5. 写入JSON尾部结构
    fwrite_string (FileHandle, '  ],\n')
    fwrite_string (FileHandle, '  "imagePath": "'+ BaseName + '.jpg",\n')
    fwrite_string (FileHandle, '  "imageData": null,\n')
    fwrite_string (FileHandle, '  "imageHeight": '+ImageHeight+',\n')
    fwrite_string (FileHandle, '  "imageWidth": '+ImageWidth+'\n')
    fwrite_string (FileHandle, '}')
    * 6. 关闭文件流
    close_file(FileHandle)
endfor- 注意:list_files 的 Directory 参数要输入你自己的路径:类似这样的 'C:/Users/Admin/Desktop/图片'
- 其中 threshold 为最简单应用,可增加其他功能应用,本例为阐述原理所述,非本文重点
七、小结
附件为:
1、测试图片(标记.jpg)
2、对应的X-AnyLabeling生成的json文件(标记.json)
3、halcon源码因版本兼容,txt格式复制粘贴使用
备注:
初写技术博客,内容均为个人技术总结与实践心得。分享出来,一方面是想记录成长,更重要的是希望能为有需要的同行提供一点参考和帮助。文中若有不当之处,恳请大家指出宝贵意见,助力内容完善,在此致谢!


 607
607

 被折叠的 条评论
为什么被折叠?
被折叠的 条评论
为什么被折叠?
 到【灌水乐园】发言


