


一、Ansible Playbook进阶语法
任务块
-
block任务块
- 可以通过block关键字,将多个任务组合到一起
- 可以将整个block任务组,一起控制是否要执行
## 样例
# 判断webservers主机组内主机系统发行版为Rocky的主机,安装nginx并启动服务
[root@pubserver ansible]# vim block1.yml
---
- name: block tasks
hosts: webservers
tasks:
- name: group tasks
block:
- name: install nginx
yum:
name: nginx
state: present
- name: start nginx
service:
name: nginx
state: started
enabled: true
when: ansible_distribution == "Rocky" #条件作用与整组任务
[root@pubserver ansible]# ansible-playbook block1.yml
-
rescue和always
-
主要用于补充block任务
-
block中的任务都执行成功则rescue中的任务不执行
-
block中的任务出现失败则执行rescue中的任务
-
always中的任务总会执行
-
## 样例
# 测试block任务执行成功
[root@pubserver ansible]# vim block2.yml
---
- name: test block/rescue/always
hosts: webservers
tasks:
- name: test
block:
- name: touch file1
file:
path: /tmp/test1.txt
state: touch
rescue:
- name: touch file2
file:
path: /tmp/test2.txt
state: touch
always:
- name: touch file3
file:
path: /tmp/test3.txt
state: touch
[root@pubserver ansible]# ansible-playbook block2.yml
[root@pubserver ansible]# ansible webservers -a "ls /tmp/test*" #未创建/tmp/test2.txt
web1 | CHANGED | rc=0 >>
/tmp/test1.txt
/tmp/test3.txt
web2 | CHANGED | rc=0 >>
/tmp/test1.txt
/tmp/test3.txt
# 测试block任务执行失败
[root@pubserver ansible]# vim block3.yml
---
- name: test block/rescue/always
hosts: webservers
tasks:
- name: test
block:
- name: touch file11
file:
path: /tmp/abcd/test11.txt
state: touch
rescue:
- name: touch file22
file:
path: /tmp/test22.txt
state: touch
always:
- name: test file33
file:
path: /tmp/test33.txt
state: touch
[root@pubserver ansible]# ansible-playbook block3.yml
[root@pubserver ansible]# ansible webservers -a "ls /tmp/test*"
web1 | CHANGED | rc=0 >>
/tmp/test1.txt
/tmp/test22.txt
/tmp/test33.txt
/tmp/test3.txt
web2 | CHANGED | rc=0 >>
/tmp/test1.txt
/tmp/test22.txt
/tmp/test33.txt
/tmp/test3.txt
loop循环
用法相当于使用shell中的for循环
特点是loop中的变量名固定为:item
## 变量定义方法
简单变量:单个元素赋值给item
loop: [a,b,c,d]
loop:
- a
- b
- c
复杂变量:整体赋值给item,可以用item.key获取指定value
loop:
- {"key": "value", "key": "value"}
## 样例
# 简单变量
[root@pubserver ansible]# vim loop1.yml
---
- name: create dirs
hosts: webservers
tasks:
- name: create dir with loop
file:
path: /tmp/{{item}}
state: directory
loop: [aa,bb,cc]
[root@pubserver ansible]# ansible-playbook loop1.yml
# 复杂变量
[root@pubserver ansible]# vim loop2.yml
---
- name: create users
hosts: webservers
tasks:
- name: create user with loop
user:
name: "{{item.iname}}"
password: "{{item.ipass|password_hash('sha512')}}"
state: present
loop:
- {"iname":"sunwukong", "ipass":"123456"}
- {"iname":"zhubajie", "ipass":"654321"}
[root@pubserver ansible]# ansible-playbook loop2.yml
[root@pubserver ansible]# ansible webservers -a "id sunwukong;id zhubajie"
二、Ansible角色
Roles产生原因
- 在实际生产环境中,为了实现不同功能,我们会编写大量的Playbook文件
- 每个Playbook文件可能还会调用其他文件,如变量文件
- 对于海量的、无规律的文件,管理起来是一件非常困难的事情
什么是Roles
- ansible自1.2版本引入的新特性,用于层次性、结构化地组织playbook
- roles能够根据层次型结构自动装载变量文件、tasks以及handlers等
- 要使用roles只需要在playbook中使用include指令引入即可
- 简单来讲,roles就是通过分别将变量、文件、任务、模板及处理器放置于单独的目录中,并可以便捷的include它们的一种机制
- 角色一般用于基于主机构建服务的场景中,但也可以是用于构建守护进程等场景中
- playbook局限在于如果文件较多的情况,不清楚哪些主机执行了哪些状态的yml文件,roles能清楚哪些主机应用哪些角色,主要使用场景代码复用度较高的情况下
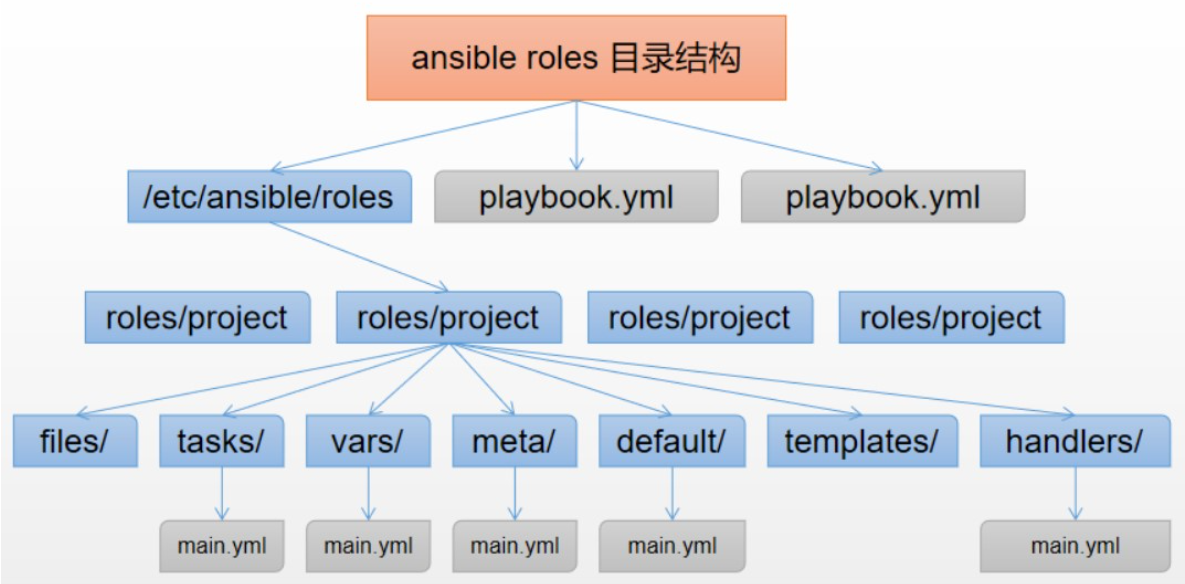
roles: #角色必须放在roles目录下,可以自定义位置,默认/etc/ansible/roles/
project: #角色项目名称
files: #用于存放静态文件,如copy或script模块需要调用的文件
templates: #用于存放动态文件,即jinja2模板,template模块会自动到此目录下寻找模板文件
tasks: #定义任务列表的地方
main.yml #任务列表内容编写在此文件中
handlers: #定义触发器的地方
main.yml #触发器内容编写在此文件中
vars: #定义变量的地方(优先级高)
main.yml #变量定义在此文件中
defaults: #定义变量缺省值的地方(优先级低)
main.yml
meta: #定义作者、版本等描述信息、依赖关系等
main.yml
README.md #整个角色的描述信息
Roles使用
-
不使用Roles完成文件同步
## 使用Playbook结合template文件完成文件同步
# 编写j2模板
[root@pubserver ansible]# vim motd.j2
Hostname: "{{ansible_hostname }}"
Date: "{{ansible_date_time.date}}"
Contact to: "{{admin}}"
# 编写Playbook
[root@pubserver ansible]# vim motd.yml
---
- name: modify /etc/motd
hosts: webservers
vars:
admin: root@tedu.cn
tasks:
- name: modify motd
template:
src: motd.j2
dest: /etc/motd
# 执行剧本测试结果
[root@pubserver ansible]# ansible-playbook motd.yml
[root@pubserver ansible]# ansible webservers -a "cat /etc/motd"
web2 | CHANGED | rc=0 >>
Hostname: "web2"
Date: "2024-03-28"
Contact to: "root@tedu.cn"
web1 | CHANGED | rc=0 >>
Hostname: "web1"
Date: "2024-03-28"
Contact to: "root@tedu.cn"
[root@pubserver ansible]#
-
使用Roles完成文件同步
## 使用角色完成文件分发
# 修改配置文件
[root@pubserver ansible]# mkdir roles
[root@pubserver ansible]# vim ansible.cfg
[defaults]
inventory = inventory
host_key_checking = false
module_name = shell
roles_path = ./roles
## 创建角色
[root@pubserver ansible]# ansible-galaxy init roles/motd
- Role roles/motd was created successfully
[root@pubserver ansible]# tree roles/motd/
roles/motd/
├── defaults
│ └── main.yml
├── files
├── handlers
│ └── main.yml
├── meta
│ └── main.yml
├── README.md
├── tasks
│ └── main.yml
├── templates
├── tests
│ ├── inventory
│ └── test.yml
└── vars
└── main.yml
8 directories, 8 files
[root@pubserver ansible]# ansible-galaxy list
# /root/ansible/roles
- motd, (unknown version)
## 配置角色
# 创建模板文件
[root@pubserver ansible]# vim roles/motd/templates/motd.j2
Hostname: "{{ansible_hostname}}"
Date: "{{ansible_date_time.date}}"
Contact to: "{{admin}}"
# 创建变量
[root@pubserver ansible]# vim roles/motd/vars/main.yml
---
# vars file for roles/motd
admin: "test@tedu.cn"
# 创建任务
[root@pubserver ansible]# vim roles/motd/tasks/main.yml
---
# tasks file for roles/motd
- name: modify motd
template:
src: motd.j2
dest: /etc/motd
## 使用角色
[root@pubserver ansible]# vim role_motd.yml
---
- name: modify motd with role
hosts: webservers
roles:
- motd
[root@pubserver ansible]# ansible-playbook role_motd.yml
[root@pubserver ansible]# ansible webservers -a "cat /etc/motd"
web2 | CHANGED | rc=0 >>
Hostname: "web2"
Date: "2024-03-28"
Contact to: "test@tedu.cn"
web1 | CHANGED | rc=0 >>
Hostname: "web1"
Date: "2024-03-28"
Contact to: "test@tedu.cn"
Roles练习
## 创建一个角色用于安装指定软件
# 创建角色
[root@pubserver ansible]# ansible-galaxy init roles/pkgs
- Role roles/pkgs was created successfully
[root@pubserver ansible]# ansible-galaxy list
# /root/ansible/roles
- motd, (unknown version)
- pkgs, (unknown version)
# 配置角色
[root@pubserver ansible]# vim roles/pkgs/tasks/main.yml
---
# tasks file for roles/pkgs
- name: install pkg
yum:
name: "{{pkg}}"
state: present
[root@pubserver ansible]# vim roles/pkgs/defaults/main.yml #defaults优先级低于vars
---
# defaults file for roles/pkgs
pkg: nginx
# 测试角色
[root@pubserver ansible]# vim inst_nginx.yml
---
- name: install nginx with role
hosts: webservers
roles:
- pkgs
[root@pubserver ansible]# ansible-playbook inst_nginx.yml
# 使用角色
[root@pubserver ansible]# vim inst_mysql.yml
---
- name: installl mysql with role
hosts: dbs
vars:
pkg: mysql-server #自定义变量优先级高于defaults ,vars
roles:
- pkgs
[root@pubserver ansible]# ansible-playbook inst_mysql.yml
三、Ansible加密解密文件
ansible-vault命令
-
该命令用于实现数据加密/解密
## 常用选项
encrypt:加密
decrypt:解密
view:查看
rekey:重置密码
## 样例
# 创建测试文件
[root@pubserver ansible]# echo "Hello World" > hello.txt
[root@pubserver ansible]# cat hello.txt
Hello World
# 加密文件
[root@pubserver ansible]# ansible-vault encrypt hello.txt
New Vault password: 1234
Confirm New Vault password: 1234
Encryption successful
[root@pubserver ansible]# cat hello.txt
$ANSIBLE_VAULT;1.1;AES256
33303462363266366362613937393833383635386234616464663462613234373436323761666238
3835323361616133346632323066313432316666343565390a306563313233353362333735316563
34646361633331386438393963376535386431303230613338626464323637336363346362623039
6262663438613938310a376238636462633638663338663239376137386230306463613533323663
3635
# 解密文件
[root@pubserver ansible]# ansible-vault decrypt hello.txt
Vault password: 1234
Decryption successful
[root@pubserver ansible]# cat hello.txt
Hello World
# 重置密码
[root@pubserver ansible]# ansible-vault encrypt hello.txt
New Vault password: 1234
Confirm New Vault password: 1234
Encryption successful
[root@pubserver ansible]# ansible-vault rekey hello.txt
Vault password: 1234
New Vault password: abcd
Confirm New Vault password: abcd
Rekey successful
[root@pubserver ansible]#
# 不解密文件查看内容
[root@pubserver ansible]# cat hello.txt
$ANSIBLE_VAULT;1.1;AES256
63326162313136393234623264366364363464653536303666656631653433356236366162643834
6430303335333666626632396433653838653236303734390a383038653832636437616563383738
32323135353865613334633731323166376535313033653463353730306266653035663439633435
3637326363393833660a393364343839393766326436393035336265343639356333633736343366
3331
[root@pubserver ansible]# ansible-vault view hello.txt
Vault password: abcd
Hello World
[root@pubserver ansible]# cat hello.txt
$ANSIBLE_VAULT;1.1;AES256
63326162313136393234623264366364363464653536303666656631653433356236366162643834
6430303335333666626632396433653838653236303734390a383038653832636437616563383738
32323135353865613334633731323166376535313033653463353730306266653035663439633435
3637326363393833660a393364343839393766326436393035336265343639356333633736343366
3331
# 使用密码文件
[root@pubserver ansible]# echo "tedu.cn" > pass.txt
[root@pubserver ansible]# echo "Hello Linux" > data.txt
[root@pubserver ansible]# ansible-vault encrypt --vault-password-file=pass.txt data.txt
Encryption successful
[root@pubserver ansible]# cat data.txt
$ANSIBLE_VAULT;1.1;AES256
64383062326638366339383539663866636665396131316166396230633130313064376532626331
3634393066383031313930363834383266363934356666390a373832303537366664333861373562
66653863353862316232333161333637306535373931393262346231613832363065353863313433
3464393964666330390a393362383034626238653566643065346439643732393738653663363836
3765
[root@pubserver ansible]# ansible-vault view --vault-password-file=pass.txt data.txt
Hello Linux
[root@pubserver ansible]# ansible-vault decrypt --vault-password-file=pass.txt data.txt
Decryption successful
[root@pubserver ansible]# cat data.txt
Hello Linux
- 使用Playbook管理被控节点,如果剧本中有敏感数据(如密码等)则需要对剧本加密
- 执行剧本时通过--ask-vault-password选项提示数据密码
## 样例
# 编写测试剧本
[root@pubserver ansible]# vim user_test.yml
---
- name: create user
hosts: webservers
tasks:
- name: create tangsanzang
user:
name: tangsanzang
password: "{{'123'|password_hash('sha512')}}"
state: present
# 加密剧本
[root@pubserver ansible]# ansible-vault encrypt user_test.yml
New Vault password: 123456
Confirm New Vault password: 123456
Encryption successful
# 测试剧本执行
[root@pubserver ansible]# ansible-playbook user_test.yml #报错无法执行
ERROR! Attempting to decrypt but no vault secrets found
# 执行加密剧本
[root@pubserver ansible]# ansible-playbook --ask-vault-password user_test.yml
Vault password: 123456
...
# 确认结果
[root@pubserver ansible]# ansible webservers -a "id tangsanzang"
web1 | CHANGED | rc=0 >>
uid=1046(tangsanzang) gid=1046(tangsanzang) groups=1046(tangsanzang)
web2 | CHANGED | rc=0 >>
uid=1046(tangsanzang) gid=1046(tangsanzang) groups=1046(tangsanzang)
四、sudo提权
sudo提权概念
-
什么是sudo提权
-
superuser or another do
-
以超级管理或其他人的身份执行命令
-
-
为什么要提权
-
Linux系统维护过程中如果一直用root用户权限过大
-
允许root用户远程登录存在风险
-
-
提权流程
-
管理员授权(修改/etc/sudoers文件)
-
普通用户以sudo的形式执行命令
-
可以通过sudo -l查看授权情况
-
-
sudo提权配置方式(修改/etc/sudoers文件)
-
修改授权方法
-
visudo(带语法检查,默认没有颜色提示)
-
vim /etc/sudoers(不带语法检查,默认有颜色提示)
-
-
授权格式
用户名或组名(%groupname) 在集中认证域中有效,单机忽略 可以执行的命令列表
用户/组 ALL=(ALL) NOPASSWD: ALL
-
sudo提权测试
## 样例
# 测试未配置提权
[root@web1 ~]# useradd zhangsan
[root@web1 ~]# echo a | passwd --stdin zhangsan
[root@web1 ~]# su - zhangsan
[zhangsan@web1 ~]$ useradd wangwu
useradd: Permission denied.
useradd: cannot lock /etc/passwd; try again later.
[zhangsan@web1 ~]$ exit
logout
[root@web1 ~]#
# 测试提权
[root@web1 ~]# vim /etc/sudoers
100 root ALL=(ALL) ALL
101 zhangsan ALL=(ALL) NOPASSWD: ALL #新添加
[root@web1 ~]# su - zhangsan
[zhangsan@web1 ~]$ useradd wangwu
useradd: Permission denied.
useradd: cannot lock /etc/passwd; try again later.
[zhangsan@web1 ~]$ sudo -l
...
User zhangsan may run the following commands on web1:
(ALL) ALL
[zhangsan@web1 ~]$
[zhangsan@web1 ~]$ sudo useradd wangwu
[zhangsan@web1 ~]$ sudo id wangwu
uid=1047(wangwu) gid=1047(wangwu) groups=1047(wangwu)
[zhangsan@web1 ~]$ exit
五、特殊的主机清单变量
特殊情况处理
-
如某个被控节点不能免密登录、ssh服务端口不是标准22端口等情况
-
则需要配置特殊的主机清单变量
## 常用配置
ansible_ssh_host:指定被控节点服务器IP地址
ansible_ssh_user:指定登陆远程主机的用户名
ansible_ssh_pass:指定登陆远程主机的密码
ansible_ssh_port:指定登陆远程主机的端口号
## 样例
# 调整web1主机配置用于测试
[root@web1 ~]# rm -rf /root/.ssh/authorized_keys #清理公钥恢复密码登录
[root@web1 ~]# systemctl disable --now firewalld #关闭防火墙
[root@web1 ~]# vim +17 /etc/ssh/sshd_config #配置ssh端口为2222
Port 2222
[root@web1 ~]# systemctl restart sshd #重启sshd服务
# 调整pubserver的hosts文件注释web1主机名解析
[root@pubserver ansible]# vim /etc/hosts
...
#192.168.88.11 web1
...
# 创建新工作目录并配置Ansible
[root@pubserver ansible]# cd
[root@pubserver ~]# mkdir myansible
[root@pubserver ~]# cd myansible/
[root@pubserver myansible]# vim ansible.cfg
[defaults]
inventory = inventory
[root@pubserver myansible]# vim inventory
[group1]
web1
web2
db1
# 测试Ansible使用
[root@pubserver myansible]# ansible all -m ping #web1主机连接失败
web1 | UNREACHABLE! => {
"changed": false,
"msg": "Failed to connect to the host via ssh: ssh: Could not resolve hostname web1: Name or service not known",
"unreachable": true
}
...
# 配置特殊的主机清单变量
[root@pubserver myansible]# vim inventory
[group1]
web1 ansible_ssh_host=192.168.88.11 ansible_ssh_port=2222 ansible_ssh_user=root ansible_ssh_pass=a
web2
db1
# 测试特殊的主机清单变量,可以成功
[root@pubserver myansible]# ansible all -m ping


 3743
3743

 被折叠的 条评论
为什么被折叠?
被折叠的 条评论
为什么被折叠?
 到【灌水乐园】发言


