


点击蓝字
关注我们,让开发变得更有趣
作者 | 张一乔
排版 | 李擎

OpenVINO™
1. 黑客松活动介绍
01
第四季飞桨黑客松(PaddlePaddle Hackathon Season 4)是由百度联合合作伙伴共同举办的开源深度学习框架类黑客松活动。本次活动旨在为全球开发者提供一个交流、合作和创新的机会,推动人工智能技术的发展和应用。
02
英特尔作为本比赛的主要合作伙伴,推出了 OpenVINO™ 系列任务。
其中,205号赛题需要开发者向OpenVINO™ Notebooks (https://github.com/openvinotoolkit/openvino_notebooks) 中提交一个Notebook,用于构建基于PaddlePaddle和OpenVINO™ 的项目示例。
具体来说,首先需要在OpenVINO™ Notebooks (https://github.com/openvinotoolkit/openvino_notebooks)中提交 Issue 以详细描述自己打算开发的项目内容,以及预期的开发进展。当对应的工作人员 review 该 issue 并通过后,即可进行notebook的开发并提交 pull requests,提交PR后需要根据审稿人的意见进行修改,当PR合入要求后,该PR将会被Approve并合入仓库。
相比于其他任务,本任务更加偏向于模型应用,同样,对参赛者的英文表达也有一定的要求。
OpenVINO™
2. 项目介绍
“表” 是生活中的随处可见的一种设备。
常见的“表”包括了家用电表,水表等设备;除此之外,还有工频场强计等“表”。由于受到区域因素以及技术因素的制约,并非每种“表”都能够进行数据的自动采集,导致只能通过人工手动抄表。这种数据采集工作较为费事和枯燥,同时,长时间工作也会导致工作人员疲劳,从而产生抄录错误。通过人工智能技术构造自动化的抄表流程能够极大的克服上述问题,提高工作效率。
当前大部分抄表相关的项目都需要在特定领域的数据集上进行微调,但实际上抄表工作的抄录内容多为文字,对于特定的表而言,其布局和展示内容较为单一,因此可以基于一些配置值,在无需微调的情况下,实现抄表工作。
本项目提供了有一种无需额外训练的抄表器,只需要人为指定一些和布局有关的配置信息,即可实现表中数据的记录。
3.OpenVINO™ 与 OpenVINO™ NoteBook
OpenVINO™ 是一个用于优化和部署 AI 推理的开源工具包。使用 OpenVINO™ 可以显著提升深度学习在计算机视觉、自动语音识别、自然语言处理和其他常见任务中的性能。能够使主流框架(如TensorFlow,PyTorch等)训练的模型在运行时减少资源需求,并在从边缘到云的一系列英特尔®平台上高效部署。
OpenVINO™ 在仓库 OpenVINO™ Notebooks (https://github.com/openvinotoolkit/openvino_notebooks) 中提供了一些可以运行的 Jupyter* Notebooks,用于学习和尝试使用 OpenVINO™ 工具套件。这些 Notebooks 旨在向各位开发者提供 OpenVINO™ 基础知识的介绍,并教会大家如何利用我们的 API 来优化深度学习推理。
4. PaddleOCR
PaddleOCR 是 PaddlePaddle 的文字识别套件。迄今为止,PaddleOCR 已经提供了许多复用性强的预训练模型。
在本项目中使用的预训练模型是 Chinese and English ultra-lightweight PP-OCR model (9.4M)。更多的信息请参考 PaddleOCR Github(https://github.com/PaddlePaddle/PaddleOCR)或 PaddleOCR Gitee(https://gitee.com/PaddlePaddle/PaddleOCR)。
一个标准的 OCR 流程包括了文字检测和文字识别,对于本项目来说,文字检测工作会通过非深度学习的方式进行处理,因此,本项目只使用PaddleOCR中的文字识别模型。
5. 技术方案概览
本项目面对的应用场景是抄录特定的一类表的信息。因此,可以通过人工配置表面的尺寸,以及各个元素在表中的布局,从而跳过 OCR 模型对文字区域的检测,而后可以进一步对识别结果进行结构化输出。
在整个Pipeline中,无需额外针对业务场景对模型进行训练或配置,从深度学习的层面上完全依赖于开源模型,只是需要人工地进行一些预处理或后处理。从而可以极大的降低OCR模型的应用门槛,也减轻了对数据准备和标注的依赖。
项目的总体流程如下:
Step 1
配置图片中屏幕区域的坐标值。(这些坐标值也可以通过 cv2 的拐点检测或深度学习进行获取)
Step 2
对图片进行预处理(仿射变换)
Step 3
配置待识别的元素对应的坐标,并裁剪对应的区域。
Step 4
如有需要,可以对裁剪下来的区域进行预处理。
Step 5
基于 OpenVINO™ 进行文字识别。
Step 6
结构化输出信息
Step 7
如有需要,对输出结果进行进一步精炼。

6. 图片输入处理
由于本项目是一个零微调的项目,因此,为了保证识别模型的有效性,需要人工对齐输入信息。
- 修正倾斜的图片,将图片中的屏幕区域修正到指定的大小
- 根据从说明书等地方获取到的设备信息,设定待识别的区域在屏幕上的布局。
通过下面代码,可以将图片从倾斜状态修正。
# 配置坐标信息
# The coordinates of the corners of the screen in case 1


POINTS = [[1121, 56],    # Left top
          [3242, 183],   # right top
          [3040, 1841],  # right bottom
          [1000, 1543]]   # left bottom

# The size of the screen in case 1
DESIGN_SHAPE = (1300, 1000)


# 配置坐标信息
# The coordinates of the corners of the screen in case 1
POINTS = [[1121, 56],    # Left top
          [3242, 183],   # right top
          [3040, 1841],  # right bottom
          [1000, 1543]]   # left bottom


# The size of the screen in case 1
DESIGN_SHAPE = (1300, 1000)


# 配置坐标信息
# The coordinates of the corners of the screen in case 1
POINTS = [[1121, 56],    # Left top
          [3242, 183],   # right top
          [3040, 1841],  # right bottom
          [1000, 1543]]   # left bottom

# The size of the screen in case 1
DESIGN_SHAPE = (1300, 1000)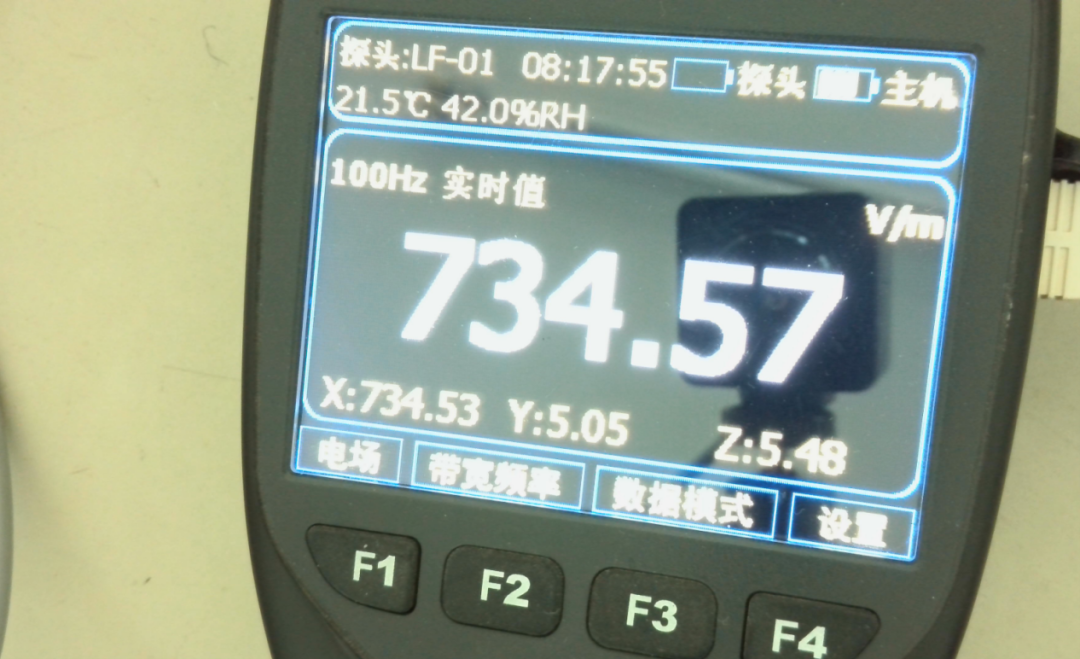
7. 基于 OpenVINO™ 加载 PaddleOCR 识别模型进行预测
7.1. 加载模型
使用 OpenVINO™ 加载 Paddle 模型无需经过任何转换,只需要
1)创建环境
2)读取模型
3)生成推理接口
假设当前模型保存在 ch_PP-OCRv3_rec_infer 目录下,则可以通过以下代码一键加载模型:
from openvino.runtime import Core


# Initialize OpenVINO Runtime for text recognition.
core = Core()


# Read the model and corresponding weights from a file.
rec_model_file_path = "ch_PP-OCRv3_rec_infer/inference.pdmodel"
rec_model = core.read_model(model=rec_model_file_path)


# Assign dynamic shapes to every input layer on the last dimension.
for input_layer in rec_model.inputs:
    input_shape = input_layer.partial_shape
    input_shape[3] = -1
    rec_model.reshape({input_layer: input_shape})


rec_compiled_model = core.compile_model(model=rec_model, device_name="CPU")


# Get input and output nodes.
rec_input_layer = rec_compiled_model.input(0)
rec_output_layer = rec_compiled_model.output(0)
7.2. 文字识别
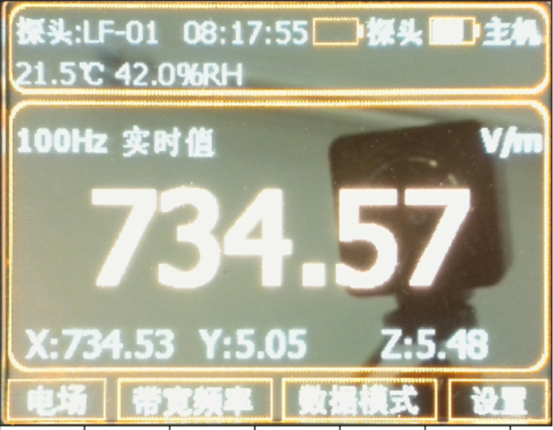
依旧对于上述示例图片,希望结构化输出以下内容:[{"Info_Probe":""}, {"Freq_Set":""}, {"Freq_Main":""}, {"Val_Total":""},{"Val_X":""}, {"Val_Y":""}, {"Val_Z":""}, {"Unit":""}, {"Field":""}]。输出示例如下图所示:
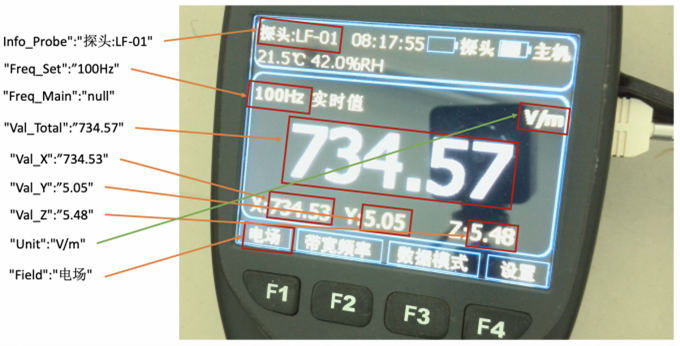
首先,需要基于仿射变换的结果,配置各个元素在图片上的布局。这个配置对于同一批表来说是固定的
# features and layout information
DESIGN_LAYOUT = {'Info_Probe':[14, 36, 410, 135],  # feature_name, xmin, ymin, xmax, ymax
                 'Freq_Set':[5, 290, 544, 406],
                 'Val_Total':[52, 419, 1256, 741],
                 'Val_X':[19, 774, 433, 882],
                 'Val_Y':[433, 773, 874, 884],
                 'Val_Z':[873, 773, 1276, 883],
                 'Unit':[1064, 291, 1295, 403],
                 'Field':[5, 913, 243, 998]}
然后,需要配置文字识别预处理函数。
首先,需要将传入的检测框转化为图片,对于本项目,检测框即为整个图片,但我们依然可以复用这个模块。
def prep_for_rec(dt_boxes, frame):
    """
    Preprocessing of the detected bounding boxes for text recognition


    Parameters:
        dt_boxes: detected bounding boxes from text detection
        frame: original input frame
    """
    ori_im = frame.copy()
    img_crop_list = []
    for bno in range(len(dt_boxes)):
        tmp_box = copy.deepcopy(dt_boxes[bno])
        img_crop = get_rotate_crop_image(ori_im, tmp_box)
        img_crop_list.append(img_crop)

    img_num = len(img_crop_list)
    # 计算对应的缩放比例
    width_list = []
    for img in img_crop_list:
        width_list.append(img.shape[1] / float(img.shape[0]))

    # 对文字进行排序以加速推理
    indices = np.argsort(np.array(width_list))
    return img_crop_list, img_num, indices
当完成裁剪之后,可以将图片分装成一个个batch,以成批次地进行预测:
def batch_text_box(img_crop_list, img_num, indices, beg_img_no, batch_num):
    """
    Batch for text recognition


    Parameters:
        img_crop_list: processed bounding box images with detected bounding box
        img_num: number of bounding boxes from text detection
        indices: sorting for bounding boxes to speed up text recognition
        beg_img_no: the beginning number of bounding boxes for each batch of text recognition inference
        batch_num: number of images in each batch
    """
    norm_img_batch = []
    max_wh_ratio = 0
    end_img_no = min(img_num, beg_img_no + batch_num)
    for ino in range(beg_img_no, end_img_no):
        h, w = img_crop_list[indices[ino]].shape[0:2]
        wh_ratio = w * 1.0 / h
        max_wh_ratio = max(max_wh_ratio, wh_ratio)
    for ino in range(beg_img_no, end_img_no):
        norm_img = resize_norm_img(img_crop_list[indices[ino]], max_wh_ratio)
        norm_img = norm_img[np.newaxis, :]
        norm_img_batch.append(norm_img)


    norm_img_batch = np.concatenate(norm_img_batch)
    norm_img_batch = norm_img_batch.copy()
return norm_img_batch
完成识别后,需要将识别结果转化为汉字,这一步需要一个映射表,可以在 PaddleOCR 或者 OpenVINO™ Notebook 中找到。
class RecLabelDecode(object):
    """ Convert between text-label and text-index """


    def __init__(self,
                 character_dict_path=None,
                 character_type='ch',
                 use_space_char=False):
        # 初始化函数


    def __call__(self, preds, label=None, *args, **kwargs):
        # 对字符进行解码


# 解码函数,用于将id转换为对应地文字
def decode(self, text_index, text_prob=None, is_remove_duplicate=False):
        """ convert text-index into text-label. """
        result_list = []
        ignored_tokens = self.get_ignored_tokens()
        batch_size = len(text_index)
        for batch_idx in range(batch_size):
            char_list = []
            conf_list = []
            for idx in range(len(text_index[batch_idx])):
                # 将id转换为对应地文字
            text = ''.join(char_list)
            result_list.append((text, np.mean(conf_list)))
        return result_list
之后就可以识别与输出啦!
下面以Freq_Set为例,进行文字识别
# 输出结构体
struct_result = {}


# Crop imgs according the layout information
xmin, ymin, xmax, ymax = DESIGN_LAYOUT['Freq_Set']
crop_img = img[ymin:ymax, xmin:xmax]


h = ymax - ymin  # height of crop_img
w = xmax - xmin  # width of crop_img
dt_boxes = [np.array([[0,0],[w,0],[w,h],[0,h]],dtype='float32')]
batch_num = 1


# since the input img is cropped, we do not need a detection model to find the position of texts
# Preprocess detection results for recognition.
img_crop_list, img_num, indices = prep_for_rec(dt_boxes, crop_img)


# txts are the recognized text results
rec_res = [['', 0.0]] * img_num
txts = []


for beg_img_no in range(0, img_num):


    # Recognition starts from here.
    norm_img_batch = batch_text_box(
        img_crop_list, img_num, indices, beg_img_no, batch_num)


    # Run inference for text recognition.
    rec_results = rec_compiled_model([norm_img_batch])[rec_output_layer]


    # Postprocessing recognition results.
    rec_result = text_decoder(rec_results)
    for rno in range(len(rec_result)):
        rec_res[indices[beg_img_no + rno]] = rec_result[rno]
    if rec_res:
        txts = [rec_res[i][0] for i in range(len(rec_res))]


# record the recognition result
struct_result['Freq_Set'] = txts[0]
print(txts[0])
8. 结构化输出与后处理
上面的逻辑已经完成了使用 OpenVINO™ 加载 PaddleOCR 并进行预测,但实际上由于整个模型没有进行微调,所以对于当前的业务场景来说可能不够完美,这个时候可以通过一些简单的逻辑进行处理,比如,对于示例图片中,右上角区域中,存在文字“100Hz 实时值”,对于检测模型而言,“Hz”可能被识别为“H2”等字样,对于识别结果“100H2 实时值”而言,可以通过将“H2”替换为“Hz”提高最后的输出效果。
简单来说,对于示例图片的这种表,可以定义如下后处理函数:
# Post-processing, fix some error made in recognition
def post_processing(results, post_configration):
    """
    Postprocessing function for correcting the recognition errors.
    Parameters:
        results (Dict): The result directory.
        post_configration (Dict): The configuration directory.
    """
    for key in results.keys():
        if len(post_configration[key]) == 0:
            continue  # nothing to do
        for post_item in post_configration[key]:
            key_word = post_item[0]
            if key_word == 'MP':  # mapping
                source_word = post_item[1]
                target_word = post_item[2]
                if source_word in results[key]:
                    results[key] = target_word
            elif key_word == 'RP':  # removing
                source_word = post_item[1]
                target_word = post_item[2]
                results[key] = results[key].replace(source_word, target_word)
            elif key_word == 'AD':  # add point
                add_position = post_item[1]
                results[key] = results[key][:add_position] + '.' + results[key][add_position:]
    return results
定义了辅助函数后,即可通过配置值进行后处理。辅助函数中共有三种配置的预处理类型,分别是映射、替换和增加小数点。以识别结果“深头:LF-01”为例,“映射”(MP)操作意味着只要文字包含“LF”,即将整段文字替换为“探头:LF-01”。以识别结果“100H2 实时值”为例,“替换”(RP)操作意味着将文字中的“H2”替换为“Hz”。以识别结果“613475”为例,如果已知最后两位必然为小数位,并且小数点极小容易被漏检,增加小数点(AD)操作可以快捷地在指定位上增加小数点。
下述代码给出了使用配置值进行后处理地示例。
# Congiguration for postprocessing of the results
RESULT_POST = {"Info_Probe":[['MP', 'LF', '探头:LF-01']],  # words need to be mapped
               "Freq_Set":[['RP', '实时值', ''], ['RP', ' ', ''], ['RP', 'H2', 'HZ']],  # words need to be replace
               "Val_Total":[['RP', 'H2', 'Hz']],
               "Val_X":[['RP', 'X', ''], ['RP', ':', '']],
               "Val_Y":[['RP', 'Y', ''], ['RP', ':', '']],
               "Val_Z":[['RP', 'Z', ''], ['RP', ':', '']],
               "Unit":[['MP', 'T', 'μT'],['MP', 'kV', 'kV/m'],['MP', 'kv', 'kV/m'],['MP', 'vm', 'V/m'],['MP', 'Vm', 'V/m'],['MP', 'A', 'A/m']],
               "Field":[]}  # nothing need to do


# Postprocessing, to fix some error made in recognition
struct_result = post_processing(struct_result, RESULT_POST)


# Print result
print(struct_result)
9. 全流程一键运行
将上述代码组合起来,可以进行全流程的运行~
# 为了避免因为图片模糊导致的漏检,配置一个输出模板,从而让每个图片输出格式都一致
# Output template in case 1
RESULT_TEMP = {"Info_Probe":"探头:---",
               "Freq_Set":"",
               "Val_Total":"无探头",
               "Val_X":"",
               "Val_Y":"",
               "Val_Z":"",
               "Unit":"A/m",
               "Field":"常规"}
# the input of recognition should be image, DESIGN information, compiled_model
def main_function(img, DESIGN_LAYOUT, RESULT_TEMP, preprocess_function=None):
    # 根据配置信息获取输出结构的格式
    struct_result = copy.deepcopy(RESULT_TEMP)


    # 逐个访问各个检测目标
    for key in DESIGN_LAYOUT.keys():
        # 裁剪各个区域的图片,并进行预处理
# 对预处理后的图片进行识别

# 返回识别结果
    return struct_result
下面是调用示例:
# 读取图片并进行图片预处理
img = cv2.imread('example1.jpg')
img = pre_processing(img, POINTS, DESIGN_SHAPE)


# 进行文字识别
struct_result = main_function(img, DESIGN_LAYOUT, RESULT_TEMP)


# 对识别结果进行精炼
instruct_result = post_processing(struct_result, RESULT_POST)
10. 总结
本文介绍了一种基于开源OCR模型(https://github.com/PaddlePaddle/PaddleOCR)进行读表的Pipeline,这个Pipeline能够在不进行模型微调的前提下完成抄表工作,并按照格式输出内容。
整个Pipeline专注于OCR模型的调用,但仍可以拼接一些检测模型或边缘检测方法,用于自动确定屏幕区域,以降低人力,提高效率。
完整的源码地址见:https://github.com/openvinotoolkit/openvino_notebooks/pull/1030
https://github.com/openvinotoolkit/openvino_notebooks/tree/main/notebooks/203-meter-reader
--END--
你也许想了解(点击蓝字查看)⬇️➡️ OpenVINO™ DevCon 2023重磅回归!英特尔以创新产品激发开发者无限潜能➡️ 5周年更新 | OpenVINO™  2023.0,让AI部署和加速更容易➡️ OpenVINO™5周年重头戏!2023.0版本持续升级AI部署和加速性能➡️ OpenVINO™2023.0实战 | 在 LabVIEW 中部署 YOLOv8 目标检测模型➡️ 开发者实战系列资源包来啦!➡️ 以AI作画,祝她节日快乐;简单三步,OpenVINO™ 助你轻松体验AIGC
➡️ 还不知道如何用OpenVINO™作画?点击了解教程。➡️ 几行代码轻松实现对于PaddleOCR的实时推理,快来get!➡️ 使用OpenVINO 在“端—边—云”快速实现高性能人工智能推理➡️ 图片提取文字很神奇?试试三步实现OCR!➡️【Notebook系列第六期】基于Pytorch预训练模型,实现语义分割任务➡️使用OpenVINO™ 预处理API进一步提升YOLOv5推理性能
扫描下方二维码立即体验
OpenVINO™ 工具套件 2023.0点击 阅读原文 立即体验OpenVINO 2023.0

文章这么精彩,你有没有“在看


 2239
2239

 被折叠的 条评论
为什么被折叠?
被折叠的 条评论
为什么被折叠?
 到【灌水乐园】发言


