我的代码是# author: baiCai
# 1. 导包
import os
import random
import torch
from torch.autograd import Variable
import torchvision.transforms as transforms
import cv2
from matplotlib import pyplot as plt
import numpy as np
import warnings
warnings.filterwarnings('ignore')
# 注意:需要确保 My_ResNet.py 文件存在,或者替换为官方 resnet50
# 这里提供一个兼容版本的导入方式(如果没有自定义 My_ResNet)
try:
from network.My_ResNet import resnet50
except ImportError:
from torchvision.models import resnet50
# 适配 YOLO 输出的 resnet50 改造(简单适配,实际需要根据你的模型调整)
class ResNet50YOLO(torch.nn.Module):
def __init__(self):
super().__init__()
self.backbone = resnet50(pretrained=False)
# 替换最后一层以适配 YOLO 的 7x7x30 输出
self.fc = torch.nn.Sequential(
torch.nn.Linear(2048, 7 * 7 * 30),
torch.nn.Unflatten(1, (7, 7, 30))
)
def forward(self, x):
x = self.backbone.conv1(x)
x = self.backbone.bn1(x)
x = self.backbone.relu(x)
x = self.backbone.maxpool(x)
x = self.backbone.layer1(x)
x = self.backbone.layer2(x)
x = self.backbone.layer3(x)
x = self.backbone.layer4(x)
x = self.backbone.avgpool(x)
x = torch.flatten(x, 1)
x = self.fc(x)
return x
def resnet50():
return ResNet50YOLO()
# 2. 定义一些基本的参数
# 类别索引
VOC_CLASSES = (
'aeroplane', 'bicycle', 'bird', 'boat',
'bottle', 'bus', 'car', 'cat', 'chair',
'cow', 'diningtable', 'dog', 'horse',
'motorbike', 'person', 'pottedplant',
'sheep', 'sofa', 'train', 'tvmonitor')
# 画矩形框的时候用到的颜色变量
Color = [[0, 0, 0],
[128, 0, 0],
[0, 128, 0],
[128, 128, 0],
[0, 0, 128],
[128, 0, 128],
[0, 128, 128],
[128, 128, 128],
[64, 0, 0],
[192, 0, 0],
[64, 128, 0],
[192, 128, 0],
[64, 0, 128],
[192, 0, 128],
[64, 128, 128],
[192, 128, 128],
[0, 64, 0],
[128, 64, 0],
[0, 192, 0],
[128, 192, 0],
[0, 64, 128]]
# 3. 解码函数
def decoder(pred):
'''
:param pred: batchx7x7x30,但是预测的时候一般一张图片一张的放,因此batch=1
:return: box[[x1,y1,x2,y2]] label[...]
'''
# 定义一些基本的参数
grid_num = 7 # 网格划分标准大小
boxes = []
cls_indexs = []
probs = []
cell_size = 1. / grid_num # 缩放因子
# 获取一些值
pred = pred.data # 预测值的数据:1*7*7*30
pred = pred.squeeze(0) # 预测值的数据:7x7x30
contain1 = pred[:, :, 4].unsqueeze(2) # 先获取第一个框的置信度,然后升维变为7*7*1
contain2 = pred[:, :, 9].unsqueeze(2) # 同上,只是为第二个框
contain = torch.cat((contain1, contain2), 2) # 拼接在一起,变为7*7*2
mask1 = contain > 0.1 # 大于阈值0.1,设置为True
mask2 = (contain == contain.max()) # 找出置信度最大的,设置为True
mask = (mask1 + mask2).gt(0) # 将mask1+mask2,让其中大于0的设置为True
# 开始迭代每个单元格,即7*7个
for i in range(grid_num):
for j in range(grid_num):
# 迭代两个预测框
for b in range(2):
# 如果mask为1,表示这个框是最大的置信度框
if mask[i, j, b] == 1:
# 获取坐标值
box = pred[i, j, b * 5:b * 5 + 4]
# 获取置信度值
contain_prob = torch.FloatTensor([pred[i, j, b * 5 + 4]])
# 将7*7的坐标,归一化
xy = torch.FloatTensor([j, i]) * cell_size # cell左上角 up left of cell
#
box[:2] = box[:2] * cell_size + xy
# 将[cx,cy,w,h]转为[x1,xy1,x2,y2]
box_xy = torch.FloatTensor(box.size()) # 重新创建一个变量存储值
box_xy[:2] = box[:2] - 0.5 * box[2:] # 这个就是中心坐标加减宽度/高度得到左上角/右下角坐标
box_xy[2:] = box[:2] + 0.5 * box[2:]
# 获取最大的概率和类别索引值
max_prob, cls_index = torch.max(pred[i, j, 10:], 0)
# 如果置信度 * 类别概率 > 0.1,即说明有一定的可信度
# 那么把值加入各个变量列表中
if float((contain_prob * max_prob)[0]) > 0.1:
boxes.append(box_xy.view(1, 4))
cls_indexs.append(torch.tensor([cls_index.item()]))
probs.append(contain_prob * max_prob)
# 如果boxes为0,表示没有框,返回0
if len(boxes) == 0:
boxes = torch.zeros((1, 4))
probs = torch.zeros(1)
cls_indexs = torch.zeros(1)
# 否则,进行处理,就是简单把原来的列表值[tensor,tensor]转为tensor的形式
# 里面的值不变
else:
boxes = torch.cat(boxes, 0) # (n,4)
probs = torch.cat(probs, 0) # (n,)
cls_indexs = torch.cat(cls_indexs, 0) # (n,)
# 后处理——NMS
keep = nms(boxes, probs)
# 返回值
return boxes[keep], cls_indexs[keep], probs[keep]
# 4. NMS处理
def nms(bboxes, scores, threshold=0.5):
'''
:param bboxes: bboxes(tensor) [N,4]
:param scores: scores(tensor) [N,]
:param threshold: 阈值
:return: 返回过滤后的框
'''
# 获取各个框的坐标值
x1 = bboxes[:, 0]
y1 = bboxes[:, 1]
x2 = bboxes[:, 2]
y2 = bboxes[:, 3]
# 计算面积
areas = (x2 - x1) * (y2 - y1)
# 将置信度按照降序排序,并获取排序后的各个置信度在这个顺序中的索引
_, order = scores.sort(0, descending=True)
keep = []
# 判断order中的元素个数是否大于0
while order.numel() > 0:
# 如果元素个数只剩下一个了,结束循环
if order.numel() == 1:
i = order.item()
keep.append(i)
break
# 获取最大置信度的索引
i = order[0]
keep.append(i)
# 对后面的元素坐标进行截断处理
xx1 = x1[order[1:]].clamp(min=x1[i]) # min指的是小于它的设置为它的值,大于它的不管
yy1 = y1[order[1:]].clamp(min=y1[i])
xx2 = x2[order[1:]].clamp(max=x2[i])
yy2 = y2[order[1:]].clamp(max=y2[i])
# 此时的xx1,yy1等是排除了目前选中的框的,即假设x1有三个元素,那么xx1只有2个元素
# 获取排序后的长和宽以及面积,如果小于0则设置为0
w = (xx2 - xx1).clamp(min=0)
h = (yy2 - yy1).clamp(min=0)
inter = w * h
# 准备更新order、
# 计算选中的框和剩下框的IOU值
ovr = inter / (areas[i] + areas[order[1:]] - inter)
# 如果 IOU小于设定的阈值,说明需要保存下来继续筛选(NMS原理)
ids = (ovr <= threshold).nonzero().squeeze()
if ids.numel() == 0:
break
order = order[ids + 1]
return torch.LongTensor(keep)
# 5. 预测函数
def predict_single(model, image_name, root_path='', device='cpu'):
result = [] # 保存结果的变量
# ========== 图片读取位置1(核心预测函数内) ==========
# 打开图片并添加有效性校验
img_path = root_path + image_name
image = cv2.imread(img_path)
# 空值校验 - 核心校验逻辑
if image is None:
raise FileNotFoundError(f"无法读取图片:{img_path},请检查路径/文件是否存在或文件是否损坏")
h, w, _ = image.shape
# resize为模型的输入大小,即448*448
img = cv2.resize(image, (448, 448))
# 由于我们模型那里定义的颜色模式为RGB,因此这里需要转换
mean = (123, 117, 104) # RGB均值
img = img - np.array(mean, dtype=np.float32)
# 预处理
transform = transforms.Compose([transforms.ToTensor(), ])
img = transform(img)
img = Variable(img[None, :, :, :], volatile=True)
img = img.to(device) # 替换cuda()为to(device)
# 开始预测
pred = model(img) # 1x7x7x30
pred = pred.cpu() # 解码部分使用CPU计算,所以转换回CPU
# 解码
boxes, cls_indexs, probs = decoder(pred)
# 开始迭代每个框
for i, box in enumerate(boxes):
# 获取相关坐标,只是需要把原来归一化后的坐标转回去
x1 = int(box[0] * w)
x2 = int(box[2] * w)
y1 = int(box[1] * h)
y2 = int(box[3] * h)
# 获取类别索引、概率等值
cls_index = cls_indexs[i]
cls_index = int(cls_index) # convert LongTensor to int
prob = probs[i]
prob = float(prob)
# 把这些值集中放入一个变量中返回
result.append([(x1, y1), (x2, y2), VOC_CLASSES[cls_index], image_name, prob])
return result
if __name__ == '__main__':
# 慢慢的显示
import time
# 创建模型,加载参数
model = resnet50()
try:
model.load_state_dict(torch.load('./save_weights/yolo.pth', map_location=torch.device('cpu')))
except FileNotFoundError:
print("警告:未找到权重文件 ./save_weights/yolo.pth,将使用随机初始化的模型进行预测")
model.eval()
# 替换为设备自适应代码(兼容CPU/GPU)
device = torch.device('cuda:0' if torch.cuda.is_available() else 'cpu')
model = model.to(device) # 替换model.cuda()
# 设置图片路径
base_path = './test_images/'
# base_path = '../data/VOC2012/JPEGImages/'
# 校验目录是否存在
if not os.path.exists(base_path):
raise FileNotFoundError(f"图片目录不存在:{base_path},请检查路径是否正确")
# 获取目录下的文件列表并过滤非图片文件
image_extensions = ('.jpg', '.jpeg', '.png', '.bmp', '.gif')
image_name_list = [
base_path + i for i in os.listdir(base_path)
if i.lower().endswith(image_extensions)
]
# 校验是否有图片文件
if not image_name_list:
raise ValueError(f"在目录 {base_path} 中未找到任何图片文件(支持格式:{image_extensions})")
# 打乱顺序
random.shuffle(image_name_list)
print('starting predicting....')
for image_name in image_name_list:
# ========== 图片读取位置2(主函数可视化部分) ==========
# 打开图片并添加有效性校验
img_path = image_name
image = cv2.imread(img_path)
# 空值校验 - 核心校验逻辑
if image is None:
print(f"警告:跳过无效图片 {img_path}")
continue
# 颜色转换
image = cv2.cvtColor(image, cv2.COLOR_BGR2RGB)
try:
result = predict_single(model, image_name, device=device) # 传递device参数
except Exception as e:
print(f"预测图片 {image_name} 时出错:{e}")
continue
# 画矩形框和对应的类别信息
for left_up, right_bottom, class_name, _, prob in result:
# 获取颜色
color = Color[VOC_CLASSES.index(class_name)]
# 画矩形
cv2.rectangle(image, left_up, right_bottom, color, 2)
# 获取类型信息和对应概率,此时为str类型
label = class_name + str(round(prob, 2))
# 把类别和概率信息写上,还要为这个信息加上一个矩形框
text_size, baseline = cv2.getTextSize(label, cv2.FONT_HERSHEY_SIMPLEX, 0.4, 1)
p1 = (left_up[0], left_up[1] - text_size[1])
cv2.rectangle(image, (p1[0] - 2 // 2, p1[1] - 2 - baseline), (p1[0] + text_size[0], p1[1] + text_size[1]),
color, -1)
cv2.putText(image, label, (p1[0], p1[1] + baseline), cv2.FONT_HERSHEY_SIMPLEX, 0.4, (255, 255, 255), 1, 8)
# 显示图片
plt.figure(figsize=(10, 8))
plt.imshow(image)
plt.axis('off') # 关闭坐标轴
plt.show()
time.sleep(2)
# 可选:保存结果图片(取消注释启用)
# save_path = f'./test_images/result_{os.path.basename(image_name)}'
# # 转换回BGR格式用于保存
# save_image = cv2.cvtColor(image, cv2.COLOR_RGB2BGR)
# cv2.imwrite(save_path, save_image)
# print(f"结果图片已保存至:{save_path}")
最新发布


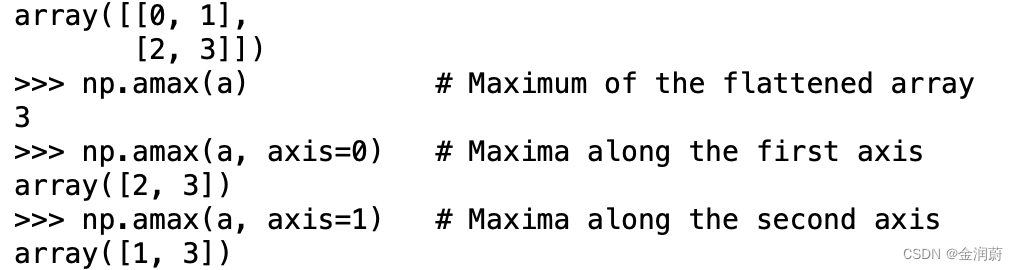
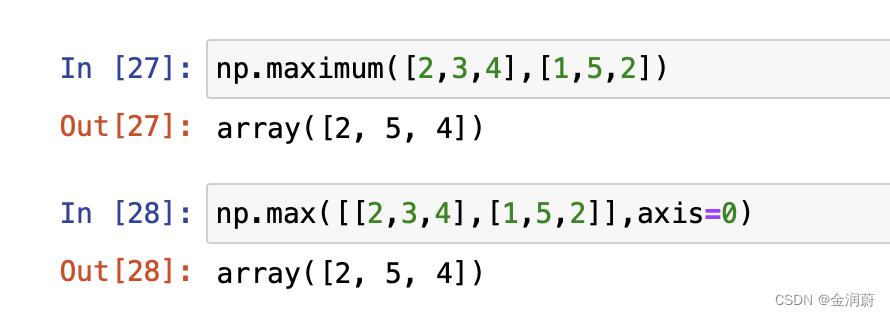
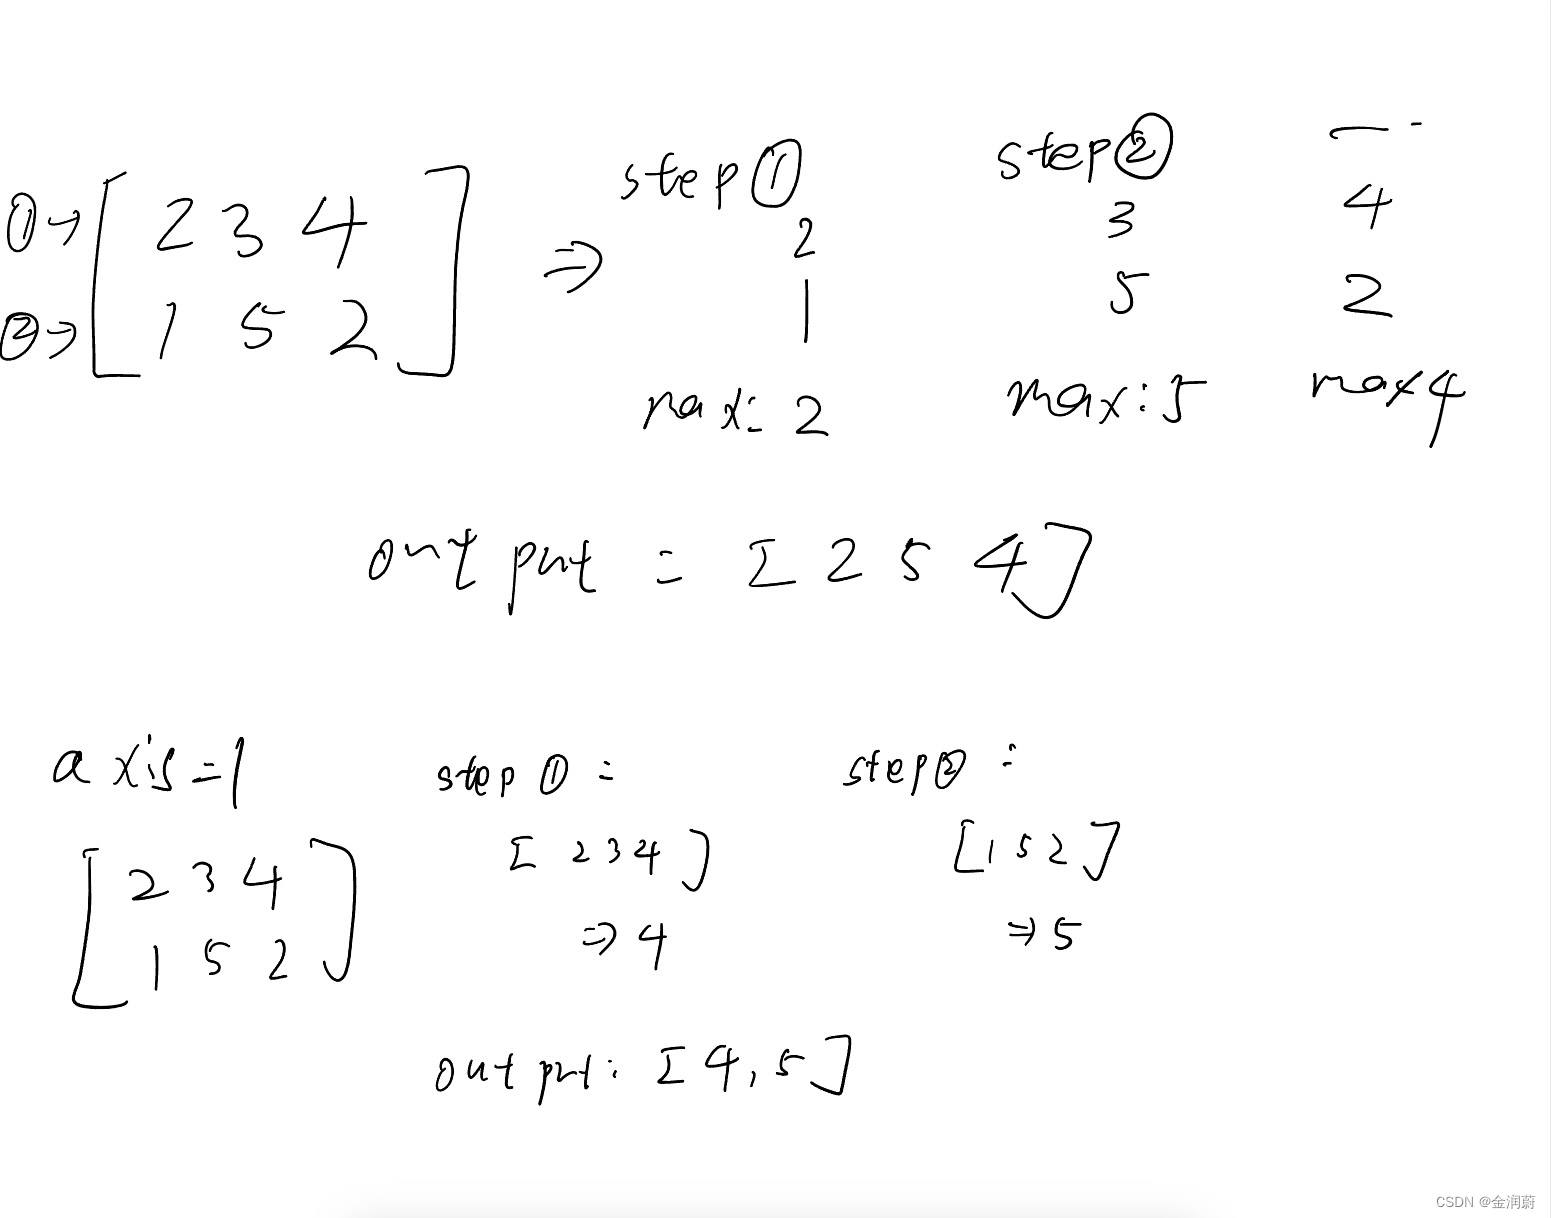
 本文解释了np.max()函数在numpy中的使用,重点在于轴(axis)0和1的区别:axis=0表示沿行操作,计算每行最大值,而axis=1则沿列操作,得到每列最大值。初学者常对此产生误解,实则是基于数组的第一轴进行的计算。


 2064
2064

 被折叠的 条评论
为什么被折叠?
被折叠的 条评论
为什么被折叠?
 到【灌水乐园】发言


