


一、下载
(1)下载llava
github:https://github.com/haotian-liu/LLaVA,按照官方的步骤准备好环境和包
- 克隆项目
git clone https://github.com/haotian-liu/LLaVA.git
cd LLaVA
- 安装包
conda create -n llava python=3.10 -y
conda activate llava
pip install --upgrade pip
# 可以用镜像加速一下
# pip install -e . -i http://mirrors.aliyun.com/pypi/simple --trusted-host mirrors.aliyun.com
pip install -e .
- (可选项)如果要训练的话可以运行这个,我没运行
pip install -e ".[train]"
pip install flash-attn --no-build-isolation
- (可选项)更新到最新版本
git pull
pip install -e .
(2)下载模型和视觉编码器
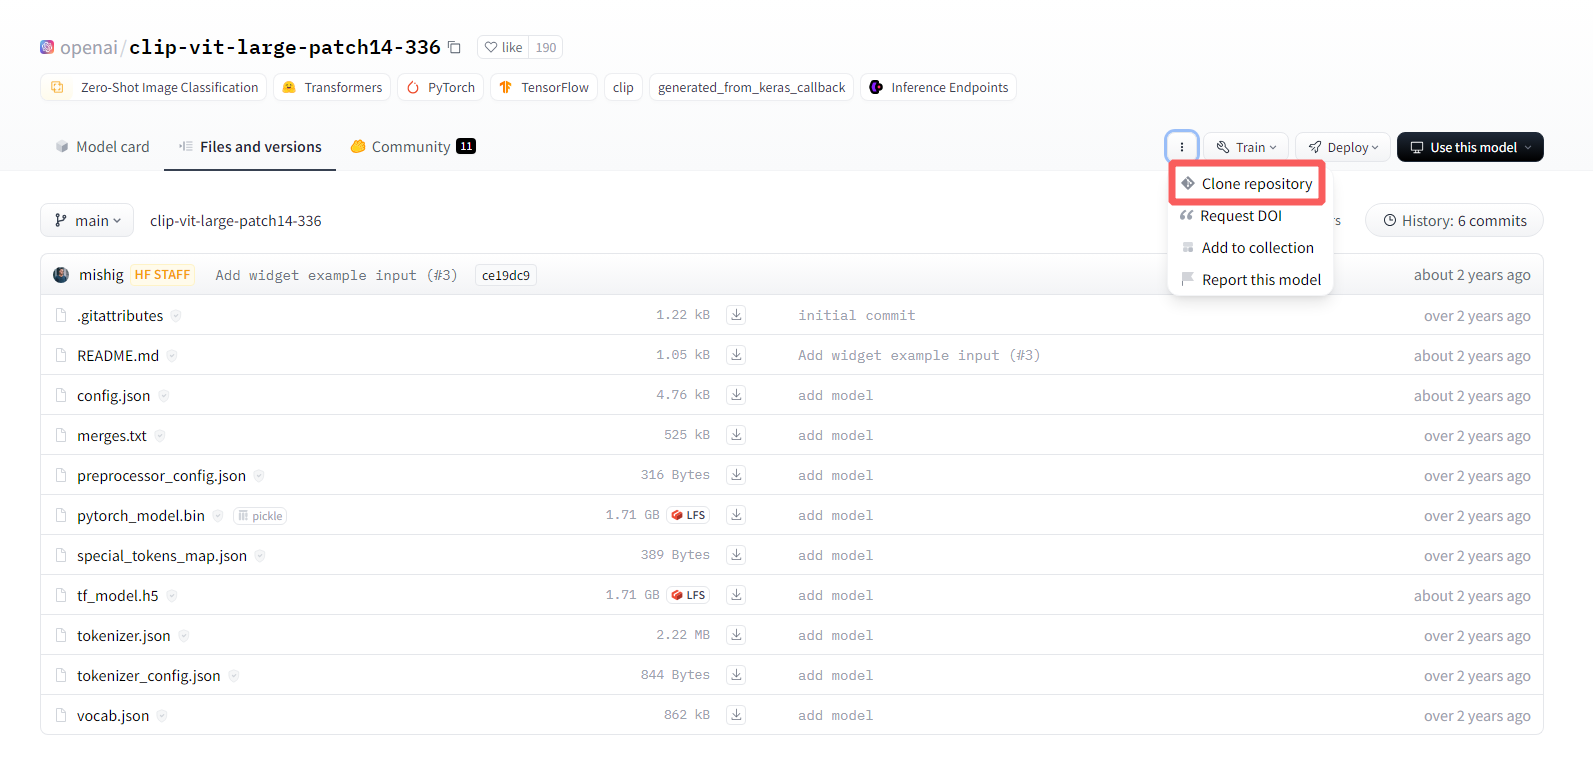
- 下载视觉编码器
新建一个文件夹(例如叫visual_encode)用来存储vit模型,到链接 https://huggingface.co/openai/clip-vit-large-patch14-336下载,可以按照Clone repository的说明进行下载,也可以逐个下载,放到clip-vit-large-patch14-336文件夹下
- 下载llava模型
新建一个文件夹(默认叫liuhaotian)用来存储llava模型,到链接下载,同样放到对应llava-v1.5-7b或llava-v1.5-13b文件夹下
https://huggingface.co/liuhaotian/llava-v1.5-13b
https://huggingface.co/liuhaotian/llava-v1.5-7b
- 调整config.json
此外,需要修改llava-v1.5-7b或llava-v1.5-13b目录下的config.json文件
# 将
"mm_vision_tower": "openai/clip-vit-large-patch14-336",
# 改为对应的本地视觉编码器模型路径,注意这个路径是相对于LLaVA文件夹的
"mm_vision_tower": "visual_encoder/clip-vit-large-patch14-336",
二、部署
启动三个终端,分别运行
- 终端1:启动控制器
python -m llava.serve.controller --host 0.0.0.0 --port 10000
- 终端2:启动网页
python -m llava.serve.gradio_web_server --controller http://localhost:10000 --model-list-mode reload
- 终端3:启动模型
# python -m llava.serve.model_worker --host 0.0.0.0 --controller http://localhost:10000 --port 40000 --worker http://localhost:40000 --model-path {模型的地址}
python -m llava.serve.model_worker --host 0.0.0.0 --controller http://localhost:10000 --port 40000 --worker http://localhost:40000 --model-path liuhaotian/llava-v1.5-7b
如果终端3如下显示,则部署成功

在浏览器打开下面任意链接,就可以进入到LLaVA对话界面
http://0.0.0.0:7861
http://localhost:7861
地址是从终端2中看出的

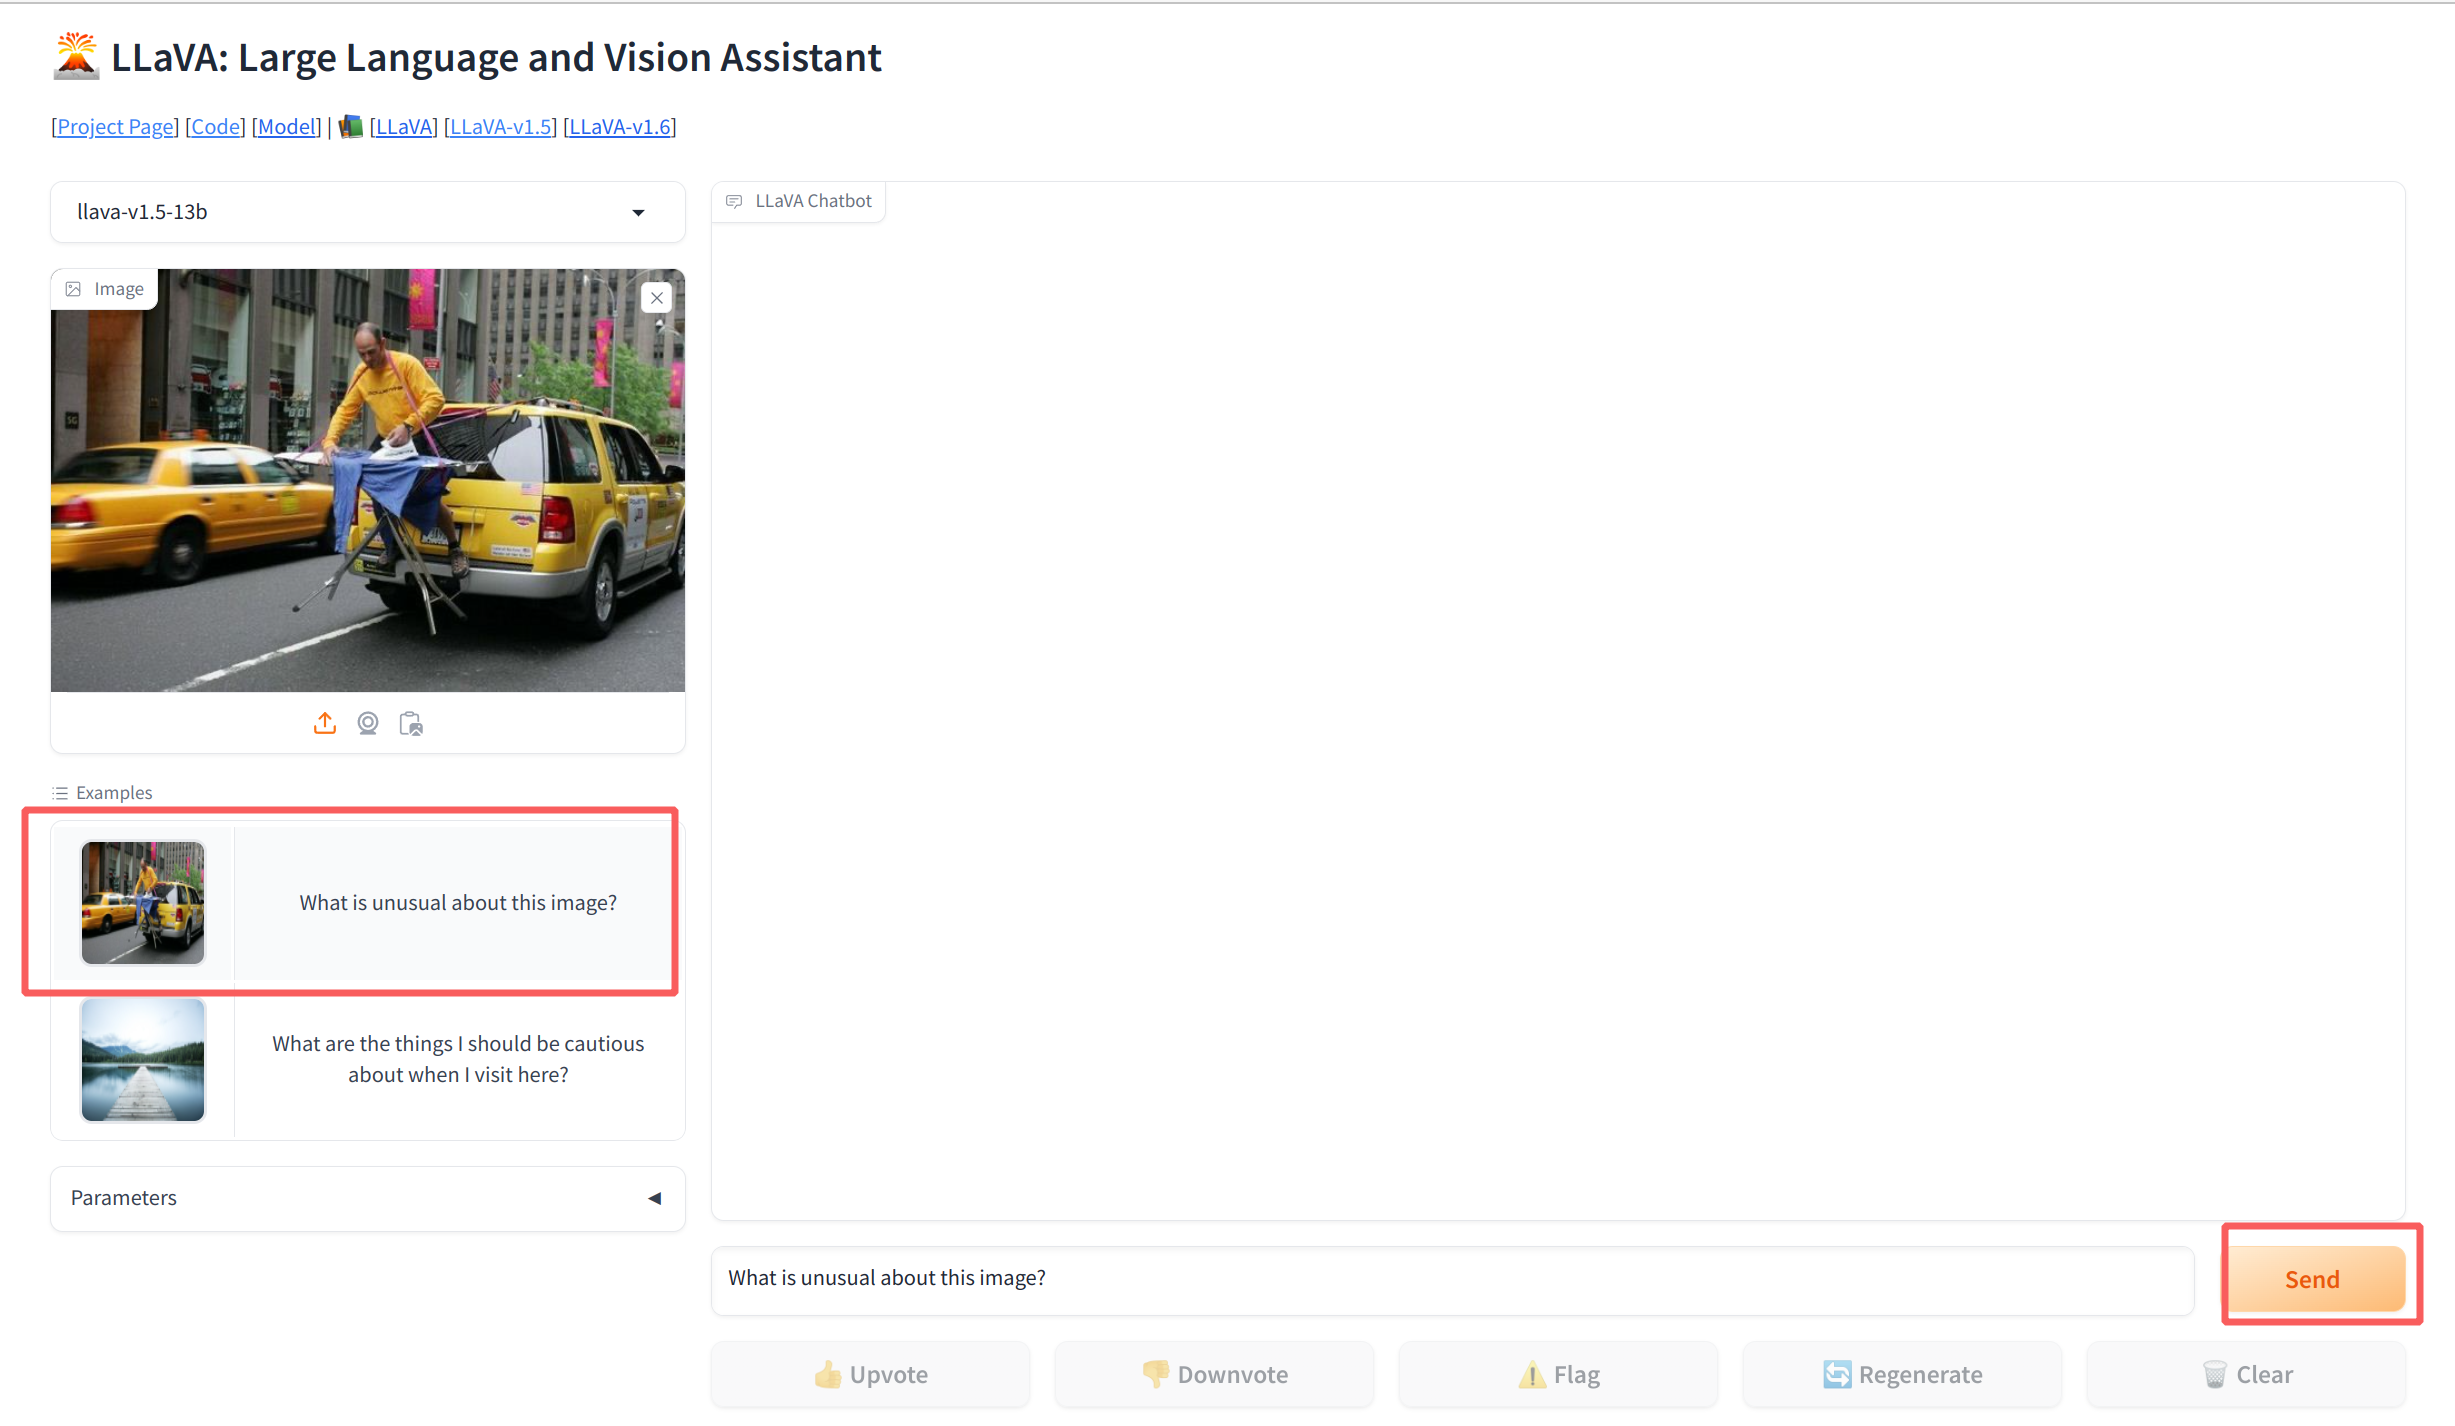
- 此时就可以用LLaVA进行对话了
三、Evaluation
参考官网 https://github.com/haotian-liu/LLaVA/blob/main/docs/Evaluation.md
(1)下载eval.zip
在准备特定任务数据之前,必须先下载eval.zip。它包含自定义注释、脚本和带有 LLaVA v1.5 的预测文件。解压到./playground/data/eval。这也为所有数据集提供了通用结构。
(2)下载数据集(textvqa为例)
下载TextVQA_0.5.1_val.json和图像 并解压至./playground/data/eval/textvqa
(3)修改脚本
文档中提到要运行CUDA_VISIBLE_DEVICES=0 bash scripts/v1_5/eval/textvqa.sh,我们打开对应的文件textvqa.sh。
gedit scripts/v1_5/eval/textvqa.sh
#!/bin/bash

python -m llava.eval.model_vqa_loader \
    --model-path liuhaotian/llava-v1.5-13b \
    --question-file ./playground/data/eval/textvqa/llava_textvqa_val_v051_ocr.jsonl \
    --image-folder ./playground/data/eval/textvqa/train_images \
    --answers-file ./playground/data/eval/textvqa/answers/llava-v1.5-13b.jsonl \
    --temperature 0 \
    --conv-mode vicuna_v1

python -m llava.eval.eval_textvqa \
    --annotation-file ./playground/data/eval/textvqa/TextVQA_0.5.1_val.json \
    --result-file ./playground/data/eval/textvqa/answers/llava-v1.5-13b.jsonl
这里注意调整几个地方:
--model-path后面改成自己的模型路径- 检查
./playground/data/eval/textvqa/目录下的几个内容自己是否都有
如果没问题就可以运行了。其他数据集也是类似的方法调整一下.sh文件
四、错误解决
(1)ImportError: cannot import name ‘LlavaLlamaForCausalLM’ from ‘llava.model’
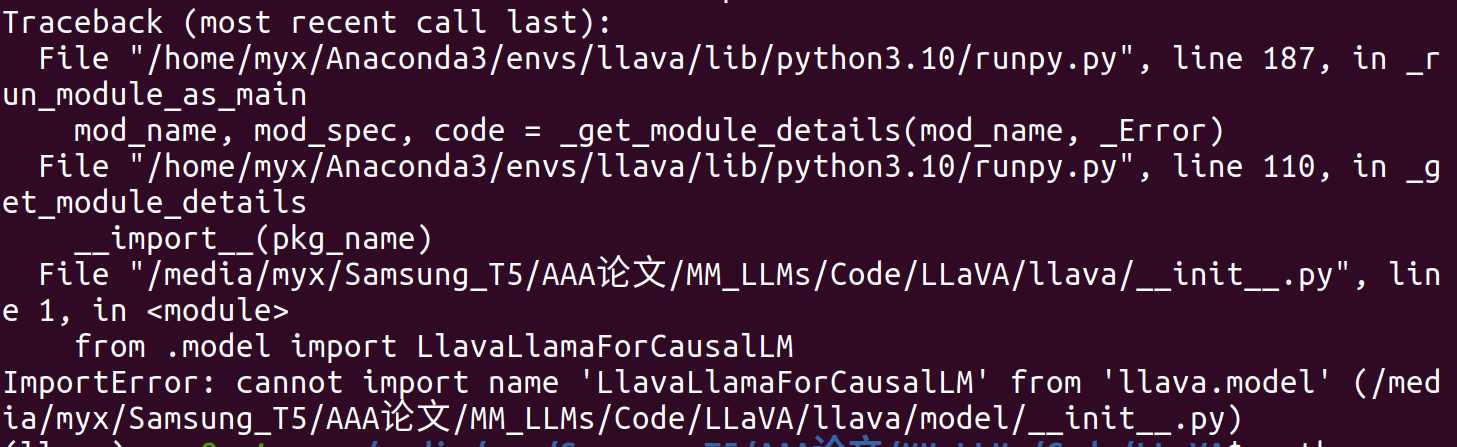
- 解决方案
直接注释掉LLaVA/llava/init.py中的from .model import LlavaLlamaForCausalLM
(2)ImportError:The new behaviour of LlamaTokenizer
ImportError:
2024-10-12 14:22:36 | ERROR | stderr | The new behaviour of LlamaTokenizer (with self.legacy = False) requires the protobuf library but it was not found in your environment. Checkout the instructions on the
2024-10-12 14:22:36 | ERROR | stderr | installation page of its repo: https://github.com/protocolbuffers/protobuf/tree/master/python#installation and follow the ones
2024-10-12 14:22:36 | ERROR | stderr | that match your environment. Please note that you may need to restart your runtime after installation.
- 解决方案
pip install protobuf
(3)PydanticSchemaGenerationError
2024-10-12 14:56:42 | ERROR | stderr | raise PydanticSchemaGenerationError(
2024-10-12 14:56:42 | ERROR | stderr | pydantic.errors.PydanticSchemaGenerationError: Unable to generate pydantic-core schema for <class ‘starlette.requests.Request’>. Setarbitrary_types_allowed=Truein the model_config to ignore this error or implement__get_pydantic_core_schema__on your type to fully support it.
2024-10-12 14:56:42 | ERROR | stderr |
2024-10-12 14:56:42 | ERROR | stderr | If you got this error by calling handler() within__get_pydantic_core_schema__then you likely need to callhandler.generate_schema(<some type>)since we do not call__get_pydantic_core_schema__on<some type>otherwise to avoid infinite recursion.
2024-10-12 14:56:42 | ERROR | stderr |
2024-10-12 14:56:42 | ERROR | stderr | For further information visit https://errors.pydantic.dev/2.9/u/schema-for-unknown-type
- 解决方案
pip install fastapi==0.111.0
参考链接:https://github.com/haotian-liu/LLaVA/issues/1701
(4)RuntimeError: cuDNN error: CUDNN_STATUS_NOT_INITIALIZED[Usage]

在输入问题后,给不出答案并报错
2024-10-12 15:04:06 | ERROR | stderr | RuntimeError: cuDNN error: CUDNN_STATUS_NOT_INITIALIZED
问题原因是cuda版本不一致
# 查看cuda,我的显示11.6
nvcc -V
# 查看torch,我的显示12.1,两个不一致
import torch
torch.version.cuda
- 解决方案
就是让他们版本一致。我在另外的链接中写了cuda版本的替换方法,此时我们希望找到支持torch==2.1.2的cuda版本
具体安装修改CUDA版本的过程见博客:Ubuntu20.04下安装多CUDA版本,以及后续切换卸载
(5)Caught ValueError: Unable to create tensor
到spyder或者pycharm下运行(这里参考官方给出的Example Code:https://github.com/haotian-liu/LLaVA?tab=readme-ov-file#quick-start-with-huggingface)测试代码,可以得到更细节的错误追溯
import os
os.environ["CUDA_VISIBLE_DEVICES"] = "0"  # 指定使用 GPU 0

from llava.model.builder import load_pretrained_model
from llava.mm_utils import get_model_name_from_path
from llava.eval.run_llava import eval_model

model_path = "liuhaotian/llava-v1.5-7b"

tokenizer, model, image_processor, context_len = load_pretrained_model(
    model_path=model_path,
    model_base=None,
    model_name=get_model_name_from_path(model_path)
)

model_path = "liuhaotian/llava-v1.5-7b"
prompt = "What are the things I should be cautious about when I visit here?"
image_file = "https://llava-vl.github.io/static/images/view.jpg"

args = type('Args', (), {
    "model_path": model_path,
    "model_base": None,
    "model_name": get_model_name_from_path(model_path),
    "query": prompt,
    "conv_mode": None,
    "image_file": image_file,
    "sep": ",",
    "temperature": 0,
    "top_p": None,
    "num_beams": 1,
    "max_new_tokens": 512
})()

eval_model(args)
Traceback (most recent call last):
File ~/Anaconda3/envs/llava/lib/python3.10/site-packages/transformers/feature_extraction_utils.py:182 in convert_to_tensors
tensor = as_tensor(value)File ~/Anaconda3/envs/llava/lib/python3.10/site-packages/transformers/feature_extraction_utils.py:141 in as_tensor
return torch.tensor(value)RuntimeError: Could not infer dtype of numpy.float32
During handling of the above exception, another exception occurred:
Traceback (most recent call last):
File ~/Anaconda3/envs/llava/lib/python3.10/site-packages/spyder_kernels/py3compat.py:356 in compat_exec
exec(code, globals, locals)File ~/桌面/MM-LLMs/LLaVA/myx_test.py:34
eval_model(args)File ~/桌面/MM-LLMs/LLaVA/llava/eval/run_llava.py:102 in eval_model
images_tensor = process_images(File ~/桌面/MM-LLMs/LLaVA/llava/mm_utils.py:173 in process_images
image = image_processor.preprocess(image, return_tensors=‘pt’)[‘pixel_values’][0]File ~/Anaconda3/envs/llava/lib/python3.10/site-packages/transformers/models/clip/image_processing_clip.py:326 in preprocess
return BatchFeature(data=data, tensor_type=return_tensors)File ~/Anaconda3/envs/llava/lib/python3.10/site-packages/transformers/feature_extraction_utils.py:78 in init
self.convert_to_tensors(tensor_type=tensor_type)File ~/Anaconda3/envs/llava/lib/python3.10/site-packages/transformers/feature_extraction_utils.py:188 in convert_to_tensors
raise ValueError(ValueError: Unable to create tensor, you should probably activate padding with ‘padding=True’ to have batched tensors with the same length.
这里有2个报错,一个是RuntimeError: Could not infer dtype of numpy.float32,一个是ValueError,其中第二个也是我们在终端3上看到的表面报错。
ValueError: Unable to create tensor, you should probably activate padding with ‘padding=True’ to have batched tensors with the same length.
定位到问题的代码地址/home/myx/Anaconda3/envs/llava/lib/python3.10/site-packages/transformers/feature_extraction_utils.py,我们发现是由于tensor = as_tensor(value)这句话报错,导致except了ValueError的提示。因此实际上,真正发生问题的代码是在第一个问题上,数据的形式不对,不能是float32,而要是float(这可能是我版本的问题,不知道有没有其他解决办法)。
        is_tensor, as_tensor = self._get_is_as_tensor_fns(tensor_type)

        # Do the tensor conversion in batch
        for key, value in self.items():
            try:
                if not is_tensor(value):
                    tensor = as_tensor(value)
                self[key] = tensor
            except:  # noqa E722
                if key == "overflowing_values":
                    raise ValueError("Unable to create tensor returning overflowing values of different lengths. ")
                raise ValueError(
                    "Unable to create tensor, you should probably activate padding "
                    "with 'padding=True' to have batched tensors with the same length."
                )
- 解决方案
于是我的一个临时的解决办法是:在/envs/llava/lib/python3.10/site-packages/transformers/feature_extraction_utils.py目录下的tensor = as_tensor(value)前面加两行数据转换的操作
                    for val in range(len(value)):
                        value[val] = value[val].astype("float")
                    tensor = as_tensor(value)
(6)xx.sh: 行 2: $‘\r’:未找到命令
想运行测试代码时,例如运行
CUDA_VISIBLE_DEVICES=0 bash scripts/v1_5/eval/textvqa.sh
发现以下报错
(llava) myx@netceor:~/桌面/MM-LLMs/LLaVA$ CUDA_VISIBLE_DEVICES=0 bash scripts/v1_5/eval/textvqa.sh
scripts/v1_5/eval/textvqa.sh: 行 2: $‘\r’:未找到命令
usage: model_vqa_loader.py [-h] [–model-path MODEL_PATH]
[–model-base MODEL_BASE]
[–image-folder IMAGE_FOLDER]
[–question-file QUESTION_FILE]
[–answers-file ANSWERS_FILE]
[–conv-mode CONV_MODE] [–num-chunks NUM_CHUNKS]
[–chunk-idx CHUNK_IDX] [–temperature TEMPERATURE]
[–top_p TOP_P] [–num_beams NUM_BEAMS]
[–max_new_tokens MAX_NEW_TOKENS]
model_vqa_loader.py: error: unrecognized arguments:
scripts/v1_5/eval/textvqa.sh: 行 4: --model-path:未找到命令
scripts/v1_5/eval/textvqa.sh: 行 5: --question-file:未找到命令
…
打开textvqa.sh发现正常给参数赋值了,打开llava/eval/model_vqa_loader.py,发现也有对应的参数需求。错误是因为脚本文件中存在 Windows 风格的换行符(CRLF),但我是在 Linux 环境下运行的,Linux 需要 Unix 风格的换行符(LF)。
解决办法:使用 dos2unix 工具将文件的换行符转换为 Unix 格式。
sudo apt install dos2unix
dos2unix scripts/v1_5/eval/textvqa.sh
此时代码可以正常运行了
参考链接:


 3万+
3万+

 被折叠的 条评论
为什么被折叠?
被折叠的 条评论
为什么被折叠?
 到【灌水乐园】发言


