


 Ansible是一款轻量级且强大的运维自动化工具,以其无客户端、易用和集中管控的特点受到青睐。本文介绍了Ansible的架构、安装、常用模块以及Playbook的使用,帮助读者快速掌握自动化运维技能。
一、什么是Ansible?
Ansible是一款非常轻量和强大的运维自动化工具;运维自动化工具本来便是用来简化运维工作的,但是如果工具本身就比较复杂,甚至需要一定的程序开发能力。就会增加使用和推广的难度。Ansible有三个最吸引人的地方:无客户端(代理程序)、简单易用和日志集中管控。Ansible是近年来知名度不断上升的DevOps自动化软件,2013年创立,虽然诞生时间不长,但是由于其采用无代理程序的架构,部署灵活,程序代码简单,因而迅速成为受瞩目的DevOps工具。
二、Ansible的架构与实现方式
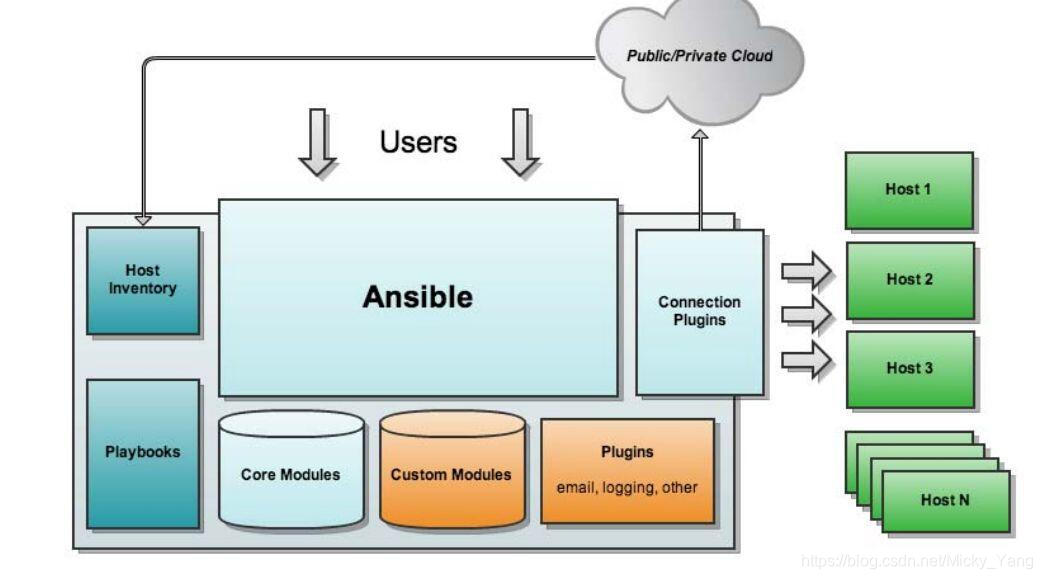
由于Ansible是客户端代理程序的一款自动化运维工具,所以它的使用是基于SSH密钥来对远程客户端进行管理的。首先会有一台服务器端,对管理的个客户端做密钥免密认证,使得服务器端可以轻松在客户端执行管理操作命令;Ansible对远程客户端做管理,需要在本地维护一个hosts客户端主机名单,Ansible的核心管理模块也非常的多,可以简单的利用模块来进行远程命令的操纵;Ansible最为强大的地方在于它可以通过Playbooks文件,通过编写此剧本文件,达到多个任务多台主机的操作,大大的减少运维时间和重复任务。
三、Ansible工具的安装
ansible工具收录在epel源当中,配置epel源即可直接基于yum程序包管理工具来安装。
[root@server ~]#vim epel.repo    //配置指向epel的yum源;
[epel]
name=Extra Packages for Enterprise Linux 7 - $basearch
mirrorlist=https://mirrors.fedoraproject.org/metalink?repo=epel-7&arch=$basearch
failovermethod=priority
enabled=1
gpgcheck=0
gpgkey=file:///etc/pki/rpm-gpg/RPM-GPG-KEY-EPEL-7

[root@server ~]# yum repolist all
Loaded plugins: fastestmirror
Loading mirror speeds from cached hostfile
 * epel: mirrors.tuna.tsinghua.edu.cn
repo id            repo name                                            status
!base/x86_64       CentOS-7 - Base - mirrors.aliyun.com                 enabled: 10,019
*!epel/x86_64      Extra Packages for Enterprise Linux 7 - x86_64       enabled: 13,068
!jyy               jyy                                                  enabled:  3,723
repolist: 26,810
[root@server ~]#
[root@server ~]# yum list all  | grep ansible
ansible.noarch                             2.7.10-1.el7                    @epel
[root@server ~]# yum install  ansible
Loaded plugins: fastestmirror
Loading mirror speeds from cached hostfile
epel/x86_64/metalink                                            | 5.7 kB  00:00:00
 * epel: mirrors.tuna.tsinghua.edu.cn
base                                                            | 3.6 kB  00:00:00
epel                                                            | 4.7 kB  00:00:00
jyy                                                             | 3.6 kB  00:00:00
......................................安装过程省略............

[root@server ~]# rpm -ql ansible |less    //查看ansible安装所生成的文件;
/etc/ansible
/etc/ansible/ansible.cfg   //这是ansible的主配置文件
/etc/ansible/hosts    //hosts是ansible管理个节点的地址信息文件
四、Ansible的常用模块
实验环境说明:
| 身份 | 地址 |
|---|---|
| 管理主机 | 192.168.126.141 |
| 被管理主机(db服务器主机) | 192.168.126.129 |
| 被管理主机(web服务器主机1) | 192.168.126.128 |
| 被管理主机(web服务器主机2) | 192.168.126.139 |
1)首先我们需要生成ssh公钥文件并发送给所有的被管理主机
[root@server ~]# ssh-keygen      //生成主机密钥信息;
Generating public/private rsa key pair.
Enter file in which to save the key (/root/.ssh/id_rsa):
/root/.ssh/id_rsa already exists.
Overwrite (y/n)? y
Enter passphrase (empty for no passphrase):
Enter same passphrase again:
Your identification has been saved in /root/.ssh/id_rsa.
Your public key has been saved in /root/.ssh/id_rsa.pub.
The key fingerprint is:
SHA256:OAWb9y0oFJk034C2FXH9ZuWiOyZnP5BgfbJZypThRoA root@master
The key's randomart image is:
+---[RSA 2048]----+
|     .=+++oo     |
|      =BE+  +   .|
|     .+o+ .+ + o |
|     ..+ oo.B B .|
|      + S.o=.% . |
|       o   .O    |
|             o   |
|          . * .  |
|           = o.. |
+----[SHA256]-----+
[root@server ~]# ssh-copy-id 192.168.126.129   //把公钥发送给所有被管理主机(此处代码只显示一台)
/usr/bin/ssh-copy-id: INFO: Source of key(s) to be installed: "/root/.ssh/id_rsa.pub"
/usr/bin/ssh-copy-id: INFO: attempting to log in with the new key(s), to filter out any that are already installed
/usr/bin/ssh-copy-id: INFO: 1 key(s) remain to be installed -- if you are prompted now it is to install the new keys
root@192.168.126.129's password:

Number of key(s) added: 1

Now try logging into the machine, with:   "ssh '192.168.126.129'"
and check to make sure that only the key(s) you wanted were added.

[root@server ~]#
[root@server ~]# ssh root@192.168.126.129 "hostname" ; ssh root@192.168.126.128 "hostname" ; ssh root@192.168.126.139 "hostname"
db
web1
web2
//对三台主机做免密测试,显示其主机名成功;
2)配置管理主机的hosts文件
[root@server ~]# cd /etc/ansible/
[root@server ansible]# vim hosts
# This is the default ansible 'hosts' file.
#
# It should live in /etc/ansible/hosts
#
#   - Comments begin with the '#' character
#   - Blank lines are ignored
#   - Groups of hosts are delimited by [header] elements
#   - You can enter hostnames or ip addresses
#   - A hostname/ip can be a member of multiple groups

# Ex 1: Ungrouped hosts, specify before any group headers.
[webserver]    //可以给多个管理主机起一个名称;下面两台主机便是我的web服务器主机地址;
192.168.126.139
192.168.126.128

[dbserver]    //这是我定义的db数据库服务器主机名称
192.168.126.129
3)常用模块的使用帮助
ansible的使用语法:
		ansible <host-pattern> [-f forks] [-m module_name] [-a args]

[root@server ~]# ansible-doc -l   //可以列出ansible所支持的所有模块;
a10_server                                           Manage A10 Networks AX
a10_server_axapi3                                    Manage A10 Networks AX
a10_service_group                                    Manage A10 Networks AX
a10_virtual_server                                   Manage A10 Networks AX
aci_aaa_user                                         Manage AAA users (aaa:
aci_aaa_user_certificate                             Manage AAA user certif
aci_access_port_to_interface_policy_leaf_profile     Manage Fabric interfac
......................

[root@server ~]# ansible-doc -s user    //-s后面接上模块名称可以查看一个模块的使用帮助;
- name: Manage user accounts
  user:
      appen
最低0.47元/天 解锁文章


 1901
1901

 被折叠的 条评论
为什么被折叠?
被折叠的 条评论
为什么被折叠?
 到【灌水乐园】发言


