


参考文献:生产环境中进行机器学习模型部署(using Flask)
机器学习的模型大多是使用python来写的,但是使用这些模型的软件工程师可能用的完全不是这些语言(机器学习模型有时只是一个软件中的一小部分,比如聊天机器人、自动邮箱发送系统)。所以针对这个问题可以有下面两种解决办法:
- 用软件工程师工作的语言来重写整个机器学习代码,但是这消耗时间和精力太多,并且像JavaScript这样的语言又不能提供很好的库来执行机器学习方法,所以这样方法是不可取的。
- 使用API方法,Web API使跨语言应用程序可以轻松运行。 如果前端开发人员需要使用ML模型来创建ML支持的Web应用程序,他们只需要从提供API的位置获取URL端点。
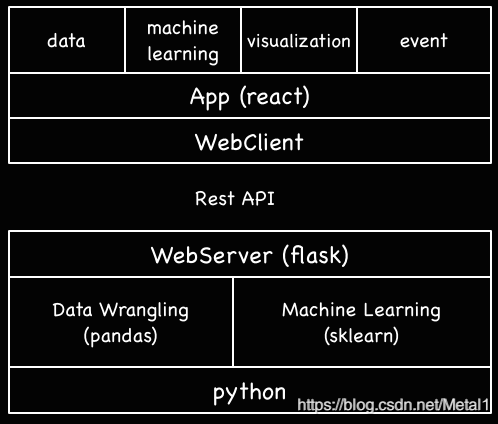
采用api方法的框架模型如下,后端采用基于Flask的机器学习api接口,可以被前端调用
基于flask的api后端构建
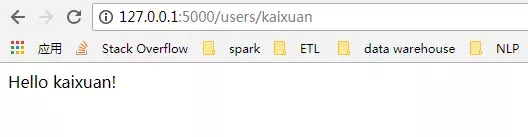
一个Flask web应用程序构建,如下
 from flask import Flask

  app = Flask(__name__)

  @app.route('/users/<string:username>')
  def hello_world(username=None):

      return("Hello {}!".format(username))
在浏览器上,输入http://127.0.0.1:5000/users/any-name
下面的程序数据集采用的是一个比赛上的数据贷款预测比赛,使用sklearn训练,把训练好的模型序列化保存到文件中。
参考文献;Loan Prediction 数据集(贷款预测)
1、创建机器学习模型
import os
import json
import numpy as np
import pandas as pd
from sklearn.externals import joblib
from sklearn.model_selection import train_test_split, GridSearchCV
from sklearn.base import BaseEstimator, TransformerMixin
from sklearn.ensemble import RandomForestClassifier

from sklearn.pipeline import make_pipeline

import warnings
warnings.filterwarnings("ignore")
!ls /home/pratos/Side-Project/av_articles/flask_api/data/
test.csv training.csv
data = pd.read_csv('../data/training.csv')
list(data.columns)
['Loan_ID',
 'Gender',
 'Married',
 'Dependents',
 'Education',
 'Self_Employed',
 'ApplicantIncome',
 'CoapplicantIncome',
 'LoanAmount',
 'Loan_Amount_Term',
 'Credit_History',
 'Property_Area',
 'Loan_Status']
data.shape
(614, 13)
- Finding out the null / Nan values in the columns:
for _ in data.columns:
    print("The number of null values in:{} == {}".format(_, data[_].isnull().sum()))
The number of null values in:Loan_ID == 0
The number of null values in:Gender == 13
The number of null values in:Married == 3
The number of null values in:Dependents == 15
The number of null values in:Education == 0
The number of null values in:Self_Employed == 32
The number of null values in:ApplicantIncome == 0
The number of null values in:CoapplicantIncome == 0
The number of null values in:LoanAmount == 22
The number of null values in:Loan_Amount_Term == 14
The number of null values in:Credit_History == 50
The number of null values in:Property_Area == 0
The number of null values in:Loan_Status == 0
- Next step is creating training and testing datasets:
pred_var = ['Gender','Married','Dependents','Education','Self_Employed','ApplicantIncome','CoapplicantIncome',\
            'LoanAmount','Loan_Amount_Term','Credit_History','Property_Area']

X_train, X_test, y_train, y_test = train_test_split(data[pred_var], data['Loan_Status'], \
                                                    test_size=0.25, random_state=42)
- To make sure that the pre-processing steps are followed religiously even after we are done with experimenting and we do not miss them while predictions, we’ll create a custom pre-processing Scikit-learn estimator.
To follow the process on how we ended up with this estimator, refer this notebook
from sklearn.base import BaseEstimator, TransformerMixin

class PreProcessing(BaseEstimator, TransformerMixin):
    """Custom Pre-Processing estimator for our use-case
    """

    def __init__(self):
        pass

    def transform(self, df):
        """Regular transform() that is a help for training, validation & testing datasets
           (NOTE: The operations performed here are the ones that we did prior to this cell)
        """
        pred_var = ['Gender','Married','Dependents','Education','Self_Employed','ApplicantIncome',\
                    'CoapplicantIncome','LoanAmount','Loan_Amount_Term','Credit_History','Property_Area']

        df = df[pred_var]

        df['Dependents'] = df['Dependents'].fillna(0)
        df['Self_Employed'] = df['Self_Employed'].fillna('No')
        df['Loan_Amount_Term'] = df['Loan_Amount_Term'].fillna(self.term_mean_)
        df['Credit_History'] = df['Credit_History'].fillna(1)
        df['Married'] = df['Married'].fillna('No')
        df['Gender'] = df['Gender'].fillna('Male')
        df['LoanAmount'] = df['LoanAmount'].fillna(self.amt_mean_)

        gender_values = {'Female' : 0, 'Male' : 1}
        married_values = {'No' : 0, 'Yes' : 1}
        education_values = {'Graduate' : 0, 'Not Graduate' : 1}
        employed_values = {'No' : 0, 'Yes' : 1}
        property_values = {'Rural' : 0, 'Urban' : 1, 'Semiurban' : 2}
        dependent_values = {'3+': 3, '0': 0, '2': 2, '1': 1}
        df.replace({'Gender': gender_values, 'Married': married_values, 'Education': education_values, \
                    'Self_Employed': employed_values, 'Property_Area': property_values, \
                    'Dependents': dependent_values}, inplace=True)

        return df.as_matrix()

    def fit(self, df, y=None, **fit_params):
        """Fitting the Training dataset & calculating the required values from train
           e.g: We will need the mean of X_train['Loan_Amount_Term'] that will be used in
                transformation of X_test
        """

        self.term_mean_ = df['Loan_Amount_Term'].mean()
        self.amt_mean_ = df['LoanAmount'].mean()
        return self
- Convert y_train & y_test to np.array:
y_train = y_train.replace({'Y':1, 'N':0}).as_matrix()
y_test = y_test.replace({'Y':1, 'N':0}).as_matrix()
We’ll create a pipeline to make sure that all the preprocessing steps that we do are just a single scikit-learn estimator.
pipe = make_pipeline(PreProcessing(),
                    RandomForestClassifier())
pipe
Pipeline(memory=None,
     steps=[('preprocessing', PreProcessing()), ('randomforestclassifier', RandomForestClassifier(bootstrap=True, class_weight=None, criterion='gini',
            max_depth=None, max_features='auto', max_leaf_nodes=None,
            min_impurity_decrease=0.0, min_impurity_split=None,
            min_samples_leaf=1, min_samples_split=2,
            min_weight_fraction_leaf=0.0, n_estimators=10, n_jobs=1,
            oob_score=False, random_state=None, verbose=0,
            warm_start=False))])
To search for the best hyper-parameters (degree for Polynomial Features & alpha for Ridge), we’ll do a Grid Search:
- Defining param_grid:
param_grid = {"randomforestclassifier__n_estimators" : [10, 20, 30],
             "randomforestclassifier__max_depth" : [None, 6, 8, 10],
             "randomforestclassifier__max_leaf_nodes": [None, 5, 10, 20],
             "randomforestclassifier__min_impurity_split": [0.1, 0.2, 0.3]}
- Running the Grid Search:
grid = GridSearchCV(pipe, param_grid=param_grid, cv=3)
- Fitting the training data on the pipeline estimator:
grid.fit(X_train, y_train)
GridSearchCV(cv=3, error_score='raise',
       estimator=Pipeline(memory=None,
     steps=[('preprocessing', PreProcessing()), ('randomforestclassifier', RandomForestClassifier(bootstrap=True, class_weight=None, criterion='gini',
            max_depth=None, max_features='auto', max_leaf_nodes=None,
            min_impurity_decrease=0.0, min_impu..._jobs=1,
            oob_score=False, random_state=None, verbose=0,
            warm_start=False))]),
       fit_params=None, iid=True, n_jobs=1,
       param_grid={'randomforestclassifier__n_estimators': [10, 20, 30], 'randomforestclassifier__max_leaf_nodes': [None, 5, 10, 20], 'randomforestclassifier__min_impurity_split': [0.1, 0.2, 0.3], 'randomforestclassifier__max_depth': [None, 6, 8, 10]},
       pre_dispatch='2*n_jobs', refit=True, return_train_score=True,
       scoring=None, verbose=0)
- Let’s see what parameter did the Grid Search select:
print("Best parameters: {}".format(grid.best_params_))
Best parameters: {'randomforestclassifier__n_estimators': 30, 'randomforestclassifier__max_leaf_nodes': 20, 'randomforestclassifier__min_impurity_split': 0.2, 'randomforestclassifier__max_depth': 8}
- Let’s score:
print("Validation set score: {:.2f}".format(grid.score(X_test, y_test)))
Validation set score: 0.79
- Load the test set:
test_df = pd.read_csv('../data/test.csv', encoding="utf-8-sig")
test_df = test_df.head()
grid.predict(test_df)
array([1, 1, 1, 1, 1])
Our pipeline is looking pretty swell & fairly decent to go the most important step of the tutorial: Serialize the Machine Learning Model
2 保存机器模型 : Serialization & Deserialization
In computer science, in the context of data storage, serialization is the process of translating data structures or object state into a format that can be stored (for example, in a file or memory buffer, or transmitted across a network connection link) and reconstructed later in the same or another computer environment.
In Python, pickling is a standard way to store objects and retrieve them as their original state. To give a simple example:
list_to_pickle = [1, 'here', 123, 'walker']

#Pickling the list
import pickle

list_pickle = pickle.dumps(list_to_pickle)
list_pickle
b'\x80\x03]q\x00(K\x01X\x04\x00\x00\x00hereq\x01K{X\x06\x00\x00\x00walkerq\x02e.'
When we load the pickle back:
loaded_pickle = pickle.loads(list_pickle)
loaded_pickle
[1, 'here', 123, 'walker']
We can save the pickled object to a file as well and use it. This method is similar to creating .rda files for folks who are familiar with R Programming.
NOTE: Some people also argue against using pickle for serialization(1). h5py could also be an alternative.
We have a custom Class that we need to import while running our training, hence we’ll be using dill module to packup the estimator Class with our grid object.
It is advisable to create a separate training.py file that contains all the code for training the model (See here for example).
- To install
dill
!pip install dill
Requirement already satisfied: dill in /home/pratos/miniconda3/envs/ordermanagement/lib/python3.5/site-packages
import dill as pickle
filename = 'model_v1.pk'
with open('../flask_api/models/'+filename, 'wb') as file:
	pickle.dump(grid, file)
So our model will be saved in the location above. Now that the model is pickled, creating a Flask wrapper around it would be the next step.
Before that, to be sure that our pickled file works fine – let’s load it back and do a prediction:
with open('../flask_api/models/'+filename ,'rb') as f:
    loaded_model = pickle.load(f)
loaded_model.predict(test_df)
array([1, 1, 1, 1, 1])
Since, we already have the preprocessing steps required for the new incoming data present as a part of the pipeline, we just have to run predict(). While working with scikit-learn, it is always easy to work with pipelines.
Estimators and pipelines save you time and headache, even if the initial implementation seems to be ridiculous. Stitch in time, saves nine!
3. 使用 Flask创建api
部署方法,是一般是把训练好的模型序列化到一个文件夹中,一个fask的serverapi 的调用训练好的模型进行预测,
We’ll keep the folder structure as simple as possible:
There are three important parts in constructing our wrapper function, apicall():
- Getting the
requestdata (for which predictions are to be made) - Loading our
pickled estimator jsonifyour predictions and send the response back withstatus code: 200
HTTP messages are made of a header and a body. As a standard, majority of the body content sent across are in json format. We’ll be sending (POST url-endpoint/) the incoming data as batch to get predictions.
(NOTE: You can send plain text, XML, csv or image directly but for the sake of interchangeability of the format, it is advisable to use json)
"""Filename: server.py
"""

import os
import pandas as pd
from sklearn.externals import joblib
from flask import Flask, jsonify, request

app = Flask(__name__)

@app.route('/predict', methods=['POST'])
def apicall():
    """API Call

    Pandas dataframe (sent as a payload) from API Call
    """
    try:
        test_json = request.get_json()
        test = pd.read_json(test_json, orient='records')

        #To resolve the issue of TypeError: Cannot compare types 'ndarray(dtype=int64)' and 'str'
        test['Dependents'] = [str(x) for x in list(test['Dependents'])]

        #Getting the Loan_IDs separated out
        loan_ids = test['Loan_ID']

    except Exception as e:
        raise e

    clf = 'model_v1.pk'

    if test.empty:
        return(bad_request())
    else:
        #Load the saved model
        print("Loading the model...")
        loaded_model = None
        with open('./models/'+clf,'rb') as f:
            loaded_model = pickle.load(f)

        print("The model has been loaded...doing predictions now...")
        predictions = loaded_model.predict(test)

        """Add the predictions as Series to a new pandas dataframe
                                OR
           Depending on the use-case, the entire test data appended with the new files
        """
        prediction_series = list(pd.Series(predictions))

        final_predictions = pd.DataFrame(list(zip(loan_ids, prediction_series)))

        """We can be as creative in sending the responses.
           But we need to send the response codes as well.
        """
        responses = jsonify(predictions=final_predictions.to_json(orient="records"))
        responses.status_code = 200

        return (responses)
Once done, run: gunicorn --bind 0.0.0.0:8000 server:app
Let’s generate some prediction data and query the API running locally at https:0.0.0.0:8000/predict
import json
import requests
"""Setting the headers to send and accept json responses
"""
header = {'Content-Type': 'application/json', \
                  'Accept': 'application/json'}

"""Reading test batch
"""
df = pd.read_csv('../data/test.csv', encoding="utf-8-sig")
df = df.head()

"""Converting Pandas Dataframe to json
"""
data = df.to_json(orient='records')
data
'[{"Loan_ID":"LP001015","Gender":"Male","Married":"Yes","Dependents":"0","Education":"Graduate","Self_Employed":"No","ApplicantIncome":5720,"CoapplicantIncome":0,"LoanAmount":110.0,"Loan_Amount_Term":360.0,"Credit_History":1.0,"Property_Area":"Urban"},{"Loan_ID":"LP001022","Gender":"Male","Married":"Yes","Dependents":"1","Education":"Graduate","Self_Employed":"No","ApplicantIncome":3076,"CoapplicantIncome":1500,"LoanAmount":126.0,"Loan_Amount_Term":360.0,"Credit_History":1.0,"Property_Area":"Urban"},{"Loan_ID":"LP001031","Gender":"Male","Married":"Yes","Dependents":"2","Education":"Graduate","Self_Employed":"No","ApplicantIncome":5000,"CoapplicantIncome":1800,"LoanAmount":208.0,"Loan_Amount_Term":360.0,"Credit_History":1.0,"Property_Area":"Urban"},{"Loan_ID":"LP001035","Gender":"Male","Married":"Yes","Dependents":"2","Education":"Graduate","Self_Employed":"No","ApplicantIncome":2340,"CoapplicantIncome":2546,"LoanAmount":100.0,"Loan_Amount_Term":360.0,"Credit_History":null,"Property_Area":"Urban"},{"Loan_ID":"LP001051","Gender":"Male","Married":"No","Dependents":"0","Education":"Not Graduate","Self_Employed":"No","ApplicantIncome":3276,"CoapplicantIncome":0,"LoanAmount":78.0,"Loan_Amount_Term":360.0,"Credit_History":1.0,"Property_Area":"Urban"}]'
"""POST <url>/predict
"""
resp = requests.post("http://0.0.0.0:8000/predict", \
                    data = json.dumps(data),\
                    headers= header)
resp.status_code
200
"""The final response we get is as follows:
"""
resp.json()
{'predictions': '[{"0":"LP001015","1":1},{...


 被折叠的 条评论
为什么被折叠?
被折叠的 条评论
为什么被折叠?
 到【灌水乐园】发言


