


提示:文章写完后,目录可以自动生成,如何生成可参考右边的帮助文档
目录
前言
上一讲我们学习了单链表的创建,也知道了链表在插入删除元素方面的优势,既然有优势我们就要学会利用它。掌握单链表的节点插入与删除操作,是深入理解链表结构的关键。插入操作需正确处理指针指向,以避免断链或内存泄漏;删除操作则需注意节点释放与指针更新的时序。这些操作不仅是学习更复杂数据结构的基础,也是面试和实际开发中的高频考点。欢迎各位的阅读学习,批评纠正谢谢。
注:本次讲解依旧统一使用C++语言,同时也会在附录放置相对应的C语言代码供大家参考。
一、单链表节点的插入
我们依旧通过引入例题讲解:
例题1
题目:给出一个只有头指针的链表和 n 次操作,每次操作为在链表的第 m 个元素后面插入一个新元素x,若m 大于链表的元素总数则将x放在链表的最后。
输入格式:
多组输入,每组数据首先输入一个整数n(n∈[1,100]),代表有n次操作。接下来的n行,每行有两个整数m (m∈[0,10000]),x。
输出格式:
对于每组数据。从前到后输出链表的所有元素,两个元素之间用空格隔开。
输入样例:
4
1 1
1 2
0 3
100 4
输出样例:
3 1 2 4
我们先简单的解读一下题意:输入一个整数n,然后紧接着输入n组数据,每一组数据由m,x两个元素,每一组操作讲第m个元素后面插入元素x,比如1 1,意思是在第一个元素后面插入1,然后1 2,在第一个元素后面插入2,即1 2,然后0 3,在初始位置插后插入3,即3 1 2,最后100 4,大于元素总数,直接放在最后,即3 1 2 4.
好了,我们已经了解题意,很明显这是节点插入元素问题,我们接下来就可以开始实现代码(此次代码风格依旧延续上一讲):
#include<bits/stdc++.h>
using namespace std;

struct node{
    int data;
    node *next;
};
上面是前置的头文件,结构体等,我们就不再做赘述,直接进行核心部分讲解:
int main(){
    int n;
    while(cin >> n){  // 多组输入
        node* head = NULL;  // 头指针,初始为空链表

        for(int i=0; i<n; i++){  // 处理n次插入操作
            int m, x;
            cin >> m >> x;

            // 创建新节点
            node* newnode = new node;
            newnode->data = x;
newnode->next = NULL;首先就是要声明输入的组数n,然后通过while循环实现多组输入(只要能从输入流中读取到n(即输入未结束),就继续处理下一组数据),紧接着初始化头指针为空,表示当前链表为空(没有任何节点),事实上头指针是链表的 "入口",始终指向链表的第一个节点。
接着开始使用for循环处理n次组的插入操作,首先声明并循环输入m,x,与之前一样,动态分配内存,创建一个newnode节点,节点将输入的数据x存储到新节点的数据域,初始化新节点的指针域为空。
接着开始进行插入操作:
 // 情况1:链表为空(无论m是多少,直接作为第一个节点)
            if(head == NULL){
                head = newnode;
                continue;
            }

            // 情况2:在表头插入(m=0)
            if(m == 0){
                newnode->next = head;  // 新节点指向原头节点
                head = newnode;        // 更新头指针
                continue;
            }

            // 情况3:在中间或尾部插入
            node* current = head;
            int count = 1;  // 记录当前遍历到第几个节点(从1开始计数)

            // 找到第m个节点(或最后一个节点)
            while(current->next != NULL && count < m){
                current = current->next;
                count++;
            }

            // 插入新节点(当前节点的后面)
            newnode->next = current->next;
            current->next = newnode;
        }
插入过程中分为三种情况:
1.链表为空情况。即头指针就为空表,示链表中还没有任何节点,这种情况将头指针head直接指向新节点,使新节点成为链表的第一个节点,然后continue跳过后续代码,进入下一次循环。
2.处理在链表头部插入的情况(m=0):让新节点的指针域指向当前的头节点(原链表的第一个节点)即newnode->next=head,然后将头指针更新为新节点,使新节点成为链表新的第一个节点,即head = newnode。
3.处理在链表中间或尾部插入的情况:
- 定义
current指针从链表头部开始遍历,count用于计数当前节点位置。 while循环找到第m个节点:- 如果
count<m且不是最后一个节点,就继续向后移动。 - 如果
m大于链表长度,会停在最后一个节点。
- 如果
- 插入操作:
newnode->next = current->next:新节点指向当前节点的下一个节点。current->next = newnode:当前节点指向新节。
自此,链表的插入工作圆满完成,接下来就是大家熟知的遍历打印还有内存的释放,这里也就不再赘述,直接放出代码:
 // 输出链表
        node* current = head;
        while(current != NULL){
            cout << current->data;
            if(current->next != NULL) cout << " ";
            current = current->next;
        }
        cout << endl;

        // 释放内存
        current = head;
        while(current != NULL){
            node* temp = current;
            current = current->next;
            delete temp;
        }
    }
    return 0;
}
下面是完整的代码:
#include<bits/stdc++.h>
using namespace std;

struct node{
    int data;
    node *next;
};

int main(){
    int n;
    while(cin >> n){  // 多组输入
        node* head = NULL;  // 头指针,初始为空链表

        for(int i=0; i<n; i++){  // 处理n次插入操作
            int m, x;
            cin >> m >> x;

            // 创建新节点
            node* newnode = new node;
            newnode->data = x;
            newnode->next = NULL;

            // 情况1:链表为空(无论m是多少,直接作为第一个节点)
            if(head == NULL){
                head = newnode;
                continue;
            }

            // 情况2:在表头插入(m=0)
            if(m == 0){
                newnode->next = head;  // 新节点指向原头节点
                head = newnode;        // 更新头指针
                continue;
            }

            // 情况3:在中间或尾部插入
            node* current = head;
            int count = 1;  // 记录当前遍历到第几个节点(从1开始计数)

            // 找到第m个节点(或最后一个节点)
            while(current->next != NULL && count < m){
                current = current->next;
                count++;
            }

            // 插入新节点(当前节点的后面)
            newnode->next = current->next;
            current->next = newnode;
        }

        // 输出链表
        node* current = head;
        while(current != NULL){
            cout << current->data;
            if(current->next != NULL) cout << " ";
            current = current->next;
        }
        cout << endl;

        // 释放内存
        current = head;
        while(current != NULL){
            node* temp = current;
            current = current->next;
            delete temp;
        }
    }
    return 0;
}
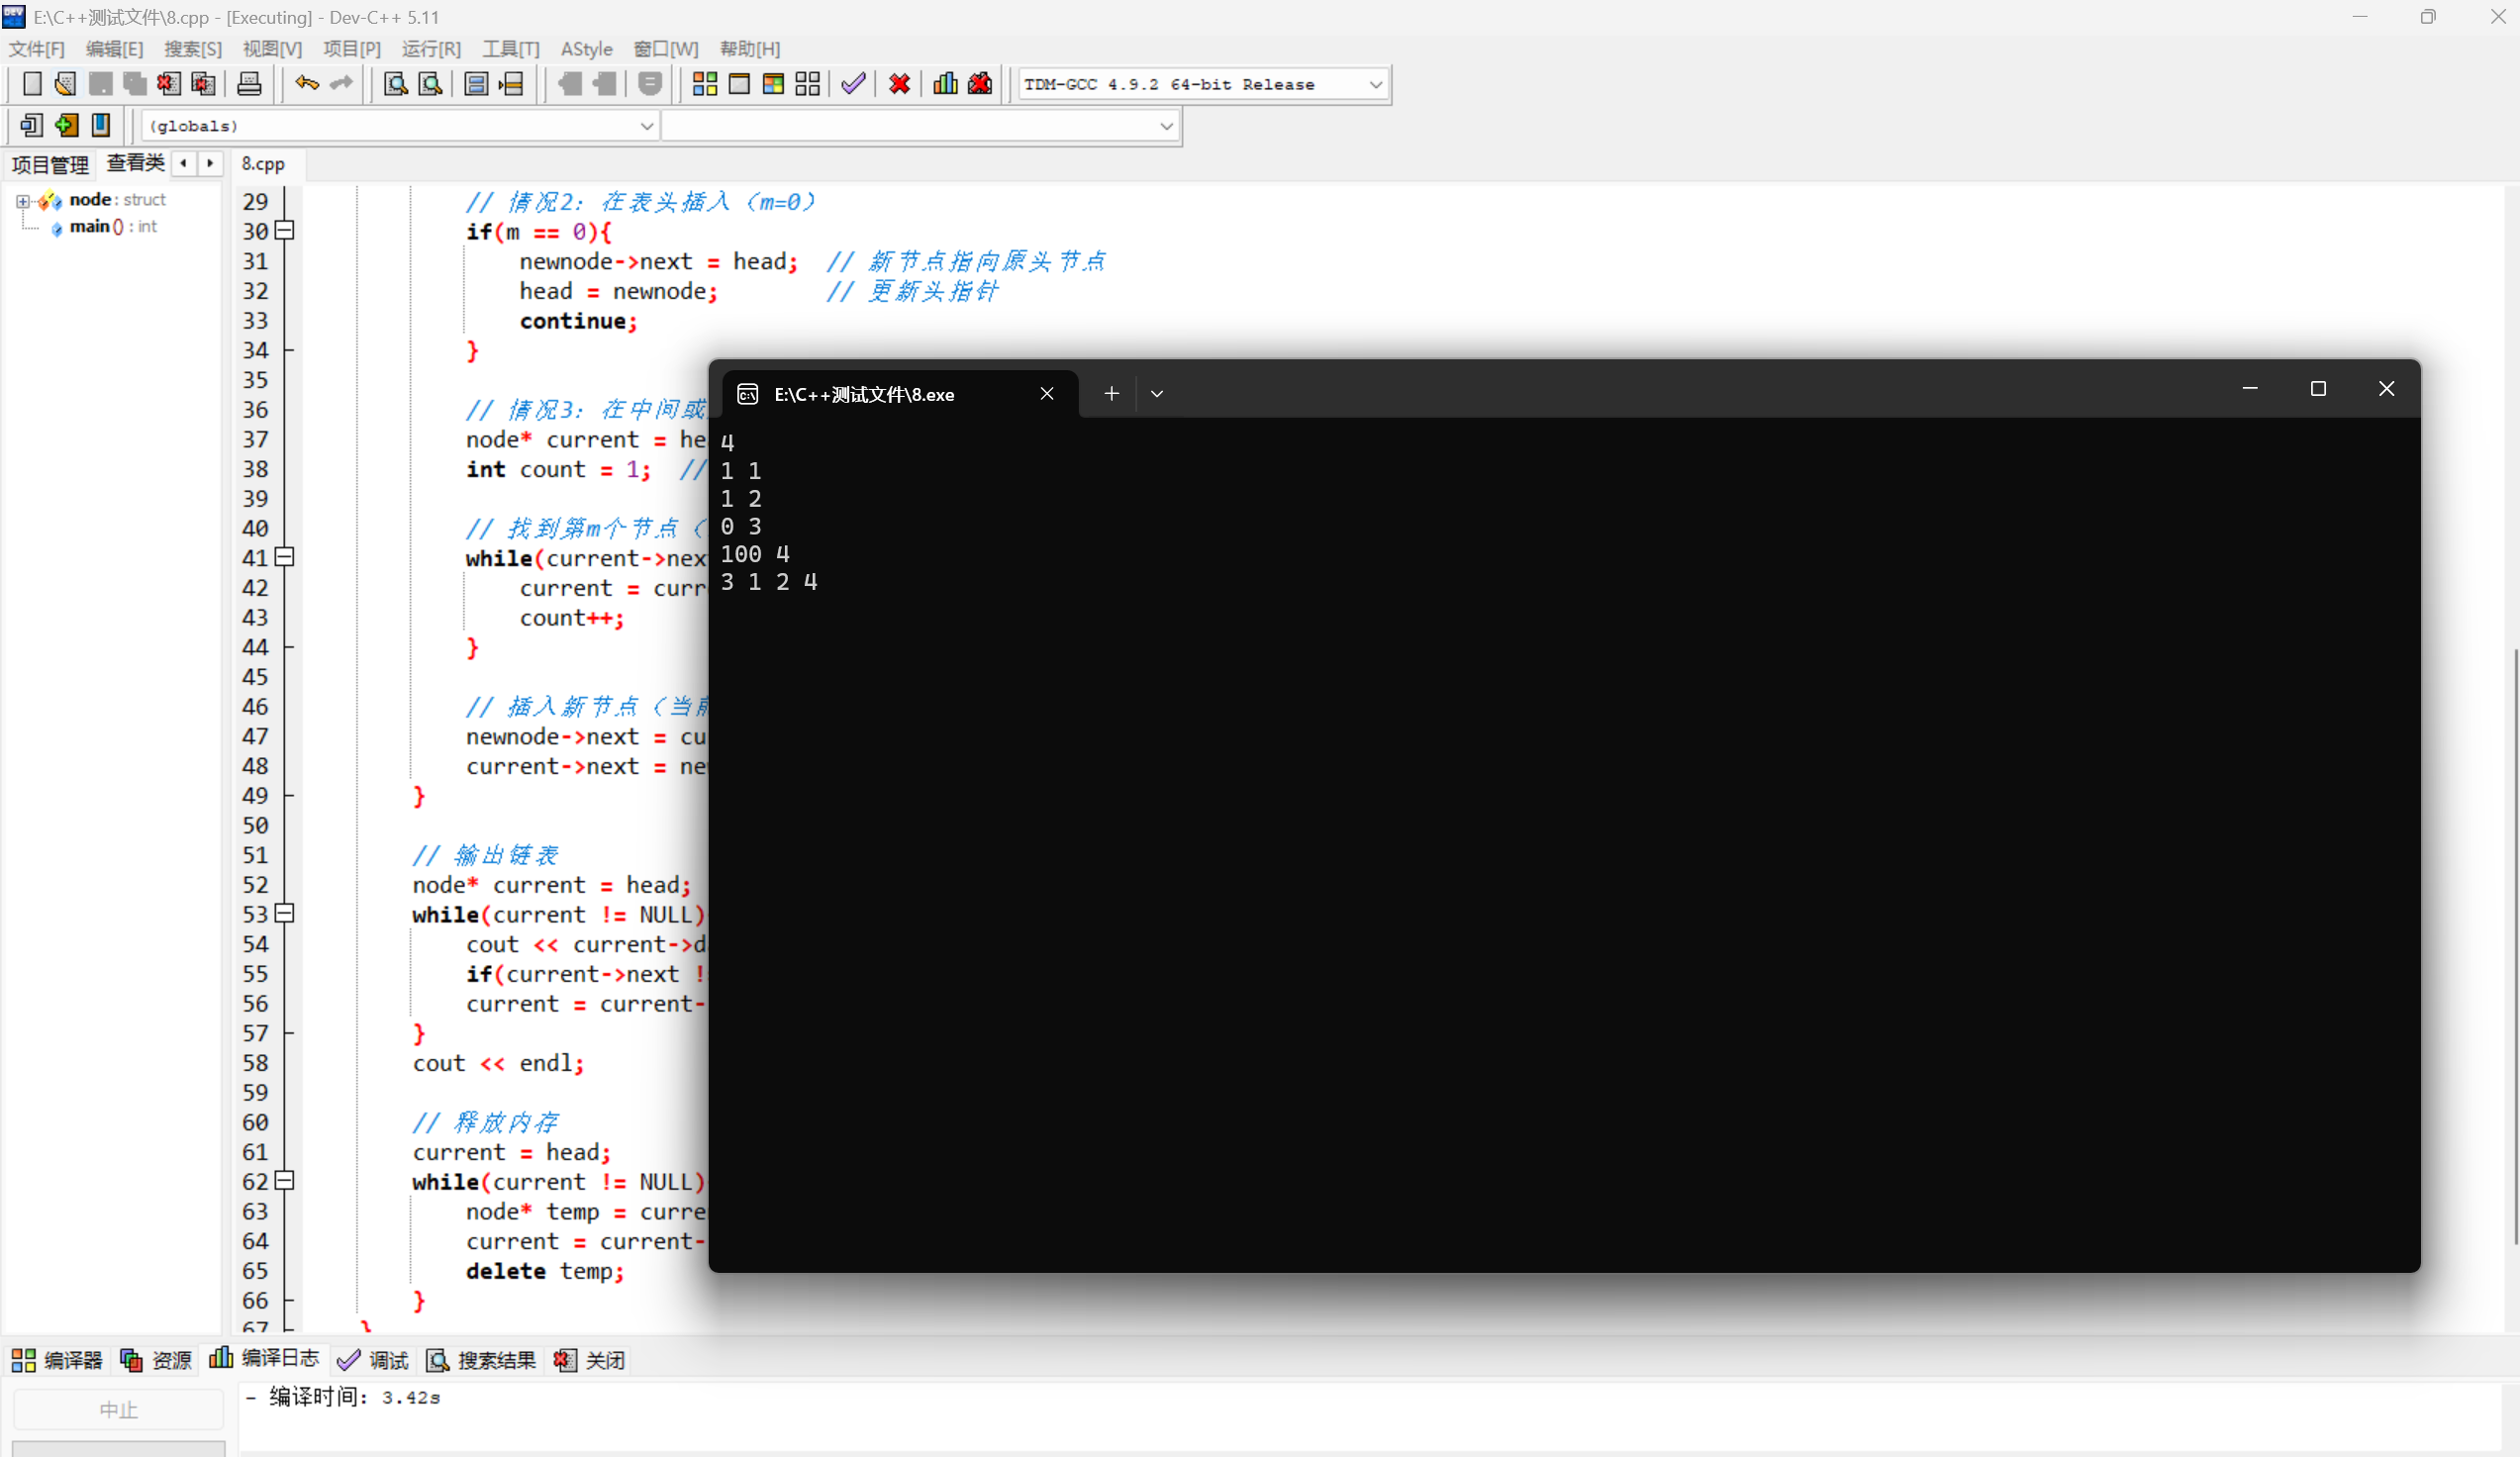
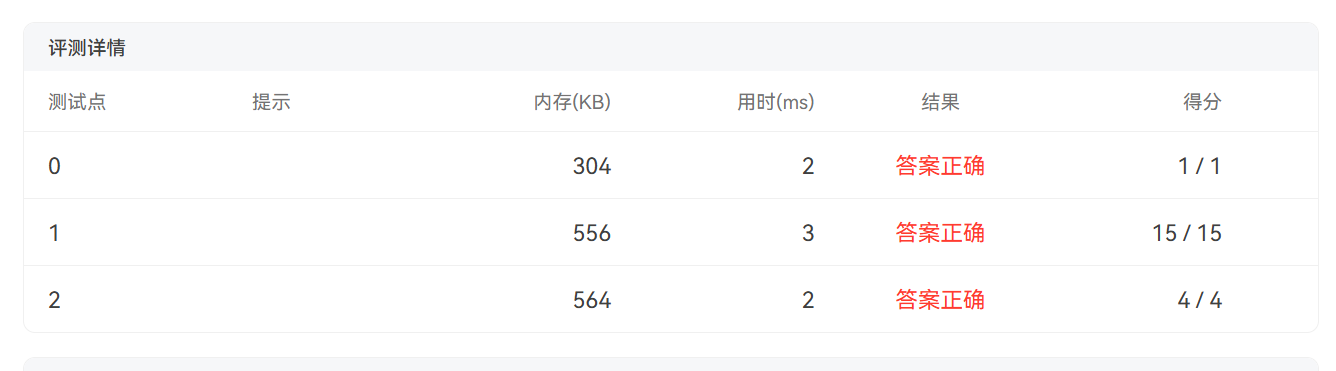
下面是DevC++运行结果和PTA测评:
二、链表元素的删除
例题2
题目:
按照数据输入的相反顺序(逆位序)建立一个单链表,并将单链表中重复的元素删除(值相同的元素只保留最后输入的一个)。
输入格式:
第一行输入元素个数 n (1 <= n <= 15);
第二行输入 n 个整数,保证在 int 范围内。输出格式:
第一行输出初始链表元素个数;
第二行输出按照逆位序所建立的初始链表;
第三行输出删除重复元素后的单链表元素个数;
第四行输出删除重复元素后的单链表。输入样例:
10
21 30 14 55 32 63 11 30 55 30
输出样例:
10
30 55 30 11 63 32 55 14 30 21
7
30 55 11 63 32 14 21
基于大家的学习已经有一定的基础,我们这里先直接给出完整代码且附有注释,让大家先自行学习理解:
#include<bits/stdc++.h>
using namespace std;

struct node{
    int data;
    node* next;
};

// 计算链表长度
int leng(node* head){
    int len = 0;
    node* current = head;
    while(current != NULL){
        len++;
        current = current->next;
    }
    return len;
}

// 打印链表元素
void print(node* head){
    node* current = head;
    while(current != NULL){
        cout << current->data;
        if(current->next != NULL){  // 最后一个元素后不加空格
            cout << " ";
        }
        current = current->next;
    }
    cout << endl;
}

// 删除重复元素(函数名改为del,避免与关键字冲突)
void del(node* head){
    if(head == NULL) return;  // 空链表直接返回,避免后续报错
    node* p = head;
    // 外层循环:以p为基准节点,检查后续所有节点
    while(p != NULL){
        node* q = p;  // q从基准节点p开始,用于遍历p之后的节点
        // 内层循环:删除p之后所有与p数据相同的节点
        while(q->next != NULL){
            if(q->next->data == p->data){
                // 找到重复节点,删除q->next
                node* temp = q->next;
                q->next = q->next->next;  // 跳过重复节点,保持链表连续
                delete temp;  // 释放重复节点的内存,避免泄漏
            } else {
                q = q->next;  // 无重复则移动q,继续检查下一个
            }
        }
        p = p->next;  // 基准节点后移,处理下一个节点的重复检查
    }
}

int main(){
    int n;
    cin >> n;
    node* head = NULL;  // 头指针初始化为空,链表为空
    node* newnode;      // 临时指针,用于创建新节点

    // 头插法建立逆位序链表(输入顺序的相反顺序)
    for(int i = 0; i < n; i++){
        int num;
        cin >> num;
        newnode = new node;       // 申请新节点内存
        newnode->data = num;      // 给新节点赋值
        newnode->next = head;     // 新节点指向当前头节点(连接原链表)
        head = newnode;           // 更新头指针,新节点成为新的链表头部
    }

    // 输出初始链表信息
    cout << leng(head) << endl;  // 输出初始长度
    print(head);                 // 输出初始链表

    // 删除重复元素
    del(head);

    // 输出删除重复后的链表信息
    cout << leng(head) << endl;  // 输出去重后长度
    print(head);                 // 输出去重后链表

    // 释放整个链表的内存(避免内存泄漏)
    node* curr = head;
    while(curr != NULL){
        node* temp = curr;
        curr = curr->next;  // 先移动到下一个节点,再释放当前节点
        delete temp;
    }

    return 0;
}
对于链表删除元素,难点在与删除元素的函数部分,接下来我们将详细讲解删除函数部分,其他部分我们就在下面简单一讲,
计算链表长度
int leng(node* head){
    int len = 0;               // 初始化长度为0
    node* current = head;      // 临时指针,从链表头部开始遍历
    while(current != NULL){    // 遍历到链表末尾(current为NULL时停止)
        len++;                 // 每经过一个节点,长度+1
        current = current->next; // 移动到下一个节点
    }
    return len;                // 返回总长度
}用current指针从头部(head)开始,逐个节点遍历,每访问一个节点就计数 + 1,直到current指向NULL(链表结束)。
打印链表 print
void print(node* head){
    node* current = head;      // 临时指针,从头部开始遍历
    while(current != NULL){    // 遍历到链表末尾
        cout << current->data; // 输出当前节点的数据
        if(current->next != NULL){  // 如果不是最后一个节点
            cout << " ";       // 输出空格分隔
        }
        current = current->next; // 移动到下一个节点
    }
    cout << endl;              // 打印完所有节点后换行
}
这一部分我之所以单独定义函数是为了方便讲解,逻辑思路和在main函数中是完全一致的。
★删除重复元素 del(重中之重)
void del(node* head){
    if(head == NULL) return;   // 空链表直接返回,避免后续报错
    node* p = head;            // p是基准节点指针,从头部开始
    while(p != NULL){          // 遍历所有基准节点
        node* q = p;           // q用于遍历p之后的节点,初始指向p
        while(q->next != NULL){// 遍历p后面的所有节点
            if(q->next->data == p->data){ // 找到与基准节点值相同的节点
                node* temp = q->next;     // 临时保存重复节点的地址
                q->next = q->next->next;  // 跳过重复节点(链表断链)
                delete temp;              // 释放重复节点的内存(避免泄漏)
            } else {
                q = q->next;   // 不重复则移动q,继续检查下一个
            }
        }
        p = p->next;           // 基准节点后移,处理下一个节点
    }
}
我们逐步解释:
1.空链表判断
如果链表是空的
if(head == NULL) return;(没有任何节点),直接结束函数,避免后面报错。
2.初始化基点
node* p = head;p是 “基点” 的指针,从链表第一个节点(head)开始。- “基点”是我们要保留的节点,后面所有和它值相同的节点都会被删掉。
3.遍历所有基点
 while(p != NULL){

}- 只要
p没指向空(还有节点没处理),就一直循环。 - 目的是让每个节点都当一次 “基点”,检查后面有没有重复值。
4.初始化查找指针
node* q = p;q是辅助指针,用来查找p后面的节点中有没有和p重复的值。- 一开始
q和p指向同一个节点(从基点的位置开始查)。
5.查找并删除重复节点
while(q->next!=NULL) { }- 只要
q的下一个节点存在(还有节点没查完),就继续循环。 - 核心逻辑在这个循环里:检查
q的下一个节点是否和p重复。
6.判断是否重复
if(q->next->data == p->data) { ... }- 如果
q的下一个节点的值,和基点p的值相同(找到重复了),就执行删除操作。
7.删除重复节点
node* temp = q->next;       // 先用temp记下这个重复节点的地址
q->next = q->next->next;    // 让q跳过重复节点,直接连到下下个节点
delete temp; // 释放重复节点的内存(彻底删掉)- 比如链表是
p(30) → 55 → q → 30 → ...,当q的下一个是30(和p重复):
① 用temp记住这个30的地址;
② 让q直接连到30的下一个节点(相当于把这个30从链上摘下来);
③ 用delete彻底删掉这个30节点,释放内存。
8.不重复则继续查找
else { q = q->next; }9.基点后移
p = p->next;- 当
p后面的所有节点都查完并删除重复后,把p往后移一个,让下一个节点当新的 “基点”,重复整个过程。
主函数部分
int main(){
    int n;
    cin >> n;
    node* head = NULL;  // 头指针初始化为空,链表为空
    node* newnode;      // 临时指针,用于创建新节点

    // 头插法建立逆位序链表(输入顺序的相反顺序)
    for(int i = 0; i < n; i++){
        int num;
        cin >> num;
        newnode = new node;       // 申请新节点内存
        newnode->data = num;      // 给新节点赋值
        newnode->next = head;     // 新节点指向当前头节点(连接原链表)
        head = newnode;           // 更新头指针,新节点成为新的链表头部
    }

    // 输出初始链表信息
    cout << leng(head) << endl;  // 输出初始长度
    print(head);                 // 输出初始链表

    // 删除重复元素
    del(head);

    // 输出删除重复后的链表信息
    cout << leng(head) << endl;  // 输出去重后长度
    print(head);                 // 输出去重后链表

    // 释放整个链表的内存(避免内存泄漏)
    node* curr = head;
    while(curr != NULL){
        node* temp = curr;
        curr = curr->next;  // 先移动到下一个节点,再释放当前节点
        delete temp;
    }

    return 0;
}
这部分与之前相似,大家自行学习理解,这里就不再详述。
好了,下面就是完整的代码了:
例2 代码
#include<bits/stdc++.h>
using namespace std;
struct node{
int data;
node* next;
};
// 计算链表长度
int leng(node* head){
int len = 0;
node* current = head;
while(current != NULL){
len++;
current = current->next;
}
return len;
}
// 打印链表元素
void print(node* head){
node* current = head;
while(current != NULL){
cout << current->data;
if(current->next != NULL){ // 最后一个元素后不加空格
cout << " ";
}
current = current->next;
}
cout << endl;
}
// 删除重复元素(函数名改为del,避免与关键字冲突)
void del(node* head){
if(head == NULL) return; // 空链表直接返回,避免后续报错
node* p = head;
// 外层循环:以p为基准节点,检查后续所有节点
while(p != NULL){
node* q = p; // q从基准节点p开始,用于遍历p之后的节点
// 内层循环:删除p之后所有与p数据相同的节点
while(q->next != NULL){
if(q->next->data == p->data){
// 找到重复节点,删除q->next
node* temp = q->next;
q->next = q->next->next; // 跳过重复节点,保持链表连续
delete temp; // 释放重复节点的内存,避免泄漏
} else {
q = q->next; // 无重复则移动q,继续检查下一个
}
}
p = p->next; // 基准节点后移,处理下一个节点的重复检查
}
}
int main(){
int n;
cin >> n;
node* head = NULL; // 头指针初始化为空,链表为空
node* newnode; // 临时指针,用于创建新节点
// 头插法建立逆位序链表(输入顺序的相反顺序)
for(int i = 0; i < n; i++){
int num;
cin >> num;
newnode = new node; // 申请新节点内存
newnode->data = num; // 给新节点赋值
newnode->next = head; // 新节点指向当前头节点(连接原链表)
head = newnode; // 更新头指针,新节点成为新的链表头部
}
// 输出初始链表信息
cout << leng(head) << endl; // 输出初始长度
print(head); // 输出初始链表
// 删除重复元素
del(head);
// 输出删除重复后的链表信息
cout << leng(head) << endl; // 输出去重后长度
print(head); // 输出去重后链表
// 释放整个链表的内存(避免内存泄漏)
node* curr = head;
while(curr != NULL){
node* temp = curr;
curr = curr->next; // 先移动到下一个节点,再释放当前节点
delete temp;
}
return 0;
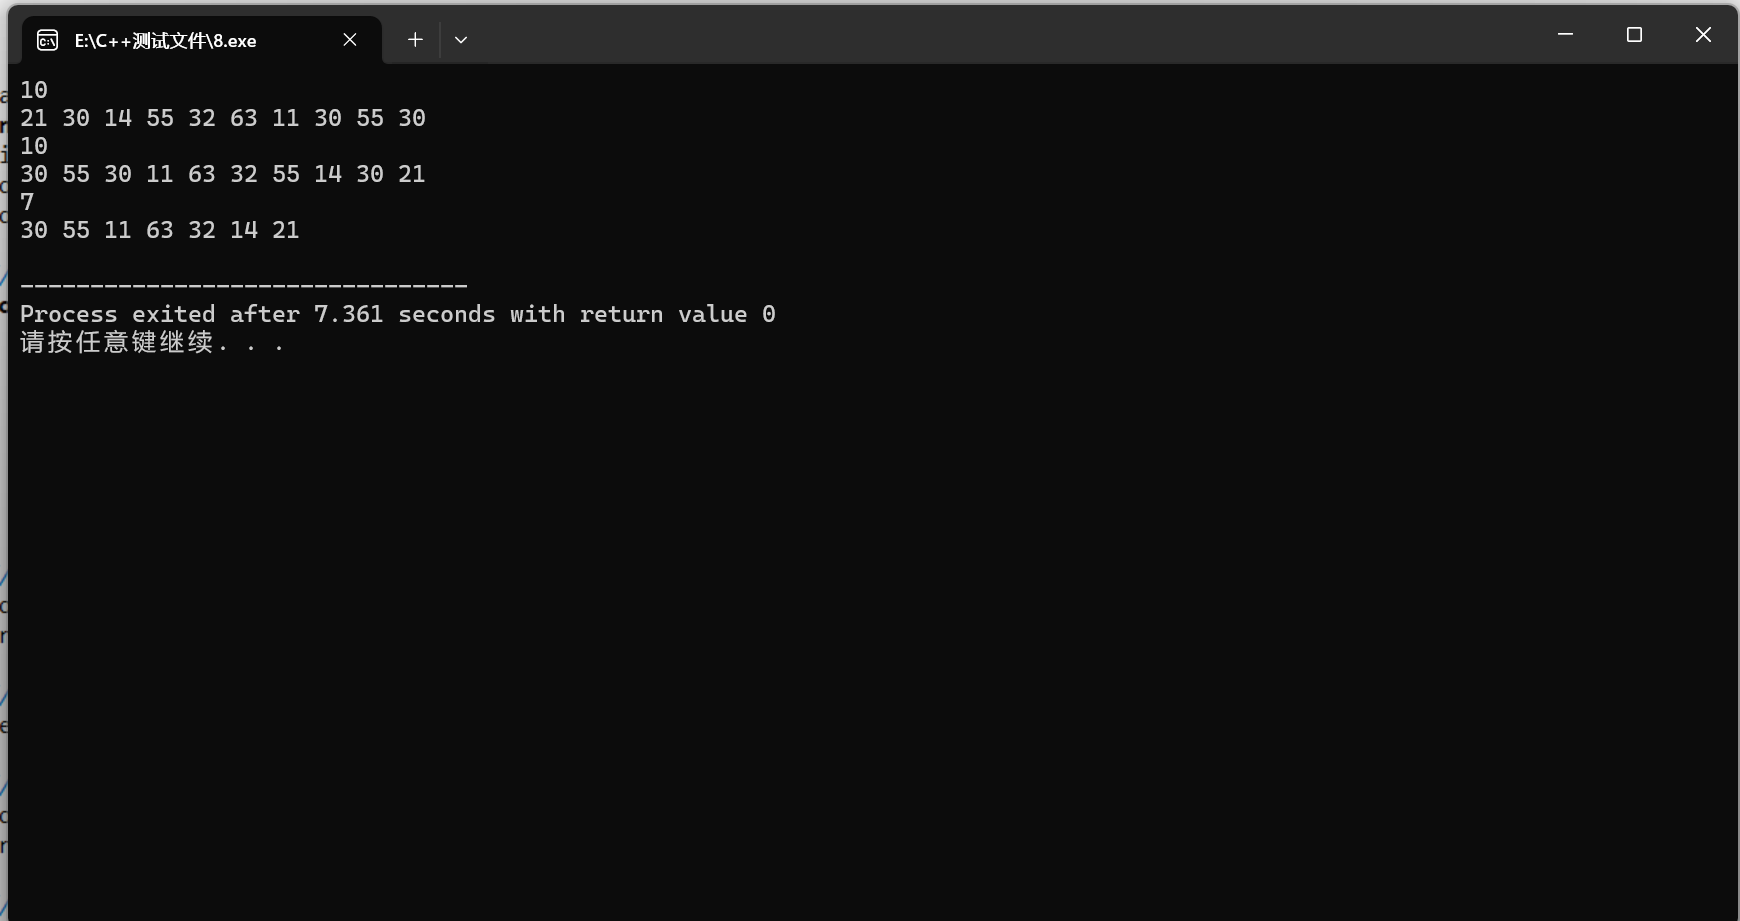
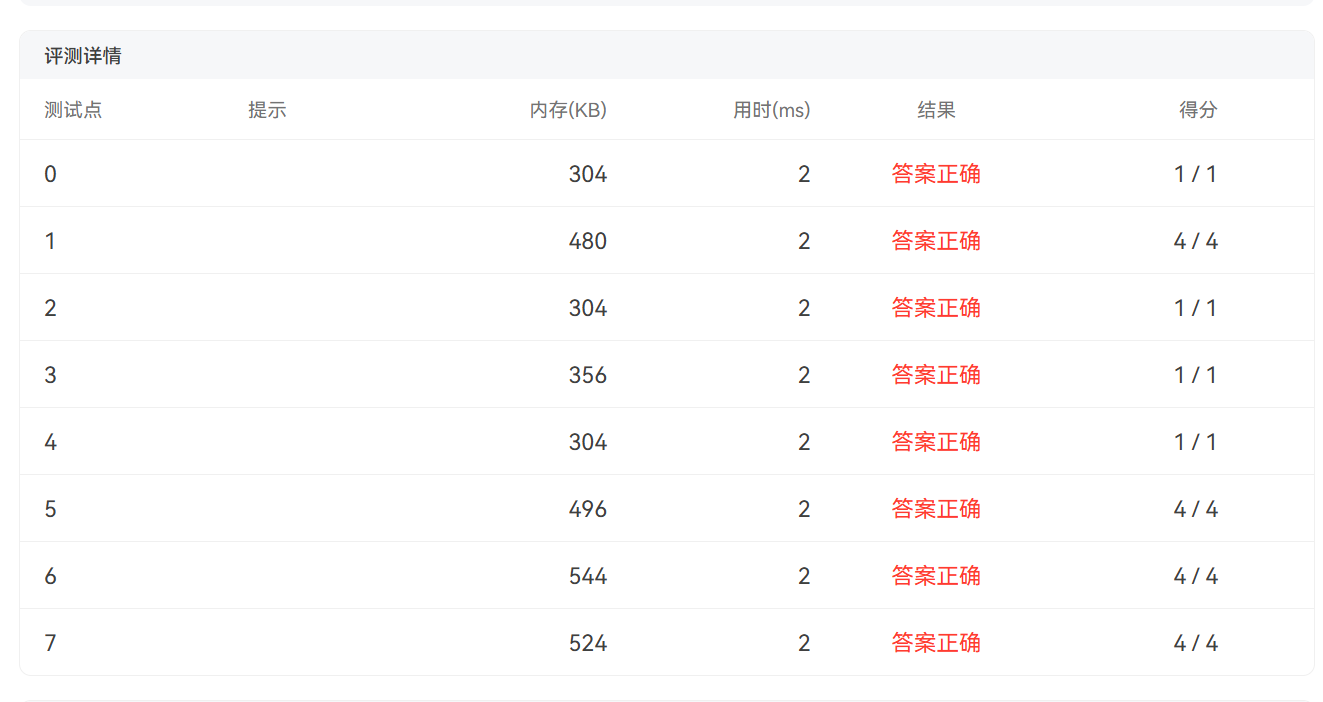
}下面是DevC++运行结果和PTA测评:
三.总结
以上就是这一讲的全部内容了,掌握单链表的节点插入与删除,是洞悉链表本质的核心环节。插入时需精准调控指针指向,既要保证链表的连续性避免断链,也要妥善管理内存防止泄漏;删除操作则需讲究时序,必须先通过临时指针暂存待删节点,更新指针完成链表重构后,再释放节点内存。这些基础操作看似简单,却是进阶学习复杂数据结构(如双向链表、循环链表)的基石,更是技术面试与实际开发中频繁考察的重点,直接体现对内存管理和指针逻辑的掌握深度。
感谢大家的支持,欢迎大家的学习和批评纠正!
四.附录
例 1
#include <stdio.h>
#include <stdlib.h>

struct node {
    int data;
    struct node* next;
};

int main() {
    int n;
    while (scanf("%d", &n) == 1) {
        struct node* head = NULL;

        for (int i = 0; i < n; i++) {
            int m, x;
            scanf("%d %d", &m, &x);

            struct node* newnode = (struct node*)malloc(sizeof(struct node));
            newnode->data = x;
            newnode->next = NULL;

            if (head == NULL) {
                head = newnode;
                continue;
            }

            if (m == 0) {
                newnode->next = head;
                head = newnode;
                continue;
            }

            struct node* current = head;
            int count = 1;

            while (current->next != NULL && count < m) {
                current = current->next;
                count++;
            }

            newnode->next = current->next;
            current->next = newnode;
        }

        struct node* current = head;
        while (current != NULL) {
            printf("%d", current->data);
            if (current->next != NULL) {
                printf(" ");
            }
            current = current->next;
        }
        printf("\n");

        current = head;
        while (current != NULL) {
            struct node* temp = current;
            current = current->next;
            free(temp);
        }
    }
    return 0;
}
例 2
#include <stdio.h>
#include <stdlib.h>

struct node {
    int data;
    struct node* next;
};

int leng(struct node* head) {
    int len = 0;
    struct node* current = head;
    while (current != NULL) {
        len++;
        current = current->next;
    }
    return len;
}

void print(struct node* head) {
    struct node* current = head;
    while (current != NULL) {
        printf("%d", current->data);
        if (current->next != NULL) {
            printf(" ");
        }
        current = current->next;
    }
    printf("\n");
}

void del(struct node* head) {
    if (head == NULL) return;
    struct node* p = head;
    while (p != NULL) {
        struct node* q = p;
        while (q->next != NULL) {
            if (q->next->data == p->data) {
                struct node* temp = q->next;
                q->next = q->next->next;
                free(temp);
            } else {
                q = q->next;
            }
        }
        p = p->next;
    }
}

int main() {
    int n;
    scanf("%d", &n);
    struct node* head = NULL;
    struct node* newnode;

    for (int i = 0; i < n; i++) {
        int num;
        scanf("%d", &num);
        newnode = (struct node*)malloc(sizeof(struct node));
        newnode->data = num;
        newnode->next = head;
        head = newnode;
    }

    printf("%d\n", leng(head));
    print(head);

    del(head);

    printf("%d\n", leng(head));
    print(head);

    struct node* curr = head;
    while (curr != NULL) {
        struct node* temp = curr;
        curr = curr->next;
        free(temp);
    }

    return 0;
}


 被折叠的 条评论
为什么被折叠?
被折叠的 条评论
为什么被折叠?
 到【灌水乐园】发言


