


提示:文章写完后,目录可以自动生成,如何生成可参考右边的帮助文档
Springboot
- 一、自定义注解简介
- 二、自定义注解的案列
- 2.1.创建SpringBoot项目
- 2.1.1.点击New Project
- 2.1.2.创建新项目
- 2.1.3.创建一个新的Module
- 2.1.4.创建SpringBoot模块
- 2.1.5.项目创建完成
- 2.2.修改pom.xml
- 2.3.案例一
- 2.3.1.新建一个annotation包
- 2.3.2.添加TranscationModel枚举类
- 2.3.3.新建MyAnnotation1注解
- 2.3.4.新建MyAnnotation2注解
- 2.3.5.新建MyAnnotation3注解
- 2.3.6.新建Demo类
- 2.3.7.新建DemoTest类
- 2.7.8.运行结果:
- 2.4. 案例二(获取类属性上的注解属性值)
- 2.5.案例三(获取参数修饰注解对应的属性值)
- 三、spring aop集成自定义注解实现日志记录功能
- 总结
一、自定义注解简介
1.Java注解简介
Java注解是附加在代码中的一些元信息,用于一些工具在编译、运行时进行解析和使用,起到说明、配置的功能。
注解相关类都包含在java.lang.annotation包中。
1.1Java注解分类
基本注解
元注解
自定义注解
1.2JDK基本注解
@Override
重写

@SuppressWarnings(value = "unchecked")
压制编辑器警告
1.3JDK元注解
@Retention:定义注解的保留策略
@Retention(RetentionPolicy.SOURCE)             //注解仅存在于源码中,在class字节码文件中不包含
@Retention(RetentionPolicy.CLASS)              //默认的保留策略,注解会在class字节码文件中存在,但运行时无法获得,
@Retention(RetentionPolicy.RUNTIME)            //注解会在class字节码文件中存在,在运行时可以通过反射获取到

@Target:指定被修饰的Annotation可以放置的位置(被修饰的目标)
@Target(ElementType.TYPE)                      //接口、类
@Target(ElementType.FIELD)                     //属性
@Target(ElementType.METHOD)                    //方法
@Target(ElementType.PARAMETER)                 //方法参数
@Target(ElementType.CONSTRUCTOR)               //构造函数
@Target(ElementType.LOCAL_VARIABLE)            //局部变量
@Target(ElementType.ANNOTATION_TYPE)           //注解
@Target(ElementType.PACKAGE)                   //包
注:可以指定多个位置,例如:
@Target({ElementType.METHOD, ElementType.TYPE}),也就是此注解可以在方法和类上面使用

@Inherited:指定被修饰的Annotation将具有继承性

@Documented:指定被修饰的该Annotation可以被javadoc工具提取成文档.
## 2.读入数据
其中最重要的是
@Retention(RetentionPolicy.RUNTIME)
@Target:指定被修饰的Annotation可以放置的位置(被修饰的目标)
1.4自定义注解
注解分类(根据Annotation是否包含成员变量,可以把Annotation分为两类):
标记Annotation:
没有成员变量的Annotation; 这种Annotation仅利用自身的存在与否来提供信息
元数据Annotation:
包含成员变量的Annotation; 它们可以接受(和提供)更多的元数据;
2.反射机制(java.Reflection)
反射最重要的就是类类,一切反射的基础是类类
2.1、静态语言 VS 动态语言
动态语言
是一类在运行时可以改变其结构的原因:例如新的函数、对象、甚至代码可以被引进,已有的函数可以被删除或是其他结构上的变化。通俗点说就是在运行时代码可以根据某些条件改变自身结构
主要动态语言:Object-c、C#、JavaScript、php、Python等
静态语言
与动态语言相对应的,运行时结构不可变的语言就是静态语言。如Java、C、C++。
Java不是动态语言,但Java可以称之为"准动态语言"。即Java有一定的动态性,我们可以利用反射机制获得类似语言的特性。Java的动态性让编程的时候更加灵活!
二、自定义注解的案列
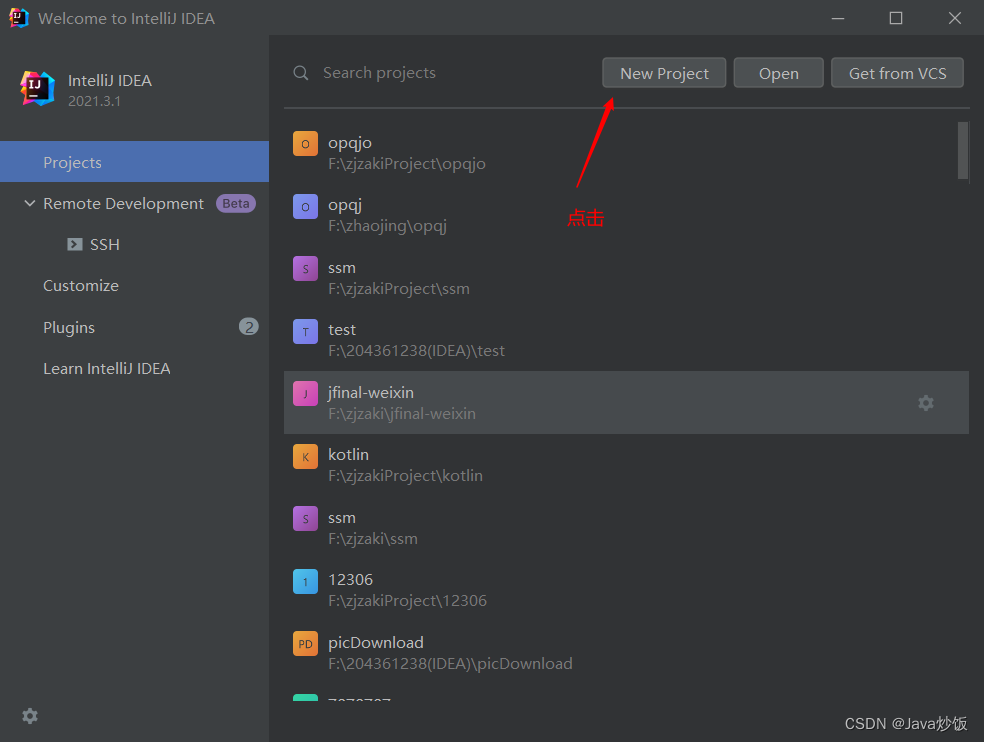
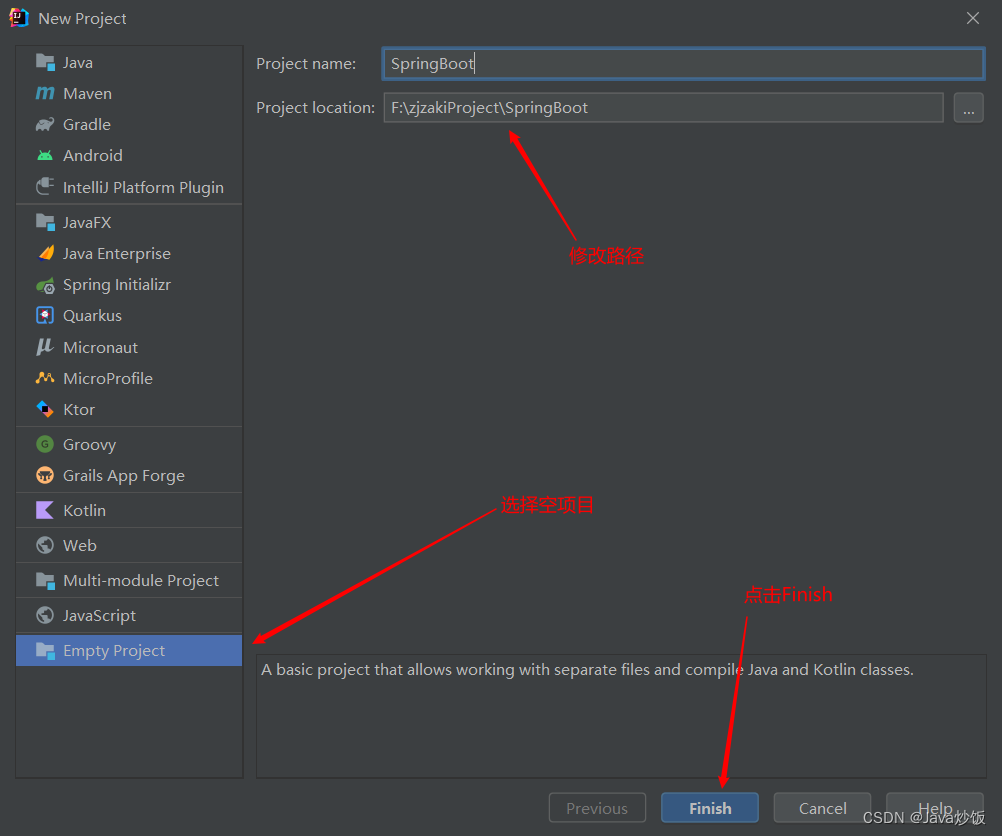
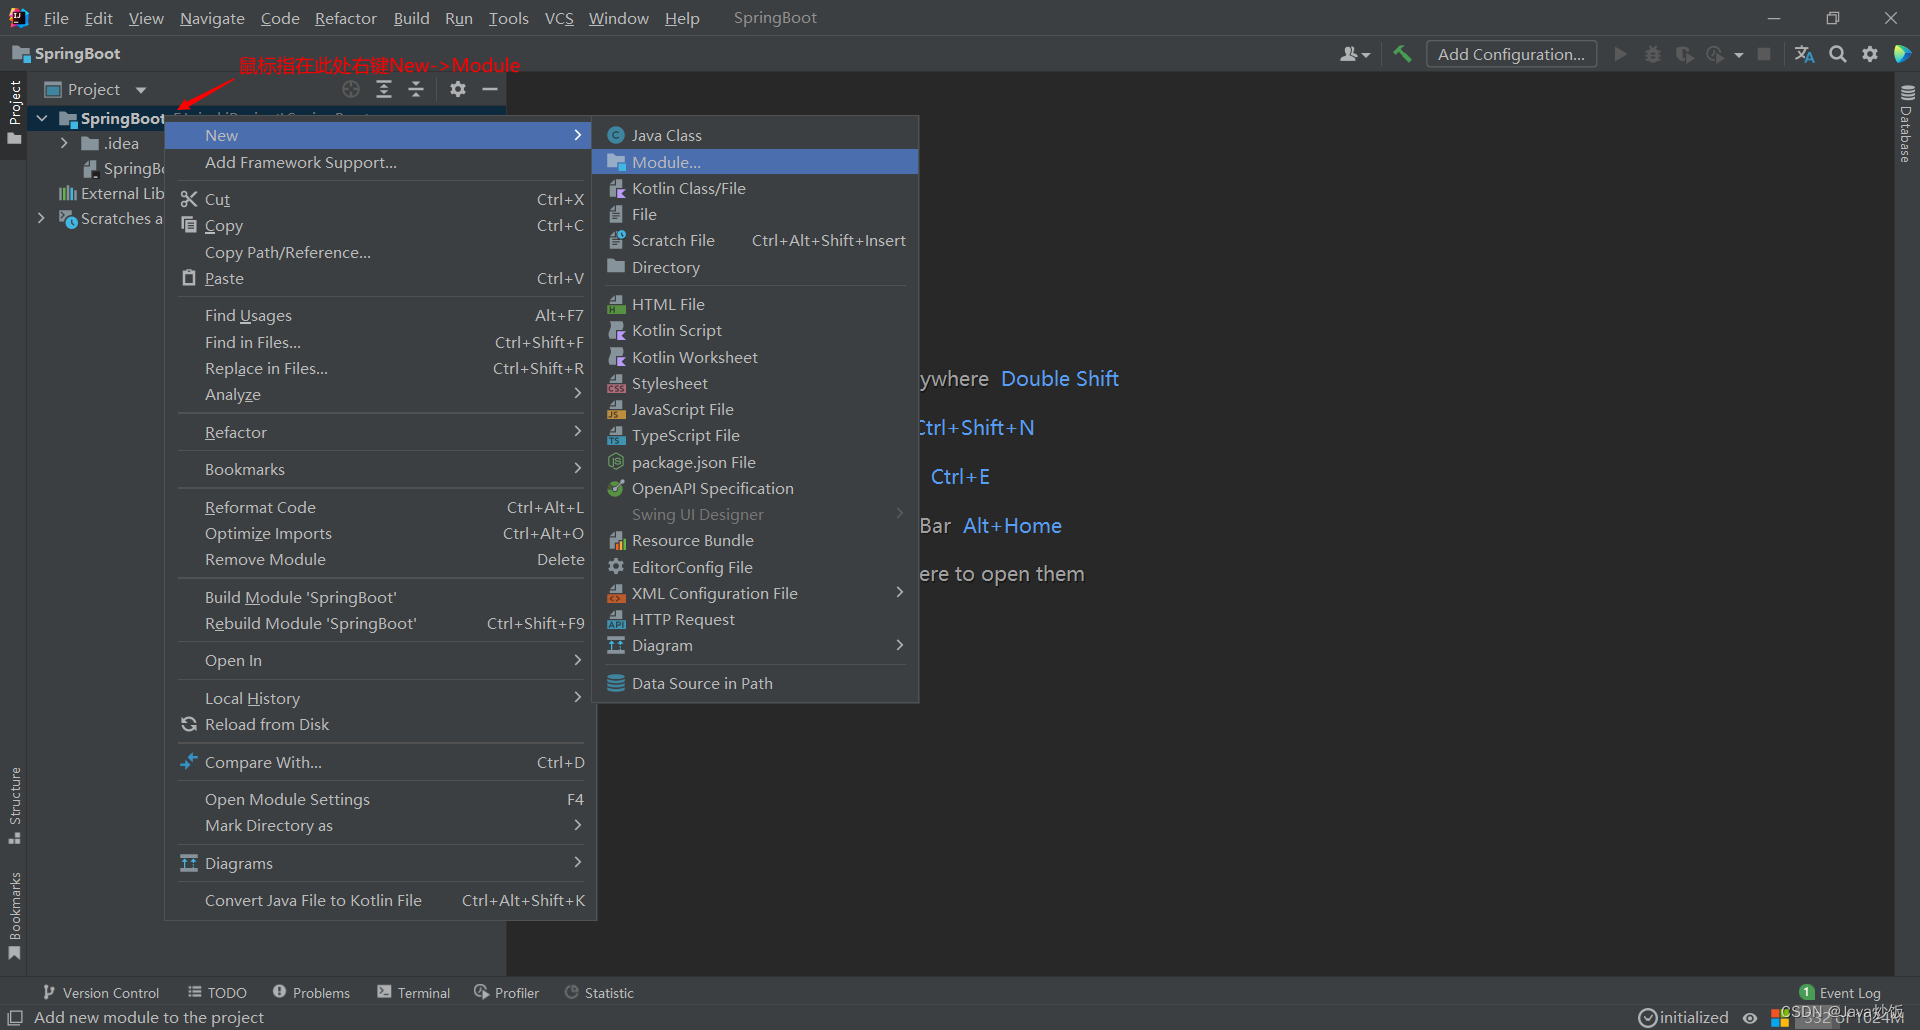
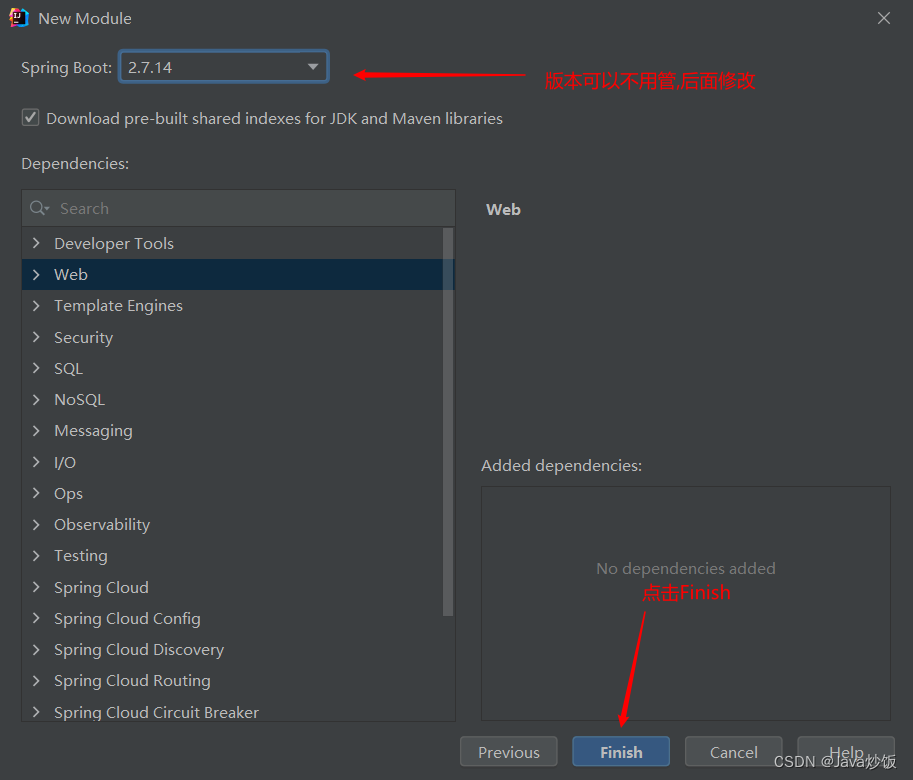
2.1.创建SpringBoot项目
PS: 后面还要使用到, 所以这里创建一个空的项目,通过创建模块的方式完成
2.1.1.点击New Project
2.1.2.创建新项目
2.1.3.创建一个新的Module
2.1.4.创建SpringBoot模块

2.1.5.项目创建完成
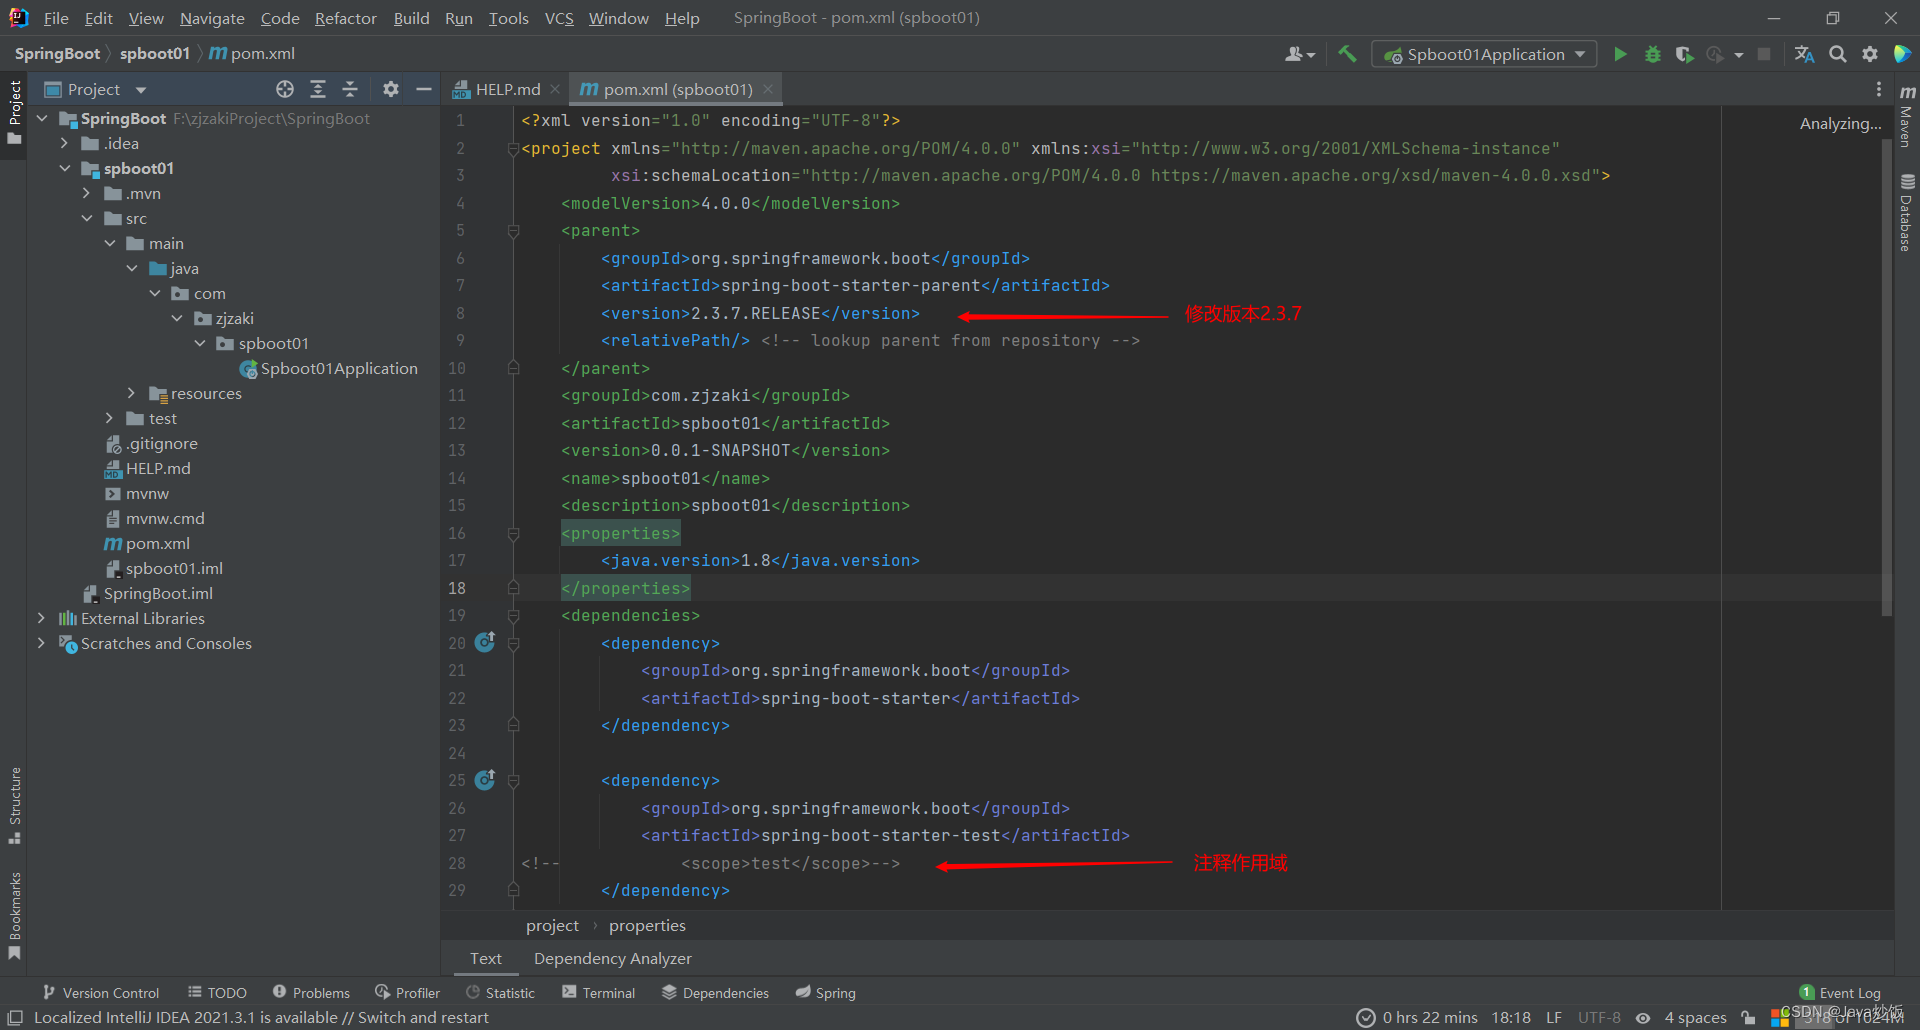
2.2.修改pom.xml
2.3.案例一
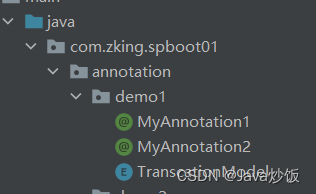
2.3.1.新建一个annotation包
2.3.2.添加TranscationModel枚举类
package com.zking.spboot01.annotation.demo1;

public enum  TranscationModel {
    Read, Write, ReadWrite
}
2.3.3.新建MyAnnotation1注解
package com.zking.spboot01.annotation.demo1;

import java.lang.annotation.Documented;
import java.lang.annotation.ElementType;
import java.lang.annotation.Target;
@Retention(RetentionPolicy.RUNTIME)
@Target({ElementType.TYPE,ElementType.FIELD,ElementType.METHOD})
@Documented
public @interface MyAnnotation1 {
    String name();
}
2.3.4.新建MyAnnotation2注解
package com.zking.spboot01.annotation.demo1;

import java.lang.annotation.*;

/**
 *  MyAnnotation2注解可以用在方法上
 *  注解运行期也保留
 *  不可继承
 */
@Target(ElementType.METHOD)
@Retention(RetentionPolicy.RUNTIME)
@Documented
public @interface MyAnnotation2 {
    TranscationModel model() default TranscationModel.ReadWrite;
}
2.3.5.新建MyAnnotation3注解
package com.zking.annotation.pi;

import java.lang.annotation.*;

/**
 *
 * MyAnnotation3注解可以用在方法上
 * 注解运行期也保留
 * 可继承
 */
@Target(ElementType.METHOD)
@Retention(RetentionPolicy.RUNTIME)
@Inherited
@Documented
public @interface MyAnnotation3 {
    TranscationModel[] models() default TranscationModel.ReadWrite;
}
2.3.6.新建Demo类
package com.zking.annotation.pi;

/**
 *
 * 获取类与方法上的注解值
 */
@MyAnnotation1(name = "abc")
public class Demo1 {

    @MyAnnotation1(name = "xyz")
    private Integer age;

    @MyAnnotation2(model = TranscationModel.Read)
    public void list() {
        System.out.println("list");
    }

    @MyAnnotation3(models = {TranscationModel.Read, TranscationModel.Write})
    public void edit() {
        System.out.println("edit");
    }
}
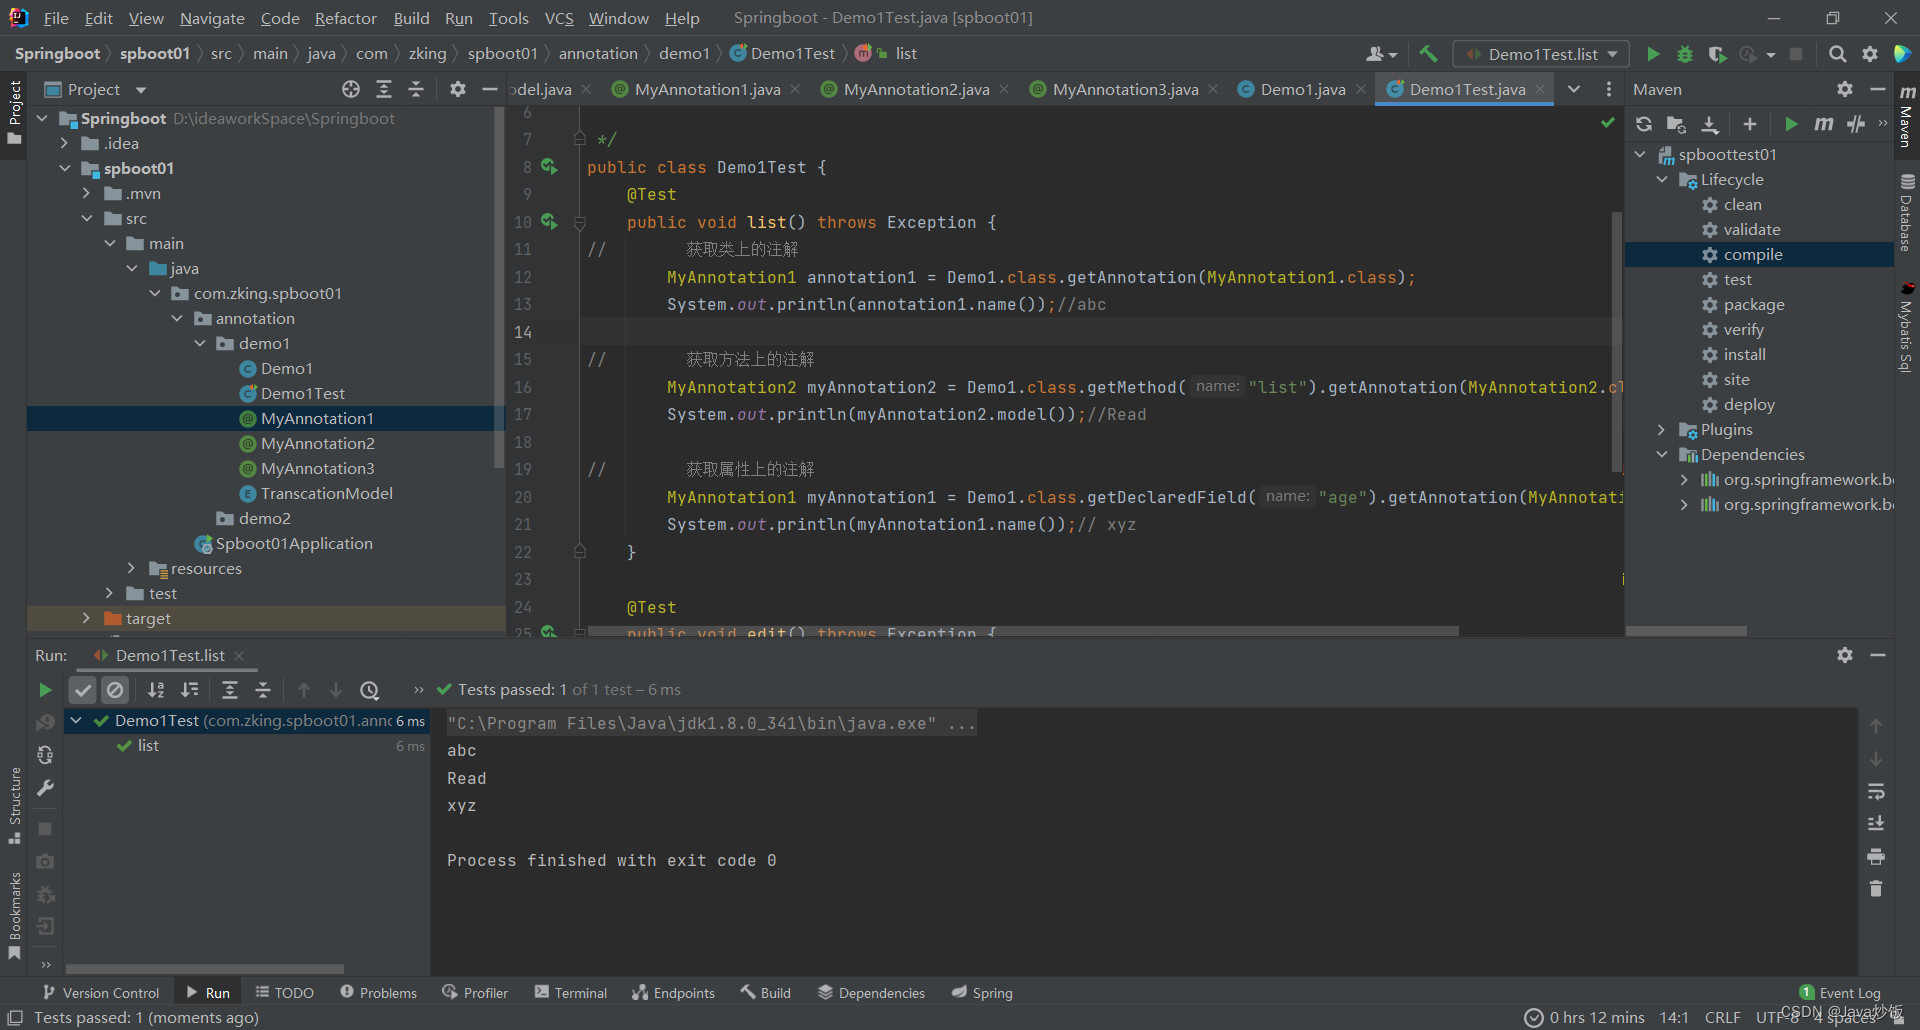
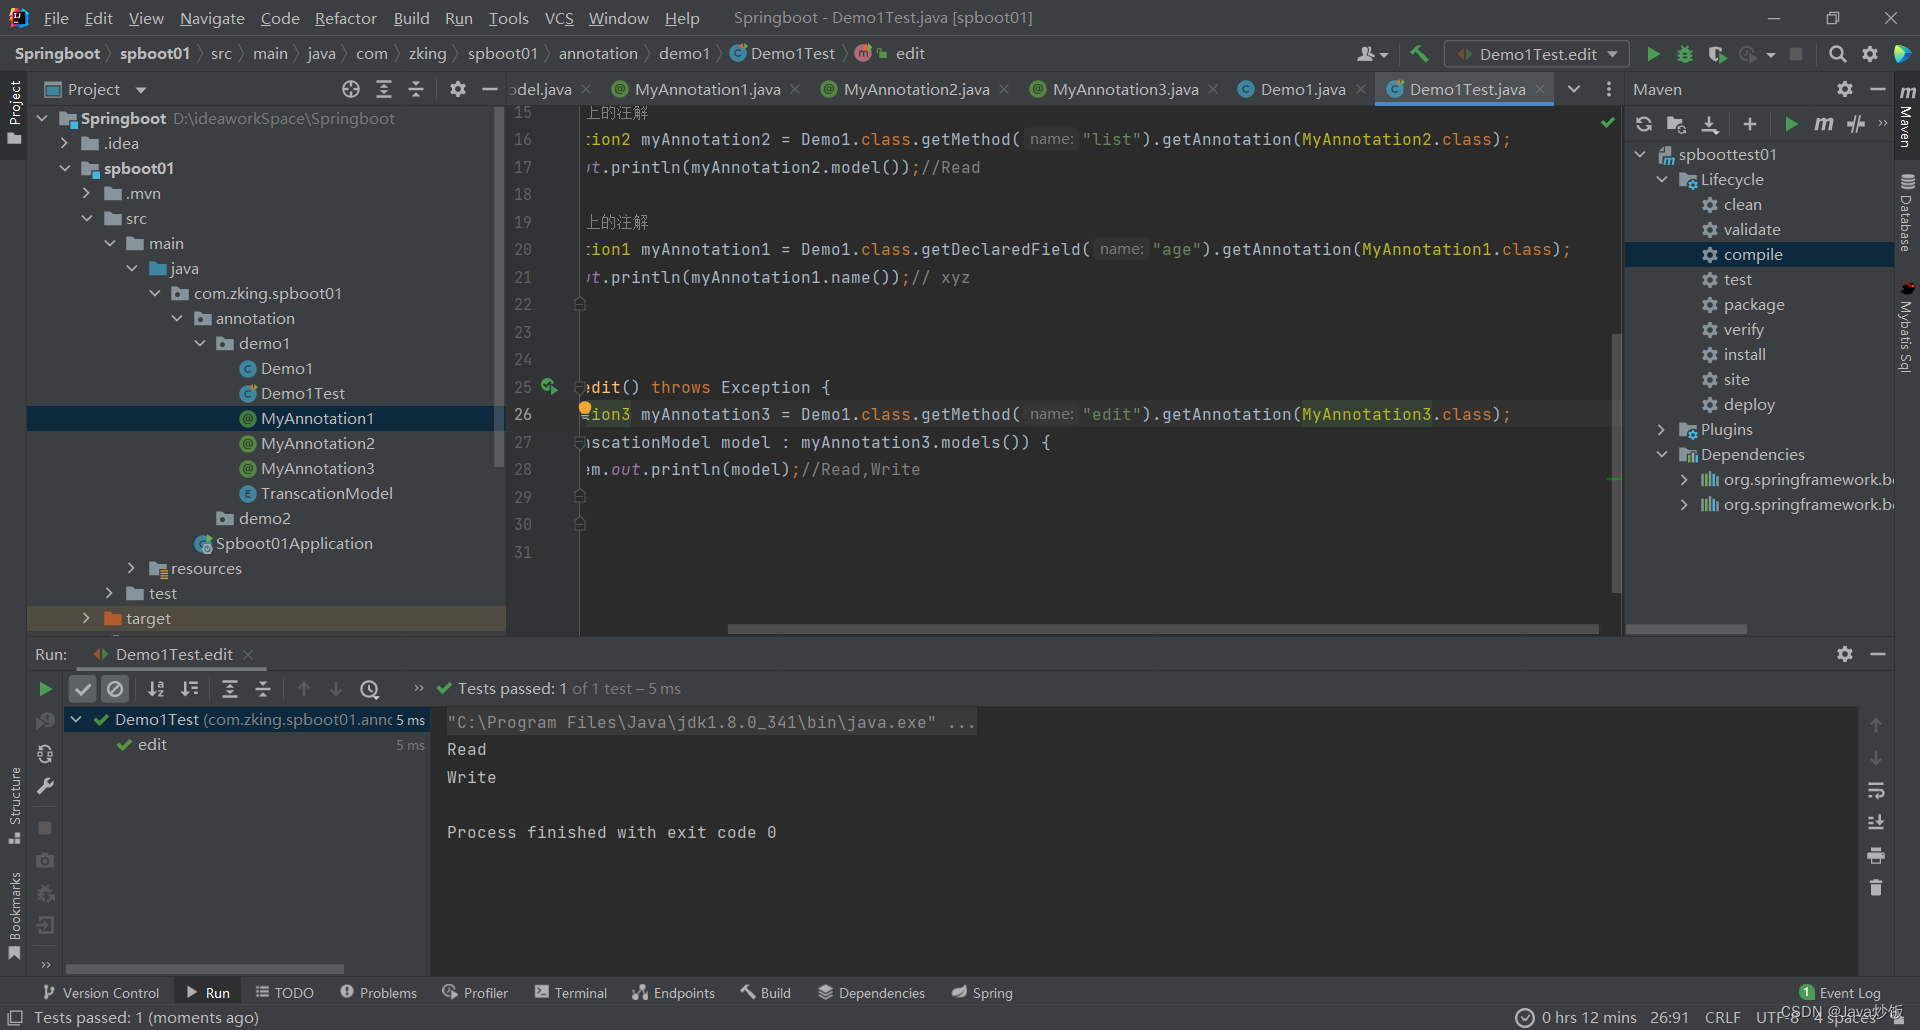
2.3.7.新建DemoTest类
package com.zking.annotation.pi;

import org.junit.Test;

/**
 */
public class Demo1Test {
    @Test
    public void list() throws Exception {
//        获取类上的注解
        MyAnnotation1 annotation1 = Demo1.class.getAnnotation(MyAnnotation1.class);
        System.out.println(annotation1.name());//abc

//        获取方法上的注解
        MyAnnotation2 myAnnotation2 = Demo1.class.getMethod("list").getAnnotation(MyAnnotation2.class);
        System.out.println(myAnnotation2.model());//Read

//        获取属性上的注解
        MyAnnotation1 myAnnotation1 = Demo1.class.getDeclaredField("age").getAnnotation(MyAnnotation1.class);
        System.out.println(myAnnotation1.name());// xyz
    }

    @Test
    public void edit() throws Exception {
        MyAnnotation3 myAnnotation3 = Demo1.class.getMethod("edit").getAnnotation(MyAnnotation3.class);
        for (TranscationModel model : myAnnotation3.models()) {
            System.out.println(model);//Read,Write
        }
    }
}
2.7.8.运行结果:
2.4. 案例二(获取类属性上的注解属性值)
2.4.1.新建demo02包
2.4.2.新建TestAnnotation注解
package com.zking.spboot01.annotation.demo2;

import java.lang.annotation.ElementType;
import java.lang.annotation.Retention;
import java.lang.annotation.RetentionPolicy;
import java.lang.annotation.Target;

/**
 */
//@Retention(RetentionPolicy.SOURCE)
@Retention(RetentionPolicy.RUNTIME)
@Target(ElementType.FIELD)
public @interface TestAnnotation {
    String value() default "默认value值";

    String what() default "这里是默认的what属性对应的值";
}
2.4.3.新建Demo2类
package com.zking.spboot01.annotation.demo2;

/**
 *
 * 获取类属性上的注解属性值
 */
public class Demo2 {
    @TestAnnotation(value = "这就是value对应的值_msg1", what = "这就是what对应的值_msg1")
    private static String msg1;

    @TestAnnotation("这就是value对应的值1")
    private static String msg2;

    @TestAnnotation(value = "这就是value对应的值2")
    private static String msg3;

    @TestAnnotation(what = "这就是what对应的值")
    private static String msg4;
}
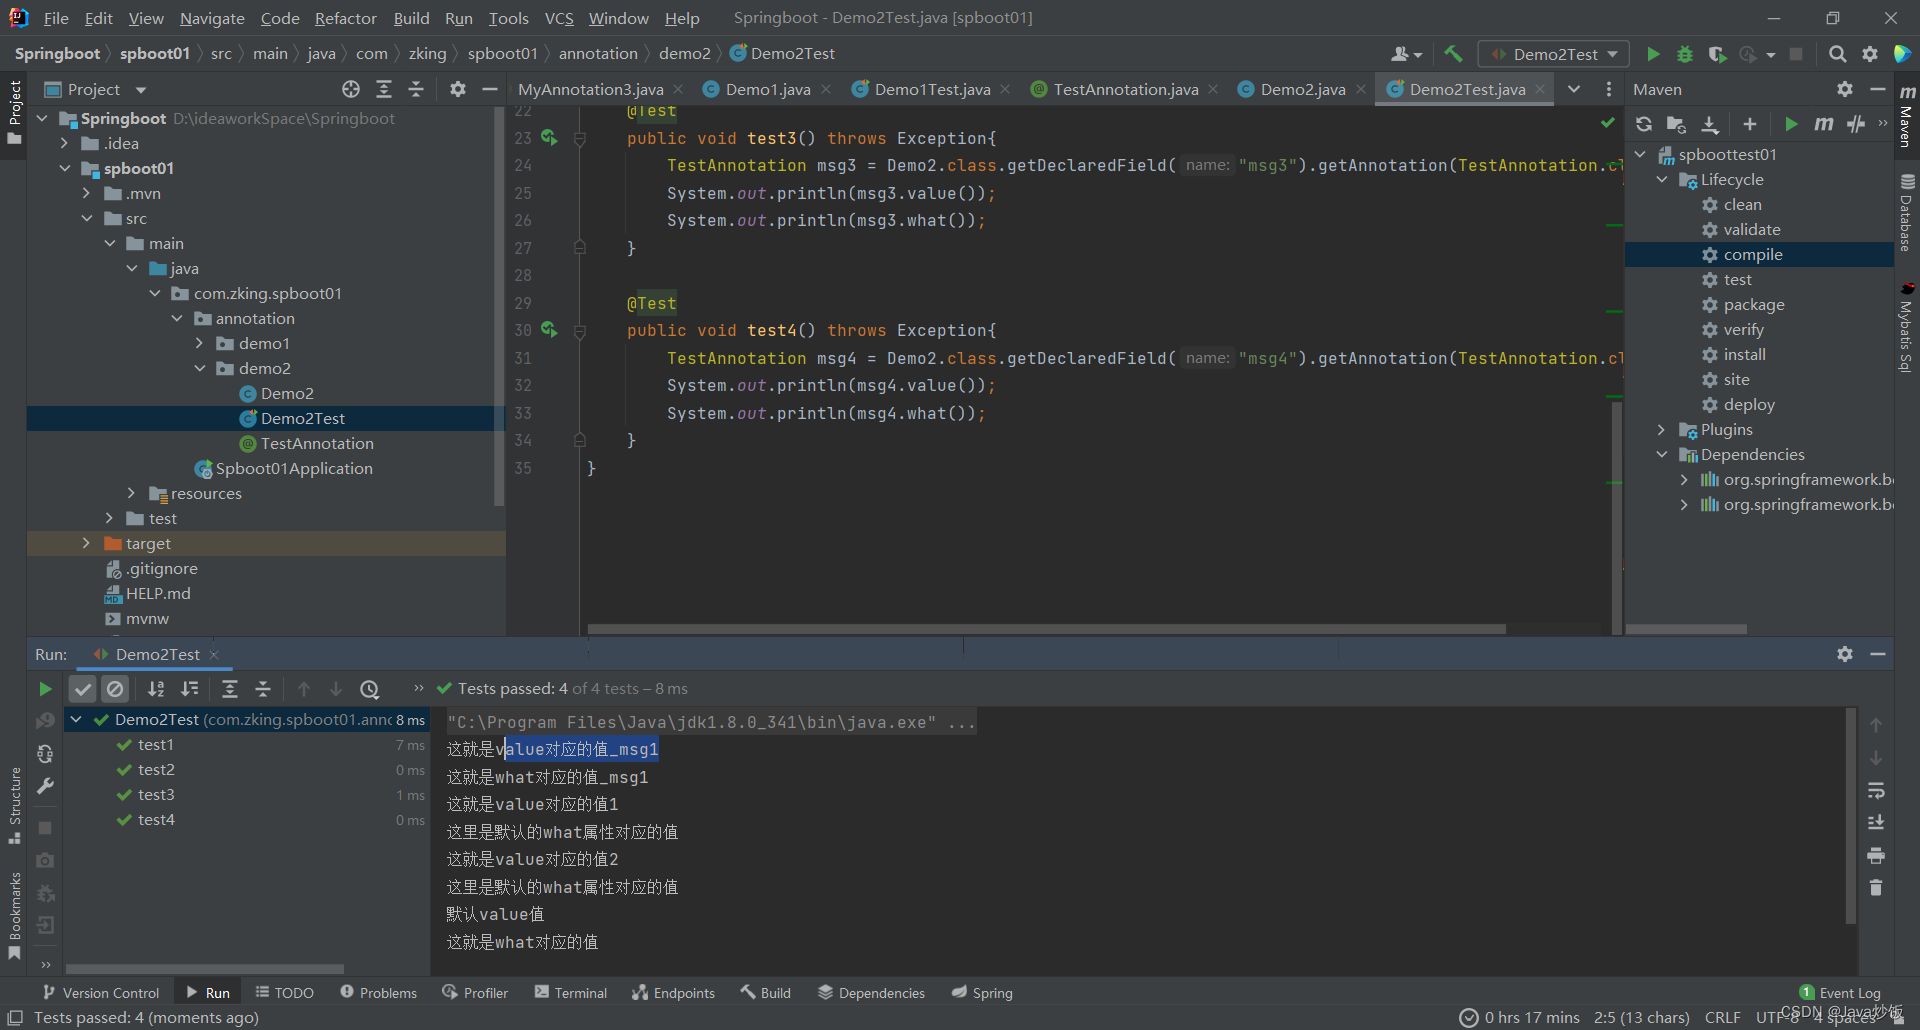
2.4.4.新建Demo2Test
package com.zking.spboot01.annotation.demo2;

import org.junit.Test;

/**
 */
public class Demo2Test {
    @Test
    public void test1() throws Exception {
        TestAnnotation msg1 = Demo2.class.getDeclaredField("msg1").getAnnotation(TestAnnotation.class);
        System.out.println(msg1.value());
        System.out.println(msg1.what());
    }

    @Test
    public void test2() throws Exception{
        TestAnnotation msg2 = Demo2.class.getDeclaredField("msg2").getAnnotation(TestAnnotation.class);
        System.out.println(msg2.value());
        System.out.println(msg2.what());
    }

    @Test
    public void test3() throws Exception{
        TestAnnotation msg3 = Demo2.class.getDeclaredField("msg3").getAnnotation(TestAnnotation.class);
        System.out.println(msg3.value());
        System.out.println(msg3.what());
    }

    @Test
    public void test4() throws Exception{
        TestAnnotation msg4 = Demo2.class.getDeclaredField("msg4").getAnnotation(TestAnnotation.class);
        System.out.println(msg4.value());
        System.out.println(msg4.what());
    }
}
2.4.5运行结果:
2.5.案例三(获取参数修饰注解对应的属性值)
package com.zking.spboot01.annotation.demo3;

import java.lang.annotation.*;

/**
 *
 * 非空注解:使用在方法的参数上,false表示此参数可以为空,true不能为空
 */
@Documented
@Target({ElementType.PARAMETER})
@Retention(RetentionPolicy.RUNTIME)
public @interface IsNotNull {
    boolean value() default false;
}
package com.zking.spboot01.annotation.demo3;

/**
 *
 * 获取参数修饰注解对应的属性值
 */
public class Demo3 {

    public void hello1(@IsNotNull(true) String name) {
        System.out.println("hello:" + name);
    }

    public void hello2(@IsNotNull String name) {
        System.out.println("hello:" + name);
    }
}
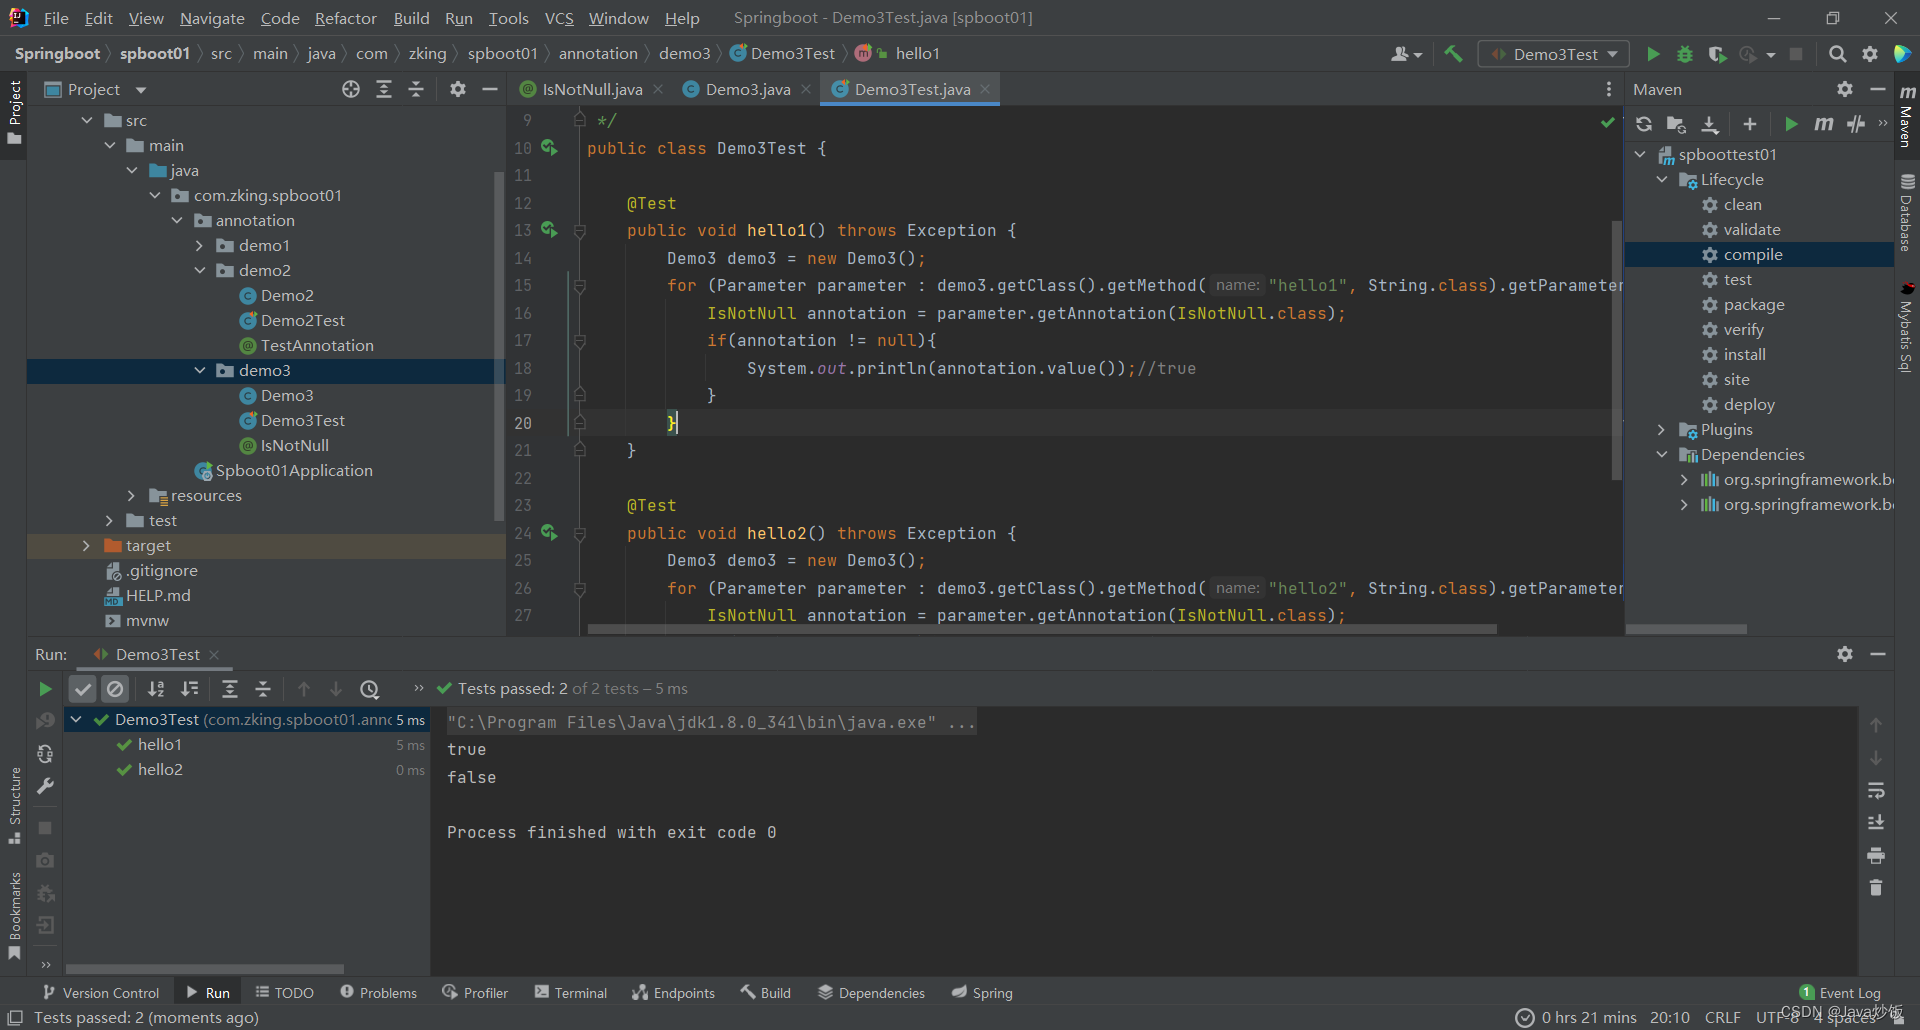
package com.zking.spboot01.annotation.demo3;

import org.junit.Test;

import java.lang.reflect.Parameter;


/**
 */
public class Demo3Test {

    @Test
    public void hello1() throws Exception {
        Demo3 demo3 = new Demo3();
        for (Parameter parameter : demo3.getClass().getMethod("hello1", String.class).getParameters()) {
            IsNotNull annotation = parameter.getAnnotation(IsNotNull.class);
            if(annotation != null){
                System.out.println(annotation.value());//true
            }
        }
    }

    @Test
    public void hello2() throws Exception {
        Demo3 demo3 = new Demo3();
        for (Parameter parameter : demo3.getClass().getMethod("hello2", String.class).getParameters()) {
            IsNotNull annotation = parameter.getAnnotation(IsNotNull.class);
            if(annotation != null){
                System.out.println(annotation.value());//false
            }
        }
    }
}
运行结果:
三、spring aop集成自定义注解实现日志记录功能
3.1.在pom.xml中添加依赖
<dependency>
            <groupId>org.springframework.boot</groupId>
            <artifactId>spring-boot-starter-aop</artifactId>
        </dependency>
3.2.自定义注解
package com.zking.spboot01.annotation.aop;

import java.lang.annotation.ElementType;
import java.lang.annotation.Retention;
import java.lang.annotation.RetentionPolicy;
import java.lang.annotation.Target;

/**
 */
@Target(ElementType.METHOD)
@Retention(RetentionPolicy.RUNTIME)
public @interface MyLog {
    String desc();
}
3.3.定义切面类
package com.zking.spboot01.annotation.aop;

import org.aspectj.lang.JoinPoint;
import org.aspectj.lang.annotation.Aspect;
import org.aspectj.lang.annotation.Before;
import org.aspectj.lang.annotation.Pointcut;
import org.aspectj.lang.reflect.MethodSignature;
import org.slf4j.Logger;
import org.slf4j.LoggerFactory;
import org.springframework.stereotype.Component;

/**
 */
@Component
@Aspect
public class MyLogAspect {
    private static final Logger logger = LoggerFactory.getLogger(MyLogAspect.class);

    /**
     * 只要用到了com.javaxl.p2.annotation.springAop.MyLog这个注解的,就是目标类
     */
    @Pointcut("@annotation(com.zking.spboot01.annotation.aop.MyLog)")
    private void MyValid() {
    }

    @Before("MyValid()")
    public void before(JoinPoint joinPoint) {
        MethodSignature signature = (MethodSignature) joinPoint.getSignature();
        logger.debug("[" + signature.getName() + " : start.....]");
        System.out.println("[" + signature.getName() + " : start.....]");

        MyLog myLog = signature.getMethod().getAnnotation(MyLog.class);
        logger.debug("【目标对象方法被调用时候产生的日志,记录到日志表中】:"+myLog.desc());
        System.out.println("【目标对象方法被调用时候产生的日志,记录到日志表中】:" + myLog.desc());
    }
}
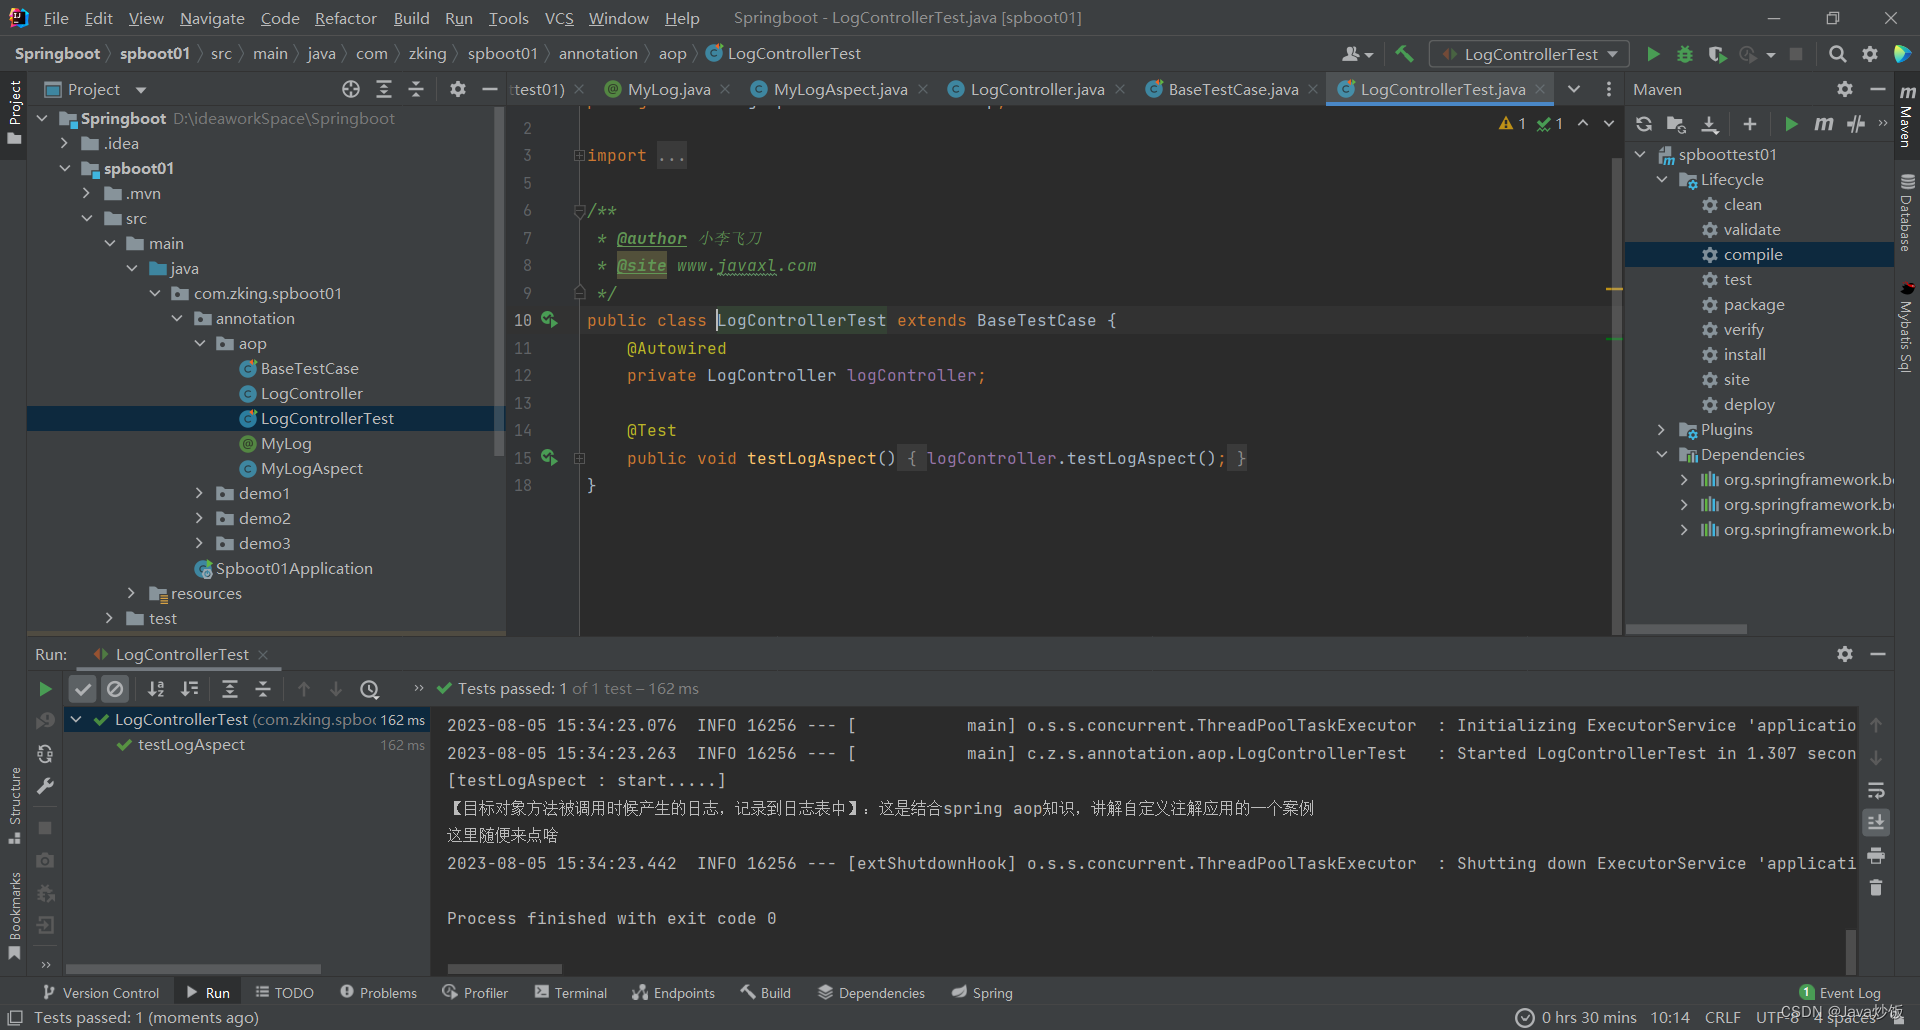
3.4.新建LogController
package com.zking.annotation.aop;

import org.springframework.stereotype.Component;

/**
 */
@Component
public class LogController {

    @MyLog(desc = "这是结合spring aop知识,讲解自定义注解应用的一个案例")
    public void testLogAspect(){
        System.out.println("这里随便来点啥");
    }
}
3.5.新建LogControllerTest
package com.zking.annotation.aop;

import org.junit.Test;
import org.springframework.beans.factory.annotation.Autowired;

/**
 */
public class LogControllerTest extends BaseTestCase {
    @Autowired
    private LogController logController;

    @Test
    public void testLogAspect(){
        logController.testLogAspect();
    }
}
3.6.运行结果:
4.6.MyLogAspect中添加内容
@Around("MyValid()")
public Object doAround(ProceedingJoinPoint pjp) throws Throwable {
    long startTime = System.currentTimeMillis();
    Object[] args = pjp.getArgs();
    System.out.println(Arrays.toString(args));
    Object ob = pjp.proceed();// ob 为方法的返回值
    System.out.println("耗时 : " + (System.currentTimeMillis() - startTime) + "ms");
    return ob;
}
4.7.修改LogController.java
package com.zking.spboot01.annotation.aop;

import org.springframework.stereotype.Component;

/**
 *
 */
@Component
public class LogController {

    @MyLog(desc = "这是结合spring aop知识,讲解自定义注解应用的一个案例")
    public void testLogAspect(String name,int age) {

        try {
            Thread.sleep(4000);
        } catch (InterruptedException e) {
            e.printStackTrace();
        }
        System.out.println("这里随便来点啥");
    }
}
4.8.修改LogConterollerTest.java
package com.zking.spboot01.annotation.aop;

import org.junit.Test;
import org.springframework.beans.factory.annotation.Autowired;

/**
 */
public class LogControllerTest extends BaseTestCase {
    @Autowired
    private LogController logController;

    @Test
    public void testLogAspect(){
        logController.testLogAspect("零零",20);
    }
}
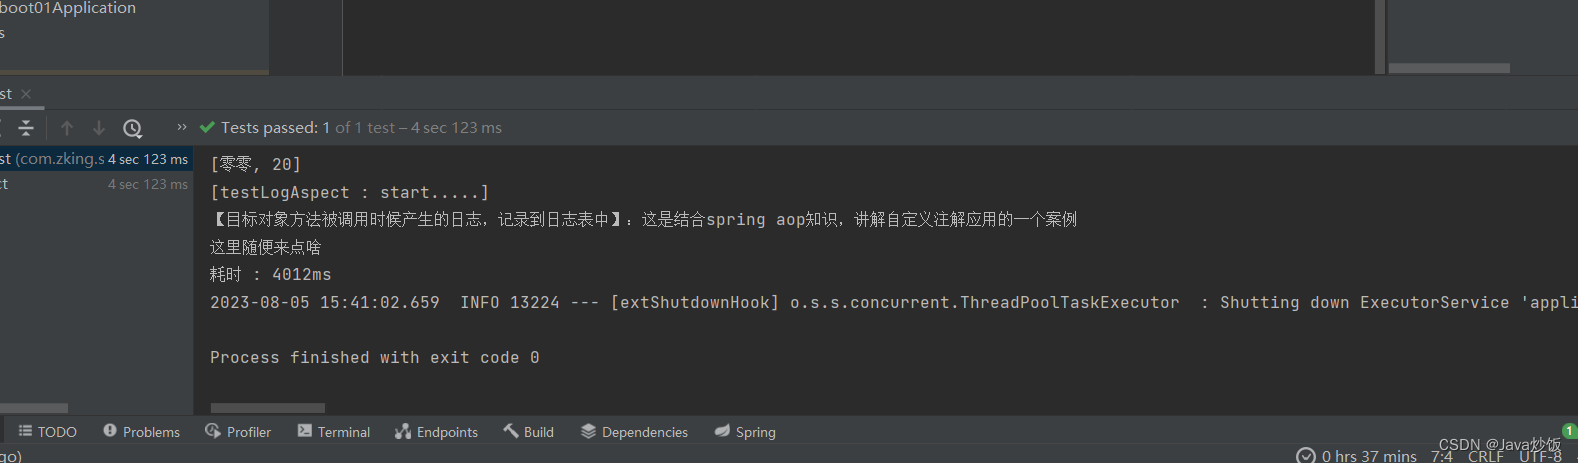
4.9运行结果:
总结
例如:以上就是今天要讲的内容,本文仅仅简单介绍了Springboot的使用,希望对你有所帮助


 1363
1363

 被折叠的 条评论
为什么被折叠?
被折叠的 条评论
为什么被折叠?
 到【灌水乐园】发言


