 视频目标检测实战


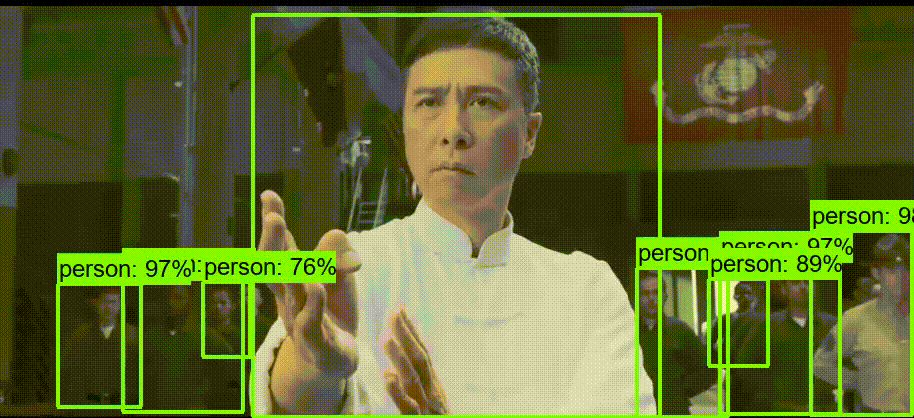
 本文详细介绍了一个使用TensorFlow和OpenCV进行视频目标检测的实战案例,包括加载预训练模型、处理视频帧并识别其中的目标,以及将检测结果可视化展示。通过处理一段视频,展示了如何在连续的帧中检测和标记出特定的物体。
参考:https://blog.youkuaiyun.com/xiaoxiao123jun/article/details/76605928
代码模块详细加载参考本人博客:https://blog.youkuaiyun.com/LearnToPain/article/details/104809107
代码:
#-*-coding:utf-8-*-
import tensorflow as tf
import cv2
import  numpy as np
import matplotlib.pyplot as plt
import label_map_util
import visualization_utils as vis_util
import os
from moviepy.editor import VideoFileClip
video_path=r'./video/叶问4x.mp4'
path=r'./mscoco_label_map.pbtxt'
label_map = label_map_util.load_labelmap(path)
categories = label_map_util.convert_label_map_to_categories(label_map, max_num_classes=90, use_display_name=True)
category_index = label_map_util.create_category_index(categories)

with tf.gfile.FastGFile(r'frozen_inference_graph.pb',mode='rb') as f:
    graph_def=tf.GraphDef() #图定义类对象
    graph_def.ParseFromString(f.read()) #字符串转对象
    tf.import_graph_def(graph_def, name='')  # 对象图导入sess
    def proc(image):
        image=np.array(image)
        image1=image[None]
        with tf.Session() as sess:
            sess.run(tf.global_variables_initializer())
            grapha = sess.graph
            image_tensor = grapha.get_tensor_by_name('image_tensor:0')
            boxes = grapha.get_tensor_by_name('detection_boxes:0')
            scores = grapha.get_tensor_by_name('detection_scores:0')
            classes = grapha.get_tensor_by_name('detection_classes:0')
            num_detections = grapha.get_tensor_by_name('num_detections:0')
            (boxes, scores, classes, num_detections) = sess.run(
                [boxes, scores, classes, num_detections],
                feed_dict={image_tensor: image1})
            vis_util.visualize_boxes_and_labels_on_image_array(image,
                                                      np.squeeze(boxes),
                                                      np.squeeze(classes).astype(np.int32),
                                                      np.squeeze(scores),
                                                      category_index,
                                                      use_normalized_coordinates=True)#对图片的处理标识出目标
            return image


    clip1 = VideoFileClip(video_path).subclip(28, 30)
    white_clip=clip1.fl_image(proc)
    white_clip.write_videofile(video_path,audio=False)
效果,视频长跑很久,于是弄了2秒的视频


 399
399

 被折叠的 条评论
为什么被折叠?
被折叠的 条评论
为什么被折叠?
 到【灌水乐园】发言


