


目录
- 第一部分 Spring MVC 的应用
- 第⼆部分 Spring MVC ⾼级技术
- 第三部分 ⼿写实现Spring MVC 框架
- 第四部分 Spring MVC 源码深度剖析
- 结语
第一部分 Spring MVC 的应用
第 1 节 Spring MVC 简介
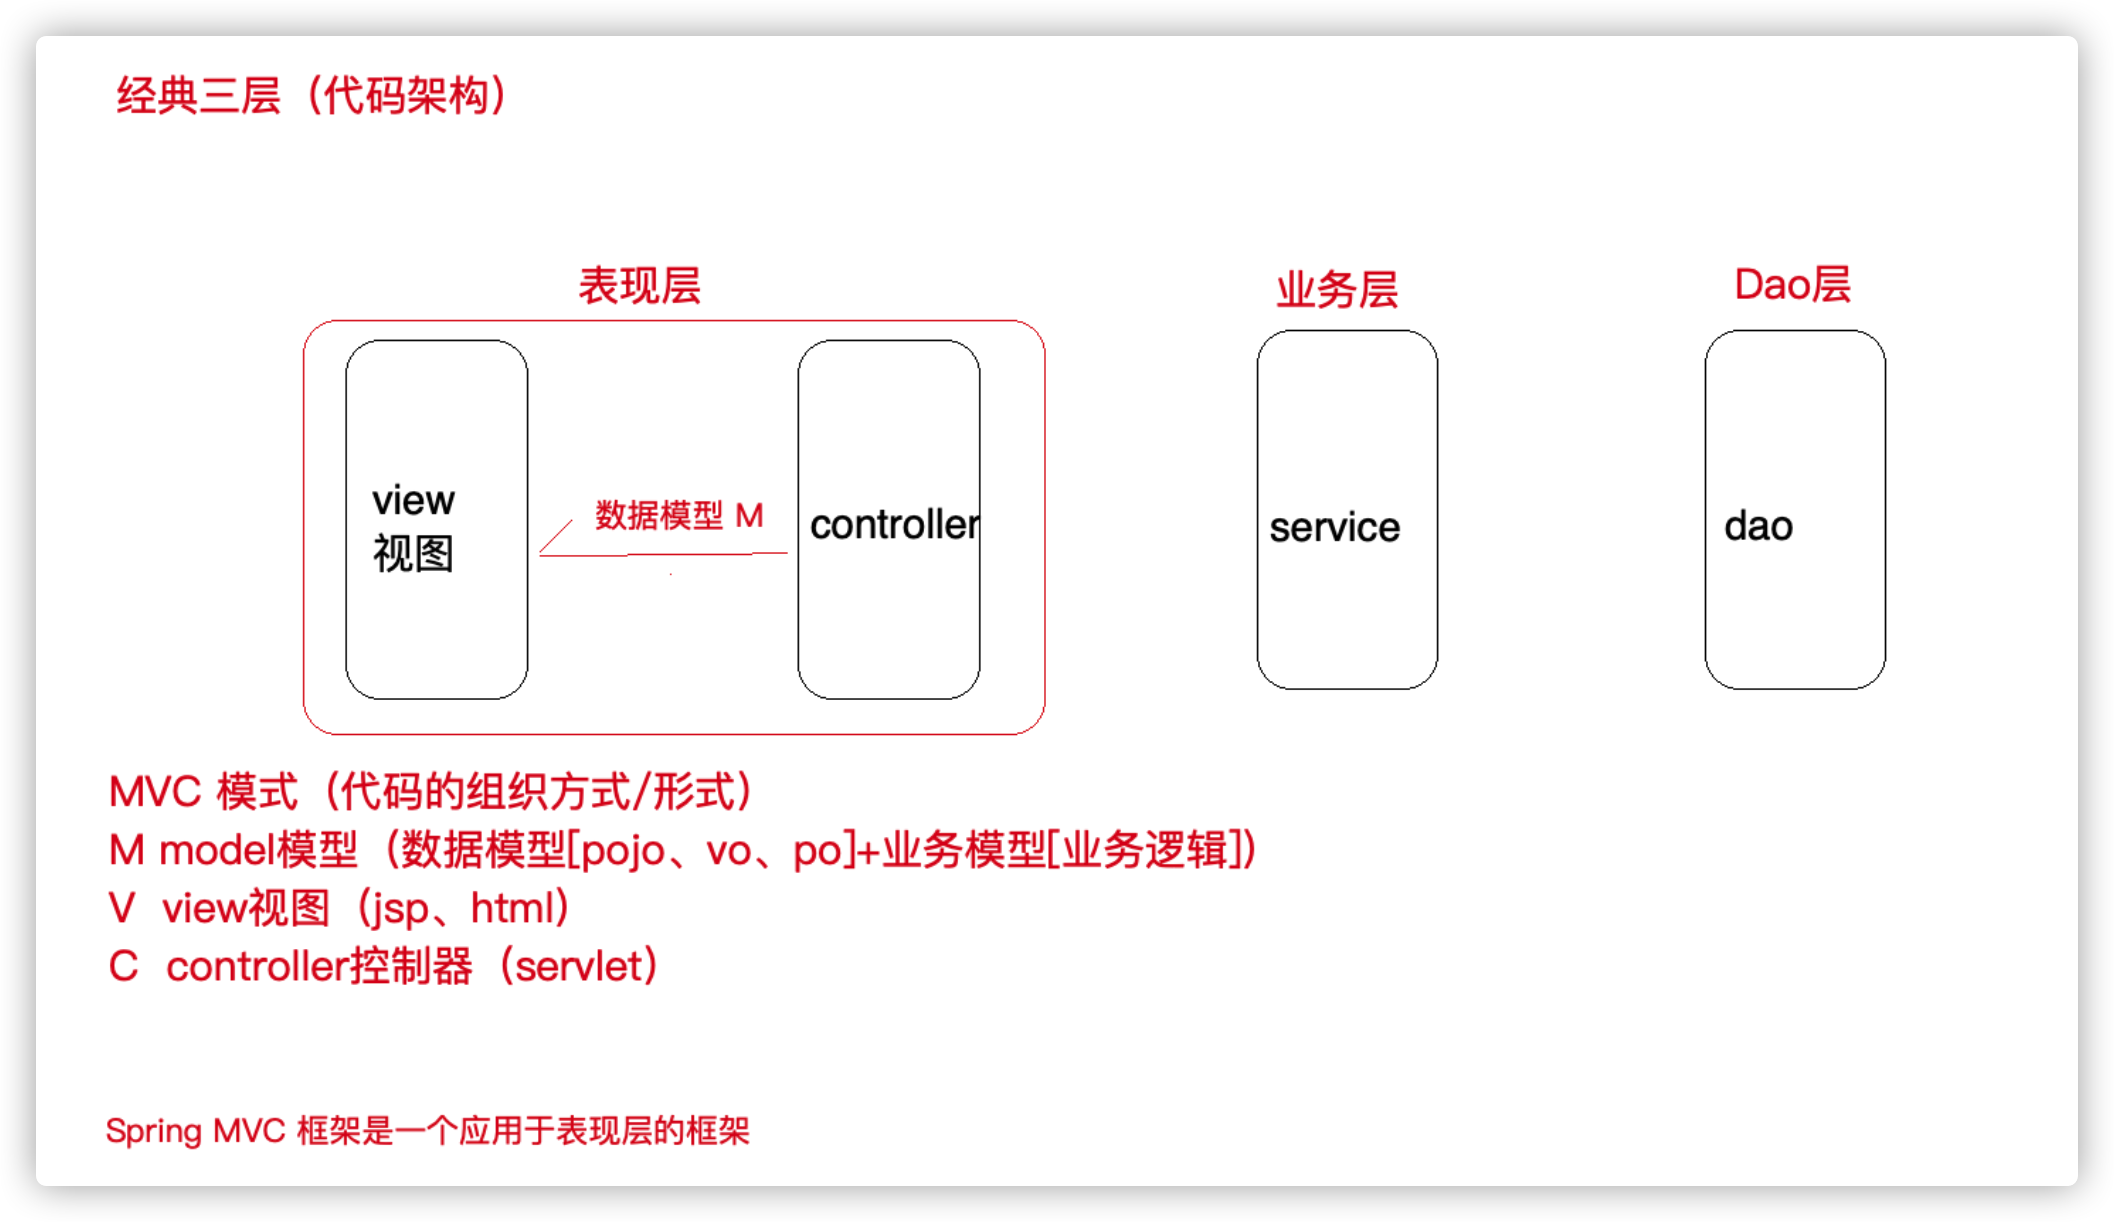
1.1 MVC 体系结构
三层架构
我们的开发架构⼀般都是基于两种形式,⼀种是 C/S 架构,也就是客户端/服务器;另⼀种是 B/S 架构,也就是浏览器服务器。在 JavaEE 开发中,⼏乎全都是基于 B/S 架构的开发。那么在 B/S 架构中,系统标准的三层架构包括:表现层、业务层、持久层。三层架构在我们的实际开发中使⽤的⾮常多,所以我们课程中的案例也都是基于三层架构设计的。三层架构中,每⼀层各司其职,接下来我们就说说每层都负责哪些⽅⾯:
表现层 :
也就是我们常说的web 层。它负责接收客户端请求,向客户端响应结果,通常客户端使⽤http 协议请求web 层,web 需要接收 http 请求,完成 http 响应。
表现层包括展示层和控制层:控制层负责接收请求,展示层负责结果的展示。
表现层依赖业务层,接收到客户端请求⼀般会调⽤业务层进⾏业务处理,并将处理结果响应给客户端。
表现层的设计⼀般都使⽤ MVC 模型。(MVC 是表现层的设计模型,和其他层没有关系)
业务层 :
也就是我们常说的 service 层。它负责业务逻辑处理,和我们开发项⽬的需求息息相关。web 层依赖业务层,但是业务层不依赖 web 层。
业务层在业务处理时可能会依赖持久层,如果要对数据持久化需要保证事务⼀致性。(也就是我们说的, 事务应该放到业务层来控制)
持久层 :
也就是我们是常说的 dao 层。负责数据持久化,包括数据层即数据库和数据访问层,数据库是对数据进⾏持久化的载体,数据访问层是业务层和持久层交互的接⼝,业务层需要通过数据访问层将数据持久化到数据库中。通俗的讲,持久层就是和数据库交互,对数据库表进⾏增删改查的。
MVC设计模式
MVC 全名是 Model View Controller,是 模型(model)-视图(view)-控制器(controller) 的缩写, 是⼀种⽤于设计创建 Web 应⽤程序表现层的模式。MVC 中每个部分各司其职:
Model(模型):模型包含业务模型和数据模型,数据模型⽤于封装数据,业务模型⽤于处理业务。
View(视图): 通常指的就是我们的 jsp 或者 html。作⽤⼀般就是展示数据的。通常视图是依据模型数据创建的。
Controller(控制器): 是应⽤程序中处理⽤户交互的部分。作⽤⼀般就是处理程序逻辑的。
MVC提倡:每⼀层只编写⾃⼰的东⻄,不编写任何其他的代码;分层是为了解耦,解耦是为了维护⽅便和分⼯协作。
1.2 Spring MVC 是什么
SpringMVC 全名叫 Spring Web MVC,是⼀种基于 Java 的实现 MVC 设计模型的请求驱动类型的轻量级Web 框架,属于 SpringFrameWork 的后续产品。SpringMVC 已经成为 ⽬前最主流的 MVC 框架 之⼀,并且 随着 Spring3.0 的发布,全⾯超越 Struts2,成为最优秀的 MVC 框架。
servlet、struts实现接⼝、springmvc中要让⼀个java类能够处理请求只需要添加注解就ok。它通过⼀套注解,让⼀个简单的 Java 类成为处理请求的控制器,⽽⽆须实现任何接⼝。同时它还⽀持RESTful 编程⻛格的请求。
总之:Spring MVC和Struts2⼀样,都是 为了解决表现层问题 的web框架,它们都是基于 MVC 设计模式的。⽽这些表现层框架的主要职责就是处理前端HTTP请求。
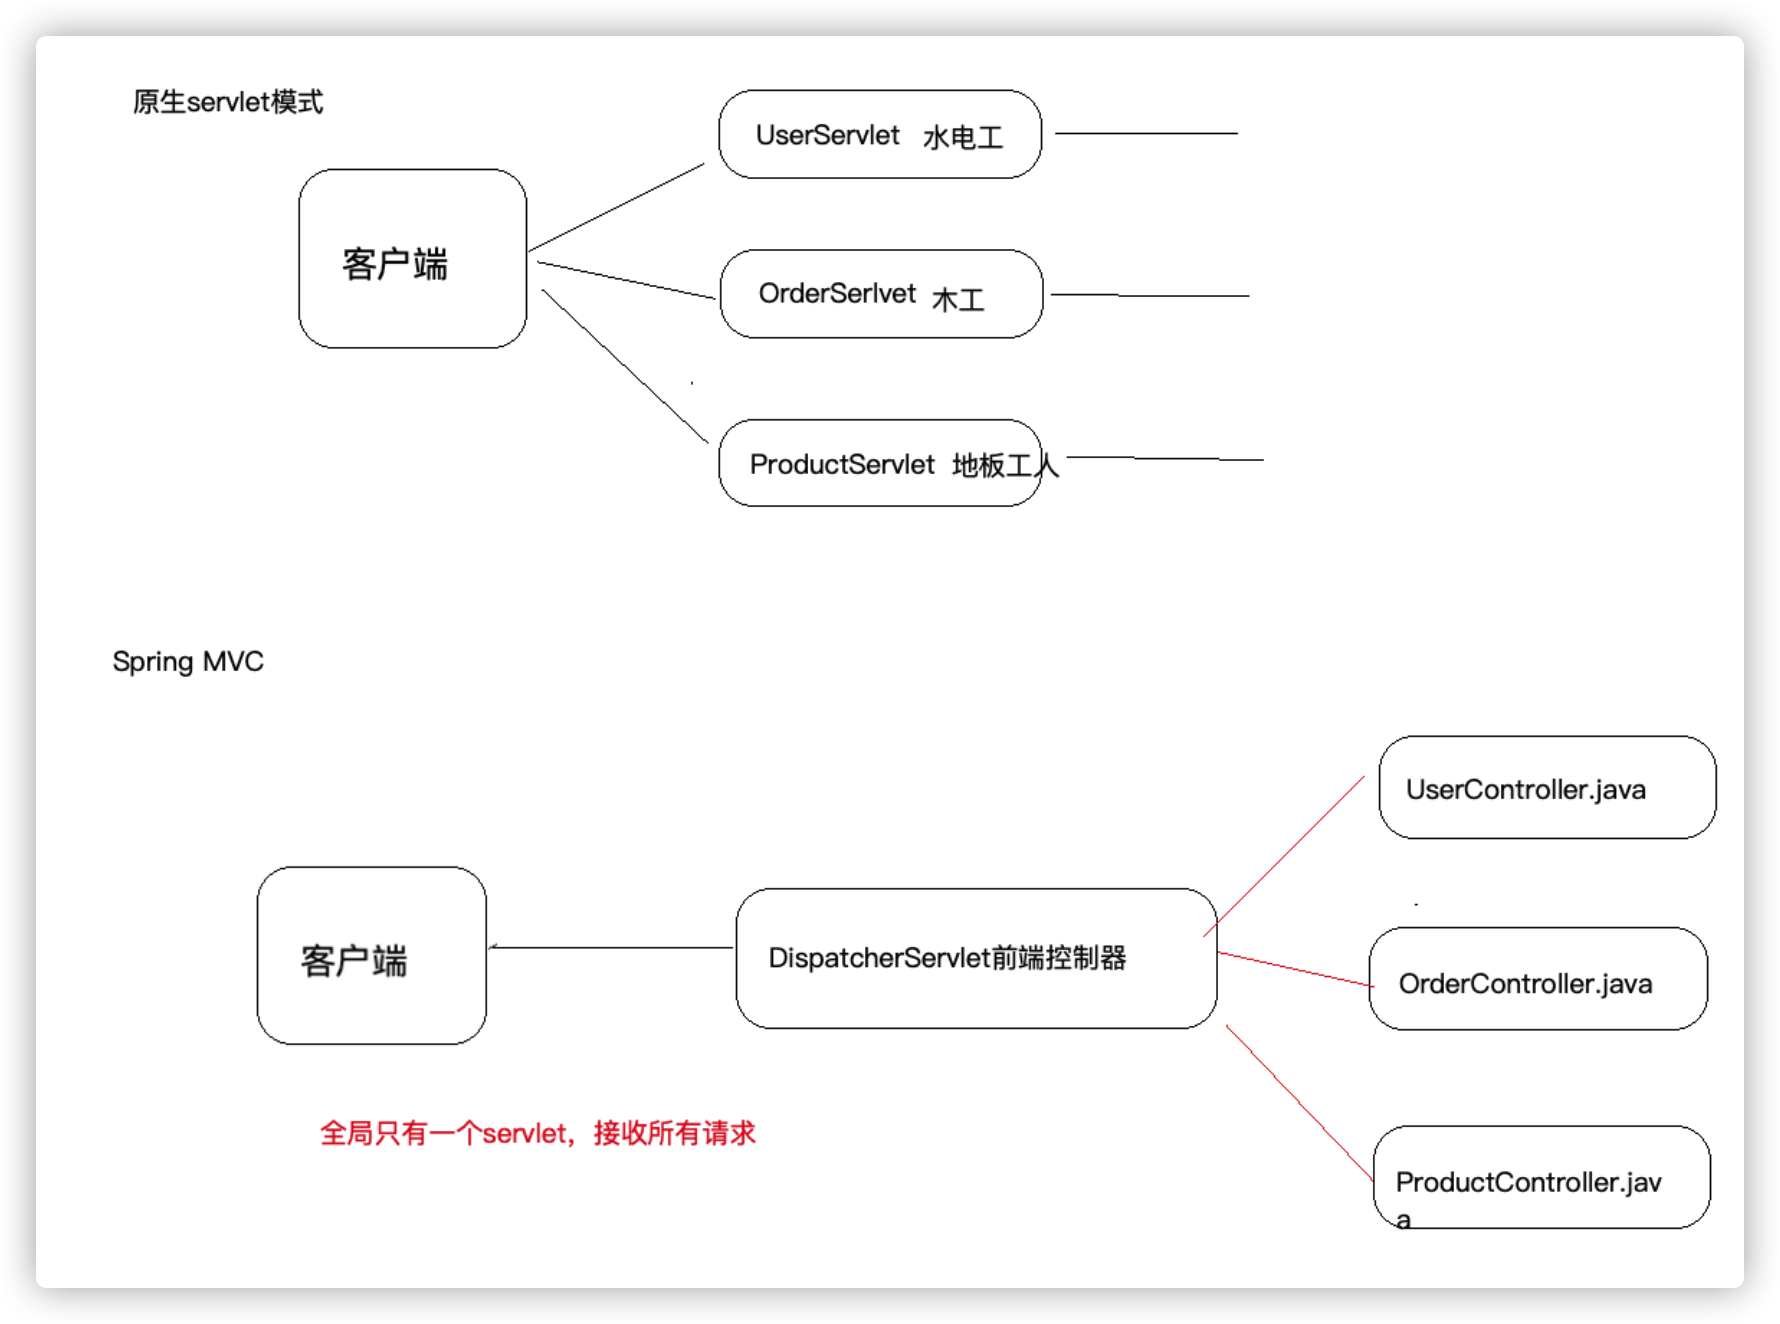
Servlet是各种工人,水泥工,建筑工,设计工,运输工等每个工人都是一个servlet。spring mvc则是一个包工队,只派出一个包工头(Dispatcher Servlet前端控制器)去接活,内部再安排对应的工人去做对应的工作。
Spring MVC 本质可以认为是对servlet的封装,简化了我们serlvet的开发。
作⽤:1)接收请求 2)返回响应,跳转⻚⾯
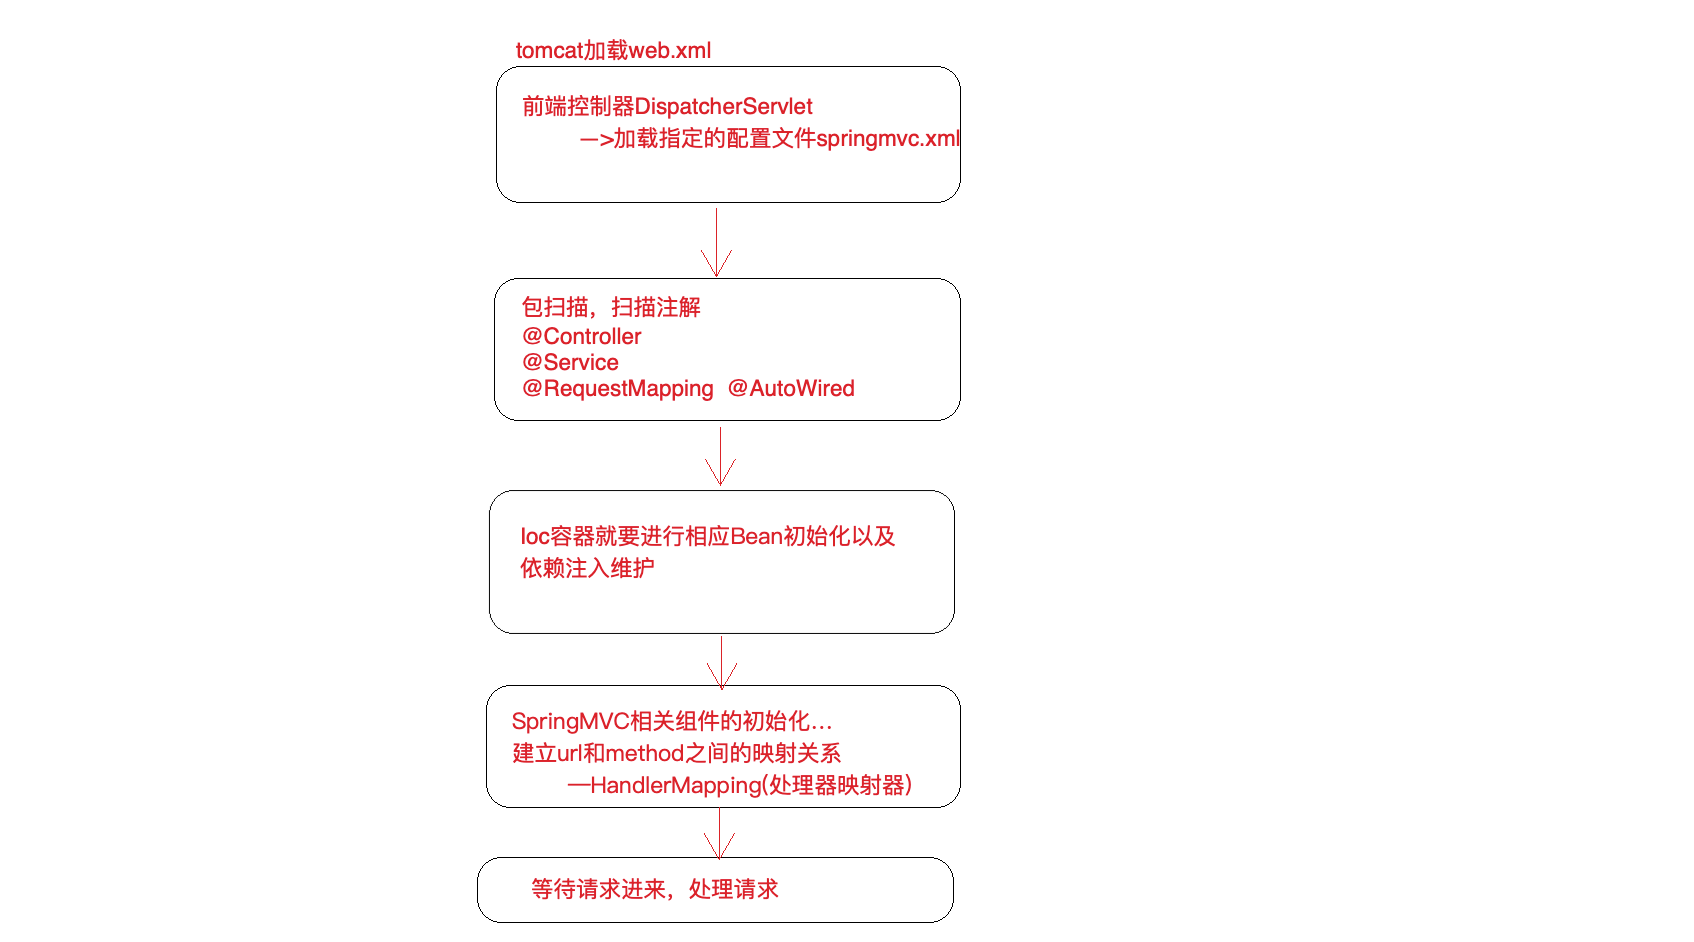
第 2 节 Spring Web MVC ⼯作流程
需求:前端浏览器请求url:http://localhost:8080/demo/handle01,前端⻚⾯显示后台服务器的时间
开发过程
1)配置DispatcherServlet前端控制器
2)开发处理具体业务逻辑的Handler(@Controller、@RequestMapping)
3)xml配置⽂件配置controller扫描,配置springmvc三⼤件
4)将xml⽂件路径告诉springmvc(DispatcherServlet)
Web.xml文件
<!DOCTYPE web-app PUBLIC
 "-//Sun Microsystems, Inc.//DTD Web Application 2.3//EN"
 "http://java.sun.com/dtd/web-app_2_3.dtd" >

<web-app>
  <display-name>Archetype Created Web Application</display-name>
  <servlet>
    <servlet-name>springmvc</servlet-name>
    <servlet-class>org.springframework.web.servlet.DispatcherServlet</servlet-class>
    <init-param>
      <param-name>contextConfigLocation</param-name>
      <!--classpath 下就是指的是编译后的classes文件下,该文件下有 java下com包,resources下的文件-->
      <param-value>classpath:springmvc.xml</param-value>
    </init-param>
  </servlet>
  <servlet-mapping>
    <servlet-name>springmvc</servlet-name>
    <!--方式一:*.action *.do 拦截后缀-->
    <!--方式二:/ 不会拦截.Djsp-->
    <!--方式三:/* 拦截所有包括jsp不推荐使用-->
    <url-pattern>/</url-pattern>
  </servlet-mapping>
</web-app>
springmvc.xml文件
<?xml version="1.0" encoding="UTF-8"?>
<beans xmlns="http://www.springframework.org/schema/beans"
       xmlns:xsi="http://www.w3.org/2001/XMLSchema-instance"
       xmlns:context="http://www.springframework.org/schema/context"
       xmlns:mvc="http://www.springframework.org/schema/mvc"
       xsi:schemaLocation="http://www.springframework.org/schema/beans
                           http://www.springframework.org/schema/beans/spring-beans.xsd
                           http://www.springframework.org/schema/context
                           http://www.springframework.org/schema/context/spring-context.xsd
                           http://www.springframework.org/schema/mvc
                           http://www.springframework.org/schema/mvc/spring-mvc.xsd">
    <!--注解扫描-->
    <context:component-scan base-package="com.lagou"/>
    <!--配置springmvc视图解析器-->
    <bean  class="org.springframework.web.servlet.view.InternalResourceViewResolver">
        <property name="prefix" value="WEB-INFO/jsp"></property>
        <property name="suffix" value=".jsp"></property>
    </bean>
    <!--自动注册最合适的处理器适配器,处理器映射器-->
    <mvc:annotation-driven />

</beans>
controller文件
package com.lagou.controller;

import org.springframework.stereotype.Controller;
import org.springframework.web.bind.annotation.RequestMapping;
import org.springframework.web.servlet.ModelAndView;

import java.util.Date;

/**
 * @author lane
 * @date 2021年03月30日 下午4:06
 */
@Controller
@RequestMapping("/demo")
public class DemoController {

    @RequestMapping("/handle01")
    public ModelAndView handle01(){
        Date date = new Date();
        //封装页面和数据信息
        ModelAndView modelAndView = new ModelAndView();
        //向请求域中添加数据 request.addAttribute()
        modelAndView.addObject("date",date);
        //视图信息,封装页面信息
        // modelAndView.setViewName("WEB-INFO/jsp/success.jsp");
        modelAndView.setViewName("success");
        return modelAndView;

    }
}
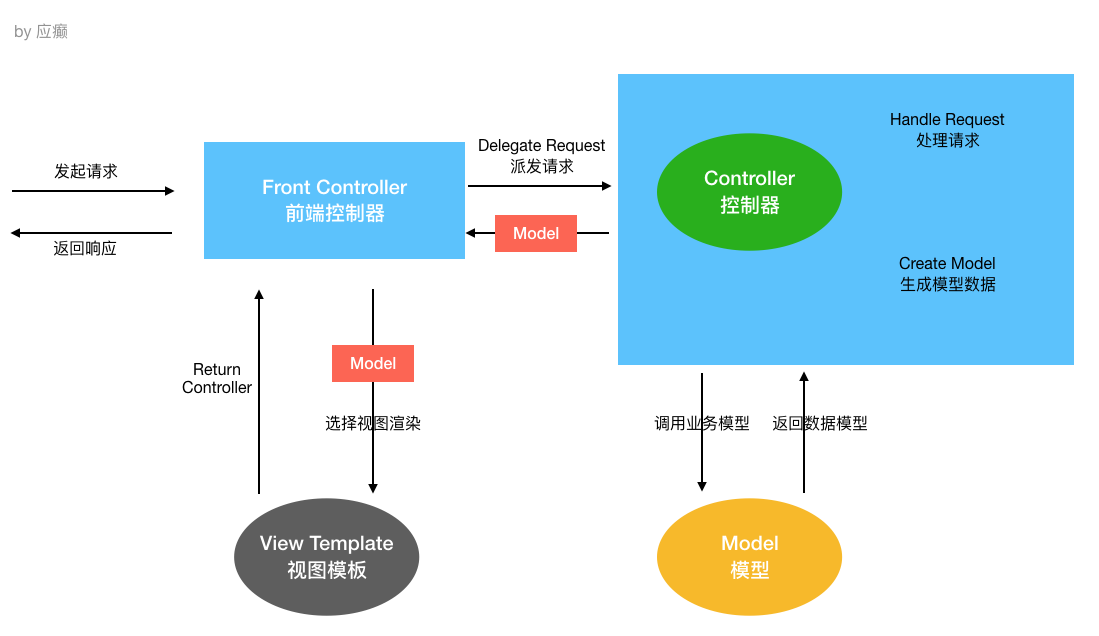
2.1 Spring MVC 请求处理流程
流程通俗讲
- 用户发送请求到包工头(前端控制器DispatcherServlet)
- 包工头自己并不知道你这个url应该发送给谁去处理,就找秘书(处理器映射器HandlerMapping)(就是个map集合)问这个种类(url)的活应该找谁
- 秘书查了下自己的map集合发现这个key(url)对应的是木工,就返回给包工头说是木工(处理器执行链,其中有一些拦截器)
- 包工头把收到的秘书消息交给副手(处理器适配器HandlerAdapter)
- 副手根据消息去找木工(处理器Handler)(具体controller方法)去处理
- 木工处理后返回给副手处理结果(ModelAndView),副手又把结果返回给包工头
- 包工头就根据处理结果让解析人员(视图解析器ViewResolver) 进行解析送去的地址信息(哪个jsp),返回一个view给包工头
- 包工头根据返回的view让外观人员(视图 jsp,freemarker) 进行渲染包装,把一些注意事项等信息(返回的数据如${})打印上去
- 包工头响应用户完全处理后的结果
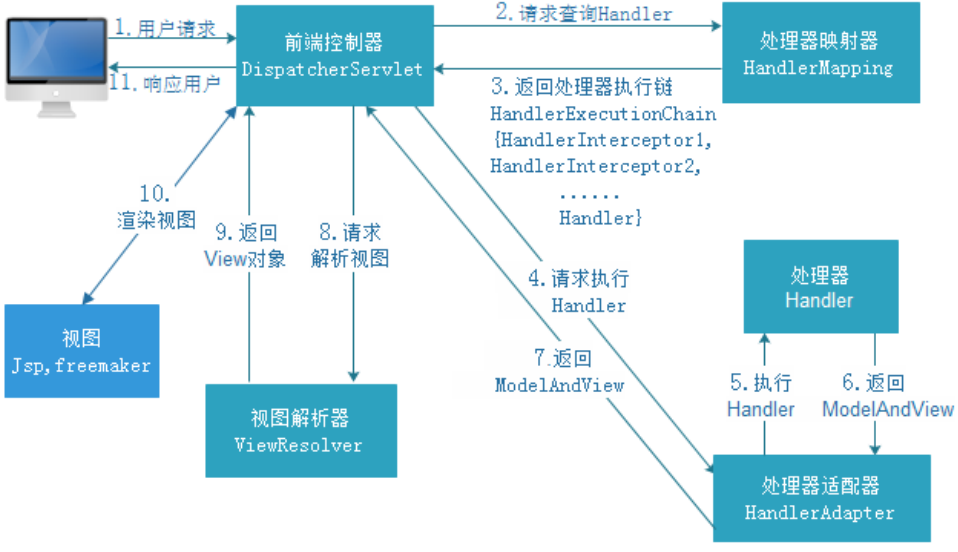
流程说明
第⼀步:⽤户发送请求⾄前端控制器DispatcherServlet
第⼆步:DispatcherServlet收到请求调⽤HandlerMapping处理器映射器
第三步:处理器映射器根据请求Url找到具体的Handler(后端控制器),⽣成处理器对象及处理器拦截器(如果 有则⽣成)⼀并返回DispatcherServlet
第四步:DispatcherServlet调⽤HandlerAdapter处理器适配器去调⽤Handler
第五步:处理器适配器执⾏Handler
第六步:Handler执⾏完成给处理器适配器返回ModelAndView
第七步:处理器适配器向前端控制器返回 ModelAndView,ModelAndView 是SpringMVC 框架的⼀个底层对 象,包括 Model 和 View
第⼋步:前端控制器请求视图解析器去进⾏视图解析,根据逻辑视图名来解析真正的视图。
第九步:视图解析器向前端控制器返回View
第⼗步:前端控制器进⾏视图渲染,就是将模型数据(在 ModelAndView 对象中)填充到 request 域
第⼗⼀步:前端控制器向⽤户响应结果
2.2 Spring MVC 九⼤组件
HandlerMapping(处理器映射器)
HandlerMapping 是⽤来查找 Handler 的,也就是处理器,具体的表现形式可以是类,也可以是⽅法。⽐如,标注了@RequestMapping的每个⽅法都可以看成是⼀个Handler。Handler负责具体实际的请求处理,在请求到达后,HandlerMapping 的作⽤便是找到请求相应的处理器Handler 和Interceptor。
HandlerAdapter(处理器适配器)
HandlerAdapter 是⼀个适配器。因为 Spring MVC 中 Handler 可以是任意形式的,只要能处理请求即可。但是把请求交给 Servlet 的时候,由于 Servlet 的⽅法结构都是doService(HttpServletRequest req,HttpServletResponse resp)形式的,要让固定的 Servlet 处理⽅法调⽤Handler 来进⾏处理,便是 HandlerAdapter 的职责。
HandlerExceptionResolver
HandlerExceptionResolver ⽤于处理 Handler 产⽣的异常情况。它的作⽤是根据异常设置ModelAndView,之后交给渲染⽅法进⾏渲染,渲染⽅法会将 ModelAndView 渲染成⻚⾯。
ViewResolver
ViewResolver即视图解析器,⽤于将String类型的视图名和Locale解析为View类型的视图,只有⼀个resolveViewName()⽅法。从⽅法的定义可以看出,Controller层返回的String类型视图名
viewName 最终会在这⾥被解析成为View。View是⽤来渲染⻚⾯的,也就是说,它会将程序返回的参数和数据填⼊模板中,⽣成html⽂件。ViewResolver 在这个过程主要完成两件事情:
ViewResolver 找到渲染所⽤的模板(第⼀件⼤事)和所⽤的技术(第⼆件⼤事,其实也就是找到视图的类型,如JSP)并填⼊参数。默认情况下,Spring MVC会⾃动为我们配置⼀个InternalResourceViewResolver,是针对 JSP 类型视图的。
RequestToViewNameTranslator
RequestToViewNameTranslator 组件的作⽤是从请求中获取 ViewName.因为 ViewResolver 根据ViewName 查找 View,但有的 Handler 处理完成之后,没有设置 View,也没有设置 ViewName,便要通过这个组件从请求中查找 ViewName。
LocaleResolver
ViewResolver 组件的 resolveViewName ⽅法需要两个参数,⼀个是视图名,⼀个是 Locale。
LocaleResolver ⽤于从请求中解析出 Locale,⽐如中国 Locale 是 zh-CN,⽤来表示⼀个区域。这个组件也是 i18n 的基础。
ThemeResolver
ThemeResolver 组件是⽤来解析主题的。主题是样式、图⽚及它们所形成的显示效果的集合。
Spring MVC 中⼀套主题对应⼀个 properties⽂件,⾥⾯存放着与当前主题相关的所有资源,如图⽚、CSS样式等。创建主题⾮常简单,只需准备好资源,然后新建⼀个“主题名.properties”并将资源设置进去,放在classpath下,之后便可以在⻚⾯中使⽤了。SpringMVC中与主题相关的类有ThemeResolver、ThemeSource和Theme。ThemeResolver负责从请求中解析出主题名,ThemeSource根据主题名找到具体的主题,其抽象也就是Theme,可以通过Theme来获取主题和具体的资源。
MultipartResolver
MultipartResolver ⽤于上传请求,通过将普通的请求包装成 MultipartHttpServletRequest 来实现。MultipartHttpServletRequest 可以通过 getFile() ⽅法 直接获得⽂件。如果上传多个⽂件,还可以调⽤ getFileMap()⽅法得到Map<FileName,File>这样的结构,MultipartResolver 的作⽤就是封装普通的请求,使其拥有⽂件上传的功能。
FlashMapManager
FlashMap ⽤于重定向时的参数传递,⽐如在处理⽤户订单时候,为了避免重复提交,可以处理完post请求之后重定向到⼀个get请求,这个get请求可以⽤来显示订单详情之类的信息。这样做虽然可以规避⽤户重新提交订单的问题,但是在这个⻚⾯上要显示订单的信息,这些数据从哪⾥来获得呢?因为重定向时么有传递参数这⼀功能的,如果不想把参数写进URL(不推荐),那么就可以通过FlashMap来传递。只需要在重定向之前将要传递的数据写⼊请求(可以通过ServletRequestAttributes.getRequest()⽅法获得)的属性OUTPUT_FLASH_MAP_ATTRIBUTE中,这样在重定向之后的Handler中Spring就会⾃动将其设置到Model中,在显示订单信息的⻚⾯上就可以直接从Model中获取数据。FlashMapManager 就是⽤来管理 FalshMap 的。
第 3 节 请求参数绑定(串讲)
请求参数绑定:说⽩了SpringMVC如何接收请求参数
http协议(超⽂本传输协议)
原⽣servlet接收⼀个整型参数:
1)String ageStr = request.getParameter("age");
Integer age = Integer.parseInt(ageStr);
SpringMVC框架对Servlet的封装,简化了servlet的很多操作
SpringMVC在接收整型参数的时候,直接在Handler⽅法中声明形参即可
@RequestMapping("xxx")

public String handle(Integer age) {

System.out.println(age);

}
参数绑定:取出参数值绑定到handler⽅法的形参上
3.1 默认⽀持 Servlet API 作为⽅法参数
当需要使⽤HttpServletRequest、HttpServletResponse、HttpSession等原⽣servlet对象时,直接在handler⽅法中形参声明使⽤即可。
/**
*
* SpringMVC 对原⽣servlet api的⽀持 url:/demo/handle02?id=1
*
* 如果要在SpringMVC中使⽤servlet原⽣对象,⽐如
HttpServletRequest\HttpServletResponse\HttpSession,直接在Handler⽅法形参中声
明使⽤即可
*
*/
@RequestMapping("/handle02")
public ModelAndView handle02(HttpServletRequest request,
HttpServletResponse response,HttpSession session) {
String id = request.getParameter("id");
Date date = new Date();
ModelAndView modelAndView = new ModelAndView();
modelAndView.addObject("date",date);
modelAndView.setViewName("success");
return modelAndView;
}
3.2 绑定简单类型参数
简单数据类型:⼋种基本数据类型及其包装类型
参数类型推荐使⽤包装数据类型,因为基础数据类型不可以为null
整型:Integer、int
字符串:String
单精度:Float、float
双精度:Double、double
布尔型:Boolean、boolean
说明:对于布尔类型的参数,请求的参数值为true或false。或者1或0
注意:绑定简单数据类型参数,只需要直接声明形参即可(形参参数名和传递的参数名要保持⼀致,建议 使⽤包装类型,当形参参数名和传递参数名不⼀致时可以使⽤@RequestParam注解进⾏⼿动映射)
/*
* SpringMVC 接收简单数据类型参数 url:/demo/handle03?id=1
*
* 注意:接收简单数据类型参数,直接在handler⽅法的形参中声明即可,框架会取出参数值
然后绑定到对应参数上
* 要求:传递的参数名和声明的形参名称保持⼀致
*/
@RequestMapping("/handle03")
public ModelAndView handle03(@RequestParam("ids") Integer id,Boolean
flag) {
Date date = new Date();
ModelAndView modelAndView = new ModelAndView();
modelAndView.addObject("date",date);
modelAndView.setViewName("success");
return modelAndView;
}
3.3 绑定Pojo类型参数
/*
* SpringMVC接收pojo类型参数 url:/demo/handle04?id=1&username=zhangsan
*
* 接收pojo类型参数,直接形参声明即可,类型就是Pojo的类型,形参名⽆所谓
* 但是要求传递的参数名必须和Pojo的属性名保持⼀致
*/
@RequestMapping("/handle04")
public ModelAndView handle04(User user) {
Date date = new Date();
ModelAndView modelAndView = new ModelAndView();
modelAndView.addObject("date",date);
modelAndView.setViewName("success");
return modelAndView;
}
3.4 绑定Pojo包装对象参数
通过类中引用属性.属性的方式如ser.username
/*
* SpringMVC接收pojo包装类型参数 url:/demo/handle05?
user.id=1&user.username=zhangsan
* 不管包装Pojo与否,它⾸先是⼀个pojo,那么就可以按照上述pojo的要求来
* 1、绑定时候直接形参声明即可
* 2、传参参数名和pojo属性保持⼀致,如果不能够定位数据项,那么通过属性名 + "." 的
⽅式进⼀步锁定数据
*
*/
@RequestMapping("/handle05")
public ModelAndView handle05(QueryVo queryVo) {
Date date = new Date();
ModelAndView modelAndView = new ModelAndView();
modelAndView.addObject("date",date);
modelAndView.setViewName("success");
return modelAndView;
}
3.5 绑定⽇期类型参数(需要配置⾃定义类型转换器)
后台controller
 // 获取前台传递的时间类型参数
    //需要自定义类型转换扩展接口和注册实现类
    @RequestMapping("/handle06")
    public String  handle06 (Date birthday){

        System.out.println(birthday);
        return "success" ;

    }
前台jsp
	  <fieldset>
        <p>测试用例:SpringMVC接收日期类型参数</p>
        <a href="/demo/handle06?birthday=2019-10-08">点击测试</a>
    </fieldset>
自定义类型转换器
package com.lagou.converter;

import org.springframework.core.convert.converter.Converter;

import java.text.ParseException;
import java.text.SimpleDateFormat;
import java.util.Date;

/**
 * 自定义类型转换器
 *
 * @author lane
 * @date 2021年03月31日 下午3:51
 * Converter<S,T>
 * S:source 原类型
 * T:target 目标类型
 */
public class DateConverter implements Converter<String, Date> {

    //完成字符串向日期的装换
    @Override
    public Date convert(String source) {

        SimpleDateFormat sm = new SimpleDateFormat("yyyy-MM-dd");
        Date date = null;
        try {

            date = sm.parse(source);

        } catch (ParseException e) {
            e.printStackTrace();
        }

        return date;
    }
}
注册自定义类型转换器
 <!--自动注册最合适的处理器适配器,处理器映射器添加-->
    <mvc:annotation-driven conversion-service="convertServiceBean" />

    <!--注册自定义类型转换器,需要在调用最合适的处理器适配器时关联-->
    <bean id="convertServiceBean" class="org.springframework.format.support.FormattingConversionServiceFactoryBean">
        <property name="converters">
            <set>
                <bean class="com.lagou.converter.DateConverter"></bean>
            </set>
        </property>

    </bean>
第 4 节 对 Restful ⻛格请求⽀持
rest⻛格请求是什么样的?
springmvc对rest⻛格请求到底提供了怎样的⽀持
是⼀个注解的使⽤@PathVariable,可以帮助我们从uri中取出参数
4.1 什么是 RESTful
Restful 是⼀种 web 软件架构⻛格,它不是标准也不是协议,它倡导的是⼀个资源定位及资源操作的⻛格。
什么是 REST:
REST(英⽂:Representational State Transfer,简称 REST)描述了⼀个架构样式的⽹络系统, ⽐如web 应⽤程序。它⾸次出现在 2000 年 Roy Fielding 的博⼠论⽂中,他是 HTTP 规范的主要编写者之⼀。在⽬前主流的三种 Web 服务交互⽅案中,REST 相⽐于 SOAP(Simple Object Access protocol,简单对象访问协议)以及 XML-RPC 更加简单明了,⽆论是对 URL 的处理还是对 Payload 的编码,REST 都倾向于⽤更加简单轻量的⽅法设计和实现。值得注意的是 REST 并没有⼀个明确的标准,⽽更像是⼀种设计的⻛格。它本身并没有什么实⽤性,其核⼼价值在于如何设计出符合 REST ⻛格的⽹络接⼝。资源 表现层 状态转移
Restful 的优点
它结构清晰、符合标准、易于理解、扩展⽅便,所以正得到越来越多⽹站的采⽤。
Restful 的特性
资源(Resources):⽹络上的⼀个实体,或者说是⽹络上的⼀个具体信息。
它可以是⼀段⽂本、⼀张图⽚、⼀⾸歌曲、⼀种服务,总之就是⼀个具体的存在。可以⽤⼀个 URI(统⼀资源定位符)指向它,每种资源对应⼀个特定的 URI 。要获取这个资源,访问它的 URI 就可以,因此URI 即为每⼀个资源的独⼀⽆⼆的识别符。
表现层(Representation):把资源具体呈现出来的形式,叫做它的表现层 (Representation)。⽐如,⽂本可以⽤ txt 格式表现,也可以⽤ HTML 格式、XML 格式、JSON 格式表现,甚⾄可以采⽤⼆进制格式。
状态转化(State Transfer):每发出⼀个请求,就代表了客户端和服务器的⼀次交互过程。HTTP 协议,是⼀个⽆状态协议,即所有的状态都保存在服务器端。因此,如果客户端想要操作服务器, 必须通过某种⼿段,让服务器端发⽣“状态转化”(State Transfer)。⽽这种转化是建⽴在表现层之上的,所以就是 “ 表现层状态转化” 。具体说, 就是 HTTP 协议⾥⾯,四个表示操作⽅式的动词:GET 、POST 、PUT 、DELETE 。它们分别对应四种基本操作:GET ⽤来获取资源,POST ⽤来新建资源,PUT ⽤来更新资源,DELETE ⽤来删除资源。
RESTful 的示例:
rest是⼀个url请求的⻛格,基于这种⻛格设计请求的url
没有rest的话,原有的url设计
http://localhost:8080/user/queryUserById.action?id=3
url中定义了动作(操作),参数具体锁定到操作的是谁
有了rest⻛格之后
rest中,认为互联⽹中的所有东⻄都是资源,既然是资源就会有⼀个唯⼀的uri标识它,代表它
http://localhost:8080/user/3 代表的是id为3的那个⽤户记录(资源)
锁定资源之后如何操作它呢?常规操作就是增删改查
根据请求⽅式不同,代表要做不同的操作
get 查询,获取资源
post 增加,新建资源
put 更新
delete 删除资源
rest⻛格带来的直观体现:就是传递参数⽅式的变化,参数可以在uri中了
/account/1 HTTP GET :得到 id = 1 的 account
/account/1 HTTP DELETE:删除 id = 1 的 account
/account/1 HTTP PUT:更新 id = 1 的 account
URL:资源定位符,通过URL地址去定位互联⽹中的资源(抽象的概念,⽐如图⽚、视频、app服务等)。
RESTful ⻛格 URL:互联⽹所有的事物都是资源,要求URL中只有表示资源的名称,没有动词。
RESTful⻛格资源操作:使⽤HTTP请求中的method⽅法put、delete、post、get来操作资源。分别对应添加、删除、修改、查询。不过⼀般使⽤时还是 post 和 get。put 和 delete⼏乎不使⽤。
RESTful ⻛格资源表述:可以根据需求对URL定位的资源返回不同的表述(也就是返回数据类型,⽐如XML、JSON等数据格式)。
Spring MVC ⽀持 RESTful ⻛格请求,具体讲的就是使⽤ @PathVariable 注解获取 RESTful ⻛格的请求URL中的路径变量。
示例代码
前端jsp页面
<div>
后台Handler⽅法
<h2>SpringMVC对Restful⻛格url的⽀持</h2>
<fieldset>
<p>测试⽤例:SpringMVC对Restful⻛格url的⽀持</p>
<a href="/demo/handle/15">rest_get测试</a>
<form method="post" action="/demo/handle">
<input type="text" name="username"/>
<input type="submit" value="提交rest_post请求"/>
</form>
<form method="post" action="/demo/handle/15/lisi">
<input type="hidden" name="_method" value="put"/>
<input type="submit" value="提交rest_put请求"/>
</form>
<form method="post" action="/demo/handle/15">
<input type="hidden" name="_method" value="delete"/>
<input type="submit" value="提交rest_delete请求"/>
</form>
</fieldset>
</div>
后台Handler⽅法
/*
* restful get /demo/handle/15
*/
@RequestMapping(value = "/handle/{id}",method ={RequestMethod.GET})
public ModelAndView handleGet(@PathVariable("id") Integer id) {
Date date = new Date();
ModelAndView modelAndView = new ModelAndView();
modelAndView.addObject("date",date);
modelAndView.setViewName("success");
return modelAndView;
}
/*
* restful post /demo/handle
*/
@RequestMapping(value = "/handle",method = {RequestMethod.POST})
public ModelAndView handlePost(String username) {
  Date date = new Date();
ModelAndView modelAndView = new ModelAndView();
modelAndView.addObject("date",date);
modelAndView.setViewName("success");
return modelAndView;
}
/*
* restful put /demo/handle/15/lisi
*/
@RequestMapping(value = "/handle/{id}/{name}",method ={RequestMethod.PUT})
public ModelAndView handlePut(@PathVariable("id") Integer
id,@PathVariable("name") String username) {
Date date = new Date();
ModelAndView modelAndView = new ModelAndView();
modelAndView.addObject("date",date);
modelAndView.setViewName("success");
return modelAndView;
}
/*
* restful delete /demo/handle/15
*/
@RequestMapping(value = "/handle/{id}",method ={RequestMethod.DELETE})
public ModelAndView handleDelete(@PathVariable("id") Integer id) {
Date date = new Date();
ModelAndView modelAndView = new ModelAndView();
modelAndView.addObject("date",date);
modelAndView.setViewName("success");
return modelAndView;
}
web.xml中配置请求⽅式过滤器(将特定的post请求转换为put和delete请求)
<!--spring mvc自己本身提供一个字符过滤器只针对post请求的乱码,get请求需要自己从tomcat配置下-->
  <filter>
    <filter-name>encodingFilter</filter-name>
    <filter-class>org.springframework.web.filter.CharacterEncodingFilter  </filter-class>
    <init-param>
      <param-name>encoding</param-name>
      <param-value>UTF-8</param-value>
    </init-param>
  </filter>
  <filter-mapping>
    <filter-name>encodingFilter</filter-name>
    <url-pattern>/*</url-pattern>
  </filter-mapping>
  <!--配置spring mvc 请求方式转换过滤器,会检查请求参数中是否有—method参数,如果有就按照指定的方式转换 -->
  <filter>
    <filter-name>hiddenHttpMethodFilter</filter-name>
    <filter-class>org.springframework.web.filter.HiddenHttpMethodFilter</filter-class>
  </filter>
  <filter-mapping>
    <filter-name>hiddenHttpMethodFilter</filter-name>
    <url-pattern>/*</url-pattern>
  </filter-mapping>
第 5 节 Ajax Json交互
5.1 交互:两个⽅向
1)前端到后台:前端ajax发送json格式字符串,后台直接接收为pojo参数,使⽤注解@RequstBody,必须是字符串才有哦!
注意:传统的ajax形式为如下,此时的contenType为’application/x-www-form-urlencoded;charset=UTF-8’,默认使用对象型传输,不需要加@RequstBody,加了之后会出现415错误Content type 'application/x-www-form-urlencoded;charset=UTF-8' not supported
   jQuery(function () {
        $("#ajaxbtn2").bind("click",function () {
            $.ajax({
                url:'/demo/handle07',
                type:'POST',
                 data:{"id":1,"username":"lisi"},
               // data:'{"id":"1","username":"lisi"}',
               // contentType:'application/json;charset=utf-8',
                success:function (data) {

                }
            })
        })
    })
   @RequestMapping(value = "/handle07",method = RequestMethod.POST)
    public String  handle07 (User user){

        System.out.println(user);
        return "success" ;

    }
另一种前台传输数据后台使用@RequestBody接收,此时必须保证
1.指定contentType为contentType:'application/json;charset=utf-8'
2.传递的参数是json字符串才行,data:{"id":1,"username":"lisi"},会出现400错误,必须是这样data:'{"id":"1","username":"lisi"}',
  jQuery(function () {
        $("#ajaxbtn2").bind("click",function () {
            $.ajax({
                url:'/demo/handle07',
                type:'POST',
                // data:{"id":1,"username":"lisi"},
                data:'{"id":"1","username":"lisi"}',
                contentType:'application/json;charset=utf-8',
                dataType: 'json',
                success:function (data) {

                }
            })
        })
    })
  @RequestMapping(value = "/handle07",method = RequestMethod.POST)
    public String  handle07 (@RequestBody User user){

        System.out.println(user);
        return "success" ;

    }
2)后台到前端:后台直接返回pojo对象,前端直接接收为json对象或者字符串,使⽤注解@ResponseBody
5.2 什么是 Json
作者: 阮一峰日期: 2009年5月30日
前几天,我才知道有一种简化的数据交换格式,叫做yaml。
我翻了一遍它的文档,看懂的地方不多,但是有一句话令我茅塞顿开。
它说,从结构上看,所有的数据(data)最终都可以分解成三种类型:
第一种类型是标量(scalar),也就是一个单独的字符串(string)或数字(numbers),比如"北京"这个单独的词。
第二种类型是序列(sequence),也就是若干个相关的数据按照一定顺序并列在一起,又叫做数组(array)或列表(List),比如"北京,上海"。
第三种类型是映射(mapping),也就是一个名/值对(Name/value),即数据有一个名称,还有一个与之相对应的值,这又称作散列(hash)或字典(dictionary),比如"首都:北京"。
我恍然大悟,数据构成的最小单位原来如此简单!难怪在编程语言中,只要有了数组(array)和对象(object)就能够储存一切数据了。
我马上想到了json。
21世纪初,Douglas Crockford寻找一种简便的数据交换格式,能够在服务器之间交换数据。当时通用的数据交换语言是XML,但是Douglas Crockford觉得XML的生成和解析都太麻烦,所以他提出了一种简化格式,也就是Json。(摘抄自阮一峰博客2009年内容)
Json的规格非常简单,只用一个页面几百个字就能说清楚,而且Douglas Crockford声称这个规格永远不必升级,因为该规定的都规定了。
1) 并列的数据之间用逗号(", ")分隔。
2) 映射用冒号(": ")表示。
3) 并列数据的集合(数组)用方括号("[]")表示。
4) 映射的集合(对象)用大括号("{}")表示。
比如,下面这句话:
“北京市的面积为16800平方公里,常住人口1600万人。上海市的面积为6400平方公里,常住人口1800万。”
写成json格式就是这样:
[
{“城市”:“北京”,“面积”:16800,“人口”:1600},
{“城市”:“上海”,“面积”:6400,“人口”:1800}
]
由此可以看到,json非常易学易用。所以,在短短几年中,它就取代xml,成为了互联网上最受欢迎的数据交换格式。
我猜想,Douglas Crockford一定事先就知道,数据结构可以简化成三种形式,否则怎么可能将json定义得如此精炼呢!
另一种json形式就是这样的
{
  "EIINVEST_LIST": {
    "EI":"发债业务",
    "PROJECTNAME": "产品名称"
  },
  "EIINVEST_ADD": {
    "PROJECTNAME_MUST": "产品名称不能为空!",
    "ENTNAME_NULL":"不能为空"
  }
}
将JSON字符串转为JS对象
  var jsonObj1 = JSON.parse(data);  //使用JSON.parse() 将JSON字符串转为JS对象;
	console.log(jsonObj1);

	var jsonObj2 = eval('(' + data + ')'); //使用eval() 将JSON字符串转为JS对象;
	console.log(jsonObj2);
将JS对象转为JSON字符串
var json = {"name":"iphone","price":666}; //创建对象;
var jsonStr = JSON.stringify(json);       //转为JSON字符串
console.log(jsonStr);
5.3 @ResponseBody注解
@responseBody注解的作⽤是将controller的⽅法返回的对象通过适当的转换器转换为指定的格式之后,写⼊到response对象的body区,通常⽤来返回JSON数据或者是XML数据。 注意:在使⽤此注解之后不会再⾛视图处理器,⽽是直接将数据写⼊到输⼊流中,他的效果等同于通过response对象输出指定格式的数据。
5.4 分析Spring MVC 使⽤ Json 交互
5.4.1 所需依赖
 <!--json数据交互所需要的jar包-->
    <dependency>
      <groupId>com.fasterxml.jackson.core</groupId>
      <artifactId>jackson-core</artifactId>
      <version>2.9.9</version>
    </dependency>
    <dependency>
      <groupId>com.fasterxml.jackson.core</groupId>
      <artifactId>jackson-databind</artifactId>
      <version>2.9.9</version>
    </dependency>
    <dependency>
      <groupId>com.fasterxml.jackson.core</groupId>
      <artifactId>jackson-annotations</artifactId>
      <version>2.9.6</version>
    </dependency>
5.4.2 前台jsp
jQuery(function () {
        $("#ajaxbtn3").bind("click",function () {
 				 $.ajax({
                url:'/demo/handle08',
                type:'POST',
                data:'{"id":"1","username":"lisi"}',
                contentType:'application/json;charset=utf-8',//指定发送数据类型
                dataType: 'json',//指定返回数据类型为json
                success:function (data) {
                    alert(data.username);
                }
            })

        });
    })
5.4.3 后台Handle方法
  @RequestMapping(value = "/handle08",method = RequestMethod.POST)
    @ResponseBody //指定返回值不经过视图解析而是放入response中
    public User  handle08 (@RequestBody User user){
        user.setUsername("lane");
        System.out.println(user);
        return user ;
    }
第 6 节 Ajax Json交互
6.1 完整web.xml
<!DOCTYPE web-app PUBLIC
 "-//Sun Microsystems, Inc.//DTD Web Application 2.3//EN"
 "http://java.sun.com/dtd/web-app_2_3.dtd" >

<web-app>
  <display-name>Archetype Created Web Application</display-name>
  <!--spring mvc自己本身提供一个字符过滤器只针对post请求的乱码,get请求需要自己从tomcat配置下-->
  <filter>
    <filter-name>encodingFilter</filter-name>
    <filter-class>org.springframework.web.filter.CharacterEncodingFilter  </filter-class>
    <init-param>
      <param-name>encoding</param-name>
      <param-value>UTF-8</param-value>
    </init-param>
  </filter>
  <filter-mapping>
    <filter-name>encodingFilter</filter-name>
    <url-pattern>/*</url-pattern>
  </filter-mapping>
  <!--配置spring mvc 请求方式转换过滤器,会检查请求参数中是否有—method参数,如果有就按照指定的方式转换 -->
  <filter>
    <filter-name>hiddenHttpMethodFilter</filter-name>
    <filter-class>org.springframework.web.filter.HiddenHttpMethodFilter</filter-class>
  </filter>
  <filter-mapping>
    <filter-name>hiddenHttpMethodFilter</filter-name>
    <url-pattern>/*</url-pattern>
  </filter-mapping>

  <servlet>
    <servlet-name>springmvc</servlet-name>
    <servlet-class>org.springframework.web.servlet.DispatcherServlet</servlet-class>
    <init-param>
      <param-name>contextConfigLocation</param-name>
      <!--classpath 下就是指的是编译后的classes文件下该文件下有 java下com包,resources下的文件-->
      <param-value>classpath:springmvc.xml</param-value>
    </init-param>
  </servlet>
  <servlet-mapping>
    <servlet-name>springmvc</servlet-name>
    <!--方式一:*.action *.do 拦截后缀比较方便在以前和现在都有很大的使用比例-->
    <!--方式二:/ 不会拦截.jsp,但是会拦截静态资源文件,如.html.css.png等
    因为在web容器tomcat当中也有一个web.xml(父)其中有一个defaultServlet负责处理静态资源文件,其中url-pattern是 /
    而我们写的web.xml(子)中url-pattern也是/ 覆盖了父类的配置,就会被Springmvc拦截了。
    解决方式 在springmvc.xml配置。
    为什么不会拦截.jsp呢?是因为 web.xml(父)中有一个JspServlet,这个拦截.jsp文件而我们没有复写这个配置-->
    <!--方式三:/* 拦截所有,包括jsp不推荐使用-->
   <!--拦截匹配规则的url进入Springmvc框架处理 -->
    <url-pattern>/</url-pattern>
  </servlet-mapping>
</web-app>
6.2 完整springmvc.xml 内容
<?xml version="1.0" encoding="UTF-8"?>
<beans xmlns="http://www.springframework.org/schema/beans"
       xmlns:xsi="http://www.w3.org/2001/XMLSchema-instance"
       xmlns:context="http://www.springframework.org/schema/context"
       xmlns:mvc="http://www.springframework.org/schema/mvc"
       xsi:schemaLocation="http://www.springframework.org/schema/beans
                           http://www.springframework.org/schema/beans/spring-beans.xsd
                           http://www.springframework.org/schema/context
                           http://www.springframework.org/schema/context/spring-context.xsd
                           http://www.springframework.org/schema/mvc
                           http://www.springframework.org/schema/mvc/spring-mvc.xsd">
    <!--注解扫描-->
    <context:component-scan base-package="com.lagou"/>
    <!--配置springmvc视图解析器-->
    <bean  class="org.springframework.web.servlet.view.InternalResourceViewResolver">
        <property name="prefix" value="/WEB-INF/jsp/"></property>
        <property name="suffix" value=".jsp"></property>
    </bean>
    <!--自动注册最合适的处理器适配器,处理器映射器-->
    <mvc:annotation-driven conversion-service="convertServiceBean" />
    <!--方案一 解决静态资源访问问题-->
    <!--原理:会在Springmvc内部定义一个DefaultServletHttpRequestHanlder对进入displatcherServlet的URL去进行筛选
    发现是静态文件就会交由web容器(tomcat)去进行处理
    局限性:只能将静态文件或目录放在webapp下不能放入web-inf或者resources或者jar内-->
    <mvc:default-servlet-handler/>
    <!--方案二 解决静态资源访问问题,spring mvc自己去处理-->
    <!--原理 mapping:静态资源约定url规则
            location:静态资源存放的位置
            也可以指定多个路径 mapping="/,/resourcess/**"-->
    <mvc:resources mapping="/resources/**" location="classpath:/"/>
    <mvc:resources mapping="/js/*" location="/WEB-INF/js/"/>
    <!--注册自定义类型转换器,需要在调用最合适的处理器适配器时关联-->
    <bean id="convertServiceBean" class="org.springframework.format.support.FormattingConversionServiceFactoryBean">
        <property name="converters">
            <set>
                <bean class="com.lagou.converter.DateConverter"></bean>
            </set>
        </property>

    </bean>
</beans>
6.3 controller 内容
package com.lagou.controller;

import com.lagou.pojo.User;
import org.springframework.stereotype.Controller;
import org.springframework.ui.Model;
import org.springframework.ui.ModelMap;
import org.springframework.web.bind.annotation.*;
import org.springframework.web.servlet.ModelAndView;

import java.lang.reflect.Method;
import java.util.Date;
import java.util.Map;

/**
 * @author lane
 * @date 2021年03月30日 下午4:06
 */
@Controller
@RequestMapping("/demo")
public class DemoController {

    @RequestMapping("/handle01")
    public ModelAndView handle01(){
        Date date = new Date();
        //封装页面和数据信息
        ModelAndView modelAndView = new ModelAndView();
        //向请求域中添加数据 request.addAttribute()
        modelAndView.addObject("date",date);
        //视图信息,封装页面信息,跳转逻辑视图名
        //modelAndView.setViewName("WEB-INFO/jsp/success.jsp");
        System.out.println(date);
        modelAndView.setViewName("success");
        return modelAndView;

    }

    @RequestMapping("/handle02")
    public String  handle02(ModelMap modelMap){
        Date date = new Date();
        modelMap.addAttribute("date",date);
        System.out.println(date);
        return "success";

    }
    //直接声明model
    @RequestMapping("/handle03")
    public String  handle02(Map<String,Object> map){
        Date date = new Date();
        map.put("date",date);
        System.out.println(date);
        return "success";
    }
    // 获取前台传递的时间类型参数
    //需要自定义类型转换扩展接口和注册实现类
    @RequestMapping("/handle06")
    public String  handle06 (Date birthday){

        System.out.println(birthday);
        return "success" ;

    }
    @RequestMapping(value = "/handle/{id}",method = {RequestMethod.GET})
    public String handle7(@PathVariable("id") Integer id){

        System.out.println(id);
        return "success";
    }

    @RequestMapping(value = "/handle",method = {RequestMethod.POST})
    public String handle8(@RequestParam("username") String name){

        System.out.println(name);
        return "success";
    }
    @RequestMapping(value = "handle/{id}/{username}",method = {RequestMethod.PUT})
    public String handle9(@PathVariable("id") Integer id,@PathVariable("username") String username){

        System.out.println(id +""+username);

        return "success";

    }
    @RequestMapping(value = "handle/{id}/{username}",method = {RequestMethod.DELETE})
    public String handle10(@PathVariable("id") Integer id,@PathVariable("username") String username){

        System.out.println(id +""+username);

        return "success";

    }


    @RequestMapping(value = "/handle07",method = RequestMethod.POST)
    public String  handle07 (@RequestBody User user){

        System.out.println(user);
        return "success" ;

    }

    @RequestMapping(value = "/handle08",method = RequestMethod.POST)
    @ResponseBody //指定返回值不经过视图解析而是放入response中
    public User  handle08 (@RequestBody User user){
        user.setUsername("lane");
        System.out.println(user);
        return user ;
    }

}
6.4 jsp 内容
<%@ page isELIgnored="false" contentType="text/html;charset=UTF-8" language="java" %>
<html>
<head>
    <title>SpringMVC 测试页</title>


    <script type="text/javascript" src="/js/jquery.min.js"></script>
    <style>
        div{
            padding:10px 10px 0 10px;
        }
    </style>
</head>
<body>
<div>
    <h2>Spring MVC 请求参数绑定</h2>
    <fieldset>
        <p>测试用例:SpringMVC 对原生servlet api的支持</p>
        <a href="/demo/handle02?id=1">点击测试</a>
    </fieldset>
    <fieldset>
        <p>测试用例:SpringMVC 接收简单数据类型参数</p>
        <a href="/demo/handle03?id=1">点击测试</a>
    </fieldset>
    <fieldset>
        <p>测试用例:SpringMVC 使用@RequestParam 接收简单数据类型参数(形参名和参数名不一致)</p>
    </fieldset>

    <fieldset>
        <p>测试用例:SpringMVC接收pojo类型参数</p>
        <a href="/demo/handle04?id=1&name=zhangsan">点击测试</a>
    </fieldset>

    <fieldset>
        <p>测试用例:SpringMVC接收pojo包装类型参数</p>
        <a href="/demo/handle05?user.id=1&user.name=zhangsan">点击测试</a>
    </fieldset>

    <fieldset>
        <p>测试用例:SpringMVC接收日期类型参数</p>
        <a href="/demo/handle06?birthday=2019-10-08">点击测试</a>
    </fieldset>
</div>


<div>
    <h2>SpringMVC对Restful风格url的支持</h2>
    <fieldset>
        <p>测试用例:SpringMVC对Restful风格url的支持</p>

        <a href="/demo/handle/15">rest_get测试</a><br/>
        <a href="/demo/handle/7">rest_get测试7</a>

        <form method="post" action="/demo/handle">
            <input type="text" name="username"/>
            <input type="submit" value="提交rest_post请求"/>
        </form>


        <form method="post" action="/demo/handle/15/lisi">
            <input type="hidden" name="_method" value="put"/>
            <input type="submit" value="提交rest_put请求"/>
        </form>
        <form method="post" action="/demo/handle/7/lisi">
            <input type="hidden" name="_method" value="put"/>
            <input type="submit" value="提交restful put请求">
        </form>
        <form method="post" action="/demo/handle/8/wangwu">
            <input type="hidden" name="_method" value="delete"/>
            <input type="submit" value="提交restful delete请求">
        </form>
        <form method="post" action="/demo/handle/15">
            <input type="hidden" name="_method" value="delete"/>
            <input type="submit" value="提交rest_delete请求"/>
        </form>
    </fieldset>
</div>


<div>
    <h2>Ajax json交互</h2>
    <fieldset>
        <input type="button" id="ajaxBtn" value="ajax提交"/>
    </fieldset>
</div>
<div>
    <h3>ajax json交互</h3>
    <fieldset>
        <input type="button" id="ajaxbtn2" value="ajax提交2"/>
    </fieldset>
</div>
<div>
    <h3>ajax json交互</h3>
    <fieldset>
        <input type="button" id="ajaxbtn3" value="ajax提交3"/>
    </fieldset>
</div>
<div>
    <h2>multipart 文件上传</h2>
    <fieldset>
        <%--
            1 method="post"
            2 enctype="multipart/form-data"
            3 type="file"
        --%>
        <form method="post" enctype="multipart/form-data" action="/demo/upload">
            <input type="file" name="uploadFile"/>
            <input type="submit" value="上传"/>
        </form>
    </fieldset>
</div>


</body>
<script>
    jQuery(function () {
        $("#ajaxbtn2").bind("click",function () {
            $.ajax({
                url:'/demo/handle07',
                type:'POST',
                // data:{"id":1,"username":"lisi"},
                data:'{"id":"1","username":"lisi"}',
                contentType:'application/json;charset=utf-8',
                dataType: 'json',
                success:function (data) {

                }
            })
        })
    })

    jQuery(function () {
        $("#ajaxbtn3").bind("click",function () {

            $.ajax({
                url:'/demo/handle08',
                type:'POST',
                data:'{"id":"1","username":"lisi"}',
                contentType:'application/json;charset=utf-8',//指定发送数据类型
                dataType: 'json',//指定返回数据类型为json
                success:function (data) {
                    alert(data.username);
                }
            })

        });
    })
</script>
</html>
第⼆部分 Spring MVC ⾼级技术
第 1 节 拦截器(Inteceptor)使⽤
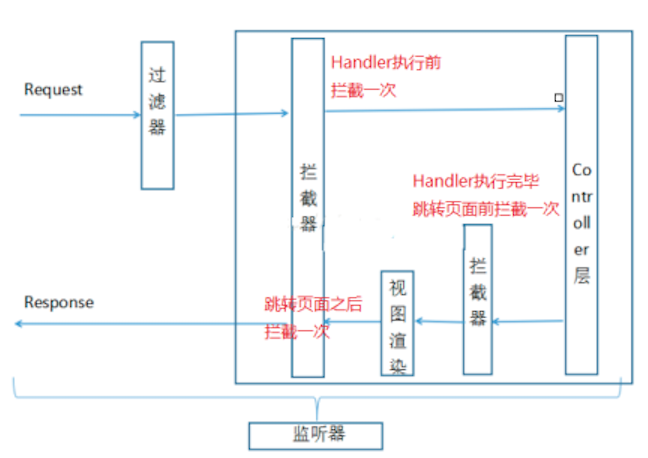
1.1 监听器、过滤器和拦截器对⽐
Servlet:处理Request请求和Response响应
过滤器(Filter):对Request请求起到过滤的作⽤,作⽤在Servlet之前,如果配置为/*可以对所有的资源访问(servlet、js/css静态资源等)进⾏过滤处理
监听器(Listener):实现了javax.servlet.ServletContextListener 接⼝的服务器端组件,它随Web应⽤的启动⽽启动,只初始化⼀次,然后会⼀直运⾏监视,随Web应⽤的停⽌⽽销毁
作⽤⼀:做⼀些初始化⼯作,web应⽤中spring容器启动ContextLoaderListener
作⽤⼆:监听web中的特定事件,⽐如HttpSession,ServletRequest的创建和销毁;变量的创建、销毁和修改等。可以在某些动作前后增加处理,实现监控,⽐如统计在线⼈数,利⽤HttpSessionLisener等。
拦截器(Interceptor):是SpringMVC、Struts等表现层框架⾃⼰的,不会拦截jsp/html/css/image的访问等,只会拦截访问的控制器⽅法(Handler)。
从配置的⻆度也能够总结发现:serlvet、filter、listener是配置在web.xml中的,⽽interceptor是配置在表现层框架⾃⼰的配置⽂件中的
在Handler业务逻辑执⾏之前拦截⼀次
在Handler逻辑执⾏完毕但未跳转⻚⾯之前拦截⼀次
在跳转⻚⾯之后拦截⼀次
1.2 拦截器的执⾏流程
在运⾏程序时,拦截器的执⾏是有⼀定顺序的,该顺序与配置⽂件中所定义的拦截器的顺序相关。 单个拦截器,在程序中的执⾏流程如下图所示:
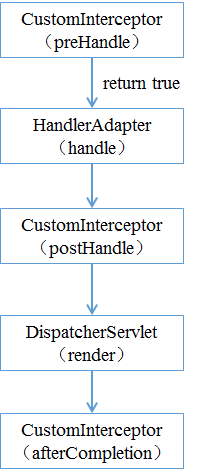
1)程序先执⾏preHandle()⽅法,如果该⽅法的返回值为true,则程序会继续向下执⾏处理器中的⽅法,否则将不再向下执⾏。
2)在业务处理器(即控制器Controller类)处理完请求后,会执⾏postHandle()⽅法,然后会通过DispatcherServlet向客户端返回响应。
3)在DispatcherServlet处理完请求后,才会执⾏afterCompletion()⽅法。
1.3 多个拦截器的执⾏流程
多个拦截器(假设有两个拦截器Interceptor1和Interceptor2,并且在配置⽂件中, Interceptor1拦截器配置在前),在程序中的执⾏流程如下图所示:
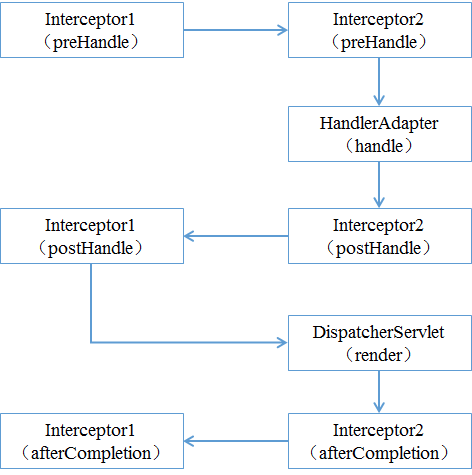
从图可以看出,当有多个拦截器同时⼯作时,它们的preHandle()⽅法会按照配置⽂件中拦截器的配置顺序执⾏,⽽它们的postHandle()⽅法和afterCompletion()⽅法则会按照配置顺序的反序执⾏。
示例代码
⾃定义SpringMVC拦截器
package com.lagou.inteceptor;

import org.springframework.web.servlet.HandlerInterceptor;
import org.springframework.web.servlet.ModelAndView;

/**
 * 自定义拦截器spingmvc所有的
 * @author lane
 * @date 2021年04月01日 上午11:50
 */
public class MyInteceptor01 implements HandlerInterceptor {
    /*
     * handle方法执行之前拦截
     * 一般用来做权限的校验
     * 较为常用
     * 返回值为true是放行方法,false的时候方法中止
     * @author lane
     * @date 2021/4/1 上午11:55
     * @param request
     * @param response
     * @param handler
     * @return boolean
     */
    @Override
    public boolean preHandle(javax.servlet.http.HttpServletRequest request, javax.servlet.http.HttpServletResponse response, Object handler) throws Exception {
        System.out.println("我是myinteceptor01的preHandle方法");
        return true;
    }

    /*
     * handle方法执行之后,视图渲染之前,未跳转页面
     * 可以在这里对视图和返回值进行修改处理
     * @author lane
     * @date 2021/4/1 上午11:58
     * @param request
     * @param response
     * @param handler
     * @param modelAndView
     */
    @Override
    public void postHandle(javax.servlet.http.HttpServletRequest request, javax.servlet.http.HttpServletResponse response, Object handler, ModelAndView modelAndView) throws Exception {
        System.out.println("我是myinteceptor01的postHandle方法");
    }
    /*
     * 视图渲染之后进行拦截
     * 可以用来捕获异常等
     * @author lane
     * @date 2021/4/1 下午12:00
     * @param request
     * @param response
     * @param handler
     * @param ex
     */
    @Override
    public void afterCompletion(javax.servlet.http.HttpServletRequest request, javax.servlet.http.HttpServletResponse response, Object handler, Exception ex) throws Exception {
        System.out.println("我是myinteceptor01的afterCompletion方法");
    }
}
springmvc.xml配置注册SpringMVC拦截器
  <mvc:interceptors>
        <!--如果只配置一个bean会拦截所有-->
      <!--  <bean class="com.lagou.inteceptor.MyInteceptor01"></bean>-->
        <mvc:interceptor>
            <!--当前拦截器规则:**代表当前目录下及其子目录下的所有url-->
            <mvc:mapping path="/**"/>
            <!--exclude-mapping可以在mapping的基础上排除一些url拦截-->
           <!-- <mvc:exclude-mapping path="/demo/**"/>-->
            <bean class="com.lagou.inteceptor.MyInteceptor01"></bean>
        </mvc:interceptor>
        <mvc:interceptor>
            <!--当前拦截器规则:**代表当前目录下及其子目录下的所有url-->
            <mvc:mapping path="/**"/>
            <!--exclude-mapping可以在mapping的基础上排除一些url拦截-->
            <!-- <mvc:exclude-mapping path="/demo/**"/>-->
            <bean class="com.lagou.inteceptor.MyInteceptor02"></bean>
        </mvc:interceptor>
    </mvc:interceptors>
打印结果
我是myinteceptor01的preHandle方法
我是myinteceptor02的preHandle方法
User{id=1, username='lisi'}
我是myinteceptor02的postHandle方法
我是myinteceptor01的postHandle方法
我是myinteceptor02的afterCompletion方法
我是myinteceptor01的afterCompletion方法
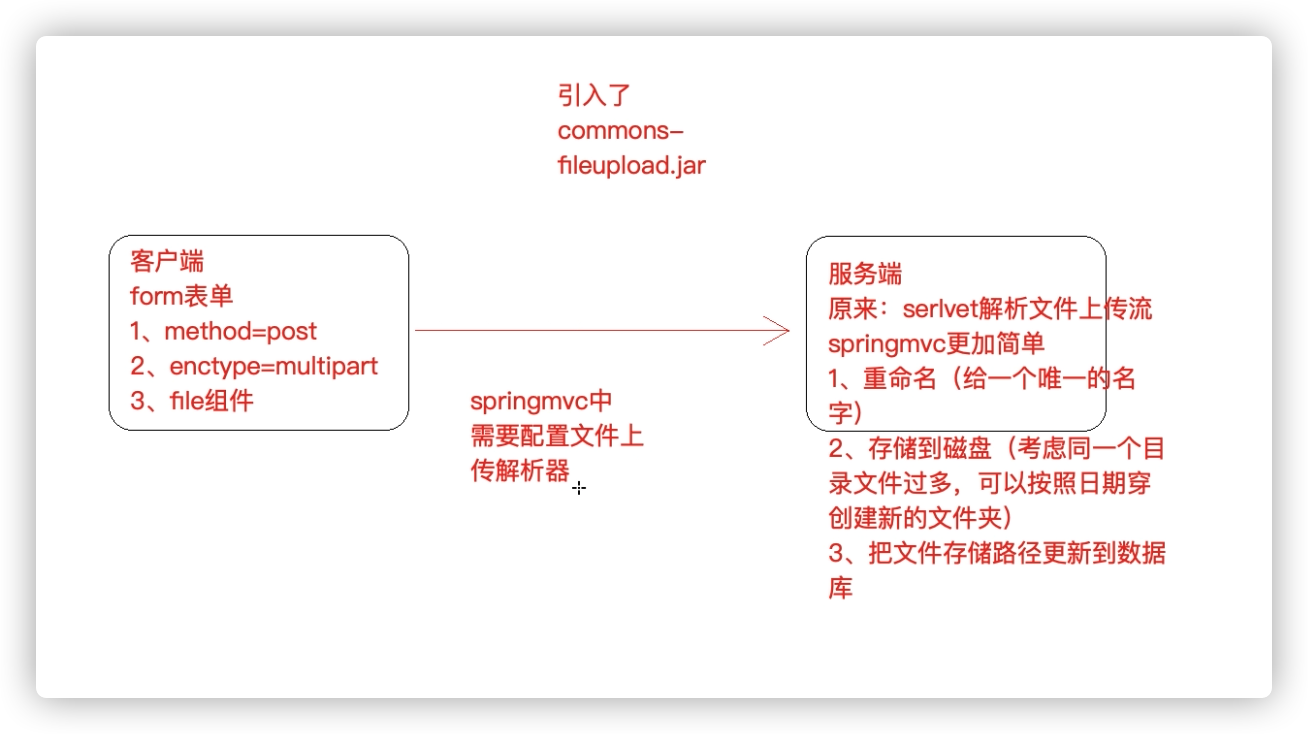
第 2 节 处理multipart形式的数据
原⽣servlet可以处理上传的⽂件数据的,springmvc⼜是对serlvet的封装,自然可以且更简单。具体请看下面的代码,一些要求都写在了注释里面了
2.1 文件上传所需依赖
 <!--文件上传所需依赖-->
    <dependency>
      <groupId>commons-fileupload</groupId>
      <artifactId>commons-fileupload</artifactId>
      <version>1.3.3</version>
    </dependency>
2.2 前台jsp
<div>
    <fieldset>
        <%--必须指定
        1、method为post
        2、enctype='multipart/form-data
        3、type = file
        4、name与后台接受参数值一样'--%>
        <form method="post" action="/demo/upload" enctype="multipart/form-data">
            <input type="file" name="uplaodFile">
            <input type="submit" value="文件上传">

        </form>
    </fieldset>
</div>
2.3 后台方法
 /**
     * 处理文件上传的方法
     * @author lane
     * @date 2021/4/2 上午9:42
     * @param uplaodFile
     * @param session
     * @return org.springframework.web.servlet.ModelAndView
     */
    @RequestMapping(value = "/upload")
    public ModelAndView   upload (MultipartFile uplaodFile, HttpSession session) throws IOException {
        //获取文件名称
        String originalFilename = uplaodFile.getOriginalFilename();
        //获取扩展名
        String ext =   originalFilename.substring(originalFilename.lastIndexOf(".")+1,originalFilename.length());
        //获取新名字
        String newName = UUID.randomUUID().toString()+"."+ext;

        //获取根本路径webapp,在此建一个文件夹,/uploads/yyyy-MM-dd这种形式存储
        String realPath = session.getServletContext().getRealPath("/uploads");
        Date  date = new Date();
        SimpleDateFormat sm =  new  SimpleDateFormat("yyyy-MM-dd");
        //获取文件夹名
        String datePath = sm.format(date);
        File folder = new File(realPath+"/"+datePath);
        if (!folder.exists()){
            folder.mkdirs();
        }
        //将上传的文件以一个新的名字放在新建的文件夹下
        uplaodFile.transferTo(new File(folder,newName));
        //TODO 上传到数据库
        MyFile myFile = new MyFile();
        myFile.setFileName(originalFilename);
        myFile.setNewFileName(newName);
        myFile.setFilePath(realPath+"/"+datePath);
        System.out.println("存储文件信息到数据库");

        ModelAndView modelAndView = new ModelAndView();
        modelAndView.setViewName("success");
        return modelAndView ;
    }
2.4 springmvc.xml配置⽂件上传解析器
<!--配置文件上传解析器 注意 id 是固定写死的-->
    <bean id="multipartResolver" class="org.springframework.web.multipart.commons.CommonsMultipartResolver">
        <!--文件最大上传大小,单位字节-->
        <property name="maxUploadSize" value="10000000000"/>
    </bean>
第 3 节 在控制器中处理异常
@ControllerAdvice,是Spring3.2提供的新注解,它是一个Controller增强器,可对controller中被 @RequestMapping注解的方法加一些逻辑处理,最常用的就是异常处理。需要配合@ExceptionHandler使用。当将异常抛到controller时,可以对异常进行统一处理,规定返回的json格式或是跳转到一个错误页面,具体实现如下:
3.1 全局异常定义类
/**
 * 全局的异常处理
 * @author lane
 * @date 2021年04月02日 上午9:53
 */
//@ControllerAdvice,是Spring3.2提供的新注解,它是一个Controller增强器,
// 可对controller中被 @RequestMapping注解的方法加一些逻辑处理。最常用的就是异常处理
@ControllerAdvice
public class GlobalException {
    /*
     * 指定捕获的异常处理,形参异常范围要大于等于指定的异常类型才可以具体处理
     * @author lane
     * @date 2021/4/2 上午9:56
     * @param arithmeticException
     * @param httpResponse
     */
    @ExceptionHandler(ArithmeticException.class)// 指定某一种异常
    public ModelAndView handleException(ArithmeticException arithmeticException,
                                        HttpServletResponse response) throws IOException {

        //可以直接输出出去
        //response.getWriter().write(arithmeticException.getMessage());

        ModelAndView modelAndView = new ModelAndView();
        modelAndView.addObject("msg",arithmeticException.getMessage());
        modelAndView.setViewName("error");

        return  modelAndView;
    }
}
第 4 节 Spring mvc中的转发和重定向
首先转发是不会改变url和丢失数据的,重定向则会改变和丢失。具体形式为
return "forward:handle10"return "redirect:handle10"
具体实现代码如下
  @GetMapping(value = "/handle10")
    public String handle10(@ModelAttribute("date") String date){
        System.out.println(date);
         return "success";
    }
    //转发原始版
    @GetMapping("/dispatcher01")
    public void dispatcher01(HttpServletRequest request, HttpServletResponse response) throws Exception {

        request.setAttribute("date", new Date());
        request.getRequestDispatcher("/WEB-INF/jsp/success.jsp").forward(request, response);

    }
    //转发mvc版
    @GetMapping("/dispatcher02")
    public String dispatcher02(String date) {

        return "forward:handle10";

    }
    //重定向mvc版--值丢失
    @GetMapping("/redirect01")
    public String redirect01(String date) {

        return "redirect:handle10";

    }
    //重定向mvc版--值拼接
    @GetMapping("/redirect02")
    public String redirect02(String date) {

        return "redirect:handle10?date="+date;

    }
    //重定向mvc版--值闪存
    @GetMapping("/redirect03")
    public String redirect03(String date, RedirectAttributes redirectAttributes) {
        //adFlashAttribute⽅法设置了⼀个flash类型属性,该属性会被暂存到session中,在跳转到⻚⾯之后该属性销毁
        redirectAttributes.addFlashAttribute("date",date);
        //存储,到页面值不会自动销毁
        redirectAttributes.addAttribute("date",date);
        return "redirect:handle10";

    }
第三部分 ⼿写实现Spring MVC 框架
根据SpringMVC执⾏的⼤致原理,⼿写一个spring mvc的简易版框架
第 1 节 代码的整体结构
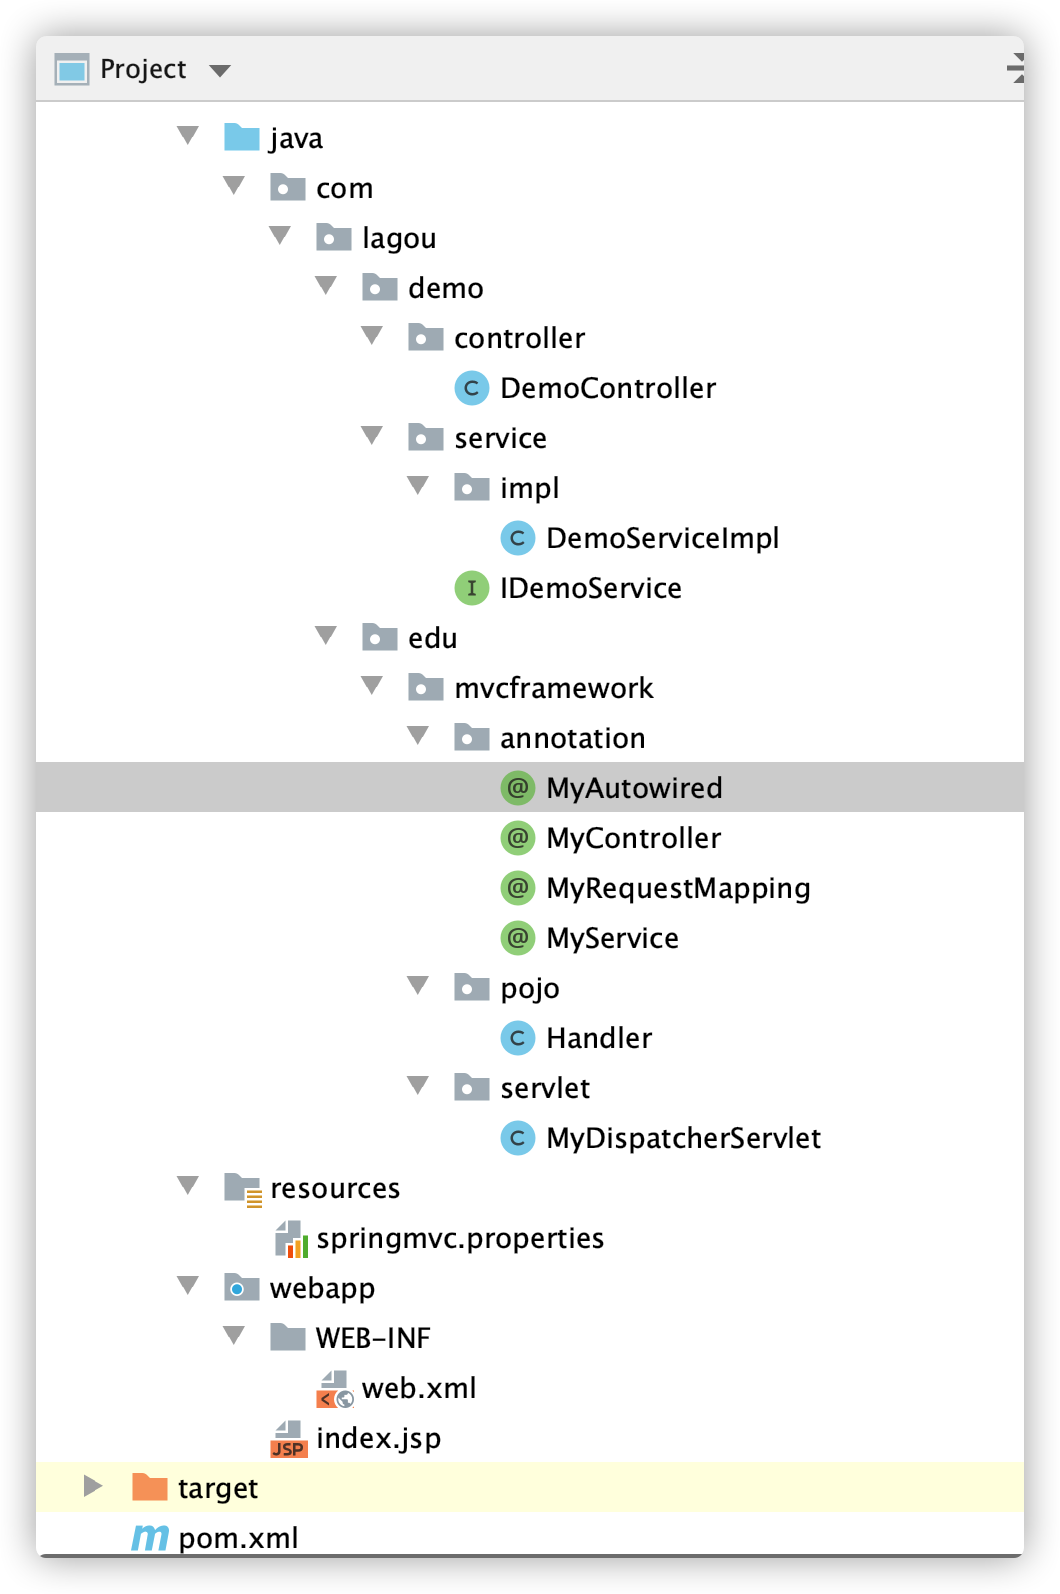
第 2 节 依赖文件pom.xml配置
<?xml version="1.0" encoding="UTF-8"?>

<project xmlns="http://maven.apache.org/POM/4.0.0" xmlns:xsi="http://www.w3.org/2001/XMLSchema-instance"
  xsi:schemaLocation="http://maven.apache.org/POM/4.0.0 http://maven.apache.org/xsd/maven-4.0.0.xsd">
  <modelVersion>4.0.0</modelVersion>

  <groupId>com.lagou.edu</groupId>
  <artifactId>my-mvc</artifactId>
  <version>1.0-SNAPSHOT</version>
  <packaging>war</packaging>

  <name>my-mvc Maven Webapp</name>
  <!-- FIXME change it to the project's website -->
  <url>http://www.example.com</url>

  <properties>
    <project.build.sourceEncoding>UTF-8</project.build.sourceEncoding>
    <maven.compiler.source>11</maven.compiler.source>
    <maven.compiler.target>11</maven.compiler.target>
  </properties>

  <dependencies>
    <dependency>
      <groupId>junit</groupId>
      <artifactId>junit</artifactId>
      <version>4.12</version>
      <scope>test</scope>
    </dependency>
    <!--servlet包,指定scope为provide表示一旦部署到服务器就不使用这个,而使用tomact自带的,不然会冲突-->
    <dependency>
      <groupId>javax.servlet</groupId>
      <artifactId>javax.servlet-api</artifactId>
      <version>4.0.1</version>
      <scope>provided</scope>
    </dependency>
    <dependency>
      <groupId>commons-lang</groupId>
      <artifactId>commons-lang</artifactId>
      <version>2.6</version>
    </dependency>
  </dependencies>
  <build>
    <plugins>
      <!--定义编译细节-->
      <plugin>
        <groupId>org.apache.maven.plugins</groupId>
        <artifactId>maven-compiler-plugin</artifactId>
        <version>3.1</version>
        <configuration>
          <source>11</source>
          <target>11</target>
          <encoding>UTF-8</encoding>
          <!--告诉编译器编译时使用参数的真实名字而不是args0,args1这种-->
          <compilerArgs>-parameters</compilerArgs>
        </configuration>
      </plugin>
      <!-- 添加tomcat插件-->
      <plugin>
        <groupId>org.apache.tomcat.maven</groupId>
        <artifactId>tomcat7-maven-plugin</artifactId>
        <version>2.2</version>
        <configuration>
          <port>8082</port>
          <path>/</path>
        </configuration>
      </plugin>
    </plugins>
  </build>
</project>
第 3 节 具体代码实现之自定义注解
@Documented
@Target(ElementType.FIELD)
@Retention(RetentionPolicy.RUNTIME)
public @interface MyAutowired {
    String value() default "";
}

@Documented
@Target(ElementType.TYPE)
@Retention(RetentionPolicy.RUNTIME)
public @interface MyController {
    String value() default "";
}

@Documented
@Target({ElementType.TYPE,ElementType.METHOD})
@Retention(RetentionPolicy.RUNTIME)
public @interface MyRequestMapping {
    String value() default "";
}

@Documented
@Target(ElementType.TYPE)
@Retention(RetentionPolicy.RUNTIME)
public @interface MyService {
    String value() default "";
}
第 4 节 具体代码实现之properties文件和web.xml文件
springmvc.properties文件
scanPackage=com.lagou.demo
web.xml文件
<!DOCTYPE web-app PUBLIC
 "-//Sun Microsystems, Inc.//DTD Web Application 2.3//EN"
 "http://java.sun.com/dtd/web-app_2_3.dtd" >

<web-app>
  <display-name>Archetype Created Web Application</display-name>
  <!--定义自己的DispatcherServlet并传入参数为springmvc.properties-->
  <servlet>
    <servlet-name>mymvc</servlet-name>
    <servlet-class>com.lagou.edu.mvcframework.servlet.MyDispatcherServlet</servlet-class>
    <init-param>
      <param-name>contextConfigLocation</param-name>
      <param-value>springmvc.properties</param-value>
    </init-param>
  </servlet>
  <servlet-mapping>
    <servlet-name>mymvc</servlet-name>
    <url-pattern>/* </url-pattern>
  </servlet-mapping>
</web-app>
第 5 节 具体代码实现之自己写的测试controller
controller
package com.lagou.demo.controller;

import com.lagou.demo.service.IDemoService;
import com.lagou.edu.mvcframework.annotation.MyAutowired;
import com.lagou.edu.mvcframework.annotation.MyController;
import com.lagou.edu.mvcframework.annotation.MyRequestMapping;

import javax.servlet.http.HttpServletRequest;
import javax.servlet.http.HttpServletResponse;


/**
 * @author lane
 * @date 2021年04月02日 下午2:28
 */
@MyController
@MyRequestMapping("/demo")
public class DemoController {
    @MyAutowired
    private IDemoService demoService;
    @MyRequestMapping("/query")
    public String query(HttpServletRequest request, HttpServletResponse response,String name){
      return  demoService.get(name);

    }
}
service
package com.lagou.demo.service;

/**
 * @author lane
 * @date 2021年04月02日 下午2:30
 */
public interface IDemoService {
    String get(String name);
}
impl
package com.lagou.demo.service.impl;

import com.lagou.demo.service.IDemoService;
import com.lagou.edu.mvcframework.annotation.MyService;

/**
 * @author lane
 * @date 2021年04月02日 下午2:31
 */
@MyService
public class DemoServiceImpl implements IDemoService {
    @Override
    public String get(String name) {
        System.out.println("service 实现类中的name为:"+name);
        return name;
    }
}
第 6 节 具体代码实现之Handler对象
主要是因为反射调用metho.invoke(obj,args[])需要传递参数,故而封装成对象,以便和url绑定
package com.lagou.edu.mvcframework.pojo;

import java.lang.reflect.Method;
import java.util.HashMap;
import java.util.Map;
import java.util.regex.Pattern;

/**
 * uri和方法映射需要多个参数封装才行
 * @author lane
 * @date 2021年04月06日 上午11:13
 */
public class Handler {
    //对象
    private Object controller;
    //方法
    private Method method;
    //url 可以存字符串,pattern是正则类型
    private Pattern pattern;
    //参数顺序,参数绑定,key是参数名value 是参数的顺序
    private Map<String,Integer> paramIndexMapping;

    public Handler(Object controller, Method method, Pattern pattern) {
        this.controller = controller;
        this.method = method;
        this.pattern = pattern;
        this.paramIndexMapping = new HashMap<>();
    }

    public Object getController() {
        return controller;
    }

    public void setController(Object controller) {
        this.controller = controller;
    }

    public Method getMethod() {
        return method;
    }

    public void setMethod(Method method) {
        this.method = method;
    }

    public Pattern getPattern() {
        return pattern;
    }

    public void setPattern(Pattern pattern) {
        this.pattern = pattern;
    }

    public Map<String, Integer> getParamIndexMapping() {
        return paramIndexMapping;
    }

    public void setParamIndexMapping(Map<String, Integer> paramIndexMapping) {
        this.paramIndexMapping = paramIndexMapping;
    }
}
第 7 节 具体代码实现之自己手写的DispatcherServlet(核心)
package com.lagou.edu.mvcframework.servlet;

import com.lagou.edu.mvcframework.annotation.MyAutowired;
import com.lagou.edu.mvcframework.annotation.MyController;
import com.lagou.edu.mvcframework.annotation.MyRequestMapping;
import com.lagou.edu.mvcframework.annotation.MyService;
import com.lagou.edu.mvcframework.pojo.Handler;
import org.apache.commons.lang.StringUtils;

import javax.servlet.ServletConfig;
import javax.servlet.ServletException;
import javax.servlet.http.HttpServlet;
import javax.servlet.http.HttpServletRequest;
import javax.servlet.http.HttpServletResponse;
import java.io.File;
import java.io.IOException;
import java.io.InputStream;
import java.lang.reflect.Field;
import java.lang.reflect.InvocationTargetException;
import java.lang.reflect.Method;
import java.lang.reflect.Parameter;
import java.util.*;
import java.util.regex.Matcher;
import java.util.regex.Pattern;

/**
 * @author lane
 * @date 2021年04月02日 上午11:35
 */
public class MyDispatcherServlet extends HttpServlet {
    //配置文件信息
    private Properties properties = new Properties();
    //缓存扫描到的类的全限定类名
    private List<String> classNames = new ArrayList<>();
    //ioc容器
    private Map<String, Object> ioc = new HashMap<>();
    //handlerMapping映射器
    //private Map<String,Method> handlerMapping = new HashMap<>();
    //添加新的handlerMapping
    private List<Handler> handlerMapping = new ArrayList<>();

    @Override
    public void init(ServletConfig config) throws ServletException {
        //1、 加载配置文件 springmvc.properties
        String contextConfigLocation = config.getInitParameter("contextConfigLocation");
        System.out.println(contextConfigLocation);
        doLoadConfig(contextConfigLocation);

        //2、 扫描相关的类相关的注解
        doScan(properties.getProperty("scanPackage"));
        //3、 初始化bean对象(ioc注解实现)
        doInstance();
        //4、 实现依赖注入 di
        doAutowired();
        //5、 构造handlerMapping处理器映射器,建立url和方法的对应关系
        initHandlerMapping();
        System.out.println("spring mvc 初始化完成~~~~~~~~");
        //6、 等待请求进入

    }
    /**
     * 构建handlerMapping,建立url和method之间到关系
     * @author lane
     * @date 2021/4/2 下午4:26
     */
    private void initHandlerMapping() {
        if (ioc.isEmpty())return;
        for (Map.Entry<String, Object> entry : ioc.entrySet()) {
            Class<?> aClass = entry.getValue().getClass();
            if (!aClass.isAnnotationPresent(MyController.class)){continue;}

            String baseUrl = "";
            //是否有注解@MyRequestMapping
            if (aClass.isAnnotationPresent(MyRequestMapping.class)){
                String value = aClass.getAnnotation(MyRequestMapping.class).value();
                baseUrl = value;
            }
            //获取方法
            Method[] methods = aClass.getMethods();
            for (int i = 0; i < methods.length; i++) {
                Method method = methods[i];
                if (!method.isAnnotationPresent(MyRequestMapping.class)){continue;}
                MyRequestMapping methodAnnotation = method.getAnnotation(MyRequestMapping.class);
                String methodValue = methodAnnotation.value();
                baseUrl = baseUrl+methodValue;
                //handlerMapping.put(baseUrl,method);
                //把方法信息封装成一个handler对象
                Handler handler = new Handler(entry.getValue(),method, Pattern.compile(baseUrl));
                //获取参数信息
                Parameter[] parameters = method.getParameters();
                //绑定参数顺序
                for (int j = 0; j < parameters.length; j++) {
                    Parameter parameter = parameters[j];
                    if(parameter.getType()==HttpServletRequest.class||parameter.getType()==HttpServletResponse.class){
                        //如果参数为request或response那么就是获取简单的名字为HttpServletRequest或HttpServletResponse
                        handler.getParamIndexMapping().put(parameter.getType().getSimpleName(),j);
                    }else {
                        //<name,2>
                        handler.getParamIndexMapping().put(parameter.getName(),j);
                    }

                }
                //缓存起来url和method之间的关系
                handlerMapping.add(handler);
            }

        }


    }

    //di
    private void doAutowired() {
        if (ioc.isEmpty()) return;
        // 遍历容器获取里面的对象属性
        for (Map.Entry<String, Object> entry : ioc.entrySet()) {
            Field[] declaredFields = entry.getValue().getClass().getDeclaredFields();
            //遍历属性
            for (int i = 0; i < declaredFields.length; i++) {
                Field declaredField = declaredFields[i];
                //判断是否存在@Myautowired注解
                if (declaredField.isAnnotationPresent(MyAutowired.class)) {
                    MyAutowired annotation = declaredField.getAnnotation(MyAutowired.class);
                    declaredField.setAccessible(true);
                    String value = annotation.value();
                    //判断是否注解存在值,注入属性对象到遍历对象中
                    try {
                        if (!"".equals(value.trim())) {
                            //如果注解值不为空,就以注解中的value为key获取对象进行di
                            declaredField.set(entry.getValue(), ioc.get(value));

                        } else {
                            //如果注解中的值为空,就获取接口的全线定名为key获取对象进行注入
                            declaredField.set(entry.getValue(), ioc.get(declaredField.getType().getName()));

                        }
                    } catch (IllegalAccessException e) {
                        e.printStackTrace();
                    }
                }
            }

        }


    }

    //ioc容器
    private void doInstance() {
        if (classNames.size() == 0) return;
        try {
            for (int i = 0; i < classNames.size(); i++) {
                String className = classNames.get(i);
                Class<?> aClass = Class.forName(className);
                //如果有controller注解
                if (aClass.isAnnotationPresent(MyController.class)) {
                    //获取controller类名小写作为bean的ID,就不自定义beanid了
                    String aClassName = aClass.getSimpleName();
                    //首字母小写
                    String beanNameLower = lowerFirst(aClassName);
                    ioc.put(beanNameLower, aClass.newInstance());

                } else if (aClass.isAnnotationPresent(MyService.class)) {

                    MyService annotation = aClass.getAnnotation(MyService.class);
                    //获取注解的value值
                    String value = annotation.value();
                    //判断是否指定value,若指定就按指定的为key,否则就类名首字母小写
                    if (!"".equals(value.trim())) {
                        ioc.put(value, aClass.newInstance());
                    } else {
                        ioc.put(lowerFirst(aClass.getSimpleName()), aClass.newInstance());
                    }
                    //service层一般是有接口的在放一份接口为id对象到ioc中,便于接口依赖注入
                    Class<?>[] interfaces = aClass.getInterfaces();
                    for (int j = 0; j < interfaces.length; j++) {
                        //接口的全线定名作为id
                        ioc.put(interfaces[j].getName(), aClass.newInstance());
                    }
                }
            }


        } catch (Exception e) {
            e.printStackTrace();
        }


    }

    //首字母小写方法
    public String lowerFirst(String str) {
        char[] chars = str.toCharArray();
        if (chars[0] >= 'A' && chars[0] <= 'Z') {
            chars[0] = (char) (chars[0] + 32);
        }
        return String.valueOf(chars);

    }

    //扫描类
    private void doScan(String scanPackage) {
        // 获取路径
        String scanPagePath = Thread.currentThread().getContextClassLoader().getResource("").getPath() + scanPackage.replaceAll("\\.", "/");
        System.out.println(scanPagePath);
        File pack = new File(scanPagePath);
        File[] files = pack.listFiles();
        for (File file : files) {
            if (file.isDirectory()) {
                //递归扫描 com.lagou.edu.controller
                doScan(scanPackage + "." + file.getName());
            } else if (file.getName().endsWith(".class")) {
                String className = scanPackage + "." + file.getName().replaceAll(".class", "");
                classNames.add(className);
            }
        }
    }

    //加载配置文件
    private void doLoadConfig(String contextConfigLocation) {
        //获取文件流
        InputStream resourceAsStream = this.getClass().getClassLoader().getResourceAsStream(contextConfigLocation);
        try {
            properties.load(resourceAsStream);
        } catch (IOException e) {
            e.printStackTrace();
        }

    }

    @Override
    protected void doGet(HttpServletRequest req, HttpServletResponse resp) throws ServletException, IOException {
        doPost(req, resp);
    }

    @Override
    protected void doPost(HttpServletRequest req, HttpServletResponse resp) throws ServletException, IOException {
        // 处理请求,获取uri
        Handler handler = getHandler(req);
        if (handler==null){
            resp.getWriter().write("404 not found!");
            return;
        }
        // 参数绑定
        // 获取我们要传入的参数数组类型,因而获取其长度
        Class<?>[] parameterTypes = handler.getMethod().getParameterTypes();
        // 传入参数的数组,以便反射调用方法执行
        Object[] paramValues = new Object[parameterTypes.length];
        // 获取请求中的参数集合
        Map<String, String[]> parameterMap = req.getParameterMap();
        // 遍历所有的参数,填充除了request 和response
        for (Map.Entry<String,String[]> parameter : parameterMap.entrySet() ) {
            //多个同类型的参数值改成,拼接形式
            String value = StringUtils.join(parameter.getValue(), ",");
            //判断参数是否在我们的handler对象的参数集合中
            if (!handler.getParamIndexMapping().containsKey(parameter.getKey())){continue;}
            //如果存在则获取index
            Integer index = handler.getParamIndexMapping().get(parameter.getKey());
            //放入要传的参数有序数组中
            paramValues[index] = value;
        }
        //最后放入req和resp
        Integer reqIndex = handler.getParamIndexMapping().get(HttpServletRequest.class.getSimpleName());
        Integer respIndex = handler.getParamIndexMapping().get(HttpServletResponse.class.getSimpleName());
        paramValues[reqIndex] = req;
        paramValues[respIndex] = resp;
        //调用handler的method方法执行
        try {
            handler.getMethod().invoke(handler.getController(), paramValues);
        } catch (IllegalAccessException e) {
            e.printStackTrace();
        } catch (InvocationTargetException e) {
            e.printStackTrace();
        }


    }
    // 获取handler对象
    private Handler getHandler(HttpServletRequest req) {
        if (handlerMapping.isEmpty()){return null;}
        String url = req.getRequestURI();
        System.out.println(url);
        for (Handler handler:handlerMapping) {
            Matcher matcher = handler.getPattern().matcher(url);
            if (!matcher.matches()){return null;}
            return handler;
        }
        return null;
    }

}
第 8 节 乱码解决
8.1 Post请求乱码,web.xml中加⼊过滤器
<!--springmvc提供的针对post请求的编码过滤器-->
  <filter>
    <filter-name>encoding</filter-name>
    <filter-class>org.springframework.web.filter.CharacterEncodingFilter</filter-class>
    <init-param>
      <param-name>encoding</param-name>
      <param-value>UTF-8</param-value>
    </init-param>
  </filter>
  <filter-mapping>
    <filter-name>encoding</filter-name>
    <url-pattern>/*</url-pattern>
  </filter-mapping>
8.2 Get请求乱码 tomcat配置文件server.xml加上编码
<Connector URIEncoding="utf-8" connectionTimeout="20000" port="8080"
protocol="HTTP/1.1" redirectPort="8443"/>
第 9 节 测试结果
4月 06, 2021 2:14:37 下午 org.apache.coyote.AbstractProtocol init
信息: Initializing ProtocolHandler ["http-bio-8082"]
4月 06, 2021 2:14:37 下午 org.apache.catalina.core.StandardService startInternal
信息: Starting service Tomcat
4月 06, 2021 2:14:37 下午 org.apache.catalina.core.StandardEngine startInternal
信息: Starting Servlet Engine: Apache Tomcat/7.0.47
4月 06, 2021 2:14:38 下午 org.apache.coyote.AbstractProtocol start
信息: Starting ProtocolHandler ["http-bio-8082"]
springmvc.properties
/Volumes/workspace/startspace/my-mvc/target/classes/com/lagou/demo
/Volumes/workspace/startspace/my-mvc/target/classes/com/lagou/demo/controller
/Volumes/workspace/startspace/my-mvc/target/classes/com/lagou/demo/service
/Volumes/workspace/startspace/my-mvc/target/classes/com/lagou/demo/service/impl
spring mvc 初始化完成~~~~~~~~
/demo/query
service 实现类中的name为:lisi
第 10 节 总结
虽然只是简单的实现的Spring mvc功能,但是里面包含了很多知识比如自定义注解和注解实现ioc等,还是很值得去反复学习和敲代码debug的。再总结下mvc的执行过程就是
//1、 加载配置文件 springmvc.properties
String contextConfigLocation = config.getInitParameter("contextConfigLocation");
doLoadConfig(contextConfigLocation);
//2、 扫描相关的类相关的注解
doScan(properties.getProperty("scanPackage"));
//3、 初始化bean对象(ioc注解实现)
doInstance();
//4、 实现依赖注入 di
doAutowired();
//5、 构造handlerMapping处理器映射器,建立url和方法的对应关系
initHandlerMapping();
System.out.println("spring mvc 初始化完成~~~~~~~~");
//6、 等待请求进入
第四部分 Spring MVC 源码深度剖析
对于现在这个阶段的我来说,源码分析只能听个大概。很难去深入的理解和学习。还是不建议初中级去花费时间学习具体的源代码,但是基本的mvc工作流程,还是要知道的。我做笔记也会看一遍笔记再排版的。
第 1 节 前端控制器 DispatcherServlet 继承结构
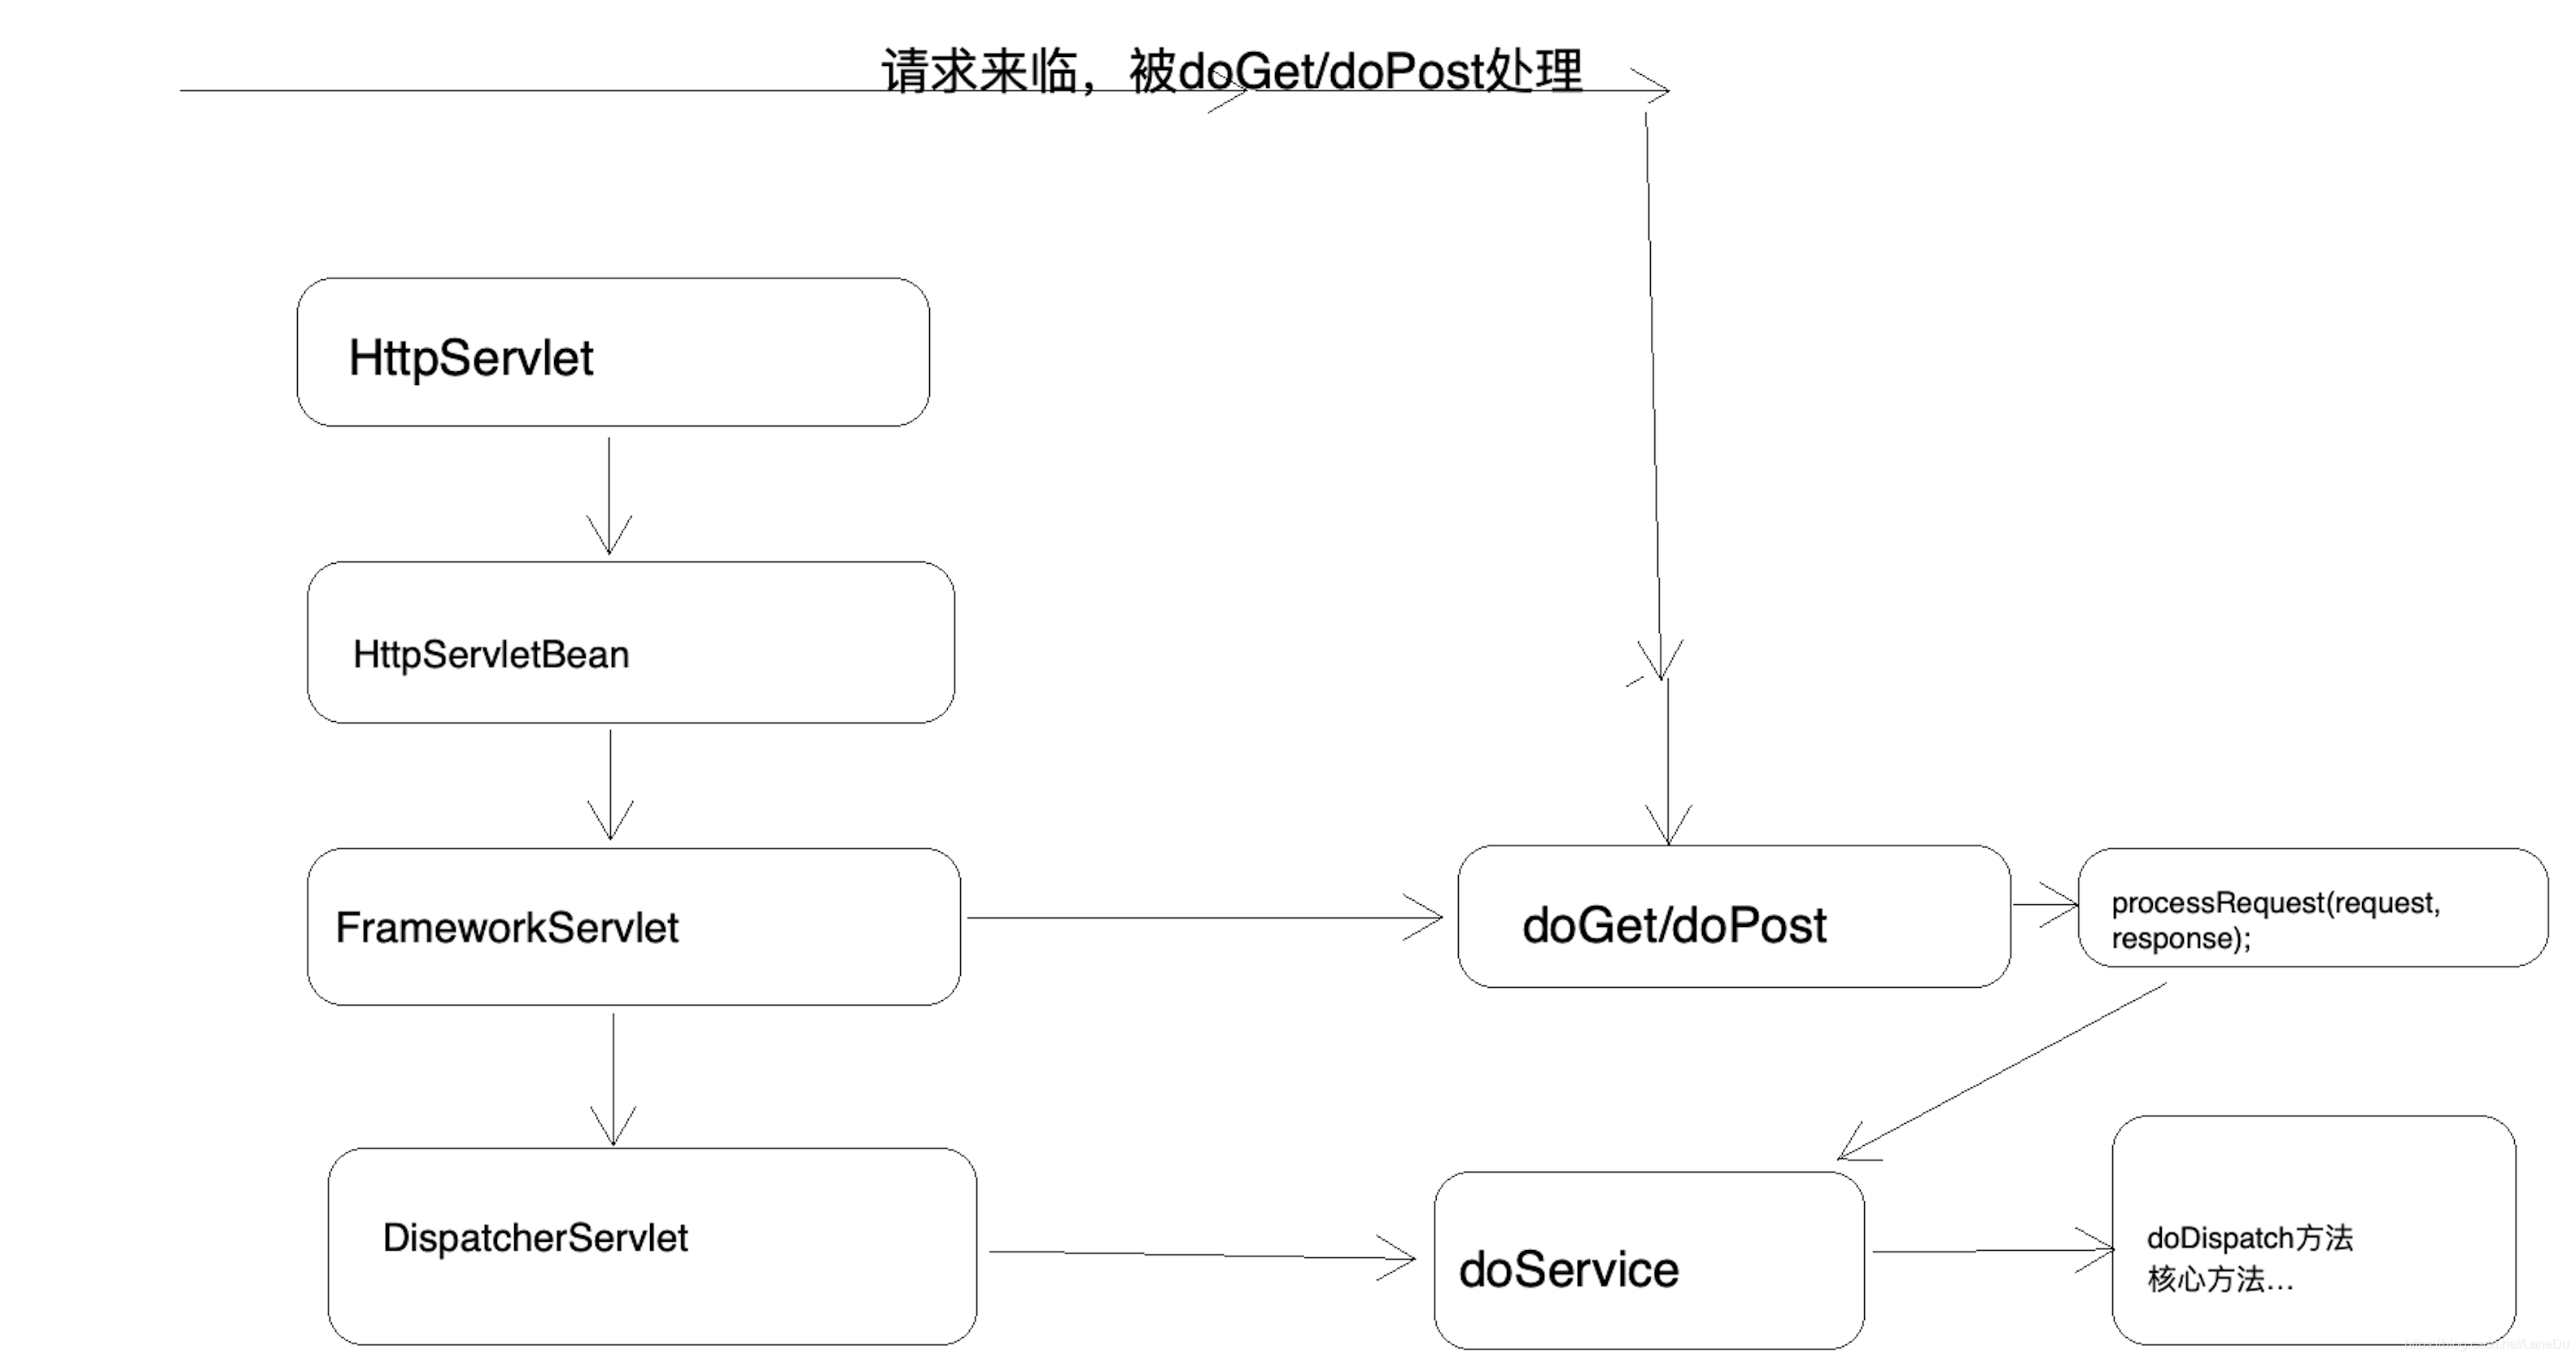
第 2 节 重要时机点分析
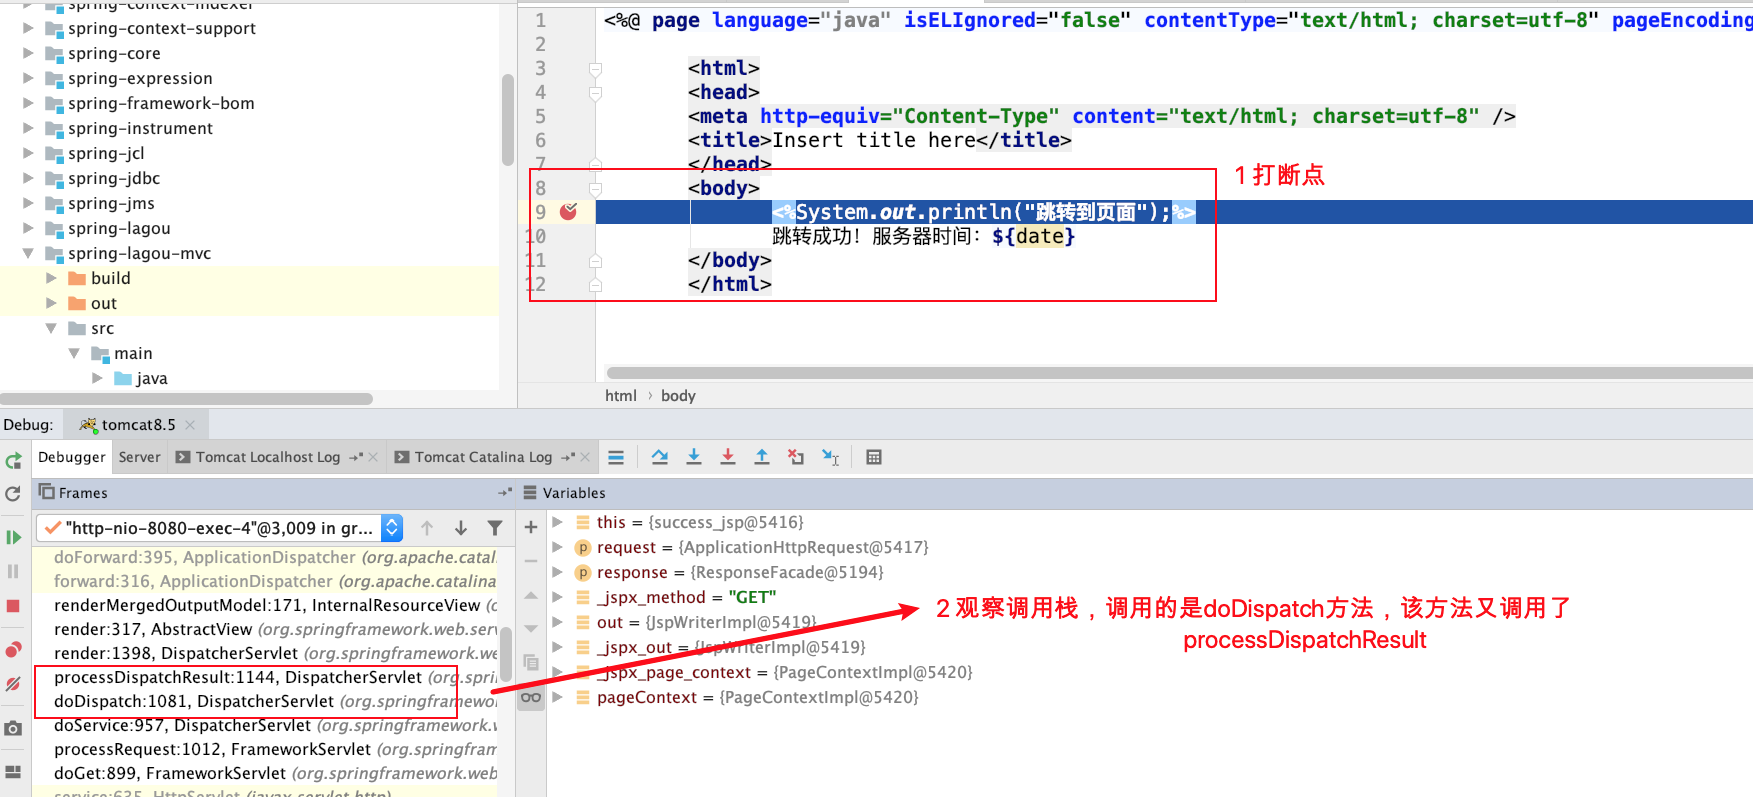
2.1 观察调⽤栈找准关键方法点

2.2 核心方法代码
protected void doDispatch(HttpServletRequest request, HttpServletResponse
response) throws Exception {
HttpServletRequest processedRequest = request;
HandlerExecutionChain mappedHandler = null;
boolean multipartRequestParsed = false;
WebAsyncManager asyncManager = WebAsyncUtils.getAsyncManager(request);
try {
ModelAndView mv = null;
Exception dispatchException = null;
try {
// 1 检查是否是⽂件上传的请求
processedRequest = checkMultipart(request);
multipartRequestParsed = (processedRequest != request);
// Determine handler for the current request.
/*
2 取得处理当前请求的Controller,这⾥也称为Handler,即处理器
这⾥并不是直接返回 Controller,⽽是返回 HandlerExecutionChain 请求处
理链对象
该对象封装了Handler和Inteceptor
*/
mappedHandler = getHandler(processedRequest);
if (mappedHandler == null) {
// 如果 handler 为空,则返回404
noHandlerFound(processedRequest, response);
return;
}
// Determine handler adapter for the current request.
// 3 获取处理请求的处理器适配器 HandlerAdapter
HandlerAdapter ha = getHandlerAdapter(mappedHandler.getHandler());
// Process last-modified header, if supported by the handler.
// 处理 last-modified 请求头
String method = request.getMethod();
boolean isGet = "GET".equals(method);
if (isGet || "HEAD".equals(method)) {
long lastModified = ha.getLastModified(request,
mappedHandler.getHandler());
if (new ServletWebRequest(request,
response).checkNotModified(lastModified) && isGet) {
return;
}
}
if (!mappedHandler.applyPreHandle(processedRequest, response)) {
return;
}
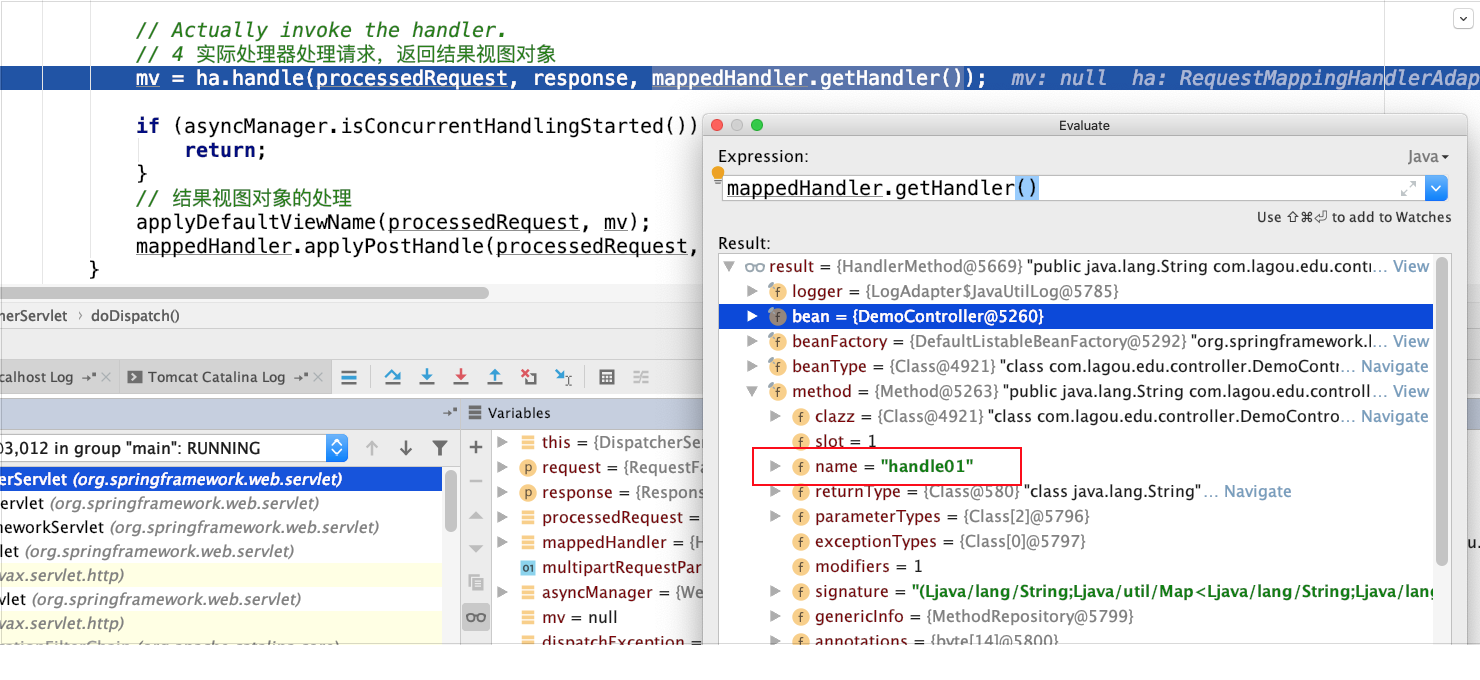
// Actually invoke the handler.
// 4 实际处理器处理请求,返回结果视图对象
mv = ha.handle(processedRequest, response,
mappedHandler.getHandler());
if (asyncManager.isConcurrentHandlingStarted()) {
return;
}
// 结果视图对象的处理
applyDefaultViewName(processedRequest, mv);
mappedHandler.applyPostHandle(processedRequest, response, mv);
}
catch (Exception ex) {
dispatchException = ex;
}
catch (Throwable err) {
// As of 4.3, we're processing Errors thrown from handler methods
as well,
// making them available for @ExceptionHandler methods and other
scenarios.
dispatchException = new NestedServletException("Handler dispatch
failed", err);
}
// 5 跳转⻚⾯,渲染视图
processDispatchResult(processedRequest, response, mappedHandler, mv,
dispatchException);
}
catch (Exception ex) {
//最终会调⽤HandlerInterceptor的afterCompletion ⽅法
triggerAfterCompletion(processedRequest, response, mappedHandler,
ex);
}
catch (Throwable err) {
//最终会调⽤HandlerInterceptor的afterCompletion ⽅法
triggerAfterCompletion(processedRequest, response, mappedHandler,
new NestedServletException("Handler processing failed", err));
}
finally {
if (asyncManager.isConcurrentHandlingStarted()) {
// Instead of postHandle and afterCompletion
if (mappedHandler != null) {
mappedHandler.applyAfterConcurrentHandlingStarted(processedRequest,
response);
}
}
else {
// Clean up any resources used by a multipart request.
if (multipartRequestParsed) {
cleanupMultipart(processedRequest);
}
}
}
}
第 3 节 核⼼步骤getHandler⽅法剖析
遍历两个HandlerMapping,试图获取能够处理当前请求的执⾏链
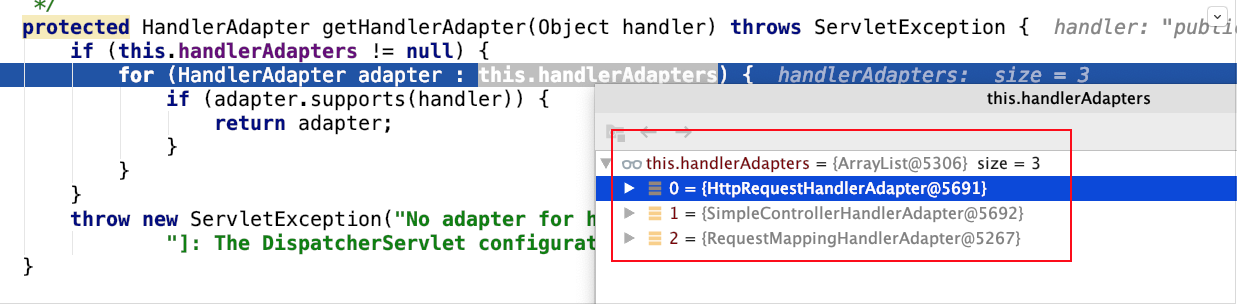
第 4 节 核⼼步骤getHandlerAdapter⽅法剖析
遍历各个HandlerAdapter,看哪个Adapter⽀持处理当前Handler
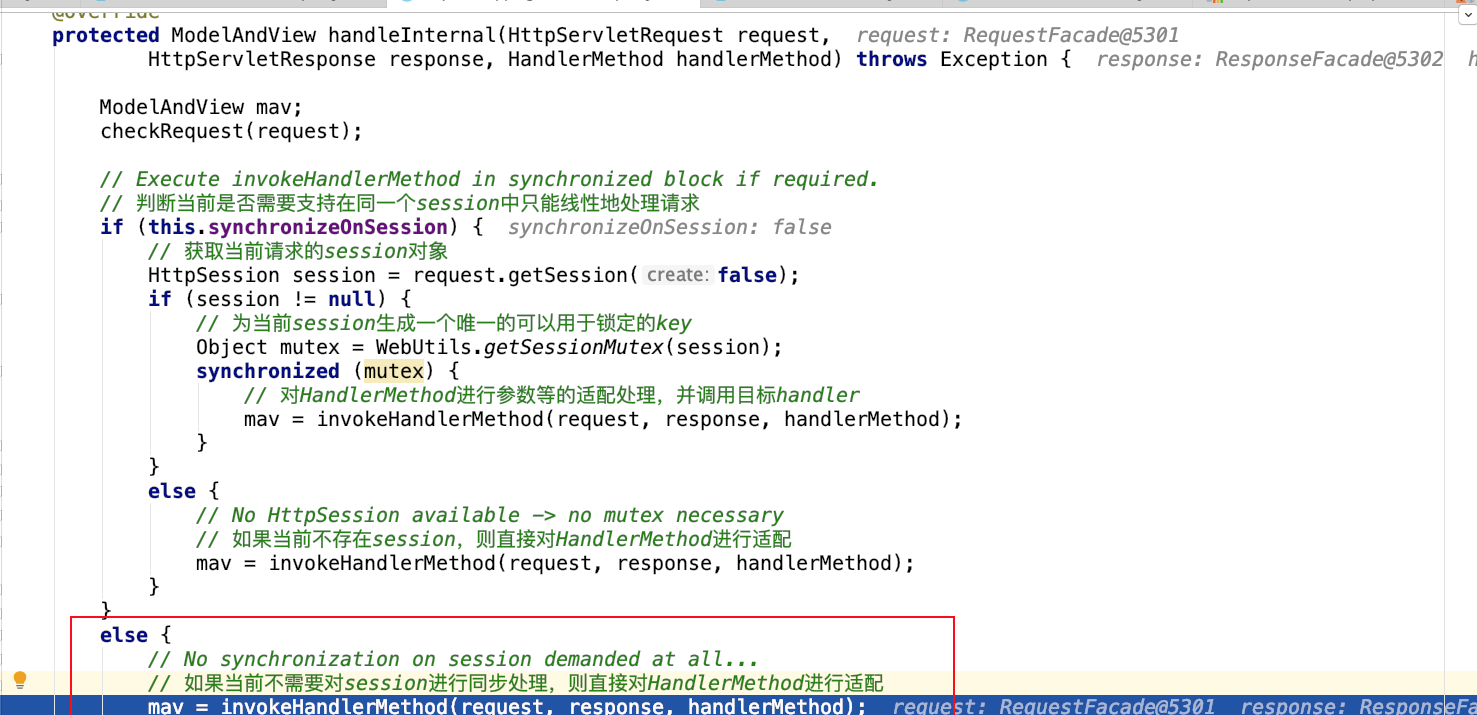
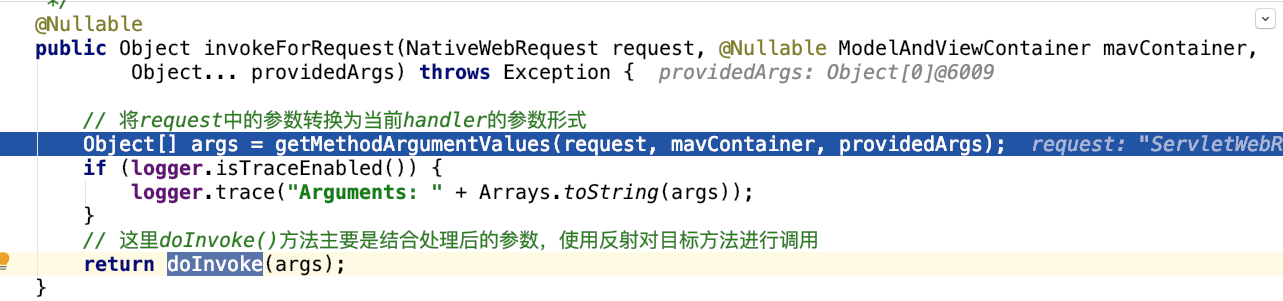
第 5 节 核⼼步骤ha.handle⽅法剖析
⼊⼝


第 6 节 核⼼步骤processDispatchResult⽅法剖析
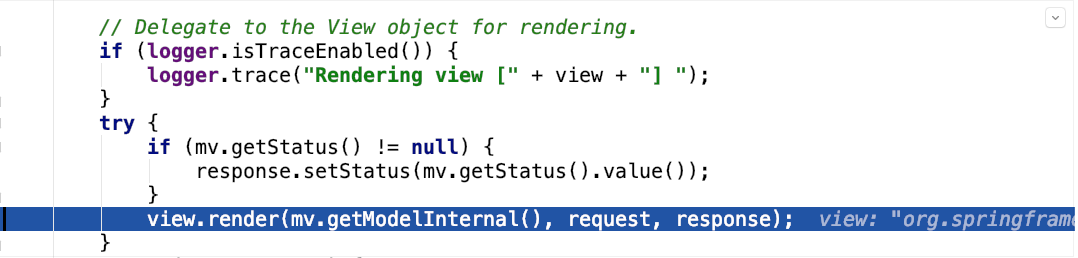
6.1 render⽅法完成渲染
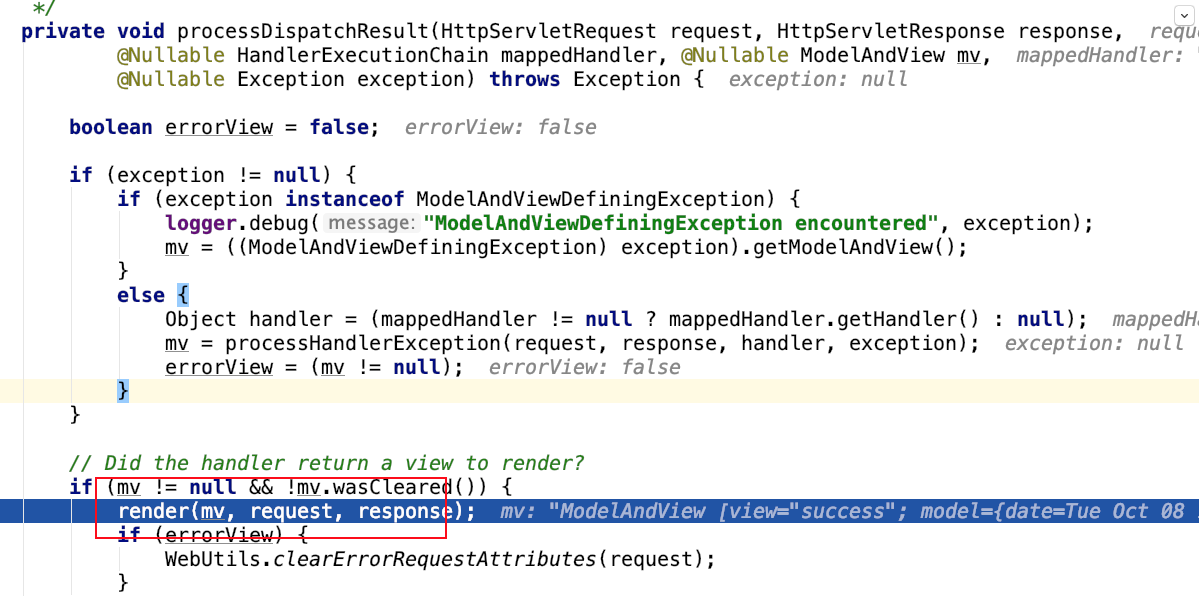
6.2 视图解析器解析出View视图对象
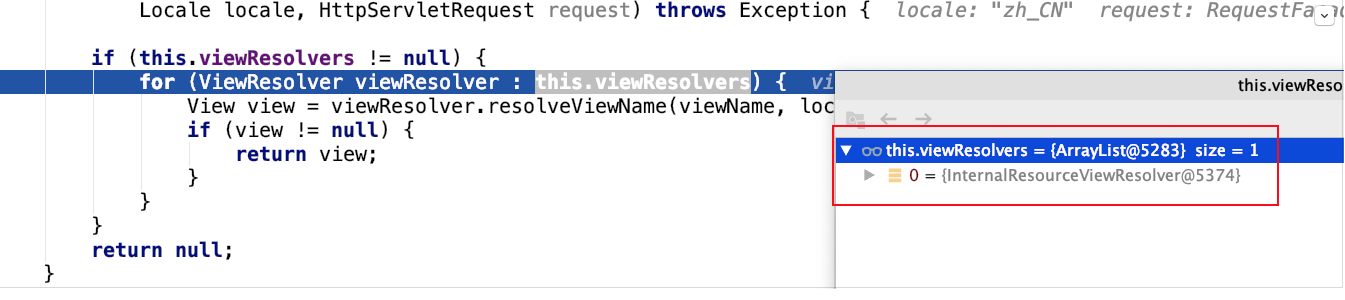
6.3 在解析出View视图对象的过程中会判断是否重定向、是否转发等,不同的情况封装的是不同的View实现
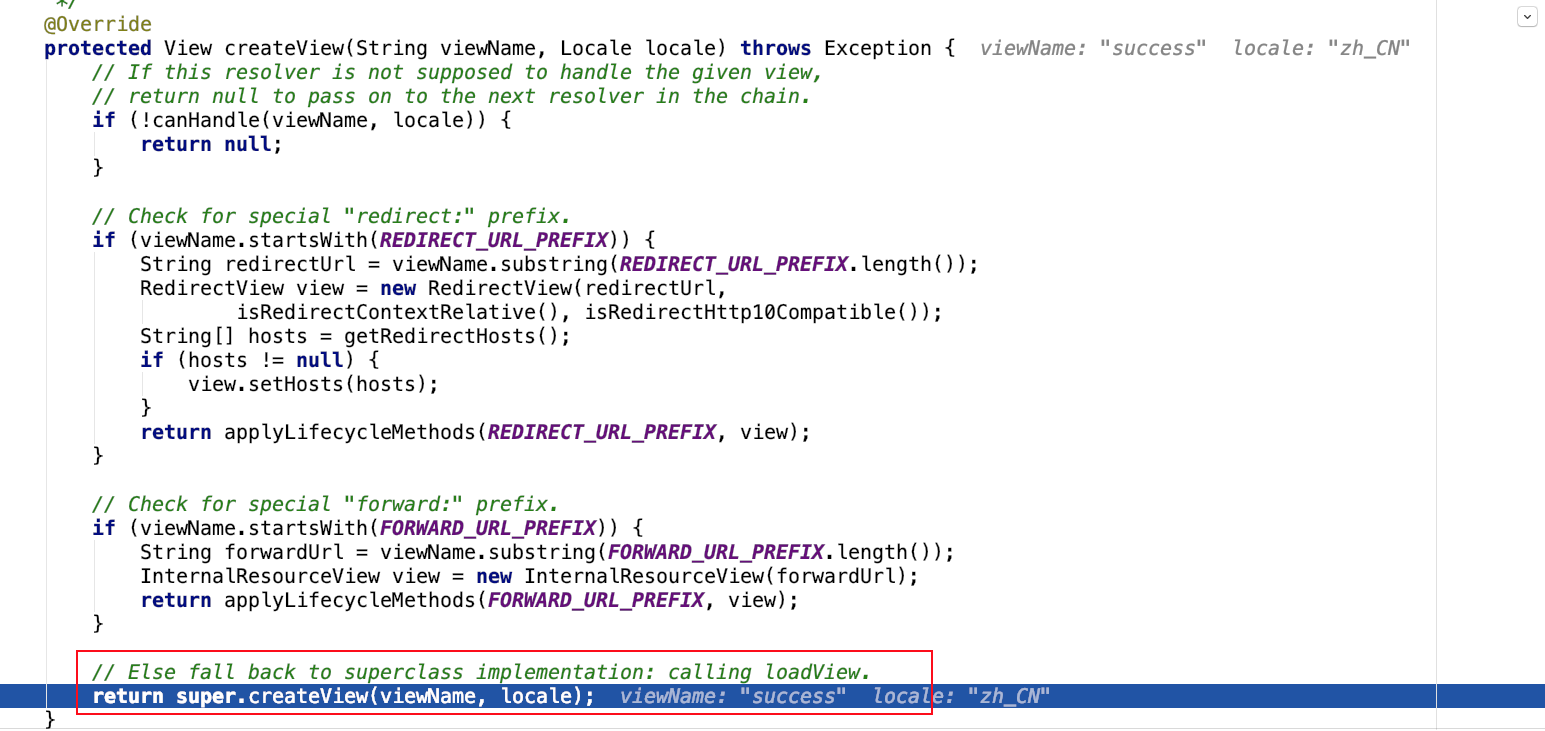
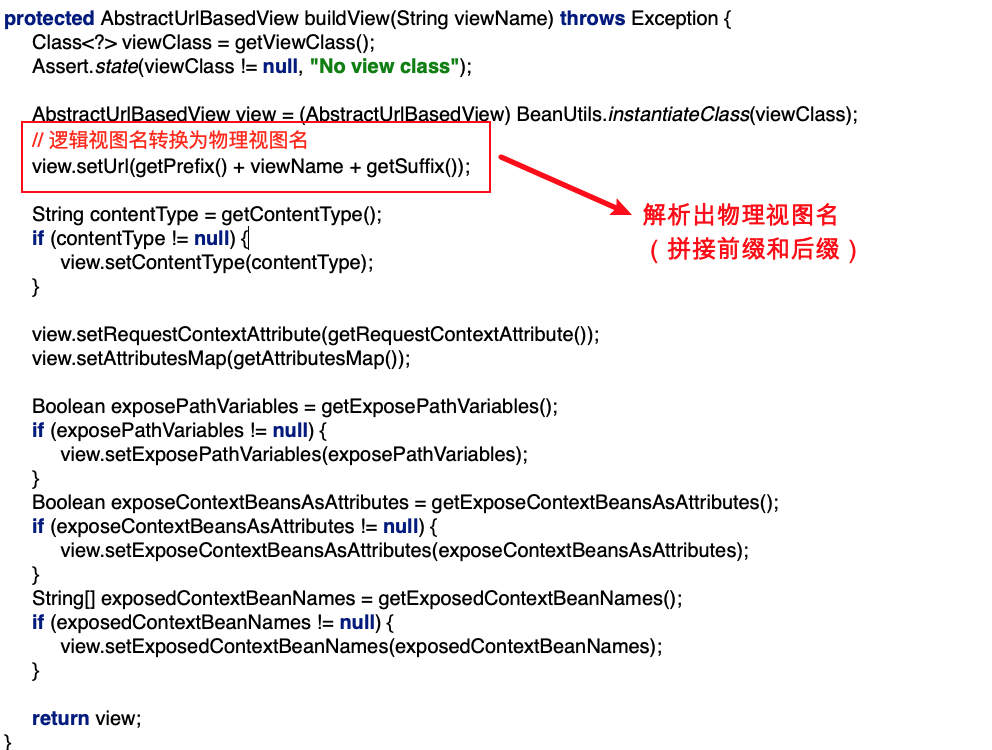
6.4 解析出View视图对象的过程中,要将逻辑视图名解析为物理视图名
6.5 封装View视图对象之后,调⽤了view对象的render⽅法
6.6 渲染数据
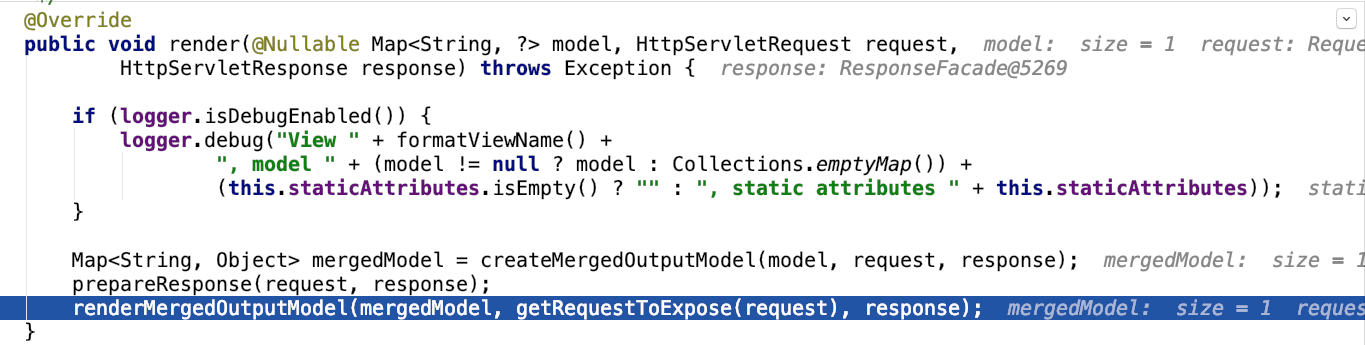
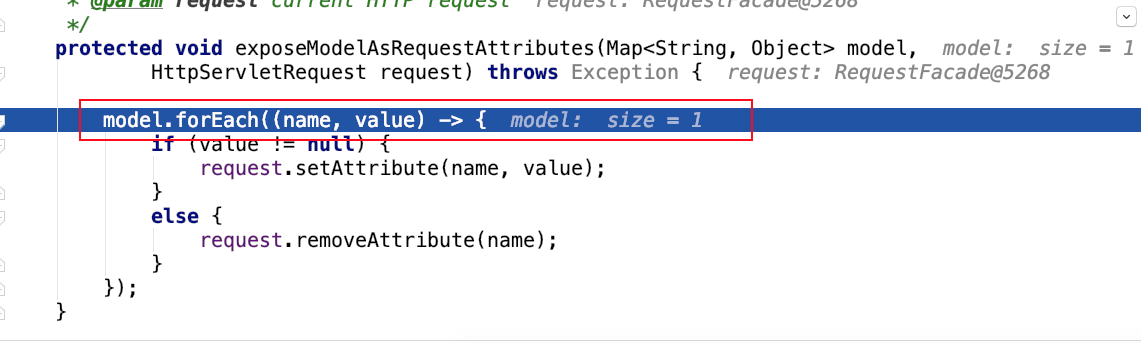
6.7 把modelMap中的数据暴露到request域中,这也是为什么后台model.add之后在jsp中可以从请求域取出来的根本原因

6.8 将数据设置到请求域中
第 7 节 SpringMVC九⼤组件初始化
7.1 在DispatcherServlet中定义了九个属性,每⼀个属性都对应⼀种组件
/** MultipartResolver used by this servlet. */
// 多部件解析器
@Nullable
private MultipartResolver multipartResolver;
/** LocaleResolver used by this servlet. */
// 区域化 国际化解析器
@Nullable
private LocaleResolver localeResolver;
/** ThemeResolver used by this servlet. */
// 主题解析器
@Nullable
private ThemeResolver themeResolver;
/** List of HandlerMappings used by this servlet. */
// 处理器映射器组件
@Nullable
private List<HandlerMapping> handlerMappings;
/** List of HandlerAdapters used by this servlet. */
// 处理器适配器组件
@Nullable
private List<HandlerAdapter> handlerAdapters;
/** List of HandlerExceptionResolvers used by this servlet. */
// 异常解析器组件
@Nullable
private List<HandlerExceptionResolver> handlerExceptionResolvers;
/** RequestToViewNameTranslator used by this servlet. */
// 默认视图名转换器组件
@Nullable
private RequestToViewNameTranslator viewNameTranslator;
/** FlashMapManager used by this servlet. */
// flash属性管理组件
@Nullable
private FlashMapManager flashMapManager;
/** List of ViewResolvers used by this servlet. */
// 视图解析器
@Nullable
private List<ViewResolver> viewResolvers;
九⼤组件都是定义了接⼝,接⼝其实就是定义了该组件的规范,⽐如ViewResolver、HandlerAdapter等都是接⼝
7.2 九⼤组件的初始化时机
DispatcherServlet中的onRefresh(),该⽅法中初始化了九⼤组件

initStrategies⽅法
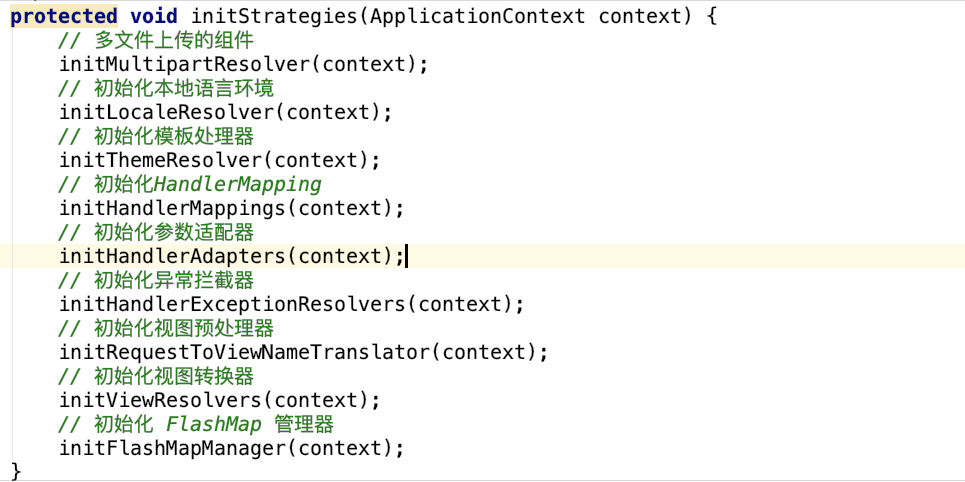
观察其中的⼀个组件initHandlerMappings(context)
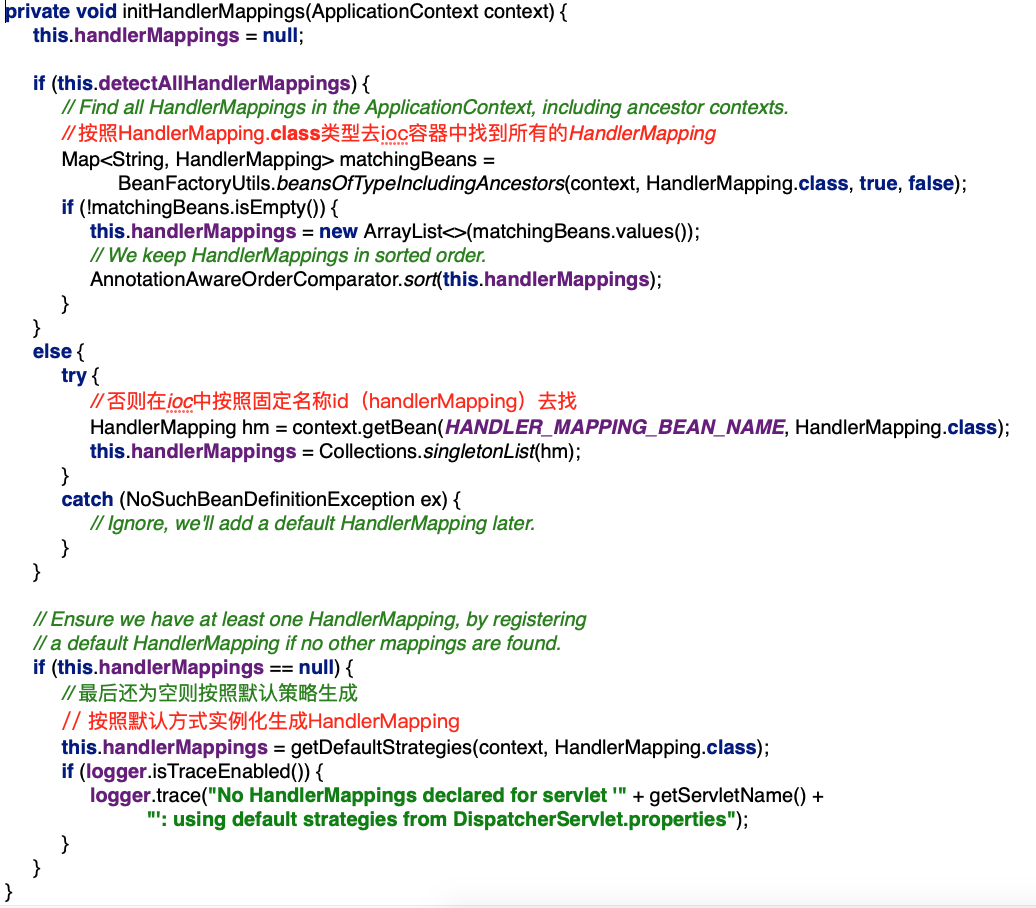
如果按照类型和按照固定id从ioc容器中找不到对应组件,则会按照默认策略进⾏注册初始化,默认策略在DispatcherServlet.properties⽂件中配置
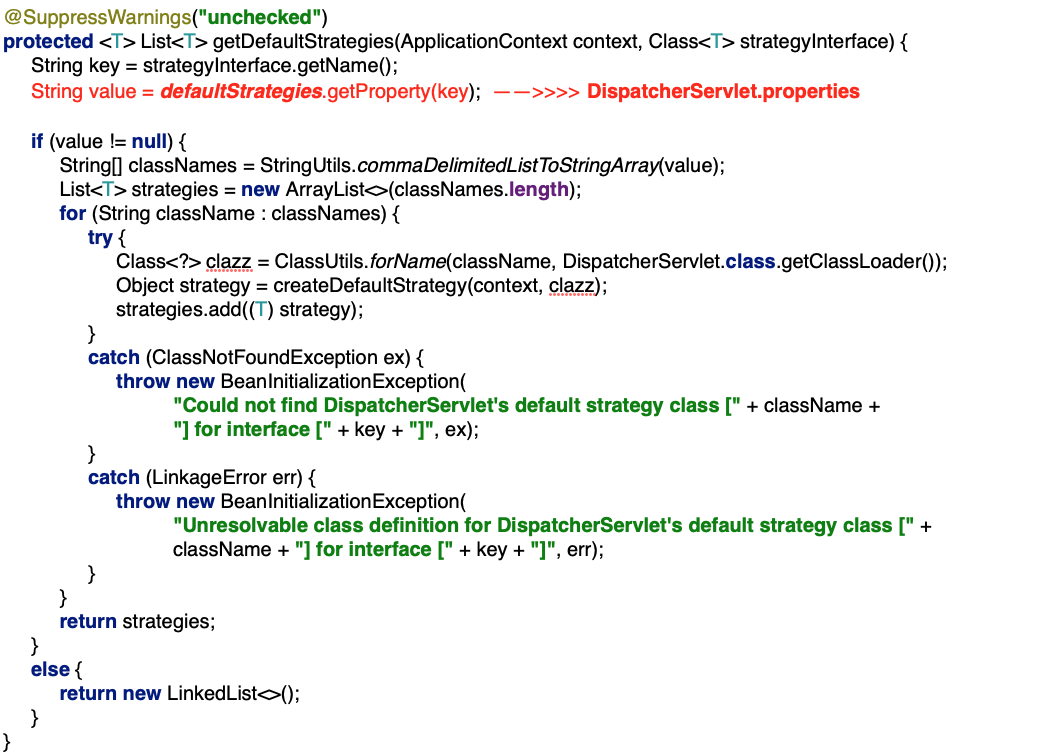
DispatcherServlet.properties
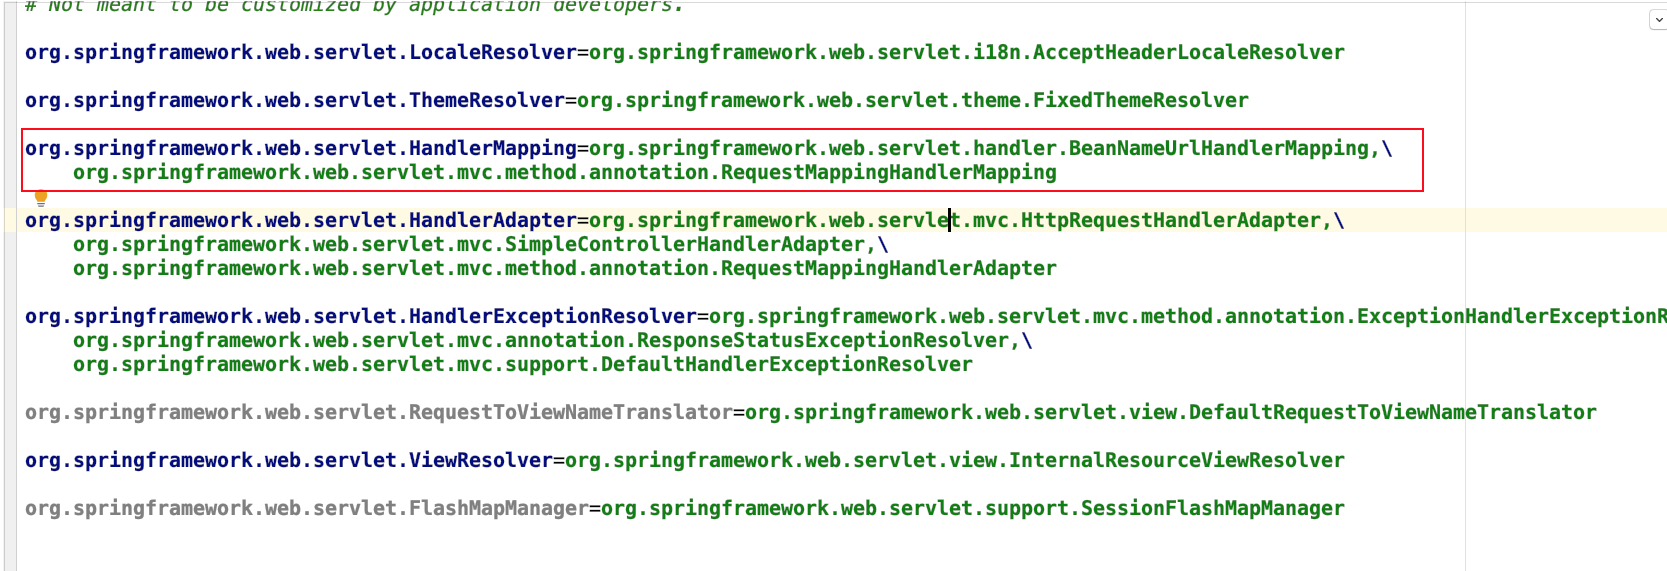
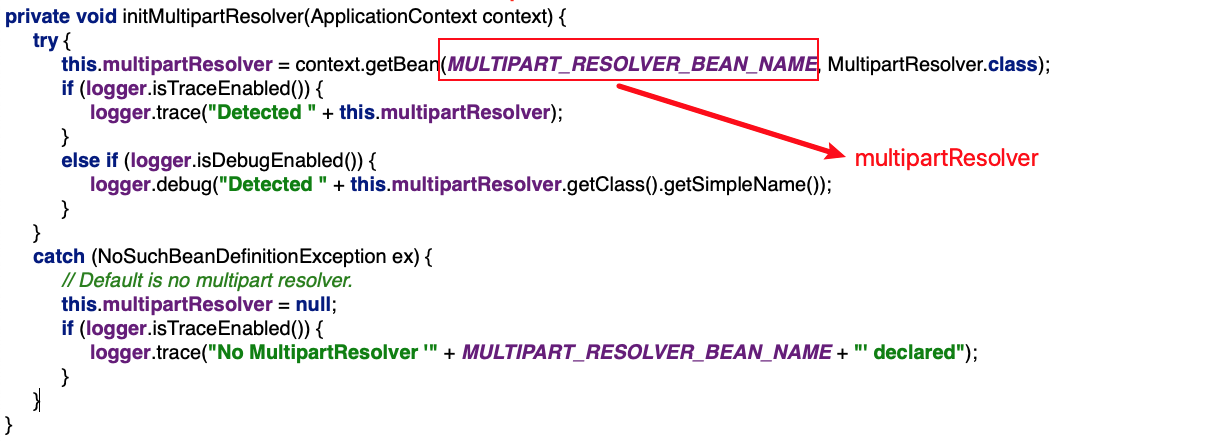
多部件解析器的初始化必须按照id注册对象(multipartResolver)
结语
感觉至少花费了一周的时间才完成这个笔记。这个笔记上在应颠老师的pdf笔记基础上加上自己动手敲的代码和一些自己的理解排版而成。
代码还是要多敲才能更好的理解。看了!= 会了。看视频+记笔记+敲代码可以记得更牢固一点,也需要时时去温习下!


 508
508

 被折叠的 条评论
为什么被折叠?
被折叠的 条评论
为什么被折叠?
 到【灌水乐园】发言


