


文章目录
- 第一章 SpringBoot应用回顾
- 第二章 SpringBoot源码剖析
- 第三章 SpringBoot数据访问
- 第四章 SpringBoot缓存深入
- 第五章 SpringBoot部署与监控
- 结束语
第一章 SpringBoot应用回顾
1.1 约定优于配置
概念:约定优于配置(Convention over Configuration),又称按约定编程,是一种软件设计规范。本质上是对系统、类库或框架中一些东西假定一个大众化合理的默认值(缺省值)。
例如在模型中存在一个名为User的类,那么对应到数据库会存在一个名为user的表,此时无需做额外的配置,只有在偏离这个约定时才需要做相关的配置(例如你想将表名命名为t_user等非user时才需要写关于这个名字的配置)。
如果所用工具的约定与你的期待相符,便可省去配置;反之,你可以配置来达到你所期待的方式。
简单来说就是假如你所期待的配置与约定的配置一致,那么就可以不做任何配置,约定不符合期待时才需要对约定进行替换配置。
好处:大大减少了配置项
1.2 SpringBoot概念
1.2.1 什么是SpringBoot
spring官方的网站:https://spring.io/
翻译:通过Spring Boot,可以轻松地创建独立的,基于生产级别的基于Spring的应用程序,并且可以
“运行”它们其实Spring Boot 的设计是为了让你尽可能快的跑起来 Spring 应用程序并且尽可能减少你的配置文件。
百度百科
SpringBoot是由Pivotal团队在2013年开始研发、2014年4月发布第一个版本的全新开源的轻量级框架。它基于Spring4.0设计,不仅继承了Spring框架原有的优秀特性,而且还通过简化配置来进一步简化了Spring应用的整个搭建和开发过程。另外SpringBoot通过集成大量的框架使得依赖包的版本冲突,以及引用的不稳定性等问题得到了很好的解决
1.2.2 SpringBoot主要特性
1、 SpringBoot Starter:他将常用的依赖分组进行了整合,将其合并到一个依赖中,这样就可以一次性添加到项目的Maven或Gradle构建中;
2、 使编码变得简单,SpringBoot采用 JavaConfig的方式对Spring进行配置,并且提供了大量的注解,极大的提高了工作效率。
3、 自动配置:SpringBoot的自动配置特性利用了Spring对条件化配置的支持,合理地推测应用所需的bean并自动化配置他们;
4、 使部署变得简单,SpringBoot内置了三种Servlet容器,Tomcat,Jetty,undertow.我们只需要一个Java的运行环境就可以跑SpringBoot的项目了,SpringBoot的项目可以打成一个jar包。
1.3 SpringBoot 案例实现
1.3.1 案例实现
案例需求:使用Spring Initializr方式构建Spring Boot项目,并请求Controller中的目标方法,将返回值响应到页面
(1)使用Spring Initializr方式构建Spring Boot项目
本质上说,Spring Initializr是一个Web应用,它提供了一个基本的项目结构,能够帮助我们快速构建一个基础的Spring Boot项目
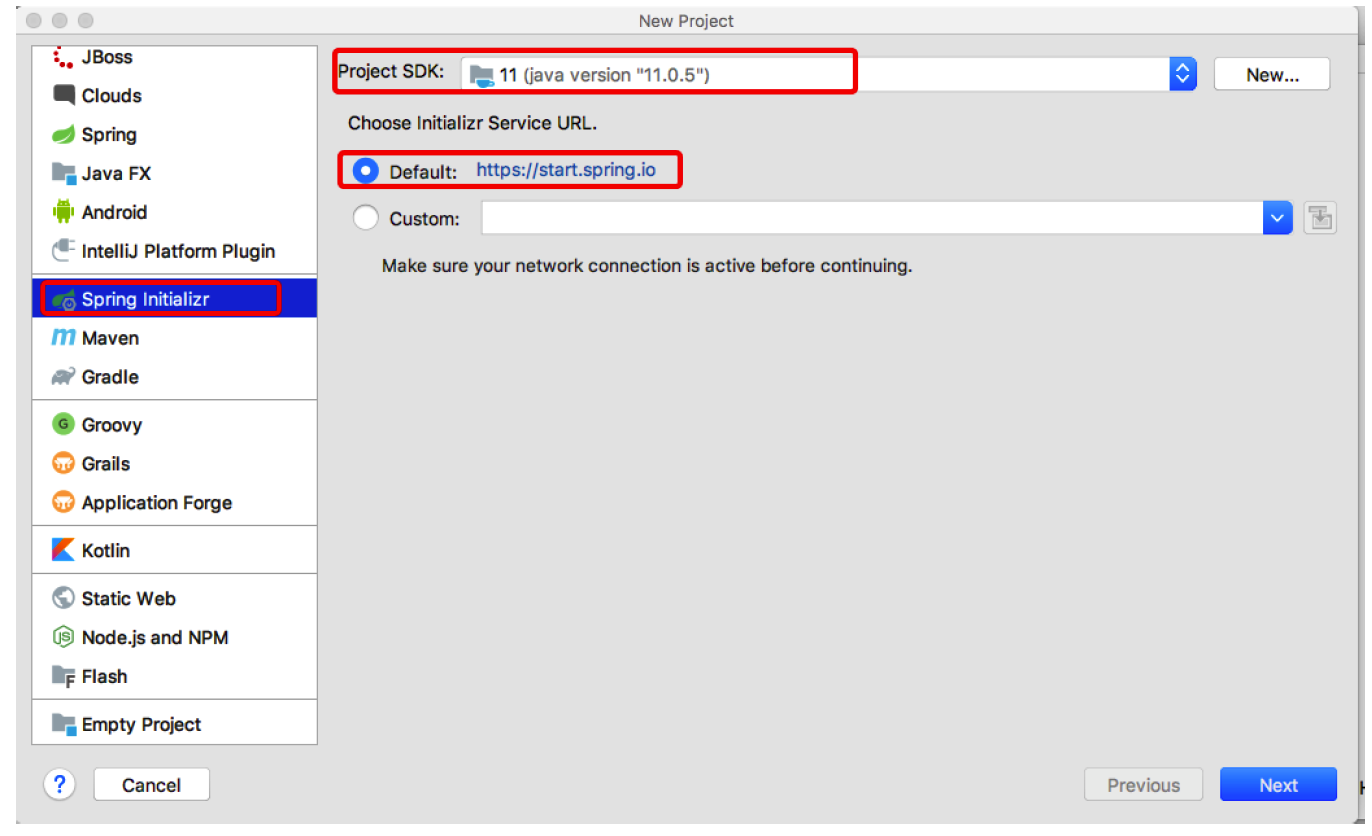
Project SDK”用于设置创建项目使用的JDK版本,这里,使用之前初始化设置好的JDK版本即可;在“Choose Initializr Service URL(选择初始化服务地址)”下使用默认的初始化服务地址“https://start.spring.io”进行Spring Boot项目创建(注意使用快速方式创建Spring Boot项目时,所在主机须在联网状态下)
Spring Boot项目就创建好了。创建好的Spring Boot项目结构如图:
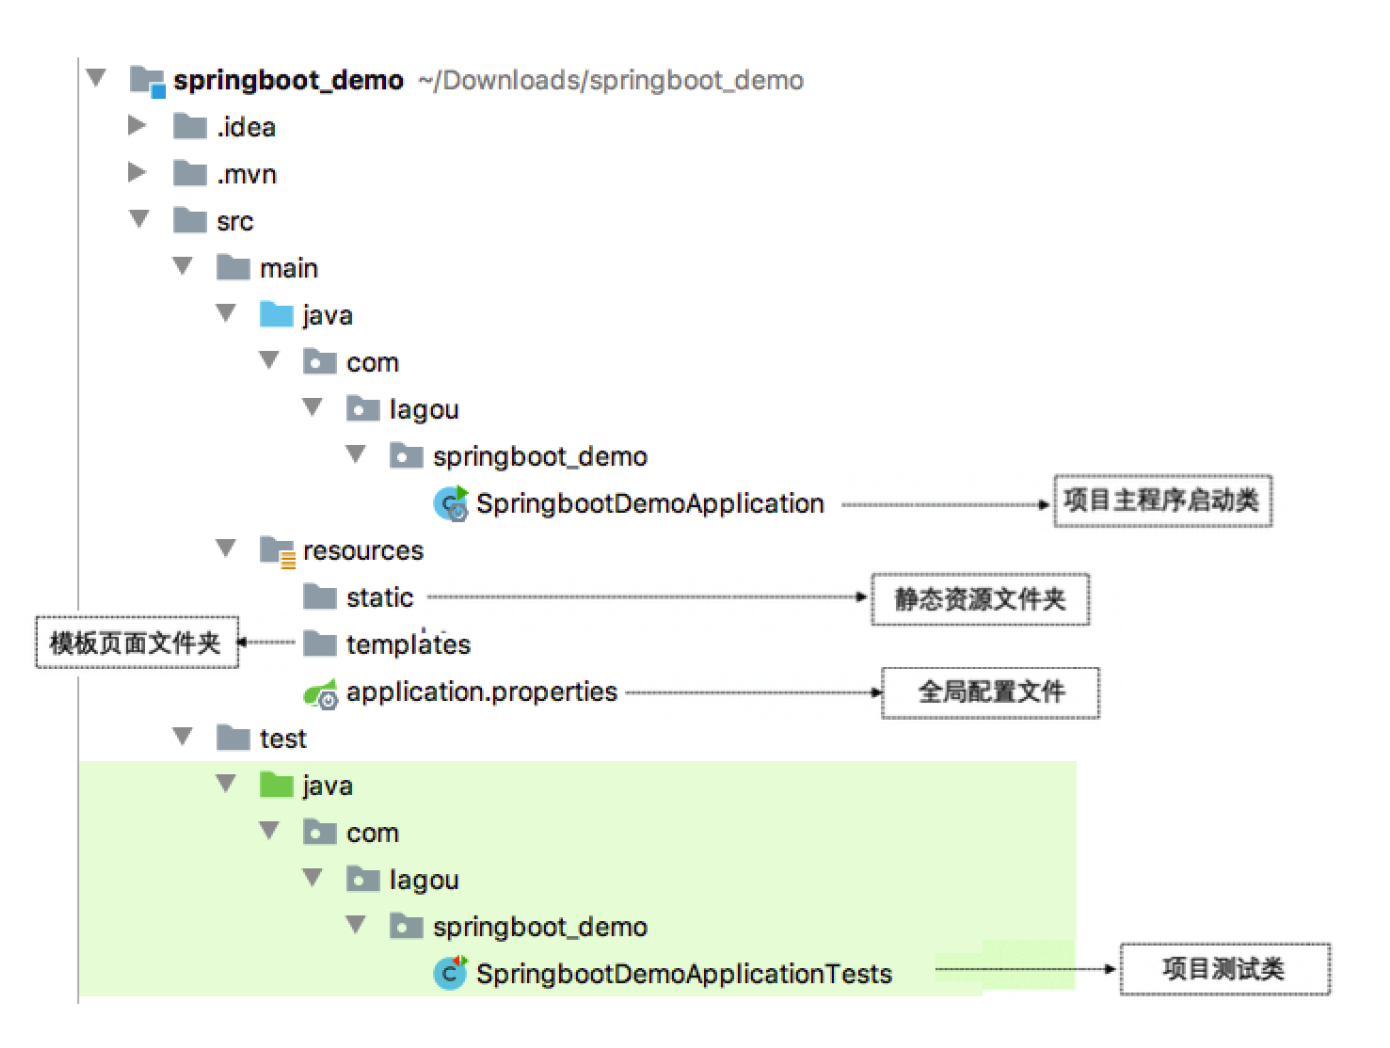
使用Spring Initializr方式构建的Spring Boot项目会默认生成项目启动类、存放前端静态资源和页面的文件夹、编写项目配置的配置文件以及进行项目单元测试的测试类
(2)创建Controller
注意:将项目启动类SpringBootDemoApplication移动到controller包的的父类下
Springboot 默认扫描启动类的父类下所有包和子包
/**
* @RestController 包含@responseBody和@controller
* @author lane
* @date 2021年04月18日 上午10:27
*/
@RestController
public class DemoController {
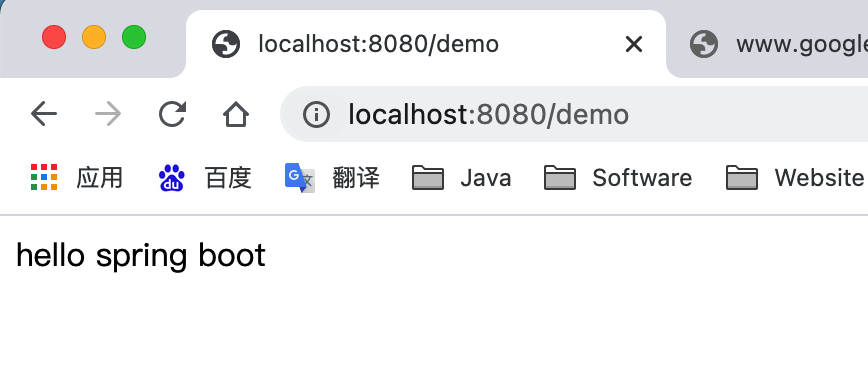
@RequestMapping("/demo")
public String demoTest(){
return "hello spring boot";
}
}
(3) 运行项目
运行主程序启动类SpringbootDemoApplication,项目启动成功后,在控制台上会发现
Tomcat initialized with port(s): 8080 (http)
附:解决中文乱码:
解决方法一:
@RequestMapping(produces = "application/json; charset=utf-8")
解决方法二:
#设置响应为utf-8
spring.http.encoding.force-response=true
1.3.2 疑问
-
starter是什么?我们如何去使用这些starter?
-
为什么包扫描只会扫描核心启动类所在的包及其子包
-
在springBoot启动的过程中,是如何完成自动装配的?
-
内嵌Tomcat是如何被创建及启动的?
-
使用了web场景对应的starter,springmvc是如何自动装配?
1.4 热部署
在开发项目过程中,当修改了某些代码后需要本地验证时,需要重启本地服务进行验证,启动这个项目,如果项目庞大的话还是需要较长时间的,spring开发团队为我们带来了一个插件:spring-bootdevtools,很好的解决了本地验证缓慢的问题。
1.4.1 热部署实现演示
1.添加spring-boot-devtools热部署依赖启动器
在Spring Boot项目进行热部署测试之前,需要先在项目的pom.xml文件中添加spring-boot-devtools热
部署依赖启动器:
<!-- 引入热部署依赖 -->
<dependency>
<groupId>org.springframework.boot</groupId>
<artifactId>spring-boot-devtools</artifactId>
</dependency>
由于使用的是IDEA开发工具,添加热部署依赖后可能没有任何效果,接下来还需要针对IDEA开发工具进行热部署相关的功能设置
2. IDEA工具热部署设置
选择IDEA工具界面的【File】->【Settings】选项,打开Compiler面板设置页面
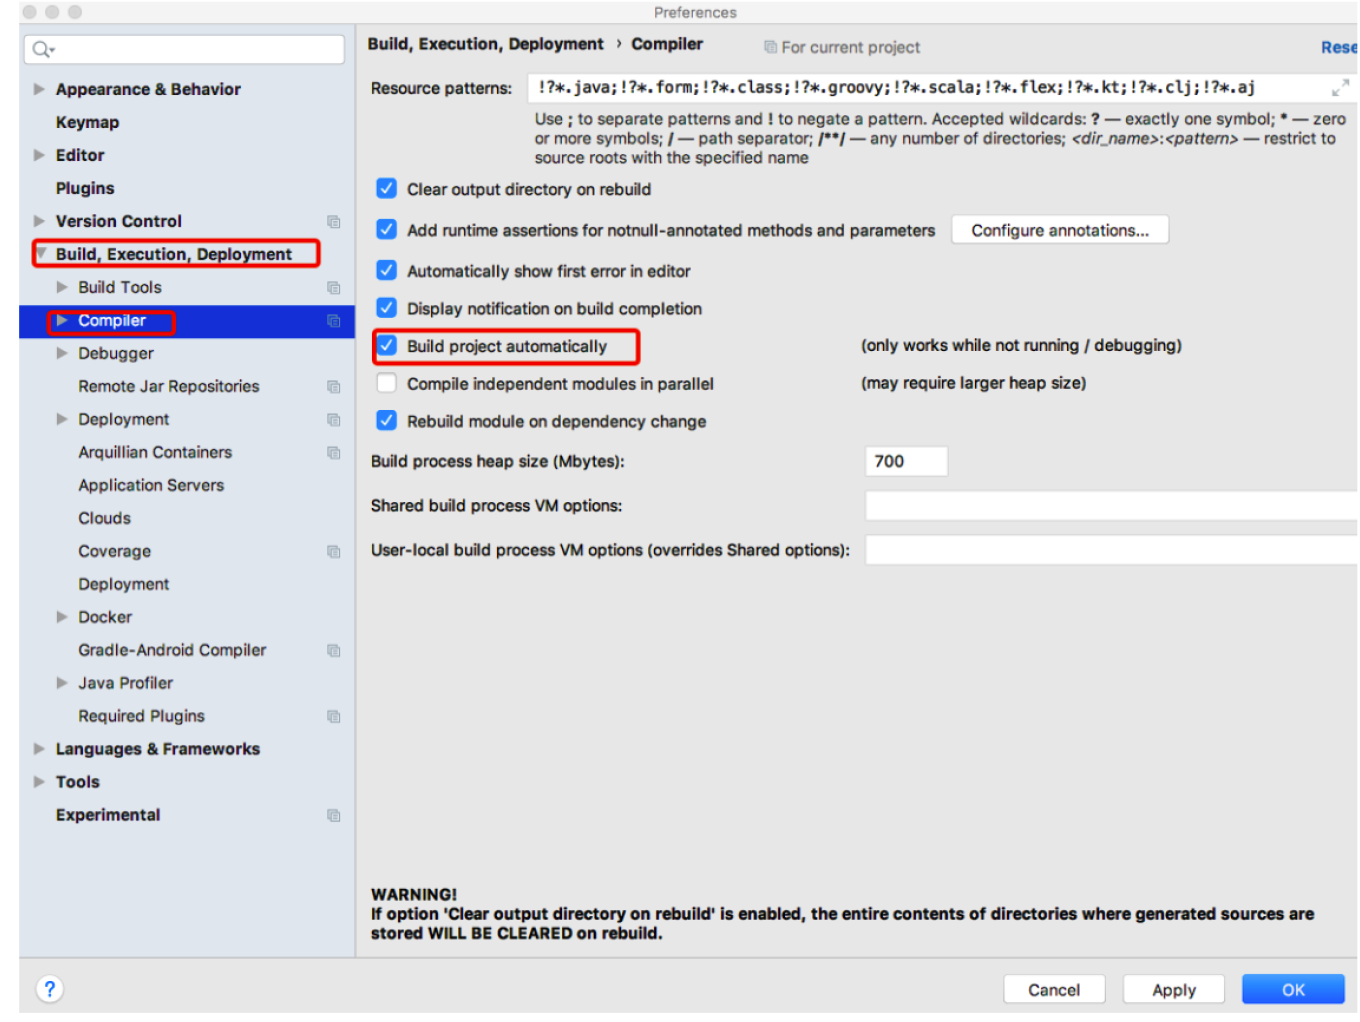
选择Build下的Compiler选项,在右侧勾选“Build project automatically”选项将项目设置为自动编译,单击【Apply】→【OK】按钮保存设置
在项目任意页面中使用组合快捷键“Ctrl+Shift+Alt+/”打开Maintenance选项框,选中并打开Registry页面
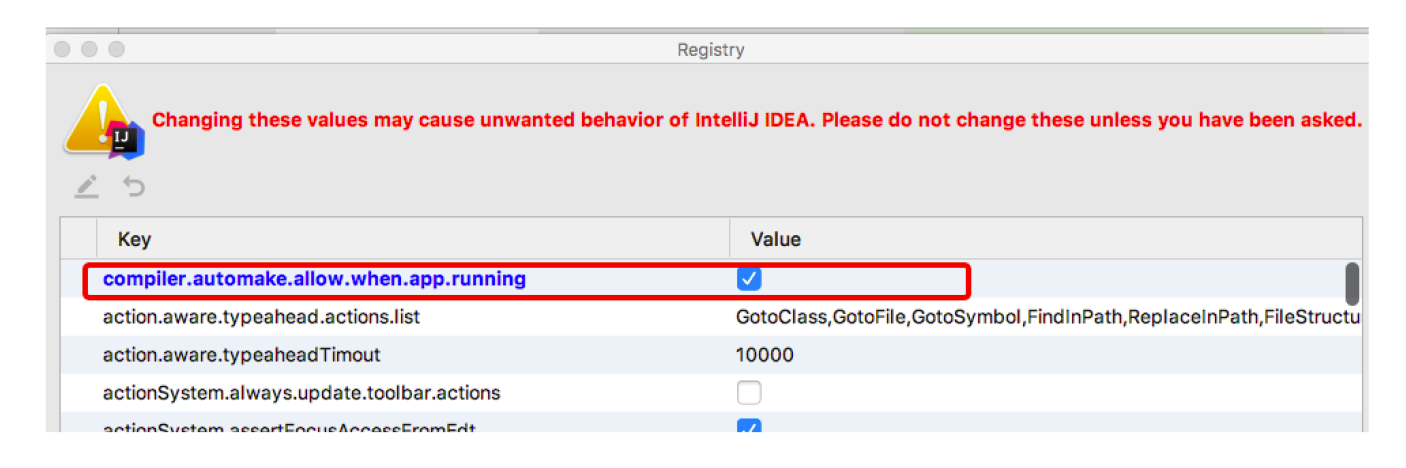
列表中找到“compiler.automake.allow.when.app.running”,将该选项后的Value值勾选,用于指定IDEA工具在程序运行过程中自动编译,最后单击【Close】按钮完成设置
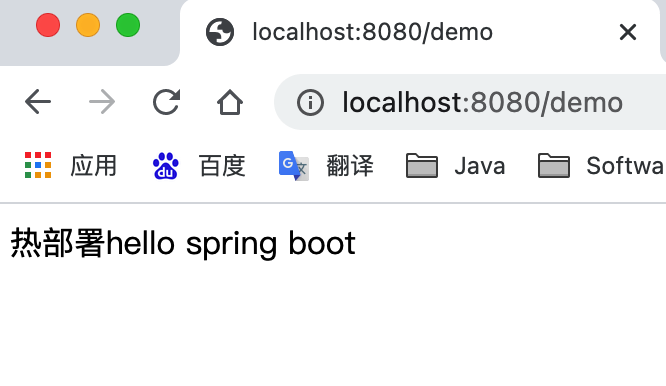
3.热部署效果测试
页面原始输出的内容是“hello Spring Boot”。为了测试配置的热部署是否有效,接下来,在不关闭当前项目的情况下,将DemoController 类中的请求处理方法hello()的返回值修改为“热部署Spring Boot”并保存,查看控制台信息会发现项目能够自动构建和编译,说明项目热部署生效,刷新了两次才改。确保刷新maven依赖
1.4.2 热部署原理分析
该原理其实很好说明,就是我们在编辑器上启动项目,然后改动相关的代码,然后编辑器自动触发编译替换掉历史的.class文件后,项目检测到有文件变更后会重启srpring-boot项目。
可以看看官网的触发描述:
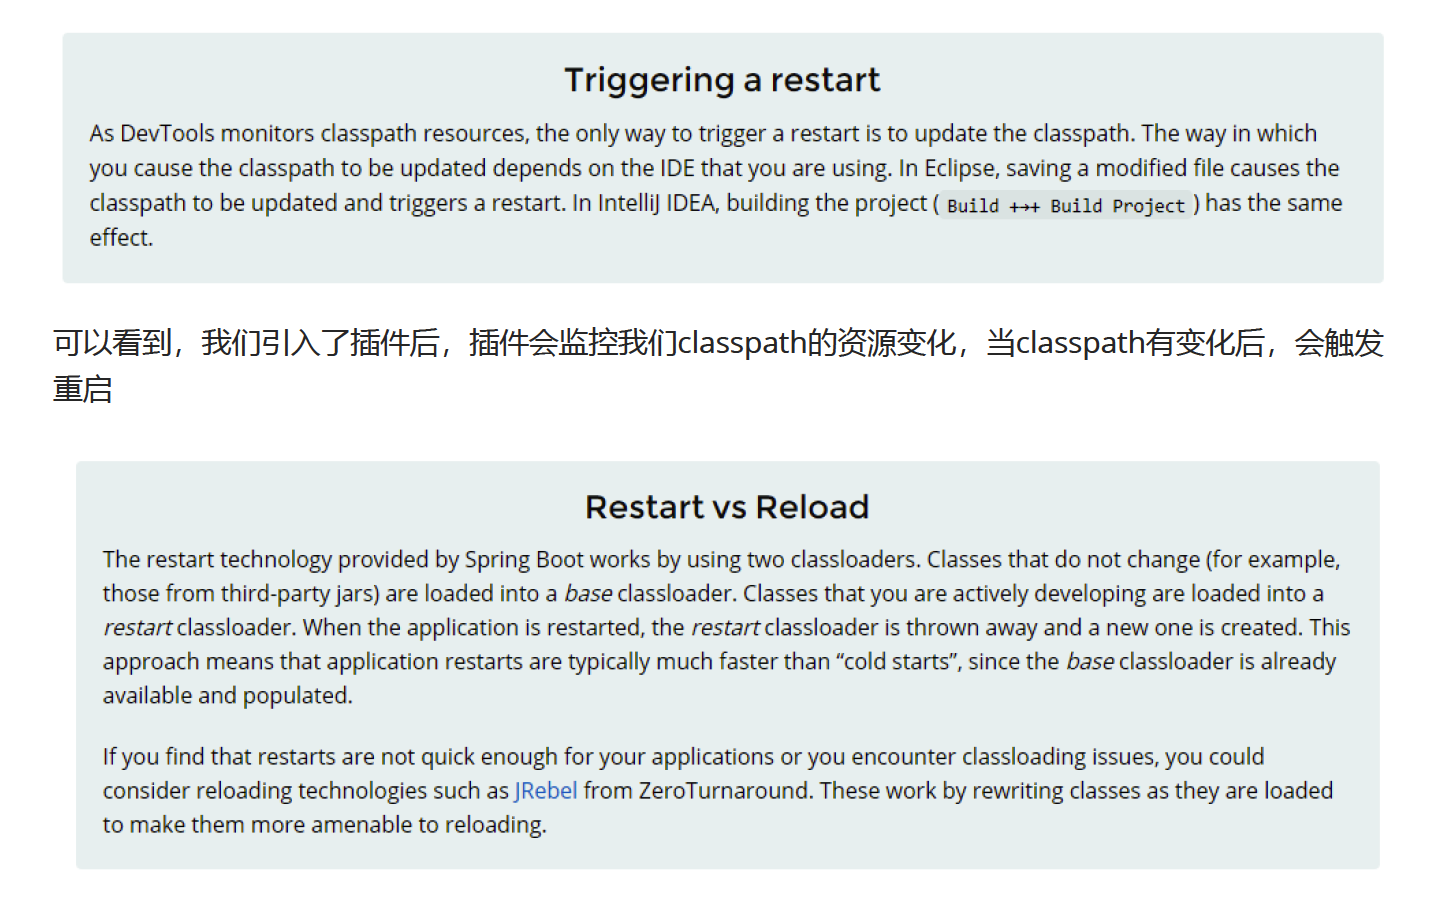
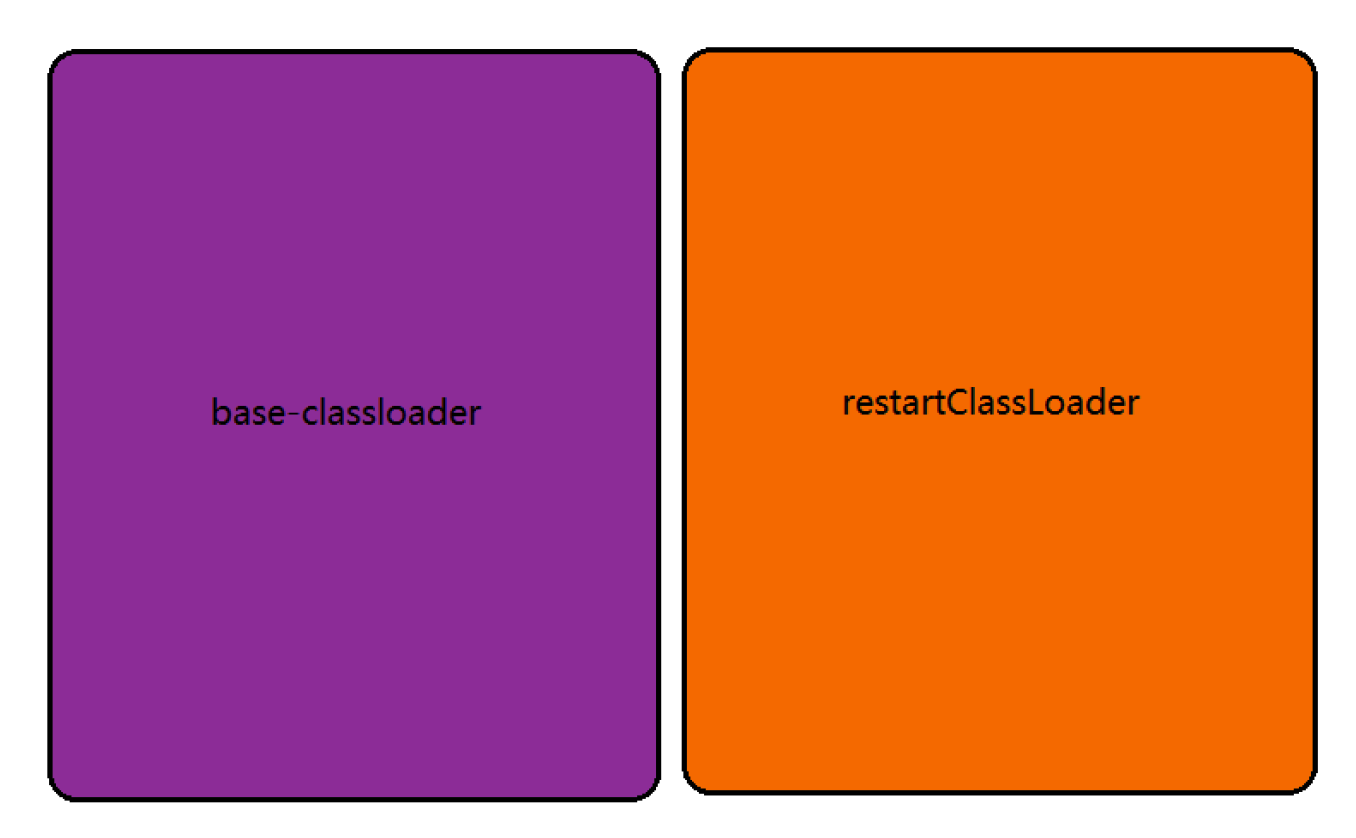
这里提到了,该插件重启快速的原因:这里对类加载采用了两种类加载器,对于第三方jar包采用baseclassloader来加载,对于开发人员自己开发的代码则使用restartClassLoader来进行加载,这使得比停掉服务重启要快的多,因为使用插件只是重启开发人员编写的代码部分。
简单验证
/**
 * @author lane
 * @date 2021年04月18日 上午11:08
 */
@Component
public class DevTools implements InitializingBean {
    private static final Logger log = LoggerFactory.getLogger(DevTools.class);
    @Override
    public void afterPropertiesSet() throws Exception {
        log.info("guava-jar classLoader: " +
                DispatcherServlet.class.getClassLoader().toString());
        log.info("Devtools ClassLoader: " +
                this.getClass().getClassLoader().toString());

    }
}
验证结果发现类加载器改变了,第三方和自己写的类加载器不一样了!
2021-04-18 11:20:29.347  INFO 10432 --- [  restartedMain] com.lagou.config.DevTools                : guava-jar classLoader: jdk.internal.loader.ClassLoaders$AppClassLoader@512ddf17
2021-04-18 11:20:29.348  INFO 10432 --- [  restartedMain] com.lagou.config.DevTools                : Devtools ClassLoader: org.springframework.boot.devtools.restart.classloader.RestartClassLoader@5b57c660
1.4.3 排除资源
某些资源在更改后不一定需要触发重新启动。例如,Thymeleaf模板可以就地编辑。默认情况下,改变资源/META-INF/maven , /META-INF/resources , /resources , /static , /public ,或/templates 不触发重新启动,但确会触发现场重装。如果要自定义这些排除项,则可以使用该spring.devtools.restart.exclude 属性。
例如,仅排除/static , /public 您将设置以下属性:
spring.devtools.restart.exclude=static/**,public/**
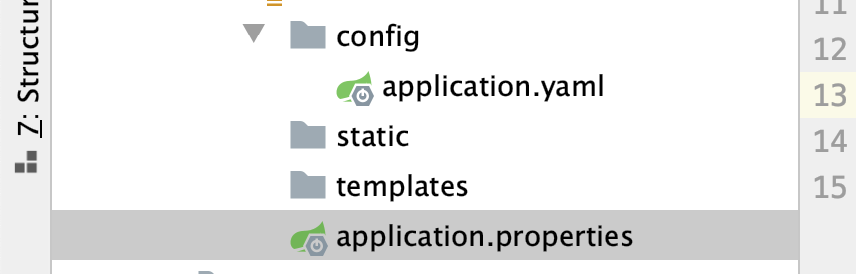
1.5 全局配置文件
全局配置文件能够对一些默认配置值进行修改及自定义配置。
Spring Boot使用一个application.properties或者application.yaml的文件作为全局配置文件

也可以从ConfigFileApplicationListener这类便可看出,其中DEFAULT_SEARCH_LOCATIONS属性设置了加载的目录:
翻译成文件系统:
–file:./config/
–file:./
–classpath:/config/
–classpath:/
翻译成语言如下( 按照优先级从高到低的顺序):
-
先去项目根目录找config文件夹下找配置文件件
-
再去根目录下找配置文件
-
去resources下找cofnig文件夹下找配置文件
-
去resources下找配置文件
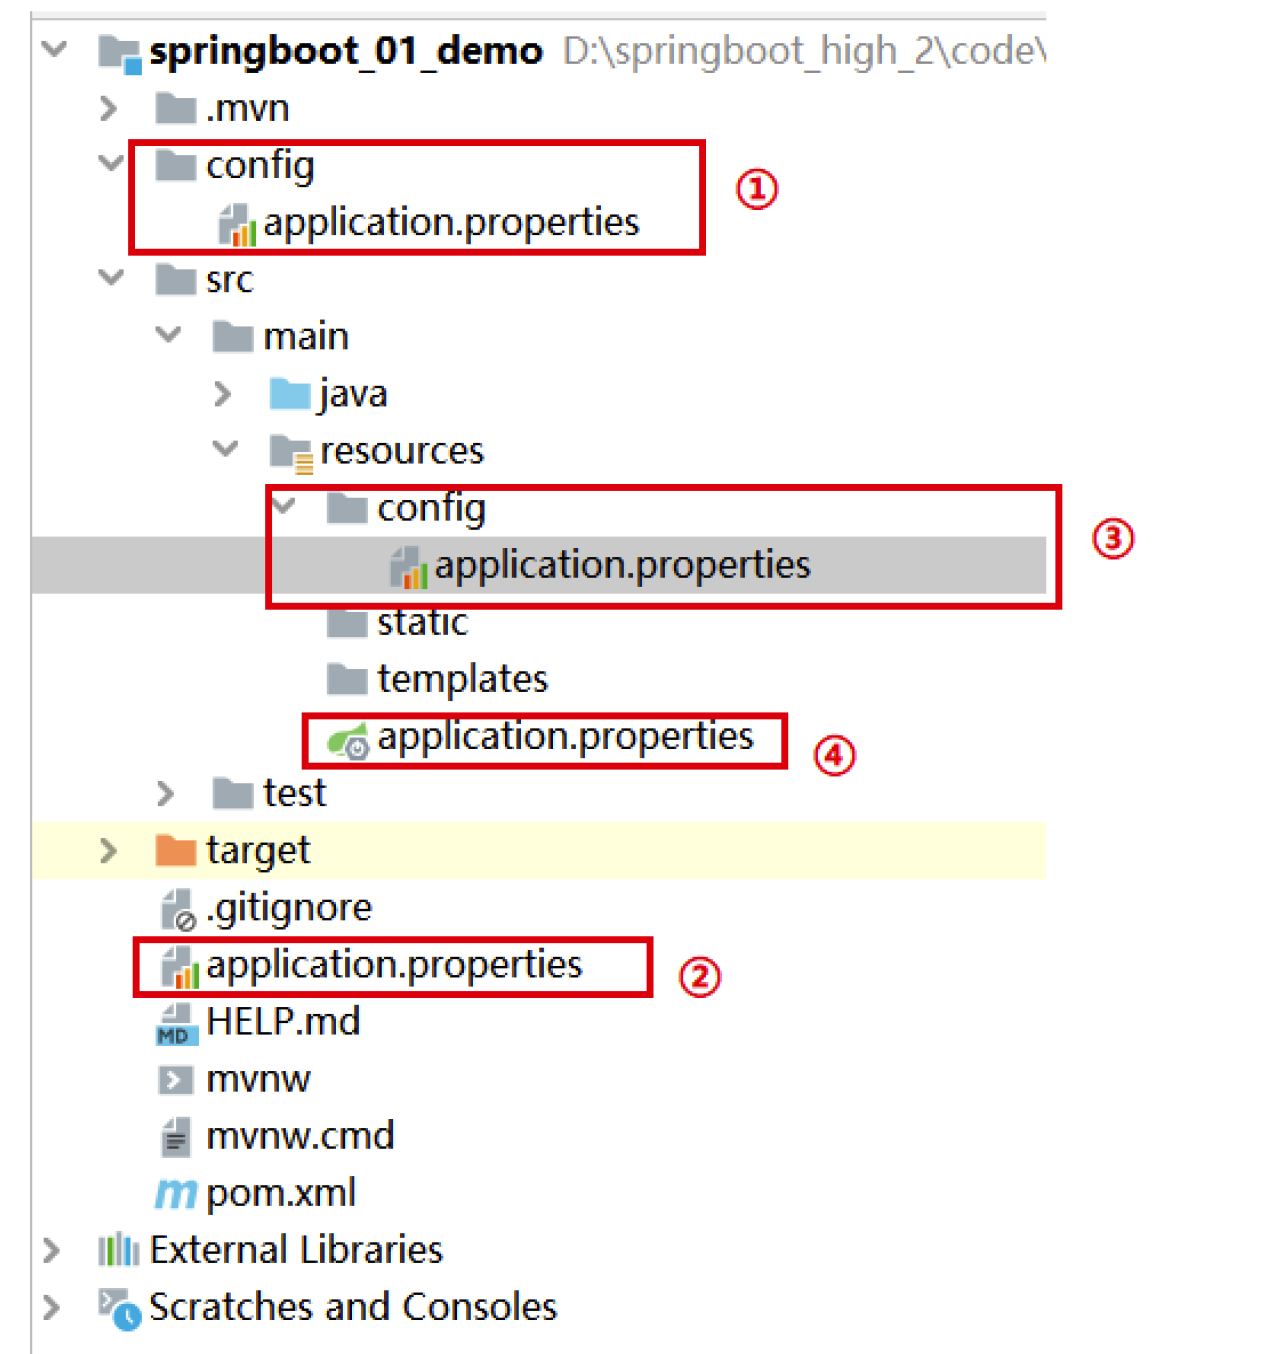
整个设计非常巧妙。SpringBoot会从这四个位置全部加载主配置文件,如果高优先级中配置文件属性与低优先级配置文件不冲突的属性,则会共同存在— 互补配置。SpringBoot会加载全部主配置文件;****
备注:
这里说的配置文件,都还是项目里面。最终都会被打进jar包里面的,需要注意。
1、如果同一个目录下,有application.yml也有application.properties,默认先读取application.properties。
2、如果同一个配置属性,在多个配置文件都配置了,默认使用第1个读取到的,后面读取的不覆盖前面读取到的。
3、优先级高到低,互补配置
4、创建SpringBoot项目时,一般的配置文件放置在“项目的resources目录下”
如果我们的配置文件名字不叫application.properties或者application.yml,可以通过以下参数来指定配置文件的名字,myproject是配置文件名
$ java -jar myproject.jar --spring.config.name=myproject
指定配置文件和默认加载的这些配置文件共同起作用形成互补配置。
java -jar run-0.0.1-SNAPSHOT.jar --
spring.config.location=D:/application.properties
接下来,将针对这两种全局配置文件application.properties及application.yml进行讲解 :
知识点补充!
Spring Boot 2.4 改进了处理 application.properties 和 application.yml 配置文件的方式,
如果是2.4.0之前版本,优先级properties>yaml
但是如果是2.4.0的版本,优先级yaml>properties
如果想继续使用 Spring Boot 2.3 的配置逻辑,也可以通过在 application.properties 或者application.yml 配置文件中添加以下参数:
spring.config.use-legacy-processing = true
1.5.2 application.properties配置文件
使用Spring Initializr方式构建Spring Boot项目时,会在resource目录下自动生成一个空的application.properties文件,Spring Boot项目启动时会自动加载application.properties文件。
我们可以在application.properties文件中定义Spring Boot项目的相关属性,当然,这些相关属性可以是系统属性、环境变量、命令参数等信息,也可以是自定义配置文件名称和位置
server.port=8081
spring.datasource.driver-class-name=com.mysql.jdbc.Driver
spring.config.name=application
一个案例来实现获取properties里的属性注入到对象中
/**
 * @author lane
 * @date 2021年04月18日 下午3:21
 */
@Component
@ConfigurationProperties(prefix = "person")
public class Person {


    private int id;            //id
    private String name;      //名称
    private List hobby;       //爱好
    private String[] family; //家庭成员
    private Map map;
    private Pet pet;          //宠物

}
@Component
public class Pet {
    // 类型
    private String type;
    // 名称
    private String name;
}
person.id=1
person.name=小智
person.hobby=吃饭,睡觉,抓宠物
person.family=大木博士,小智妈妈
person.map.k1 = baby
person.map.v1 = pikaqiu
person.pet.name = 皮卡丘
person.pet.type = mouse
package com.lagou;

import com.lagou.pojo.Person;
import org.junit.Test;
import org.junit.runner.RunWith;
import org.springframework.beans.factory.annotation.Autowired;
import org.springframework.boot.test.context.SpringBootTest;
import org.springframework.test.context.junit4.SpringRunner;

/**
 * @author lane
 * @date 2021年04月18日 下午3:38
 */
@RunWith(SpringRunner.class)
@SpringBootTest
public class SpringBootDemoApplicationTest {

    @Autowired
    Person peroson ;
    @Test
    public void testPerson(){
        System.out.println(peroson);
    }
}
结果
Person{id=1, name=‘小智’, hobby=[吃饭, 睡觉, 抓宠物], family=[大木博士, 小智妈妈], map={k1=baby, v1=pikaqiu}, pet=Pet{type=‘mouse’, name=‘皮卡丘’}}
@ConfigurationProperties(prefix = “person”)注解的作用是将配置文件中以person开头的属性值通过setXX()方法注入到实体类对应属性中
@Component注解的作用是将当前注入属性值的Person类对象作为Bean组件放到Spring容器中,只有这样才能被@ConfigurationProperties注解进行赋值
编写application.properties配置文件时,由于要配置的Person对象属性是我们自定义的,SpringBoot无法自动识别,所以不会有任何书写提示。在实际开发中,为了出现代码提示的效果来方便配置,在使用@ConfigurationProperties注解进行配置文件属性值注入时,可以在pom.xml文件中添加一个Spring Boot提供的配置处理器依赖:
<!-- 配置代码提示-->
        <dependency>
            <groupId>org.springframework.boot</groupId>
            <artifactId>spring-boot-configuration-processor</artifactId>
            <optional>true</optional>
        </dependency>
在pom.xml中添加上述配置依赖后,还需要重新运行项目启动类或者使用“Ctrl+F9”快捷键(即Build Project)重构当前Spring Boot项目方可生效
1.5.3 application.yaml配置文件
YAML文件格式是Spring Boot支持的一种JSON超集文件格式,以数据为中心,比properties、xml等更适合做配置文件
yml和xml相比,少了一些结构化的代码,使数据更直接,一目了然,相比properties文件更简洁
YAML文件的扩展名可以使用.yml或者.yaml。
application.yml文件使用 “key:(空格)value”格式配置属性,使用缩进控制层级关系。
这里,针对不同数据类型的属性值,介绍一下YAML
(1)value值为普通数据类型(例如数字、字符串、布尔等)
当YAML配置文件中配置的属性值为普通数据类型时,可以直接配置对应的属性值,同时对于字符串类型的属性值,不需要额外添加引号,示例代码如下
server:
port: 8080
servlet:
context-path: /hello
(2)value值为数组和单列集合
当YAML配置文件中配置的属性值为数组或单列集合类型时,主要有两种书写方式:缩进式写法和行内式写法。
其中,缩进式写法还有两种表示形式,示例代码如下
person:
	hobby:
		- play
		- read
		- sleep
或者
person:
	hobby:
		play,
		read,
		sleep
上述代码中,在YAML配置文件中通过两种缩进式写法对person对象的单列集合(或数组)类型的爱好hobby赋值为play、read和sleep。其中一种形式为“-(空格)属性值”,另一种形式为多个属性值之前加英文逗号分隔(注意,最后一个属性值后不要加逗号)。
person:
	hobby: [play,read,sleep]
(3)value值为Map集合和对象
person:
	map:
		k1: v1
		k2: v2
或者
person:
	map: {k1: v1,k2: v2}
在YAML配置文件中,配置的属性值为Map集合或对象类型时,缩进式写法的形式按照YAML文件格式编写即可,而行内式写法的属性值要用大括号“{}”包含。
server:
  port: 8082
  servlet:
    context-path: /springboot
spring:
  config:
    use-legacy-processing: true
person:
  family: [大木博士2,小智妈妈2]
  hobby: [吃饭2,睡觉2,去吧皮卡丘2]
  map: {k1: v1,k2: v2}
  name: 小智2
  pet: {name: 皮卡丘,type: 老鼠}
  id: 2
把这个文件放入1号位置才生效,虽然我这个版本是2.4.5,说明上面的版本优先级说明并不正确,是properties的优先级高于yaml
当三种文件路径相同时,三个文件中的配置信息都会生效,但是当三个文件中有配置信息冲突时,加载顺序是properties>yaml>yml
这里的逻辑顺序是先加载yml再加载yaml再加properties,后加载的自然会把先加载的数据给覆盖掉.
原因:至于原因可以在spring-boot-starter-parent里找到(下图)
Person{id=2, name='小智2', hobby=[吃饭2, 睡觉2, 去吧皮卡丘2], family=[大木博士2, 小智妈妈2], map={k1=v1, k2=v2, v1=pikaqiu}, pet=Pet{type='老鼠', name='皮卡丘'}}
1.6 属性注入
使用Spring Boot全局配置文件设置属性时:
如果配置属性是Spring Boot已有属性,例如服务端口server.port,那么Spring Boot内部会自动扫描并读取这些配置文件中的属性值并覆盖默认属性。
如果配置的属性是用户自定义属性,例如刚刚自定义的Person实体类属性,还必须在程序中注入这些配置属性方可生效。
1.6.1 属性注入常用注解
@Configuration:声明一个类作为配置类
@Bean:声明在方法上,将方法的返回值加入Bean容器
@Value:属性注入
@ConfigurationProperties(prefix = “jdbc”):批量属性注入
@PropertySource(“classpath:/jdbc.properties”)指定外部属性文件。在类上添加
1.6.2 @Value属性值注入@Value:属性注入
- 引入数据源连接依赖
 <!--druid连接池-->
        <dependency>
            <groupId>com.github.drtrang</groupId>
            <artifactId>druid-spring-boot2-starter</artifactId>
            <version>1.1.10</version>
        </dependency>
- application.properties添加信息
#添加数据源信息
jdbc.driverClassName = com.mysql.jdbc.Driver
jdbc.url = jdbc:mysql://127.0.1:3306/springboot_h
jdbc.username = root
jdbc.password = root
- 配置数据源
package com.lagou.config;

import com.alibaba.druid.pool.DruidDataSource;
import org.springframework.beans.factory.annotation.Value;
import org.springframework.context.annotation.Bean;
import org.springframework.context.annotation.Configuration;

import javax.sql.DataSource;

/**
 * @author lane
 * @date 2021年04月20日 上午10:35
 */
@Configuration
public class JdbcConfiguration {

    @Value("${jdbc.driverClassName}")
    private  String driverClassName;
    @Value("${jdbc.url}")
    private  String url;
    @Value("${jdbc.username}")
    private String username;
    @Value("${jdbc.password}")
    private String password;
    //默认方法名作为bean的id放入ioc
    @Bean
    public DataSource dataSource(){
        DruidDataSource druidDataSource = new DruidDataSource();
        druidDataSource.setDriverClassName(driverClassName);
        druidDataSource.setUrl(url);
        druidDataSource.setUsername(username);
        druidDataSource.setPassword(password);
        return druidDataSource;
    }

    @Override
    public String toString() {
        return "JdbcConfiguration{" +
                "driverClassName='" + driverClassName + '\'' +
                ", url='" + url + '\'' +
                ", username='" + username + '\'' +
                ", password='" + password + '\'' +
                '}';
    }
}
- 测试
    @Autowired
    DataSource dataSource;
    @Autowired
    JdbcConfiguration jdbcConfiguration;
    @Test
    public void testValue(){

        System.out.println(jdbcConfiguration);
    }
测试结果
JdbcConfiguration{driverClassName='com.mysql.jdbc.Driver', url='jdbc:mysql://127.0.1:3306/springboot_h', username='root', password='root'}
1.6.3 @ConfigurationProperties(prefix = “”)全局set方法注入作用类上
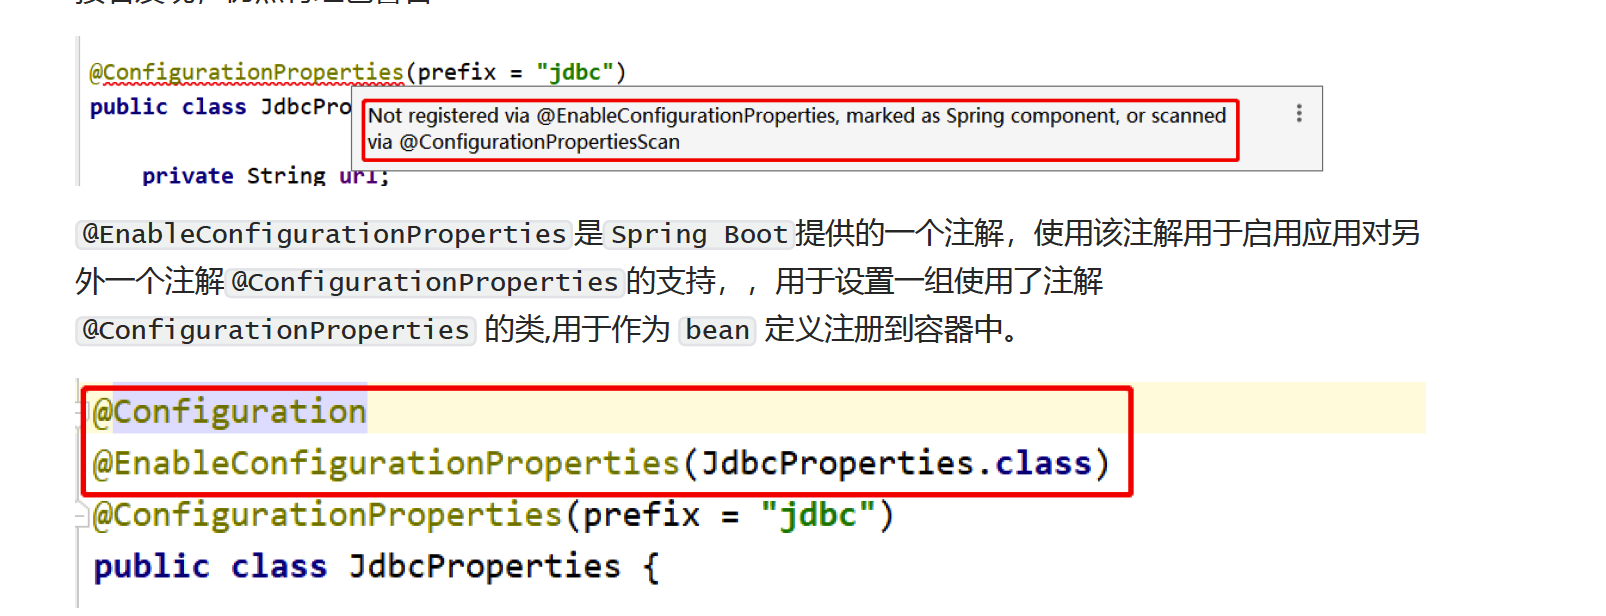
或者只配合@Component 完成全局Set方法注入
1.6.4 @ConfigurationProperties(prefix = “”)全局set方法注入作用方法上
 //通过下面这个注解给第三方jar中的对象注入属性放入ioc容器中
    //该注解也可以放在类上配合@Component 完成全局Set方法注入
    @ConfigurationProperties(prefix = "jar")
    @Bean
    public JarObject jarObject(){
        return new JarObject();
    }
//配置
#第三方jar内对象属性注入
jar.name=妙蛙种子
jar.type=草系神奇宝贝
  //测试
   @Autowired
    JarObject jarObject;
    @Test
    public void testCon(){
        System.out.println(jarObject);
    }
//结果
JarObject{name='妙蛙种子', type='草系神奇宝贝'}
1.6.5 松散绑定
Spring Boot使用一些宽松的规则将环境属性绑定到@ConfigurationProperties bean,因此环境属性名和bean属性名之间不需要完全匹配,依然可以完成注入,如下面四种类型的命名法
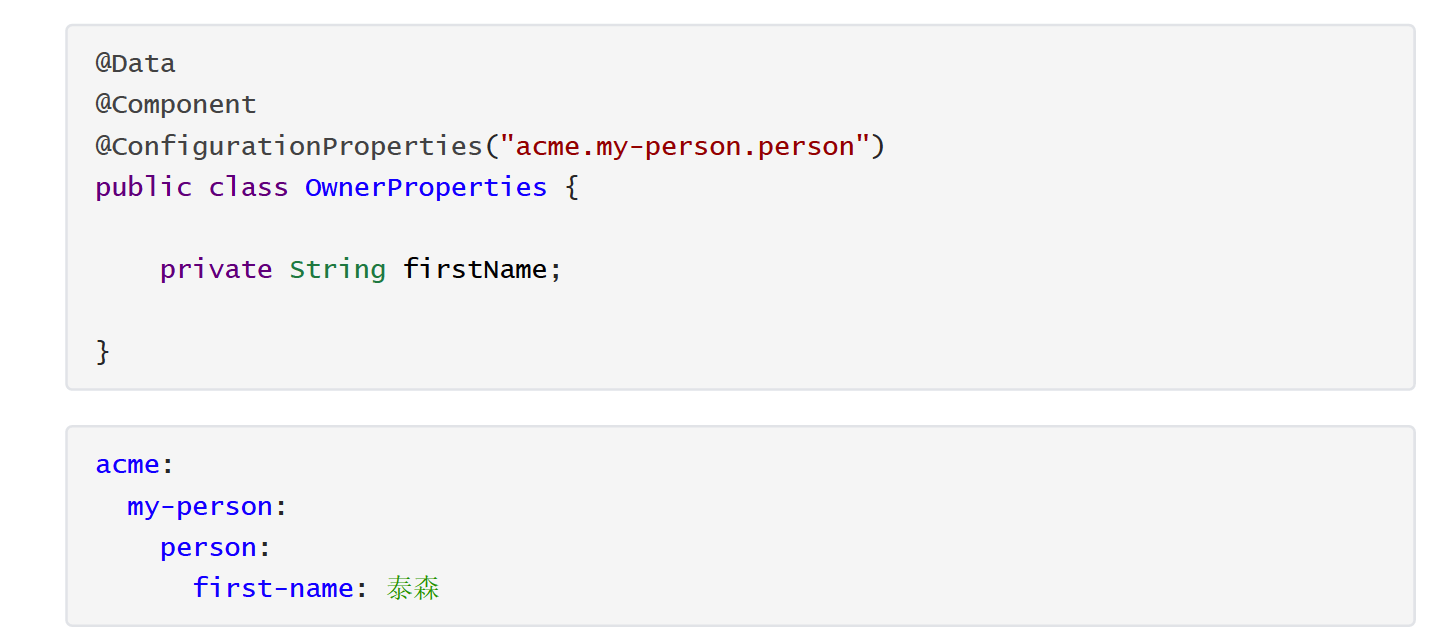
| 属性文件中配置 | 说明 |
|---|---|
| acme.my-project.person.first-name | 羊肉串模式 |
| acme.myProject.person.firstName | 标准驼峰模式 |
| acme.my_project.person.first_name | 下划线模式 |
| ACME_MYPROJECT_PERSON_FIRSTNAME | 大写下划线,如果使用系统环境时候推荐使用 |
1.6.6 @ConfigurationProperties vs @Value
| 特征 | @ConfigurationProperties | @Value |
|---|---|---|
| 宽 松的绑定 | yes | Limited(详见下方官网截图) |
| 元 数据支持 | yes | no |
| SpEL 表达式 | no | yes |
| 应用场景 | 批量属性绑定 | 单个属性绑定 |
1.7 SpringBoot日志框架
1.7.1 日志框架介绍
在项目的开发中,日志是必不可少的一个记录事件的组件,不管是记录运行情况还是追踪线上问题,都离不开对日志的分析,所以也会相应的在项目中实现和构建我们所需要的日志框架。
而市面上常见的日志框架有很多,比如:JCL、SLF4J、Jboss-logging、jUL、log4j、log4j2、logback等等,我们该如何选择呢?
通常情况下,日志是由一个抽象层+实现层的组合来搭建的。
| 日志-抽象层 | 日志-实现层 |
|---|---|
| JCL(Jakarta Commons Logging)、SLF4J(Simple Logging Facade for Java)、jboss-logging | jul(java.util.logging)、log4j、logback、log4j2 |
Spring 框架选择使用了 JCL 作为默认日志输出。而 Spring Boot 默认选择了 SLF4J 结合 LogBack
1.7.2 SLF4J 的使用
在开发的时候不应该直接使用日志实现类,应该使用日志的抽象层。具体参考 SLF4J 官方。
SLF4J 官方给出了简单示例。
首先要为系统导入 SLF4J 的 jar .
import org.slf4j.Logger;
import org.slf4j.LoggerFactory;
public class HelloWorld {
public static void main(String[] args) {
elloWorld.class);
logger.info("Hello World");
}
}
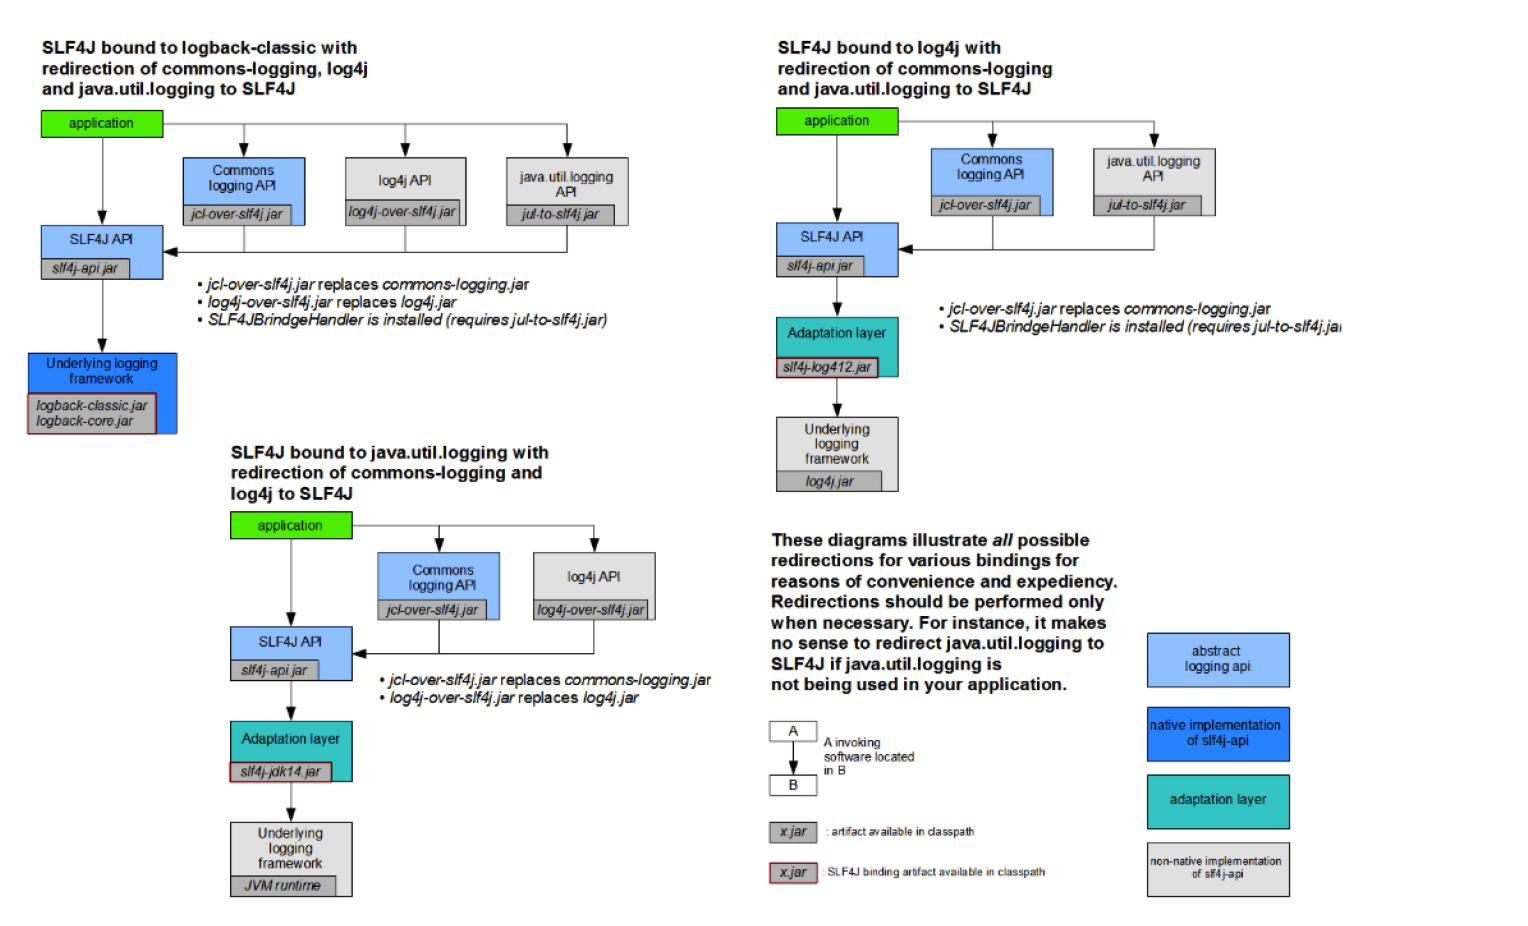
下图是 SLF4J 结合各种日志框架的官方示例,从图中可以清晰的看出 SLF4J API 永远作为日志的门面,直接应用与应用程序中。
[外链图片转存失败,源站可能有防盗链机制,建议将图片保存下来直接上传(img-kBRikSBv-1619604605093)(https://cdn.jsdelivr.net/gh/lanedu/upic@main/uPic/20210420/image-20210420120530521.png)]
注意:由于每一个日志的实现框架都有自己的配置文件,所以在使用 SLF4j 之后,配置文件还是要使用实现日志框架的配置文件。
1.7.3. 统一日志框架的使用
遗留问题:A项目(slf4J + logback): Spring(commons logging)、Hibernate(jboss-logging)、mybatis…
一般情况下,在项目中存在着各种不同的第三方 jar ,且它们的日志选择也可能不尽相同,显然这样是不利于我们使用的,那么如果我们想为项目设置统一的日志框架该怎么办呢?在 SLF4J 官方,也给了我们参考的例子
从图中我们得到一种统一日志框架使用的方式,可以使用一种和要替换的日志框架类完全一样的 jar 进行替换,这样不至于原来的第三方 jar 报错,而这个替换的 jar 其实使用了 SLF4J API. 这样项目中的日志就都可以通过 SLF4J API 结合自己选择的框架进行日志输出。
统一日志框架使用步骤归纳如下:
-
排除系统中的其他日志框架。
-
使用中间包替换要替换的日志框架。
-
导入我们选择的 SLF4J 实现。
1.7.4 Spring Boot 的日志关系
① 排除其他日志框架
根据上面总结的要统一日志框架的使用,第一步要排除其他的日志框架,在 Spring Boot 的 Maven 依赖里可以清楚的看到 Spring Boot 排除了其他日志框架。
我们自行排除依赖时也只需要按照图中的方式就好了。
② 统一框架引入替换包
Spring Boot 是使用了 SLF4J+logback 的日志框架组合,查看 Spring Boot 项目的 Maven 依赖关系可以看到 Spring Boot 的核心启动器 spring-boot-starter 引入了 spring-boot-starter-logging.
<dependency>
<groupId>org.springframework.boot</groupId>
<artifactId>spring-boot-starter-logging</artifactId>
<version>2.4.0.RELEASE</version>
</dependency>
而 spring-boot-starter-logging 的 Maven 依赖主要引入了 logback-classic (包含了日志框架 Logback的实现),log4j-to-slf4j (在 log4j 日志框架作者开发此框架的时候还没有想到使用日志抽象层进行开发,因此出现了 log4j 向 slf4j 转换的工具),jul-to-slf4j ( Java 自带的日志框架转换为 slf4j).
<dependencies>
<dependency>
<groupId>ch.qos.logback</groupId>
<artifactId>logback-classic</artifactId>
<version>1.2.3</version>
<scope>compile</scope>
</dependency>
<dependency>
<groupId>org.apache.logging.log4j</groupId>
<artifactId>log4j-to-slf4j</artifactId>
<version>2.13.3</version>
<scope>compile</scope>
</dependency>
<dependency>
<groupId>org.slf4j</groupId>
<artifactId>jul-to-slf4j</artifactId>
<version>1.7.30</version>
<scope>compile</scope>
</dependency>
</dependencies>
从上面的分析,Spring Boot 对日志框架的使用已经是清晰明了了,我们使用 IDEA 工具查看 Maven 依赖关系,可以清晰的看到日志框架的引用
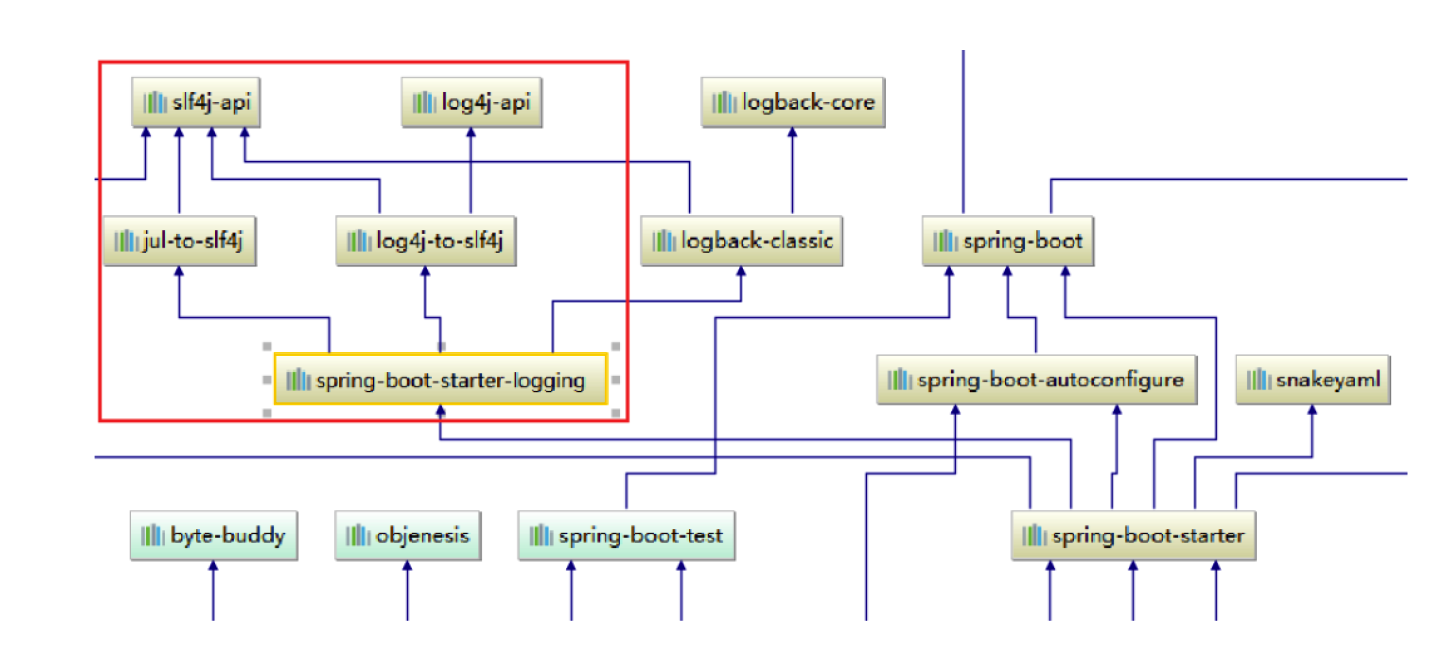
由此可见,Spring Boot 可以自动的适配日志框架,而且底层使用 SLF4j + LogBack 记录日志,如果我们自行引入其他框架,需要排除其日志框架。
1.7.5. Spring Boot 的日志使用
日志级别和格式
从上面的分析,发现 Spring Boot 默认已经使用了 SLF4J + LogBack . 所以我们在不进行任何额外操作的情况下就可以使用 SLF4J + Logback 进行日志输出。
编写 Java 测试类进行测试。
package com.lagou;

import org.junit.Test;
import org.junit.runner.RunWith;
import org.slf4j.Logger;
import org.slf4j.LoggerFactory;
import org.springframework.boot.test.context.SpringBootTest;
import org.springframework.test.context.junit4.SpringRunner;

/**
 * @author lane
 * @date 2021年04月20日 下午3:34
 */
@RunWith(SpringRunner.class)
@SpringBootTest
public class LogbackTest {

   private Logger log =  LoggerFactory.getLogger(this.getClass());

    @Test
    public void logTest(){
        System.out.println("传统输出信息、、、、、、");
        //trace<debug<info<warn<error
        //springboot的默认输出级别是info,低于这个级别的不显示,可以修改默认级别
        log.trace("trace 日志、、、、、、、");
        log.debug("debug 日志、、、、、、、");
        log.info("info 日志、、、、、、、");
        log.warn("warn 日志、、、、、、、");
        log.error("error 日志、、、、、、、");
    }
}
输出结果
传统输出信息、、、、、、
2021-04-20 15:40:39.233  INFO 24973 --- [           main] com.lagou.LogbackTest                    : info 日志、、、、、、、
2021-04-20 15:40:39.233  WARN 24973 --- [           main] com.lagou.LogbackTest                    : warn 日志、、、、、、、
2021-04-20 15:40:39.233 ERROR 24973 --- [           main] com.lagou.LogbackTest                    : error 日志、、、、、、、
springboot的默认输出级别是info,低于这个级别的不显示,可以修改默认级别
从上面的日志结合 Logback 日志格式可以知道 Spring Boot 默认日志格式是
%d{yyyy-MM-dd HH:mm:ss.SSS} [%thread] %-5level %logger{50} - %msg%n
# %d{yyyy-MM-dd HH:mm:ss.SSS} 时间
# %thread 线程名称
# %-5level 日志级别从左显示5个字符宽度
# %logger{50} 类名
# %msg%n 日志信息加换行
至于为什么 Spring Boot 的默认日志输出格式是这样?
1.7.6 自定义日志输出
可以直接在配置文件编写日志相关配置
#日志的配置
#指定具体的日志级别到包
logging.level.com.lagou = trace
#控制台和日志输出格式
#logging.charset.console=UTF-8
logging.pattern.console=%d{yyyy-MM-dd HH:mm:ss.SSS} [%thread] %-5level%logger{50} - %msg%n
logging.pattern.file=%d{yyyy-MM-dd HH:mm:ss.SSS} [%thread] %-5level%logger{50} - %msg%n
#日志的输出路径默认是spring.log,项目盘根目录下var/log/spring.log
#logging.file.path=/var/log
#日志输出的路径为项目下的my.log
logging.file.name=my.log
打印效果
2021-04-20 15:53:22.230 [main] TRACEcom.lagou.LogbackTest - trace 日志、、、、、、、
2021-04-20 15:53:22.231 [main] DEBUGcom.lagou.LogbackTest - debug 日志、、、、、、、
2021-04-20 15:53:22.231 [main] INFO com.lagou.LogbackTest - info 日志、、、、、、、
2021-04-20 15:53:22.231 [main] WARN com.lagou.LogbackTest - warn 日志、、、、、、、
2021-04-20 15:53:22.231 [main] ERRORcom.lagou.LogbackTest - error 日志、、、、、、、
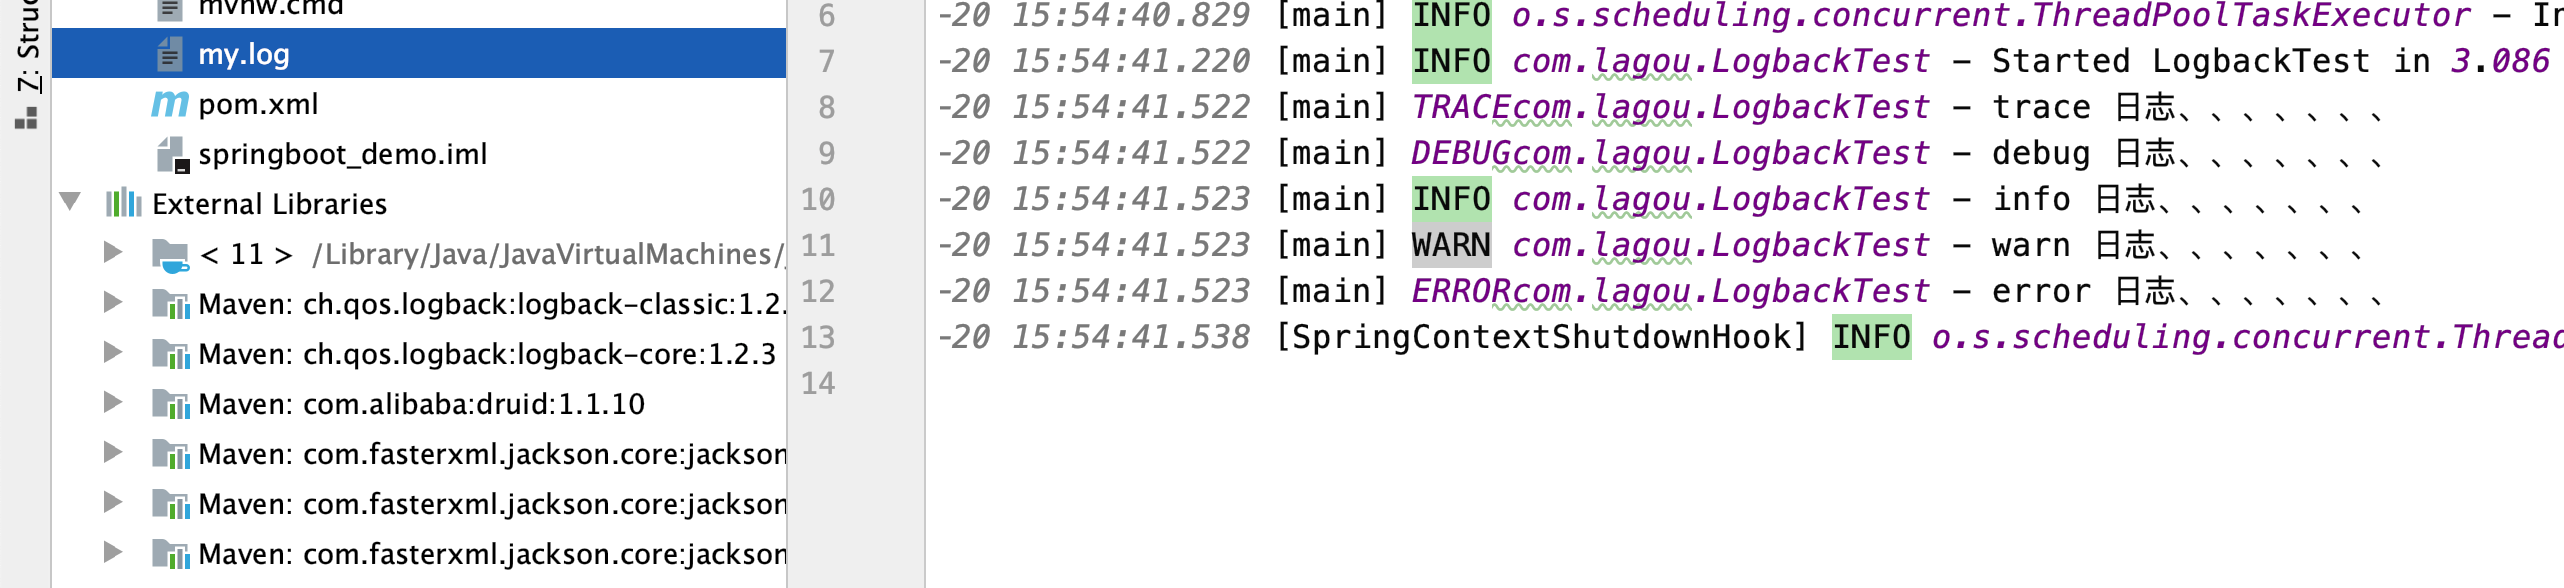
关于日志的输出路径,可以使用 logging.file 或者 logging.path 进行定义,两者存在关系如下表。
| logging.file | logging.path | 例子 | 描述 |
|---|---|---|---|
| (没有) | (没有) | 仅控制台记录。 | |
| 具体文件 | (没有) | my.log | 写入指定的日志文件,名称可以是精确位置或相对于当前目录。 |
| (没有) | 具体目录 | /var/log | 写入spring.log 指定的目录,名称可以是精确位置或相对于当前目录。 |
1.7.7 替换日志框架
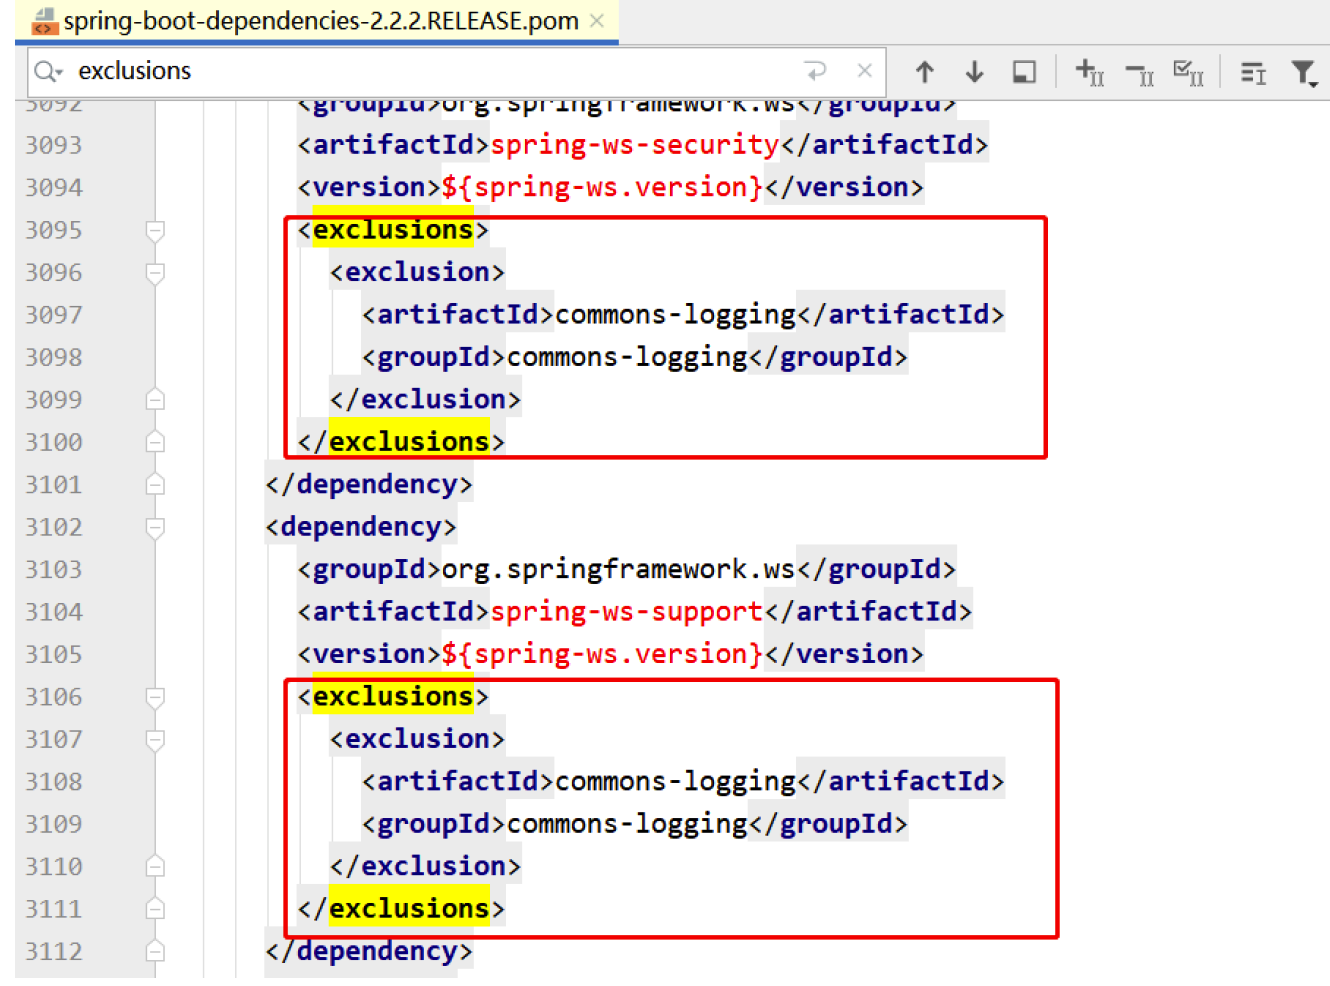
因为springboot默认采用slf4j和logback的组合,如果不相使用logback,那么可供选择的实现层的框架就只有log4j2了,因为log4j最后更新是在2014年,作者都已经承认存在性能问题才放弃掉重新设计了slf4j抽象层+logback实现层的新组合,所以不要选择log4j,而log4j2则是Apache下的还可以,故而springboot直接有这个stater可以直接用,具体操作如下
 <dependency>
            <groupId>org.springframework.boot</groupId>
            <artifactId>spring-boot-starter-web</artifactId>
            <exclusions>
                <exclusion>
                    <artifactId>spring-boot-starter-logging</artifactId>
                    <groupId>org.springframework.boot</groupId>
                </exclusion>
            </exclusions>
        </dependency>
        <!--可以排除掉logback,然后引入log4j2框架-->
        <dependency>
            <groupId>org.springframework.boot</groupId>
            <artifactId>spring-boot-starter-log4j2</artifactId>
        </dependency>
第二章 SpringBoot源码剖析
2.1 SpringBoot源码环境构建
2.1.1 下载源码
https://github.com/spring-projects/spring-boot/releases
下载对应版本的源码(课程中采用spring-boot-2.2.9.RELEASE)因为在这个版本之后就是gradle构建的,不利于学习,这个是maven构建的

2.1.2 环境准备
1、JDK1.8+
2、Maven3.5+
2.1.3 编译源码
进⼊spring-boot源码根⽬录
执⾏mvn命令: mvn clean install -DskipTests -Pfast // 跳过测试⽤例,会下载⼤量 jar 包(时间会长一些)
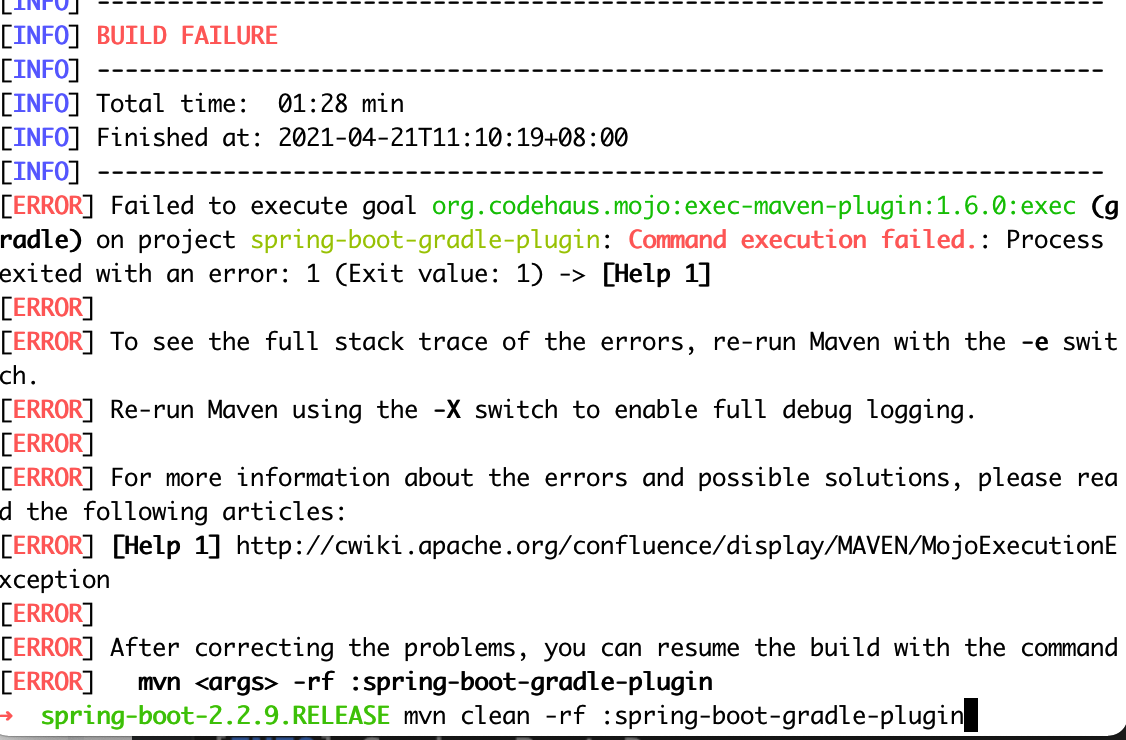
不出意外的话,会报错,执行mvn clean -rf :spring-boot-gradle-plugin之后会build sueccess
2.1.4 导入IDEA
Import 编译后的项目 需要一些时间
打开pom.xml关闭maven代码检查
<properties>
<revision>2.2.9.RELEASE</revision>
<main.basedir>${basedir}</main.basedir>
<disable.checks>true</disable.checks>
</properties>
打开pom.xml关闭maven代码检查
<properties>
<revision>2.2.9.RELEASE</revision>
<main.basedir>${basedir}</main.basedir>
<disable.checks>true</disable.checks>
</properties>
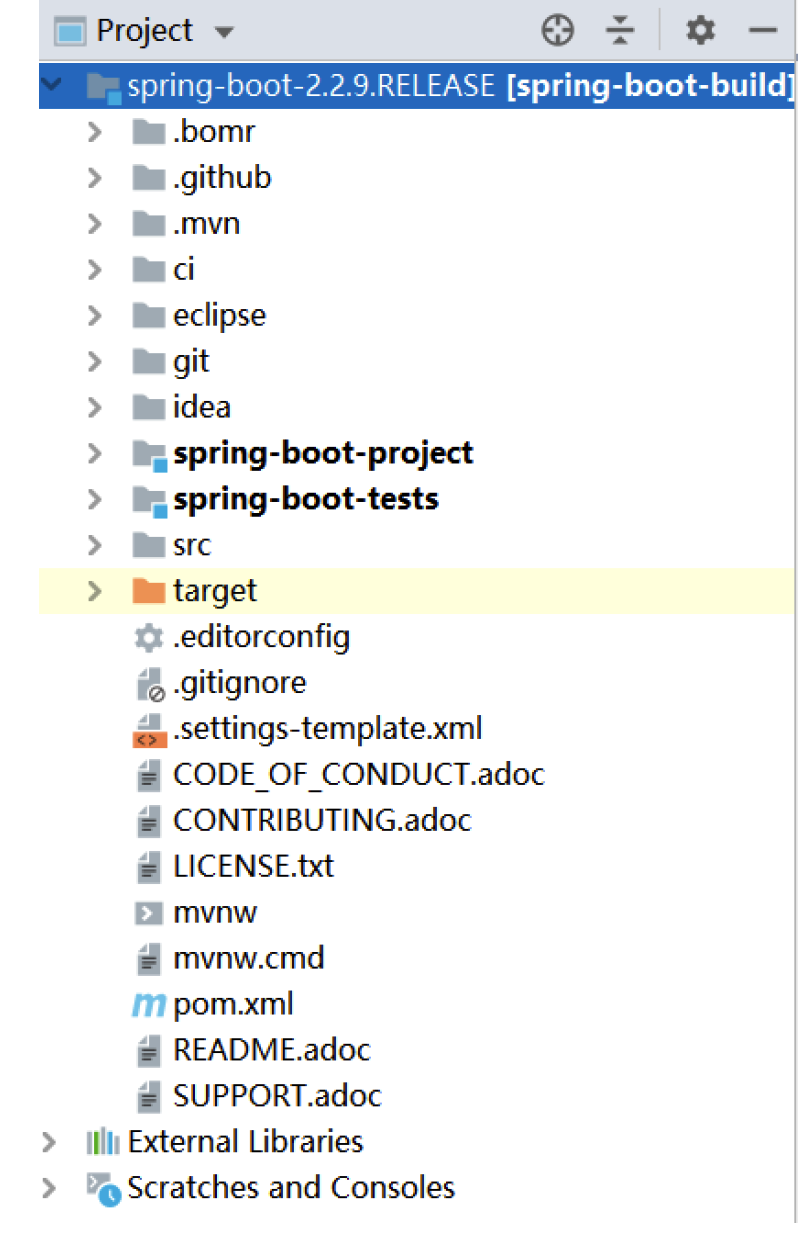
2.1.5 新建一个module

![[外链图片转存失败,源站可能有防盗链机制,建议将图片保存下来直接上传(img-ZH49K53m-1619604605103)(/Users/dulane/Library/Application Support/typora-user-images/image-20210421115157405.png)]](https://i-blog.csdnimg.cn/blog_migrate/798e6547794dbbe86d72777f69aabf39.png)
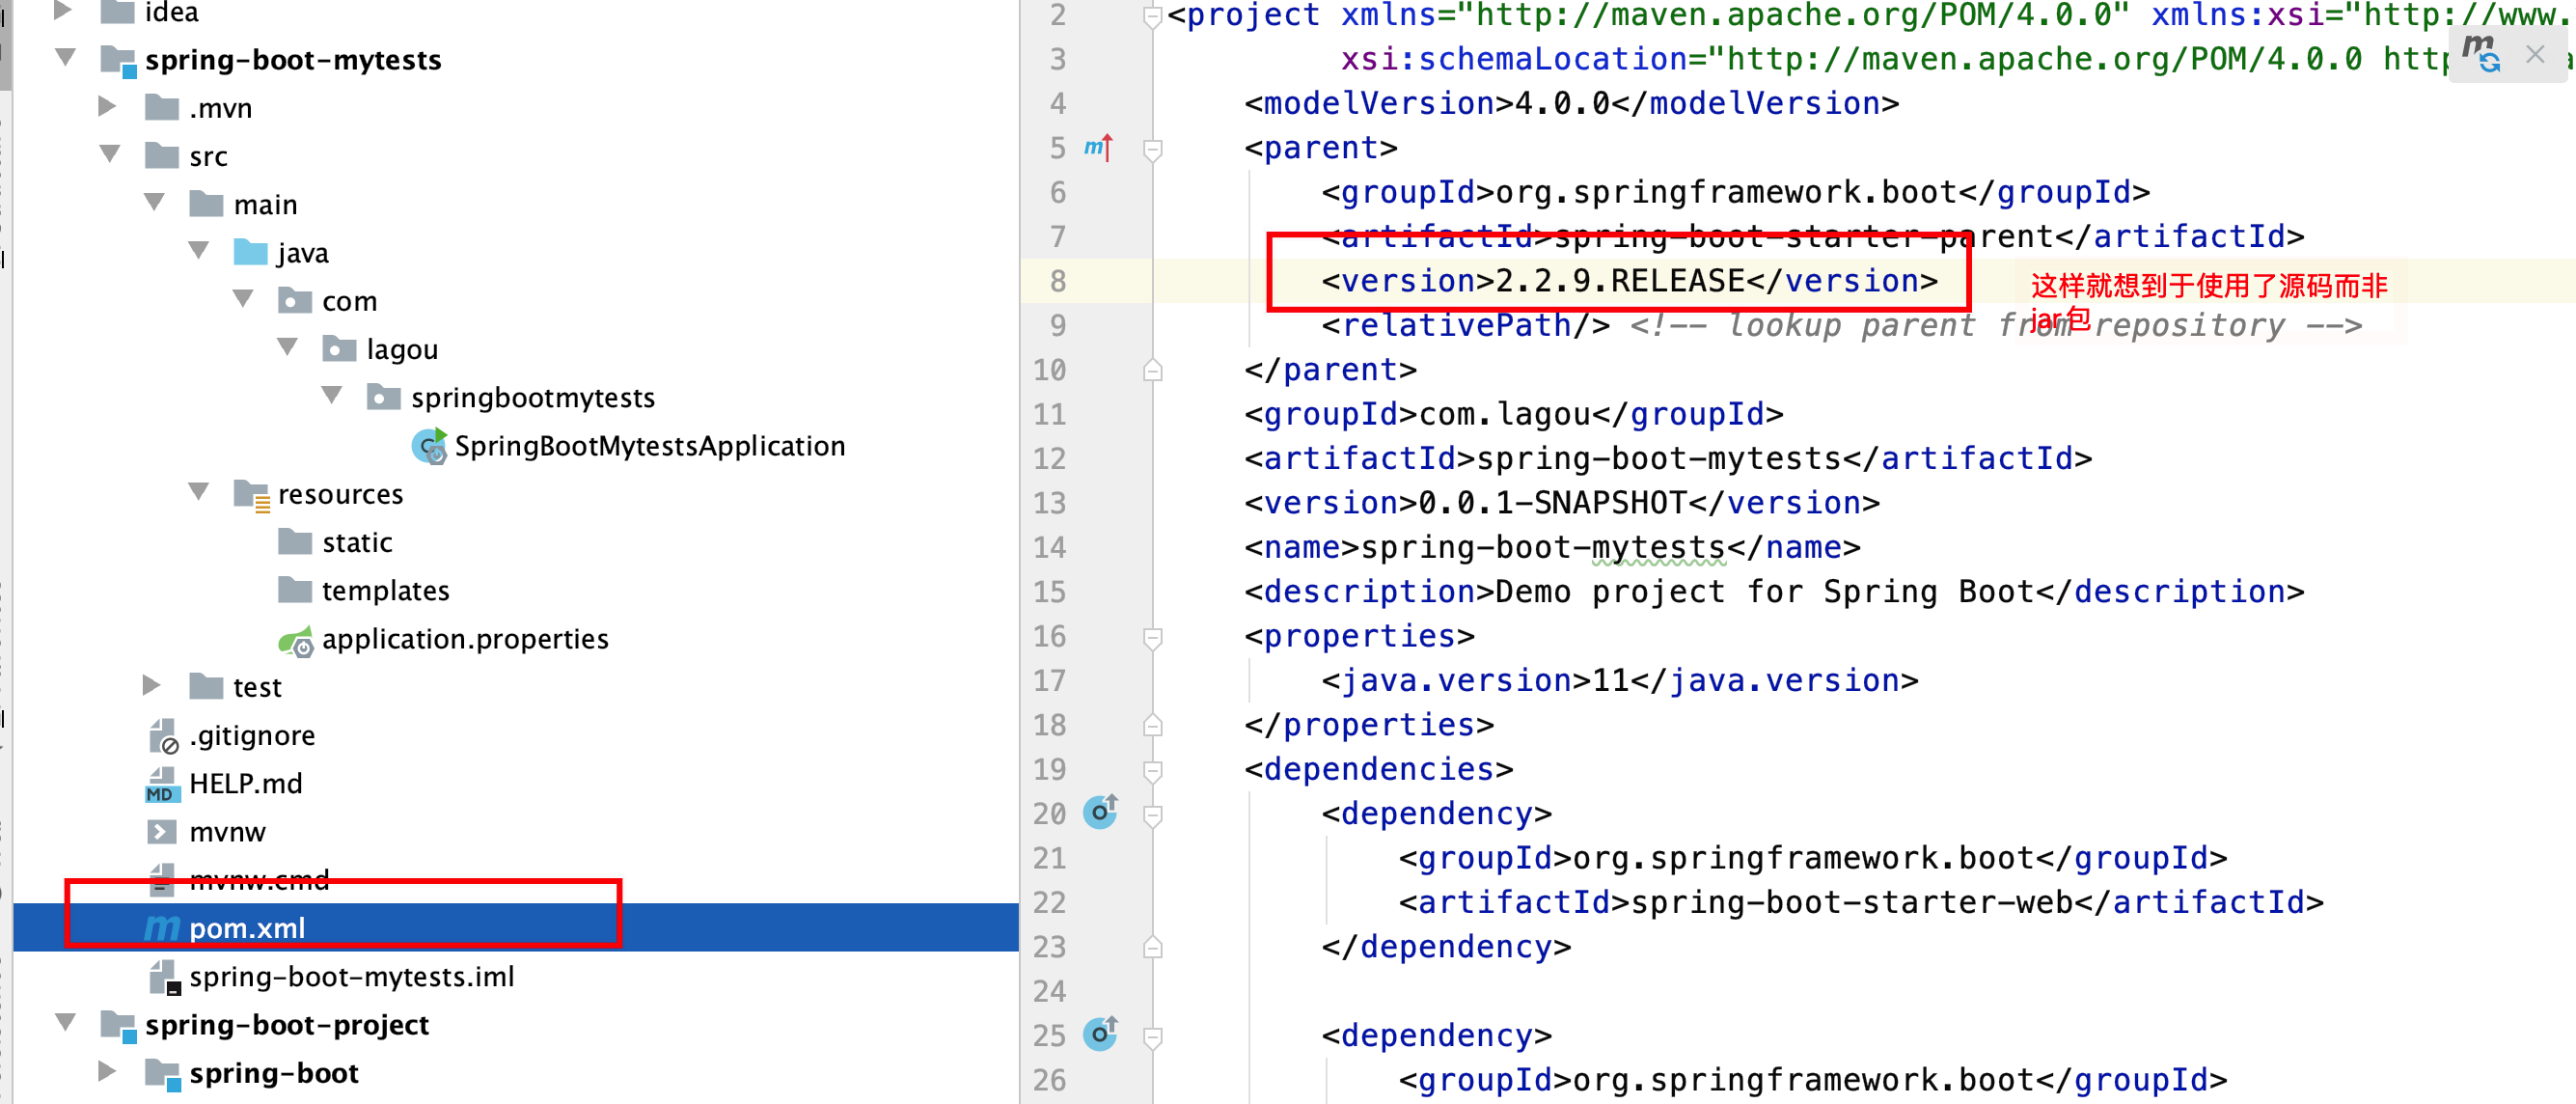
指定父类版本为2.2.9.RELEASE
2.1.6 新建一个Controller
/**
* @author lane
* @date 2021年04月21日 上午11:59
*/
@RestController
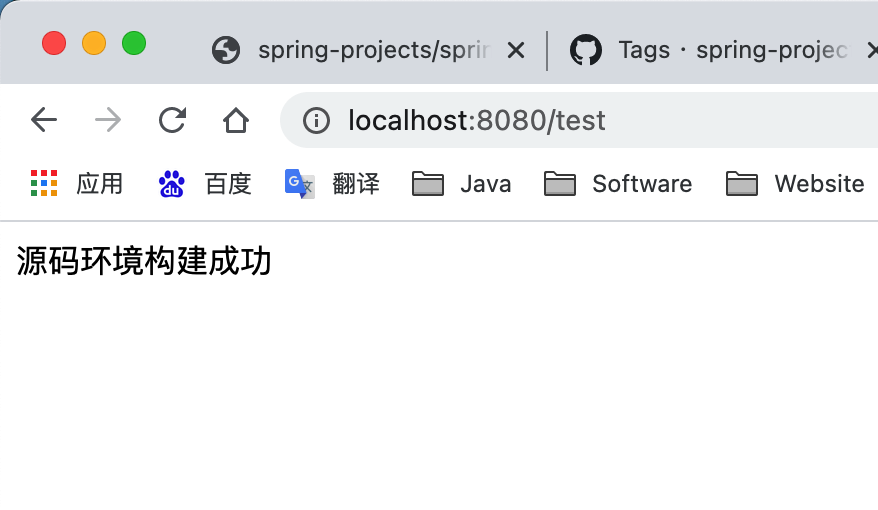
public class TestController {
@RequestMapping("/test")
public String test(){
System.out.println("源码环境构建成功");
return "源码环境构建成功";
}
}
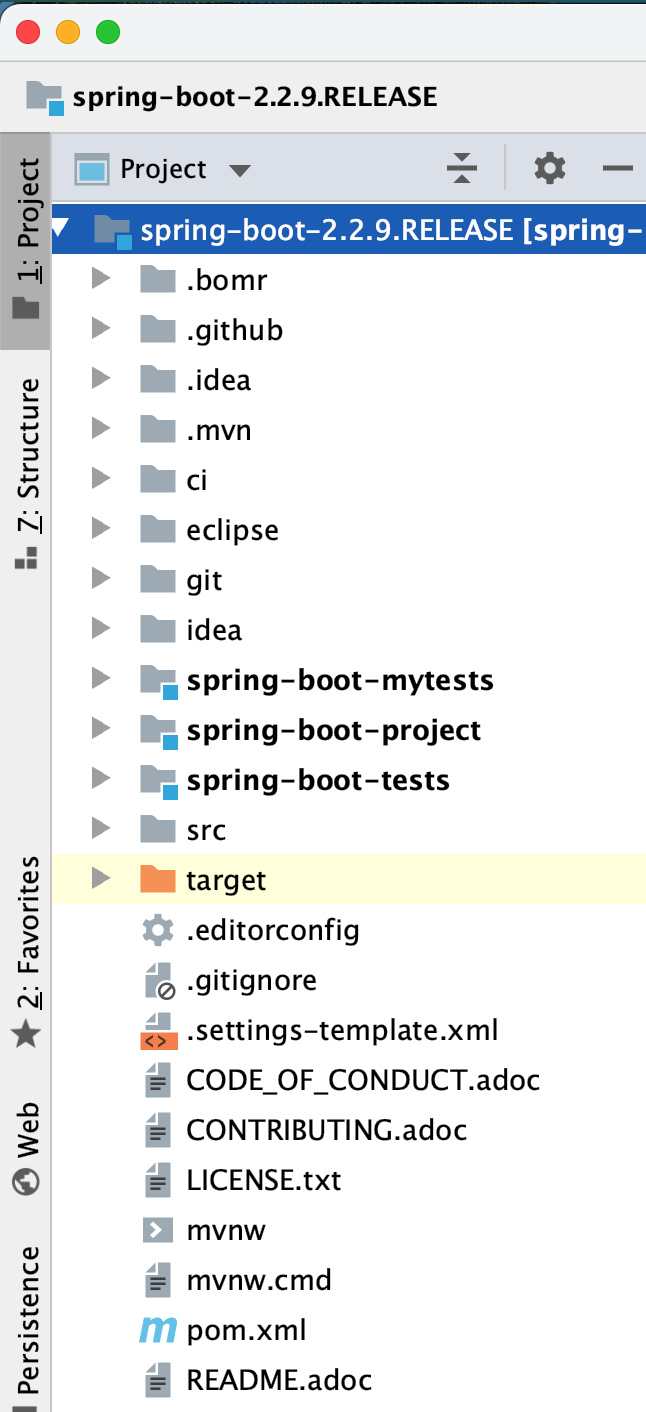
修改下配置启动类的位置,不然扫描不到
[外链图片转存失败,源站可能有防盗链机制,建议将图片保存下来直接上传(img-8nhZ1Aq0-1619604605105)(/Users/dulane/Library/Application Support/typora-user-images/image-20210421120654123.png)]
2.2 源码剖析-依赖管理
2.2.1 为什么导入dependency时不需要指定版本?
在Spring Boot入门程序中,项目pom.xml文件有两个核心依赖,分别是spring-boot-starterparent和spring-boot-starter-web,关于这两个依赖的相关介绍具体如下
spring-boot-starter-parent
在chapter01项目中的pom.xml文件中找到spring-boot-starter-parent依赖,示例代码如下:
<!-- Spring Boot父项目依赖管理 -->
<parent>
<groupId>org.springframework.boot</groupId>
<artifactId>spring-boot-starter-parent</artifactId>
<version>2.2.9.RELEASE</version>
<relativePath/> <!-- lookup parent from repository -->
</parent>
上述代码中,将spring-boot-starter-parent依赖作为Spring Boot项目的统一父项目依赖管理,并将项目版本号统一为2.2.9.RELEASE,该版本号根据实际开发需求是可以修改的使用“Ctrl+鼠标左键”进入并查看spring-boot-starter-parent底层源文件,先看spring-bootstarter-parent做了哪些事
首先看spring-boot-starter-parent 的properties 节点
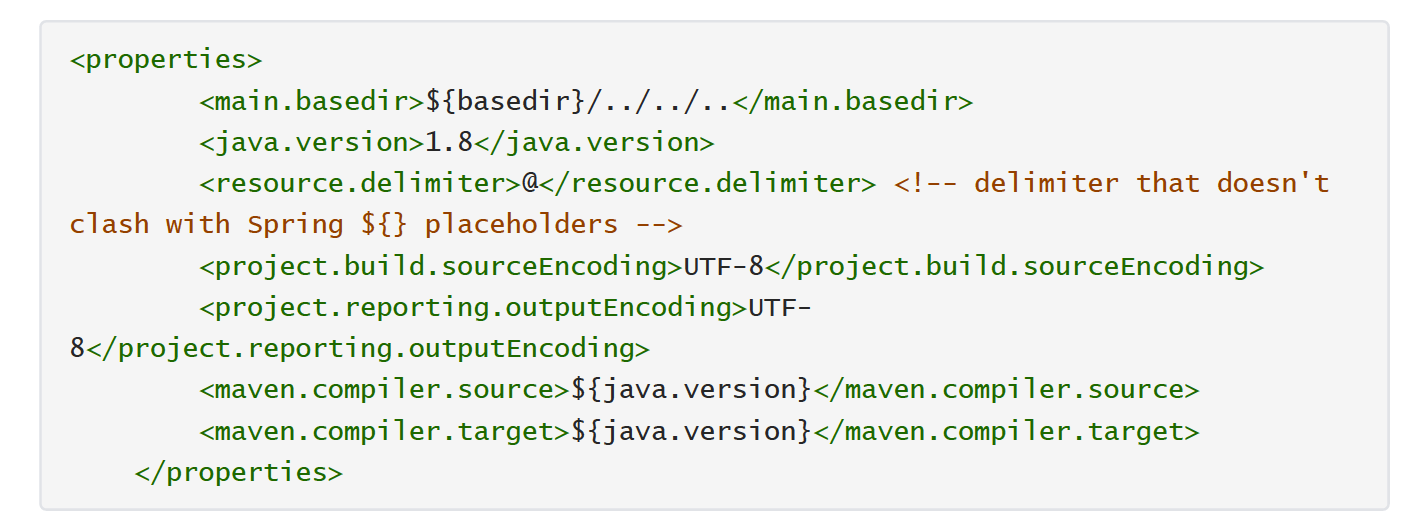
在这里spring-boot-starter-parent 定义了:
-
工程的Java版本为1.8 。
-
工程代码的编译源文件编码格式为UTF-8
-
工程编译后的文件编码格式为UTF-8
-
Maven打包编译的版本
再来看spring-boot-starter-parent 的「build」节点
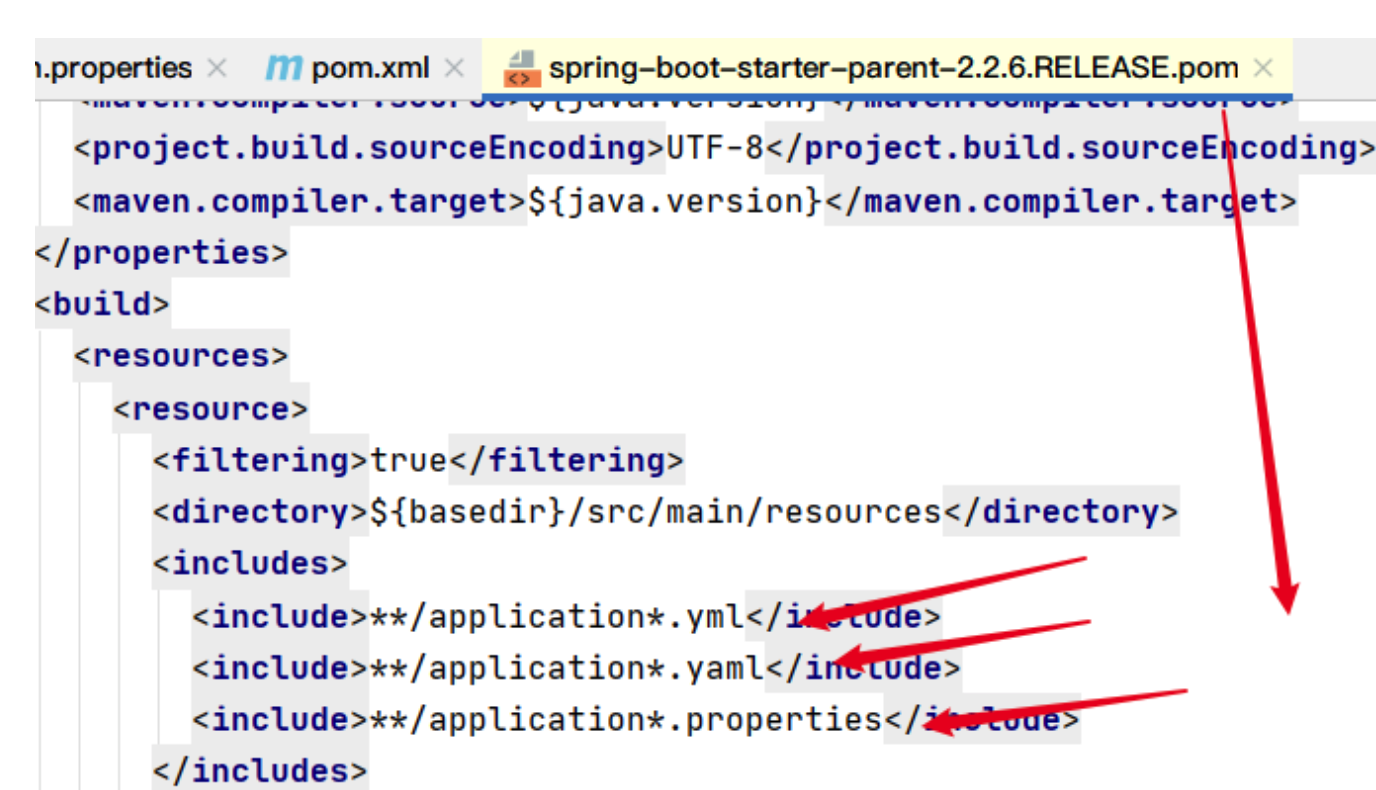
接下来看POM的build 节点,分别定义了resources 资源和pluginManagement
  <resource>
        <directory>${basedir}/src/main/resources</directory>
        <filtering>true</filtering>
        <includes>
          <include>**/application*.yml</include>
          <include>**/application*.yaml</include>
          <include>**/application*.properties</include>
        </includes>
      </resource>
      <resource>
        <directory>${basedir}/src/main/resources</directory>
        <excludes>
          <exclude>**/application*.yml</exclude>
          <exclude>**/application*.yaml</exclude>
          <exclude>**/application*.properties</exclude>
        </excludes>
      </resource>
    </resources>
我们详细看一下resources 节点,里面定义了资源过滤,针对application 的yml 、properties 格式进行了过滤,可以支持支持不同环境的配置,比如application-dev.yml 、applicationtest.yml 、application-dev.properties 、application-dev.properties 等等。
pluginManagement 则是引入了相应的插件和对应的版本依赖
最后来看spring-boot-starter-parent的父依赖spring-boot-dependencies
spring-boot-dependencies的properties节点
我们看定义POM,这个才是SpringBoot项目的真正管理依赖的项目,里面定义了SpringBoot相关的版本

spring-boot-dependencies的dependencyManagement节点
在这里,dependencies定义了SpringBoot版本的依赖的组件以及相应版本。
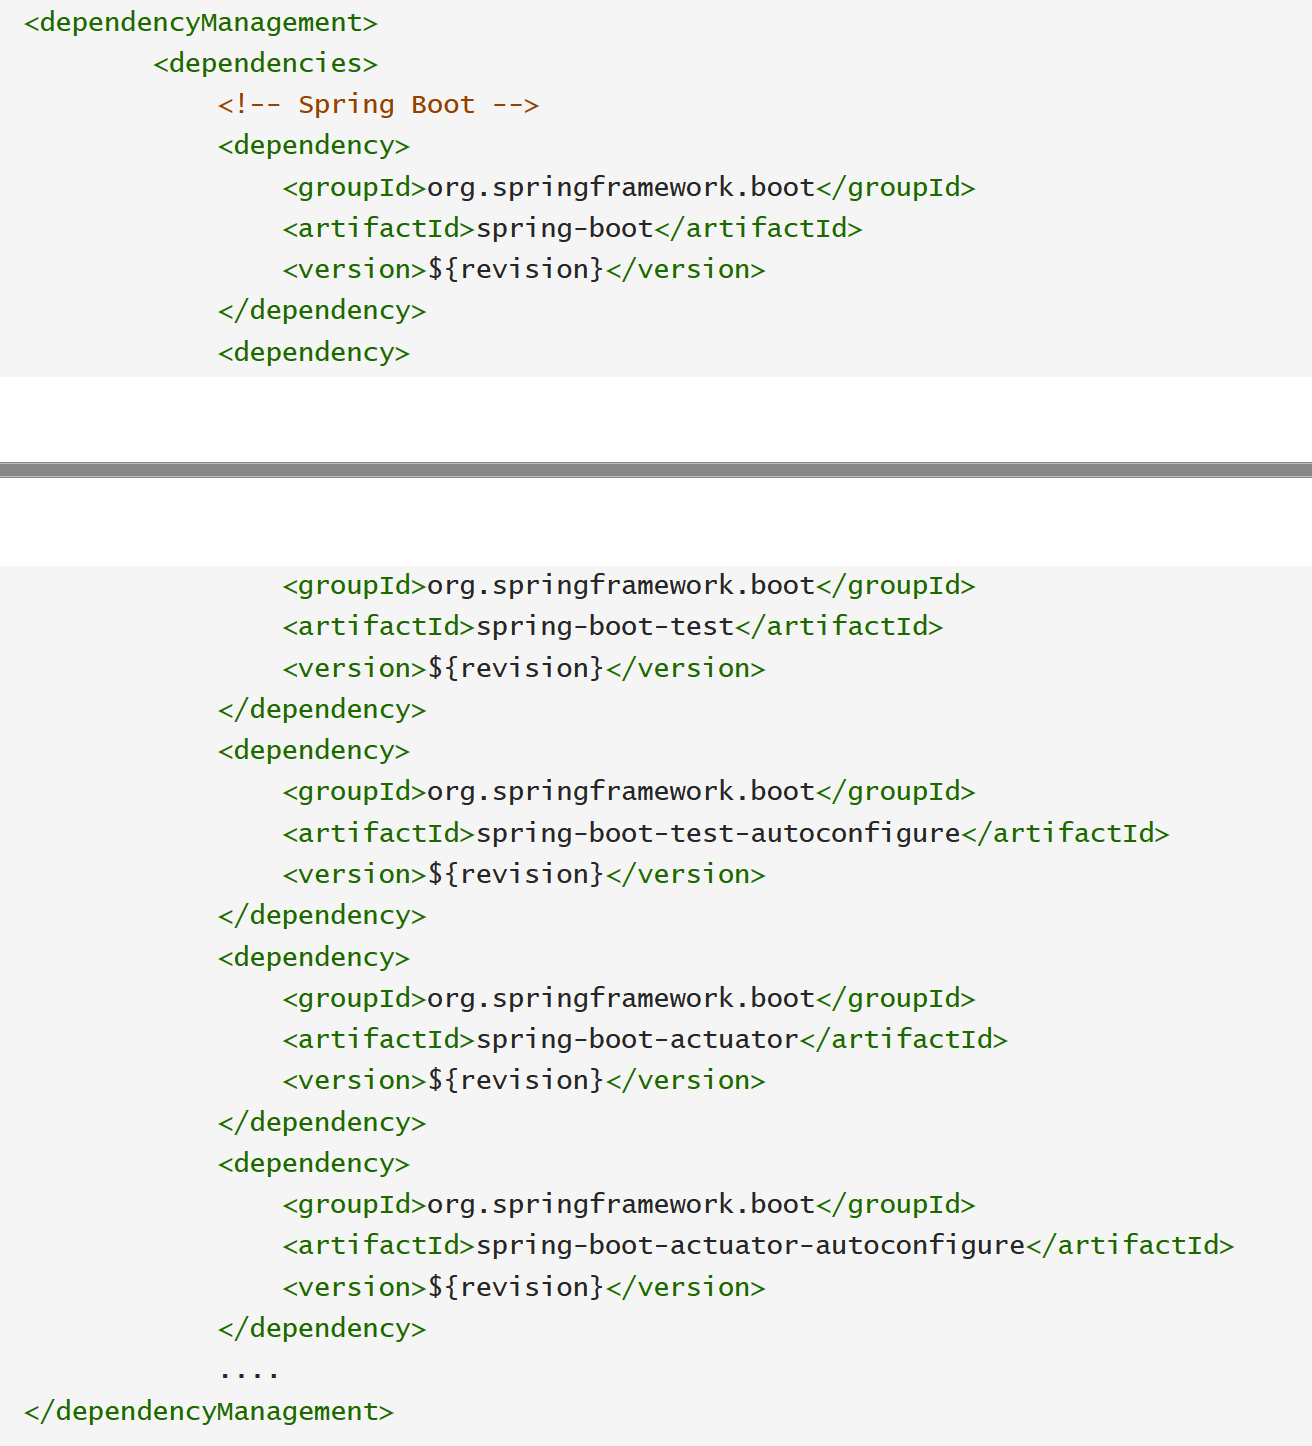
spring-boot-starter-parent 通过继承spring-boot-dependencies 从而实现了SpringBoot的版本依赖管理,所以我们的SpringBoot工程继承spring-boot-starter-parent后已经具备版本锁定等配置了,这也就是在 Spring Boot 项目中部分依赖不需要写版本号的原因
2.2.2 项目运行依赖的JAR包是从何而来的?
spring-boot-starter-web
查看spring-boot-starter-web依赖文件源码,核心代码具体如下
<dependency>
<groupId>org.springframework.boot</groupId>
<artifactId>spring-boot-starter-tomcat</artifactId>
</dependency>
<dependency>
<groupId>org.springframework.boot</groupId>
<artifactId>spring-boot-starter-validation</artifactId>
<exclusions>
<exclusion>
<groupId>org.apache.tomcat.embed</groupId>
<artifactId>tomcat-embed-el</artifactId>
</exclusion>
</exclusions>
</dependency>
<dependency>
<groupId>org.springframework</groupId>
<artifactId>spring-web</artifactId>
</dependency>
<dependency>
<groupId>org.springframework</groupId>
<artifactId>spring-webmvc</artifactId>
</dependency>
从上述代码可以发现,spring-boot-starter-web依赖启动器的主要作用是打包了Web开发场景所需的底层所有依赖(基于依赖传递,当前项目也存在对应的依赖jar包)正是如此,在pom.xml中引入spring-boot-starter-web依赖启动器时,就可以实现Web场景开发,而不需要额外导入Tomcat服务器以及其他Web依赖文件等。
当然,这些引入的依赖文件的版本号还是由spring-boot-starter-parent父依赖进行的统一管理。
Spring Boot除了提供有上述介绍的Web依赖启动器外,还提供了其他许多开发场景的相关依赖,
我们可以打开Spring Boot官方文档,搜索“Starters”关键字查询场景依赖启动器
![[外链图片转存失败,源站可能有防盗链机制,建议将图片保存下来直接上传(img-F9g9qkn9-1619604605112)(/Users/dulane/Library/Application Support/typora-user-images/image-20210422134000764.png)]](https://i-blog.csdnimg.cn/blog_migrate/493dc2cf58ded75d3d0ec1c31f4f66c7.png)
列出了Spring Boot官方提供的部分场景依赖启动器,这些依赖启动器适用于不同的场景开发,使用时只需要在pom.xml文件中导入对应的依赖启动器即可。
需要说明的是,Spring Boot官方并不是针对所有场景开发的技术框架都提供了场景启动器,例如阿里巴巴的Druid数据源等,Spring Boot官方就没有提供对应的依赖启动器。为了充分利用Spring Boot框架的优势,在Spring Boot官方没有整合这些技术框架的情况下,Druid等技术框架所在的开发团队主动与Spring Boot框架进行了整合,实现了各自的依赖启动器,例如druid-spring-boot-starter等。我们在
pom.xml文件中引入这些第三方的依赖启动器时,切记要配置对应的版本号
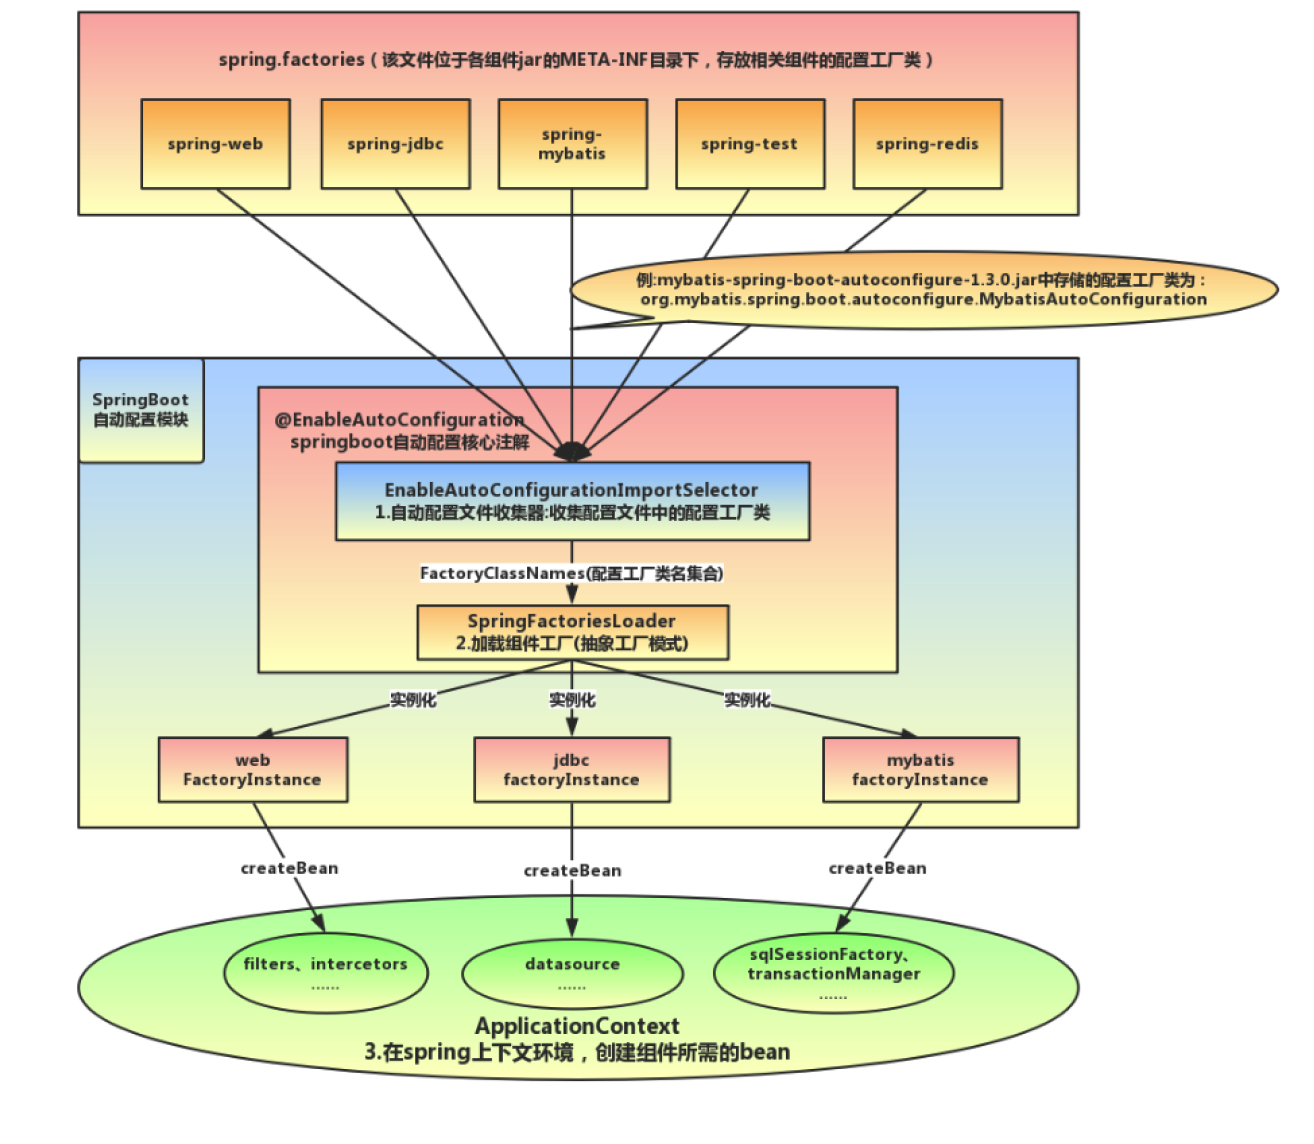
2.3 源码剖析-自动配置
自动配置:根据我们添加的jar包依赖,会自动将一些配置类的bean注册进ioc容器,我们可以需要的地方使用@autowired或者@resource等注解来使用它。
2.3.1 Spring Boot到底是如何进行自动配置的,都把哪些组件进行了自动配置?
Spring Boot应用的启动入口是@SpringBootApplication注解标注类中的main()方法,@SpringBootApplication : SpringBoot 应用标注在某个类上说明这个类是SpringBoot 的主配置类, SpringBoot 就应该运行这个类的main() 方法启动SpringBoot 应用。
@SpringBootApplication
下面,查看@SpringBootApplication内部源码进行分析 ,核心代码具体如下
@Target({ElementType.TYPE}) //注解的适用范围,Type表示注解可以描述在类、接口、注解或枚举中
@Retention(RetentionPolicy.RUNTIME) //表示注解的生命周期,Runtime运行时
@Documented //表示注解可以记录在javadoc中
@Inherited //表示可以被子类继承该注解
@SpringBootConfiguration // 标明该类为配置类
@EnableAutoConfiguration // 启动自动配置功能
@ComponentScan(excludeFilters = { @Filter(type = FilterType.CUSTOM, classes =
TypeExcludeFilter.class),
@Filter(type = FilterType.CUSTOM, classes =
AutoConfigurationExcludeFilter.class) })
public @interface SpringBootApplication {
// 根据class来排除特定的类,使其不能加入spring容器,传入参数value类型是class类型。
@AliasFor(annotation = EnableAutoConfiguration.class)
Class<?>[] exclude() default {};
// 根据classname 来排除特定的类,使其不能加入spring容器,传入参数value类型是class的全
类名字符串数组。
@AliasFor(annotation = EnableAutoConfiguration.class)
String[] excludeName() default {};
// 指定扫描包,参数是包名的字符串数组。
@AliasFor(annotation = ComponentScan.class, attribute = "basePackages")
String[] scanBasePackages() default {};
// 扫描特定的包,参数类似是Class类型数组。
@AliasFor(annotation = ComponentScan.class, attribute =
"basePackageClasses")
Class<?>[] scanBasePackageClasses() default {};
}
从上述源码可以看出,@SpringBootApplication注解是一个组合注解,前面 4 个是注解的元数据信息, 我们主要看后面 3 个注解:@SpringBootConfiguration、@EnableAutoConfiguration、@ComponentScan三个核心注解,关于这三个核心注解的相关说明具体如下
@SpringBootConfiguration
@SpringBootConfiguration : SpringBoot 的配置类,标注在某个类上,表示这是一个SpringBoot
的配置类。查看@SpringBootConfiguration注解源码,核心代码具体如下。
@Target({ElementType.TYPE})
@Retention(RetentionPolicy.RUNTIME)
@Documented
@Configuration // 配置类的作用等同于配置文件,配置类也是容器中的一个对象
public @interface SpringBootConfiguration {
}
从上述源码可以看出,@SpringBootConfiguration注解内部有一个核心注解@Configuration,该注解是Spring框架提供的,表示当前类为一个配置类(XML配置文件的注解表现形式),并可以被组件扫描器扫描。由此可见,@SpringBootConfiguration注解的作用与@Configuration注解相同,都是标识一个可以被组件扫描器扫描的配置类,只不过@SpringBootConfiguration是被Spring Boot进行了重新封装命名而已
@EnableAutoConfiguration
package org.springframework.boot.autoconfigure;
// 自动配置包
@AutoConfigurationPackage
// Spring的底层注解@Import,给容器中导入一个组件;
// 导入的组件是AutoConfigurationPackages.Registrar.class
@Import(AutoConfigurationImportSelector.class)
// 告诉SpringBoot开启自动配置功能,这样自动配置才能生效。
public @interface EnableAutoConfiguration {
String ENABLED_OVERRIDE_PROPERTY = "spring.boot.enableautoconfiguration";
// 返回不会被导入到 Spring 容器中的类
Class<?>[] exclude() default {};
// 返回不会被导入到 Spring 容器中的类名
String[] excludeName() default {};
}
Spring 中有很多以Enable 开头的注解,其作用就是借助@Import 来收集并注册特定场景相关的Bean ,并加载到IOC 容器。
@EnableAutoConfiguration就是借助@Import来收集所有符合自动配置条件的bean定义,并加载到IoC容器。
@AutoConfigurationPackage
package org.springframework.boot.autoconfigure;
@Import(AutoConfigurationPackages.Registrar.class) // 导入Registrar中注册的组件
public @interface AutoConfigurationPackage {
}
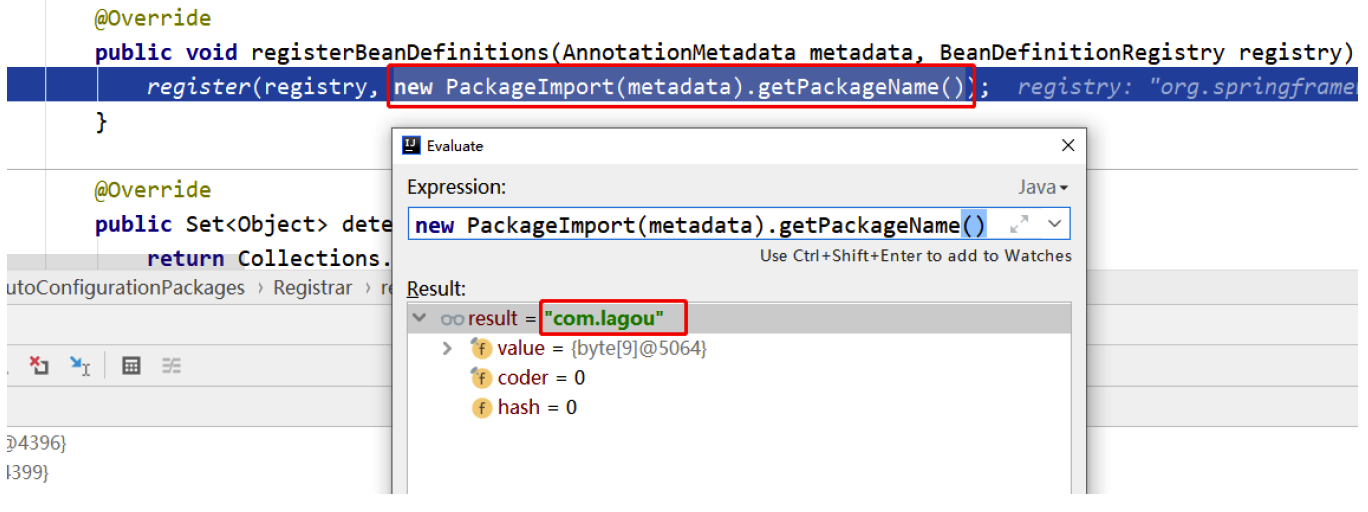
@AutoConfigurationPackage :自动配置包,它也是一个组合注解,其中最重要的注解是@Import(AutoConfigurationPackages.Registrar.class) ,它是Spring 框架的底层注解,它的作用就是给容器中导入某个组件类,例如@Import(AutoConfigurationPackages.Registrar.class) ,它就是将Registrar 这个组件类导入到容器中,可查看Registrar 类中registerBeanDefinitions 方法:
@Override
public void registerBeanDefinitions(AnnotationMetadata metadata,
BeanDefinitionRegistry registry) {
// 将注解标注的元信息传入,获取到相应的包名
register(registry, new PackageImport(metadata).getPackageName());
}
我们对new PackageImport(metadata).getPackageName() 进行检索,看看其结果是什么?
再看register方法
public static void register(BeanDefinitionRegistry registry, String...packageNames) {
// 这里参数 packageNames 缺省情况下就是一个字符串,是使用了注解
// @SpringBootApplication 的 Spring Boot 应用程序入口类所在的包
if (registry.containsBeanDefinition(BEAN)) {
// 如果该bean已经注册,则将要注册包名称添加进去
BeanDefinition beanDefinition = registry.getBeanDefinition(BEAN);
ConstructorArgumentValues constructorArguments = beanDefinition.getConstructorArgumentValues();
constructorArguments.addIndexedArgumentValue(0,addBasePackages(constructorArguments, packageNames));
}
else {
//如果该bean尚未注册,则注册该bean,参数中提供的包名称会被设置到bean定义中去
GenericBeanDefinition beanDefinition = new GenericBeanDefinition();
beanDefinition.setBeanClass(BasePackages.class);
beanDefinition.getConstructorArgumentValues().addIndexedArgumentValue(0,packageNames);
beanDefinition.setRole(BeanDefinition.ROLE_INFRASTRUCTURE);
registry.registerBeanDefinition(BEAN, beanDefinition);
}
}
AutoConfigurationPackages.Registrar这个类就干一个事,注册一个Bean ,这个Bean 就是org.springframework.boot.autoconfigure.AutoConfigurationPackages.BasePackages ,它有一个参数,这个参数是使用了@AutoConfigurationPackage 这个注解的类所在的包路径,保存自动配置类以供之后的使用,比如给JPA entity 扫描器用来扫描开发人员通过注解@Entity 定义的entity类。
@Import(AutoConfigurationImportSelector.class)
@Import({AutoConfigurationImportSelector.class}) :将AutoConfigurationImportSelector 这个类导入到Spring 容器中,AutoConfigurationImportSelector 可以帮助Springboot 应用将所有符合条件的@Configuration配置都加载到当前SpringBoot 创建并使用的IOC 容器( ApplicationContext )中。

可以看到AutoConfigurationImportSelector 重点是实现了DeferredImportSelector 接口和各种Aware 接口,然后DeferredImportSelector 接口又继承了ImportSelector 接口。其不光实现了ImportSelector 接口,还实现了很多其它的Aware 接口,分别表示在某个时机会被回调。
确定自动配置实现逻辑的入口方法:
跟自动配置逻辑相关的入口方法在DeferredImportSelectorGrouping 类的getImports 方法处,因此我们就从DeferredImportSelectorGrouping 类的getImports 方法来开始分析SpringBoot的自动配置源码好了。
先看一下getImports 方法代码:
// ConfigurationClassParser.java
public Iterable<Group.Entry> getImports() {
// 遍历DeferredImportSelectorHolder对象集合deferredImports,deferredImports集合装了各种ImportSelector,当然这里装的是AutoConfigurationImportSelector
for (DeferredImportSelectorHolder deferredImport : this.deferredImports) {
// 【1】,利用AutoConfigurationGroup的process方法来处理自动配置的相关逻辑,决定导入哪些配置类(这个是我们分析的重点,自动配置的逻辑全在这了)
this.group.process(deferredImport.getConfigurationClass().getMetadata(),deferredImport.getImportSelector());
}
// 【2】,经过上面的处理后,然后再进行选择导入哪些配置类
return this.group.selectImports();
}
标【1】处的的代码是我们分析的重中之重,自动配置的相关的绝大部分逻辑全在这里了。那么this.group.process(deferredImport.getConfigurationClass().getMetadata(),deferredImport.getImportSelector()) ;主要做的事情就是在this.group 即AutoConfigurationGroup 对象的process 方法中,传入AutoConfigurationImportSelector对象来选择一些符合条件的自动配置类,过滤掉一些不符合条件的自动配置类,就是这么个事情。
注:
AutoConfigurationGroup:是AutoConfigurationImportSelector的内部类,主要用来处理自动配置相关的逻辑,拥有process和selectImports方法,然后拥有entries和autoConfigurationEntries集合属性,这两个集合分别存储被处理后的符合条件的自动配置类,我们知道这些就足够了;
AutoConfigurationImportSelector:承担自动配置的绝大部分逻辑,负责选择一些符合条件的自动配置类;
metadata:标注在SpringBoot启动类上的@SpringBootApplication注解元数据
标【2】的this.group.selectImports的方法主要是针对前面的process方法处理后的自动配置类再进一步有选择的选择导入
再进入到AutoConfigurationImportSelector$AutoConfigurationGroup的pross方法:
![[外链图片转存失败,源站可能有防盗链机制,建议将图片保存下来直接上传(img-3DKeyfZE-1619604605118)(/Users/dulane/Library/Application Support/typora-user-images/image-20210422140216884.png)]](https://i-blog.csdnimg.cn/blog_migrate/9ab85baa412fb971fa69056bedecb296.png)
通过图中我们可以看到,跟自动配置逻辑相关的入口方法在process方法中
// AutoConfigurationImportSelector$AutoConfigurationGroup.java
// 这里用来处理自动配置类,比如过滤掉不符合匹配条件的自动配置类
public void process(AnnotationMetadata annotationMetadata,
DeferredImportSelector deferredImportSelector) {
Assert.state(
deferredImportSelector instanceof AutoConfigurationImportSelector,
() -> String.format("Only %s implementations are supported, got %s",
AutoConfigurationImportSelector.class.getSimpleName(),
deferredImportSelector.getClass().getName()));
// 【1】,调用getAutoConfigurationEntry方法得到自动配置类放入
autoConfigurationEntry对象中
AutoConfigurationEntry autoConfigurationEntry =
((AutoConfigurationImportSelector) deferredImportSelector)
.getAutoConfigurationEntry(getAutoConfigurationMetadata(),
annotationMetadata);
  // 【2】,又将封装了自动配置类的autoConfigurationEntry对象装进
autoConfigurationEntries集合
this.autoConfigurationEntries.add(autoConfigurationEntry);
// 【3】,遍历刚获取的自动配置类
for (String importClassName : autoConfigurationEntry.getConfigurations()) {
// 这里符合条件的自动配置类作为key,annotationMetadata作为值放进entries集合
this.entries.putIfAbsent(importClassName, annotationMetadata);
}
}
上面代码中我们再来看标【1】的方法getAutoConfigurationEntry ,这个方法主要是用来获取自动配置类有关,承担了自动配置的主要逻辑。直接上代码:
// AutoConfigurationImportSelector.java
// 获取符合条件的自动配置类,避免加载不必要的自动配置类从而造成内存浪费
protected AutoConfigurationEntry getAutoConfigurationEntry(
AutoConfigurationMetadata autoConfigurationMetadata,
AnnotationMetadata annotationMetadata) {
// 获取是否有配置spring.boot.enableautoconfiguration属性,默认返回true
if (!isEnabled(annotationMetadata)) {
return EMPTY_ENTRY;
}
// 获得@Congiguration标注的Configuration类即被审视introspectedClass的注解数据,
// 比如:@SpringBootApplication(exclude = FreeMarkerAutoConfiguration.class)
// 将会获取到exclude = FreeMarkerAutoConfiguration.class和excludeName=""的注解
数据
AnnotationAttributes attributes = getAttributes(annotationMetadata);
// 【1】得到spring.factories文件配置的所有自动配置类
List<String> configurations = getCandidateConfigurations(annotationMetadata,
attributes);
// 利用LinkedHashSet移除重复的配置类
configurations = removeDuplicates(configurations);
// 得到要排除的自动配置类,比如注解属性exclude的配置类
// 比如:@SpringBootApplication(exclude = FreeMarkerAutoConfiguration.class)
// 将会获取到exclude = FreeMarkerAutoConfiguration.class的注解数据
Set<String> exclusions = getExclusions(annotationMetadata, attributes);
// 检查要被排除的配置类,因为有些不是自动配置类,故要抛出异常
checkExcludedClasses(configurations, exclusions);
// 【2】将要排除的配置类移除
configurations.removeAll(exclusions);
// 【3】因为从spring.factories文件获取的自动配置类太多,如果有些不必要的自动配置类都加载
进内存,会造成内存浪费,因此这里需要进行过滤
// 注意这里会调用AutoConfigurationImportFilter的match方法来判断是否符合
@ConditionalOnBean,@ConditionalOnClass或@ConditionalOnWebApplication,后面会重点分
析一下
configurations = filter(configurations, autoConfigurationMetadata);
// 【4】获取了符合条件的自动配置类后,此时触发AutoConfigurationImportEvent事件,
// 目的是告诉ConditionEvaluationReport条件评估报告器对象来记录符合条件的自动配置类
// 该事件什么时候会被触发?--> 在刷新容器时调用invokeBeanFactoryPostProcessors后置处
理器时触发
fireAutoConfigurationImportEvents(configurations, exclusions);
// 【5】将符合条件和要排除的自动配置类封装进AutoConfigurationEntry对象,并返回
return new AutoConfigurationEntry(configurations, exclusions);
}
深入 getCandidateConfigurations 方法
这个方法中有一个重要方法loadFactoryNames ,这个方法是让SpringFactoryLoader 去加载一些组件的名字。
protected List<String> getCandidateConfigurations(AnnotationMetadata
metadata, AnnotationAttributes attributes) {
// 这个方法需要传入两个参数getSpringFactoriesLoaderFactoryClass()和getBeanClassLoader()
// getSpringFactoriesLoaderFactoryClass()这个方法返回的是EnableAutoConfiguration.class
// getBeanClassLoader()这个方法返回的是beanClassLoader(类加载器)
List<String> configurations =
SpringFactoriesLoader.loadFactoryNames(getSpringFactoriesLoaderFactoryClass(),
getBeanClassLoader());
Assert.notEmpty(configurations, "No auto configuration classes found in META-INF/spring.factories. If you "+ "are using a custom packaging, make sure that file iscorrect.");
return configurations;
继续点开loadFactory 方法
public static List<String> loadFactoryNames(Class<?> factoryClass, @Nullable
ClassLoader classLoader) {
//获取出入的键
String factoryClassName = factoryClass.getName();
return
(List)loadSpringFactories(classLoader).getOrDefault(factoryClassName,
Collections.emptyList());
}
private static Map<String, List<String>> loadSpringFactories(@Nullable
ClassLoader classLoader) {
MultiValueMap<String, String> result =
(MultiValueMap)cache.get(classLoader);
if (result != null) {
return result;
} else {
try {
//如果类加载器不为null,则加载类路径下spring.factories文件,将其中设置的配置类的全路径信息封装 为Enumeration类对象
Enumeration<URL> urls = classLoader != null ?
classLoader.getResources("META-INF/spring.factories") :
ClassLoader.getSystemResources("META-INF/spring.factories");
LinkedMultiValueMap result = new LinkedMultiValueMap();
  //循环Enumeration类对象,根据相应的节点信息生成Properties对象,通过传入的键获取值,在将值切割为一个个小的字符串转化为Array,方法result集合中
while(urls.hasMoreElements()) {
URL url = (URL)urls.nextElement();
UrlResource resource = new UrlResource(url);
Properties properties =
PropertiesLoaderUtils.loadProperties(resource);
Iterator var6 = properties.entrySet().iterator();
  while(var6.hasNext()) {
Entry<?, ?> entry = (Entry)var6.next();
String factoryClassName =
((String)entry.getKey()).trim();
String[] var9 =
StringUtils.commaDelimitedListToStringArray((String)entry.getValue());
int var10 = var9.length;
for(int var11 = 0; var11 < var10; ++var11) {
String factoryName = var9[var11];
result.add(factoryClassName, factoryName.trim());
}
}
}
cache.put(classLoader, result);
return result;
}
}
}
从代码中我们可以知道,在这个方法中会遍历整个ClassLoader中所有jar包下的spring.factories文件。spring.factories里面保存着springboot的默认提供的自动配置类
META-INF/spring.factories
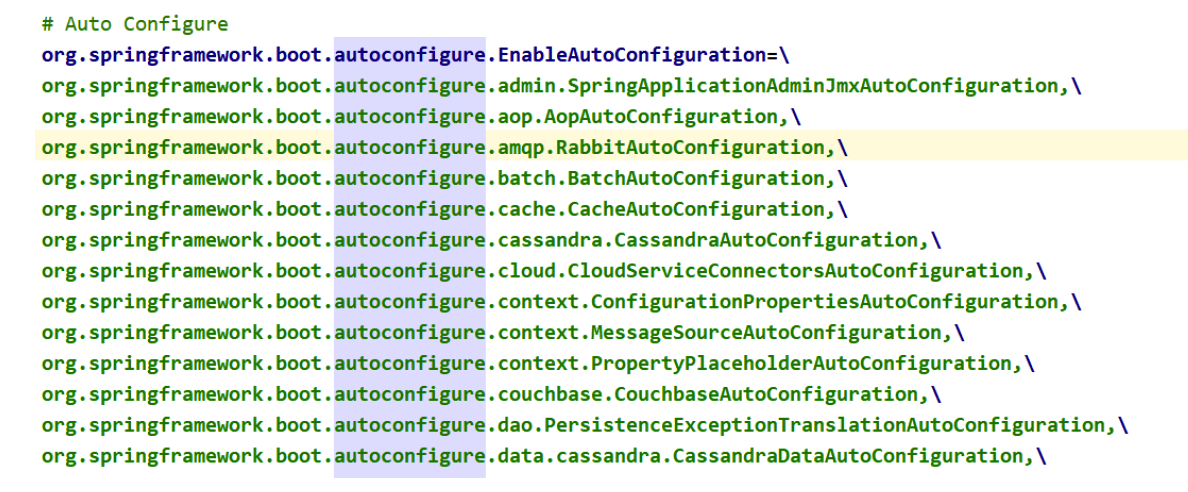
AutoConfigurationEntry 方法主要做的事情就是获取符合条件的自动配置类,避免加载不必要的自动配置类从而造成内存浪费。我们下面总结下AutoConfigurationEntry 方法主要做的事情:
【1】从spring.factories 配置文件中加载EnableAutoConfiguration 自动配置类),获取的自动配置类如图所示。
【2】若@EnableAutoConfiguration 等注解标有要exclude 的自动配置类,那么再将这个自动配置类排除掉;
【3】排除掉要exclude 的自动配置类后,然后再调用filter 方法进行进一步的过滤,再次排除一些不符合条件的自动配置类;
【4】经过重重过滤后,此时再触发AutoConfigurationImportEvent 事件,告诉ConditionEvaluationReport 条件评估报告器对象来记录符合条件的自动配置类;
【5】 最后再将符合条件的自动配置类返回。
总结了AutoConfigurationEntry 方法主要的逻辑后,我们再来细看一下AutoConfigurationImportSelector 的filter 方法:
// AutoConfigurationImportSelector.java
private List<String> filter(List<String> configurations,
AutoConfigurationMetadata autoConfigurationMetadata) {
long startTime = System.nanoTime();
// 将从spring.factories中获取的自动配置类转出字符串数组
String[] candidates = StringUtils.toStringArray(configurations);
// 定义skip数组,是否需要跳过。注意skip数组与candidates数组顺序一一对应
boolean[] skip = new boolean[candidates.length];
boolean skipped = false;
// getAutoConfigurationImportFilters方法:拿到OnBeanCondition,
OnClassCondition和OnWebApplicationCondition
// 然后遍历这三个条件类去过滤从spring.factories加载的大量配置类
for (AutoConfigurationImportFilter filter :
getAutoConfigurationImportFilters()) {
// 调用各种aware方法,将beanClassLoader,beanFactory等注入到filter对象中,
// 这里的filter对象即OnBeanCondition,OnClassCondition或
OnWebApplicationCondition
invokeAwareMethods(filter);
// 判断各种filter来判断每个candidate(这里实质要通过candidate(自动配置类)拿到其标注的
// @ConditionalOnClass,@ConditionalOnBean和@ConditionalOnWebApplication里面的注解值)是否匹配,
// 注意candidates数组与match数组一一对应
/**********************【主线,重点关注】********************************/
boolean[] match = filter.match(candidates, autoConfigurationMetadata);
// 遍历match数组,注意match顺序跟candidates的自动配置类一一对应
for (int i = 0; i < match.length; i++) {
// 若有不匹配的话
if (!match[i]) {
// 不匹配的将记录在skip数组,标志skip[i]为true,也与candidates数组一一对应
skip[i] = true;
// 因为不匹配,将相应的自动配置类置空
candidates[i] = null;
// 标注skipped为true
skipped = true;
}
}
}
// 这里表示若所有自动配置类经过OnBeanCondition,OnClassCondition和OnWebApplicationCondition过滤后,全部都匹配的话,则全部原样返回
if (!skipped) {
return configurations;
}
// 建立result集合来装匹配的自动配置类
List<String> result = new ArrayList<>(candidates.length);
for (int i = 0; i < candidates.length; i++) {
// 若skip[i]为false,则说明是符合条件的自动配置类,此时添加到result集合中
if (!skip[i]) {
result.add(candidates[i]);
}
}
// 打印日志
  if (logger.isTraceEnabled()) {
int numberFiltered = configurations.size() - result.size();
logger.trace("Filtered " + numberFiltered + " auto configuration class
in "
+ TimeUnit.NANOSECONDS.toMillis(System.nanoTime() - startTime)
+ " ms");
}
// 最后返回符合条件的自动配置类
return new ArrayList<>(result);
}
AutoConfigurationImportSelector 的filter 方法主要做的事情就是调用
AutoConfigurationImportFilter 接口的match 方法来判断每一个自动配置类上的条件注解(若有的话) @ConditionalOnClass , @ConditionalOnBean 或@ConditionalOnWebApplication 是否满足条件,若满足,则返回true,说明匹配,若不满足,则返回false说明不匹配。我们现在知道AutoConfigurationImportSelector 的filter 方法主要做了什么事情就行了,现在先不用研究的过深
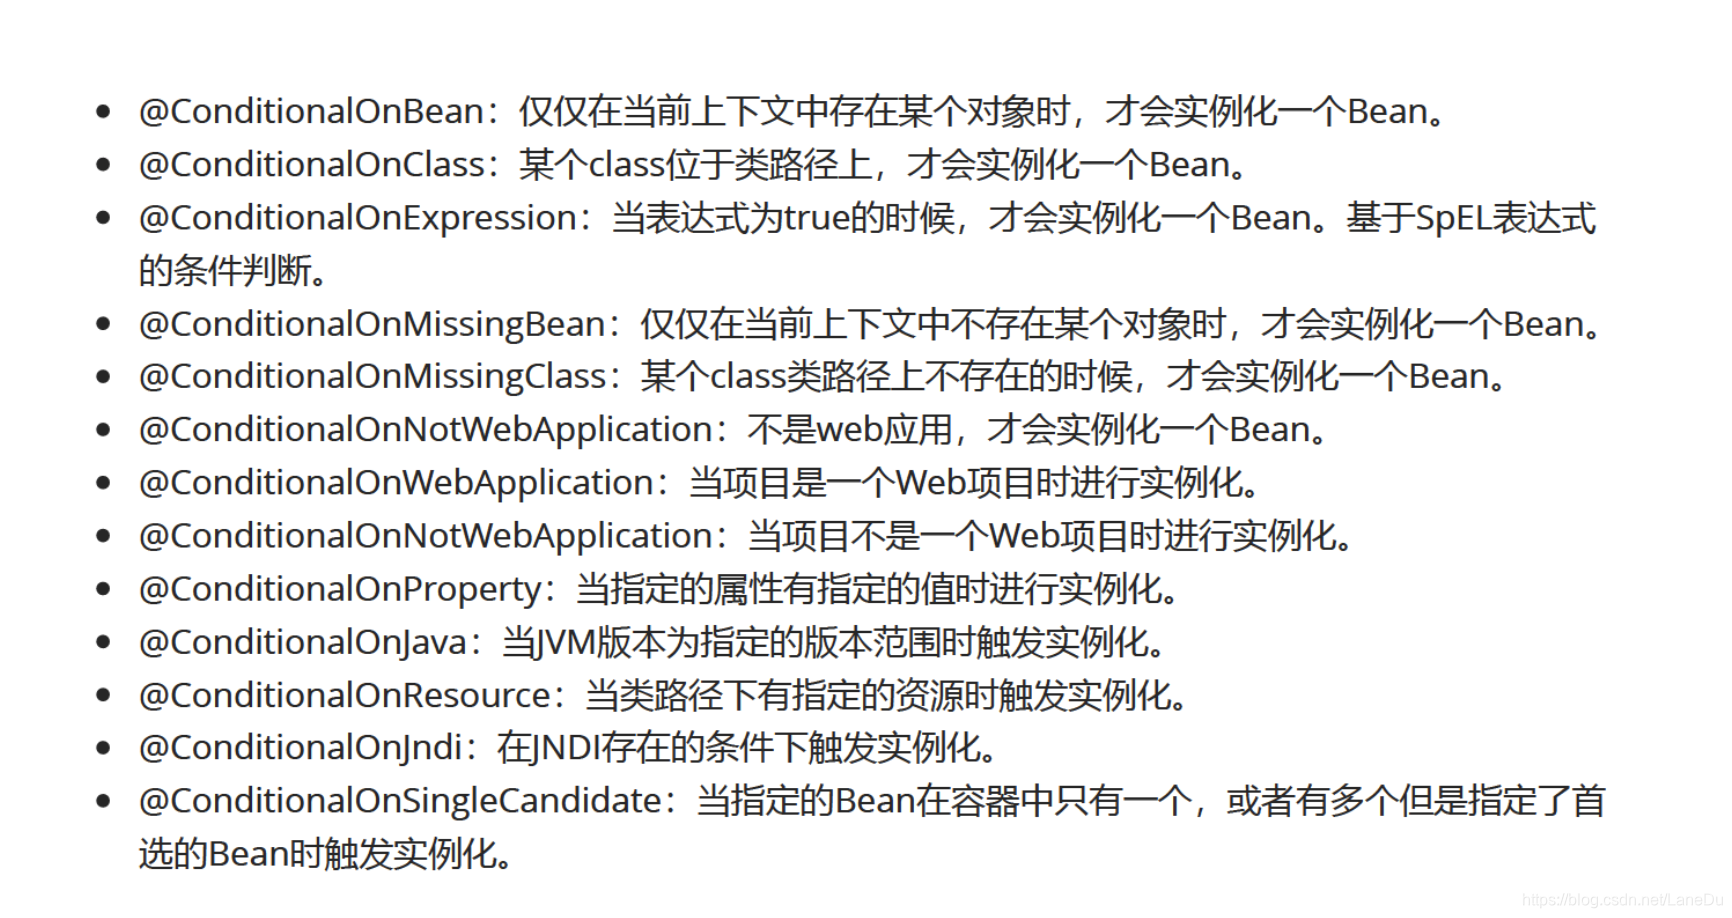
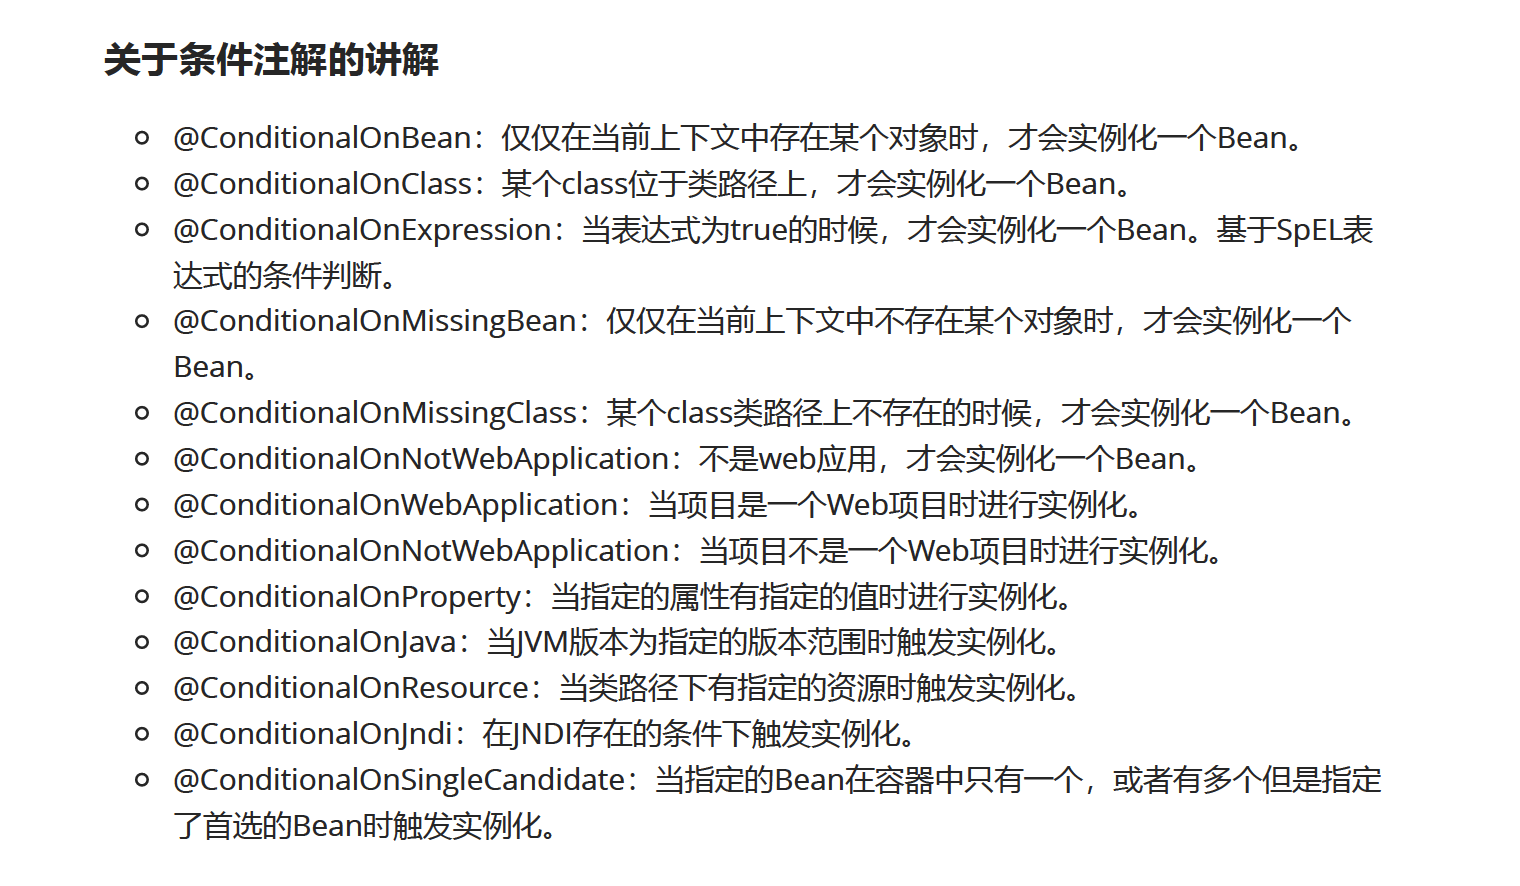
2.3.2 条件注解的讲解
@Conditional是Spring4新提供的注解,它的作用是按照一定的条件进行判断,满足条件给容器注册bean。
有选择的导入自动配置类
this.group.selectImports 方法是如何进一步有选择的导入自动配置类的。直接看代码:
// AutoConfigurationImportSelector$AutoConfigurationGroup.java
public Iterable<Entry> selectImports() {
if (this.autoConfigurationEntries.isEmpty()) {
return Collections.emptyList();
}
// 这里得到所有要排除的自动配置类的set集合
Set<String> allExclusions = this.autoConfigurationEntries.stream()
.map(AutoConfigurationEntry::getExclusions).flatMap(Collection::stream).collect(Collectors.toSet());
// 这里得到经过滤后所有符合条件的自动配置类的set集合
Set<String> processedConfigurations = this.autoConfigurationEntries.stream()
.map(AutoConfigurationEntry::getConfigurations)
.flatMap(Collection::stream)
.collect(Collectors.toCollection(LinkedHashSet::new));
// 移除掉要排除的自动配置类
processedConfigurations.removeAll(allExclusions);
// 对标注有@Order注解的自动配置类进行排序,
return sortAutoConfigurations(processedConfigurations,
getAutoConfigurationMetadata())
.stream()
.map((importClassName) -> new Entry(
this.entries.get(importClassName), importClassName))
.collect(Collectors.toList());
}
可以看到, selectImports 方法主要是针对经过排除掉exclude 的和被AutoConfigurationImportFilter 接口过滤后的满足条件的自动配置类再进一步排除exclude 的自动配置类,然后再排序
2.3.3 总结SpringBoot自动配置的原理
-
从spring.factories配置文件中加载自动配置类;
-
加载的自动配置类中排除掉@EnableAutoConfiguration 注解的exclude 属性指定的自动配置类;
-
然后再用AutoConfigurationImportFilter 接口去过滤自动配置类是否符合其标注注解(若有标注的话) @ConditionalOnClass , @ConditionalOnBean 和@ConditionalOnWebApplication 的条件,若都符合的话则返回匹配结果;
-
然后触发AutoConfigurationImportEvent 事件,告诉ConditionEvaluationReport 条件评估报告器对象来分别记录符合条件和exclude 的自动配置类。
-
最后spring再将最后筛选后的自动配置类导入IOC容器中
2.3.4 以HttpEncodingAutoConfiguration为例解释自动配置原理
// 表示这是一个配置类,和以前编写的配置文件一样,也可以给容器中添加组件
@Configuration
// 启动指定类的ConfigurationProperties功能;将配置文件中对应的值和HttpEncodingProperties绑定起来;
@EnableConfigurationProperties({HttpEncodingProperties.class})
// Spring底层@Conditional注解,根据不同的条件,如果满足指定的条件,整个配置类里面的配置就会生效。
// 判断当前应用是否是web应用,如果是,当前配置类生效。并把HttpEncodingProperties加入到 ioc容器中
@ConditionalOnWebApplication
// 判断当前项目有没有这个CharacterEncodingFilter : SpringMVC中进行乱码解决的过滤器
@ConditionalOnClass({CharacterEncodingFilter.class})
// 判断配置文件中是否存在某个配置 spring.http.encoding.enabled 如果不存在,判断也是成立的
// matchIfMissing = true 表示即使我们配置文件中不配置spring.http.encoding.enabled=true,也是默认生效的
@ConditionalOnProperty(
prefix = "spring.http.encoding",
value = {"enabled"},
matchIfMissing = true
)
public class HttpEncodingAutoConfiguration {
// 它已经和SpringBoot配置文件中的值进行映射了
private final HttpEncodingProperties properties;
// 只有一个有参构造器的情况下,参数的值就会从容器中拿
public HttpEncodingAutoConfiguration(HttpEncodingProperties properties) {
this.properties = properties;
}
@Bean //给容器中添加一个组件,这个组件中的某些值需要从properties中获取
@ConditionalOnMissingBean({CharacterEncodingFilter.class}) //判断容器中没有这个组件
public CharacterEncodingFilter characterEncodingFilter() {
CharacterEncodingFilter filter = new OrderedCharacterEncodingFilter();
filter.setEncoding(this.properties.getCharset().name());
filter.setForceRequestEncoding(this.properties.shouldForce(Type.REQUEST));
filter.setForceResponseEncoding(this.properties.shouldForce(Type.RESPONSE));
return filter;
}
根据当前不同的条件判断,决定这个配置类是否生效。一旦这个配置类生效,这个配置类就会给容器中添加各种组件;这些组件的属性是从对应的properties 类中获取的,这些类里面的每一个属性又是和配置文件绑定的。
# 我们能配置的属性都是来源于这个功能的properties类
spring.http.encoding.enabled=true
spring.http.encoding.charset=utf-8
spring.http.encoding.force=true
所有在配置文件中能配置的属性都是在 xxxProperties 类中封装着,配置文件能配置什么就可以参照某个功能对应的这个属性类。
// 从配置文件中获取指定的值和bean的属性进行绑定
@ConfigurationProperties(prefix = "spring.http.encoding")
public class HttpEncodingProperties {
public static final Charset DEFAULT_CHARSET = Charset.forName("UTF-8");
-
SpringBoot 启动会加载大量的自动配置类
-
我们看我们需要实现的功能有没有SpringBoot 默认写好的自动配置类
-
我们再来看这个自动配置类中到底配置了哪些组件;(只要我们有我们要用的组件,我们就不需要再来配置了)
-
给容器中自动配置类添加组件的时候,会从properties 类中获取某些属性,我们就可以在配置文件中指定这些属性的值。
xxxAutoConfiguration :自动配置类,用于给容器中添加组件从而代替之前我们手动完成大量繁琐的配置。
xxxProperties : 封装了对应自动配置类的默认属性值,如果我们需要自定义属性值,只需要根据xxxProperties 寻找相关属性在配置文件设值即可。
@ComponentScan注解
主要是从定义的扫描路径中,找出标识了需要装配的类自动装配到spring 的bean容器中。常用属性如下:
basePackages、value:指定扫描路径,如果为空则以@ComponentScan注解的类所在的包为基本的扫描路径
basePackageClasses:指定具体扫描的类
includeFilters:指定满足Filter条件的类
excludeFilters:指定排除Filter条件的类
includeFilters和excludeFilters 的FilterType可选:ANNOTATION=注解类型 默认、
ASSIGNABLE_TYPE(指定固定类)、ASPECTJ(ASPECTJ类型)、REGEX(正则表达式)、CUSTOM(自定义类型),自定义的Filter需要实现TypeFilter接口
@ComponentScan的配置如下:
@ComponentScan(excludeFilters = { @Filter(type = FilterType.CUSTOM, classes =
TypeExcludeFilter.class),
@Filter(type = FilterType.CUSTOM, classes =
AutoConfigurationExcludeFilter.class) })
借助excludeFilters将TypeExcludeFillter及FilterType这两个类进行排除当前@ComponentScan注解没有标注basePackages及value,所以扫描路径默认为@ComponentScan注解的类所在的包为基本的扫描路径(也就是标注了@SpringBootApplication注解的项目启动类所在的路径)
抛出疑问:@EnableAutoConfiguration注解是通过@Import注解加载了自动配置固定的bean@ComponentScan注解自动进行注解扫描
那么真正根据包扫描,把组件类生成实例对象存到IOC容器中,又是怎么来完成的?
2.4 源码剖析-Run方法执行流程
不想整理了,现在看太吃梨了,也记不住多少
第一步:获取并启动监听器
第二步:构造应用上下文环境
第三步:初始化应用上下文
第四步:刷新应用上下文前的准备阶段
第五步:刷新应用上下文
第六步:刷新应用上下文后的扩展接口
2.4.1 获取并启动监听器
2.4.2 构造应用上下文环境
2.4.3 初始化应用上下文
2.4.4 刷新应用上下文前的准备阶段
2.4.5 刷新应用上下文
2.4.6 刷新应用上下文后的扩展接口
2.5 源码剖析-自定义Start
2.5.1 SpringBoot starter机制
SpringBoot中的starter是一种非常重要的机制,能够抛弃以前繁杂的配置,将其统一集成进starter,应用者只需要在maven中引入starter依赖,SpringBoot就能自动扫描到要加载的信息并启动相应的默认配置。starter让我们摆脱了各种依赖库的处理,需要配置各种信息的困扰。
SpringBoot会自动通过classpath路径下的类发现需要的Bean,并注册进IOC容器。SpringBoot提供了针对日常企业应用研发各种场景的spring-boot-starter依赖模块。所有这些依赖模块都遵循着约定成俗的默认配置,并允许我们调整这些配置,即遵循“约定大于配置”的理念。比如我们在springboot里面要引入redis,那么我们需要在pom中引入以下内容
<dependency>
<groupId>org.springframework.boot</groupId>
<artifactId>spring-boot-starter-data-redis</artifactId>
</dependency>
这其实就是一个starter。
简而言之,starter就是一个外部的项目,我们需要使用它的时候就可以在当前springboot项目中引入它
为什么要自定义starter
在我们的日常开发工作中,经常会有一些独立于业务之外的配置模块,我们经常将其放到一个特定的包下,然后如果另一个工程需要复用这块功能的时候,需要将代码硬拷贝到另一个工程,重新集成一遍,麻烦至极。如果我们将这些可独立于业务代码之外的功配置模块封装成一个个starter,复用的时候只需要将其在pom中引用依赖即可,再由SpringBoot为我们完成自动装配,就非常轻松了
2.5.2 自定义starter的案例
以下案例是开发中遇到的部分场景
▲ 动态数据源。
▲ 登录模块。
▲ 基于AOP技术实现日志切面。
2.5.3 自定义starter的命名规则
SpringBoot提供的starter以spring-boot-starter-xxx 的方式命名的。
官方建议自定义的starter使用xxx-spring-boot-starter 命名规则。以区分SpringBoot生态提供的starter
2.5.4 自定义starter代码实现
(1)新建maven jar工程,工程名为zdy-spring-boot-starter,导入依赖:
<dependencies>
<dependency>
<groupId>org.springframework.boot</groupId>
<artifactId>spring-boot-autoconfigure</artifactId>
<version>2.2.9.RELEASE</version>
</dependency>
</dependencies>
(2)编写javaBean
package com.lagou.pojo;

import org.springframework.boot.context.properties.ConfigurationProperties;
import org.springframework.boot.context.properties.EnableConfigurationProperties;

/**
 * @author lane
 * @date 2021年04月22日 上午11:45
 */
@EnableConfigurationProperties(SimpleBean.class)
@ConfigurationProperties(prefix = "simplebean")
public class SimpleBean {

	private String id;
	private String name;

	public String getId() {
		return id;
	}

	public void setId(String id) {
		this.id = id;
	}

	public String getName() {
		return name;
	}

	public void setName(String name) {
		this.name = name;
	}

	@Override
	public String toString() {
		return "SimpleBean{" +
				"id='" + id + '\'' +
				", name='" + name + '\'' +
				'}';
	}
}
(3))编写配置类StartConfiguration
package com.lagou.config;

import com.lagou.pojo.SimpleBean;
import org.springframework.beans.factory.annotation.Autowired;
import org.springframework.context.annotation.Bean;
import org.springframework.context.annotation.Configuration;

/**
 * @author lane
 * @date 2021年04月22日 上午11:51
 */
@Configuration
public class StartConfiguration {
   static {
      System.out.println("执行start配置类.....");
   }
   @Bean
   public SimpleBean simpleBean(){
      return new SimpleBean();
   }

}
(4)resources下创建/META-INF/spring.factories
org.springframework.boot.autoconfigure.EnableAutoConfiguration=\
com.lagou.config.StartConfiguration
上面这句话的意思就是SpringBoot启动的时候会去加载我们的simpleBean到IOC容器中。这其实是一种变形的SPI机制
(5)下面的步骤都是在另一个模块中进行了,导入自定义starter的依赖
		<dependency>
			<groupId>com.lagou</groupId>
			<artifactId>lane-spring-boot-start</artifactId>
			<version>2.2.9.RELEASE</version>
		</dependency>
(6)在全局配置文件中配置属性值
#配置simplebean的信息
simplebean.id =1
simplebean.name =杜莱
(7)编写测试方法
package com.lagou.springbootmytests;

import com.lagou.pojo.SimpleBean;
import org.junit.jupiter.api.Test;
import org.junit.runner.RunWith;
import org.springframework.beans.factory.annotation.Autowired;
import org.springframework.boot.test.context.SpringBootTest;
import org.springframework.test.context.junit4.SpringRunner;

@RunWith(SpringRunner.class)
@SpringBootTest
class SpringBootMytestsApplicationTests {
   @Autowired
   public SimpleBean simpleBean;
   @Test
   void contextLoads() {

     System.out.println(simpleBean);

   }

}
(8)测试结果
SimpleBean{id='1', name='æœèŽ±'}
丝毫不慌,因为properties里面的编码可能不是utf-8,需要在idea里面配置下,打个V
![[外链图片转存失败,源站可能有防盗链机制,建议将图片保存下来直接上传(img-Z8x6X6bP-1619604605122)(/Users/dulane/Library/Application Support/typora-user-images/image-20210422144744615.png)]](https://i-blog.csdnimg.cn/blog_migrate/1889d16b9e122695c2e39c8466628751.png)
还是这样子
SimpleBean{id='1', name='æœèŽ±'}
把原先的properties中的删掉重新添加,就正常了
SimpleBean{id='1', name='杜莱'}
2.5.5 热插拔技术
还记得我们经常会在启动类Application上面加@EnableXXX注解吗?
![[外链图片转存失败,源站可能有防盗链机制,建议将图片保存下来直接上传(img-intB3NcE-1619604605122)(/Users/dulane/Library/Application Support/typora-user-images/image-20210422160003838.png)]](https://i-blog.csdnimg.cn/blog_migrate/666c5f1adf34861fad04f515ed016d28.png)
其实这个@Enablexxx注解就是一种热拔插技术,加了这个注解就可以启动对应的starter,当不需要对应的starter的时候只需要把这个注解注释掉就行,是不是很优雅呢?那么这是如何实现的呢?改造工程新增热插拔支持类新增标记类ConfigMarker
/**
 * @author lane
 * @date 2021年04月22日 下午3:55
 */
public class ConfigMarker {
}

@Target(ElementType.TYPE)
@Retention(RetentionPolicy.RUNTIME)
@Import(ConfigMarker.class)
public @interface EnableRegisterServer {
}

/**
 * @author lane
 * @date 2021年04月22日 上午11:51
 */
@Configuration
@ConditionalOnBean(ConfigMarker.class) //判断是否存在这个bean,不存在则不配置
public class StartConfiguration {

	static {
		System.out.println("执行start配置类.....");
	}

	@Bean
	public SimpleBean simpleBean(){
		return new SimpleBean();
	}

}
改造MyAutoConfiguration 新增条件注解@ConditionalOnBean(ConfigMarker.class) ,@ConditionalOnBean 这个是条件注解,前面的意思代表只有当期上下文中含有ConfigMarker对象,被标注的类才会被实例化。
到此热插拔就实现好了,当你加了@EnableImRegisterServer 的时候启动zdy工程就会自动装配SimpleBean,反之则不装配。
的原理也很简单,当加了@EnableImRegisterServer 注解的时候,由于这个注解使用了@Import({ConfigMarker.class}) ,所以会导致Spring去加载ConfigMarker 到上下文中,而又因为条件注解@ConditionalOnBean(ConfigMarker.class) 的存在,所以
StartConfiguration 类就会被实例化。
简而言之就是,判断是否存在类的实例不存在则不配置,因为注解EnableImRegisterServer中添加了@Import(configMarker.class),在SpringbootApplication初始化时候配置这个注解,就会使得configMarker实例化,条件判断存在就会配置simplebean,就可以Autowared
2.6 源码剖析-内嵌Tomcat
Spring Boot默认支持Tomcat,Jetty,和Undertow作为底层容器。
而Spring Boot默认使用Tomcat,一旦引入spring-boot-starter-web模块,就默认使用Tomcat容器。
<dependency>
<groupId>org.springframework.boot</groupId>
<artifactId>spring-boot-starter-web</artifactId>
</dependency>
2.6.1 Servlet容器的使用
默认servlet容器
核心就是引入了tomcat和SpringMvc
![[外链图片转存失败,源站可能有防盗链机制,建议将图片保存下来直接上传(img-olO6gEWB-1619604605124)(/Users/dulane/Library/Application Support/typora-user-images/image-20210423141854888.png)]](https://i-blog.csdnimg.cn/blog_migrate/e42fa8405767610334b6942c29db1162.png)
2.6.2 切换servlet容器
那如果我么想切换其他Servlet容器呢,只需如下两步:
-
将tomcat依赖移除掉
-
引入其他Servlet容器依赖
引入jetty:
<dependency>
<groupId>org.springframework.boot</groupId>
<artifactId>spring-boot-starter-web</artifactId>
<exclusions>
<exclusion>
<!--移除spring-boot-starter-web中的tomcat-->
<artifactId>spring-boot-starter-tomcat</artifactId>
<groupId>org.springframework.boot</groupId>
  </exclusion>
</exclusions>
</dependency>
<dependency>
<groupId>org.springframework.boot</groupId>
<!--引入jetty-->
<artifactId>spring-boot-starter-jetty</artifactId>
</dependency>
2.6.3 内嵌Tomcat自动配置原理(略)
springboot的内部通过new Tomcat() 的方式启动了一个内置Tomcat
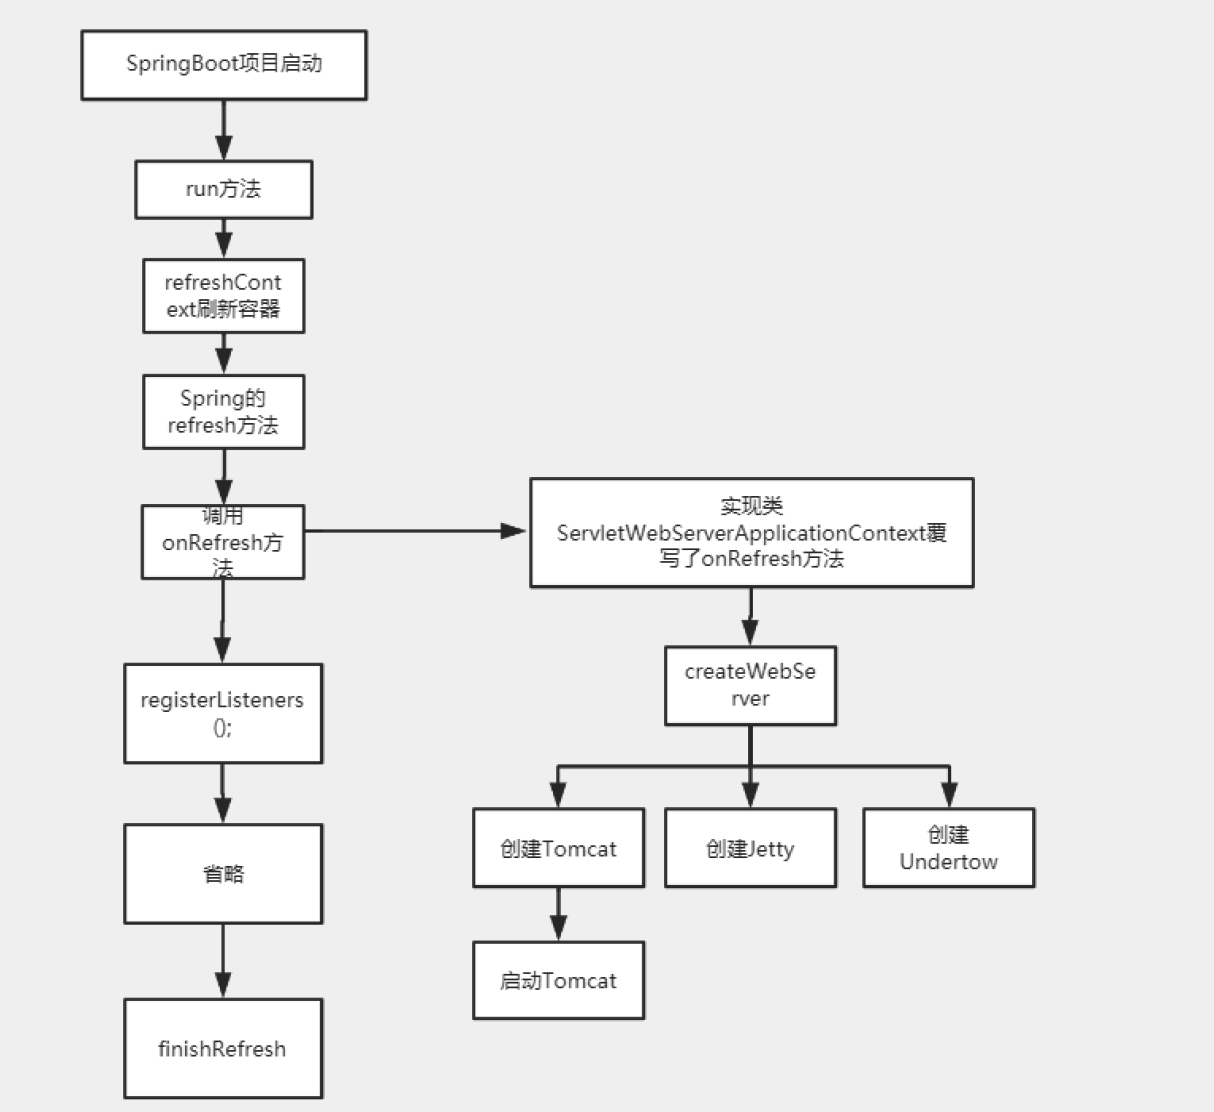
2.7 源码剖析-自动配置SpringMVC(略)
总结
SpringBoot自动装配SpringMvc其实就是往ServletContext中加入了一个Dispatcherservlet
Servlet3.0规范中有这个说明,除了可以动态加Servlet,还可以动态加Listener,Filter
addServlet、addListener、addFilter
第三章 SpringBoot数据访问
3.1 数据源自动配置源码剖析
3.1.1 选择数据库驱动的库文件
3.1.2 配置数据库连接
在application.properties中配置数据库连接
spring.datasource.driver-class-name=com.mysql.cj.jdbc.Driver
spring.datasource.url=jdbc:mysql:///springboot_h?useUnicode=true&characterEncoding=utf8&useSSL=true&serverTimezone=UTC
spring.datasource.username=root
spring.datasource.password=root
3.1.3 配置spring-boot-starter-jdbc
<dependency>
<groupId>org.springframework.boot</groupId>
<artifactId>spring-boot-starter-jdbc</artifactId>
</dependency>
3.1.4 编写测试类
package com.lagou.springbootdatasourceaccess;

import org.junit.jupiter.api.Test;
import org.junit.runner.RunWith;
import org.springframework.beans.factory.annotation.Autowired;
import org.springframework.boot.test.context.SpringBootTest;
import org.springframework.test.context.junit4.SpringRunner;

import javax.sql.DataSource;
import java.sql.Connection;
import java.sql.SQLException;

@RunWith(SpringRunner.class)
@SpringBootTest
class SpringBootDatasourceAccessApplicationTests {

	@Autowired
	private DataSource dataSource;
	@Test
	void contextLoads() throws SQLException {
		Connection connection = dataSource.getConnection();
		System.out.println(connection);
	}

}
测试结果
HikariProxyConnection@165337720 wrapping com.mysql.cj.jdbc.ConnectionImpl@4207852d
3.1.5 连接池配置方式
SpringBoot提供了三种数据库连接池:
- HikariCP
- Commons DBCP2
- Tomcat JDBC Connection Pool
其中spring boot2.x版本默认使用HikariCP,maven中配置如下:
<dependency>
<groupId>org.springframework.boot</groupId>
<artifactId>spring-boot-starter-jdbc</artifactId>
</dependency>
如果不使用HikariCP,而改用Commons DBCP2,则配置如下:
<dependency>
<groupId>org.apache.commons</groupId>
<artifactId>commons-dbcp2</artifactId>
</dependency>
<dependency>
<groupId>org.springframework.boot</groupId>
<artifactId>spring-boot-starter-jdbc</artifactId>
<exclusions>
<exclusion>
<groupId>com.zaxxer</groupId>
<artifactId>HikariCP</artifactId>
</exclusion>
</exclusions>
</dependency>
如果不使用HikariCP,而改用Tomcat JDBC Connection Pool,则配置如下:
<dependency>
<groupId>org.apache.tomcat</groupId>
<artifactId>tomcat-jdbc</artifactId>
</dependency>
<dependency>
<groupId>org.springframework.boot</groupId>
<artifactId>spring-boot-starter-jdbc</artifactId>
<exclusions>
<exclusion>
<groupId>com.zaxxer</groupId>
<artifactId>HikariCP</artifactId>
</exclusion>
</exclusions>
</dependency>
3.1.6 数据源自动配置
spring.factories中找到数据源的配置类:

@Configuration(proxyBeanMethods = false)
@ConditionalOnClass({ DataSource.class, EmbeddedDatabaseType.class })
@EnableConfigurationProperties(DataSourceProperties.class)
@Import({ DataSourcePoolMetadataProvidersConfiguration.class,
DataSourceInitializationConfiguration.class })
public class DataSourceAutoConfiguration {
@Configuration(proxyBeanMethods = false)
@Conditional(EmbeddedDatabaseCondition.class)
@ConditionalOnMissingBean({ DataSource.class, XADataSource.class })
@Import(EmbeddedDataSourceConfiguration.class)
protected static class EmbeddedDatabaseConfiguration {
}
@Configuration(proxyBeanMethods = false)
@Conditional(PooledDataSourceCondition.class)
@ConditionalOnMissingBean({ DataSource.class, XADataSource.class })
@Import({ DataSourceConfiguration.Hikari.class,
DataSourceConfiguration.Tomcat.class,
DataSourceConfiguration.Dbcp2.class,
DataSourceConfiguration.Generic.class,
DataSourceJmxConfiguration.class })
protected static class PooledDataSourceConfiguration {
}
...
@Conditional(PooledDataSourceCondition.class) 根据判断条件,实例化这个类,指定了配置文件中,必须有type这个属性
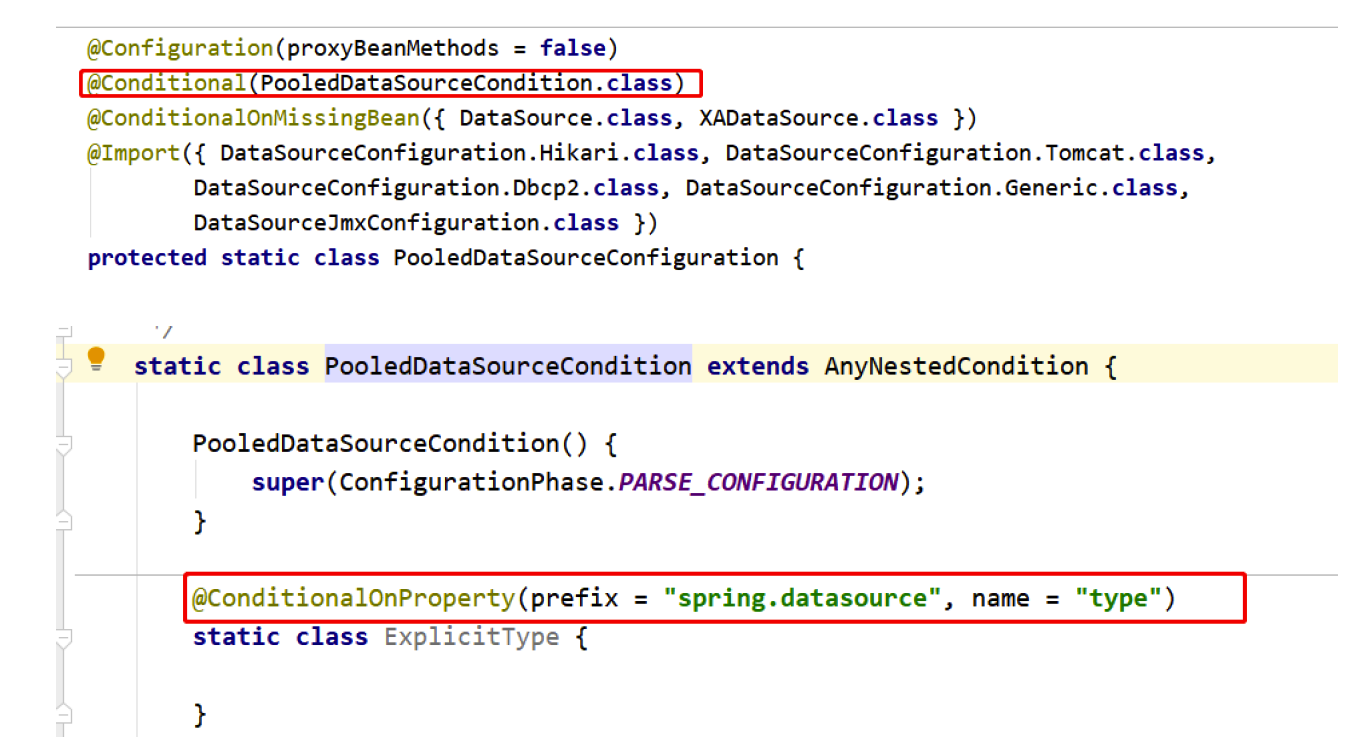
另外springboot 默认支持 type 类型设置的数据源;
@Import({ DataSourceConfiguration.Hikari.class,
DataSourceConfiguration.Tomcat.class,
DataSourceConfiguration.Dbcp2.class,
DataSourceConfiguration.Generic.class,
DataSourceJmxConfiguration.class })
abstract class DataSourceConfiguration {
DataSourceConfiguration() {
}
protected static <T> T createDataSource(DataSourceProperties properties,
Class<? extends DataSource> type) {
return properties.initializeDataSourceBuilder().type(type).build();
}
//自定义连接池 接口 spring.datasource.type 配置
@ConditionalOnMissingBean({DataSource.class})
@ConditionalOnProperty(
name = {"spring.datasource.type"}
)
static class Generic {
Generic() {
}
@Bean
public DataSource dataSource(DataSourceProperties properties) {
//创建数据源 initializeDataSourceBuilder DataSourceBuilder
return properties.initializeDataSourceBuilder().build();
}
}
//Dbcp2 连接池
@ConditionalOnClass({BasicDataSource.class})
@ConditionalOnMissingBean({DataSource.class})
@ConditionalOnProperty(
name = {"spring.datasource.type"},
havingValue = "org.apache.commons.dbcp2.BasicDataSource",
matchIfMissing = true
)
  static class Dbcp2 {
Dbcp2() {
}
@Bean
@ConfigurationProperties(
prefix = "spring.datasource.dbcp2"
)
public BasicDataSource dataSource(DataSourceProperties properties) {
return
(BasicDataSource)DataSourceConfiguration.createDataSource(properties,
BasicDataSource.class);
}
}
//2.0 之后默认默认使用 hikari 连接池
@ConditionalOnClass({HikariDataSource.class})
  @ConditionalOnMissingBean({DataSource.class})
@ConditionalOnProperty(
name = {"spring.datasource.type"},
havingValue = "com.zaxxer.hikari.HikariDataSource",
matchIfMissing = true
)
static class Hikari {
Hikari() {
}
@Bean
@ConfigurationProperties(
prefix = "spring.datasource.hikari"
)
public HikariDataSource dataSource(DataSourceProperties properties)
{
HikariDataSource dataSource =
(HikariDataSource)DataSourceConfiguration.createDataSource(properties,
HikariDataSource.class);
if (StringUtils.hasText(properties.getName())) {
dataSource.setPoolName(properties.getName());
}
return dataSource;
}
}
  //2.0 之后默认不是使用 tomcat 连接池,或者使用tomcat 容器
//如果导入tomcat jdbc连接池 则使用此连接池,在使用tomcat容器时候 或者导入此包时候
@ConditionalOnClass({org.apache.tomcat.jdbc.pool.DataSource.class})
@ConditionalOnMissingBean({DataSource.class})
//并且配置的配置是 org.apache.tomcat.jdbc.pool.DataSource 会采用tomcat 连接池
@ConditionalOnProperty(
name = {"spring.datasource.type"}, //name用来从application.properties中读取某个属性值
havingValue = "org.apache.tomcat.jdbc.pool.DataSource",
//缺少该property时是否可以加载。如果为true,没有该property也会正常加载;反之报错
// 不管你配不配置 都以 tomcat 连接池作为连接池
matchIfMissing = true //默认是false
)
static class Tomcat {
Tomcat() {
}
//给容器中加数据源
@Bean
@ConfigurationProperties(
prefix = "spring.datasource.tomcat"
)
public org.apache.tomcat.jdbc.pool.DataSource
dataSource(DataSourceProperties properties) {
org.apache.tomcat.jdbc.pool.DataSource dataSource =
(org.apache.tomcat.jdbc.pool.DataSource)DataSourceConfiguration.createDataSo
urce(properties, org.apache.tomcat.jdbc.pool.DataSource.class);
DatabaseDriver databaseDriver =
DatabaseDriver.fromJdbcUrl(properties.determineUrl());
  String validationQuery = databaseDriver.getValidationQuery();
if (validationQuery != null) {
dataSource.setTestOnBorrow(true);
dataSource.setValidationQuery(validationQuery);
}
return dataSource;
}
}
}
如果在类路径没有找到 jar包 则会跑出异常
Field dataSource in com.example.springsession.demo.jpa.StudentController required a bean
of type ‘javax.sql.DataSource’ that could not be found.
- Bean method ‘dataSource’ not loaded because @ConditionalOnClass did not find required
class ‘org.springframework.jdbc.datasource.embedded.EmbeddedDatabaseType’
Bean method ‘dataSource’ not loaded because @ConditionalOnClass did not find
required classes ‘javax.transaction.TransactionManager’,
‘org.springframework.jdbc.datasource.embedded.EmbeddedDatabaseType’
DataSourceConfiguration
配置文件中没有指定数据源时候 会根据注解判断然后选择相应的实例化数据源对象!
则 type 为空。
@ConditionalOnClass({HikariDataSource.class})
@ConditionalOnMissingBean({DataSource.class}) //注解判断是否执行初始化代码,即如果用户已经创建了bean,则相关的初始化代码不再执行
@ConditionalOnProperty(
name = {"spring.datasource.type"}, //拿配置文件中的type 如果为空返回fale
havingValue = "com.zaxxer.hikari.HikariDataSource", //type 不为空则去havingValue 对比 ,相同则ture 否则为false
matchIfMissing = true // 不管上面文件中是否配置,默认都进行加载 ,matchIfMissing的默值为false
)
static class Hikari {
Hikari() {
}
@Bean
@ConfigurationProperties(
prefix = "spring.datasource.hikari"
)
public HikariDataSource dataSource(DataSourceProperties properties) {
//创建数据源
HikariDataSource dataSource =
(HikariDataSource)DataSourceConfiguration.createDataSource(properties,
//创建数据源
HikariDataSource.class);
if (StringUtils.hasText(properties.getName())) {
dataSource.setPoolName(properties.getName());
}
return dataSource;}
createDataSource 方法
protected static <T> T createDataSource(DataSourceProperties properties,
Class<? extends DataSource> type) {
// 使用DataSourceBuilder 建造数据源,利用反射创建type数据源,然后绑定相关属性
return properties.initializeDataSourceBuilder().type(type).build();
}
DataSourceBuilder 类
设置type
public <D extends DataSource> DataSourceBuilder<D> type(Class<D> type) {
this.type = type;
return this;
}
根据设置type的选择类型
private Class<? extends DataSource> getType() {
//如果没有配置type 则为空 默认选择 findType
Class<? extends DataSource> type = this.type != null ? this.type :
findType(this.classLoader);
if (type != null) {
return type;
} else {
throw new IllegalStateException("No supported DataSource type
found");
}
}
public static Class<? extends DataSource> findType(ClassLoader classLoader)
{
String[] var1 = DATA_SOURCE_TYPE_NAMES;
int var2 = var1.length;
int var3 = 0;
while(var3 < var2) {
String name = var1[var3];
try {
return ClassUtils.forName(name, classLoader);
} catch (Exception var6) {
++var3;
}
}
return null;
}
//数组
private static final String[] DATA_SOURCE_TYPE_NAMES = new String[]
{"com.zaxxer.hikari.HikariDataSource",
"org.apache.tomcat.jdbc.pool.DataSource",
"org.apache.commons.dbcp2.BasicDataSource"};
取出来的第一个值就是com.zaxxer.hikari.HikariDataSource,那么证实在没有指定Type的情况下,默认类型为com.zaxxer.hikari.HikariDataSource
3.2 Druid连接池的配置
3.2.1 添加依赖
<dependency>
			<groupId>com.alibaba</groupId>
			<artifactId>druid-spring-boot-starter</artifactId>
			<version>1.1.16</version>
		</dependency>
3.2.2 添加配置
spring:
  datasource:
    username: root
    password: root
    url: jdbc:mysql:///springboot_h?useUnicode=true&characterEncoding=utf-8&useSSL=true&serverTimezone=UTC
    driver-class-name: com.mysql.cj.jdbc.Driver
    initialization-mode: always
    # 使用druid数据源
    type: com.alibaba.druid.pool.DruidDataSource
    # 数据源其他配置
    druid:
      max-active: 20
      min-idle: 3
2021-04-24 10:00:16.622  INFO 927 --- [           main] c.a.d.s.b.a.DruidDataSourceAutoConfigure : Init DruidDataSource
2021-04-24 10:00:16.953  INFO 927 --- [           main] com.alibaba.druid.pool.DruidDataSource   : {dataSource-1} inited
但是Dubug查看DataSource的值,会发现有些属性是没有生效的

这是因为:如果单纯在yml文件中编写如上的配置,SpringBoot肯定是读取不到druid的相关配置的。因为它并不像我们原生的jdbc,系统默认就使用DataSourceProperties与其属性进行了绑定。所以我们应该编写一个类与其属性进行绑定
/**
 * @author lane
 * @date 2021年04月23日 下午4:19
 */
@Configuration
public class DruidConfig {

	@Bean
	@ConfigurationProperties(prefix = "spring.datasource")
	public DataSource dataSource(){
		return new DruidDataSource() ;
	}

}
测试的时候,突然发现控制台报错了。经过查找发现是yml文件里的
因为我们springBoot2.0以后使用的日志框架已经不再使用log4j了。此时应该引入相应的适配器。
我们可以在pom.xml文件上加入
<!--引入适配器-->
<dependency>
<groupId>org.slf4j</groupId>
<artifactId>slf4j-log4j12</artifactId>
</dependency>
![[外链图片转存失败,源站可能有防盗链机制,建议将图片保存下来直接上传(img-ANT4zRsz-1619604605132)(/Users/dulane/Library/Application Support/typora-user-images/image-20210424100342275.png)]](https://i-blog.csdnimg.cn/blog_migrate/9bb1d09fedbec1f60156b5ba33a35be6.png)
3.3 SpringBoot整合Mybatis
MyBatis 是一款优秀的持久层框架,Spring Boot官方虽然没有对MyBatis进行整合,但是MyBatis团队自行适配了对应的启动器,进一步简化了使用MyBatis进行数据的操作
因为Spring Boot框架开发的便利性,所以实现Spring Boot与数据访问层框架(例如MyBatis)的整合非常简单,主要是引入对应的依赖启动器,并进行数据库相关参数设置即可
3.3.1 添加依赖
<!-- 配置数据库驱动和mybatis dependency -->
<dependency>
<groupId>org.mybatis.spring.boot</groupId>
<artifactId>mybatis-spring-boot-starter</artifactId>
<version>1.3.2</version>
</dependency>
<dependency>
<groupId>org.projectlombok</groupId>
<artifactId>lombok</artifactId>
<optional>true</optional>
</dependency>
3.3.2 添加配置文件
spring:
  datasource:
    username: root
    password: root
    url: jdbc:mysql:///springboot_h?useUnicode=true&characterEncoding=utf-8&useSSL=true&serverTimezone=UTC
    driver-class-name: com.mysql.cj.jdbc.Driver
    initialization-mode: always
    # 使用druid数据源
    type: com.alibaba.druid.pool.DruidDataSource
3.3.3 基本代码
/**
 * @author lane
 * @date 2021年04月24日 上午10:13
 */
@Data
public class User {

	private Integer id;
	private String username;
	private Integer age;

}


/**
 * @author lane
 * @date 2021年04月24日 上午10:22
 */
//@Mapper //放在配置启动类包扫描mapper了
public interface UserMapper {

	@Select("select * from user")
	public List<User> findAllUser();

}


/**
 * @author lane
 * @date 2021年04月24日 上午10:23
 */
@Service
public class UserService {

	@Autowired
	private UserMapper userMapper;

	Logger logger = LoggerFactory.getLogger(UserService.class);

	public List<User> findAllUser() {

		List<User> allUser = userMapper.findAllUser();
		logger.info("用户信息为:"+allUser.toString());
		return allUser;
	}
}


@SpringBootApplication
@MapperScan("com.lagou.mapper")
public class SpringBootDatasourceAccessApplication {

	public static void main(String[] args) {
		SpringApplication.run(SpringBootDatasourceAccessApplication.class, args);
	}

}
3.3.4 测试整合
@RunWith(SpringRunner.class)
@SpringBootTest
class SpringBootDatasourceAccessApplicationTests {

	@Autowired
	private DataSource dataSource;
	@Test
	void contextLoads() throws SQLException {
		Connection connection = dataSource.getConnection();
		System.out.println(connection);
	}

	@Autowired
	private UserService userService;

	@Test
	public void test1(){
		List<User> allUser = userService.findAllUser();
	}

}
打印结果
用户信息为:[User(id=1, username=tom, age=11), User(id=2, username=lucy, age=12)]
3.4 Mybatis自动配置源码分析(略)
1、springboot项目最核心的就是自动加载配置,该功能则依赖的是一个注解
@SpringBootApplication中的@EnableAutoConfiguration
2、EnableAutoConfiguration主要是通过AutoConfigurationImportSelector类来加载
以mybatis为例,*selector通过反射加载spring.factories中指定的java类,也就是加载
MybatisAutoConfiguration类(该类有Configuration注解,属于配置类)
![[外链图片转存失败,源站可能有防盗链机制,建议将图片保存下来直接上传(img-9Q0cNeGs-1619604605132)(/Users/dulane/Library/Application Support/typora-user-images/image-20210424140000698.png)]](https://i-blog.csdnimg.cn/blog_migrate/8f10d4fa444aca773f0fa76d00309ed0.png)

3、MybatisAutoConfiguration:
①类中有个MybatisProperties类,该类对应的是mybatis的配置文件
②类中有个sqlSessionFactory方法,作用是创建SqlSessionFactory类、Configuration类
(mybatis最主要的类,保存着与mybatis相关的东西)
③SelSessionTemplate,作用是与mapperProoxy代理类有关
sqlSessionFactory主要是通过创建了一个SqlSessionFactoryBean,这个类实现了FactoryBean接
口,所以在Spring容器就会注入这个类中定义的getObject方法返回的对象。
@MapperScan(basePackages = “com.mybatis.mapper”)这个定义,扫描指定包下的
mapper接口,然后设置每个mapper接口的beanClass属性为MapperFactoryBean类型并加入到spring的bean容器中。
MapperFactoryBean实现了FactoryBean接口,所以当spring从待实例化的bean容器中遍历到这个bean并开始执行实例化时返回的对象实际上是getObject方法中返回的对象。
public class MapperFactoryBean<T> extends SqlSessionDaoSupport implements
FactoryBean<T>
最后看一下MapperFactoryBean的getObject方法,实际上返回的就是mybatis中通过getMapper拿到的对象,熟悉mybatis源码的就应该清楚,这个就是mybatis通过动态代理生成的mapper接口实现类
@Override
public T getObject() throws Exception {
return getSqlSession().getMapper(this.mapperInterface);
}
到此,mapper接口现在也通过动态代理生成了实现类,并且注入到spring的bean容器中了,之后使用者就可以通过@Autowired或者getBean等方式,从spring容器中获取到了
3.5 SpringBoot + Mybatis实现动态数据源切换
3.5.1 动态数据源介绍
业务背景
电商订单项目分正向和逆向两个部分:其中正向数据库记录了订单的基本信息,包括订单基本信息、订单商品信息、优惠卷信息、发票信息、账期信息、结算信息、订单备注信息、收货人信息等;逆向数据库主要包含了商品的退货信息和维修信息。数据量超过500万行就要考虑分库分表和读写分离,那么我们在正向操作和逆向操作的时候,就需要动态的切换到相应的数据库,进行相关的操作。
解决思路
现在项目的结构设计基本上是基于MVC的,那么数据库的操作集中在dao层完成,主要业务逻辑在service层处理,controller层处理请求。假设在执行dao层代码之前能够将数据源(DataSource)换成我们想要执行操作的数据源,那么这个问题就解决了
[外链图片转存失败,源站可能有防盗链机制,建议将图片保存下来直接上传(img-s0rIFOKw-1619604605134)(https://cdn.jsdelivr.net/gh/lanedu/upic@main/uPic/20210424/image-20210424155549698.png)]
Spring内置了一个AbstractRoutingDataSource,它可以把多个数据源配置成一个Map,然后,根据不同的key返回不同的数据源。因为AbstractRoutingDataSource也是一个DataSource接口,因此,应用程序可以先设置好key, 访问数据库的代码就可以从AbstractRoutingDataSource拿到对应的一个真实的数据源,从而访问指定的数据库
上面源码中还有另外一个核心的方法setTargetDataSources(Map<Object, Object>targetDataSources) ,它需要一个Map,在方法注释中我们可以得知,这个Map存储的就是我们配置的多个数据源的键值对。我们整理一下这个类切换数据源的运作方式,这个类在连接数据库之前会执行determineCurrentLookupKey()方法,这个方法返回的数据将作为key去targetDataSources中查找相应的值,如果查找到相对应的DataSource,那么就使用此DataSource获取数据库连接
它是一个abstract类,所以我们使用的话,推荐的方式是创建一个类来继承它并且实现它的determineCurrentLookupKey() 方法,这个方法介绍上面也进行了说明,就是通过这个方法进行数据源的切换
思路步骤

3.5.2 动态数据源具体实现
添加依赖
<dependency>
   <groupId>org.springframework.boot</groupId>
   <artifactId>spring-boot-starter-web</artifactId>
</dependency>
<dependency>
   <groupId>org.springframework.boot</groupId>
   <artifactId>spring-boot-starter-aop</artifactId>
</dependency>
数据库信息
基本代码之pojo
package com.lagou.mapper;

import com.lagou.pojo.Product;
import org.apache.ibatis.annotations.Select;

import java.util.List;

/**
 * @author lane
 * @date 2021年04月24日 下午2:44
 */
public interface ProductMapper {
	@Select("select * from product")
	public List<Product> findAllProductM();

	@Select("select * from product")
	public List<Product> findAllProductS();

}
基本代码之mapper
/**
 * @author lane
 * @date 2021年04月24日 下午2:44
 */
public interface ProductMapper {
	@Select("select * from product")
	public List<Product> findAllProductM();

	@Select("select * from product")
	public List<Product> findAllProductS();

}
基本代码之service
package com.lagou.service;

import com.lagou.config.MyDataSource;
import com.lagou.config.RoutingDataSourceContext;
import com.lagou.mapper.ProductMapper;
import com.lagou.pojo.Product;
import org.slf4j.Logger;
import org.slf4j.LoggerFactory;
import org.springframework.beans.factory.annotation.Autowired;
import org.springframework.stereotype.Service;

import java.util.List;

/**
 * @author lane
 * @date 2021年04月24日 下午2:45
 */
@Service
public class ProductService {

	@Autowired
	private ProductMapper productMapper;

	Logger logger = LoggerFactory.getLogger(this.getClass());


	@MyDataSource("masterDataSource")
	public List<Product> findAllProductM(){
//		String key ="masterDataSource";
//		RoutingDataSourceContext routingDataSourceContext = new RoutingDataSourceContext(key);
		List<Product> allProductM = productMapper.findAllProductM();
		logger.info("master:"+allProductM.toString());
		return allProductM;

	}
	@MyDataSource("slaveDataSource")
	public List<Product> findAllProductS(){

//		String key ="slaveDataSource";
//		RoutingDataSourceContext routingDataSourceContext = new RoutingDataSourceContext(key);
		List<Product> allProductS = productMapper.findAllProductS();
		logger.info("slave:"+allProductS.toString());
		return allProductS;

	}

}
基本代码之controller
package com.lagou.controller;

import com.lagou.service.ProductService;
import org.springframework.beans.factory.annotation.Autowired;
import org.springframework.web.bind.annotation.RequestMapping;
import org.springframework.web.bind.annotation.RestController;

/**
 * @author lane
 * @date 2021年04月24日 下午2:49
 */
@RestController
public class ProductController {

	@Autowired
	private ProductService productService;

	@RequestMapping("/findAllProductM")
	public String findAllProductM(){
		productService.findAllProductM();
		return "master";
	}

	@RequestMapping("/findAllProductS")
	public String findAllProductS(){
		productService.findAllProductS();
		return "slave";
	}

}
配置代码之数据库信息
#主数据源
spring.druid.datasource.master.password=root
spring.druid.datasource.master.username=root
spring.druid.datasource.master.jdbcurl=jdbc:mysql://localhost:3306/product_master?useUnicode=true&characterEncoding=utf-8&useSSL=true&serverTimezone=UTC
spring.druid.datasource.master.driver-class-name=com.mysql.cj.jdbc.Driver
#分数据源
spring.druid.datasource.slave.password=root
spring.druid.datasource.slave.username=root
spring.druid.datasource.slave.jdbcurl=jdbc:mysql://localhost:3306/product_slave?useUnicode=true&characterEncoding=utf-8&useSSL=true&serverTimezone=UTC
spring.druid.datasource.slave.driver-class-name=com.mysql.cj.jdbc.Driver
配置代码之动态存储key
/**
 * 用于动态存储数据源的key
 * @author lane
 * @date 2021年04月24日 下午3:21
 */
public class RoutingDataSourceContext {

	static final ThreadLocal<String> threadLocalDataSourceKey = new ThreadLocal<>();


	public RoutingDataSourceContext(String key){
		threadLocalDataSourceKey.set(key);
	}

	public static String getKey(){

		String key = threadLocalDataSourceKey.get();
		return key==null?"masterDataSource":key;

	}

	public void close(){
		threadLocalDataSourceKey.remove();
	}
}
配置代码之选择数据源
/**
 * 选择哪个数据源
 * @author lane
 * @date 2021年04月24日 下午3:00
 */
public class RoutingDataSource extends AbstractRoutingDataSource {

	@Override
	protected Object determineCurrentLookupKey() {

		return RoutingDataSourceContext.getKey();

	}
}
配置代码之数据源配置
/**
 * 重写数据源的配置类
 * @author lane
 * @date 2021年04月24日 下午2:53
 */
@Configuration
public class MyDataSourceConfiguratioin {

	Logger logger = LoggerFactory.getLogger(MyDataSourceConfiguratioin.class);
	@Bean
	@ConfigurationProperties(prefix = "spring.druid.datasource.master")
	public DataSource masterDataSource(){
		logger.info("masterDatasource...");
		 return DataSourceBuilder.create().build();
	}

	@Bean
	@ConfigurationProperties(prefix = "spring.druid.datasource.slave")
	public DataSource slaveDataSource(){
		logger.info("slaveDatasource...");
		return DataSourceBuilder.create().build();
	}


	@Bean
	@Primary//主要的数据源毕竟3个datasource
	public DataSource primaryDataSource(
			@Autowired @Qualifier("masterDataSource") DataSource masterDataSource,
			@Autowired @Qualifier("slaveDataSource") DataSource slaveDataSource
	){
		logger.info("create routing dataSource ...");
		Map<Object,Object> map = new HashMap<>();
		map.put("masterDataSource",masterDataSource);
		map.put("slaveDataSource",slaveDataSource);
		RoutingDataSource routingDataSource = new RoutingDataSource();
		routingDataSource.setTargetDataSources(map);
		return routingDataSource;
	}

}
启动类配置排除自动装配的数据源
@SpringBootApplication(exclude = {DataSourceAutoConfiguration.class})
@MapperScan("com.lagou.mapper")
public class SpringBootDatasourceAccessApplication {

	public static void main(String[] args) {
		SpringApplication.run(SpringBootDatasourceAccessApplication.class, args);
	}

}
优雅配置之注解
@Target(ElementType.METHOD)
@Retention(RetentionPolicy.RUNTIME)
public @interface MyDataSource {
	String value() default "masterDataSource";
}
优雅配置之AOP解析注解
package com.lagou.config;

import org.aspectj.lang.ProceedingJoinPoint;
import org.aspectj.lang.annotation.Around;
import org.aspectj.lang.annotation.Aspect;
import org.springframework.stereotype.Component;

/**
 * @author lane
 * @date 2021年04月24日 下午3:46
 */
@Component
@Aspect
public class AopDataSource {

	@Around("@annotation(myDataSource)")
	public Object around(ProceedingJoinPoint joinPoint,MyDataSource myDataSource) throws Throwable {

		String value = myDataSource.value();
		RoutingDataSourceContext routingDataSourceContext = new RoutingDataSourceContext(value);
		Object proceed = joinPoint.proceed();
		return proceed;

	}
}
测试结果
2021-04-24 16:16:09.365  INFO 5099 --- [nio-8080-exec-1] com.lagou.service.ProductService         : master:[Product{id=1, name='master', price=100.0}]
2021-04-24 16:17:19.145  INFO 5099 --- [nio-8080-exec-3] com.lagou.service.ProductService         : slave:[Product{id=1, name='salve', price=80.0}]
第四章 SpringBoot缓存深入
4.1 JSR107
JSR是Java Specification Requests 的缩写 ,Java规范请求,故名思议提交Java规范, JSR-107就是关于如何使用缓存的规范,是java提供的一个接口规范,类似于JDBC规范,没有具体的实现,具体的实现就是reids等这些缓存。
4.1.1 JSR107核心接口
Java Caching(JSR-107)定义了5个核心接口,分别是CachingProvider、CacheManager、Cache、Entry和Expiry。
CachingProvider(缓存提供者):创建、配置、获取、管理和控制多个CacheManager
CacheManager(缓存管理器):创建、配置、获取、管理和控制多个唯一命名的Cache,Cache存在于CacheManager的上下文中。一个CacheManager仅对应一个CachingProvider
Cache(缓存):是由CacheManager管理的,CacheManager管理Cache的生命周期,Cache存在于CacheManager的上下文中,是一个类似map的数据结构,并临时存储以key为索引的值。一个Cache仅被一个CacheManager所拥有
Entry(缓存键值对):是一个存储在Cache中的key-value对
Expiry(缓存时效):每一个存储在Cache中的条目都有一个定义的有效期。一旦超过这个时间,条目就自动过期,过期后,条目将不可以访问、更新和删除操作。缓存有效期可以通过ExpiryPolicy设置
4.1.2 JSR107图示
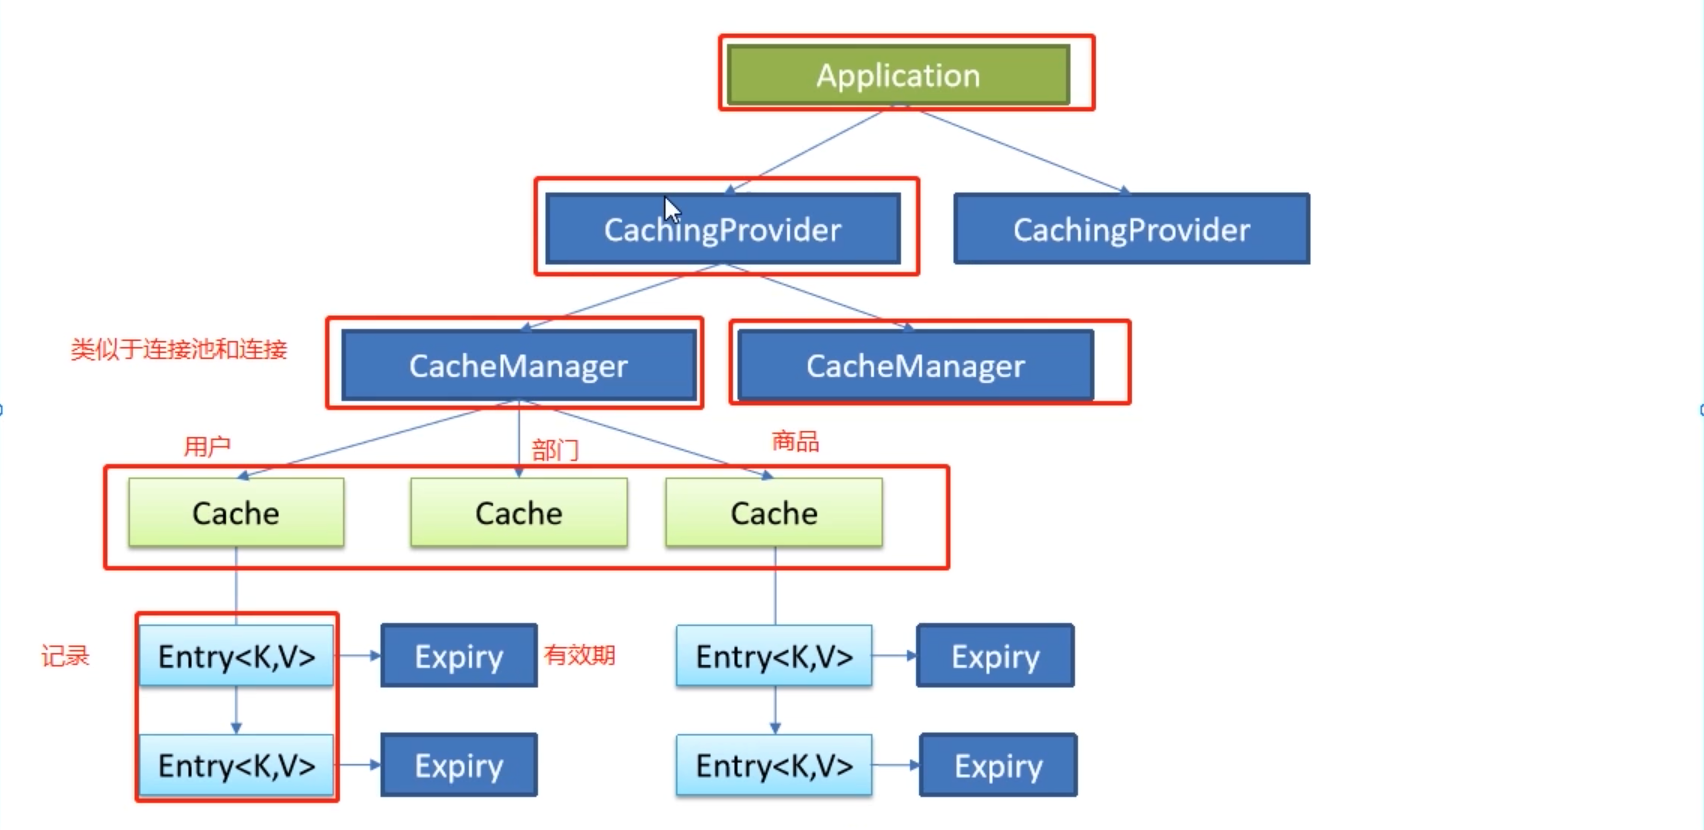
一个应用里面可以有多个缓存提供者(CachingProvider),一个缓存提供者可以获取到多个缓存管理器(CacheManager),一个缓存管理器管理着不同的缓存(Cache),缓存中是一个个的缓存键值对(Entry),每个entry都有一个有效期(Expiry)。缓存管理器和缓存之间的关系有点类似于数据库中连接池和连接的关系。
使用JSR-107需导入的依赖
<dependency>
<groupId>javax.cache</groupId>
<artifactId>cache-api</artifactId>
</dependency>
4.2 Spring的缓存抽象
4.2.1 缓存抽象定义
Spring从3.1开始定义了org.springframework.cache.Cache和org.springframework.cache.CacheManager接口来统一不同的缓存技术;并支持使用JavaCaching(JSR-107)注解简化我们进行缓存开发。
Spring Cache 只负责维护抽象层,具体的实现由自己的技术选型来决定。将缓存处理和缓存技术解除耦合。
每次调用需要缓存功能的方法时,Spring会检查指定参数的指定的目标方法是否已经被调用过,如果有就直接从缓存中获取方法调用后的结果,如果没有就调用方法并缓存结果后返回给用户。下次调用直接从缓存中获取。
使用Spring缓存抽象时我们需要关注以下两点:
① 确定那些方法需要被缓存
② 缓存策略
4.2.2 重要接口
Cache:缓存抽象的规范接口,缓存实现有:RedisCache、EhCache、ConcurrentMapCache等
CacheManager:缓存管理器,管理Cache的生命周期
4.3 Spring缓存使用
4.3.1 重要概念&缓存注解
案例实践之前,先介绍下Spring提供的重要缓存注解及几个重要概念
几个重要概念&缓存注解:
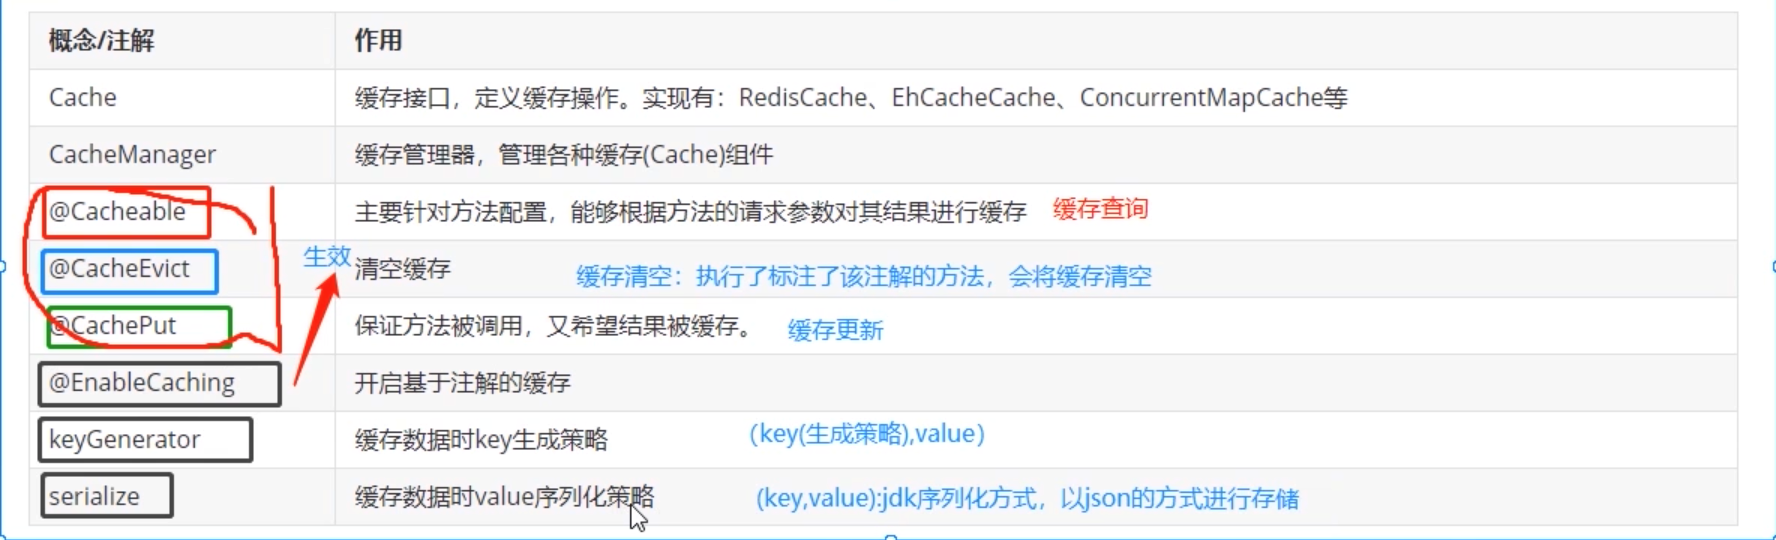
4.3.2 环境搭建
(1)创建SpringBoot应用:选中Mysql、Mybatis、Web模块
(2)创建数据库表
SET FOREIGN_KEY_CHECKS=0;
DROP TABLE IF EXISTS `department`;
CREATE TABLE `department` (
`id` int(11) NOT NULL AUTO_INCREMENT,
`departmentName` varchar(255) DEFAULT NULL,
PRIMARY KEY (`id`)
) ENGINE=InnoDB DEFAULT CHARSET=utf8;
DROP TABLE IF EXISTS `employee`;
CREATE TABLE `employee` (
`id` int(11) NOT NULL AUTO_INCREMENT,
`lastName` varchar(255) DEFAULT NULL,
`email` varchar(255) DEFAULT NULL,
`gender` int(2) DEFAULT NULL,
`d_id` int(11) DEFAULT NULL,
PRIMARY KEY (`id`)
) ENGINE=InnoDB DEFAULT CHARSET=utf8;
(3)创建表对应的实体Bean
package com.lagou.pojo;

import lombok.Data;

/**
 * @author lane
 * @date 2021年04月25日 上午10:20
 */
@Data
public class Employee {

	private Integer id;
	private String lastName;
	private String email;
	private Integer gender; //性别 1男 0女
	private Integer dId;

}
package com.lagou.pojo;

import lombok.Data;

/**
 * @author lane
 * @date 2021年04月25日 上午10:21
 */
@Data
public class Department {

	private Integer id;
	private String departmentName;


}
(4)整合mybatis操作数据库
spring.datasource.url=jdbc:mysql://localhost:3306/springboot_h?useUnicode=true&characterEncoding=utf-8&useSSL=true&serverTimezone=UTC
spring.datasource.username=root
spring.datasource.password=root
#spring.datasource.driver-class-name=com.mysql.jdbc.Driver
#开启驼峰命名
mybatis.configuration.map-underscore-to-camel-case=true
#日志配置
#指定具体包的日志级别为debug可以看到sql信息
logging.level.com.lagou.mapper=debug
(5) mapper
package com.lagou.mapper;

import com.lagou.pojo.Employee;
import org.apache.ibatis.annotations.Delete;
import org.apache.ibatis.annotations.Insert;
import org.apache.ibatis.annotations.Select;
import org.apache.ibatis.annotations.Update;

/**
 * @author lane
 * @date 2021年04月25日 上午10:23
 */
public interface EmployeeMapper {

	@Select("SELECT * FROM employee WHERE id = #{id}")
	public Employee getEmpById(Integer id);

	@Insert("INSERT INTO employee(lastName,email,gender,d_id) VALUES(#{lastName},#{email},#{gender},#{dId})")
	public void insertEmp(Employee employee);

	@Update("UPDATE employee SET lastName = #{lastName},email = #{email},gender = #{gender},d_id = #{dId} WHERE id = #{id}")
	public void updateEmp(Employee employee);

	@Delete("DELETE FROM employee WHERE id = #{id}")
	public void deleteEmpById(Integer id);
}
(6) 使用注解版Mybatis:使用@MapperScan指定mapper接口所在的包
@SpringBootApplication
@MapperScan("com.lagou.mapper")
public class SpringBootCashApplication {

	public static void main(String[] args) {
		SpringApplication.run(SpringBootCashApplication.class, args);
	}

}
(7) service
package com.lagou.service;

import com.lagou.mapper.EmployeeMapper;
import com.lagou.pojo.Employee;
import org.springframework.beans.factory.annotation.Autowired;
import org.springframework.stereotype.Service;

/**
 * @author lane
 * @date 2021年04月25日 上午10:27
 */
@Service
public class EmployeeService {
	@Autowired
	private EmployeeMapper employeeMapper;

	public Employee getEmpById(Integer id){

		Employee emp = employeeMapper.getEmpById(id);

		return emp;
	}
}
(8) 编写Controller:
package com.lagou.controller;

import com.lagou.pojo.Employee;
import com.lagou.service.EmployeeService;
import org.springframework.beans.factory.annotation.Autowired;
import org.springframework.web.bind.annotation.PathVariable;
import org.springframework.web.bind.annotation.RequestMapping;
import org.springframework.web.bind.annotation.RestController;

/**
 * @author lane
 * @date 2021年04月25日 上午10:29
 */
@RestController
public class EmployeeController {

	@Autowired
	private EmployeeService employeeService;

	@RequestMapping("/emp/{id}")
	public Employee getEmp(@PathVariable("id") Integer id){

		Employee emp = employeeService.getEmpById(id);

		return emp;
	}
}
(9) 测试
2021-04-25 10:43:56.916 DEBUG 6842 --- [nio-8080-exec-2] c.l.mapper.EmployeeMapper.getEmpById     : ==>  Preparing: SELECT * FROM employee WHERE id = ?
2021-04-25 10:43:56.916 DEBUG 6842 --- [nio-8080-exec-2] c.l.mapper.EmployeeMapper.getEmpById     : ==> Parameters: 1(Integer)
2021-04-25 10:43:56.917 DEBUG 6842 --- [nio-8080-exec-2] c.l.mapper.EmployeeMapper.getEmpById     : <==      Total: 1
{"id":1,"lastName":"lane","email":"lane.du@outlook.com","gender":1,"did":1}
4.3.3 缓存实现
① 开启基于注解的缓存功能:主启动类标注@EnableCaching
@SpringBootApplication
@MapperScan("com.lagou.mapper")
@EnableCaching //开启基于注解的缓存
public class SpringBootCashApplication {

	public static void main(String[] args) {
		SpringApplication.run(SpringBootCashApplication.class, args);
	}

}
② 标注缓存相关注解:@Cacheable、CacheEvict、CachePut
@Cacheable:将方法运行的结果进行缓存,以后再获取相同的数据时,直接从缓存中获取,不再调用方法
@Cacheable(cacheNames = {"employee"},key = "#id",condition = "#id>0",unless = "#result ==null")
	public Employee getEmpById(Integer id){

		Employee emp = employeeMapper.getEmpById(id);

		return emp;
	}
![[外链图片转存失败,源站可能有防盗链机制,建议将图片保存下来直接上传(img-kzF5ZIQP-1619604605138)(/Users/dulane/Library/Application Support/typora-user-images/image-20210425113958604.png)]](https://i-blog.csdnimg.cn/blog_migrate/3376d43ffad28f8b8d3169e901b87f96.png)
@Cacheable注解的属性:
| 属性名 | 描述 |
|---|---|
| cacheNames/value | 指定缓存的名字,缓存使用CacheManager管理多个缓存组件Cache,这些Cache组件就是根据这个名字进行区分的。对缓存的真正CRUD操作在Cache中定义,每个缓存组件Cache都有自己唯一的名字,通过cacheNames或者value属性指定,相当于是将缓存的键 值对进行分组,缓存的名字是一个数组,也就是说可以将一个缓存 键值对分到多个组里面 |
| key | 缓存数据时的key的值,默认是使用方法参数的值,可以使用SpEL表达式计算key的值 |
| keyGenerator | 缓存的生成策略,和key二选一,都是生成键的,keyGenerator可自 定义 |
| cacheManager | 指定缓存管理器(如ConcurrentHashMap、Redis等) |
| cacheResolver | 和cacheManager功能一样,和cacheManager二选一 |
| condition | 指定缓存的条件(满足什么条件时才缓存),可用SpEL表达式(如 #id>0,表示当入参id大于0时才缓存) |
| unless | 否定缓存,即满足unless指定的条件时,方法的结果不进行缓存, 使用unless时可以在调用的方法获取到结果之后再进行判断(如#result==null,表示如果结果为null时不缓存) |
| sync | 是否使用异步模式进行缓存 |
可用的SpEL表达式见下表:
| 名字 | 位置 | 描述 | 示例 |
|---|---|---|---|
| methodName | root object | 当前被调用的方法名 | #root.methodName |
| method | root object | 当前被调用的方法 | #root.method.name |
| target | root object | 当前被调用的目标对象 | #root.target |
| targetClass | root object | 当前被调用的目标对象类 | root.targetClass |
| args | root object | 当前被调用的方法的参数列表 | #root.args[0] |
| caches | root object | 当前方法调用使用的缓存列表 (如@Cacheable(value= {“cache1”, “cache2”})),则有两个cache | #root.caches[0].name |
| argument name | evaluation context | 方法参数的名字,可以直接 # 参数名,也可以使用#p0或#a0 的形式,0代表参数的索引 | #iban、#a0、#p0 |
| result | evaluation context | 方法执行后的返回值(仅当方法执行之后的判断有效, 如"unless","cache put"的表达式,"cache evict"的表达式beforeInvocation=false) | #result |
4.4 缓存自动配置原理源码剖析
在springBoot中所有的自动配置都是…AutoConfiguration 所以我们去搜CacheAutoConfiguration 这个类在这个类中有一个静态内部类CacheConfigurationImportSelector 他有一个selectImport 方法是用来给容器中添加一些缓存要用的组件;
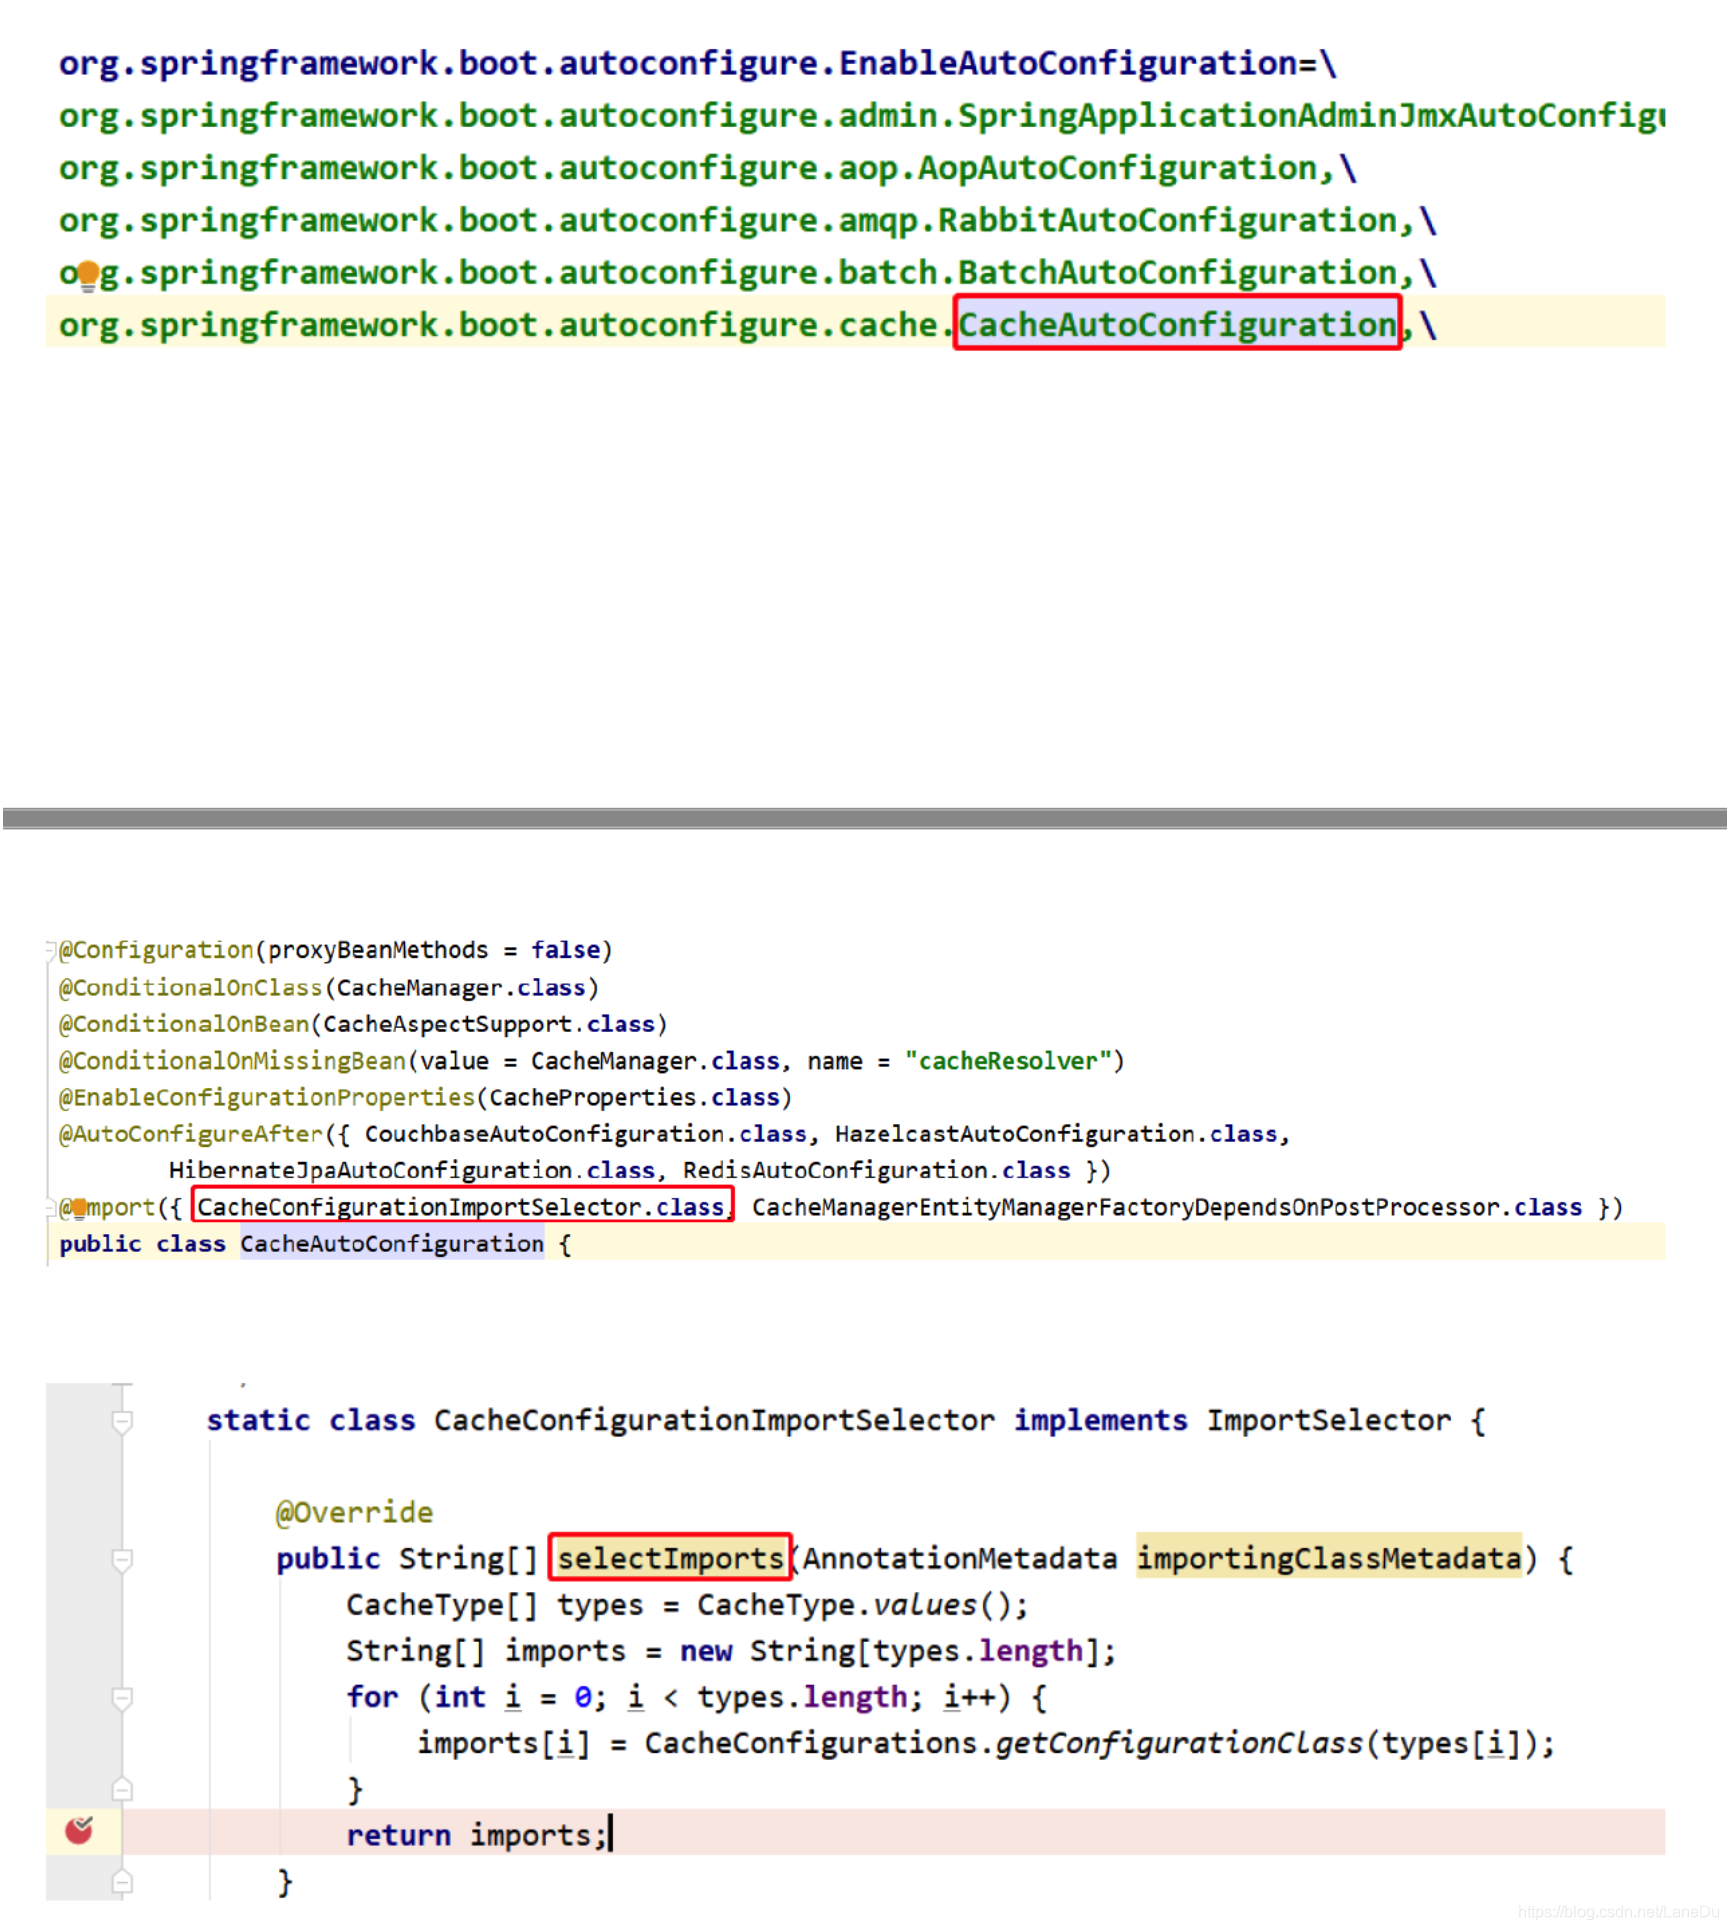
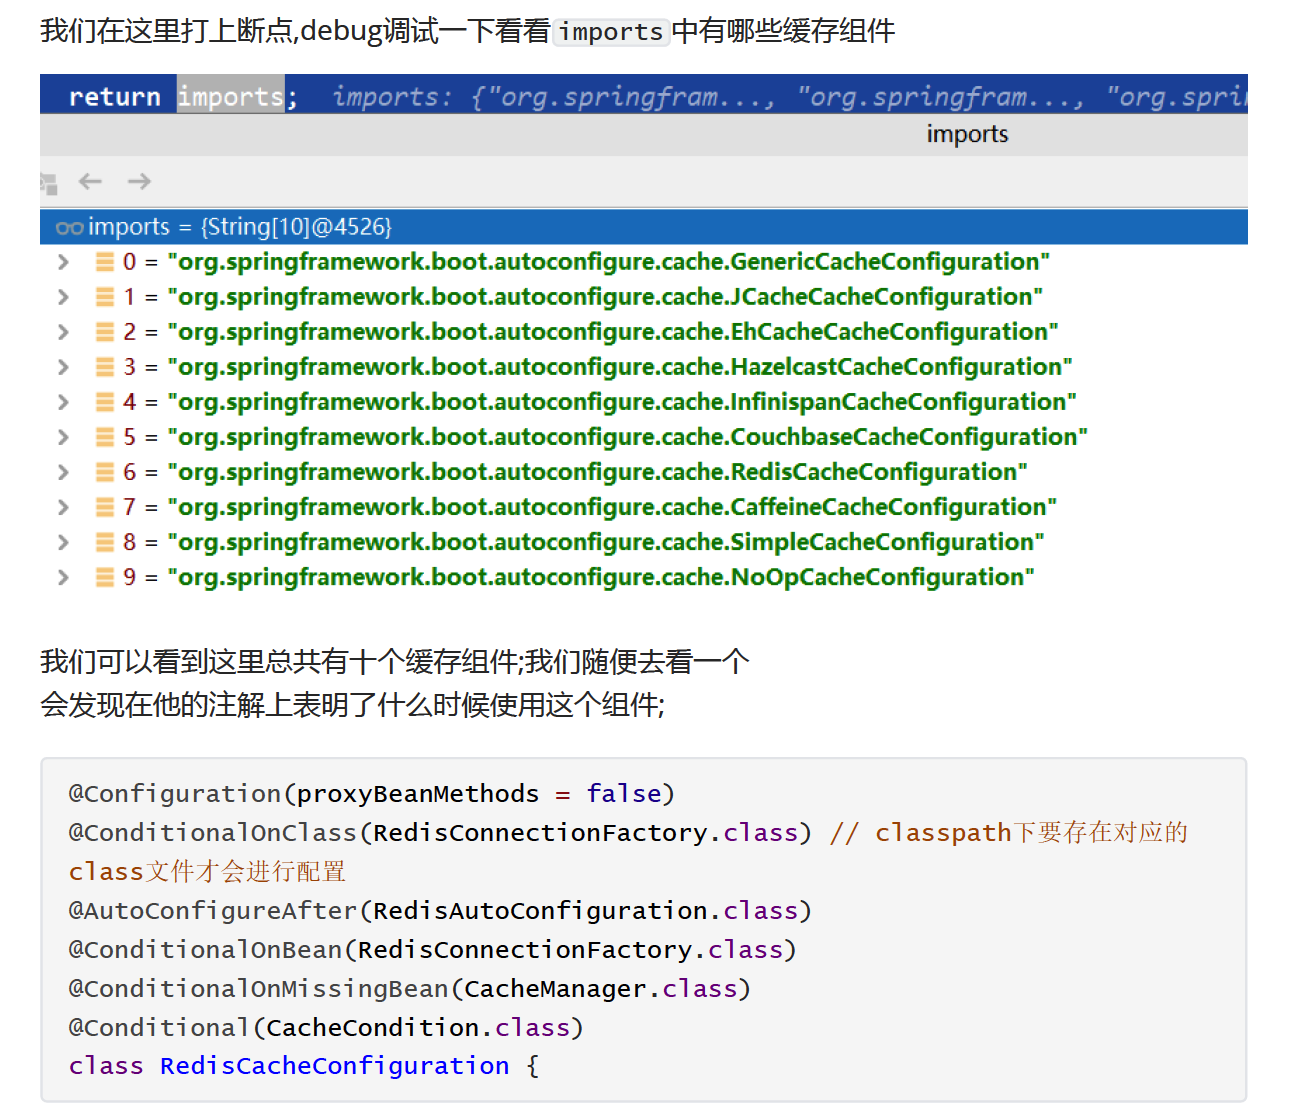
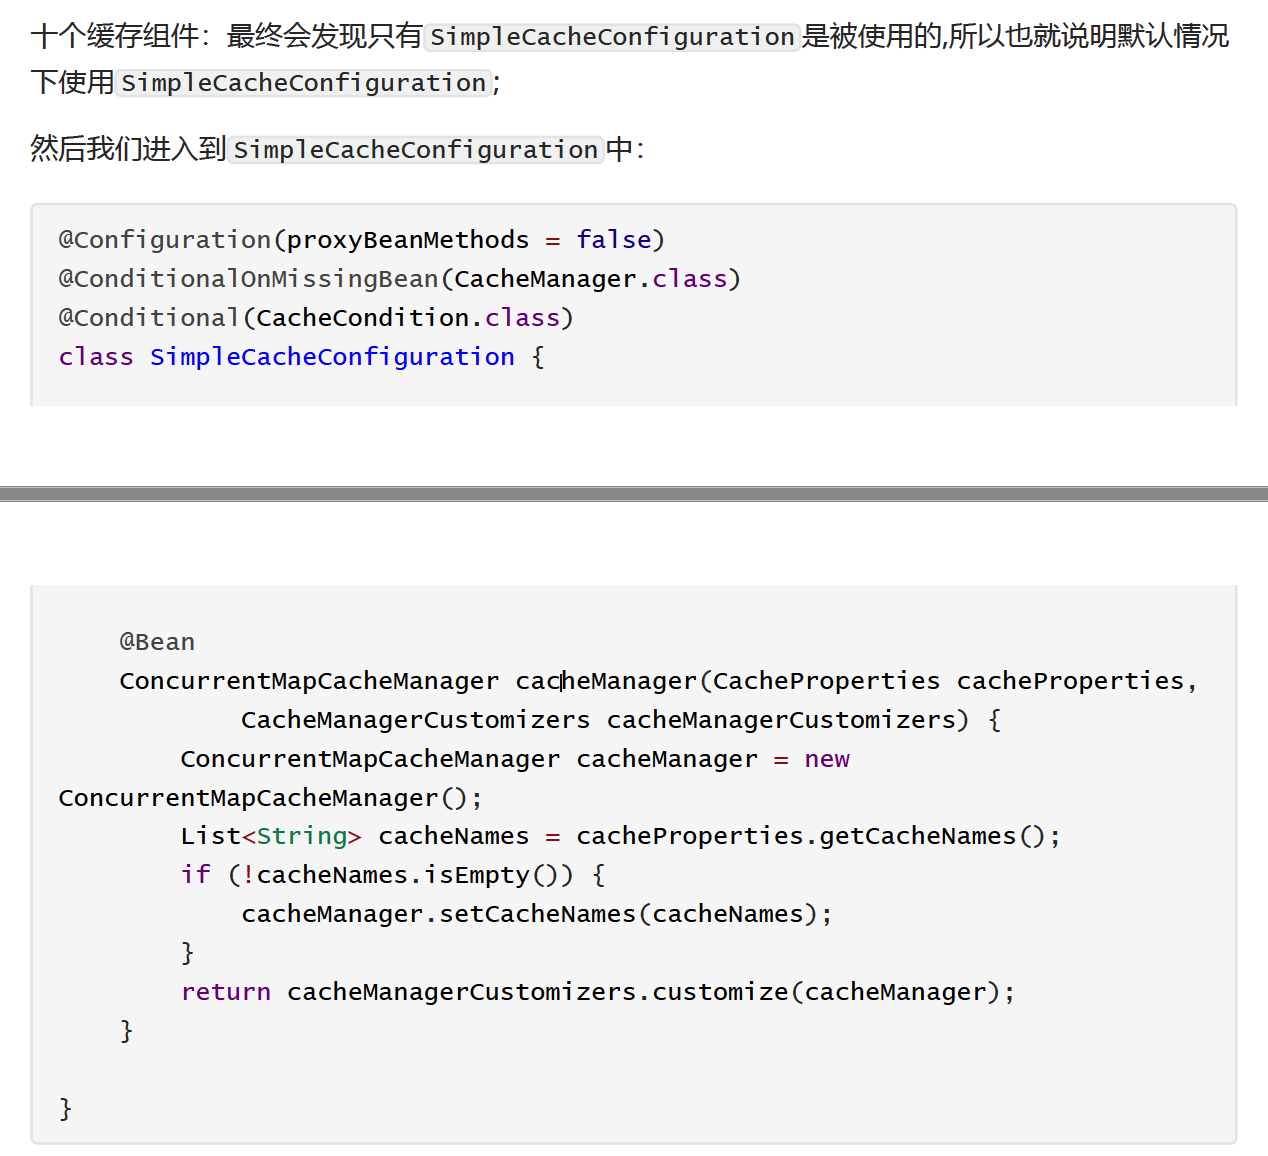

这个方法会创建一个ConcurrentMapCache 这个就是我们说的Cache ;
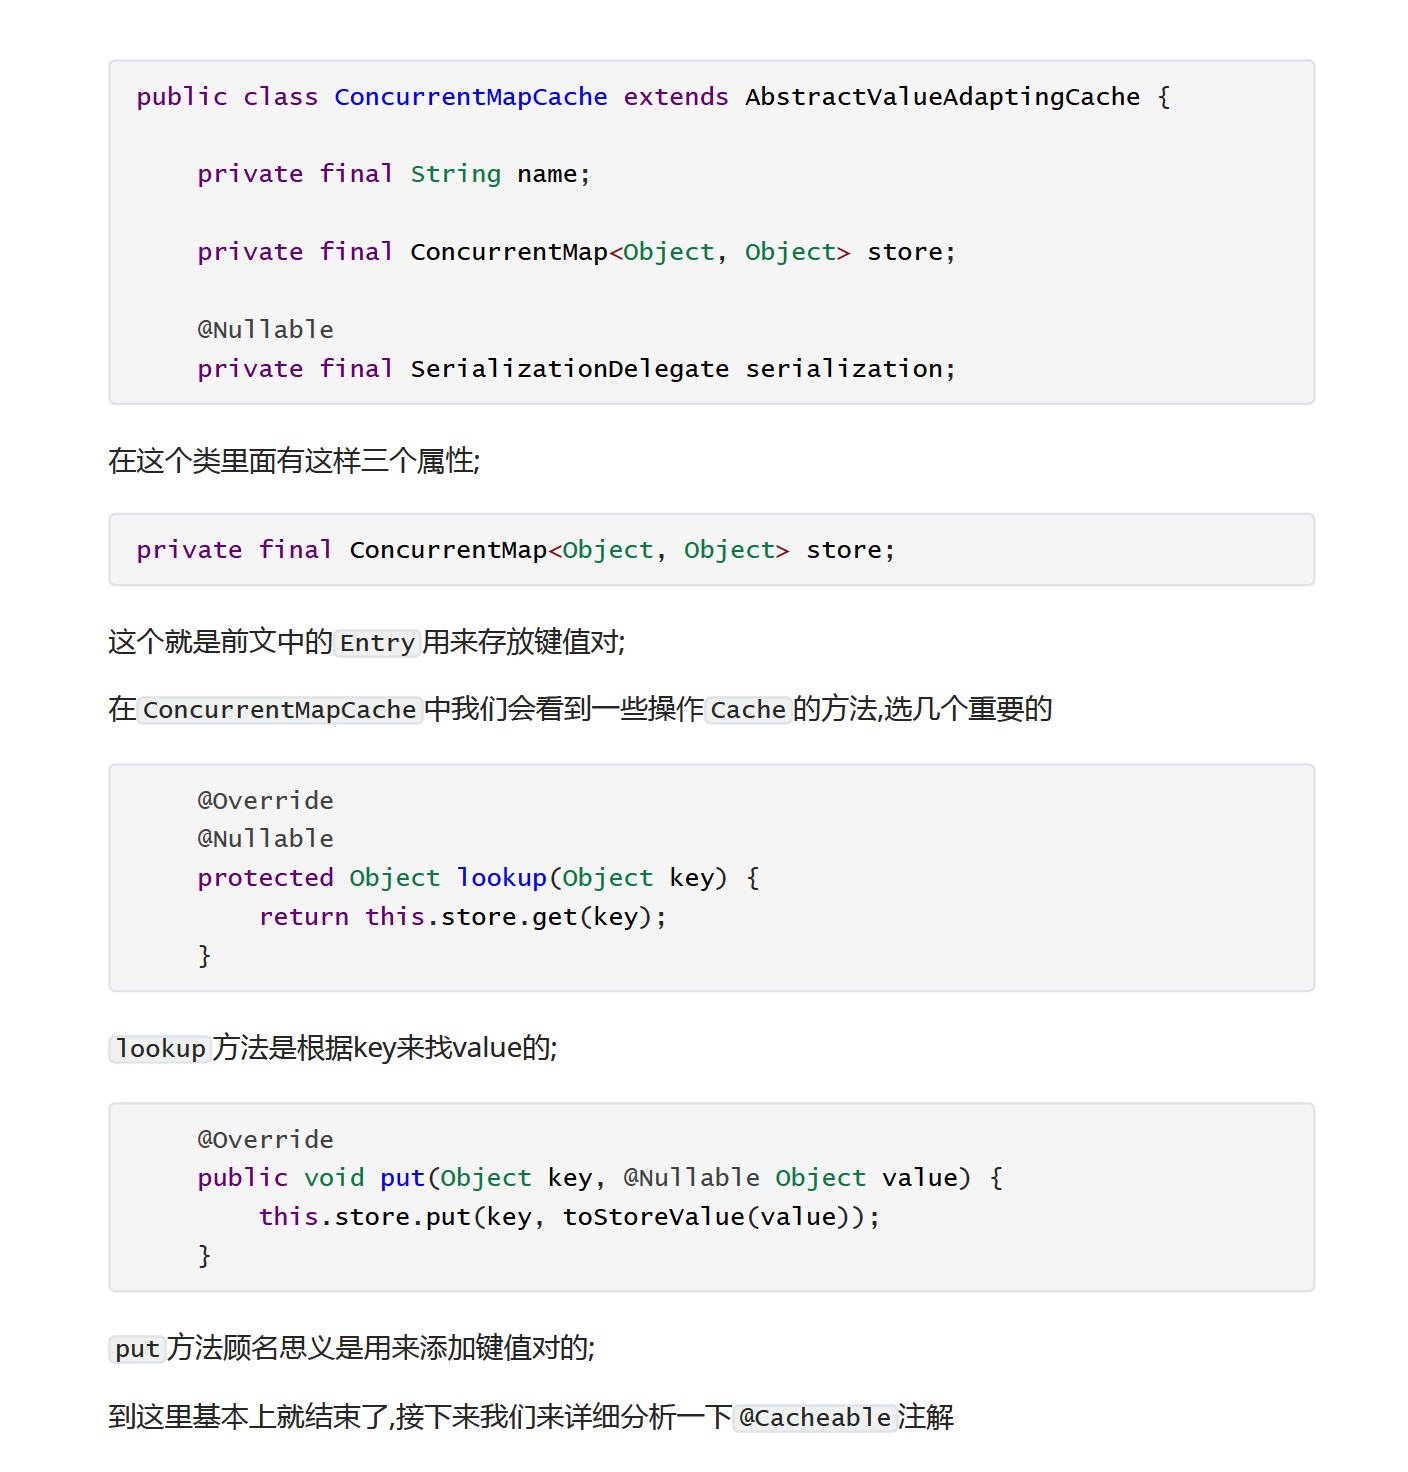
4.5 @Cacheable源码分析
我们在上述的两个方法上打上断点;debug运行springBoot;访问getEmp接口;
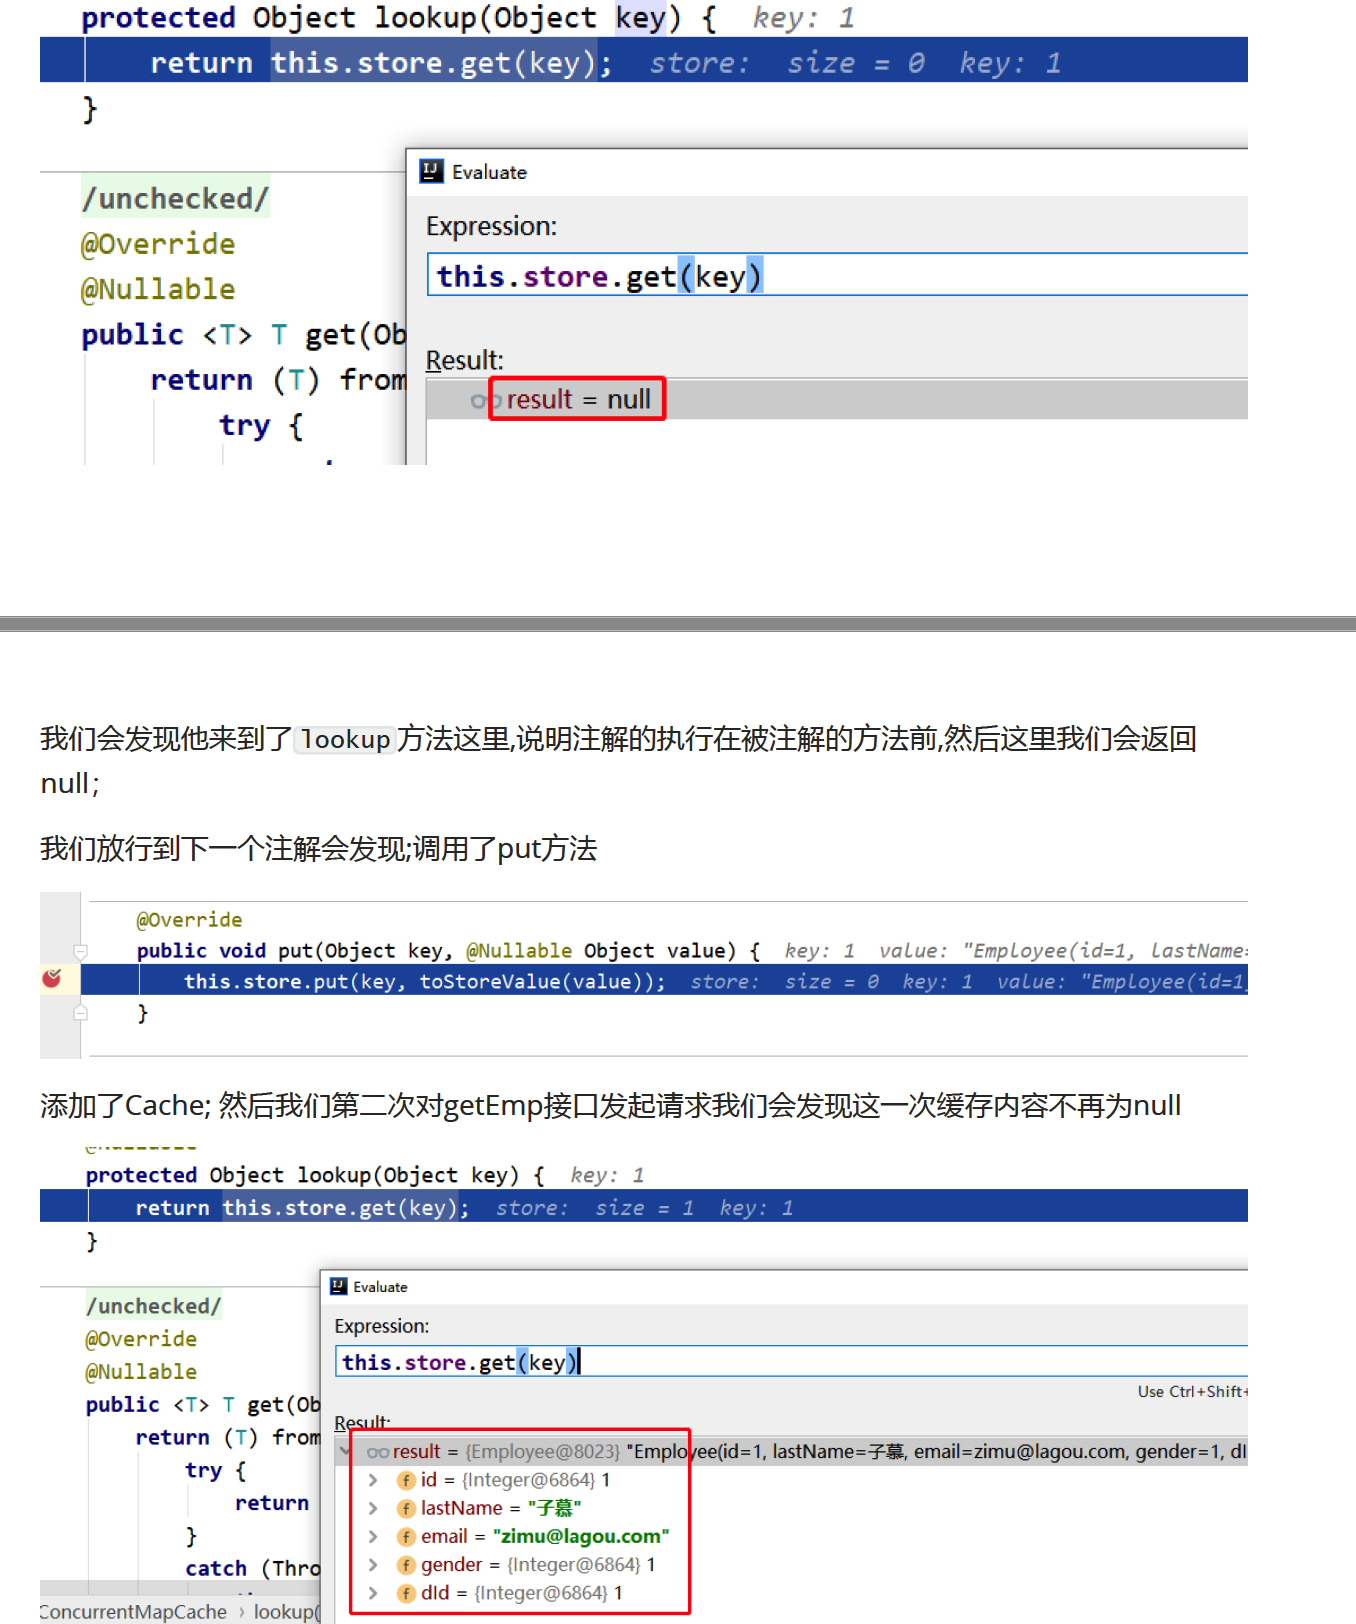
@Cacheable运行流程:
①方法运行之前,先去查询Cache(缓存组件),按照cacheNames指定的名字获取(CacheManager先获取相应的缓存,第一次获取缓存如果没有Cache组件会自动创建)
②去Cache中查找缓存的内容,使用的key默认就是方法的参数:key默认是使用keyGenerator生成的,默认使用的是SimpleKeyGenerator
SimpleKeyGenerator生成key的默认策略:
如果没有参数:key = new SimpleKey();
如果有一个参数:key = 参数的值
如果有多个参数:key = new SimpleKey(params);
③没有查到缓存就调用目标方法
④将目标方法返回的结果放进缓存中
总结:@Cacheable标注的方法在执行之前会先检查缓存中有没有这个数据,默认按照参数的值为key查询缓存,如果没有就运行方法并将结果放入缓存,以后再来调用时直接使用缓存中的数据。
核心:
1、使用CacheManager(ConcurrentMapCacheManager)按照名字得到Cache(ConcurrentMapCache)组件
2、key使用keyGenerator生成,默认使用SimpleKeyGenerator
4.6 @CachePut&@CacheEvict&@CacheConfig
@CachePut
1、说明:既调用方法,又更新缓存数据,一般用于更新操作,在更新缓存时一定要和想更新的缓存有b(可类比同一张表的同一条数据)
2、运行时机:
①先调用目标方法
②将目标方法的结果缓存起来
3、示例:
@CachePut(cacheNames = {"employees"},key = "#employee.id")
	public Employee updateEmp(Employee employee){
		employeeMapper.updateEmp(employee);
		return employee;
	}
总结 :@CachePut标注的方法总会被调用,且调用之后才将结果放入缓存,因此可以使用#result获取到方法的返回值。
@CacheEvict
1、说明:缓存清除,清除缓存时要指明缓存的名字和key,相当于告诉数据库要删除哪个表中的哪条数据,key默认为参数的值
2、属性:
value/cacheNames:缓存的名字 key:缓存的键
allEntries:是否清除指定缓存中的所有键值对,默认为false,设置为true时会清除缓存中的所有键值对,与key属性二选一使用
beforeInvocation:在@CacheEvict注解的方法调用之前清除指定缓存,默认为false,即在方法调用之后清除缓存,设置为true时则会在方法调用之前清除缓存(在方法调用之前还是之后清除缓存的区别在于方法调用时是否会出现异常,若不出现异常,这两种设置没有区别,若出现异常,设置为在方法调用之后清除缓存将不起作用,因为方法调用失败了)
@CacheConfig
1、作用:标注在类上,抽取缓存相关注解的公共配置,可抽取的公共配置有缓存名字、主键生成器等(如注解中的属性所示)
@Target({ElementType.TYPE})
@Retention(RetentionPolicy.RUNTIME)
@Documented
public @interface CacheConfig {
String[] cacheNames() default {};
String keyGenerator() default "";
String cacheManager() default "";
String cacheResolver() default "";
}
2、示例:通过@CacheConfig的cacheNames 属性指定缓存的名字之后,该类中的其他缓存注解就不必再写value或者cacheName了,会使用该名字作为value或cacheName的值,当然也遵循就近原则
@Service
@CacheConfig(cacheNames = {"employee"})
public class EmployeeService {
4.7 基于Redis的缓存实现
SpringBoot默认开启的缓存管理器是ConcurrentMapCacheManager,创建缓存组件是ConcurrentMapCache,将缓存数据保存在一个个的ConcurrentHashMap<Object, Object>中。开发时我们可以使用缓存中间件:redis、memcache、ehcache等,这些缓存中间件的启用很简单——只要向容器中加入相关的bean就会启用,可以启用多个缓存中间件
4.7.1 安装启动Redis
4.7.2 整合Redis
①引入Redis的starter
<dependency>
<groupId>org.springframework.boot</groupId>
<artifactId>spring-boot-starter-data-redis</artifactId>
</dependency>
引入redis的starter之后,会在容器中加入redis相关的一些bean,其中有两个跟操作redis相关的:
RedisTemplate和StringRedisTemplate(用来操作字符串:key和value都是字符串),template中封装了操作各种数据类型的操作(stringRredisTemplate.opsForValue()、stringRredisTemplate.opsForList()等)
@Configuration
@ConditionalOnClass({JedisConnection.class, RedisOperations.class,
Jedis.class})
@EnableConfigurationProperties({RedisProperties.class})
public class RedisAutoConfiguration {
public RedisAutoConfiguration() {
}
@Configuration
protected static class RedisConfiguration {
protected RedisConfiguration() {
}
@Bean
@ConditionalOnMissingBean(
name = {"redisTemplate"}
)
public RedisTemplate<Object, Object>
redisTemplate(RedisConnectionFactory redisConnectionFactory) throws
UnknownHostException {
RedisTemplate<Object, Object> template = new RedisTemplate();
template.setConnectionFactory(redisConnectionFactory);
return template;
}
@Bean
@ConditionalOnMissingBean({StringRedisTemplate.class})
public StringRedisTemplate
stringRedisTemplate(RedisConnectionFactory redisConnectionFactory) throws
UnknownHostException {
StringRedisTemplate template = new StringRedisTemplate();
template.setConnectionFactory(redisConnectionFactory);
return template;
}
}
//...
②配置redis:只需要配置redis的主机地址(端口默认即为6379,因此可以不指定)
#redis 配置
spring.redis.host=127.0.0.1
spring.redis.database= 6
spring.redis.port=6379
③测试:
访问http://localhost:8080/emp/1
使用redis存储对象时,该对象必须可序列化(实现Serializable接口),否则会报错,此时存储的结果在redis的管理工具中查看如下:由于序列化的原因值和键都变为了另外一种形式
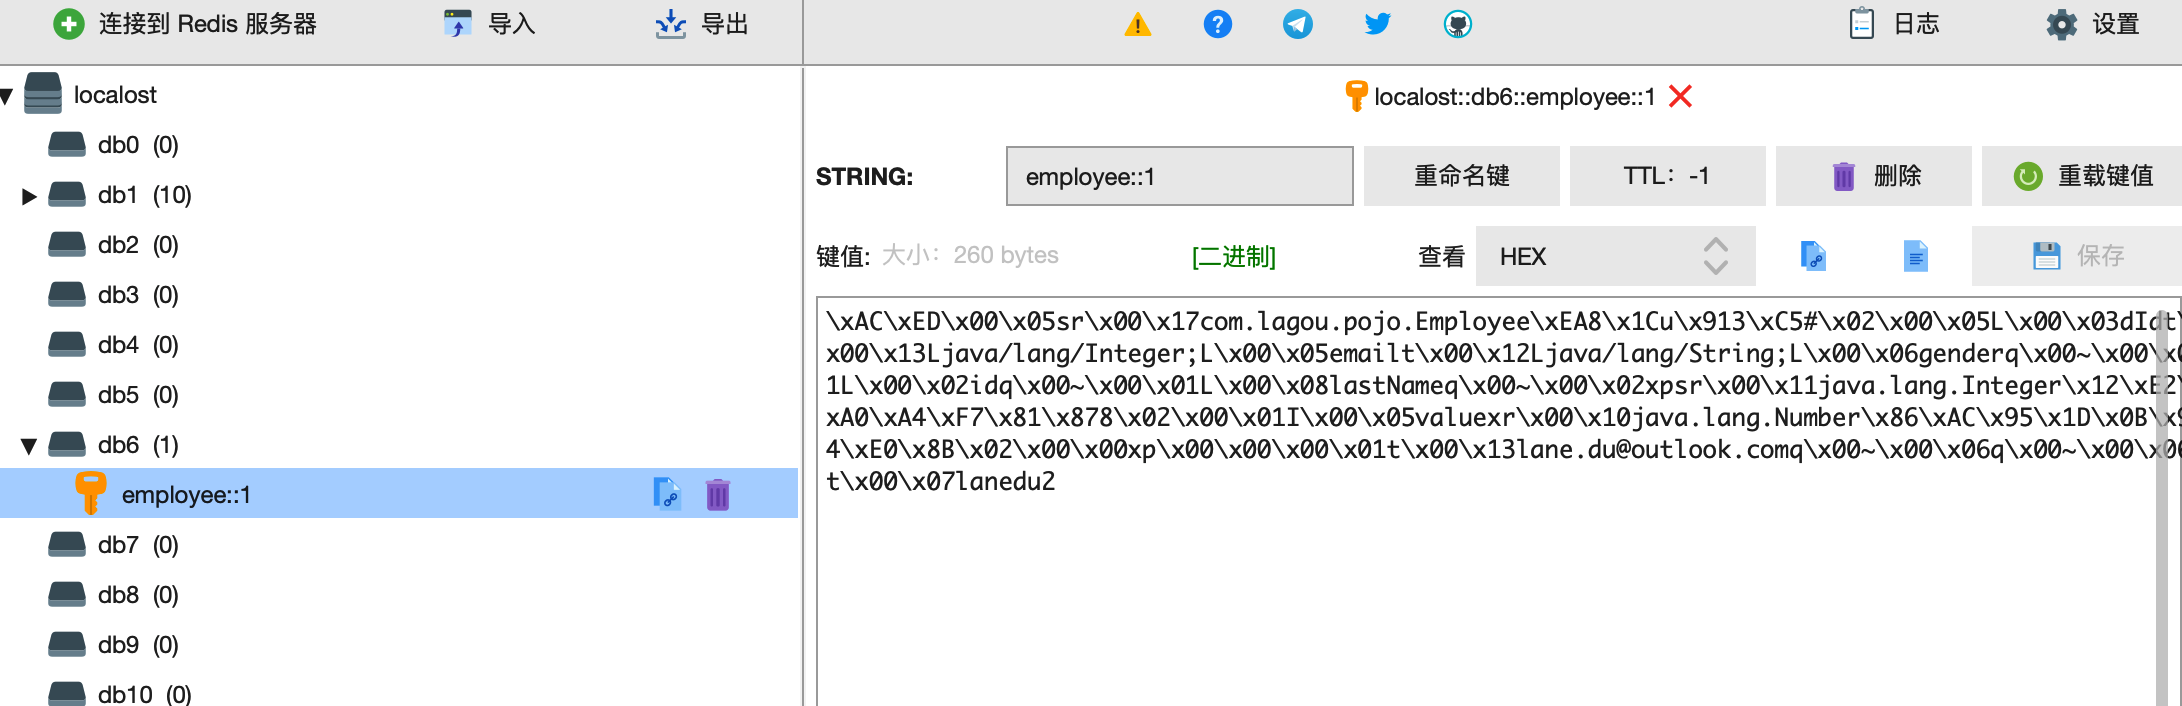
SpringBoot默认采用的是JDK的对象序列化方式,我们可以切换为使用JSON格式进行对象的序列化操作,这时需要我们自定义序列化规则(当然我们也可以使用Json工具先将对象转化为Json格式之后再保存至redis,这样就无需自定义序列化)
4.8 自定义RedisCacheManager
4.8.1 Redis注解默认序列化机制
打开Spring Boot整合Redis组件提供的缓存自动配置类RedisCacheConfiguration(org.springframework.boot.autoconfigure.cache包下的),查看该类的源码信息,其核心代码如下
@Configuration
class RedisCacheConfiguration {
@Bean
public RedisCacheManager cacheManager(RedisConnectionFactory
redisConnectionFactory,ResourceLoader
resourceLoader) {
RedisCacheManagerBuilder builder =
RedisCacheManager.builder(redisConnectionFactory)
.cacheDefaults(this.determineConfiguration(resourceLoader.getClassLoader()))
;
List<String> cacheNames = this.cacheProperties.getCacheNames();
if(!cacheNames.isEmpty()) {
builder.initialCacheNames(new LinkedHashSet(cacheNames));
}
return
(RedisCacheManager)this.customizerInvoker.customize(builder.build());
}
private org.springframework.data.redis.cache.RedisCacheConfiguration
determineConfiguration(ClassLoader classLoader){
if(this.redisCacheConfiguration != null) {
return this.redisCacheConfiguration;
} else {
Redis redisProperties = this.cacheProperties.getRedis();
org.springframework.data.redis.cache.RedisCacheConfiguration
config =
org.springframework.data.redis.cache.RedisCacheConfiguration.defaultCacheCo
nfig();
config =
config.serializeValuesWith(SerializationPair.fromSerializer(
new
JdkSerializationRedisSerializer(classLoader)));
...
return config;
}
}
}
从上述核心源码中可以看出,RedisCacheConfiguration内部同样通过Redis连接工厂RedisConnectionFactory定义了一个缓存管理器RedisCacheManager;同时定制RedisCacheManager时,也默认使用了JdkSerializationRedisSerializer序列化方式。如果想要使用自定义序列化方式的RedisCacheManager进行数据缓存操作,可以参考上述核心代码创建一个名为cacheManager的Bean组件,并在该组件中设置对应的序列化方式即可
4.8.2 自定义RedisCacheManager
在项目的Redis配置类RedisConfig中,按照上一步分析的定制方法自定义名为cacheManager的Bean组件
package com.lagou.config;

import com.fasterxml.jackson.annotation.JsonAutoDetect;
import com.fasterxml.jackson.annotation.PropertyAccessor;
import com.fasterxml.jackson.databind.ObjectMapper;
import org.springframework.context.annotation.Bean;
import org.springframework.context.annotation.Configuration;
import org.springframework.data.redis.cache.RedisCacheConfiguration;
import org.springframework.data.redis.cache.RedisCacheManager;
import org.springframework.data.redis.connection.RedisConnectionFactory;
import org.springframework.data.redis.serializer.Jackson2JsonRedisSerializer;
import org.springframework.data.redis.serializer.RedisSerializationContext;
import org.springframework.data.redis.serializer.RedisSerializer;
import org.springframework.data.redis.serializer.StringRedisSerializer;

import java.time.Duration;

/**
 * @author lane
 * @date 2021年04月25日 下午3:36
 */
@Configuration
public class RedisCacheManagerConfig {
	@Bean
	public RedisCacheManager cacheManager(RedisConnectionFactory redisConnectionFactory) {
		// 分别创建String和JSON格式序列化对象,对缓存数据key和value进行转换
		RedisSerializer<String> strSerializer = new StringRedisSerializer();
		Jackson2JsonRedisSerializer jacksonSeial =
				new Jackson2JsonRedisSerializer(Object.class);
		// 解决查询缓存转换异常的问题
		ObjectMapper om = new ObjectMapper();
		om.setVisibility(PropertyAccessor.ALL, JsonAutoDetect.Visibility.ANY);
		om.enableDefaultTyping(ObjectMapper.DefaultTyping.NON_FINAL);
		jacksonSeial.setObjectMapper(om);
		// 定制缓存数据序列化方式及时效
		RedisCacheConfiguration config = RedisCacheConfiguration.defaultCacheConfig()
				.entryTtl(Duration.ofDays(1))
				.serializeKeysWith(RedisSerializationContext.SerializationPair
						.fromSerializer(strSerializer))
				.serializeValuesWith(RedisSerializationContext.SerializationPair
						.fromSerializer(jacksonSeial))
				.disableCachingNullValues();
		RedisCacheManager cacheManager = RedisCacheManager
				.builder(redisConnectionFactory).cacheDefaults(config).build();
		return cacheManager;
	}

}
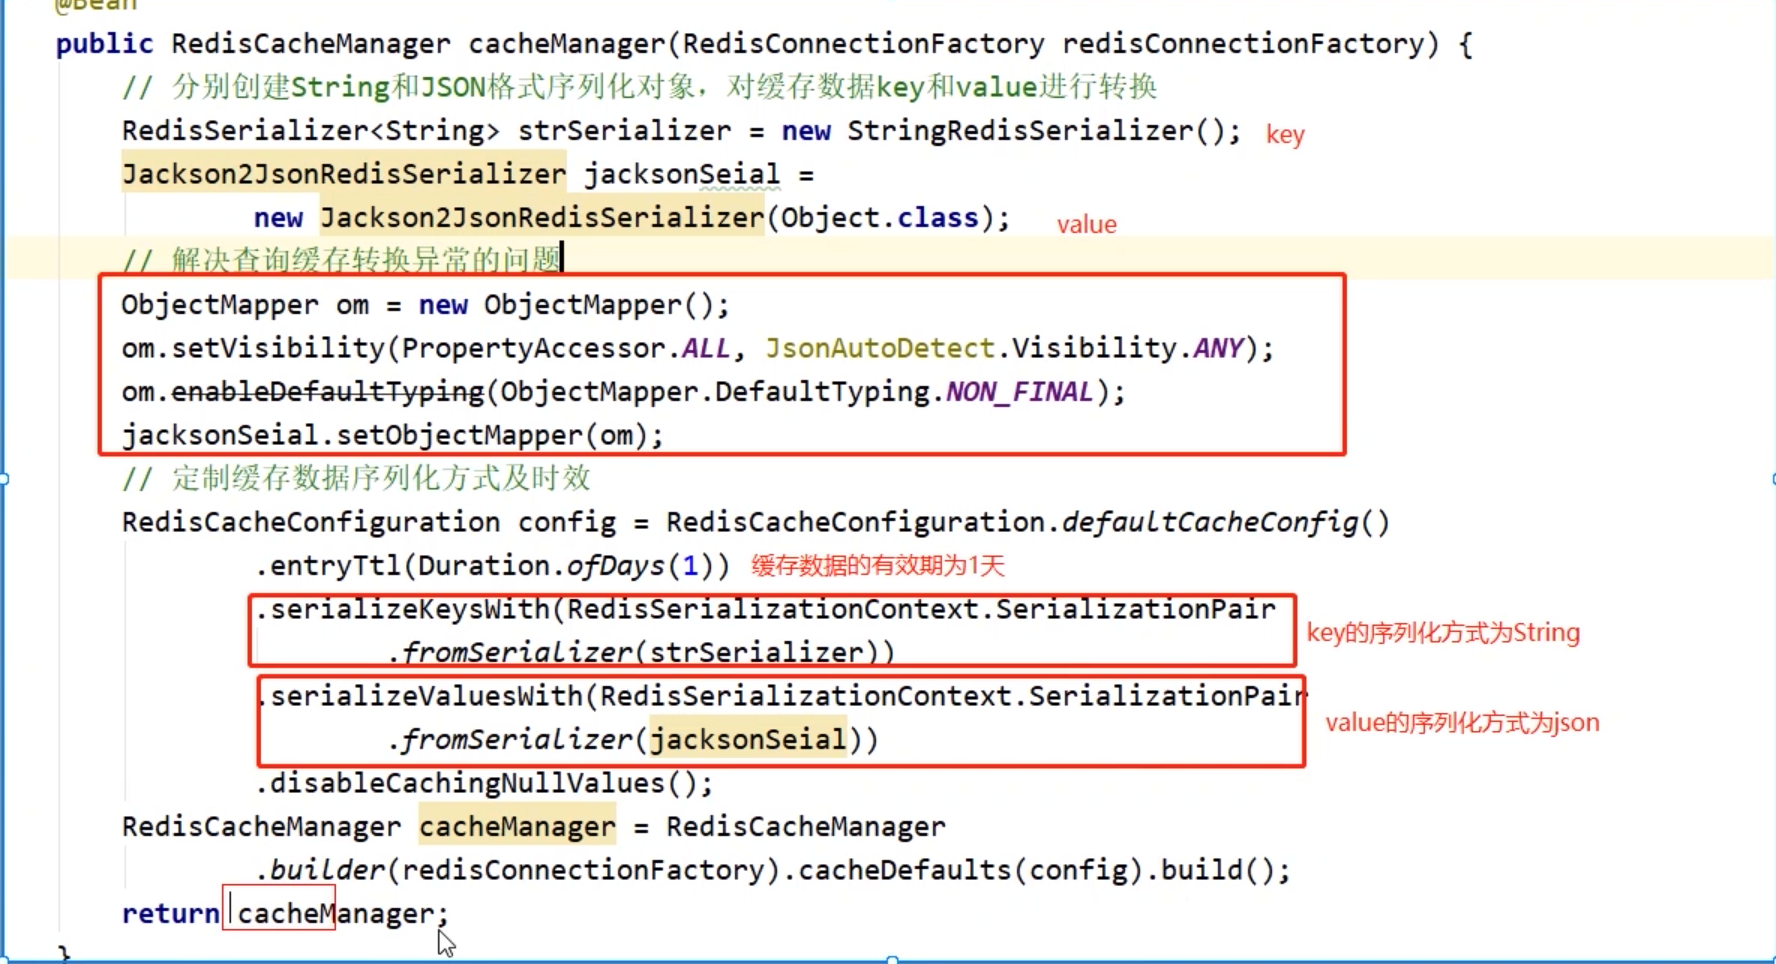
上述代码中,在RedisConfig配置类中使用@Bean注解注入了一个默认名称为方法名的cacheManager组件。在定义的Bean组件中,通过RedisCacheConfiguration对缓存数据的key和value分别进行了序列化方式的定制,其中缓存数据的key定制StringRedisSerializer(即String格式),而value定制为了Jackson2JsonRedisSerializer(即JSON格式),同时还使用entryTtl(Duration.ofDays(1))方法将缓存数据有效期设置为1天完成基于注解的Redis缓存管理器RedisCacheManager定制后,可以对该缓存管理器的效果进行测试(使用自定义序列化机制的RedisCacheManager测试时,实体类可以不用实现序列化接口)
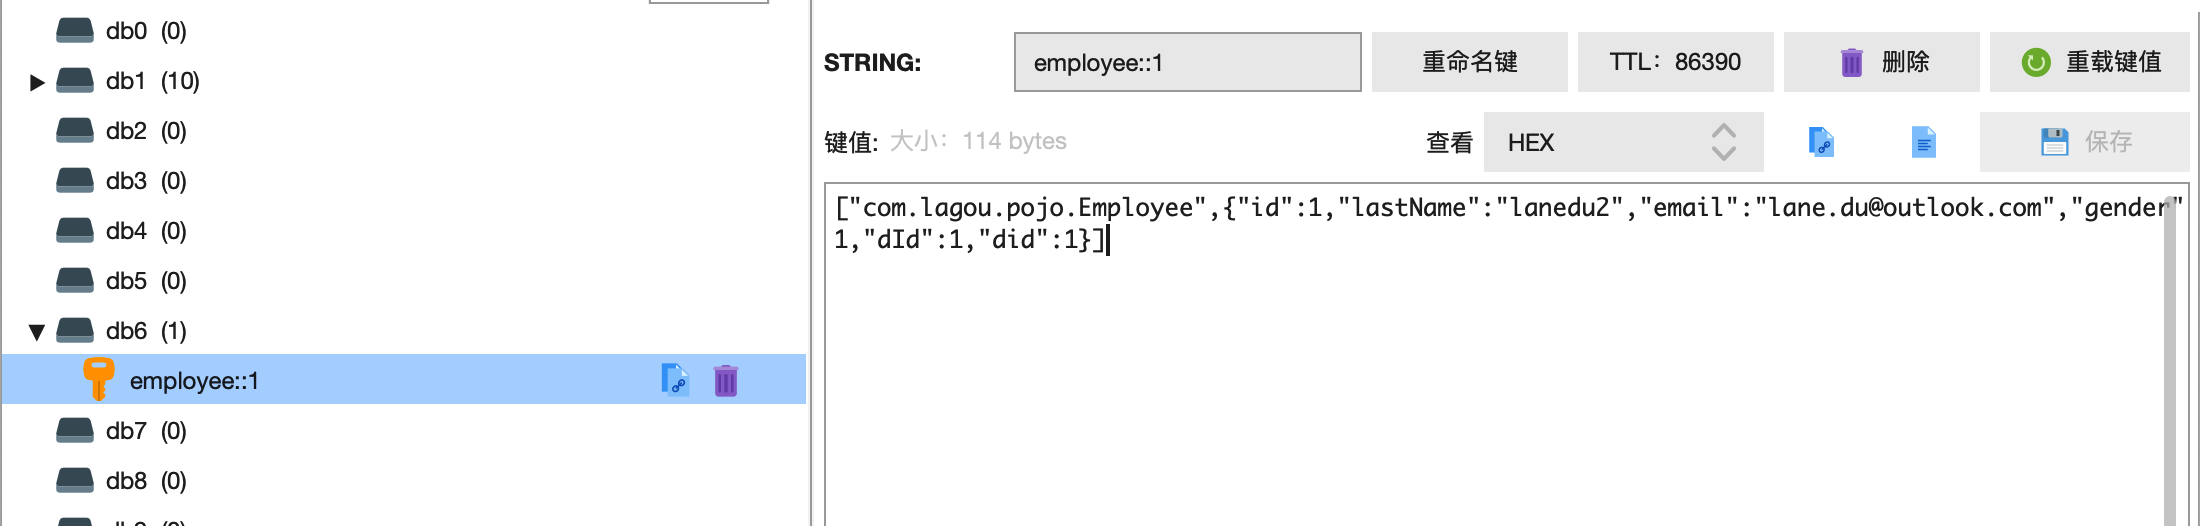
第五章 SpringBoot部署与监控
5.1 SpringBoot项目部署
目前,前后端分离的架构已成主流,而使用SpringBoot构建Web应用是非常快速的,项目发布到服务器上的时候,只需要打成一个jar包,然后通过命令 : java -jar jar包名称即可启动服务了。
5.1.1 jar包(官方推荐)
SpringBoot项目默认打包成jar包
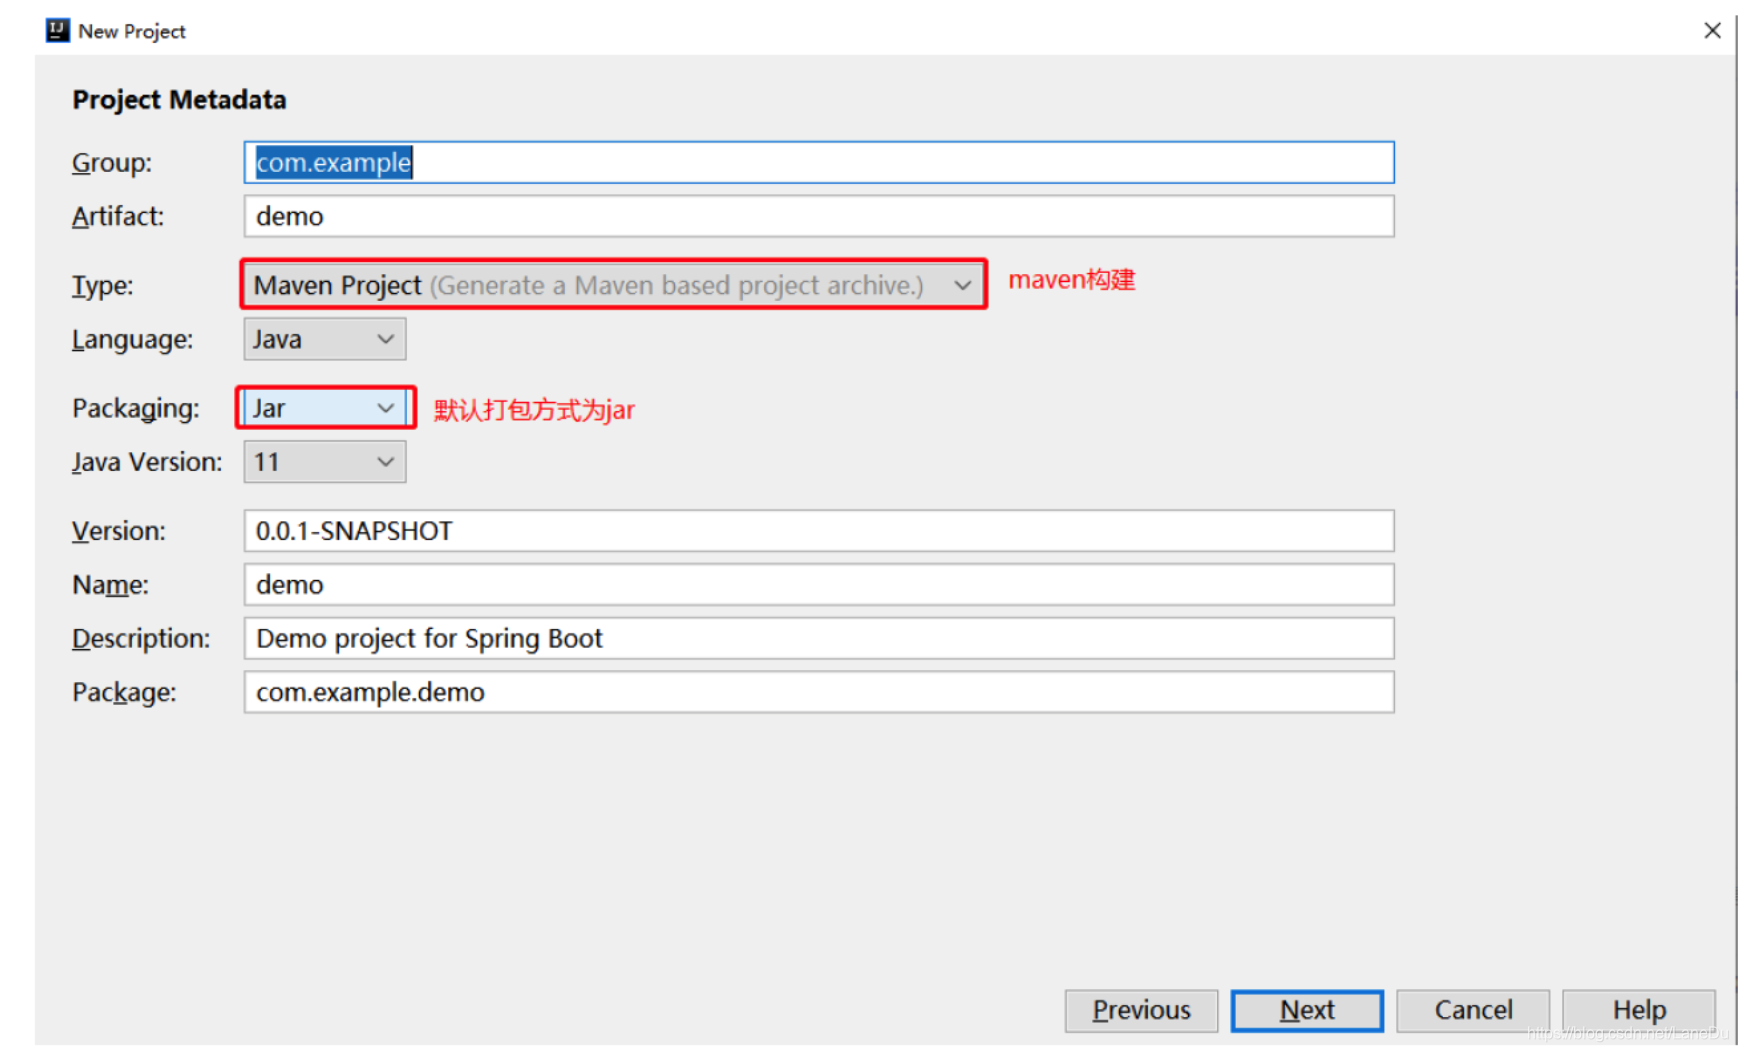
jar包方式启动,也就是使用SpringBoot内置的tomcat运行。服务器上面只要你配置了jdk1.8及以上就ok,不需要外置tomcat。
1、SpringBoot将项目打包成jar包
<!--将应用打包成一个可以执行的jar包-->
<build>
<plugins>
<plugin>
<groupId>org.springframework.boot</groupId>
<artifactId>spring-boot-maven-plugin</artifactId>
</plugin>
</plugins>
[外链图片转存失败,源站可能有防盗链机制,建议将图片保存下来直接上传(img-I8tKE5ja-1619604605149)(https://cdn.jsdelivr.net/gh/lanedu/upic@main/uPic/20210425/image-20210425161435483.png)]
d.可以将jar包上传到Linux服务器上,以jar运行(此处本地验证打包成功)
java -jar spring-boot-cash-0.0.1-SNAPSHOT.jar
5.1.2 war包
传统的部署方式:将项目打成war包,放入tomcat 的webapps目录下面,启动tomcat,即可访问。
SpringBoot项目改造打包成war的流程
1、pom.xml配置修改
<packaging>jar</packaging>
//修改为
<packaging>war</packaging>
2、pom文件添加如些依赖
<!--添加servlet-api的依赖,用来打war包 -->
<dependency>
<groupId>javax.servlet</groupId>
<artifactId>javax.servlet-api</artifactId>
<scope>provided</scope>
</dependency>
3、排除springboot内置的tomcat干扰
<!--最终打成war包,排除内置的tomcat-->
<dependency>
<groupId>org.springframework.boot</groupId>
<artifactId>spring-boot-starter-web</artifactId>
<exclusions>
<exclusion>
<groupId>org.springframework.boot</groupId>
<artifactId>spring-boot-starter-tomcat</artifactId>
</exclusion>
</exclusions>
</dependency>
4、改造启动类
如果是war包发布,需要增加SpringBootServletInitializer子类,并重写其configure方法,或者将main函数所在的类继承SpringBootServletInitializer,并重写configure方法,当时打包为war时上传到tomcat服务器中访问项目始终报404错就是忽略了这个步骤!!!
改造之前:
@SpringBootApplication
public class MainApp {
public static void main(String[] args) {
SpringApplication.run(MainApp.class,args);
}
}
改造之后:
@SpringBootApplication
public class SpringBootMytestApplication extends
SpringBootServletInitializer {
public static void main(String[] args) {
SpringApplication.run(SpringBootMytestApplication.class, args);
}
@Override
protected SpringApplicationBuilder configure(SpringApplicationBuilder
builder) {
// 注意这里要指向原先用main方法执行的Application启动类
return builder.sources(SpringBootMytestApplication.class);
}
这种改造方式也是官方比较推荐的方法
5、pom文件中不要忘了maven编译插件
<build>
<plugins>
<plugin>
<groupId>org.springframework.boot</groupId>
<artifactId>spring-boot-maven-plugin</artifactId>
</plugin>
</plugins>
</build>
6、在IDEA中使用mvn clean命令清除旧的包,并使用mvn package生成新的war包
执行完毕后,可以看到war包已经生成了,默认是在target目录下,位置可以在pom文件中进行配
置:
7、使用外部Tomcat运行该 war 文件(把 war 文件直接丢到 tomcat的webapps目录,启动tomcat)
注意事项:
将项目打成war包,部署到外部的tomcat中,这个时候,不能直接访问spring boot 项目中配置文件配置的端口。application.yml中配置的server.port配置的是spring boot内置的tomcat的端口号, 打成war包部署在独立的tomcat上之后, 配置server.port是不起作用的。一定要注意这一点!!
个人尝试打war包可以,但是启动不了
5.1.3 jar包和war包方式对比
1.SpringBoot项目打包时能打成 jar 与 war包,对比两种打包方式:
jar更加简单方便,使用 java -jar xx.jar 就可以启动。所以打成 jar 包的最多。而 war包可以部署到tomcat的 webapps 中,随Tomcat的启动而启动。具体使用哪种方式,应视应用场景而定。
2、打jar包时不会把src/main/webapp 下的内容打到jar包里 (你认为的打到jar包里面,路径是不行的会报404)
打war包时会把src/main/webapp 下的内容打到war包里
3.打成什么文件包进行部署与项目业务有关,就像提供 rest 服务的项目需要打包成 jar文件,用命令运行很方便。。。而有大量css、js、html,且需要经常改动的项目,打成 war 包去运行比较方便,因为改动静态资源可以直接覆盖,很快看到改动后的效果,这是 jar 包不能比的
(举个‘栗’子:项目打成 jar 包运行,一段时间后,前端要对其中某几个页面样式进行改动,使其更美观,那么改动几个css、html后,需要重新打成一个新的 jar 包,上传服务器并运行,这种改动频繁时很不友好,文件大时上传服务器很耗时,那么 war包就能免去这种烦恼,只要覆盖几个css与html即可)
5.1.4 多环境部署
在项目运行中,包括多种环境,例如线上环境prod(product)、开发环境dev(development)、测试环境test、提测环境qa、单元测试unitest等等。不同的环境需要进行不同的配置,从而在不同的场景中跑我们的程序。例如prod环境和dev环境通常需要连接不同的数据库、需要配置不同的日志输出配置。还有一些类和方法,在不同的环境下有不同的实现方式。Spring Boot 对此提供了支持,一方面是注解@Profile,另一方面还有多资源配置文件。
@Profile
@profile 注解的作用是指定类或方法在特定的 Profile 环境生效,任何@Component 或@Configuration 注解的类都可以使用@Profile 注解。在使用DI来依赖注入的时候,能够根据@profile 标明的环境,将注入符合当前运行环境的相应的bean。
使用要求:
@Component 或@Configuration 注解的类可以使用@profile
@Profile 中需要指定一个字符串,约定生效的环境
/**
 * @author lane
 * @date 2021年04月27日 下午9:23
 */
@Configuration
@Profile("dev")
public class ProfileConfigDev {

	public ProfileConfigDev(){
		System.out.println("dev.......");
	}
}
/**
 * @author lane
 * @date 2021年04月27日 下午9:23
 */
@Configuration
@Profile("online")
public class ProfileConfigOnline {

	public ProfileConfigOnline(){
		System.out.println("online.......");
	}
}
#指定配置文件
spring.profiles.active=dev
或者java -jar spring-boot-config-0.0.1-SNAPSHOT.jar --spring.profiles.active=dev;
@Profile 修饰注解
@Profile 注解支持定义在其他注解之上,以创建自定义场景注解。这样就创建了一个@Dev 注解,该注解可以标识bean使用于@Dev 这个场景。后续就不再需要使用@Profile(“dev”) 的方式,这样即可以简化代码。
@Target(ElementType.TYPE)
@Retention(RetentionPolicy.RUNTIME)
@Profile("prod")
public @interface Production {
}
多Profile的资源文件
除了@profile注解的可以标明某些方法和类具体在哪个环境下注入。springboot的环境隔离还可以使用多资源文件的方式,进行一些参数的配置。
①资源配置文件
Springboot的资源配置文件除了application.properties之外,还可以有对应的资源文件application-{profile}.properties。
假设,一个应用的工作环境有:dev、test、prod
那么,我们可以添加 4 个配置文件:
applcation.properties - 公共配置
application-dev.properties - 开发环境配置
application-test.properties - 测试环境配置
application-prod.properties - 生产环境配置
不同的properties配置文件也可以是在 applcation.properties 文件中来激活 profile:spring.profiles.active = test
②效果演示
以下是一个多个资源配置文件的例子,主要区分了开发环境dev和线上环境prod。
  @Value("${com.name}")
	private String name;
	@Value("${com.location}")
	private String location;

	@RequestMapping("/profile")
	public String proTest(){

		String s =name+ "来自"+location;
		return s;
	}
application.properties文件内容如下:
#指定配置文件
spring.profiles.active=dev
application-dev.properties文件内容如下:
server.port=8081
com.name = dev
com.location= shanghai
application-online.properties文件内容如下
server.port=8082
com.name = online
com.location= beijing
dev来自shanghai
5.2 SpringBoot 监控
微服务的特点决定了功能模块的部署是分布式的,大部分功能模块都是运行在不同的机器上,彼此通过服务调用进行交互,前后台的业务流会经过很多个微服务的处理和传递,出现了异常如何快速定位是哪个环节出现了问题?
在这种情况下,微服务的监控显得尤为重要。springboot作为微服务框架,除了它强大的快速开发功能外,还有就是它提供了actuator模块,引入该模块能够自动为springboot应用提供一系列用于监控的端点
5.2.1 Acturator
什么是Actuator
Actuator是spring boot的一个附加功能,可帮助你在应用程序生产环境时监视和管理应用程序。可以使用HTTP的各种请求来监管,审计,收集应用的运行情况。Spring Boot Actuator提供了对单个Spring Boot的监控,信息包含:应用状态、内存、线程、堆栈等等,比较全面的监控了Spring
Boot应用的整个生命周期。特别对于微服务管理十分有意义。
Actuator 的 REST 接口
Actuator 监控分成两类:原生端点和用户自定义端点;自定义端点主要是指扩展性,用户可以根据自己的实际应用,定义一些比较关心的指标,在运行期进行监控。
原生端点是在应用程序里提供众多 Web 接口,通过它们了解应用程序运行时的内部状况。原生端点又可以分成三类:
应用配置类:可以查看应用在运行期的静态信息:例如自动配置信息、加载的 springbean信息、yml 文件配置信息、环境信息、请求映射信息;度量指标类:主要是运行期的动态信息,例如堆栈、请求链、一些健康指标、metrics 信息等;
操作控制类:主要是指 shutdown,用户可以发送一个请求将应用的监控功能关闭。
Actuator 提供了 13 个接口,具体如下表所示。
| HTTP 方法 | 路径 | 描述 |
|---|---|---|
| GET | /auditevents | 显示应用暴露的审计事件 (比如认证进入、订单失败) |
| GET | /beans | 描述应用程序上下文里全部的 Bean,以及它们的关系 |
| GET | /conditions | 就是 1.0 的 /autoconfig ,提供一份自动配置生效的条件情况,记录哪些自动配置条件通过了,哪些没通过 |
| GET | /configprops | 描述配置属性(包含默认值)如何注入Bean |
| GET | /env | 获取全部环境属性 |
| GET | /env/{name} | 根据名称获取特定的环境属性值 |
| GET | /flyway | 提供一份 Flyway 数据库迁移信息 |
| GET | /liquidbase | 显示Liquibase 数据库迁移的纤细信息 |
| GET | /health | 报告应用程序的健康指标,这些值由 HealthIndicator 的实现类提供 |
| GET | /heapdump | dump 一份应用的 JVM 堆信息 |
| GET | /httptrace | 显示HTTP足迹,最近100个HTTP request/repsponse |
| GET | /info | 获取应用程序的定制信息,这些信息由info打头的属性提供 |
| GET | /logfile | 返回log file中的内容(如果 logging.file 或者 logging.path 被设置) |
| GET | /loggers | 显示和修改配置的loggers |
| GET | /metrics | 报告各种应用程序度量信息,比如内存用量和HTTP请求计数 |
| GET | /metrics/{name} | 报告指定名称的应用程序度量值 |
| GET | /scheduledtasks | 展示应用中的定时任务信息 |
| GET | /sessions | 如果我们使用了 Spring Session 展示应用中的 HTTP sessions 信息 |
| POST | /shutdown | 关闭应用程序,要求endpoints.shutdown.enabled设置为 true |
| GET | /mappings | 描述全部的 URI路径,以及它们和控制器(包含Actuator端点)的映射关系 |
| GET | /threaddump | 获取线程活动的快照 |
体验Actuator
使用Actuator功能与springBoot使用其他功能一样简单,只需要在pom.xml中添加如下依赖:
<dependency>
<groupId>org.springframework.boot</groupId>
<artifactId>spring-boot-starter-actuator</artifactId>
</dependency>
为了保证 actuator 暴露的监控接口的安全性,需要添加安全控制的依赖spring-boot-startsecurity依赖,访问应用监控端点时,都需要输入验证信息。Security 依赖,可以选择不加,不进行安全管理。
配置文件
#暴露所有监控接口
management.endpoints.web.exposure.include=*
#展示health细节,除了always之外还有when-authorized、never,默认值是never
management.endpoint.health.show-details=always
#management.endpoints.web.base-path=/monitor
#可以通过接口关闭项目
management.endpoint.shutdown.enabled=true
#自定义信息必须info开头
info.app.name=spring-boot-actuator
info.app.version= 1.0.0
info.app.test= test
配置完成之后,启动项目就可以继续验证各个监控功能了。
属性详解
在 Spring Boot 2.x 中为了安全期间,Actuator 只开放了两个端点 /actuator/health 和/actuator/info 。可以在配置文件中设置打开。
可以打开所有的监控点
management.endpoints.web.exposure.include=*
也可以选择打开部分
management.endpoints.web.exposure.include=beans,trace
Actuator 默认所有的监控点路径都在/actuator/* ,当然如果有需要这个路径也支持定制。
management.endpoints.web.base-path=/manage
设置完重启后,再次访问地址就会变成/manage/*
Actuator 几乎监控了应用涉及的方方面面,我们重点讲述一些经常在项目中常用的属性。
health
health 主要用来检查应用的运行状态,这是我们使用最高频的一个监控点。通常使用此接口提醒我们应用实例的运行状态,以及应用不”健康“的原因,比如数据库连接、磁盘空间不够等。
默认情况下 health 的状态是开放的,添加依赖后启动项目,访问:http://localhost:8080/actuator/health 即可看到应用的状态。
health 通过合并几个健康指数检查应用的健康情况。Spring Boot Actuator 有几个预定义的健康指标比如DataSourceHealthIndicator , DiskSpaceHealthIndicator ,MongoHealthIndicator , RedisHealthIndicator 等,它使用这些健康指标作为健康检查的一部分。
举个例子,如果你的应用使用 Redis, RedisHealthindicator 将被当作检查的一部分;如果使用 MongoDB,那么MongoHealthIndicator 将被当作检查的一部分。
可以在配置文件中关闭特定的健康检查指标,比如关闭 redis 的健康检查:
management.health.redise.enabled=false
info
info 就是我们自己配置在配置文件中以 info 开头的配置信息,比如我们在示例项目中的配置是:
启动示例项目,访问: http://localhost:8080/actuator/info 返回部分信息如下:
{
"app": {
"name": "spring-boot-actuator",
"version": "1.0.0",
"test":"test"
}
}
beans
根据示例就可以看出,展示了 bean 的别名、类型、是否单例、类的地址、依赖等信息。启动示例项目,访问: http://localhost:8080/actuator/beans 返回部分信息如下:
[
{
"context": "application:8080:management",
"parent": "application:8080",
"beans": [
{
  "bean": "embeddedServletContainerFactory",
"aliases": [
],
"scope": "singleton",
"type":
"org.springframework.boot.context.embedded.tomcat.TomcatEmbeddedServletConta
inerFactory",
"resource": "null",
"dependencies": [
]
},
{
"bean": "endpointWebMvcChildContextConfiguration",
"aliases": [
],
"scope": "singleton",
"type":
"org.springframework.boot.actuate.autoconfigure.EndpointWebMvcChildContextCo
nfiguration$$EnhancerBySpringCGLIB$$a4a10f9d",
"resource": "null",
"dependencies": [
]
}
}
]
conditions
Spring Boot 的自动配置功能非常便利,但有时候也意味着出问题比较难找出具体的原因。使用conditions 可以在应用运行时查看代码了某个配置在什么条件下生效,或者某个自动配置为什么没有生效。
heapdump
返回一个 GZip 压缩的 JVM 堆 dump
启动示例项目,访问: http://localhost:8080/actuator/heapdump 会自动生成一个 Jvm 的堆文件 heapdump,我们可以使用 JDK 自带的 Jvm 监控工具 VisualVM 打开此文件查看内存快照。
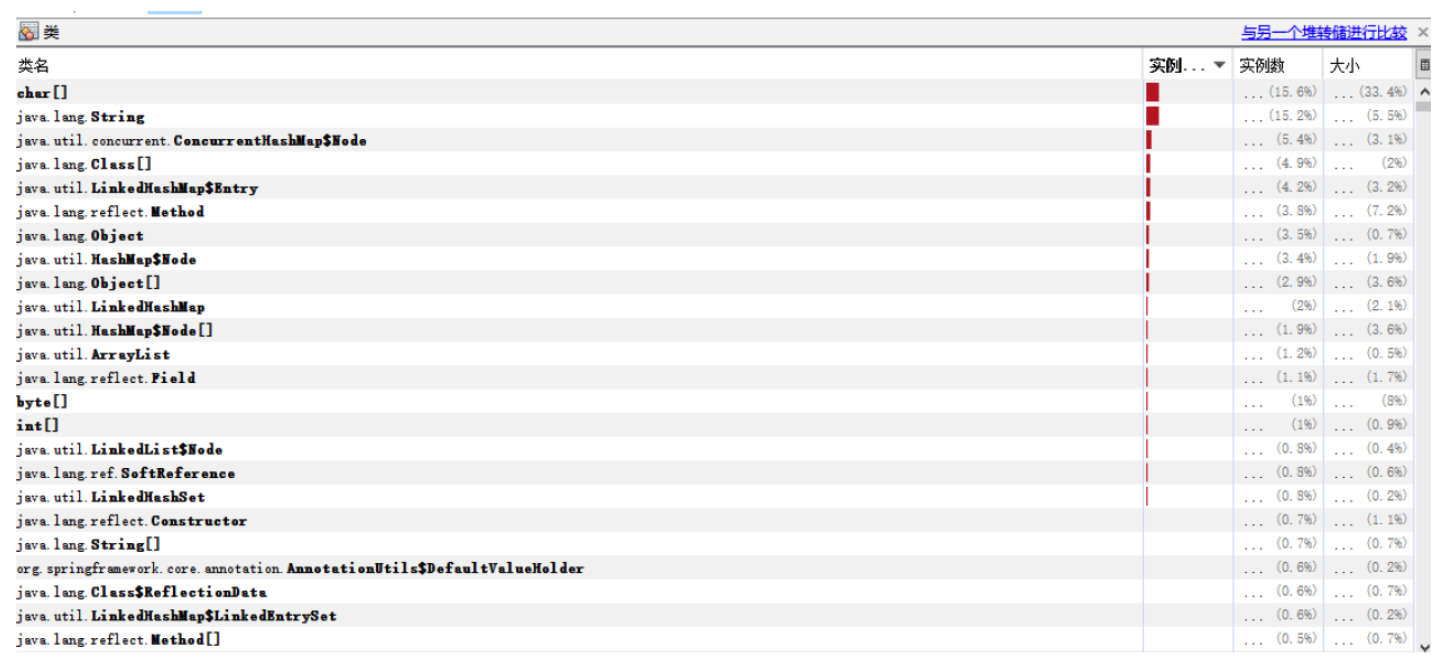
mappings
描述全部的 URI 路径,以及它们和控制器的映射关系
threaddump
/threaddump 接口会生成当前线程活动的快照。这个功能非常好,方便我们在日常定位问题的时候查看线程的情况。 主要展示了线程名、线程ID、线程的状态、是否等待锁资源等信息。
shutdown
开启接口优雅关闭 Spring Boot 应用,要使用这个功能首先需要在配置文件中开启:
management.endpoint.shutdown.enabled=true
配置完成之后,启动示例项目,使用 curl 模拟 post 请求访问 shutdown 接口。shutdown 接口默认只支持 post 请求。
5.2.2 Spring Boot Admin
什么是Spring Boot Admin
对于spring actuator而言,最大的缺点在于是以json形式来进行展示,为了更好的进行监控显示,我们来介绍一个更加方便的工具:spring boot admin。
Spring Boot Admin:可视化后台管理系统
Spring Boot Admin 是一个针对spring-boot的actuator接口进行UI美化封装的监控工具。他可以返回在列表中浏览所有被监控spring-boot项目的基本信息比如:Spring容器管理的所有的bean、详细的Health信息、内存信息、JVM信息、垃圾回收信息、各种配置信息(比如数据源、缓存列表
和命中率)等,Threads 线程管理,Environment 管理等。
利用springbootadmin进行监控的架构图如下:
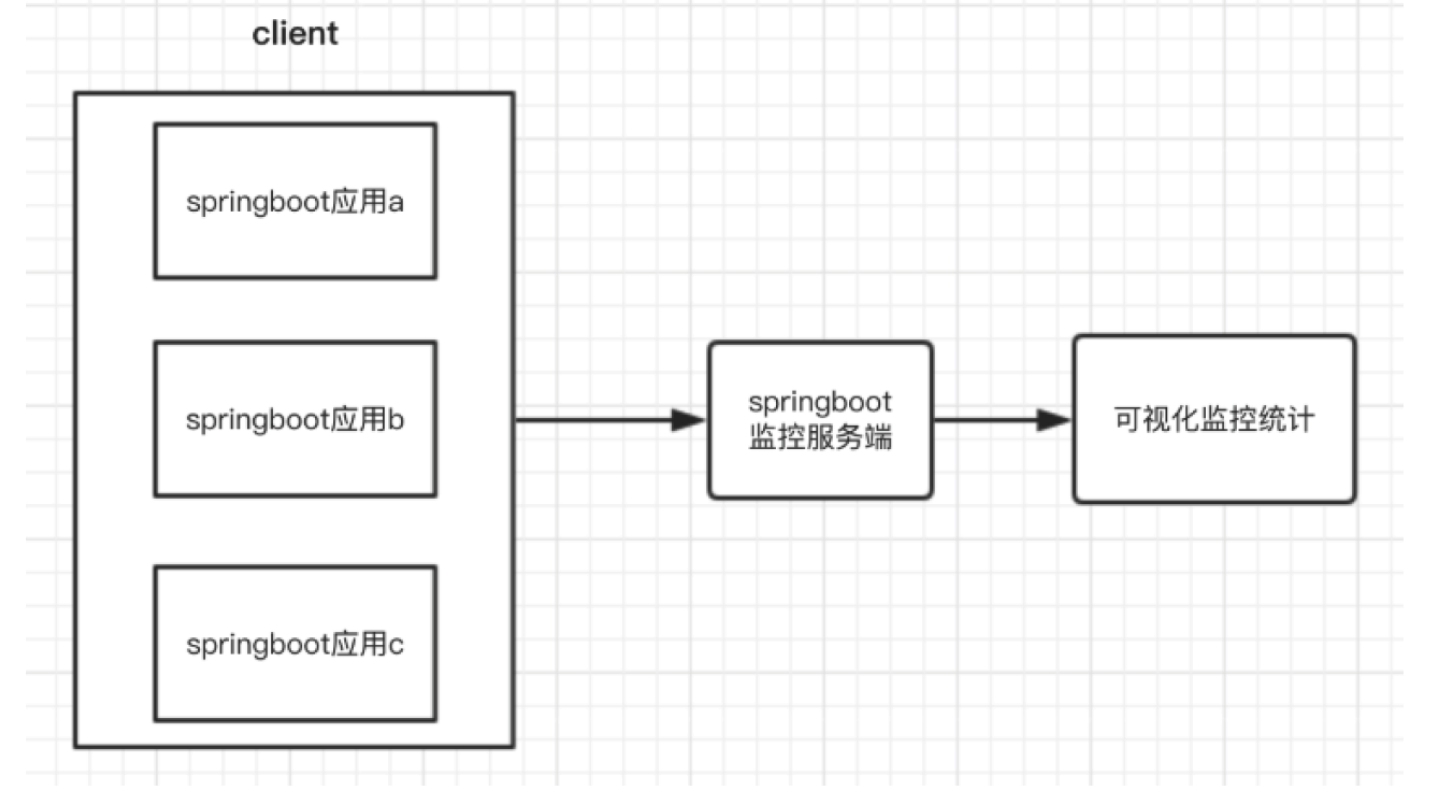
springbootadmin监控
通俗点,就是我们如果有n个springboot业务系统需要监控的话,那么需要一个额外的springbootadmin应用来进行监控这些client,client和server之间需要做一点配置即可。
搭建Server端
pom.xml
<dependency>
<groupId>org.springframework.boot</groupId>
<artifactId>spring-boot-starter-web</artifactId>
</dependency>
<dependency>
<groupId>org.springframework.boot</groupId>
<artifactId>spring-boot-starter-actuator</artifactId>
</dependency>
<dependency>
<groupId>de.codecentric</groupId>
<artifactId>spring-boot-admin-starter-server</artifactId>
</dependency>
applicaiton.yml
server:
	port: 8081
@EnableAdminServer
@EnableAdminServer
@SpringBootApplication
public class App {
public static void main(String[] args) {
SpringApplication.run(App.class, args);
}
启动服务端:

搭建client端
pom.xml
<dependency>
<groupId>org.springframework.boot</groupId>
<artifactId>spring-boot-starter-web</artifactId>
</dependency>
<dependency>
<groupId>org.springframework.boot</groupId>
<artifactId>spring-boot-starter-actuator</artifactId>
</dependency>
<dependency>
<groupId>de.codecentric</groupId>
<artifactId>spring-boot-admin-starter-client</artifactId>
<version>2.1.0</version>
</dependency>
application.yml
server:
  port: 8080
#自定义配置信息用于"/actuator/info"读取
info:
  name: 老王
  age: 100
  phone: 110

#通过下面的配置启用所有的监控端点,默认情况下,这些端点是禁用的;
management:
  endpoints:
    web:
      exposure:
        include: "*"
  endpoint:
    health:
      show-details: always

## 将Client作为服务注册到Server,通过Server来监听项目的运行情况
spring:
  boot:
    admin:
      client:
        url: http://localhost:9080
  ##application实例名
  application:
    name : spring-boot-admin-client
package com.lagou.controller;

import org.springframework.web.bind.annotation.RequestMapping;
import org.springframework.web.bind.annotation.RestController;

/**
 * @author lane
 * @date 2021年04月27日 下午10:35
 */
@RestController
public class clientController {

		@RequestMapping("/index")
		public String index() {
			return "这是index";
		}
		@RequestMapping("/home")
		public String home() {
			return "这是home";
		}

}
启动 client……
几秒后刷新,可以看到 client 端已注册到 server。
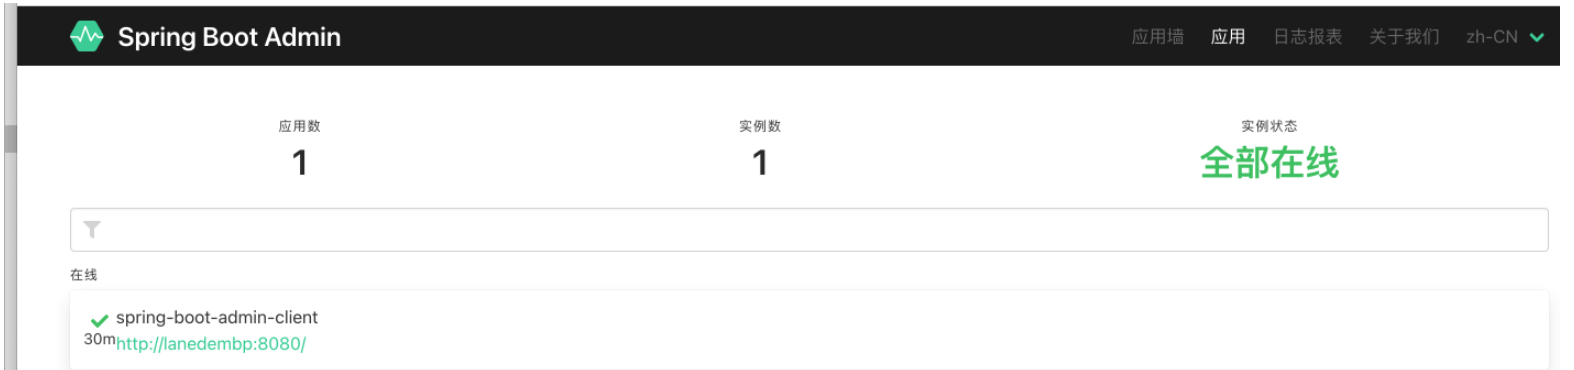
查看 client 详细信息:
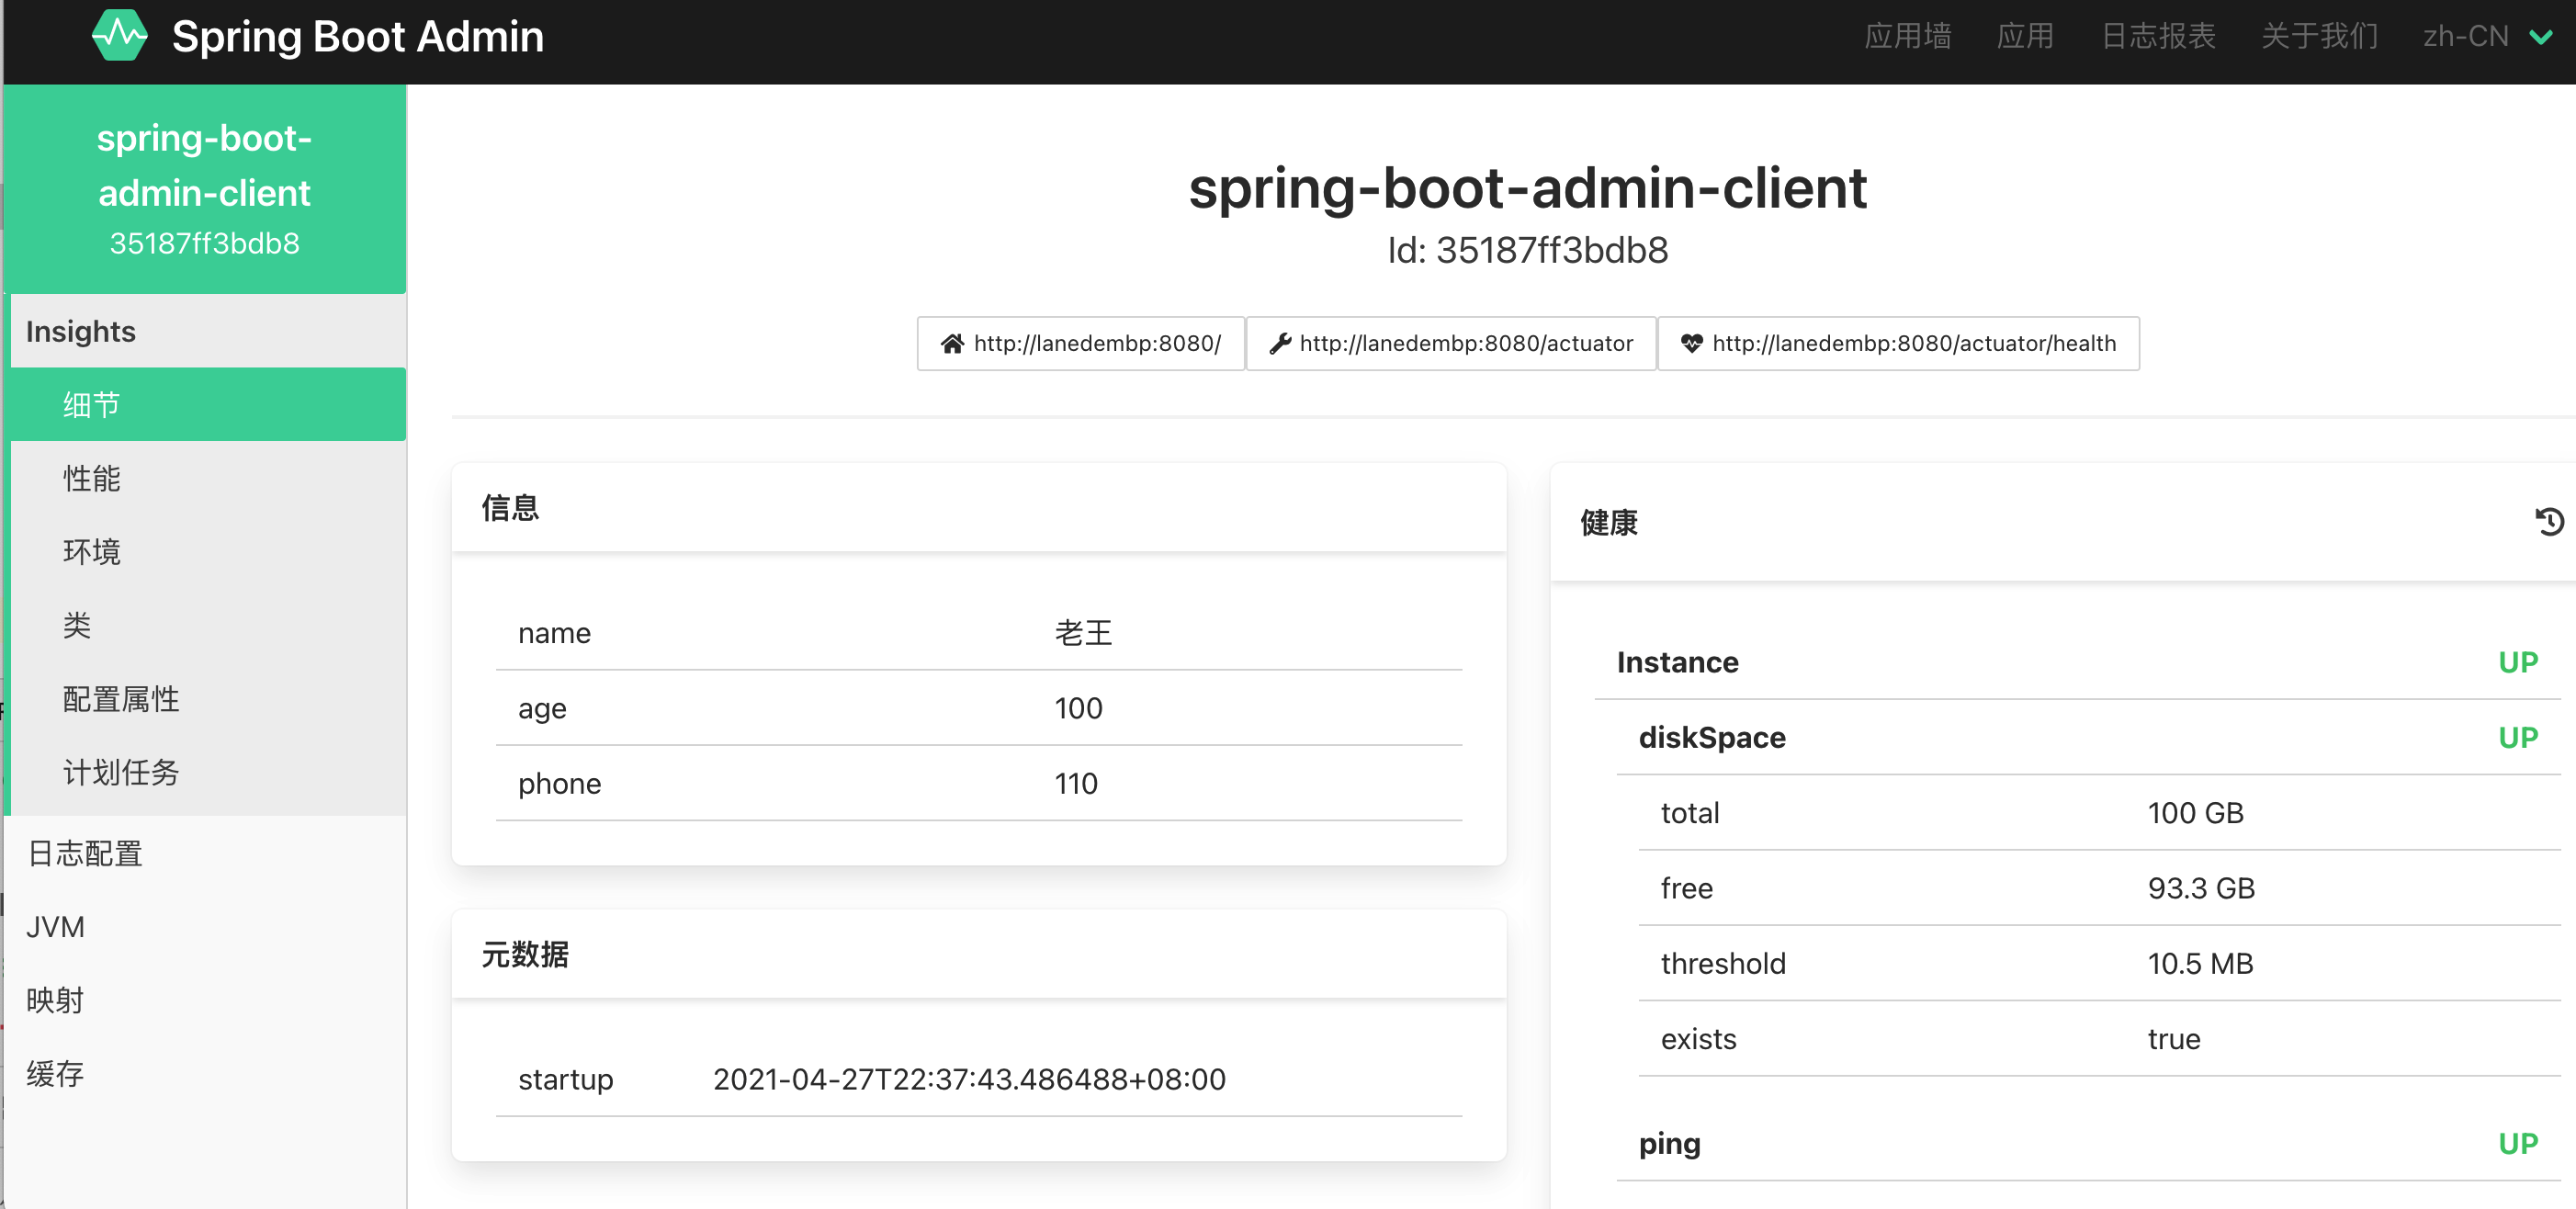
结束语
本文是在子慕老师的基础上整理完成,用来个人学习和复习


 1580
1580

 被折叠的 条评论
为什么被折叠?
被折叠的 条评论
为什么被折叠?
 到【灌水乐园】发言


