


一、先创建uniapp项目,可选择vue2/vue3,我们实例为vue2
二、打开项目控制台,下载 TUIKit 组件
命令:npm init -y
三、在这里分为两个版本 macOS和Windows,根据使用的电脑下载对应的般般
《 macOS:》
命令1:
npm i @tencentcloud/chat-uikit-uniapp unplugin-vue2-script-setup
下载完成命令1后,下载如下依赖文件,也是在控制台下载
命令2:
mkdir -p ./TUIKit && rsync -av --exclude={'node_modules','package.json','excluded- list.txt'} ./ node_modules/@tencentcloud/chat-uikit-uniapp/ ./TUIKit
命令3:
mkdir -p ./TUIKit/tui-customer-service-plugin && rsync -av ./node_modules/@tencentcloud/tui-customer-service-plugin/ ./TUIKit/tui-customer-service-plugin
《Windows:》
命令1:
npm i @tencentcloud/chat-uikit-uniapp unplugin-vue2-script-setup
命令2:
xcopy .\node_modules\@tencentcloud\chat-uikit-uniapp .\TUIKit /i /e /exclude:.\node_modules\@tencentcloud\chat-uikit-uniapp\excluded-list.txt
命令3:
xcopy .\node_modules\@tencentcloud\tui-customer-service-plugin .\TUIKit\tui-customer-service-plugin /i /e
四、在manifest.json中配置内容
// weixin miniProgram
"mp-weixin" : {
    "appid" : "",
    "optimization" : {
        "subPackages" : true
    }
},
// H5: close treeshaking to solve the problem of uni[methond]() is not a function
"h5" : {
    "optimization" : {
        "treeShaking" : {
            "enable" : false
        }
    }
},
五、Vue2 项目必须在根目录下创建或修改 vue.config.js 。然后引入改代码
const ScriptSetup = require('unplugin-vue2-script-setup/webpack').default;

module.exports = {
  parallel: false,
  configureWebpack: {
    plugins: [
      ScriptSetup({
        /* options */
      }),
    ],
  },
  chainWebpack(config) {
    // disable type check and let `vue-tsc` handles it
    config.plugins.delete('fork-ts-checker');
  },
};
六、配置App.vue
<script lang="ts">
import { TUILogin } from '@tencentcloud/tui-core';
// #ifdef APP-PLUS || H5
import { TUIChatKit } from './TUIKit';
TUIChatKit.init();
// #endif

let vueVersion = 2;
// #ifdef VUE3
vueVersion = 3;
// #endif

// Required information
// You can get userSig from TencentCloud chat console for Testing TUIKit.
// Deploy production environment please get it from your server.
// View https://cloud.tencent.com/document/product/269/32688
uni.$SDKAppID = 0; // Your SDKAppID
uni.$userID = ''; // Your userID
uni.$userSig = ''; // Your userSig

export default {
  onLaunch: function () {
	 TUILogin.login({
	   SDKAppID: uni.$SDKAppID,
	   userID: uni.$userID,
	   userSig: uni.$userSig,
	   useUploadPlugin: true, // If you need to send rich media messages, please set to true.
	   framework: `vue${vueVersion}` // framework used vue2 / vue3
	 }).catch(() => {});
  }
};
</script>
<style>
/* common css for page */
uni-page-body,html,body,page {
  width: 100% !important;
  height: 100% !important;
  overflow: hidden;
}
</style>
七、配置pages.json文件
{
  "pages": [
    {
      "path": "pages/index/index" // 您的项目首页
    }
  ],
  "subPackages": [
    {
      "root": "TUIKit",
      "pages": [
        {
          "path": "components/TUIConversation/index",
          "style": {
            "navigationBarTitleText": "腾讯云 IM"
          }
        },
        {
          "path": "components/TUIChat/index",
          "style": {
            "navigationBarTitleText": "腾讯云 IM",
            "app-plus": {
              "softinputMode": "adjustResize",
              "titleNView": {
                "buttons": [
                  {
                    "type": "menu"
                  }
                ]
              }
            },
            "h5": {
              "titleNView": {
                "buttons": []
              }
            }
          }
        },
        // 集成 chat 组件,必须配置该路径: 视频播放
        {
          "path": "components/TUIChat/video-play",
          "style": {
            "navigationBarTitleText": "腾讯云 IM"
          }
        },
        {
          "path": "components/TUIChat/web-view",
          "style": {
            "navigationBarTitleText": "腾讯云 IM"
          }
        },
        {
          "path": "components/TUIContact/index",
          "style": {
            "navigationBarTitleText": "腾讯云 IM"
          }
        },
        {
          "path": "components/TUIGroup/index",
          "style": {
            "navigationBarTitleText": "腾讯云 IM"
          }
        },
        {
          "path": "components/TUISearch/index",
          "style": {
            "navigationBarTitleText": "聊天记录"
          }
        }
      ]
    }
  ],
  "preloadRule": {
    "pages/index/index": {
      "network": "all",
      "packages": ["TUIKit"]
    }
  },
  "globalStyle": {
    "navigationBarTextStyle": "black",
    "navigationBarTitleText": "uni-app",
    "navigationBarBackgroundColor": "#F8F8F8",
    "backgroundColor": "#F8F8F8"
  }
}
八、配置main.js文件
// #ifndef VUE3
import VueCompositionAPI from '@vue/composition-api';
Vue.use(VueCompositionAPI);
// #endif
九、在页面中使用
<template>
  <div>
    <button @click="openConversationList">打开会话列表</button>
    <button @click="openContact">打开联系人</button>
  </div>
</template>
<script>
export default {
  methods: {
    // 打开会话列表
    openConversationList() {
      uni.navigateTo({ url: '/TUIKit/components/TUIConversation/index' });
    },
    // 打开联系人
    openContact() {
      uni.navigateTo({ url: '/TUIKit/components/TUIContact/index' });
    },
  },
};
</script>
十、获取 SDKAppID 、userID 、 userSig(获取 SDKAppID、userID、userSig 信息后填写到 App.vue 中对应的字段上。)
uni.$SDKAppID = 0; // Your SDKAppID
uni.$userID = ''; // Your userID
uni.$userSig = ''; // Your userSig
获取:
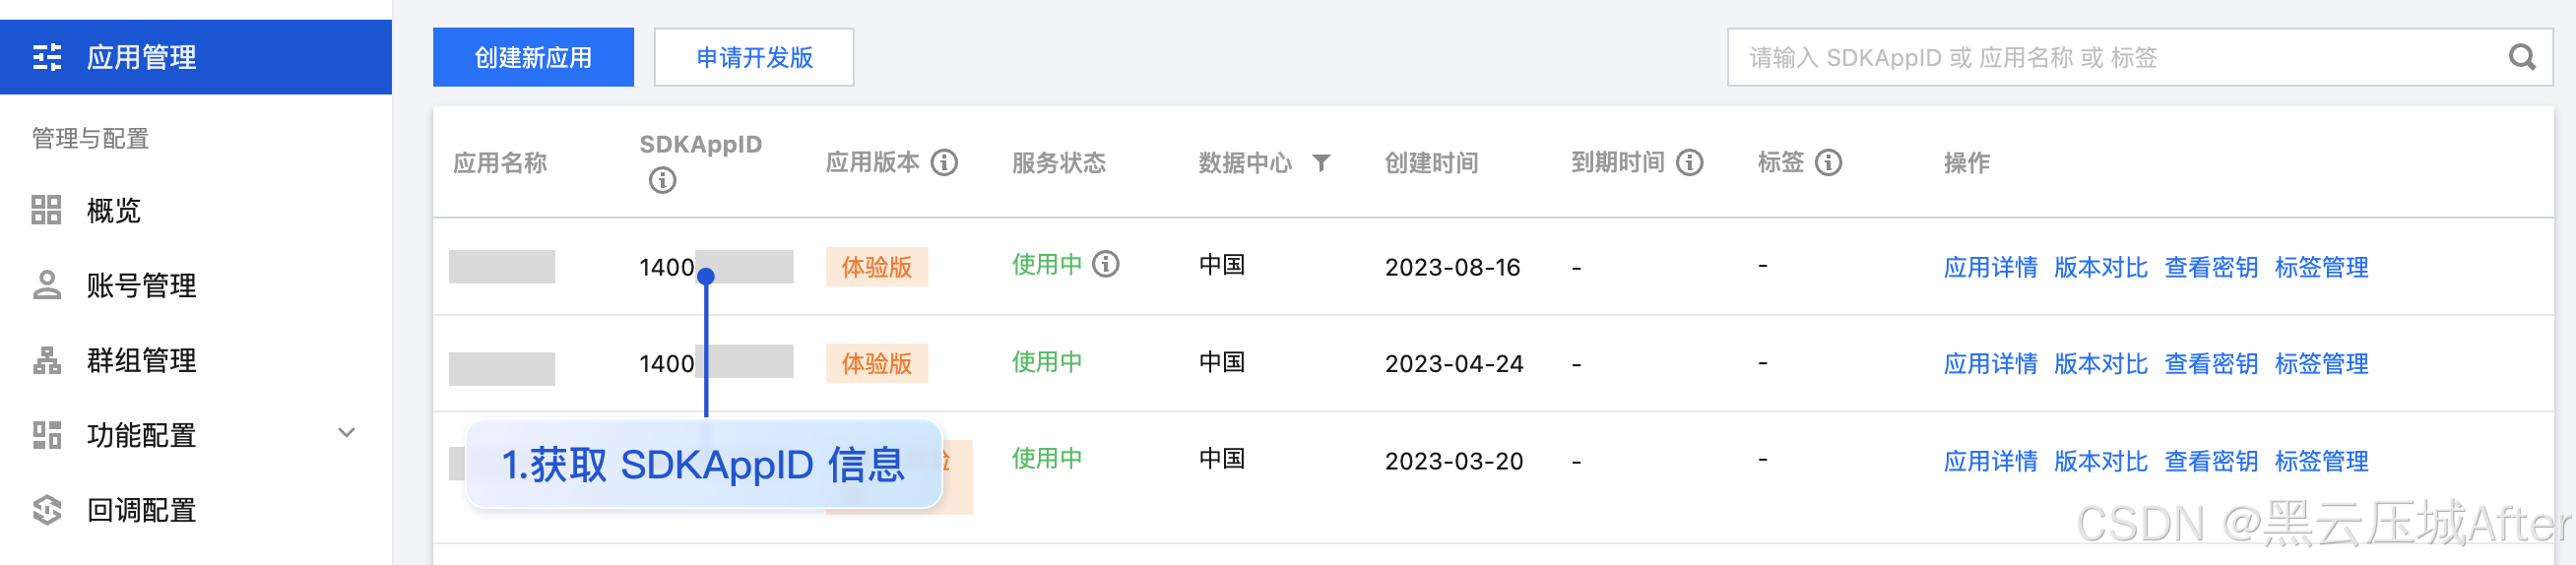
SDKAppID 信息,可通过 即时通信 IM 控制台 获取:
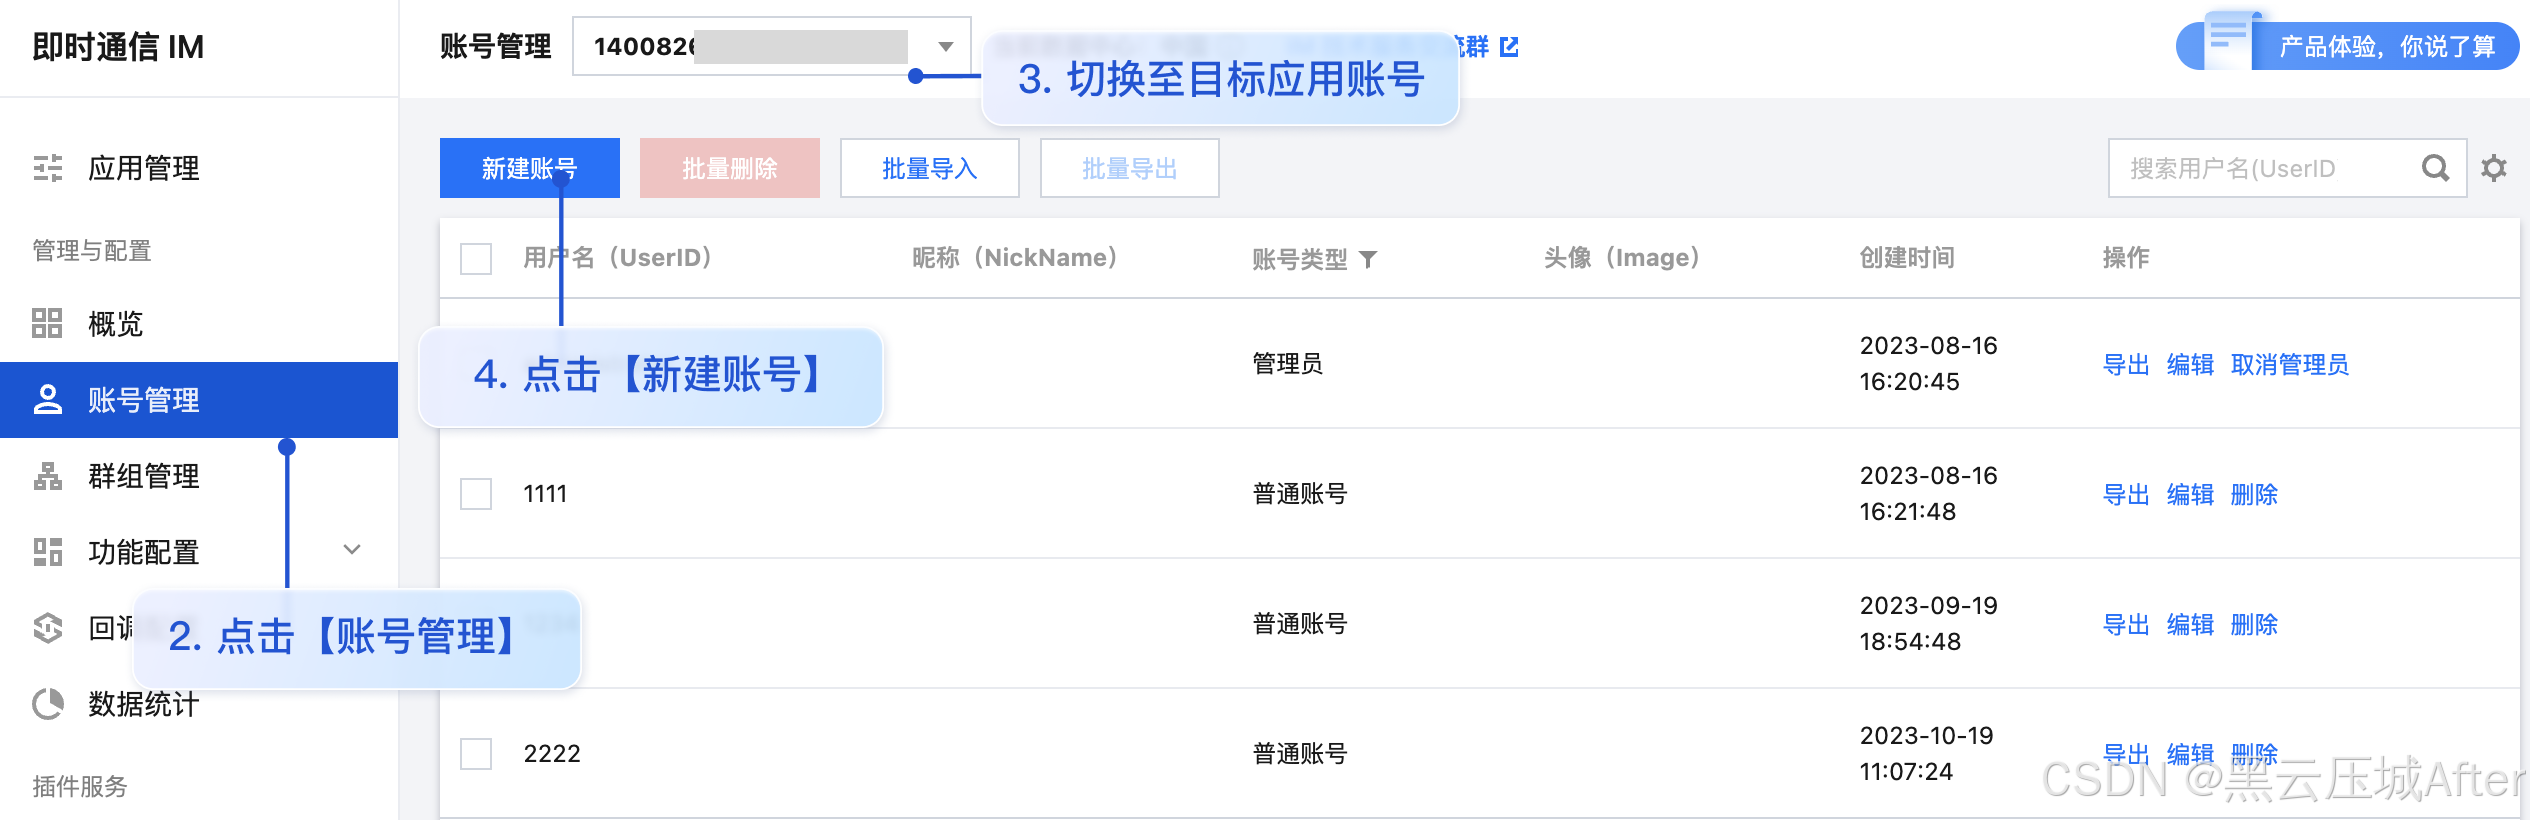
userID 信息,可单击 即时通信 IM 控制台 > 账号管理,切换至目标应用所在账号,创建 2 个 userID 方便后续体验聊天功能。
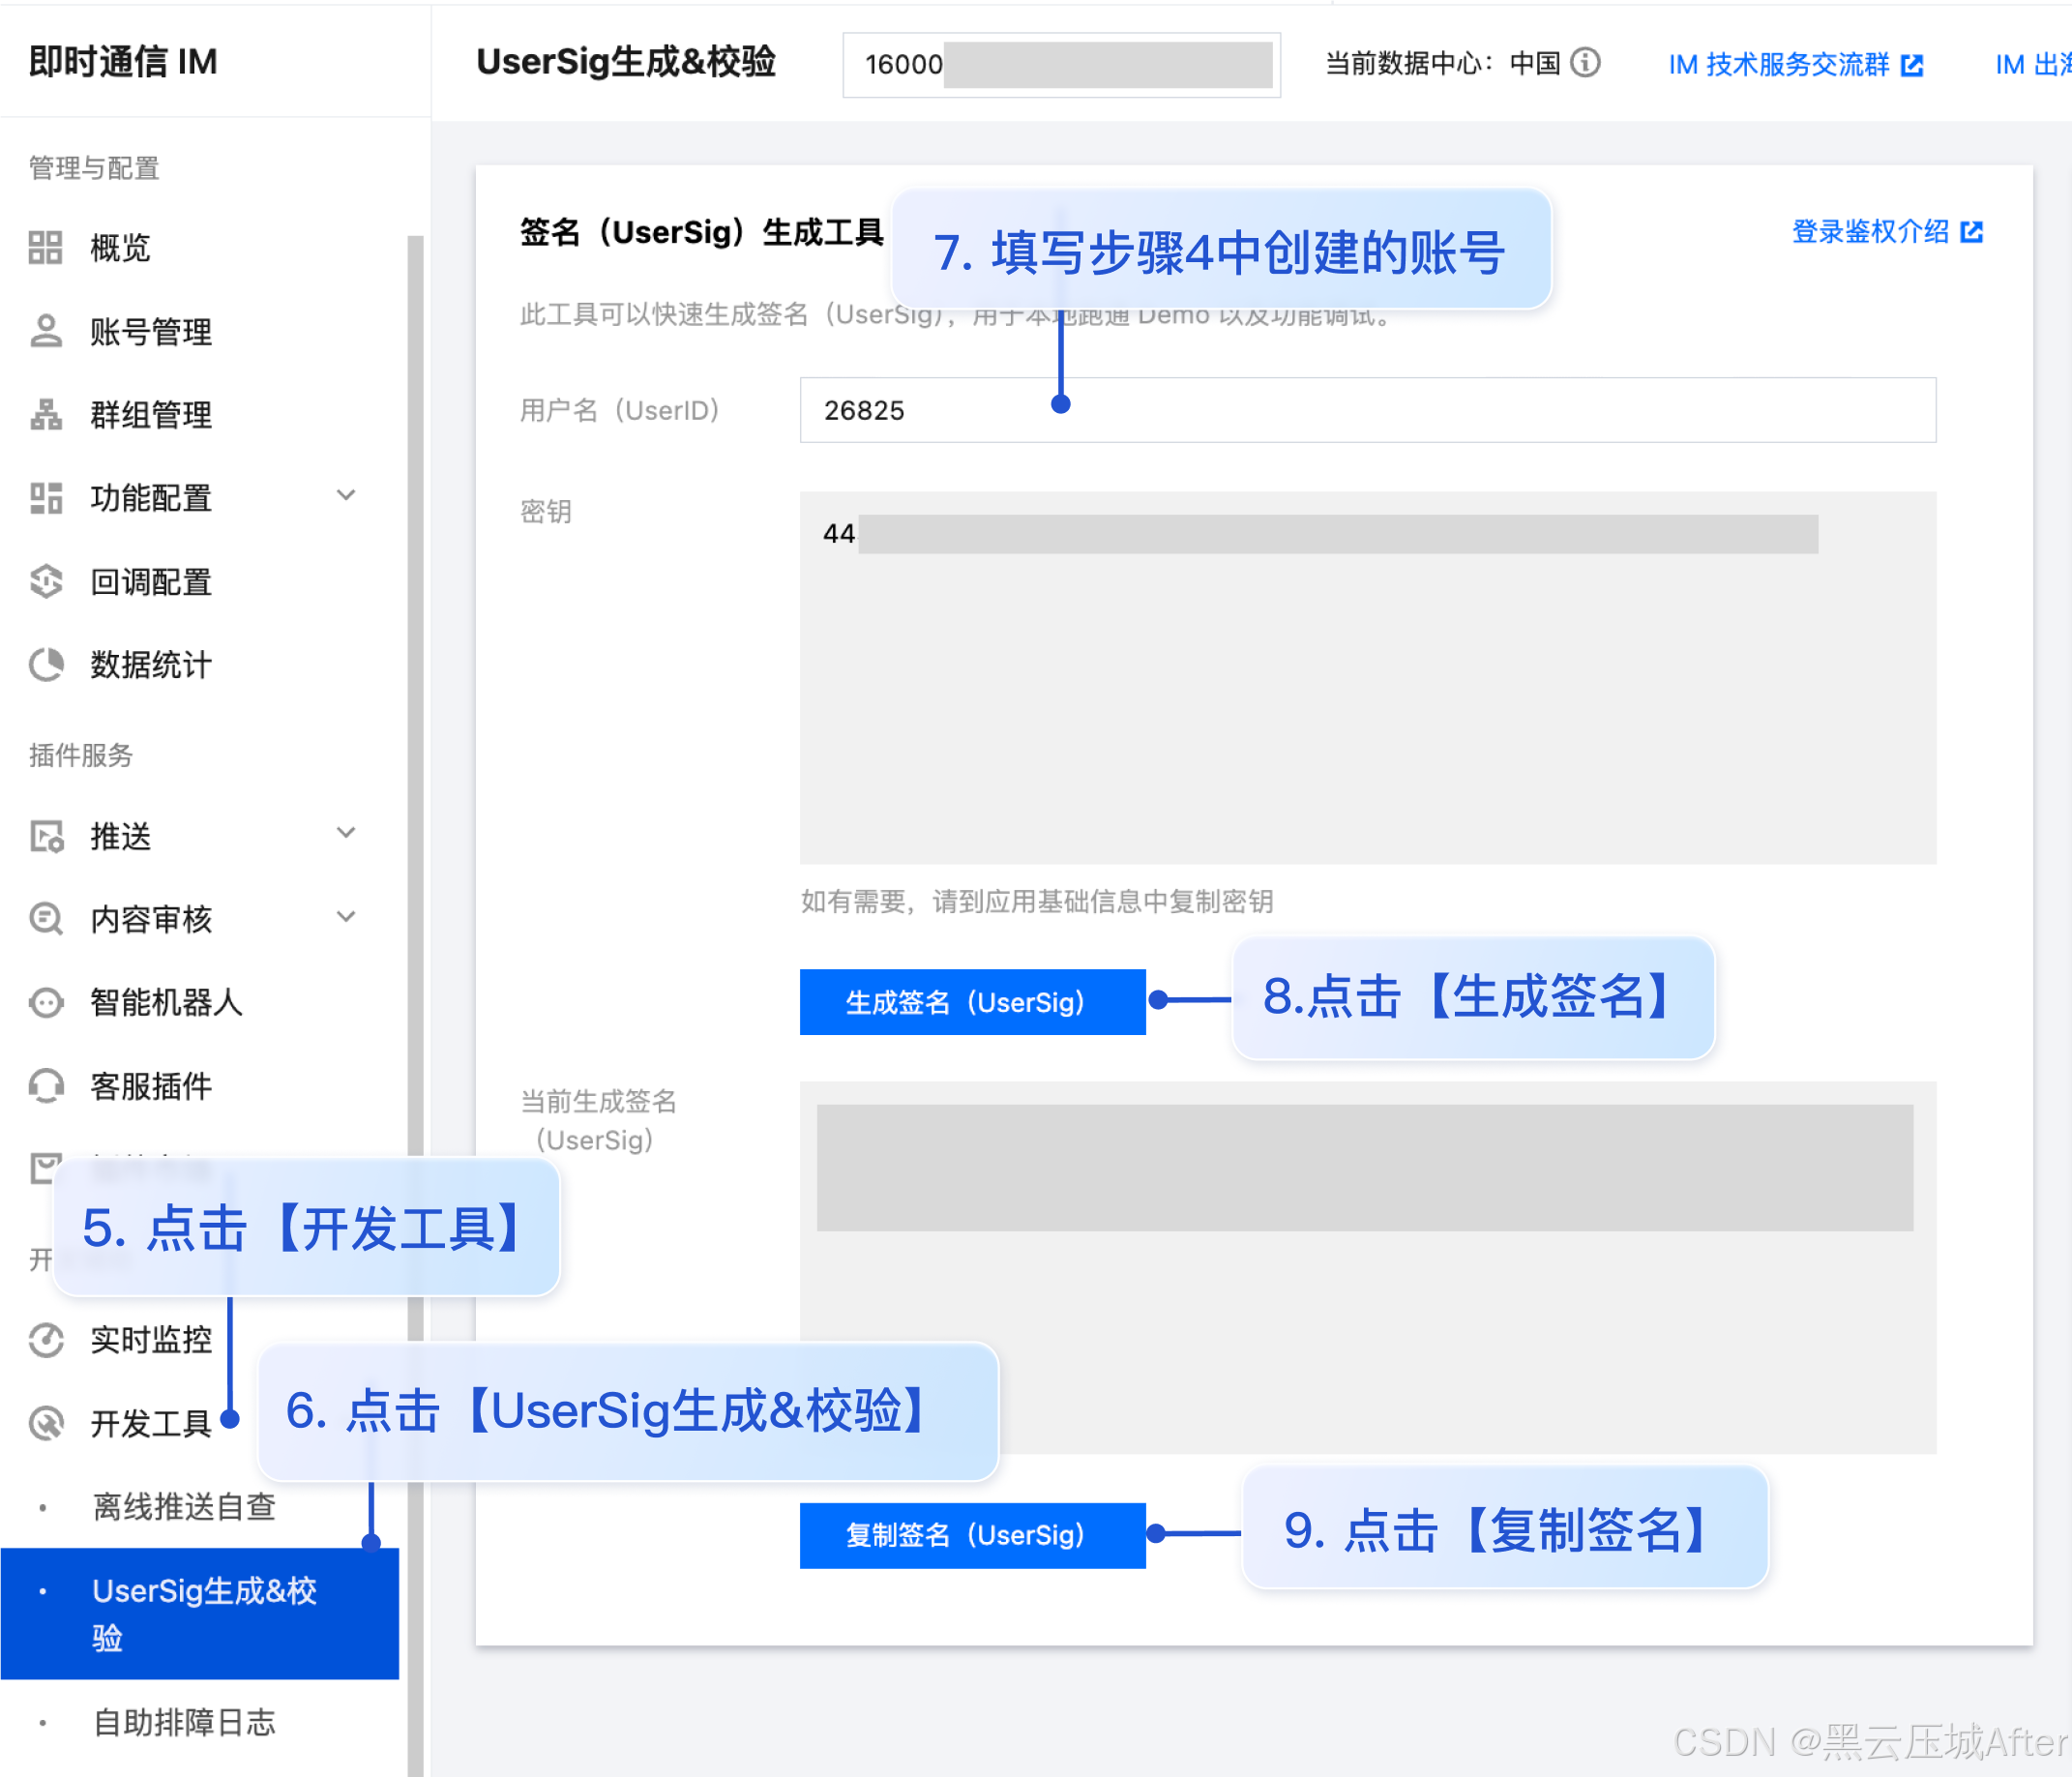
userSig 信息,可单击 即时通信 IM 控制台 > 开发工具 > UserSig生成&校验,填写创建的 userID,即可生成 userSig。
然后启动项目就可以了


 1万+
1万+

 被折叠的 条评论
为什么被折叠?
被折叠的 条评论
为什么被折叠?
 到【灌水乐园】发言


