


 文章描述了一个使用SpringCloud构建的项目结构,前端通过Nginx部署并加载静态文件,后端通过Gateway网关处理请求,结合OAuth2.0实现授权服务,包括JWT令牌的生成、验证和权限控制。其他服务通过引入相关依赖和配置实现安全保护,网关服务则通过过滤器进行权限验证,确保只有合法请求能通过。
1. 项目结构体
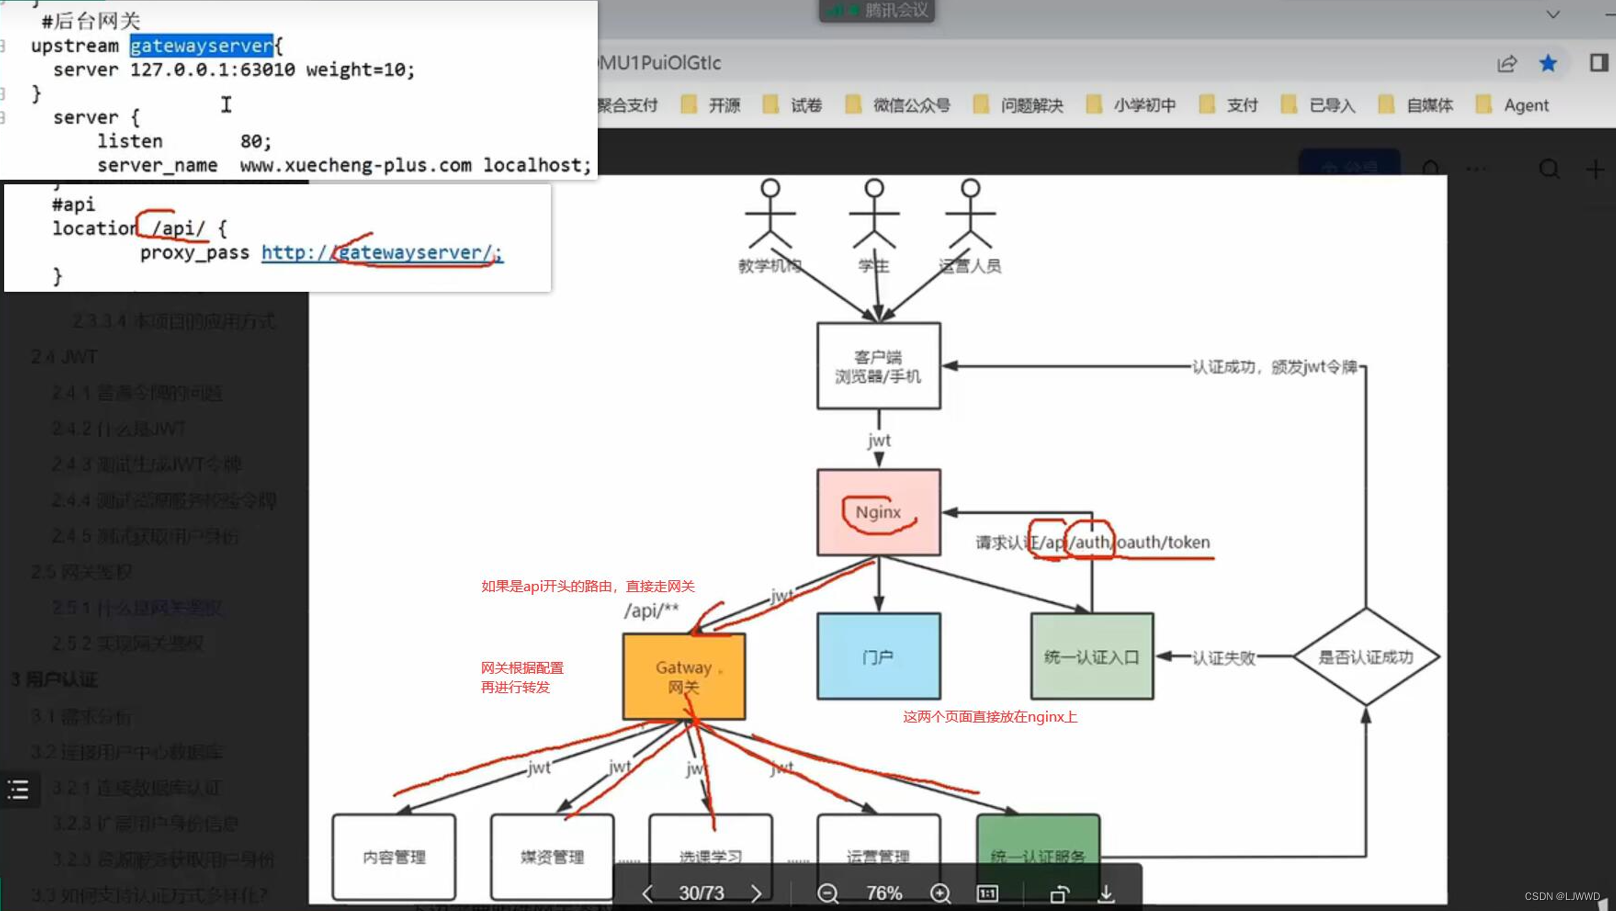
用户通过客户端访问项目时,前端项目会部署在nginx上,加载静态文件时直接从nginx上返回即可。
当用户在客户端操作时,需要调用后端的一些服务接口。这些接口会通过Gateway网关,网关进行一定的处理(jwt合法性校验,黑名单、白名单,过滤一部分请求)之后再转发给具体的微服务。
具体的资源服务会对请求进行解析,判断当前登录用户是否有权限调用该资源的接口。
2. 步骤
2.1. 统一认证服务
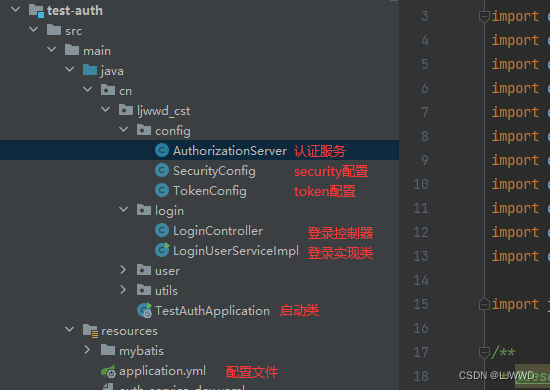
项目目录结构:
2.1.2. 引入依赖
下面两个为关键依赖,还可以自行补充nacos等依赖
	   <dependency>
           <groupId>org.springframework.cloud</groupId>
           <artifactId>spring-cloud-starter-security</artifactId>
       </dependency>
       <dependency>
           <groupId>org.springframework.cloud</groupId>
           <artifactId>spring-cloud-starter-oauth2</artifactId>
       </dependency>
2.1.3. 引入代码
AuthorizationServer :
/**
 * @description 授权服务器配置  OAUTH2.0
 * @author Mr.M
 * @date 2022/9/26 22:25
 * @version 1.0
 */
 @Configuration
 @EnableAuthorizationServer
 public class AuthorizationServer extends AuthorizationServerConfigurerAdapter {


  @Resource(name="authorizationServerTokenServicesCustom")
  private AuthorizationServerTokenServices authorizationServerTokenServices;
 @Autowired
 private AuthenticationManager authenticationManager;
  //客户端详情服务
 /**
  * 用来配置客户端详情服务(ClientDetailsService),
  * 随便一个客户端都可以随便接入到它的认证服务吗?
  * 答案是否定的,服务提供商会给批准接入的客户端一个身份,用于接入时的凭据,
  * 有客户端标识和客户端秘钥,在这里配置批准接入的客户端的详细信息。
  */
  @Override
  public void configure(ClientDetailsServiceConfigurer clients)
          throws Exception {


        clients.inMemory()// 使用in-memory存储
                .withClient("XcWebApp")// client_id
//                .secret("XcWebApp")//客户端密钥
                .secret(new BCryptPasswordEncoder().encode("XcWebApp"))//客户端密钥
                .resourceIds("xuecheng-plus")//资源列表
                .authorizedGrantTypes("authorization_code", "password","client_credentials","implicit","refresh_token")// 该client允许的授权类型authorization_code,password,refresh_token,implicit,client_credentials
                .scopes("all")// 允许的授权范围
                .autoApprove(false)//false跳转到授权页面
                //客户端接收授权码的重定向地址
                .redirectUris("http://ip:8100/api/user");
        /*
                1、get请求获取授权码
                地址: /oauth/authorize?client_id=XcWebApp&response_type=code&scope=all&redirect_uri=http://ip:8100/api/user
                参数列表如下:
                •client_id:客户端准入标识。
                •response_type:授权码模式固定为code。
                •scope:客户端权限。
                •redirect_uri:跳转uri,当授权码申请成功后会跳转到此地址,并在后边带上code参数(授权码)。

                2、请求成功,重定向至http://www.xuecheng-plus.com/?code=授权码,比如:http://www.xuecheng-plus.com/?code=Wqjb5H
                3、使用httpclient工具post申请令牌
                /oauth/token?client_id=XcWebApp&client_secret=XcWebApp&grant_type=authorization_code&code=授权码&redirect_uri=http://ip:8100/api/user
                参数列表如下
                •client_id:客户端准入标识。
                •client_secret:客户端秘钥。
                •grant_type:授权类型,填写authorization_code,表示授权码模式
                •code:授权码,就是刚刚获取的授权码,注意:授权码只使用一次就无效了,需要重新申请。
                •redirect_uri:申请授权码时的跳转url,一定和申请授权码时用的redirect_uri一致。

                4、申请令牌成功如下所示:
                JSON
                {
                  "access_token": "368b1ee7-a9ee-4e9a-aae6-0fcab243aad2",
                  "token_type": "bearer",
                  "refresh_token": "3d56e139-0ee6-4ace-8cbe-1311dfaa991f",
                  "expires_in": 7199,
                  "scope": "all"
                }
                说明:
                1、access_token,访问令牌,用于访问资源使用。
                2、token_type,bearer是在RFC6750中定义的一种token类型,在携带令牌访问资源时需要在head中加入bearer 空格 令牌内容
                3、refresh_token,当令牌快过期时使用刷新令牌可以再次生成令牌。
                4、expires_in:过期时间(秒)
                5、scope,令牌的权限范围,服务端可以根据令牌的权限范围去对令牌授权。
         */
  }

  //令牌端点的访问配置
 /**
  * 用来配置令牌(token)的访问端点和令牌服务(token services)。
  */
 @Override
  public void configure(AuthorizationServerEndpointsConfigurer endpoints) {


   endpoints
           .authenticationManager(authenticationManager)//认证管理器
           .tokenServices(authorizationServerTokenServices)//令牌管理服务
           .allowedTokenEndpointRequestMethods(HttpMethod.POST);
  }

  //令牌端点的安全配置
 /**
  * 用来配置令牌端点的安全约束.
  */
 @Override
  public void configure(AuthorizationServerSecurityConfigurer security){


   security
           .tokenKeyAccess("permitAll()")                    //oauth/token_key是公开
           .checkTokenAccess("permitAll()")                  //oauth/check_token公开
           .allowFormAuthenticationForClients()				//表单认证(申请令牌)
   ;
  }
 }
SecurityConfig :
@EnableGlobalMethodSecurity(securedEnabled = true,prePostEnabled = true)
@EnableWebSecurity
public class SecurityConfig extends WebSecurityConfigurerAdapter {


    //OAUTH2.0   配置认证管理bean
    @Bean
    public AuthenticationManager authenticationManagerBean() throws Exception {


        return super.authenticationManagerBean();
    }
//    //配置用户信息服务  这里注释之后需要实现一个接口--UserDetailsService
//    @Bean
//    public UserDetailsService userDetailsService() {


//        //这里配置用户信息,这里暂时使用这种方式将用户存储在内存中
//        InMemoryUserDetailsManager manager = new InMemoryUserDetailsManager();
//        manager.createUser(User.withUsername("zhangsan").password("123").authorities("p1").build());
//        manager.createUser(User.withUsername("lisi").password("456").authorities("p2").build());
//        return manager;
//    }
    @Bean
    public PasswordEncoder passwordEncoder() {


        //密码为明文方式
//        return NoOpPasswordEncoder.getInstance();
        //密码加密
        return new BCryptPasswordEncoder();
    }
    //配置安全拦截机制
    @Override
    protected void configure(HttpSecurity http) throws Exception {


        http
                .authorizeRequests()
                .antMatchers("/r/**").authenticated()//访问/r开始的请求需要认证通过
                .anyRequest().permitAll()//其它请求全部放行
                .and()
                .formLogin(
最低0.47元/天 解锁文章


 1923
1923

 被折叠的 条评论
为什么被折叠?
被折叠的 条评论
为什么被折叠?
 到【灌水乐园】发言


