


目录
(六)邮件配置和实现 Keepalived 状态切换的通知脚本
(七)实现ipvs的高可用(keepalived和lvs相结合)
一、高可用集群
(一)集群类型
LB:Load Balance 负载均衡
LVS/HAProxy/nginx(http/upstream, stream/upstream)
HA:High Availability 高可用集群 数据库、Redis
SPoF: Single Point of Failure,解决单点故障
HPC:High Performance Computing 高性能集群
(二)实现高可用
提升系统高用性的解决方案:降低MTTR- Mean Time To Repair(平均故障时间) 解决方案:建立冗余机制
active/passive 主/备
active/active 双主
active --> HEARTBEAT --> passive
active HEARTBEAT active
(三)VRRP
Virtual Router Redundancy Protocol
虚拟路由冗余协议,解决静态网关单点风险
物理层:路由器、三层交换机
软件层:keepalived
1、相关术语
虚拟路由器:Virtual Router
虚拟路由器标识:VRID(0-255),唯一标识虚拟路由器
VIP:Virtual IP
VMAC:Virutal MAC (00-00-5e-00-01-VRID)
物理路由器:
master:主设备
backup:备用设备
priority:优先级
2、相关技术
通告:心跳,优先级等;周期性
工作方式:抢占式,非抢占式
安全认证:
无认证
简单字符认证:预共享密钥
MD5
工作模式:
主/备:单虚拟路由器
主/主:主/备(虚拟路由器1),备/主(虚拟路由器2)
二、keepalived部署
(一)简介
vrrp 协议的软件实现,原生设计目的为了高可用 ipvs服务
官网:http://keepalived.org/
功能:
基于vrrp协议完成地址流动
为vip地址所在的节点生成ipvs规则(在配置文件中预先定义)
为ipvs集群的各RS做健康状态检测
基于脚本调用接口完成脚本中定义的功能,进而影响集群事务,以此支持nginx、haproxy等服务
(二)架构
官方文档:
https://keepalived.org/doc/
http://keepalived.org/documentation.html
用户空间核心组件:
vrrp stack:VIP消息通告
checkers:监测real server
system call:实现 vrrp 协议状态转换时调用脚本的功能
SMTP:邮件组件
IPVS wrapper:生成IPVS规则
Netlink Reflector:网络接口
WatchDog:监控进程
控制组件:提供keepalived.conf 的解析器,完成Keepalived配置
IO复用器:针对网络目的而优化的自己的线程抽象
内存管理组件:为某些通用的内存管理功能(例如分配,重新分配,发布等)提供访问权限
(三)相关文件
软件包名:keepalived
主程序文件:/usr/sbin/keepalived
主配置文件:/etc/keepalived/keepalived.conf
配置文件示例:/usr/share/doc/keepalived/
Unit File:/lib/systemd/system/keepalived.service
Unit File的环境配置文件:/etc/sysconfig/keepalived
三、实验
(一)全局配置虚拟路由
实验环境
1、准备四台7.9的虚拟机,分别取名为KA1.KA2.sever1.server2
2、KA1的IP为172.25.254.10
3、KA2的IP为172.25.254.20
4、server的IP为172.25.254.110
5、server2的IP为172.25.254.120
配置
KA1
[root@ka1 ~]# ifconfig
eth0: flags=4163<UP,BROADCAST,RUNNING,MULTICAST>  mtu 1500
        inet 172.25.254.10  netmask 255.255.255.0  broadcast 172.25.254.255
        inet6 fe80::20c:29ff:feb2:7b0b  prefixlen 64  scopeid 0x20<link>
        ether 00:0c:29:b2:7b:0b  txqueuelen 1000  (Ethernet)
        RX packets 8258  bytes 670849 (655.1 KiB)
        RX errors 0  dropped 0  overruns 0  frame 0
        TX packets 6417  bytes 546594 (533.7 KiB)
        TX errors 0  dropped 0 overruns 0  carrier 0  collisions 0

关闭火墙
[root@ka1 ~]# systemctl disable --now firewalld.service
关闭selinux
[root@ka1 ~]# setenforce 0
[root@ka1 ~]# getenforce
Permissive

测试两台server的http
[root@ka1 ~]# curl 172.25.254.110
172.25.254.110
[root@ka1 ~]# curl 172.25.254.120
172.25.254.120

下载keepalive
[root@ka1 ~]# yum install keepalived

[root@ka1 ~]# vim /etc/keepalived/keepalived.conf
global_defs {
   notification_email {
     acassen@firewall.loc
     failover@firewall.loc
     sysadmin@firewall.loc
   }
   notification_email_from Alexandre.Cassen@firewall.loc
   smtp_server 127.0.0.1
   smtp_connect_timeout 30
   router_id LVS_DEVEL
   vrrp_skip_check_adv_addr
   vrrp_strict
   vrrp_garp_interval 0
   vrrp_gna_interval 0
   vrrp_mcast_group4 224.0.0.18
}

vrrp_instance VI_1 {
    state MASTER
    interface eth0
    virtual_router_id 100
    priority 100
    advert_int 1
    authentication {
        auth_type PASS
        auth_pass 1111
    }
    virtual_ipaddress {
        172.25.254.100/24 dev eth0 label eth0:1
    }


[root@ka1 ~]# systemctl enable --now keepalived.service
KA2
[root@ka2 ~]# ifconfig
eth0: flags=4163<UP,BROADCAST,RUNNING,MULTICAST>  mtu 1500
        inet 172.25.254.20  netmask 255.255.255.0  broadcast 172.25.254.255
        inet6 fe80::20c:29ff:feb2:7b0b  prefixlen 64  scopeid 0x20<link>
        ether 00:0c:29:b2:7b:0b  txqueuelen 1000  (Ethernet)
        RX packets 8258  bytes 670849 (655.1 KiB)
        RX errors 0  dropped 0  overruns 0  frame 0
        TX packets 6417  bytes 546594 (533.7 KiB)
        TX errors 0  dropped 0 overruns 0  carrier 0  collisions 0

关闭火墙
[root@ka2 ~]# systemctl disable --now firewalld.service
关闭selinux
[root@ka2 ~]# setenforce 0
[root@ka2 ~]# getenforce
Permissive

测试两台server的http
[root@ka2 ~]# curl 172.25.254.110
172.25.254.110
[root@ka2 ~]# curl 172.25.254.120
172.25.254.120

下载keepalive
[root@ka2 ~]# yum install keepalived

[root@ka2 ~]# vim /etc/keepalived/keepalived.conf

其他与KA1相同,就state和优先级不同
vrrp_instance VI_1 {
    state BACKUP
    interface eth0
    virtual_router_id 100
    priority 80
    advert_int 1
    authentication {
        auth_type PASS
        auth_pass 1111
    }
    virtual_ipaddress {
        172.25.254.100/24 dev eth0 label eth0:1
    }


[root@ka1 ~]# systemctl enable --now keepalived.service
server1
[root@server1 ~]# ifconfig
eth0: flags=4163<UP,BROADCAST,RUNNING,MULTICAST>  mtu 1500
        inet 172.25.254.110  netmask 255.255.255.0  broadcast 172.25.254.255
        inet6 fe80::20c:29ff:fe1c:5c41  prefixlen 64  scopeid 0x20<link>
        ether 00:0c:29:1c:5c:41  txqueuelen 1000  (Ethernet)
        RX packets 1849  bytes 182418 (178.1 KiB)
        RX errors 0  dropped 0  overruns 0  frame 0
        TX packets 1255  bytes 138350 (135.1 KiB)
        TX errors 0  dropped 0 overruns 0  carrier 0  collisions 0

[root@server1 ~]# setenforce 0
[root@server1 ~]# getenforce
Permissive
[root@server1 ~]# systemctl disable --now firewalld.service
[root@server1 ~]# yum install httpd
[root@server1 ~]# echo 172.25.254.110 > /var/www/html/index.html
[root@server1 ~]# systemctl enable --now httpd.service
server2
[root@server2 ~]# ifconfig
eth0: flags=4163<UP,BROADCAST,RUNNING,MULTICAST>  mtu 1500
        inet 172.25.254.120  netmask 255.255.255.0  broadcast 172.25.254.255
        inet6 fe80::20c:29ff:fe73:269a  prefixlen 64  scopeid 0x20<link>
        ether 00:0c:29:73:26:9a  txqueuelen 1000  (Ethernet)
        RX packets 1301  bytes 127861 (124.8 KiB)
        RX errors 0  dropped 0  overruns 0  frame 0
        TX packets 751  bytes 87351 (85.3 KiB)
        TX errors 0  dropped 0 overruns 0  carrier 0  collisions 0

[root@server2 ~]# setenforce 0
[root@server2 ~]# systemctl disable --now firewalld.service
Removed symlink /etc/systemd/system/multi-user.target.wants/firewalld.service.
Removed symlink /etc/systemd/system/dbus-org.fedoraproject.FirewallD1.service.
[root@server2 ~]# yum install httpd
[root@server2 ~]# echo 172.25.254.120 > /var/www/html/index.html
[root@server2 ~]# systemctl enable --now httpd.service
Created symlink from /etc/systemd/system/multi-user.target.wants/httpd.service to /usr/lib/sy
测试
命令:[root@ka1 ~]# tcpdump -i eth0 -nn host 224.0.0.18
(二) 独立日志实验
[root@ka1 ~]# vim /etc/rsyslog.conf

local6.*                                                /var/log/keepalived.log

[root@ka1 ~]# vim /etc/sysconfig/keepalived

KEEPALIVED_OPTIONS="-D -S 6"


[root@ka1 ~]# vim /etc/keepalived/keepalived.conf
[root@ka1 ~]# systemctl restart keepalived.service
[root@ka1 ~]# systemctl restart rsyslog.service
[root@ka1 ~]# ll /var/log/keepalived.log
-rw-------. 1 root root 1002 8月  12 12:42 /var/log/keepalived.log
[root@ka1 ~]# cat /var/log/keepalived.log
Aug 12 12:42:30 ka1 Keepalived_healthcheckers[5421]: Error connecting server [192.168.200.3]:1358.
Aug 12 12:42:31 ka1 Keepalived_healthcheckers[5421]: Timeout connecting server [192.168.201.100]:443.
Aug 12 12:42:33 ka1 Keepalived_healthcheckers[5421]: Error connecting server [192.168.200.2]:1358.
Aug 12 12:42:35 ka1 Keepalived_healthcheckers[5421]: Timeout connecting server [192.168.200.4]:1358.
Aug 12 12:42:35 ka1 Keepalived_healthcheckers[5421]: Timeout connecting server [192.168.200.5]:1358.
Aug 12 12:42:35 ka1 Keepalived_healthcheckers[5421]: Error connecting server [192.168.200.3]:1358.
Aug 12 12:42:37 ka1 Keepalived_healthcheckers[5421]: Timeout connecting server [192.168.201.100]:443.
Aug 12 12:42:38 ka1 Keepalived_healthcheckers[5421]: Error connecting server [192.168.200.2]:1358.
Aug 12 12:42:40 ka1 Keepalived_healthcheckers[5421]: Error connecting server [192.168.200.3]:1358.
Aug 12 12:42:41 ka1 Keepalived_healthcheckers[5421]: Timeout connecting server [192.168.200.4]:1358.
Aug 12 12:42:41 ka1 Keepalived_healthcheckers[5421]: Timeout connecting server [192.168.200.5]:1358.
Aug 12 12:42:43 ka1 Keepalived_healthcheckers[5421]: Error connecting server [192.168.200.2]:1358.
(三) 独立配置文件
[root@ka1 ~]# vim /etc/keepalived/keepalived.conf

#vrrp_instance VI_1 {
#    state MASTER
#    interface eth0
#    virtual_router_id 100
#    priority 100
#    advert_int 1
#    authentication {
#        auth_type PASS
#        auth_pass 1111
#    }
#    virtual_ipaddress {
#        172.25.254.100/24 dev eth0 label eth0:1
#    }
#}
#
include "/etc/keepalived/conf.d/*.conf"

[root@ka1 ~]# systemctl restart keepalived.service

这个错误告诉我们没有/etc/keepalived/conf.d/*.conf这个文件
Job for keepalived.service failed because the control process exited with error code. See "systemctl status keepalived.service" and "journalctl -xe" for details.
创建文件
[root@ka1 ~]# mkdir -p /etc/keepalived/conf.d
[root@ka1 ~]# vim /etc/keepalived/conf.d/172.25.254.100.conf
[root@ka1 ~]# vim /etc/keepalived/keepalived.conf

[root@ka1 ~]# cat /etc/keepalived/conf.d/172.25.254.100.conf
vrrp_instance VI_1 {
    state MASTER
    interface eth0
    virtual_router_id 100
    priority 100
    advert_int 1
    authentication {
        auth_type PASS
        auth_pass 1111
    }
    virtual_ipaddress {
        172.25.254.100/24 dev eth0 label eth0:1#    }
    }
}

[root@ka1 ~]# systemctl restart keepalived.service
测试:
[root@ka1 ~]# ifconfig
eth0: flags=4163<UP,BROADCAST,RUNNING,MULTICAST>  mtu 1500
        inet 172.25.254.10  netmask 255.255.255.0  broadcast 172.25.254.255
        inet6 fe80::20c:29ff:feb2:7b0b  prefixlen 64  scopeid 0x20<link>
        ether 00:0c:29:b2:7b:0b  txqueuelen 1000  (Ethernet)
        RX packets 27511  bytes 2081762 (1.9 MiB)
        RX errors 0  dropped 0  overruns 0  frame 0
        TX packets 20822  bytes 1584921 (1.5 MiB)
        TX errors 0  dropped 0 overruns 0  carrier 0  collisions 0

eth0:1: flags=4163<UP,BROADCAST,RUNNING,MULTICAST>  mtu 1500
        inet 172.25.254.100  netmask 255.255.255.0  broadcast 0.0.0.0
        ether 00:0c:29:b2:7b:0b  txqueuelen 1000  (Ethernet)

lo: flags=73<UP,LOOPBACK,RUNNING>  mtu 65536
        inet 127.0.0.1  netmask 255.0.0.0
        inet6 ::1  prefixlen 128  scopeid 0x10<host>
        loop  txqueuelen 1000  (Local Loopback)
        RX packets 100  bytes 5000 (4.8 KiB)
        RX errors 0  dropped 0  overruns 0  frame 0
        TX packets 100  bytes 5000 (4.8 KiB)
        TX errors 0  dropped 0 overruns 0  carrier 0  collisions 0

virbr0: flags=4099<UP,BROADCAST,MULTICAST>  mtu 1500
        inet 192.168.122.1  netmask 255.255.255.0  broadcast 192.168.122.255
        ether 52:54:00:a5:ca:b0  txqueuelen 1000  (Ethernet)
        RX packets 0  bytes 0 (0.0 B)
        RX errors 0  dropped 0  overruns 0  frame 0
        TX packets 0  bytes 0 (0.0 B)
        TX errors 0  dropped 0 overruns 0  carrier 0  collisions 0
( 四)非抢占和延时抢占
默认为抢占模式preempt,即当高优先级的主机恢复在线后,会抢占低先级的主机的master角色, 这样会使vip在KA主机中来回漂移,造成网络抖动, 建议设置为非抢占模nopreempt ,即高优先级主机恢复后,并不会抢占低优先级主机的master角色 非抢占模块下,如果原主机down机, VIP迁移至的新主机, 后续也发生down时,仍会将VIP迁移回原主机
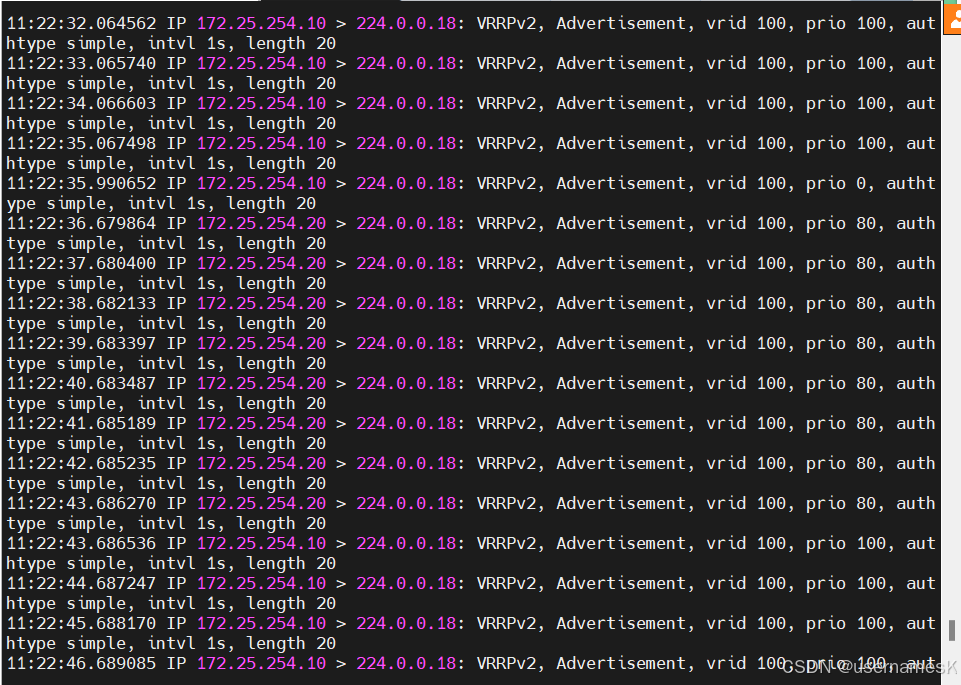
非抢占
KA1和KA2的keepalive文件一直,优先级不变
[root@ka1 ~]# vim /etc/keepalived/keepalived.conf

vrrp_instance VI_1 {
    state BACKUP
    interface eth0
    virtual_router_id 100
    priority 100
    advert_int 1
    nopreempt
    authentication {
        auth_type PASS
        auth_pass 1111
    }
    virtual_ipaddress {
        172.25.254.100/24 dev eth0 label eth0:1
    }
}

测试:当一个服务器挂了之后另一个才会继承vip,而不会随着优先级而进行抢占
[root@ka1 ~]# tcpdump -i eth0 -nn host 224.0.0.18
tcpdump: verbose output suppressed, use -v or -vv for full protocol decode
listening on eth0, link-type EN10MB (Ethernet), capture size 262144 bytes
14:28:48.085416 IP 172.25.254.10 > 224.0.0.18: VRRPv2, Advertisement, vrid 100, prio 100,  1s, length 20
14:29:11.113917 IP 172.25.254.10 > 224.0.0.18: VRRPv2, Advertisement, vrid 100, prio 100, authtype simple, intvl 1s, length 20
14:29:11.256395 IP 172.25.254.10 > 224.0.0.18: VRRPv2, Advertisement, vrid 100, prio 0, authtype simple, intvl 1s, length 20
14:29:11.945351 IP 172.25.254.20 > 224.0.0.18: VRRPv2, Advertisement, vrid 100, prio 80, authtype simple, intvl 1s, length 20
14:29:42.977338 IP 172.25.254.20 > 224.0.0.18: VRRPv2, Advertisement, vrid 100, prio 80, authtype simple, intvl 1s, length 20
14:29:43.454695 IP 172.25.254.20 > 224.0.0.18: VRRPv2, Advertisement, vrid 100, prio 0, authtype simple, intvl 1s, length 20
14:29:44.064994 IP 172.25.254.10 > 224.0.0.18: VRRPv2, Advertisement, vrid 100, prio 100, authtype simple, intvl 1s, length 20
14:29:45.066551 IP 172.25.254.10 > 224.0.0.18: VRRPv2, Advertisement, vrid 100, prio 100, authtype simple, intvl 1s, length 20
14:29:46.067096 IP 172.25.254.10 > 224.0.0.18: VRRPv2, Advertisement, vrid 100, prio 100, authtype simple, intvl 1s, length 20
14:29:47.067854 IP 172.25.254.10 > 224.0.0.18: VRRPv2, Advertisement, vrid 100, prio 100, authtype simple, intvl 1s, length 20
14:29:48.069404 IP 172.25.254.10 > 224.0.0.18: VRRPv2, Advertisement, vrid 100, prio 100, authtype simple, intvl 1s, length 20
14:29:49.070614 IP 172.25.254.10 > 224.0.0.18: VRRPv2, Advertisement, vrid 100, prio 100, authtype simple, intvl 1s, length 20
14:29:50.070977 IP 172.25.254.10 > 224
延时抢占
抢占延迟模式,即优先级高的主机恢复后,不会立即抢回VIP,而是延迟一段时间(默认300s)再抢回 VIP
注意:需要各keepalived服务器state为BACKUP,并且不要启用 vrrp_strict
KA2的配置一样,除过优先级
[root@ka1 ~]# vim /etc/keepalived/keepalived.conf

vrrp_instance VI_1 {
    state BACKUP
    interface eth0
    virtual_router_id 100
    priority 100
    advert_int 1
    preempt_delay 5s         设定延时5秒抢占vip
    authentication {
        auth_type PASS
        auth_pass 1111
    }
    virtual_ipaddress {
        172.25.254.100/24 dev eth0 label eth0:1
    }
}

测试:当优先级高的服务器重新上线后并不会立即抢占vip,而是在5秒后抢占
[root@ka1 ~]# systemctl restart keepalived.service

[root@ka1 ~]# ifconfig
eth0: flags=4163<UP,BROADCAST,RUNNING,MULTICAST>  mtu 1500
        inet 172.25.254.10  netmask 255.255.255.0  broadcast 172.25.254.255
        inet6 fe80::20c:29ff:feb2:7b0b  prefixlen 64  scopeid 0x20<link>
        ether 00:0c:29:b2:7b:0b  txqueuelen 1000  (Ethernet)
        RX packets 47852  bytes 3572690 (3.4 MiB)
        RX errors 0  dropped 0  overruns 0  frame 0
        TX packets 35703  bytes 2641382 (2.5 MiB)
        TX errors 0  dropped 0 overruns 0  carrier 0  collisions 0

[root@ka1 ~]# ifconfig
eth0: flags=4163<UP,BROADCAST,RUNNING,MULTICAST>  mtu 1500
        inet 172.25.254.10  netmask 255.255.255.0  broadcast 172.25.254.255
        inet6 fe80::20c:29ff:feb2:7b0b  prefixlen 64  scopeid 0x20<link>
        ether 00:0c:29:b2:7b:0b  txqueuelen 1000  (Ethernet)
        RX packets 47857  bytes 3573074 (3.4 MiB)
        RX errors 0  dropped 0  overruns 0  frame 0
        TX packets 35708  bytes 2641912 (2.5 MiB)
        TX errors 0  dropped 0 overruns 0  carrier 0  collisions 0


[root@ka1 ~]# ifconfig
eth0: flags=4163<UP,BROADCAST,RUNNING,MULTICAST>  mtu 1500
        inet 172.25.254.10  netmask 255.255.255.0  broadcast 172.25.254.255
        inet6 fe80::20c:29ff:feb2:7b0b  prefixlen 64  scopeid 0x20<link>
        ether 00:0c:29:b2:7b:0b  txqueuelen 1000  (Ethernet)
        RX packets 47865  bytes 3573680 (3.4 MiB)
        RX errors 0  dropped 0  overruns 0  frame 0
        TX packets 35721  bytes 2643056 (2.5 MiB)
        TX errors 0  dropped 0 overruns 0  carrier 0  collisions 0

eth0:1: flags=4163<UP,BROADCAST,RUNNING,MULTICAST>  mtu 1500
        inet 172.25.254.100  netmask 255.255.255.0  broadcast 0.0.0.0
        ether 00:0c:29:b2:7b:0b  txqueuelen 1000  (Ethernet)
(五)vip单播配置
默认keepalived主机之间利用多播相互通告消息,会造成网络拥塞,可以替换成单播,减少网络流量
注意:启用 vrrp_strict 时,不能启用单播
KA1:
[root@ka1 ~]# vim /etc/keepalived/keepalived.conf
vrrp_instance VI_1 {
    state MASTER
    interface eth0
    virtual_router_id 100
    priority 100
    advert_int 1
    #preempt_delay 5s
    authentication {
        auth_type PASS
        auth_pass 1111
    }
    virtual_ipaddress {
        172.25.254.100/24 dev eth0 label eth0:1
    }
    unicast_src_ip 172.25.254.10
    unicast_peer {
        172.25.254.20
}
}

测试:
[root@ka1 ~]# tcpdump -i eth0 -nn host 172.25.254.10 and dst 172.25.254.20
tcpdump: verbose output suppressed, use -v or -vv for full protocol decode
listening on eth0, link-type EN10MB (Ethernet), capture size 262144 bytes
14:48:07.850274 IP 172.25.254.10 > 172.25.254.20: VRRPv2, Advertisement, vrid 100, prio 100, authtype simple, intvl 1s, length 20
14:48:08.852006 IP 172.25.254.10 > 172.25.254.20: VRRPv2, Advertisement, vrid 100, prio 100, authtype simple, intvl 1s, length 20
14:48:09.853581 IP 172.25.254.10 > 172.25.254.20: VRRPv2, Advertisement, vrid 100, prio 100, authtype simple, intvl 1s, length 20
14:48:10.855618 IP 172.25.254.10 > 172.25.254.20: VRRPv2, Advertisement, vrid 100, prio 100, authtype simple, intvl 1s, length 20
14:48:11.856800 IP 172.25.254.10 > 172.25.254.20: VRRPv2, Advertisement, vrid 100, prio 100, authtype simple, intvl 1s, length 20


KA2:测试之前要有vip,也就是KA2在测试的时候有停掉KA1的keepzlived
[root@ka2 ~]# vim /etc/keepalived/keepalived.conf
vrrp_instance VI_1 {
    state BACKUP
    interface eth0
    virtual_router_id 100
    priority 80
    advert_int 1
    #preempt_delay 5s
    authentication {
        auth_type PASS
        auth_pass 1111
    }
    virtual_ipaddress {
        172.25.254.100/24 dev eth0 label eth0:1
    }
    unicast_src_ip 172.25.254.20
    unicast_peer {
        172.25.254.10
}
}


测试:
[root@ka2 ~]# tcpdump -i eth0 -nn host 172.25.254.20 and dst 172.25.254.10
tcpdump: verbose output suppressed, use -v or -vv for full protocol decode
listening on eth0, link-type EN10MB (Ethernet), capture size 262144 bytes
14:48:51.448810 IP 172.25.254.20 > 172.25.254.10: VRRPv2, Advertisement, vrid 100, prio 80, authtype simple, intvl 1s, length 20
14:48:52.450232 IP 172.25.254.20 > 172.25.254.10: VRRPv2, Advertisement, vrid 100, prio 80, authtype simple, intvl 1s, length 20
14:48:53.451997 IP 172.25.254.20 > 172.25.254.10: VRRPv2, Advertisement, vrid 100, prio 80, authtype simple, intvl 1s, length 20
14:48:54.453349 IP 172.25.254.20 > 172.25.254.10: VRRPv2, Advertisement, vrid 100, prio 80, authtype simple, intvl 1s, length 20
14:48:55.454963 IP 172.25.254.20 > 172.25.254.10: VRRPv2, Advertisement, vrid 100, prio 80, authtype simple, intvl 1s, length 20
(六)邮件配置和实现 Keepalived 状态切换的通知脚本
当keepalived的状态变化时,可以自动触发脚本的执行,比如:发邮件通知用户
1、通知脚本类型
当前节点成为主节点时触发的脚本
notify_master <STRING>| <QUOTED-STRING>
当前节点转为备节点时触发的脚本
notify_backup <STRING>| <QUOTED-STRING>
当前节点转为“失败”状态时触发的脚本
notify_fault <STRING> | <QUOTED-STRING>
通用格式的通知触发机制,一个脚本可完成以上三种状态的转换时的通知
notify <STRING> | <QUOTED-STRING>
当停止VRRP时触发的脚本
notify_stop <STRING> | <QUOTED-STRING>
2、脚本调用方法
在 vrrp_instance VI_1 语句块的末尾加下面行
notify_master "/etc/keepalived/notify.sh master"
notify_backup "/etc/keepalived/notify.sh backup"
notify_fault "/etc/keepalived/notify.sh fault"
KA1和KA2的配置一样
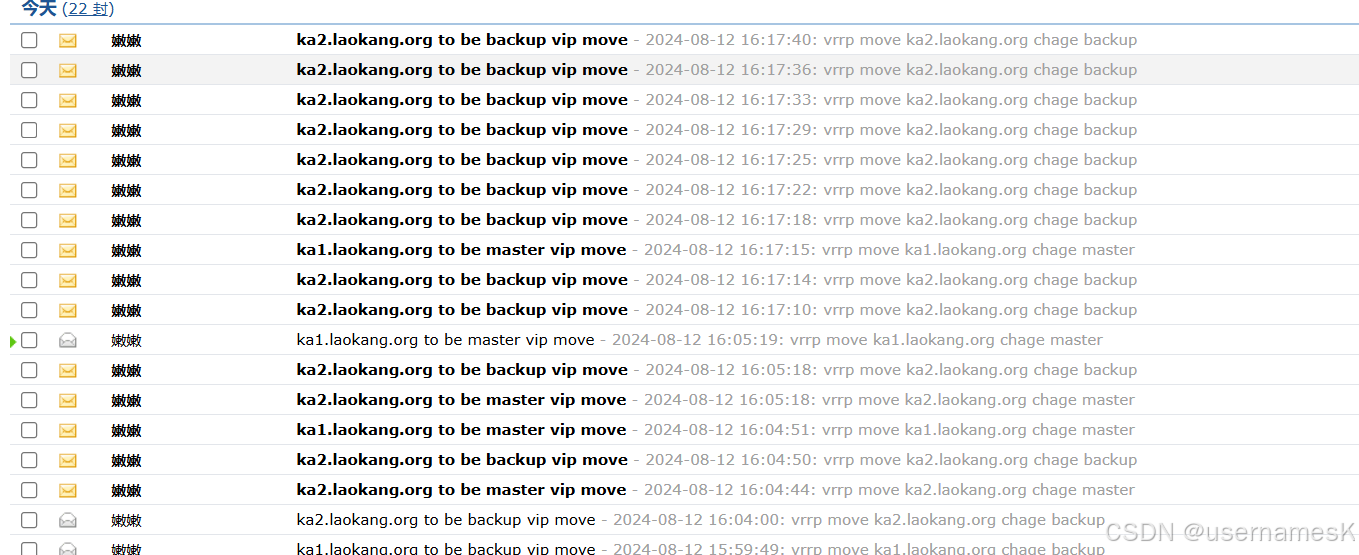
[root@ka1 ~]# vim /etc/mail.rc
[root@ka1 ~]# cat /etc/mail.rc
set from=自己的qq邮箱
set smtp=smtp.qq.com
set smtp-auth-user=自己的qq邮箱
set smtp-auth-password=为自己邮箱生成的授权码
set smtp-auth=login
set ssl-verify=ignore

[root@ka1 ~]# mailq
Mail queue is empty
[root@ka1 ~]# mail
No mail for root
书写脚本
[root@ka1 ~]# echo hello word | mail -s test 584122526@qq.com
[root@ka1 ~]# vim /etc/keepalived/mail.sh
给脚本执行权限
[root@ka1 ~]# chmod +x /etc/keepalived/mail.sh
[root@ka1 ~]# vim /etc/keepalived/keepalived.conf
[root@ka1 ~]# systemctl restart keepalived.service
[root@ka1 ~]# cat /etc/keepalived/mail.sh
#!/bin/bash
mail_dst="584122526@qq.com"
send_message()
{
        mail_sub="$HOSTNAME to be $1 vip move"
        mail_msg="`date +%F\ %T`: vrrp move $HOSTNAME chage $1"
        echo $mail_msg |mail -s "$mail_sub" $mail_dst

}
case $1 in
        master)
        send_message master
        ;;
        backup)
        send_message backup
        ;;
        fault)
        send_message fault
        ;;
        *)
        ;;
esac
[root@ka1 ~]# vim /etc/keepalived/keepalived.conf
vrrp_instance VI_1 {
    state MASTER
    interface eth0
    virtual_router_id 100
    priority 100
    advert_int 1
    #preempt_delay 5s
    authentication {
        auth_type PASS
        auth_pass 1111
    }
    virtual_ipaddress {
        172.25.254.100/24 dev eth0 label eth0:1
    }
    unicast_src_ip 172.25.254.10
    unicast_peer {
        172.25.254.20
}
        notify_master "/etc/keepalived/mail.sh master"
        notify_backup "/etc/keepalived/mail.sh backup"
        notify_fault "/etc/keepalived/mail.sh fault"

}


[root@ka1 ~]# systemctl restart keepalived.service
测试:将keepalive文件停止,重启后都发送了邮件
(七)实现ipvs的高可用(keepalived和lvs相结合)
1、virtual server (虚拟服务器)的定义格式
virtual_server IP port #定义虚拟主机IP地址及其端口
virtual_server fwmark int #ipvs的防火墙打标,实现基于防火墙的负载均衡集群 virtual_server group string #使用虚拟服务器组
2、虚拟服务器配置
virtual_server IP port { #VIP和PORT
delay_loop #检查后端服务器的时间间隔
lb_algo rr|wrr|lc|wlc|lblc|sh|dh #定义调度方法
lb_kind NAT|DR|TUN #集群的类型,注意要大写
persistence_timeout #持久连接时长
protocol TCP|UDP|SCTP #指定服务协议,一般为TCP
sorry_server #所有RS故障时,备用服务器地址
real_server { #RS的IP和PORT
weight #RS权重
notify_up | #RS上线通知脚本
notify_down | #RS下线通知脚本 HTTP_GET|SSL_GET|TCP_CHECK|SMTP_CHECK|MISC_CHECK { ... } #定义当前主机健康状 态检测方法 } }
#注意:括号必须分行写,两个括号写在同一行,如: }} 会出错
3、应用层检测
应用层检测:HTTP_GET|SSL_GET
HTTP_GET|SSL_GET {
url {
path <URL_PATH> #定义要监控的URL
status_code <INT> #判断上述检测机制为健康状态的响应码,一般为 200
}
connect_timeout <INTEGER> #客户端请求的超时时长, 相当于haproxy的timeout server
nb_get_retry <INT> #重试次数
delay_before_retry <INT> #重试之前的延迟时长
connect_ip <IP ADDRESS> #向当前RS哪个IP地址发起健康状态检测请求
connect_port <PORT> #向当前RS的哪个PORT发起健康状态检测请求
bindto <IP ADDRESS> #向当前RS发出健康状态检测请求时使用的源地址
bind_port <PORT> #向当前RS发出健康状态检测请求时使用的源端口
}
实验环境跟以上实验环境一样
server1
配置vip
[root@server1 ~]# vim /etc/sysctl.d/arp.conf

net.ipv4.conf.all.arp_announce = 2
net.ipv4.conf.all.arp_ignore = 1
net.ipv4.conf.lo.arp_announce = 2
net.ipv4.conf.lo.arp_ignore = 1

[root@server1 ~]# sysctl -p
[root@server1 ~]# ip a a 172.25.254.100/32 dev lo
[root@server1 ~]# ip a
1: lo: <LOOPBACK,UP,LOWER_UP> mtu 65536 qdisc noqueue state UNKNOWN group default qlen 1000
    link/loopback 00:00:00:00:00:00 brd 00:00:00:00:00:00
    inet 127.0.0.1/8 scope host lo
       valid_lft forever preferred_lft forever
    inet 172.25.254.100/32 scope global lo
       valid_lft forever preferred_lft forever
    inet6 ::1/128 scope host
       valid_lft forever preferred_lft forever
server2
[root@server2 ~]# vim /etc/sysctl.d/arp.conf

pv4.conf.all.arp_announce = 2
net.ipv4.conf.all.arp_ignore = 1
net.ipv4.conf.lo.arp_announce = 2
net.ipv4.conf.lo.arp_ignore = 1

[root@server2 ~]# sysctl -p
[root@server2 ~]# ip a a 172.25.254.100/32 dev lo
[root@server2 ~]# ip a
1: lo: <LOOPBACK,UP,LOWER_UP> mtu 65536 qdisc noqueue state UNKNOWN group default qlen 1000
    link/loopback 00:00:00:00:00:00 brd 00:00:00:00:00:00
    inet 127.0.0.1/8 scope host lo
       valid_lft forever preferred_lft forever
    inet 172.25.254.100/32 scope global lo
       valid_lft forever preferred_lft forever
    inet6 ::1/128 scope host
       valid_lft forever preferred_lft forever
KA1
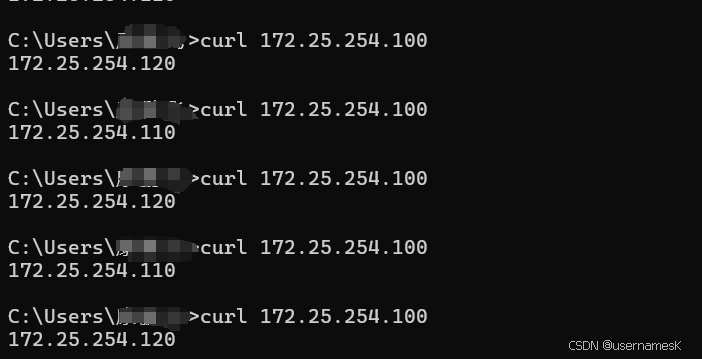
[root@ka1 ~]# yum install ipvsadm -y
[root@ka1 ~]# vim /etc/keepalived/keepalived.conf

virtual_server 172.25.254.100 80 {
    delay_loop 6
    lb_algo wrr
    lb_kind DR
#    persistence_timeout 50
    protocol TCP

    real_server 172.25.254.110 80 {
        weight 1
        HTTP_GET {
            url {
              path /
              status_code 200
            }
            connect_timeout 3
            nb_get_retry 3
            delay_before_retry 3
        }
    }

     real_server 172.25.254.120 80 {
        weight 1
        HTTP_GET {
            url {
              path /
              status_code 200
            }
            connect_timeout 3
            nb_get_retry 3
            delay_before_retry 3
        }
    }
}

[root@ka1 ~]# systemctl restart keepalived.service
[root@ka1 ~]# ipvsadm -Ln
IP Virtual Server version 1.2.1 (size=4096)
Prot LocalAddress:Port Scheduler Flags
  -> RemoteAddress:Port           Forward Weight ActiveConn InActConn
TCP  172.25.254.100:80 wrr
  -> 172.25.254.110:80            Route   1      0          0
  -> 172.25.254.120:80            Route   1      0          0
TCP  10.10.10.2:1358 rr persistent 50
  -> 192.168.200.200:1358         Masq    1      0          0
TCP  10.10.10.3:1358 rr persistent 50
KA2
[root@ka2 ~]# yum install ipvsadm -y

[root@ka2 ~]# vim /etc/keepalived/keepalived.conf

virtual_server 172.25.254.100 80 {
    delay_loop 6
    lb_algo wrr
    lb_kind DR
    #persistence_timeout 50
    protocol TCP
###########################################################
    real_server 172.25.254.110 80 {
        weight 1
        HTTP_GET {
            url {
              path /
                status_code 200
            }
            connect_timeout 3
            nb_get_retry 3
            delay_before_retry 3
        }
    }
     real_server 172.25.254.120 80 {
        weight 1
        HTTP_GET {
            url {
              path /
                status_code 200
            }
            connect_timeout 3
            nb_get_retry 3
            delay_before_retry 3
        }
    }
}


[root@ka2 ~]# systemctl restart keepalived.service
[root@ka2 ~]# ipvsadm -Ln
IP Virtual Server version 1.2.1 (size=4096)
Prot LocalAddress:Port Scheduler Flags
  -> RemoteAddress:Port           Forward Weight ActiveConn InActConn
TCP  172.25.254.100:80 wrr
  -> 172.25.254.110:80            Route   1      0          0
  -> 172.25.254.120:80            Route   1      0          0
TCP  10.10.10.2:1358 rr persistent 50
  -> 192.168.200.2:1358           Masq    1      0          0
  -> 192.168.200.3:1358           Masq    1      0          0
TCP  10.10.10.3:1358 rr persistent 50
  -> 192.168.200.4:1358           Masq    1      0          0
  -> 192.168.200.5:1358           Masq    1      0          0
测试:
关掉KA1之后在进行测试
(八)高可用(keepalive和haproxy)
server1
摘除server1上的vip
[root@server1 ~]# vim /etc/sysctl.d/arp.conf

net.ipv4.conf.all.arp_announce = 0
net.ipv4.conf.all.arp_ignore = 0
net.ipv4.conf.lo.arp_announce = 0
net.ipv4.conf.lo.arp_ignore = 0

[root@server1 ~]# sysctl -p
[root@server1 ~]# ip a a 172.25.254.100/32 dev lo
server2
摘除server2上的vip
[root@server2 ~]# vim /etc/sysctl.d/arp.conf

net.ipv4.conf.all.arp_announce = 0
net.ipv4.conf.all.arp_ignore = 0
net.ipv4.conf.lo.arp_announce = 0
net.ipv4.conf.lo.arp_ignore = 0

[root@server2 ~]# sysctl -p
[root@server2 ~]# ip a a 172.25.254.100/32 dev lo
KA1
编写脚本
[root@ka1 ~]# vim /etc/keepalived/tets.sh

#!/bin/bash
killall -0 haproxy


[root@ka1 ~]# vim /etc/keepalived/keepalived.conf

 vrrp_script check_haproxy {
        script "/etc/keepalived/tets.sh"
        interval 1
        weight -30
        fall 2
        rise 2
        timeout 2
}
vrrp_instance VI_1 {
    state MASTER
    interface eth0
    virtual_router_id 100
    priority 100
    advert_int 1
    #preempt_delay 5s
    authentication {
        auth_type PASS
        auth_pass 1111
    }
    virtual_ipaddress {
        172.25.254.100/24 dev eth0 label eth0:1
    }
    unicast_src_ip 172.25.254.10
    unicast_peer {
        172.25.254.20
    }
        track_script {
        check_haproxy

[root@ka1 ~]# yum install haproxy.x86_64


[root@ka1 ~]# vim /etc/haproxy/haproxy.cfg

listen webcluster
        bind 172.25.254.100:80
        mode http
        balance roundrobin
        server web1 172.25.254.110:80 check inter 3 fall 2 rise 5
        server web2 172.25.254.120:80 check inter 3 fall 2 rise 5

[root@ka1 ~]# systemctl enable --now haproxy.service
[root@ka1 ~]# cat /etc/sysctl.conf
# sysctl settings are defined through files in
# /usr/lib/sysctl.d/, /run/sysctl.d/, and /etc/sysctl.d/.
#
# Vendors settings live in /usr/lib/sysctl.d/.
# To override a whole file, create a new file with the same in
# /etc/sysctl.d/ and put new settings there. To override
# only specific settings, add a file with a lexically later
# name in /etc/sysctl.d/ and put new settings there.
#
# For more information, see sysctl.conf(5) and sysctl.d(5).

net.ipv4.ip_nonlocal_bind=1
KA2
编写脚本
[root@ka2 ~]# vim /etc/keepalived/tets.sh

#!/bin/bash
killall -0 haproxy


[root@ka2 ~]# vim /etc/keepalived/keepalived.conf

 vrrp_script check_haproxy {
        script "/etc/keepalived/tets.sh"
        interval 1
        weight -30
        fall 2
        rise 2
        timeout 2
}
vrrp_instance VI_1 {
    state BACKUP
    interface eth0
    virtual_router_id 100
    priority 80
    advert_int 1
    #preempt_delay 5s
    authentication {
        auth_type PASS
        auth_pass 1111
    }
    virtual_ipaddress {
        172.25.254.100/24 dev eth0 label eth0:1
    }
    unicast_src_ip 172.25.254.20
    unicast_peer {
        172.25.254.10
    }
        track_script {
        check_haproxy

[root@ka2 ~]# yum install haproxy.x86_64


[root@ka2 ~]# vim /etc/haproxy/haproxy.cfg

listen webcluster
        bind 172.25.254.100:80
        mode http
        balance roundrobin
        server web1 172.25.254.110:80 check inter 3 fall 2 rise 5
        server web2 172.25.254.120:80 check inter 3 fall 2 rise 5

[root@ka2 ~]# systemctl enable --now haproxy.service
[root@ka2 ~]# cat /etc/sysctl.conf
# sysctl settings are defined through files in
# /usr/lib/sysctl.d/, /run/sysctl.d/, and /etc/sysctl.d/.
#
# Vendors settings live in /usr/lib/sysctl.d/.
# To override a whole file, create a new file with the same in
# /etc/sysctl.d/ and put new settings there. To override
# only specific settings, add a file with a lexically later
# name in /etc/sysctl.d/ and put new settings there.
#
# For more information, see sysctl.conf(5) and sysctl.d(5).

net.ipv4.ip_nonlocal_bind=1
测试:
关闭KA1上的haproxy在进行测试


 1696
1696

 被折叠的 条评论
为什么被折叠?
被折叠的 条评论
为什么被折叠?
 到【灌水乐园】发言


