


 本文深入浅出地介绍了设计模式中的原型模式,通过示例代码详细解释了如何利用原型模式简化对象创建过程,提高代码效率。
最近在学习设计模式,结合了一下其它博客的观点,按照了自己的理解与实现,将自己的想法表达出来,以比较简单的易懂的方式写出来,作为自己学习的输出,内容不是十分全面,希望帮助你们通过这里快速了解大概的思想,之后再做进一步学习。
为了引出原型模式:
先简单的写一个Sheep的Bean:
public class Sheep {
    private Integer id;
    private String name;
    private Integer age;

    public Integer getId() {
        return id;
    }

    public void setId(Integer id) {
        this.id = id;
    }

    public String getName() {
        return name;
    }

    public void setName(String name) {
        this.name = name;
    }

    public Integer getAge() {
        return age;
    }

    public void setAge(Integer age) {
        this.age = age;
    }

    public Sheep() {
    }

    public Sheep(Integer id, String name, Integer age) {
        this.id = id;
        this.name = name;
        this.age = age;
    }
}
如果我们需要多次新建相同对象,我们应该会怎么做呢?传统的方法是重复new同一个对象,并且完成相同的初始化,如下所示:
public class Client {
    public static void main(String[] args) {
        Sheep sheep1 = new Sheep(1,"Dolly",1);
        Sheep sheep2 = new Sheep(1,"Dolly",1);
        Sheep sheep3 = new Sheep(1,"Dolly",1);
        Sheep sheep4 = new Sheep(1,"Dolly",1);
    }
}
传统的方法优点是比较好理解,操作简单,在创建新的对象时,总是需要重新获取原始对象的属性,如果创建的对象比较复杂时,效率较低,并且不够灵活。
于是我们提出原型模式:
原型模式有助于创建具有更好性能的重复对象。
在原型模式中,将返回一个现有对象的克隆,而不是创建新的对象。
我们使用原型设计模式,如果创建一个新对象的成本是昂贵和资源密集型。
类图关系如下: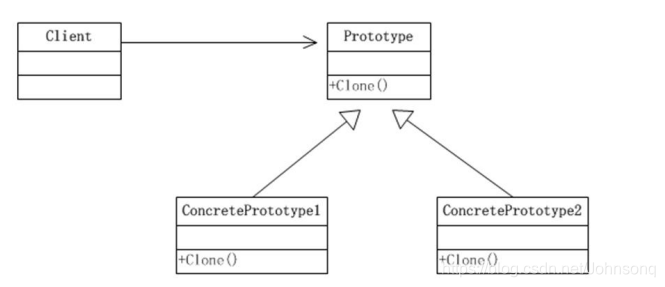
通过实现Cloneable接口,重写Clone方法,在客户端调用对象的clone方法便可新建对象:
//这里省略的getter、setter等方法
public class Sheep implements Cloneable{
    private Integer id;
    private String name;
    private Integer age;

	//重写clone方法
    @Override
    protected Object clone() {
        Sheep sheep = null;
        try {
        	//调用父类(Object)的克隆方法能返回一个Object对象
            sheep = (Sheep)super.clone();
        } catch (CloneNotSupportedException e) {
            e.printStackTrace();
        }
        return sheep;
    }
}
客户端:
public class Client {
    public static void main(String[] args)  {
        Sheep sheep = new Sheep(1,"Dolly",1);
        Sheep sheep1 = (Sheep)sheep.clone();
        Sheep sheep2 = (Sheep)sheep.clone();
        Sheep sheep3 = (Sheep)sheep.clone();
        Sheep sheep4 = (Sheep)sheep.clone();
    }
}
这样的方便多了,如果有需要修改Bean对象与初始化值则仅仅只需要修改一项就足够了。
现在我们来定义一个比较通用的情况:
public class Prototype implements Cloneable {
    @Override
    protected Object clone() throws CloneNotSupportedException {
        Prototype prototype = null;

        try {
            prototype = (Prototype)super.clone();
        } catch (CloneNotSupportedException e) {
            e.printStackTrace();
        }
        return prototype;
    }
}
新建一个具体实现类继承原型类:
public class ConcretePrototype extends Prototype{
    public void info(){
        System.out.println("我是原型模式的具体实现类");
    }
}
客户端调用:
public class Client {
    public static void main(String[] args)  {
        ConcretePrototype concretePrototype = new ConcretePrototype();
        ConcretePrototype clone1 =(ConcretePrototype) concretePrototype.clone();
        ConcretePrototype clone2 =(ConcretePrototype) concretePrototype.clone();
        ConcretePrototype clone3 =(ConcretePrototype) concretePrototype.clone();
    }
}
有了这种思想,以后我们在新建同样对象的时候就不用一个一个实例化,我们就可以类似复制粘贴来简化操作。


 被折叠的 条评论
为什么被折叠?
被折叠的 条评论
为什么被折叠?
 到【灌水乐园】发言


