


 本文介绍了如何在阿里云CentOS7环境下,通过安装bison、flex、libpcap等工具,配置libjnetpcap.so库,来实现使用Java的jnetpcap库抓取本机NGINX的HTTP请求。详细步骤包括安装依赖、创建软链接以及项目代码结构的说明。
环境准备:
部署环境为: 阿里云centos7 + jdk + bison-2.4.1 + flex-2.5.35 + libpcap-1.4.0 + m4-1.4.13 + libjnetpcap.so
需要的安装包在后面
上传安装包
bison-2.4.1.tar.gz
flex-2.5.35.tar.gz
libpcap-1.4.0.tar.gz
m4-1.4.13.tar.gz
全部解压
tar -zxvf bison-2.4.1.tar.gz
tar -zxvf flex-2.5.35.tar.gz
tar -zxvf libpcap-1.4.0.tar.gz
tar -zxvf m4-1.4.13.tar.gz
开始安装(必须按照顺序)
cd m4-1.4.13
./configure
make
make install
cd bison-2.4.1
./configure
make
make install
cd flex-2.5.35
./configure
make
make install
cd libpcap-1.4.0
./configure
make
make install
安装完成后/usr/local/lib 下会有 libpcap.so libpcap.so.1 libpcap.so.1.4.0 文件
建立一个软连接或者直接复制到 /usr/lib 和 /usr/lib64下
sudo ln -s /usr/local/lib/libpcap.so.1 /usr/lib/libpcap.so.1
sudo ln -s /usr/local/lib/libpcap.so /usr/lib/libpcap.so
sudo ln -s /usr/local/lib/libpcap.so.1.4.0 /usr/lib/libpcap.so.1.4.0
sudo ln -s /usr/local/lib/libpcap.so.1 /usr/lib64/libpcap.so.1
sudo ln -s /usr/local/lib/libpcap.so /usr/lib64/libpcap.so
sudo ln -s /usr/local/lib/libpcap.so.1.4.0 /usr/lib64/libpcap.so.1.4.0
将 libjnetpcap.so 文件复制到 /usr/lib 和 /usr/lib64下
已有的就不用管
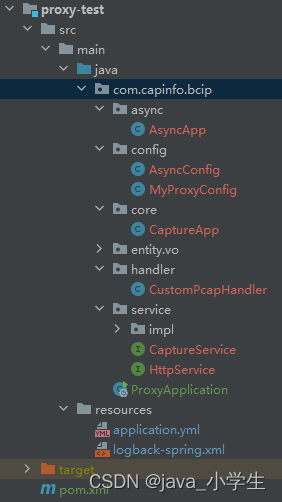
代码实现:
项目结构:
pom.xml
<dependencies>
        <dependency>
            <groupId>org.springframework.boot</groupId>
            <artifactId>spring-boot-starter-web</artifactId>
        </dependency>
        <dependency>
            <groupId>org.projectlombok</groupId>
            <artifactId>lombok</artifactId>
            <optional>true</optional>
        </dependency>
        <dependency>
            <groupId>jnetpcap</groupId>
            <artifactId>jnetpcap</artifactId>
            <version>1.4.r1425-1g</version>
        </dependency>
        <dependency>
            <groupId>cn.hutool</groupId>
            <artifactId>hutool-all</artifactId>
            <version>5.6.3</version>
        </dependency>
        <dependency>
            <groupId>com.alibaba</groupId>
            <artifactId>fastjson</artifactId>
            <version>1.2.73</version>
        </dependency>
    </dependencies>
application.yml
server:
  port: 8083

myproxy:
  # 抓取每个请求头里面设定好的值,此值用于降抓取的请求返回配对,值为NGINX随机生成,后面nginx有配置
  headerKey: Psession_id
logging:
  file:
    path: logs/proxy-java/
    name: logs/proxy-java/debug.log
  level:
    "com.capinfo": debug
AsyncApp.java
package com.capinfo.bcip.async;


import com.capinfo.bcip.service.CaptureService;
import lombok.extern.slf4j.Slf4j;
import org.jnetpcap.PcapIf;
import org.springframework.beans.factory.annotation.Autowired;
import org.springframework.scheduling.annotation.Async;
import org.springframework.stereotype.Component;


@Component
@Slf4j
public class AsyncApp {

    @Autowired
    private CaptureService captureService;


    @Async("start")
    public void start(PcapIf anIf){
        try{
            captureService.capturePcap(anIf);
        }catch (Exception e){
            e.printStackTrace();
            log.info("网卡监听失败! {}",anIf);
        }
    }


}
AsyncConfig.java
package com.capinfo.bcip.config;

import lombok.extern.slf4j.Slf4j;
import org.springframework.aop.interceptor.AsyncUncaughtExceptionHandler;
import org.springframework.context.annotation.Bean;
import org.springframework.context.annotation.Configuration;
import org.springframework.scheduling.annotation.AsyncConfigurer;
import org.springframework.scheduling.annotation.EnableAsync;
import org.springframework.scheduling.concurrent.ThreadPoolTaskExecutor;

import java.lang.reflect.Method;

@Configuration
@EnableAsync
@Slf4j
public class AsyncConfig implements AsyncConfigurer {


    @Bean("start")
    public ThreadPoolTaskExecutor start() {
        ThreadPoolTaskExecutor executor = new ThreadPoolTaskExecutor();
        //最多同时提交10个文件
        executor.setCorePoolSize(5);
        executor.setMaxPoolSize(Integer.MAX_VALUE);
        executor.setQueueCapacity(Integer.MAX_VALUE);
        executor.setThreadNamePrefix("start-");
        executor.initialize();
        return executor;
    }


    /**
     * 异步任务中未处理的异常会在这里处理
     *
     * @return
     */
    @Override
    public AsyncUncaughtExceptionHandler getAsyncUncaughtExceptionHandler() {
        return new AsyncUncaughtExceptionHandler() {
            @Override
            public void handleUncaughtException(Throwable throwable, Method method, Object... objects) {

                log.error("异步任务失败:\n", throwable);
                throwable.printStackTrace();
            }
        };
    }
}
MyProxyConfig.java
package com.capinfo.bcip.config;


import lombok.Data;
import org.springframework.boot.context.properties.ConfigurationProperties;
import org.springframework.stereotype.Component;

import java.util.List;

@Component
@Data
@ConfigurationProperties(value = "myproxy")
public class MyProxyConfig {

    /**
     * nginx 添加的头key
     */
    private String headerKey;


}
CaptureApp.java
package com.capinfo.bcip.core;

import com.capinfo.bcip.async.AsyncApp;
import com.capinfo.bcip.service.CaptureService;
import lombok.extern.slf4j.Slf4j;
import org.jnetpcap.PcapIf;
import org.springframework.beans.factory.annotation.Autowired;
import org.springframework.boot.ApplicationArguments;
import org.springframework.boot.ApplicationRunner;
import org.springframework.core.annotation.Order;
import org.springframework.stereotype.Component;
import cn.hutool.core.collection.CollUtil;

import java.util.List;


@Order(value = 2)
@Component
@Slf4j
public class CaptureApp implements ApplicationRunner {

	@Autowired
	private AsyncApp asyncApp;
    @Autowired
    private CaptureService captureService;

    @Override
    public void run(ApplicationArguments args) throws Exception {
        List<PcapIf> pcapIf = captureService.getPcapIf();
        log.info("初始化-> 获取到的网卡为:{}",pcapIf);
        if(CollUtil.isNotEmpty(pcapIf)){
            for (PcapIf anIf : pcapIf) {
                log.info("开始监听:网卡为:{}",anIf);
                asyncApp.start(anIf);
            }
        }
    }
}
entity:
package com.capinfo.bcip.entity.vo;


import lombok.Data;

@Data
public class HttpMessageVo {
    //来源ID
    private String resourceId;
    //是否是返回值 true:返回值
    private Boolean isResponse;
    //请求相关
    private RequestMessage requestMessage;
    //返回相关
    private ResponseMessage responseMessage;
    //来源Ip
    private String SourceIp;
    //来源端口
    private String SourcePort;
    //目的ip
    private String DstIp;
    //目的端口
    private String DstPort;

}


------------------------------------------------------

package com.capinfo.bcip.entity.vo;

import lombok.Data;

@Data
public class RequestMessage {


    private String headers;
    private String body;


    private String requestMethod;
    private String requestURI;
    private String timestamp;


}


------------------------------------------------------


package com.capinfo.bcip.entity.vo;

import lombok.Data;

@Data
public class ResponseMessage {


    private String headers;
    private String body;


    private String responseStatus;
    private String timestamp;

}
CustomPcapHandler.java
package com.capinfo.bcip.handler;

import cn.hutool.core.util.ObjectUtil;
import com.alibaba.fastjson.JSONObject;
import com.capinfo.bcip.entity.vo.HttpMessageVo;
import com.capinfo.bcip.service.HttpService;
import lombok.extern.slf4j.Slf4j;
import org.jnetpcap.packet.PcapPacket;
import org.jnetpcap.packet.PcapPacketHandler;
import org.jnetpcap.protocol.tcpip.Http;
import org.springframework.beans.factory.annotation.Autowired;
import org.springframework.stereotype.Component;


@Slf4j
@Component
public class CustomPcapHandler<Object> implements PcapPacketHandler<Object> {


    @Autowired
    private HttpService httpService;


    @Override
    public void nextPacket(PcapPacket packet, Object object) {
        if (packet.hasHeader(Http.ID)) {//只抓取http请求
            HttpMessageVo httpMessageVo = httpService.extractHttpInfo(packet);
            if(ObjectUtil.isNotEmpty(httpMessageVo)){
                // todo 处理消息,httpMessageVo.getIsResponse() 判断是否是请求还是返回
            }
        }
    }
}
CaptureService.java
package com.capinfo.bcip.service;

import org.jnetpcap.PcapIf;

import java.util.List;

public interface CaptureService {
	/**
	 * @Description:获取网络适配器,当返回List<PcapIf>为空时,说明未获取到网卡
	 */
	public List<PcapIf> getPcapIf();

	/**
	 * @Description:开始捕获数据包
	 */
	public void capturePcap(PcapIf device);
}
HttpService.java
package com.capinfo.bcip.service;


import com.capinfo.bcip.entity.vo.HttpMessageVo;
import org.jnetpcap.packet.PcapPacket;


public interface HttpService {

	/**
	 * @Description:提取http中的信息
	 */
	HttpMessageVo extractHttpInfo(PcapPacket packet);

}
CaptureServiceImpl.java
package com.capinfo.bcip.service.impl;


import com.capinfo.bcip.handler.CustomPcapHandler;
import com.capinfo.bcip.service.CaptureService;
import org.jnetpcap.Pcap;
import org.jnetpcap.PcapIf;
import org.springframework.beans.factory.annotation.Autowired;
import org.springframework.stereotype.Service;

import java.io.PrintStream;
import java.util.ArrayList;
import java.util.List;

@Service
public class CaptureServiceImpl implements CaptureService {

	@Autowired
	private CustomPcapHandler<Object> handler;

	/**
	 * @Description:获取网络适配器,当返回List<PcapIf>为空时,说明未获取到网卡
	 */
	@Override
	public List<PcapIf> getPcapIf() {
		StringBuilder errbuf = new StringBuilder();
		//定义网卡列表
		List<PcapIf> ifs = new ArrayList<PcapIf>();
		/* 返回值是一个整数结果代码,就像在 C 计数器部分一样。
		 * ifs 列表中填充了从 C 函数调用 findAllDevs 返回的相应 C 结构 pcap_if 链表中找到的所有网络设备。
		 */
		int statusCode = Pcap.findAllDevs(ifs, errbuf);
		if(statusCode != Pcap.OK){
			System.err.println("获取网卡失败:" + errbuf.toString());
		}
		return ifs;
    }

	/**
	 * @Description:开始捕获数据包
	 */
	@Override
	public void capturePcap(PcapIf device) {
		//截断此大小的数据包
		int snaplen = Pcap.DEFAULT_JPACKET_BUFFER_SIZE;

		int promiscous = Pcap.MODE_PROMISCUOUS;

		//以毫秒为单位
		int timeout = 60 * 1000;
		//如果发生错误,它将保存一个错误字符串。 错误打开 Live 将返回 null
		StringBuilder errbuf = new StringBuilder();

		Pcap pcap = Pcap.openLive(device.getName(),snaplen,promiscous,timeout,errbuf);
		if(pcap == null) {
			System.err.println("获取数据包失败:" + errbuf.toString());
		}

		//CustomPcapHandler<Object> handler = new CustomPcapHandler<Object>();
		// 捕获数据包计数
		int cnt = 1;
		//我们要发送到处理程序的自定义对象
		PrintStream out = System.out;
		while(true) {
			//每个数据包将被分派到抓包处理器Handler
			pcap.loop(cnt, handler, out);
		}
		//启动以后一直抓取数据
		//pcap.close();
	}
}
HttpServiceImpl.java
package com.capinfo.bcip.service.impl;


import cn.hutool.core.util.StrUtil;
import com.capinfo.bcip.config.MyProxyConfig;
import com.capinfo.bcip.entity.vo.*;
import com.capinfo.bcip.service.HttpService;
import lombok.extern.slf4j.Slf4j;
import org.jnetpcap.packet.PcapPacket;
import org.jnetpcap.protocol.tcpip.Http;
import org.springframework.beans.factory.annotation.Autowired;
import org.springframework.stereotype.Service;

import java.io.UnsupportedEncodingException;
import java.util.Date;
import java.util.HashMap;
import java.util.Map;


/**
 * @Description:抓包工具类
 */
@Service
@Slf4j
public class HttpServiceImpl implements HttpService {


	@Autowired
	private MyProxyConfig myProxyConfig;

	/**
	 * @Description:提取http中的信息
	 */
	@Override
	public HttpMessageVo extractHttpInfo(PcapPacket packet) {
		if(!packet.hasHeader(Http.ID)) {
			return null;
		}
		Http http = packet.getHeader(new Http());
		byte[] headerByte = http.getHeader();
		String header = byteToString(headerByte);
//		System.err.println(header);
		if(!header.contains(myProxyConfig.getHeaderKey())){
			return null;
		}
		HttpMessageVo httpMessageVo = new HttpMessageVo();
		try{
			Boolean isResponse = false;
			//获取当前http请求中存在的请求头参数
			Map<String,String> map = new HashMap<>();
			ResponseMessage responseMessage = new ResponseMessage();
			RequestMessage requestMessage = new RequestMessage();
			String[] split = header.split("\r\n");
			for (int i = 0; i < split.length; i++) {
				String s = split[i];
				if(i==0){
					String[] s1 = s.split(" ");
					isResponse = s1[0].contains("HTTP");
					if(isResponse){//返回
						responseMessage.setResponseStatus(s1[1]);
					}else{
						requestMessage.setRequestMethod(s1[0]);
						requestMessage.setRequestURI(s1[1]);
					}
				}
				if(s.contains(": ")){
					String[] split1 = s.split(": ");
					map.put(split1[0],split1[1]);
				}
			}
			httpMessageVo.setIsResponse(isResponse);
			Date date = new Date();
			String result = "";
			//保存body
			if(http.hasPayload()) {
				try {
					byte[] payload = http.getPayload();
					result = new String(payload,"UTF-8");
				} catch (Exception e) {
					e.printStackTrace();
				}
			}
			//判断请求还是返回
			if(isResponse){
				responseMessage.setHeaders(header);
				responseMessage.setTimestamp(date.getTime()+"");
				responseMessage.setBody(result);
				httpMessageVo.setResponseMessage(responseMessage);
				httpMessageVo.setResourceId(map.get(myProxyConfig.getHeaderKey()));
			}else{
				requestMessage.setHeaders(header);
				requestMessage.setTimestamp(date.getTime()+"");
				requestMessage.setBody(result);
				httpMessageVo.setSourceIp(map.get("X-Real-IP"));
				String host = map.get("Host");
				if(StrUtil.isNotBlank(host)){
					httpMessageVo.setDstIp(host.split(":")[0]);
					httpMessageVo.setDstPort(host.split(":")[1]);
				}
				httpMessageVo.setResourceId(map.get(myProxyConfig.getHeaderKey()));
				httpMessageVo.setRequestMessage(requestMessage);
			}
		}catch (Exception e){
			e.printStackTrace();
			log.info("抓取信息是解析异常:{}",header);
		}
		return httpMessageVo;
	}


	private static String byteToString (byte[] bytes) {
		if (null == bytes || bytes.length == 0) {
			return "";
		}
		String strContent = "";
		try {
			strContent = new String(bytes, "utf-8");
		} catch (UnsupportedEncodingException e) {
			e.printStackTrace();
		}
		return strContent;
	}
}
NG配置:
nginx 其他配置随意,项目中需要为每个请求加一个固定的头Psession_id的配置就行
location / {
            #其他配置不变,增加以下配置
       	    add_header Psession_id $request_id always;
            proxy_set_header Psession_id $request_id;
}资源下载地址: https://download.youkuaiyun.com/download/JavaeeGad/87700870


 497
497

 被折叠的 条评论
为什么被折叠?
被折叠的 条评论
为什么被折叠?
 到【灌水乐园】发言


