


 本文详细分析了ServiceStack.Redis的连接池获取RedisClient的流程,从PooledRedisClientManager的GetClient()方法入手,介绍了连接池耗尽后的处理、Client创建过程以及哨兵模式下Master节点的选择策略。通过源码解析,展示了RedisSentinelResolver如何确保连接到Master节点,并涉及异常处理和故障转移机制。
前几天在生产环境上redis创建连接方面的故障,分析过程中对ServiceStack.Redis的连接创建和连接池机制有了进一步了解。问题分析结束后,通过此问题系统的将学习到的知识点整理出来。
从连接池获取RedisClient的流程
业务程序中通过PooledRedisClientManager对象的GetClient()方法获取客户端对象,就以此处的源码作为入口:
查看代码
public IRedisClient GetClient() { RedisClient redisClient = null; DateTime now = DateTime.Now; for (; ; ) { if (!this.deactiveClientQueue.TryPop(out redisClient)) { if (this.redisClientSize >= this.maxRedisClient) { Thread.Sleep(3); if (this.PoolTimeout != null && (DateTime.Now - now).TotalMilliseconds >= (double)this.PoolTimeout.Value) { break; } } else { redisClient = this.CreateRedisClient(); if (redisClient != null) { goto Block_5; } } } else { if (!redisClient.HadExceptions) { goto Block_6; } List<RedisClient> obj = this.writeClients; lock (obj) { this.writeClients.Remove(redisClient); this.redisClientSize--; } RedisState.DisposeDeactivatedClient(redisClient); } } bool flag2 = true; if (flag2) { throw new TimeoutException("Redis Timeout expired. The timeout period elapsed prior to obtaining a connection from the pool. This may have occurred because all pooled connections were in use."); } return redisClient; Block_5: this.writeClients.Add(redisClient); return redisClient; Block_6: redisClient.Active = true; this.InitClient(redisClient); return redisClient; }
此方法的主体是死循环,主要实现了这几项功能:
- this.deactiveClientQueue代表空闲的Client集合,是ConcurrentStack<RedisClient>类型的。
- 当this.deactiveClientQueue能够Pop出redisClient时,则跳转到Block_6分支:标记redisClient.Active属性,并执行this.InitClient(redisClient),然后将redisClient实例返回。
- 当this.deactiveClientQueue没有可以Pop的元素时,首先执行Client数量上限的判断this.redisClientSize >= this.maxRedisClient;如果未到达上限,则执行redisClient = this.CreateRedisClient();如果达到上限,则先休眠3毫秒,然后判断是否超过连接池超时时间this.PoolTimeout,单位毫秒。超时的话直接break中断循环,不超时的话继续下一次for循环。
上述流程就是从连接池获取Client的主要流程,其中this.deactiveClientQueue相当于“Client池”。需要注意this.PoolTimeout的含义是当连接池耗尽时调用方等待的时间。
上述过程通过流程图表示为:

创建新Client的过程:CreateRedisClient()
源码如下:
查看代码
private RedisClient CreateRedisClient(){if (this.redisClientSize >= this.maxRedisClient){return null;}object obj = this.lckObj;RedisClient result;lock (obj){if (this.redisClientSize >= this.maxRedisClient){result = null;}else{Random random = new Random((int)DateTime.Now.Ticks);RedisClient newClient = this.InitNewClient(this.RedisResolver.CreateMasterClient(random.Next(100)));newClient.OnDispose += delegate(){if (!newClient.HadExceptions){List<RedisClient> obj2 = this.writeClients;lock (obj2){if (!newClient.HadExceptions){try{this.deactiveClientQueue.Push(newClient);return;}catch{this.writeClients.Remove(newClient);this.redisClientSize--;RedisState.DisposeDeactivatedClient(newClient);}}}}this.writeClients.Remove(newClient);this.redisClientSize--;RedisState.DisposeDeactivatedClient(newClient);};this.redisClientSize++;result = newClient;}}return result;}
基于并发的考虑,创建新Client的流程需要增加并发锁限制,即lock (obj)处。此时如果多个线程都进入CreateRedisClient()方法,则只有一个线程实际执行,其它线程阻塞等待锁释放。这个现象可以通过windbg的syncblk、clrstack命令分析查看。其余的部分就是继续调用this.InitNewClient(
this.RedisResolver.CreateMasterClient(random.Next(100)))创建对象,并对newClient的OnDispose事件增加了处理逻辑。需要说明的是此处OnDispose事件并不是传统意义的析构,而是调用方用完此RedisClient对象后,用于将其回收到连接池的操作,即:newClient对象没有异常的前提下, 将其Push到this.deactiveClientQueue栈里,连接池就是此处回收扩充的。
this.InitNewClient()方法解读
此处是对新创建的RedisClient对象初始化,包括Id、Active等,并继续调用this.InitClient()进一步初始化。
this.RedisResolver.CreateMasterClient()解读
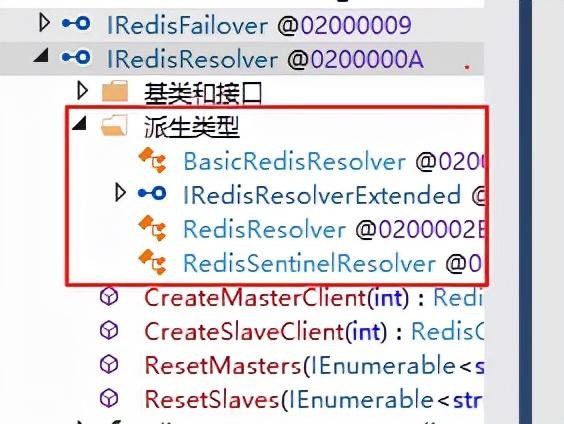
this.redisResolver是IRedisResolver接口类型,源码中有三种实现,如下截图。此处以生产常见的哨兵模式为例进行分析。
RedisSentinelResolver类对应的就是哨兵模式,其相关操作源码如下:
查看代码
public RedisClient CreateMasterClient(int desiredIndex){return this.CreateRedisClient(this.GetReadWriteHost(desiredIndex), true);}public RedisEndpoint GetReadWriteHost(int desiredIndex){return this.sentinel.GetMaster() ?? this.masters[desiredIndex % this.masters.Length];}public virtual RedisClient CreateRedisClient(RedisEndpoint config, bool master){RedisClient result = this.ClientFactory(config);if (master){RedisServerRole redisServerRole = RedisServerRole.Unknown;try{using (RedisClient redisClient = this.ClientFactory(config)){redisClient.ConnectTimeout = 5000;redisClient.ReceiveTimeout = 5000;redisServerRole = redisClient.GetServerRole();if (redisServerRole == RedisServerRole.Master){this.lastValidMasterFromSentinelAt = DateTime.UtcNow;return result;}}}catch (Exception exception){Interlocked.Increment(ref RedisState.TotalInvalidMasters);using (RedisClient redisClient2 = this.ClientFactory(config)){redisClient2.ConnectTimeout = 5000;redisClient2.ReceiveTimeout = 5000;if (redisClient2.GetHostString() == this.lastInvalidMasterHost){object obj = this.oLock;lock (obj){if (DateTime.UtcNow - this.lastValidMasterFromSentinelAt > this.sentinel.WaitBeforeForcingMasterFailover){this.lastInvalidMasterHost = null;this.lastValidMasterFromSentinelAt = DateTime.UtcNow;RedisSentinelResolver.log.Error("Valid master was not found at '{0}' within '{1}'. Sending SENTINEL failover...".Fmt(redisClient2.GetHostString(), this.sentinel.WaitBeforeForcingMasterFailover), exception);Interlocked.Increment(ref RedisState.TotalForcedMasterFailovers);this.sentinel.ForceMasterFailover();Thread.Sleep(this.sentinel.WaitBetweenFailedHosts);redisServerRole = redisClient2.GetServerRole();}goto IL_16E;}}this.lastInvalidMasterHost = redisClient2.GetHostString();IL_16E:;}}if (redisServerRole != RedisServerRole.Master && RedisConfig.VerifyMasterConnections){try{Stopwatch stopwatch = Stopwatch.StartNew();for (;;){try{RedisEndpoint master2 = this.sentinel.GetMaster();using (RedisClient redisClient3 = this.ClientFactory(master2)){redisClient3.ReceiveTimeout = 5000;redisClient3.ConnectTimeout = this.sentinel.SentinelWorkerConnectTimeoutMs;if (redisClient3.GetServerRole() == RedisServerRole.Master){this.lastValidMasterFromSentinelAt = DateTime.UtcNow;return this.ClientFactory(master2);}Interlocked.Increment(ref RedisState.TotalInvalidMasters);}}catch{}if (stopwatch.Elapsed > this.sentinel.MaxWaitBetweenFailedHosts){break;}Thread.Sleep(this.sentinel.WaitBetweenFailedHosts);}throw new TimeoutException("Max Wait Between Sentinel Lookups Elapsed: {0}".Fmt(this.sentinel.MaxWaitBetweenFailedHosts.ToString()));}catch (Exception exception2){RedisSentinelResolver.log.Error("Redis Master Host '{0}' is {1}. Resetting allHosts...".Fmt(config.GetHostString(), redisServerRole), exception2);List<RedisEndpoint> list = new List<RedisEndpoint>();List<RedisEndpoint> list2 = new List<RedisEndpoint>();RedisClient redisClient4 = null;foreach (RedisEndpoint redisEndpoint in this.allHosts){try{using (RedisClient redisClient5 = this.ClientFactory(redisEndpoint)){redisClient5.ReceiveTimeout = 5000;redisClient5.ConnectTimeout = RedisConfig.HostLookupTimeoutMs;RedisServerRole serverRole = redisClient5.GetServerRole();if (serverRole != RedisServerRole.Master){if (serverRole == RedisServerRole.Slave){list2.Add(redisEndpoint);}}else{list.Add(redisEndpoint);if (redisClient4 == null){redisClient4 = this.ClientFactory(redisEndpoint);}}}}catch{}}if (redisClient4 == null){Interlocked.Increment(ref RedisState.TotalNoMastersFound);string message = "No master found in: " + string.Join(", ", this.allHosts.Map((RedisEndpoint x) => x.GetHostString()));RedisSentinelResolver.log.Error(message);throw new Exception(message);}this.ResetMasters(list);this.ResetSlaves(list2);return redisClient4;}return result;}return result;}return result;}
其中GetReadWriteHost()方法的逻辑是:优先使用this.sentinel.GetMaster()得到的主节点信息。如果GetMaster()失败,则从现有的主节点集合masters中随机选择一个进行连接。
然后进入CreateRedisClient()方法内:
- 首先通过this.ClientFactory()工厂创建对象redisClient,工厂内部实现了计数和new RedisClient()操作。没有太多内容。
- 然后是执行redisClient.GetServerRole(),代表向服务器核实当前连接的节点确实是Master角色。如果确认,则直接返回给调用方。【如果发送查询请求的过程出现异常,且符合一定条件,则会发起故障转移请求,即this.sentinel.ForceMasterFailover();】
- 如果当前连接的不是Master角色的节点,则多次调用this.sentinel.GetMaster()查询Master节点信息并重新实例化RedisClient对象;
- 如果超时仍然未能连接到Master节点,则会进入catch异常处理流程,遍历this.allHosts全部节点并更新对应的节点角色。
至此,通过上述的流程,最终能够得到master节点的RedisClient对象,并返回给调用方。
上述过程中,还有几处方法的实现比较重要和复杂,下面对其一一解释说明:
RedisSentinel类的GetMaster()实现原理解析
调用处很简单,但是此方法的实现操作挺多,RedisSentinel类 源码如下:
查看代码
public RedisEndpoint GetMaster(){RedisSentinelWorker validSentinelWorker = this.GetValidSentinelWorker();RedisSentinelWorker obj = validSentinelWorker;RedisEndpoint result;lock (obj){string masterHost = validSentinelWorker.GetMasterHost(this.masterName);if (this.ScanForOtherSentinels && DateTime.UtcNow - this.lastSentinelsRefresh > this.RefreshSentinelHostsAfter){this.RefreshActiveSentinels();}result = ((masterHost != null) ? ((this.HostFilter != null) ? this.HostFilter(masterHost) : masterHost).ToRedisEndpoint(null) : null);}return result;}private RedisSentinelWorker GetValidSentinelWorker(){if (this.isDisposed){throw new ObjectDisposedException(base.GetType().Name);}if (this.worker != null){return this.worker;}RedisException innerException = null;while (this.worker == null && this.ShouldRetry()){try{this.worker = this.GetNextSentinel();this.GetSentinelInfo();this.worker.BeginListeningForConfigurationChanges();this.failures = 0;return this.worker;}catch (RedisException ex){if (this.OnWorkerError != null){this.OnWorkerError(ex);}innerException = ex;this.worker = null;this.failures++;Interlocked.Increment(ref RedisState.TotalFailedSentinelWorkers);}}this.failures = 0;Thread.Sleep(this.WaitBetweenFailedHosts);throw new RedisException("No Redis Sentinels were available", innerException);}private RedisSentinelWorker GetNextSentinel(){object obj = this.oLock;RedisSentinelWorker result;lock (obj){if (this.worker != null){this.worker.Dispose();this.worker = null;}int num = this.sentinelIndex + 1;this.sentinelIndex = num;if (num >= this.SentinelEndpoints.Length){this.sentinelIndex = 0;}result = new RedisSentinelWorker(this, this.SentinelEndpoints[this.sentinelIndex]){OnSentinelError = new Action<Exception>(this.OnSentinelError)};}return result;}private void OnSentinelError(Exception ex){if (this.worker != null){RedisSentinel.Log.Error("Error on existing SentinelWorker, reconnecting...");if (this.OnWorkerError != null){this.OnWorkerError(ex);}this.worker = this.GetNextSentinel();this.worker.BeginListeningForConfigurationChanges();}}
先通过GetValidSentinelWorker()获得RedisSentinelWorker对象。此方法的实现包含了重试机制的控制,最终是通过this.GetNextSentinel()方法给this.worker字段,即RedisSentinelWorker对象实例。
而GetNextSentinel()方法内部包含了同步锁、调用this.worker.Dispose()、随机选择哨兵节点、实例化RedisSentinelWorker对象等操作。
后面是对validSentinelWorker进行加锁,然后继续执行string masterHost =
validSentinelWorker.GetMasterHost(this.masterName);
对应的RedisSentinelWorker类的代码如下:
查看代码
internal string GetMasterHost(string masterName){string result;try{result = this.GetMasterHostInternal(masterName);}catch (Exception obj){if (this.OnSentinelError != null){this.OnSentinelError(obj);}result = null;}return result;}private string GetMasterHostInternal(string masterName){List<string> list = this.sentinelClient.SentinelGetMasterAddrByName(masterName);if (list.Count <= 0){return null;}return this.SanitizeMasterConfig(list);}public void Dispose(){new IDisposable[]{this.sentinelClient,this.sentinePubSub}.Dispose(RedisSentinelWorker.Log);}
注意GetMasterHost()方法内:当发生异常时,会触发this对象的OnSentinelError事件,顾名思义这个事件用于哨兵异常的后续处理。通过源码搜索,只有GetNextSentinel()方法内对OnSentinelError事件增加了处理程序-->即RedisSentinel内的private void OnSentinelError(Exception ex)方法。而这个方法内部对打印日志和触发事件this.OnWorkerError后,又调用GetNextSentinel()重新给this.worker字段赋值。
需要注意:Dispose()方法实际是分别调用了this.sentinelClient和this.sentinePubSub的注销操作。
RedisNativeClient类的相关功能和实现
接着调用了RedisNativeClient类的
SentinelGetMasterAddrByName()方法:
这个类里的几个方法的含义综合起来就是:将哨兵客户端的查询指令通过Socket发送到服务端,并将返回结果格式化为所需的RedisEndpoint类型。
在方法SendReceive()内还包含了Socket连接、重试、频率控制、超时控制等机制。
查看代码
public List<string> SentinelGetMasterAddrByName(string masterName){List<byte[]> list = new List<byte[]>{Commands.Sentinel,Commands.GetMasterAddrByName,masterName.ToUtf8Bytes()};return this.SendExpectMultiData(list.ToArray()).ToStringList();}protected byte[][] SendExpectMultiData(params byte[][] cmdWithBinaryArgs){return this.SendReceive<byte[][]>(cmdWithBinaryArgs, new Func<byte[][]>(this.ReadMultiData), (this.Pipeline != null) ? new Action<Func<byte[][]>>(this.Pipeline.CompleteMultiBytesQueuedCommand) : null, false) ?? TypeConstants.EmptyByteArrayArray;}protected T SendReceive<T>(byte[][] cmdWithBinaryArgs, Func<T> fn, Action<Func<T>> completePipelineFn = null, bool sendWithoutRead = false){int num = 0;Exception ex = null;DateTime utcNow = DateTime.UtcNow;T t;for (;;){try{this.TryConnectIfNeeded();if (this.socket == null){throw new RedisRetryableException("Socket is not connected");}if (num == 0){this.WriteCommandToSendBuffer(cmdWithBinaryArgs);}if (this.Pipeline == null){this.FlushSendBuffer();}else if (!sendWithoutRead){if (completePipelineFn == null){throw new NotSupportedException("Pipeline is not supported.");}completePipelineFn(fn);t = default(T);t = t;break;}T t2 = default(T);if (fn != null){t2 = fn();}if (this.Pipeline == null){this.ResetSendBuffer();}if (num > 0){Interlocked.Increment(ref RedisState.TotalRetrySuccess);}Interlocked.Increment(ref RedisState.TotalCommandsSent);t = t2;}catch (Exception ex2){RedisRetryableException ex3 = ex2 as RedisRetryableException;if ((ex3 == null && ex2 is RedisException) || ex2 is LicenseException){this.ResetSendBuffer();throw;}Exception ex4 = ex3 ?? this.GetRetryableException(ex2);if (ex4 == null){throw this.CreateConnectionError(ex ?? ex2);}if (ex == null){ex = ex4;}if (!(DateTime.UtcNow - utcNow < this.retryTimeout)){if (this.Pipeline == null){this.ResetSendBuffer();}Interlocked.Increment(ref RedisState.TotalRetryTimedout);throw this.CreateRetryTimeoutException(this.retryTimeout, ex);}Interlocked.Increment(ref RedisState.TotalRetryCount);Thread.Sleep(RedisNativeClient.GetBackOffMultiplier(++num));continue;}break;}return t;}
总结
本文着重以Redis连接创建、获取为线索,对SDK内部的实现机制有了更深入的了解。在此基础上,分析生产环境Redis SDK相关故


 470
470

 被折叠的 条评论
为什么被折叠?
被折叠的 条评论
为什么被折叠?
 到【灌水乐园】发言


