一. 前言

前段时间体验了几个开源的开发框架 ,发现他们的亮点主要集中在启动快 ,内存低上面。

随之回想 SpringBoot ,发现自己并不能准确的说出 SpringBoot 启动慢的详细原因,所以才有了这篇文章。

来,让我们详细的理解一下 ,SpringBoot 启动这么慢 ,是做了什么?

二. 宏观路线

先来选择一个最简单的 MVC 项目 ,来看一下时间轴 :

都说 SpringBoot 启动慢,知道慢在哪吗?_初始化

  • 其中耗时最多的是我标注的 :prepareEnvironment 和 refreshContext
  • 这段代码是 Spring 启动类里面的代码 ,这里简单列一下 :
public void run(String... args) {
    // 3. 触发启动开始事件
    listeners.starting();

    // 4. 准备应用运行环境
    // 包括:加载配置、设置profile、系统环境变量等
    ConfigurableEnvironment environment = prepareEnvironment(listeners, applicationArguments);

    // 7. 创建应用上下文
    // 根据应用类型(Web/普通)创建不同的上下文
    context = createApplicationContext();

    // 8. 准备应用上下文
    // 包括:设置环境、注册初始化器、加载source、处理前置处理器等
    prepareContext(context, environment, listeners, applicationArguments, printedBanner);

    // 9. 刷新应用上下文
    refreshContext(context);

    // 13. 触发上下文启动完成事件
    listeners.started(context);

    // 14. 执行所有注册的运行器(ApplicationRunner和CommandLineRunner)
    callRunners(context, applicationArguments);

    // 15. 触发应用运行事件
    listeners.running(context);
}
  • 1.
  • 2.
  • 3.
  • 4.
  • 5.
  • 6.
  • 7.
  • 8.
  • 9.
  • 10.
  • 11.
  • 12.
  • 13.
  • 14.
  • 15.
  • 16.
  • 17.
  • 18.
  • 19.
  • 20.
  • 21.
  • 22.
  • 23.
  • 24.
  • 25.
  • 26.
  • 27.
  • 28.

三. 看一下细节

3.1 各环节做了什么这么慢

prepareEnvironment 部分 :

都说 SpringBoot 启动慢,知道慢在哪吗?_初始化_02

这里我专门做了一些简单的配置 ,可以看到这些对启动的影响微乎其微 (这里先不考虑 Cloud 取配置)

其实可以理解 ,在不获取远程配置的情况下 ,整个过程中无非就是内存里面的处理

如果你近期准备面试跳槽,建议在ddkk.com在线刷题,涵盖 一万+ 道 Java 面试题,几乎覆盖了所有主流技术面试题,还有市面上最全的技术五百套,精品系列教程,免费提供。

来对着源码来看一下 :

// 根据应用类型创建基础环境对象  
ConfigurableEnvironment environment = getOrCreateEnvironment();  

// 环境配置 : 设置profile和处理启动参数  
configureEnvironment(environment, applicationArguments.getSourceArgs());  

// 高级环境注入 : 增强属性源,提供更灵活的配置解析  
// - 特殊的环境绑定 : 驼峰 ,下划线等
// - 自动进行属性类型转换
// - 复杂的嵌套属性解析 , 占位符 $ 的变量替换
// - 各种优先级相关
ConfigurationPropertySources.attach(environment);  

// 触发环境准备事件,允许监听器处理  
listeners.environmentPrepared(environment);  

// 将环境配置绑定到SpringApplication  
bindToSpringApplication(environment);  

// 返回配置完成的环境对象  
return environment;
  • 1.
  • 2.
  • 3.
  • 4.
  • 5.
  • 6.
  • 7.
  • 8.
  • 9.
  • 10.
  • 11.
  • 12.
  • 13.
  • 14.
  • 15.
  • 16.
  • 17.
  • 18.
  • 19.
  • 20.
  • 21.

refreshContext 部分 :

可以看到 ,refreshContext 部分才是大头 ,这里就是 Bean 加载创建最核心的流程 ,我们一般知道的 doGetBean 和 populateBean 就是在这个环节中进行的 :

都说 SpringBoot 启动慢,知道慢在哪吗?_加载_03

最耗时的三个地方 :

BeanFactory后置处理器 : 这个是由于 Spring 做Bean管理的时候 ,大量用到了这类对象

初始化Web容器 : 这能理解 ,创建 Web 容器 ,Tomcat 等处理都是要耗时的

结束初始化单例Bean : 这就是 Bean 创建的主流程 ,当然也会很慢

// 前置刷新上下文环境  
this.prepareRefresh();

// 获取freshBeanFactory,初始化BeanFactory  
ConfigurableListableBeanFactory beanFactory = this.obtainFreshBeanFactory();  
    
// 配置BeanFactory的标准属性  
this.prepareBeanFactory(beanFactory);  
// 提供子类扩展BeanFactory的机会  
this.postProcessBeanFactory(beanFactory);  
        
// 执行BeanFactory后置处理器  
this.invokeBeanFactoryPostProcessors(beanFactory);  
        
// 注册Bean后置处理器  
this.registerBeanPostProcessors(beanFactory);  
        
// 初始化消息源  
this.initMessageSource();  
        
// 初始化应用事件广播器  
this.initApplicationEventMulticaster();  
        
// 提供子容器刷新的扩展点  
this.onRefresh();  
        
// 注册监听器  
this.registerListeners();  
        
// 初始化所有非懒加载单例Bean  
this.finishBeanFactoryInitialization(beanFactory);  
        
// 完成刷新,发布容器刷新事件  
this.finishRefresh();
  • 1.
  • 2.
  • 3.
  • 4.
  • 5.
  • 6.
  • 7.
  • 8.
  • 9.
  • 10.
  • 11.
  • 12.
  • 13.
  • 14.
  • 15.
  • 16.
  • 17.
  • 18.
  • 19.
  • 20.
  • 21.
  • 22.
  • 23.
  • 24.
  • 25.
  • 26.
  • 27.
  • 28.
  • 29.
  • 30.
  • 31.
  • 32.
  • 33.
  • 34.

3.2 空项目如此 ,如果是加上各种依赖的生产级项目呢 ?

生产级项目的分析和上面的是完全不一样的 ,生产级的复杂度远超单一的小项目 ,这也是导致大家认为 : Spring 启动太慢了

我贴了一个我这边启动中规中矩的一个项目的处理栈 ,整个大概花了 35s , 来分析一下 :

都说 SpringBoot 启动慢,知道慢在哪吗?_初始化_04

场景一 : 多容器环境 (反复创建容器)

都说 SpringBoot 启动慢,知道慢在哪吗?_时间戳_05

  • 就像 SpringApplication.run() 方法 ,在主应用启动 和 Cloud BootStrap 启动的时候都会分别加载一次
  • 也就是说环境会被整个执行多次 ,那么创建不同环境的耗时是很大的

场景二 :配置侧的环境 Listener (资源文件的读取)

都说 SpringBoot 启动慢,知道慢在哪吗?_初始化_06

这里不能理解为我们通常用的某个Listener 的操作 ,监听个什么东西什么的

这里的环境 Listener 是为了加载 BootStrap 等复杂流程

或者你可以理解为这里是为了开启 Cloud 的配置加载 ,也就是初始 Bootstrap上下文 , 加载外部配置

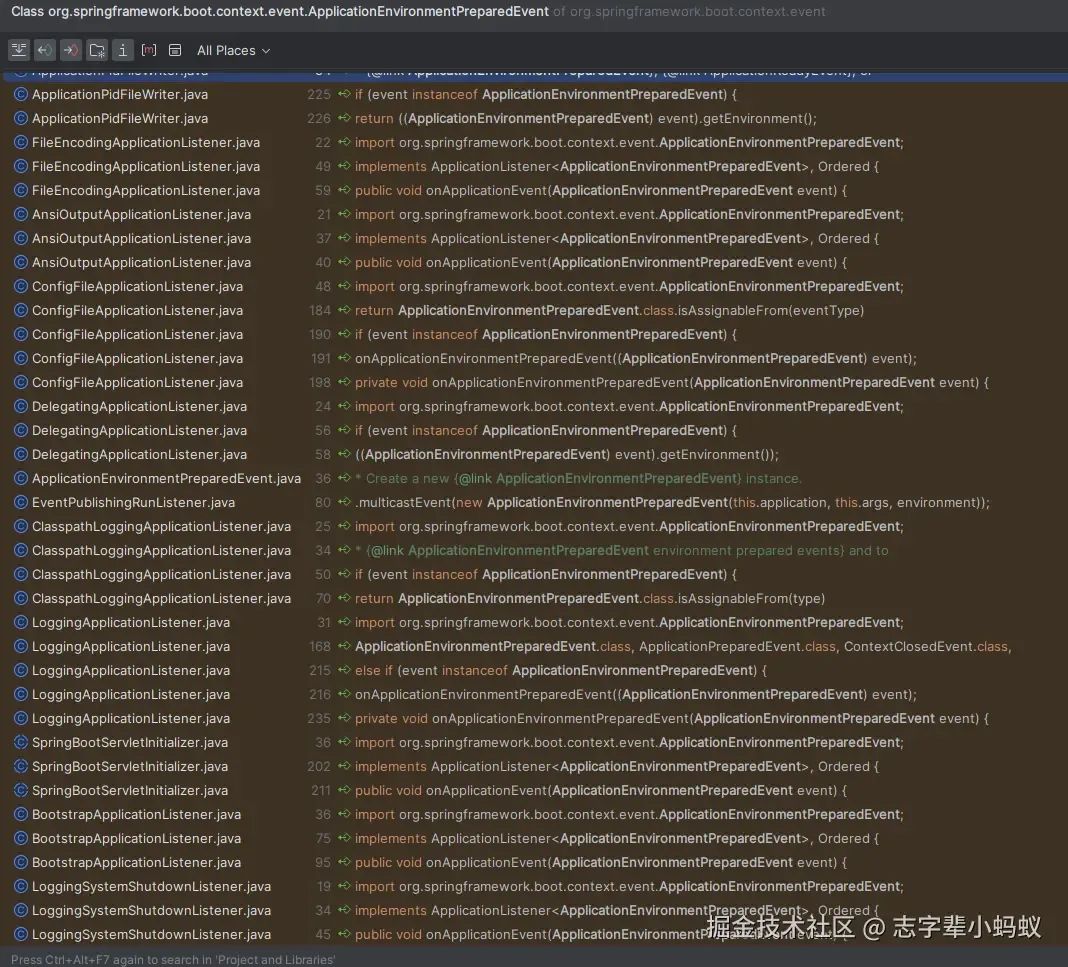
ApplicationEnvironmentPreparedEvent 有很多很复杂的 Listener 在监听

ConfigFileApplicationListener : 

用于加载外部文件

SpringBootServletInitializer :

用于 Servlet容器集成

BootstrapApplicationListener : 

初始化 SpringCloud 到的配置
都说 SpringBoot 启动慢,知道慢在哪吗?_加载_07

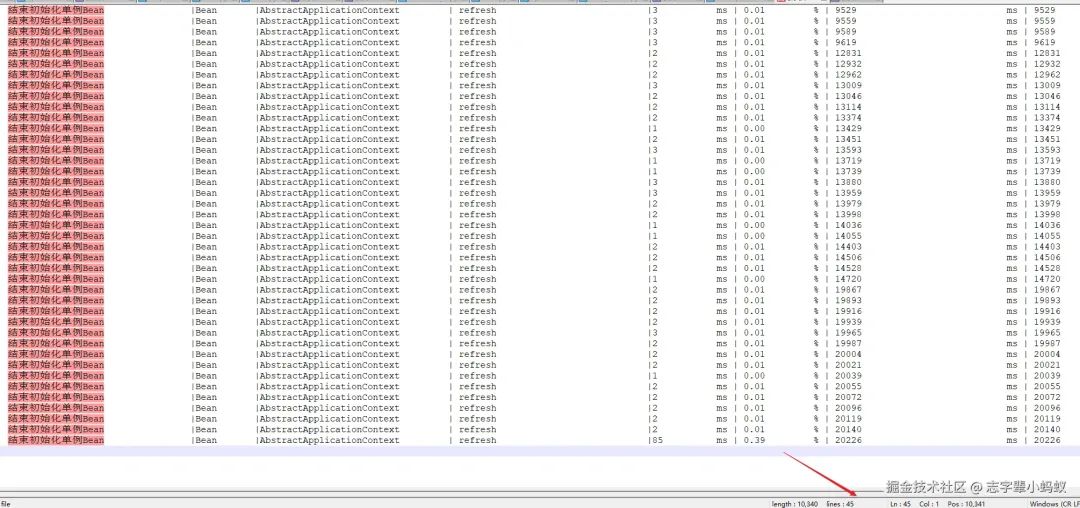
场景三 : 大量的 doRefrsh() Bean 的加载 (重复读资源)
都说 SpringBoot 启动慢,知道慢在哪吗?_初始化_08

一个10万行代码的小项目 ,反反复复的触发了40多次 refresh() ,要知道这个环节要执行近10项大型处理流程

每一次循环都会触发大量的 Listner 和 PostProcessor 以及 Aware 操作

场景四 :各种 Bean 的加载 (大量 Bean)

这个是一大根源 ,(由于统计时间的逻辑不够严谨,所以Bean处理的时间被分摊到 prepareRefresh 中了)

都说 SpringBoot 启动慢,知道慢在哪吗?_初始化_09

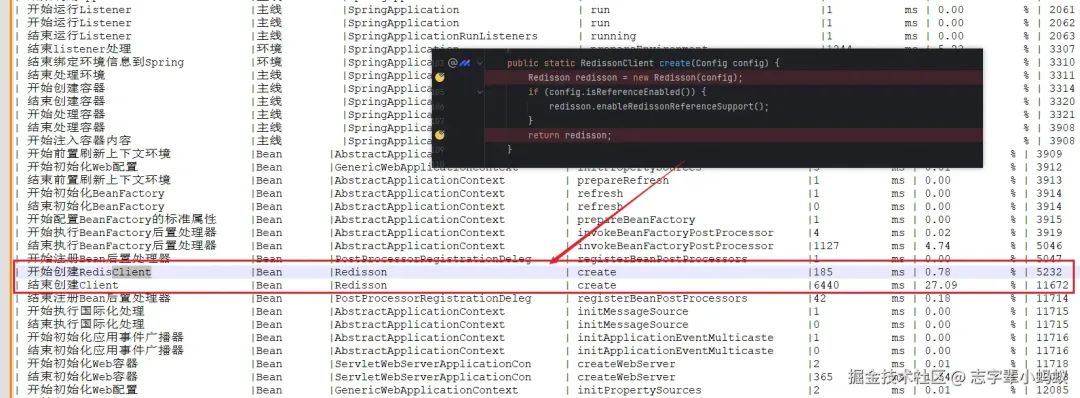
场景五 : 第三方组件 Client 的创建 (连接第三方)

以 Redis 为例 ,创建 Client 的过程也消耗了大量的时间

同理 MySQL , 因为创建 Client 的时候就会创建连接 ,有的甚至于会创建连接池
都说 SpringBoot 启动慢,知道慢在哪吗?_加载_10

四. 贴一下统计的源码

大部分时间都用来写这了 ,感觉还行, 在 IDEA 里面进行 DEBUG 就行 :

S1 : 在需要记录的位置运行断点 Log :StopWatchExpand.start("Bean","开始-创建RedisClient")

S2 : 结束后执行 : StopWatchExpand.start("主线","全部完成"); StopWatchExpand.stop();

package com.gang.start;

import java.text.SimpleDateFormat;
import java.util.ArrayList;
import java.util.List;

/**
 * 检测程序片段运行时间拓展
 */
publicclass StopWatchExpand {

    /**
     * 存储时间节点的静态集合
     */
    privatestatic List<TaskEntry> taskEntries = new ArrayList<>();

    /**
     * 开启计时
     *
     * @param processLine 流程线
     * @param node        节点行为
     * @return 提示字符串
     */
    public static String start(String processLine, String node) {
        try {
            // 获取调用的类和方法信息
            StackTraceElement[] stackTrace = Thread.currentThread().getStackTrace();
            // 注意: stackTrace[2]是调用start方法的方法
            String callerClass = stackTrace[2].getClassName().substring(
                    stackTrace[2].getClassName().lastIndexOf(".") + 1
            );
            String callerMethod = stackTrace[2].getMethodName();

            // 记录当前时间戳
            long currentTimeMillis = System.currentTimeMillis();

            // 将流程线、节点行为、调用类、调用方法和时间戳保存到集合
            taskEntries.add(new TaskEntry(processLine, node, callerClass, callerMethod, currentTimeMillis));

            return String.format("[ 流程: %s | 节点: %s | 调用类: %s | 调用方法: %s ] 监测到达时间: %s",
                    processLine, node, callerClass, callerMethod, formatTimestamp(currentTimeMillis));
        } catch (Exception e) {
            e.printStackTrace();
            return"执行异常: " + node;
        }
    }

    /**
     * 结束计时并记录统计
     */
    public static void stop() {
        logStatistics();
        // 清空记录,防止跨调用干扰
        taskEntries.clear();
    }

    /**
     * 打印所有任务的时间节点以及间隔时间和百分比
     */
    private static void logStatistics() {
        if (taskEntries.isEmpty()) {
            return;
        }

        // 1. 预处理:计算最大节点行为长度和最大流程行长度
        int maxNodeLength = taskEntries.stream()
                .map(entry -> entry.getNode().length())
                .max(Integer::compare)
                .orElse(30); // 默认最小宽度为30

        // 保证processLine长度为10
        int processLineWidth = 10;
        int classNameWidth = 30;
        int methodNameWidth = 30;

        // 2. 创建格式化模板,使用动态宽度
        String headerFormat = "%-" + (maxNodeLength + 10) + "s |%-" + processLineWidth + "s | %-" + classNameWidth + "s | %-" + methodNameWidth + "s | %-9s | %-12s | %-24s | %-30s\n";
        String rowFormat = "%-" + processLineWidth + "s |%-" + (classNameWidth+4) + "s | %-" + (methodNameWidth+4) + "s |%-11d ms | %-13.2f%% | %-31d ms | %-30d ms\n";

        // 3. 计算总时长:从第一个节点到最后一个节点的时间差
        long startTime = taskEntries.get(0).getTimeMillis();
        long endTime = taskEntries.get(taskEntries.size() - 1).getTimeMillis();
        long totalDuration = endTime - startTime;

        // 4. 构建日志字符串
        StringBuilder sb = new StringBuilder();
        sb.append("--------------------------------------------------------------------------------------------------\n");
        sb.append("时间节点统计:\n");
        sb.append("--------------------------------------------------------------------------------------------------\n");

        // 5. 使用动态宽度的格式化模板打印表头
        sb.append(String.format(headerFormat,
                "节点行为", "流程", "调用类", "调用方法", "节点耗时", "占比", "相对总初始节点时间戳",
                "相对当前流程初始节点时间戳"));
        sb.append("--------------------------------------------------------------------------------------------------\n");

        // 6. 遍历并格式化每一行
        for (int i = 0; i < taskEntries.size(); i++) {
            TaskEntry entry = taskEntries.get(i);

            // 填充processLine到固定长度
            String processLine = String.format("%-" + processLineWidth + "s",
                    entry.getProcessLine().length() > processLineWidth
                            ? entry.getProcessLine().substring(0, processLineWidth)
                            : entry.getProcessLine());

            // 截断或填充调用类和方法名
            String callerClass = padString(entry.getCallerClass(), classNameWidth);
            String callerMethod = padString(entry.getCallerMethod(), methodNameWidth);

            String node = padChineseNode(entry.getNode(), maxNodeLength + 10);
            long taskTimeMillis = entry.getTimeMillis();

            // 7. 计算时间相关指标
            long interval = (i == 0) ? 0 : (taskTimeMillis - taskEntries.get(i - 1).getTimeMillis());
            double intervalPercentage = totalDuration > 0 ? ((double) interval / totalDuration) * 100 : 0.0;

            long relativeToInitial = taskTimeMillis - startTime;
            long relativeToCurrentProcess = (i == 0) ? 0 : (taskTimeMillis - startTime);

            // 8. 使用动态宽度的格式化模板打印每一行
            sb.append("| ");
            sb.append(node);
            sb.append("   |");
            sb.append(String.format(rowFormat,
                    processLine,
                    callerClass,
                    callerMethod,
                    interval,
                    intervalPercentage,
                    relativeToInitial,
                    relativeToCurrentProcess));
        }

        sb.append("---------------------------------------------------------------\n");

        // 9. 输出到日志
        System.out.println(sb);
    }

    /**
     * 格式化时间戳为字符串
     *
     * @param timestamp 时间戳
     * @return 格式化后的字符串
     */
    private static String formatTimestamp(long timestamp) {
        SimpleDateFormat sdf = new SimpleDateFormat("yyyy-MM-dd HH:mm:ss.SSS");
        return sdf.format(timestamp);
    }

    /**
     * 填充或截断字符串到指定长度
     */
    private static String padString(String input, int length) {
        if (input == null) input = "";
        if (input.length() > length) {
            return input.substring(0, length);
        }
        return String.format("%-" + length + "s", input);
    }

    /**
     * 处理中文节点的填充
     */
    private static String padChineseNode(String node, int maxNodeLength) {
        int width = 0;
        StringBuilder result = new StringBuilder();

        for (char c : node.toCharArray()) {
            int charWidth = (c >= 0x4E00 && c <= 0x9FA5) ||
                    (c >= 'a' && c <= 'z') ||
                    (c >= 'A' && c <= 'Z') ?
                    ((c >= 0x4E00 && c <= 0x9FA5) ? 2 : 1) : 0;

            if (width + charWidth > maxNodeLength) {
                break;
            }

            if (charWidth > 0) {
                result.append(c);
                width += charWidth;
            }
        }

        while (width < maxNodeLength) {
            result.append(" ");
            width++;
        }

        return result.toString();
    }

    /**
     * 任务条目类,增加调用类和调用方法字段
     */
    privatestaticclass TaskEntry {
        private String processLine;   // 流程线
        private String node;           // 节点行为
        private String callerClass;    // 调用类
        private String callerMethod;   // 调用方法
        privatelong timeMillis;       // 时间戳

        public TaskEntry(String processLine, String node, String callerClass, String callerMethod, long timeMillis) {
            this.processLine = processLine;
            this.node = node;
            this.callerClass = callerClass;
            this.callerMethod = callerMethod;
            this.timeMillis = timeMillis;
        }

        // 增加getter方法
        public String getProcessLine() { return processLine; }
        public String getNode() { return node; }
        public String getCallerClass() { return callerClass; }
        public String getCallerMethod() { return callerMethod; }
        public long getTimeMillis() { return timeMillis; }
    }

    // 可选的main方法,用于测试
    public static void main(String[] args) {
        // 测试用例
        start("测试流程", "开始处理");
        try {
            Thread.sleep(100); // 模拟处理时间
        } catch (InterruptedException e) {
            e.printStackTrace();
        }
        start("测试流程", "处理中");
        try {
            Thread.sleep(50); // 模拟处理时间
        } catch (InterruptedException e) {
            e.printStackTrace();
        }
        stop();
    }
}
  • 1.
  • 2.
  • 3.
  • 4.
  • 5.
  • 6.
  • 7.
  • 8.
  • 9.
  • 10.
  • 11.
  • 12.
  • 13.
  • 14.
  • 15.
  • 16.
  • 17.
  • 18.
  • 19.
  • 20.
  • 21.
  • 22.
  • 23.
  • 24.
  • 25.
  • 26.
  • 27.
  • 28.
  • 29.
  • 30.
  • 31.
  • 32.
  • 33.
  • 34.
  • 35.
  • 36.
  • 37.
  • 38.
  • 39.
  • 40.
  • 41.
  • 42.
  • 43.
  • 44.
  • 45.
  • 46.
  • 47.
  • 48.
  • 49.
  • 50.
  • 51.
  • 52.
  • 53.
  • 54.
  • 55.
  • 56.
  • 57.
  • 58.
  • 59.
  • 60.
  • 61.
  • 62.
  • 63.
  • 64.
  • 65.
  • 66.
  • 67.
  • 68.
  • 69.
  • 70.
  • 71.
  • 72.
  • 73.
  • 74.
  • 75.
  • 76.
  • 77.
  • 78.
  • 79.
  • 80.
  • 81.
  • 82.
  • 83.
  • 84.
  • 85.
  • 86.
  • 87.
  • 88.
  • 89.
  • 90.
  • 91.
  • 92.
  • 93.
  • 94.
  • 95.
  • 96.
  • 97.
  • 98.
  • 99.
  • 100.
  • 101.
  • 102.
  • 103.
  • 104.
  • 105.
  • 106.
  • 107.
  • 108.
  • 109.
  • 110.
  • 111.
  • 112.
  • 113.
  • 114.
  • 115.
  • 116.
  • 117.
  • 118.
  • 119.
  • 120.
  • 121.
  • 122.
  • 123.
  • 124.
  • 125.
  • 126.
  • 127.
  • 128.
  • 129.
  • 130.
  • 131.
  • 132.
  • 133.
  • 134.
  • 135.
  • 136.
  • 137.
  • 138.
  • 139.
  • 140.
  • 141.
  • 142.
  • 143.
  • 144.
  • 145.
  • 146.
  • 147.
  • 148.
  • 149.
  • 150.
  • 151.
  • 152.
  • 153.
  • 154.
  • 155.
  • 156.
  • 157.
  • 158.
  • 159.
  • 160.
  • 161.
  • 162.
  • 163.
  • 164.
  • 165.
  • 166.
  • 167.
  • 168.
  • 169.
  • 170.
  • 171.
  • 172.
  • 173.
  • 174.
  • 175.
  • 176.
  • 177.
  • 178.
  • 179.
  • 180.
  • 181.
  • 182.
  • 183.
  • 184.
  • 185.
  • 186.
  • 187.
  • 188.
  • 189.
  • 190.
  • 191.
  • 192.
  • 193.
  • 194.
  • 195.
  • 196.
  • 197.
  • 198.
  • 199.
  • 200.
  • 201.
  • 202.
  • 203.
  • 204.
  • 205.
  • 206.
  • 207.
  • 208.
  • 209.
  • 210.
  • 211.
  • 212.
  • 213.
  • 214.
  • 215.
  • 216.
  • 217.
  • 218.
  • 219.
  • 220.
  • 221.
  • 222.
  • 223.
  • 224.
  • 225.
  • 226.
  • 227.
  • 228.
  • 229.
  • 230.
  • 231.
  • 232.
  • 233.
  • 234.
  • 235.
  • 236.
  • 237.

总结一下

整个过程中 ,Client 端的连接是最耗时的 ,其次是配置读取 。 也就是外部资源的加载更耗时 。

所以后面看看新版本的时候 ,来看一下他们是怎么解决的 ,以及其他优秀的开源组件又是怎么解决的。

SpringBoot 本身是知道自己过于臃肿的 ,所以在后面的迭代中都有意识的为自己的代码进行瘦身。

先看懂了 SpringBoot2 的慢 ,后面会有一篇来感受一下SpringBoot3 干了什么 ,以及是否真的提升了加载的速度。