


1、Java SPI 和 Dubbo SPI的区别
1.1、实现机制
- Java SPI:Java SPI是Java标准库提供的一种服务扩展机制。它允许服务提供者通过在META-INF/services目录下放置接口实现类的配置文件来注册自己的实现。Java SPI通过java.util.ServiceLoader类来加载和发现服务提供者。Java SPI相对简单,但只支持单一的实现,且不支持动态替换。
- Dubbo SPI:Dubbo SPI是基于Java SPI的一种增强机制,专门用于Dubbo框架中的服务扩展。Dubbo SPI扩展了Java SPI的功能,支持在配置文件中配置多个扩展实现,并允许动态替换和自适应扩展。Dubbo SPI通过自定义的ExtensionLoader来加载和管理扩展,配置文件通常位于META-INF/dubbo目录下。
1.2、灵活性
- Java SPI:Java SPI的灵活性相对有限,因为它只支持单一的实现,并且不支持动态替换。一旦服务提供者被加载,就固定使用配置文件中的实现。
- Dubbo SPI:Dubbo SPI提供了更高的灵活性。它支持多个扩展实现,并允许在运行时通过配置文件修改扩展实现。此外,Dubbo SPI还引入了自适应扩展机制,通过自动生成代理类来动态适应不同的扩展。
1.3、配置方式
- Java SPI:Java SPI的配置文件通常位于META-INF/services目录下,文件内容包含服务接口实现类的全限定类名。配置方式相对简单直观,但缺乏灵活性。
- Dubbo SPI:Dubbo SPI的配置文件通常位于META-INF/dubbo目录下(也可能在META-INF/dubbo/internal目录中)。配置文件内容可以包含多个扩展实现,每个扩展实现对应一个键值对,键是扩展实现的名字,值是扩展实现的全限定类名。这种配置方式更加灵活,支持多个实现和动态替换。
1.4、应用场景
- Java SPI:Java SPI适用于各种Java应用程序,特别是那些需要动态加载服务提供者的场景。例如,JDBC API就利用了Java SPI机制来加载不同数据库供应商提供的驱动程序。
- Dubbo SPI:Dubbo SPI是Dubbo框架的扩展机制核心,专门用于Dubbo服务的扩展和替换。它允许开发者在不修改主程序代码的情况下,通过配置来切换不同的服务实现。这种机制特别适合于构建可扩展的应用和插件式架构。
总结
Java SPI和Dubbo SPI在实现机制、灵活性、配置方式以及应用场景上存在显著差异。Java SPI作为Java标准库的一部分,具有广泛的兼容性和适用性;而Dubbo SPI则是对Java SPI的增强和扩展,专为Dubbo框架设计,提供了更高的灵活性和扩展性。在实际应用中,可以根据具体需求选择合适的SPI机制。
2、Dubbo与Spring整合
2.1、@EnableDubboConfig(创建N多XXXConfig)
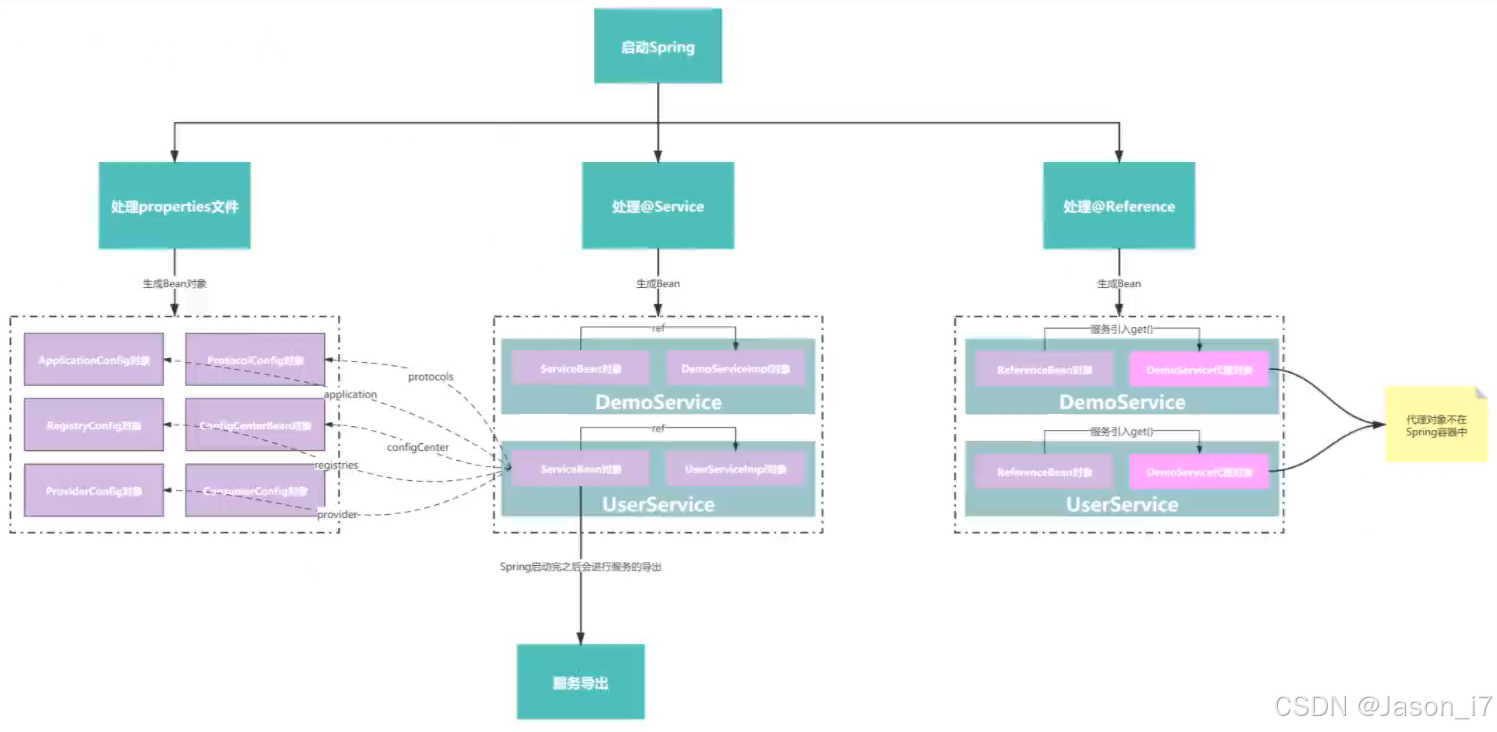
目的:将各种各样的配置,最终生成为各类XXXConfig对象。
该注解引入了@Import(DubboConfigConfigurationRegistrar.class),该注册器继承自ImportBeanDefinitionRegistrar接口,所以在bean定义的时候会进入到registerBeanDefinitions方法。
registerBeanDefinitions方法大致逻辑:
- 获取@EnableDubboConfig注解的配置参数值(默认或大多情况下没有配置)解析出来丢到AnnotationAttributes对象中保存。
- 获取是否配置了属性"multiple",通过该参数来处理不同属性配置,Single处理单个的,比如dubbo.application和dubbo.protocol ,Multiple处理dubbo.applications和dubbo.protocols 等。例如有的接口可以配置多个protocol,根据自定义名字进行区分,这里主要是便于管理配置。通过代码的实现将单数跟复数形式的配置绑定起来。然后通过DubboConfigBindingBeanPostProcessor进行属性赋值,创建出来的BeanName如:org.apache.dubbo.config.ApplicationConfig#0。
举例:
dubbo.registry.address=zookeeper://127.0.0.1:2181
目的为:创建RegistryConfig对象的Bean,再把属性值放进去,进行构建。
dubbo.protocol.name=dubbo
目的为:创建ProtocolConfig对象的Bean,再把属性值放进去,进行构建。
dubbo.protocols.p1.xxx 与 dubbo.protocols.p2.xxx 会生成两个ProtocolConfig对象。
版本缺陷:在2.7.5版本中,DubboConfigBindingBeanPostProcessor 对每个XXXConfig生成的Bean对象,都会创建一个beanPostProcessor,通过里面的属性beanName判断是否是当前bean,由于第一个bean跟第二个bean都会进去,但是因为beanName属性是创建时固定的,所以容易被排除很多次,这一点其实很不好,没有必要创建这么多个的beanPostProcessor,新版本已调整为单个beanPostProcessor实现。
常见的XXXConfig有以下几种,multiple属性无非是prefix后面加个s。
@EnableConfigurationBeanBindings({
            @EnableConfigurationBeanBinding(prefix = "dubbo.application", type = ApplicationConfig.class),
            @EnableConfigurationBeanBinding(prefix = "dubbo.module", type = ModuleConfig.class),
            @EnableConfigurationBeanBinding(prefix = "dubbo.registry", type = RegistryConfig.class),
            @EnableConfigurationBeanBinding(prefix = "dubbo.protocol", type = ProtocolConfig.class),
            @EnableConfigurationBeanBinding(prefix = "dubbo.monitor", type = MonitorConfig.class),
            @EnableConfigurationBeanBinding(prefix = "dubbo.provider", type = ProviderConfig.class),
            @EnableConfigurationBeanBinding(prefix = "dubbo.consumer", type = ConsumerConfig.class),
            @EnableConfigurationBeanBinding(prefix = "dubbo.config-center", type = ConfigCenterBean.class),
            @EnableConfigurationBeanBinding(prefix = "dubbo.metadata-report", type = MetadataReportConfig.class),
            @EnableConfigurationBeanBinding(prefix = "dubbo.metrics", type = MetricsConfig.class),
            @EnableConfigurationBeanBinding(prefix = "dubbo.ssl", type = SslConfig.class)
    })
    public static class Single {

    }
流程图如下:
2.2、@DubboComponentScan(创建N多ServiceBean&ref)
2.2.1、处理@Service注解
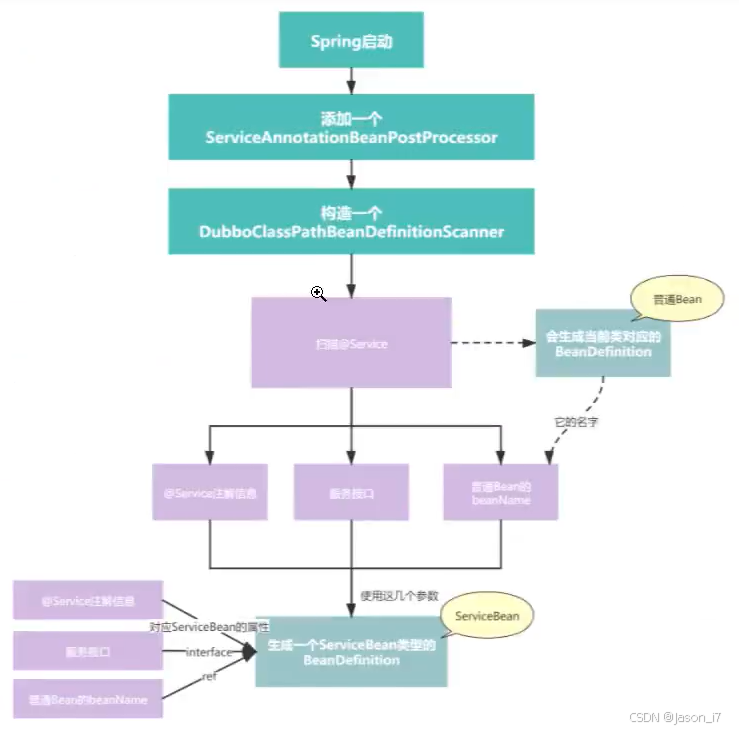
- 首先是向Spring注册了一个ServiceAnnotationBeanPostProcessor,因为继承的是BeanDefinitionRegistryPostProcessor,所以其实并不是Bean的beanPostProcessor,而是Bean工厂(BeanDefinition)的后置处理器,主要目的还是创建BeanDefinition。
public class ServiceAnnotationBeanPostProcessor implements BeanDefinitionRegistryPostProcessor, EnvironmentAware,
        ResourceLoaderAware, BeanClassLoaderAware {
- 开始生成服务的Bean,如服务userServer等,通过ServiceAnnotationBeanPostProcessor.registerServiceBean,拿到服务的Class和生成beanName,同时拿到@Service注解上面的所有属性。
- 生成ServiceBean,引用关系可看上图,主要是将上一步的服务Bean绑定到该Bean的ref属性上。这里思考一个问题,为什么不直接把ref暴露出去使用?主要还是因为Dubbo要在接口前后做一些自己的事情,直接调用了方法,没有达到框架的目的。同时对ServiceBean里面的多个属性进行赋值,对一些属性进行了单独处理,比如provider,monitor,protocol等。拿protocol举例,假设注解声明了protocol=p1,那么这个p1不是简单字符串,是要找到p1对应的ProtocolConfig对象,赋值给ServiceBean(而且还是List<>ProtocolConfig)。
- 简单概括就是先将@Service绑定上具体服务的ref,再将注解上面的字符串简单属性赋值给ServiceBean,最后将一些复杂的,例如注册中心,协议等XXXConfig赋值给ServiceBean对象,自此就创建完毕了。
- 初始化配置完成,等待DubboBootstrapApplicationListener#onContextRefreshedEvent进行服务导出。
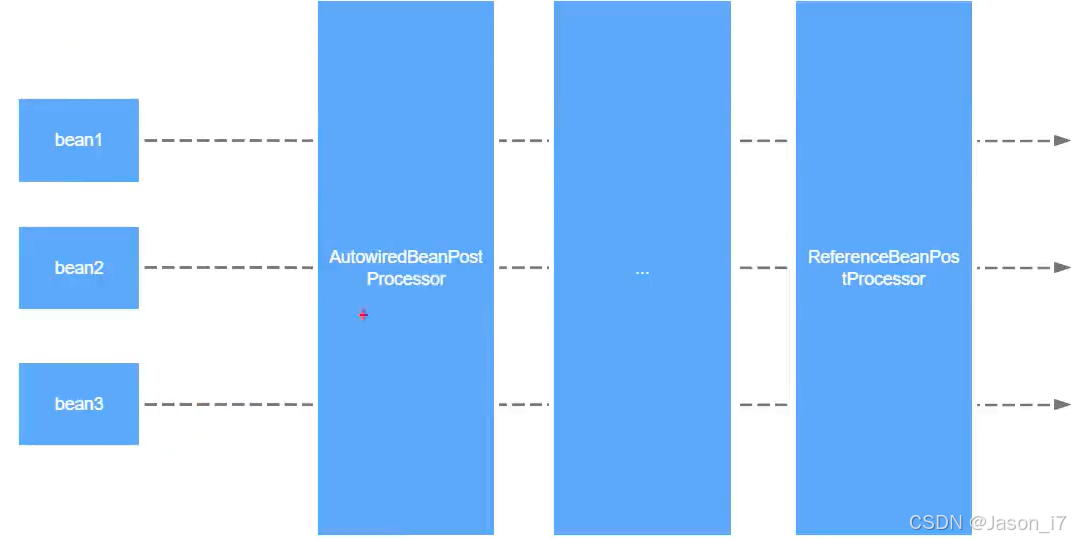
2.2.2、处理@Reference注解
- 注册后置处理器ReferenceAnnotationBeanPostProcessor。
- 被标记为@Reference注解的对象,无非就是要赋值,正好通过上一步的处理器方法doGetInjectedBean进行处理。
- 寻找注入点:①寻找标记了@Reference的属性,②寻找标记了@Reference的方法。
对需要注入的属性,利用ServiceBeanNameBuilder生成beanName,规则如下:
①需要服务classType
②拿到注解声明的所有属性
③获取属性中的version值
④获取属性中的group值
生成规则:ServiceBean:interfaceClassName:version:group - 创建referencedBeanName,用于放到Spring bean容器中的,比如ServiceBean:com.xxx.DemoService:1.0.2,其次创建referenceBeanName,由于做内部缓存使用,例如:@Reference(connections=4,timeout=3003,version=1.0.2) com.xxx.DemoService。比如同一个服务都标记的@Reference注解,参数一致的情况下应该是同一个单例对象。(因此:每次会判断是否在缓存对象referenceBeanCache中存在,不存在再创建。
- 假设不存在缓存,就开始创建,这里的创建过程跟ServiceBean类似,主要是创建一个ReferenceBean对象出来,这时候同样会把配置在@Reference上面的属性,挨个添加到属性里面,特殊得如protocol等跟ServiceBean处理一致,进行匹配。又因为ReferenceBean实现了FactoryBean,所以调用得是getObject()方法进行创建,该方法最终返回ref对象,即最终服务对象。
注:最后把创建好了的ReferenceBean丢到了Spring容器中,导致后面进行@Autowired标记也是可以拿到服务对象的。其次还会判断是否是本地服务,如果存在则直接构建ReferenceBean的代理。
public class ReferenceBean<T> extends ReferenceConfig<T> implements FactoryBean,
        ApplicationContextAware, InitializingBean, DisposableBean {
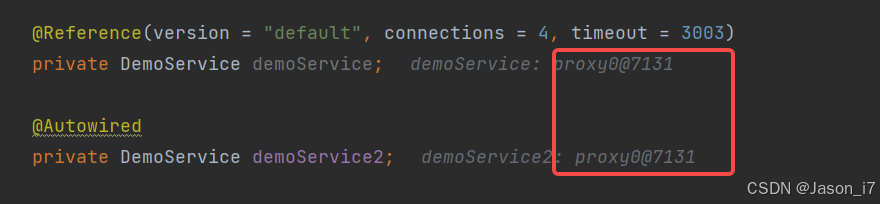
- 通过@Reference和@Autowired注解的区别验证:
结论: 无区别。
整个跟Spring整合,流程图大致如下:
3、服务导出
3.1、大致流程
① 读取配置—> 获取到每个服务最新(优先级最高的)最全的配置
②启动Netty / Tomcat
③服务注册—>服务相关信息—>注册中心
④服务提供者 监听动态配置
3.2、具体实现
- @DubboComponentScan,启动类标注
- 会创建上一步的@ServiceAnnotationBeanPostProcessor,通过postProcessBeanDefinitionRegistry自定义beanDefinition完毕后创建一个DubboBootstrapApplicationListener.class的Spring事件监听器。
- DubboBootstrapApplicationListener的构造方法,会创建一个Dubbo的引导器DubboBootstrap,并在这里进行初始化。
- 等Spring容器加载完毕后,触发onContextRefreshedEvent事件,开始执行dubboBootstrap.start()执行服务的导出工作。
public DubboBootstrap start() {
        if (started.compareAndSet(false, true)) {
            initialize();
            if (logger.isInfoEnabled()) {
                logger.info(NAME + " is starting...");
            }
            // 1. export Dubbo Services
            exportServices();

            // Not only provider register
            if (!isOnlyRegisterProvider() || hasExportedServices()) {
                // 2. export MetadataService
                exportMetadataService();
                //3. Register the local ServiceInstance if required
                registerServiceInstance();
            }

            referServices();

            if (logger.isInfoEnabled()) {
                logger.info(NAME + " has started.");
            }
        }
        return this;
    }
- exportServices() 方法主要目的导出所有@Service注解的服务
- 这里会拿到configManager.getServices()整个列表进行循环,又因为所有的服务其实都是被封装成了,ServiceBean->ServiceConfig,所以在列表进行循环时,每一个元素都是ServiceConfig,调用了其export方法。
- checkAndUpdateSubConfigs获取最新最全的配置
7.1、首先服务是有层级的,比如服务—应用,假设服务没有配置某注册中心,就从应用里面获取注册中心,这样说明了平时我们在声明服务的时候只配置了部分服务的参数,比如超时时间,重试次数等,甚至什么都没有配置,但是服务也发布成功了,这里就用到了大量父类(应用)的配置。
7.2、连接到远程注册中心,刷新配置。所谓刷新就是把注册中心的配置覆盖本地的配置文件。代码片段:getApplication().ifPresent(ApplicationConfig::refresh);
7.3、isConfigCenterFirst,默认true,代表优先使用远程配置中心的参数。
如果true情况下:
配置加载优先级:
SystemConfiguration --系统级别,
EnvironmentConfiguration --jvm参数级别,
InmemoryConfiguration(appExternalConfigurationMap) --远程配置-应用级别,
InmemoryConfigurationexternal(ConfigurationMap) --远程配置-服务级别,
ServiceConfig --当前项目配置,
PropertiesConfiguration --其它属性文件配置
如果配置为false:
SystemConfiguration --系统级别,
EnvironmentConfiguration --jvm参数级别,
ServiceConfig --当前项目配置,
InmemoryConfiguration(appExternalConfigurationMap) --远程配置-应用级别,
InmemoryConfigurationexternal(ConfigurationMap) --远程配置-服务级别,
PropertiesConfiguration --其它属性文件配置 - 将注册中心配置转换为URL(URL在Dubbo中跟Invoke一样,是个很特殊的概念,比如注册中心,服务等都是一个资源,如zookeeper://,dubbo://),如registry://。接下来构造服务的URL。
doExportUrlsFor1Protocol(protocolConfig, registryURLs); // 为每个服务协议导出一次,也就代表了多协议会执行多次导出。同理,如果此时配置了多个注册中心,每个协议的也会默认注册到多个中心上。
最终配置为:(假设在@Service中对@Methods进行了单个方法配置,比如sayHello配置了超时,就会多拼接&sayHello.timeout=3333到URL中)
另外可以通过配置&token=xxxx来防止其他人拼凑URL进行服务调用,默认会走TokenFilter进行token校验,不满足会拦截。
/dubbo/com.abc.dubbo.common.api.DemoService/providers/dubbo://192.168.0.1:20880/com.abc.dubbo.common.api.DemoService?anyhost=true&application=dubbo-provider-demo&callbacks=3&deprecated=false&dubbo=2.0.2&dynamic=true&generic=false&interface=com.abc.dubbo.common.api.DemoService&methods=sayHello,sayHelloAsync&pid=12228&release=2.7.5&revision=callback&sayHello.2.callback=true&sayHello.return=true&side=provider×tamp=1725854987815&version=callback
- 如果配置了scope=none,则不进行导出。其次判断是否是本地服务,所谓本地服务,还是走了Dubbo整个调用链路,只不过只在当前jvm中调用。接着开始根据SPI配置的代理方式把ref传进去创建代理对象。默认使用的是@SPI(“javassist”)。
这里对比一下,默认提供的两种javassist跟JDK代理的区别: JDK动态代理只能对实现了接口的类进行代理,而Javassist既可以代理类也可以代理接口。JDK动态代理主要通过接口实现代理,它需要目标对象实现一个或多个接口。而Javassist是通过字节码操作库直接生成字节码并加载到JVM中,生成的代理对象通常比JDK原生动态代理生成的代理对象性能更好。因为Javassist生成的代理类直接是一个普通类,没有反射的开销。但是,如果代理类的方法非常多,Javassist可能会导致大量的内存消耗。在选择使用哪种动态代理技术时,需要根据具体的需求和场景来决定。JDK原生动态代理的API相对简单,而Javassist的API则相对复杂,需要更深入的了解字节码操作。 - 最后将dubbo://192.168.0.1:xxxx/最为参数,encode之后放在registry://192.168.0.0.1:2181/xxxxx&=后面拼凑出registryURL。
自此,大致处理流程可以分为:ServiceBean.export() --> 刷新ServiceBean的参数 --> 得到注册中心URL和协议URL --> 便利每个协议URL --> 组成服务URL --> 生成可执行服务Invoker --> 导出服务。
Invoker<?> invoker = PROXY_FACTORY.getInvoker(ref, (Class) interfaceClass, registryURL.addParameterAndEncoded(EXPORT_KEY, url.toFullString()));
// 用到了设计模式之一责任链模式,对invoker进行多次封装,最厉害整个invoker就是真正执行服务的,其他都是做前置处理。
DelegateProviderMetaDataInvoker wrapperInvoker = new DelegateProviderMetaDataInvoker(invoker, this);
Exporter<?> exporter = protocol.export(wrapperInvoker);
exporters.add(exporter);
- 导出服务之前加了个监听器,用于接收注册中心配置变更
// 获取订阅变更通知的URL
// 例如常见的URL为:provider://192.168.0.1:20880/com.abc.dubbo.common.api.DemoService?anyhost
// =true&application=dubbo-provider-demo&bind.ip=192.168.0.1&bind.port=20880&category=configurators
// &check=false&deprecated=false&dubbo=2.0.2&dynamic=true&generic=false&interface=com.abc.dubbo.
// common.api.DemoService&methods=sayHello,sayHelloAsync&pid=5752&qos.enable=false&release=2.7.5
// &revision=timeout&side=provider&timeout=6000×tamp=1725867026643&version=timeout
final URL overrideSubscribeUrl = getSubscribedOverrideUrl(providerUrl);
// 创建一个监听器
final OverrideListener overrideSubscribeListener = new OverrideListener(overrideSubscribeUrl, originInvoker);
overrideListeners.put(overrideSubscribeUrl, overrideSubscribeListener);
内部会判断本次配置的修改,是否导致了oldURL跟newURL不一致,如果不一致,需要进行重新发布。
// 重新发布的时候还是跟之前一样,拿一堆的配置,最后拼凑一个dubbo://xxxx出来。
RegistryProtocol.this.reExport(originInvoker, newUrl);
重新发布的时候是先注销之前的服务,再注册新服务。
// 判断URL,如果一致,直接跳走不做处理了。
if (!newProviderUrl.equals(statedUrl.getProviderUrl())) {
    if (statedUrl.isRegistered()) {
        Registry registry = getRegistry(originInvoker);
        logger.info("Try to unregister old url: " + statedUrl.getProviderUrl());
        // 这里的下线,根据SPI机制获取对应的实现,zookeeper情况下是FailbackRegistry具体实现。
        registry.unregister(statedUrl.getProviderUrl());
        logger.info("Try to register new url: " + newProviderUrl);
        registry.register(newProviderUrl);
    }
    statedUrl.setProviderUrl(newProviderUrl);
    exporter.setRegisterUrl(newProviderUrl);
}
注销服务用到了一个单例线程池。
private final ExecutorService executor = newSingleThreadExecutor(new NamedThreadFactory("Exporter-Unexport", true));
public void unexport() {
     String key = getCacheKey(this.originInvoker);
     ......
     executor.submit(() -> {
         try {
         // 获取服务器关闭的默认超时值(毫秒) int DEFAULT_SERVER_SHUTDOWN_TIMEOUT = 10000;
         // 由此可见,在单线程池中,只能挨个挨个下线,不能批量
             int timeout = ConfigurationUtils.getServerShutdownTimeout();
             if (timeout > 0) {
                 logger.info("Waiting " + timeout + "ms for registry to notify all consumers before unexport. " +
                         "Usually, this is called when you use dubbo API");
                 Thread.sleep(timeout);
             }
             exporter.unexport();
         } catch (Throwable t) {
             logger.warn(t.getMessage(), t);
         }
     });
 }
另外还有一种情况,可能改到的是Netty相关的配置,这里Dubbo没有重新开启Netty连接,这样代价太大,而是通过修改Netty内部的Task机制来达成效果。比如:修改了心跳时间,channelHandler线程数。都是通过重新开启Task来规避重启带来的影响。
public class HeaderExchangeServer implements ExchangeServer {
    ......
	public void reset(URL url) {
	    server.reset(url);
	    try {
	        int currHeartbeat = getHeartbeat(getUrl());
	        int currIdleTimeout = getIdleTimeout(getUrl());
	        int heartbeat = getHeartbeat(url);
	        int idleTimeout = getIdleTimeout(url);
	        // 判断心跳时间,空闲超时时间,如果异常了,就取消掉task重新注册,注意:这里的reset仅仅是对Task和变量做操作
	        // 并没有重启整个server。(netty4实现时)
	        if (currHeartbeat != heartbeat || currIdleTimeout != idleTimeout) {
	            cancelCloseTask();
	            startIdleCheckTask(url);
	        }
	    } catch (Throwable t) {
	        logger.error(t.getMessage(), t);
	    }
	}
}
- 导出服务
public <T> Exporter<T> export(Invoker<T> invoker) throws RpcException {
// 一次常见的URL -> dubbo://192.168.0.1:20880/com.abc.dubbo.common.api.DemoService?anyhost=true&application=dubbo-provider-demo&bind.ip=192.168.0.1&bind.port=20880&deprecated=false&dubbo=2.0.2&dynamic=true&generic=false&interface=com.abc.dubbo.common.api.DemoService&methods=sayHello,sayHelloAsync&pid=19500&qos.enable=false&release=2.7.5&revision=timeout&side=provider&timeout=6000×tamp=1725868922297&version=timeout
URL url = invoker.getUrl();
// 转换为Key为:com.adc.dubbo.common.api.DemoService:timeout:20880
String key = serviceKey(url);
DubboExporter<T> exporter = new DubboExporter<T>(invoker, key, exporterMap);
// 这里用了缓存,主要是适配多协议多端口的支持。最终目的在要收到请求的时候,需要判断用哪个来接收。
// 常见如:
// "com.adc.dubbo.common.api.DemoService:timeout:20880" -> {DubboExporter@8332} "org.apache.dubbo.registry.integration.RegistryProtocol$InvokerDelegate@66756662"
// "com.adc.dubbo.common.api.DemoService:timeout:20882" -> {DubboExporter@8315} "org.apache.dubbo.registry.integration.RegistryProtocol$InvokerDelegate@9d3d54e"
// "com.adc.dubbo.common.api.DemoService:timeout:20881" -> {DubboExporter@6694} "org.apache.dubbo.registry.integration.RegistryProtocol$InvokerDelegate@6f85ee02"
exporterMap.put(key, exporter);
//export an stub service for dispatching event
Boolean isStubSupportEvent = url.getParameter(STUB_EVENT_KEY, DEFAULT_STUB_EVENT);
Boolean isCallbackservice = url.getParameter(IS_CALLBACK_SERVICE, false);
if (isStubSupportEvent && !isCallbackservice) {
String stubServiceMethods = url.getParameter(STUB_EVENT_METHODS_KEY);
if (stubServiceMethods == null || stubServiceMethods.length() == 0) {
if (logger.isWarnEnabled()) {
logger.warn(new IllegalStateException("consumer [" + url.getParameter(INTERFACE_KEY) +
"], has set stubproxy support event ,but no stub methods founded."));
}
} else {
stubServiceMethodsMap.put(url.getServiceKey(), stubServiceMethods);
}
}
// 开启具体服务,如Tomcat / Netty ,dubbo协议默认使用的是Netty4.x
// 如果是重新发布,这里也会判断是否创建过server,创建过则跳过,如果修改过属性走reset同上述属性修改发布流程。
openServer(url);
// 针对序列化处理,只有kryo序列化时生效。
optimizeSerialization(url);
return exporter;
}
上述中开启一次Netty服务的链路为:
openServer(url); —> createServer(url) —> Exchangers.bind(url, requestHandler) —> getExchanger(url).bind(url, handler) —> Transporters.bind(url, new DecodeHandler(new HeaderExchangeHandler(handler))) —> getTransporter().bind(url, handler) —> NettyTransporter.bind —> new NettyServer(url, listener) 即最终通过SPI得到默认dubbo协议的服务实现为Netty4.x版本。
public class NettyServer extends AbstractServer implements RemotingServer {
	 protected void doOpen() throws Throwable {
	        bootstrap = new ServerBootstrap();
			// 默认boss 接收请求的线程,写死了就一个
			// work线程池,从URL的中获取iothreads参数,如果没有就CPU核心数+1 跟 32 取最小值。
	        bossGroup = new NioEventLoopGroup(1, new DefaultThreadFactory("NettyServerBoss", true));
	        workerGroup = new NioEventLoopGroup(getUrl().getPositiveParameter(IO_THREADS_KEY, Constants.DEFAULT_IO_THREADS),
	                new DefaultThreadFactory("NettyServerWorker", true));

	        final NettyServerHandler nettyServerHandler = new NettyServerHandler(getUrl(), this);
	        channels = nettyServerHandler.getChannels();

	        bootstrap.group(bossGroup, workerGroup)
        }
}
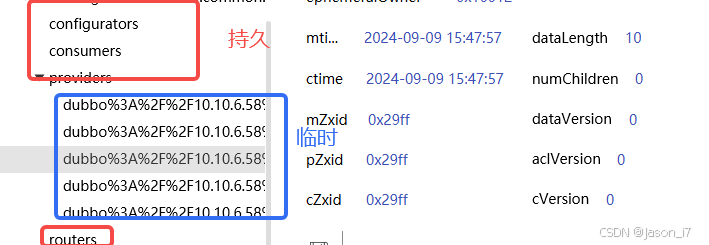
注册到Zookeeper上面的节点,服务/消费/配置等节点都是临时的,服务目录根基是持久的。
通过znode节点属性ephemeralOwner可以判断是否是临时,0x0即0是持久,0x010012XY 是临时会随会话中断而删除。
13. 至此,Dubbo发布导出完毕,ServiceBean#publishExportEvent会执行事件发布,如果对某个服务的发布感兴趣,就可以订阅。
4、服务导入
4.1、大致流程
① 构造Invoker(多级多层次调用)
② 构造一个服务目录,此时要去注册中心上获取
③ 多少个提供者 List<Invoker> 服务提供者URL —> 配置优先级 —> 动态配置 —> List<DubboInvoker>
④ 监听路由+服务列表+动态配置目录变更
⑤ 创建路由链,实现路由过滤,如:TagRouter—> AppRouter —> ServiceRouter
4.2、具体实现
- ReferenceAnnotationBeanPostProcessor加载doGetInjectedBean方法,进行bean注册时获取创建方式,因为ReferenceBean实现了FactoryBean,所以调用其get()方法进行对象创建。
- ReferenceConfig.init()开始初始化dubbo,接着跟服务导出,ServiceConfig填充参数一样,从各个配置渠道加载配置,最后生成一个标准的URL。
- ReferenceConfig.createProxy(map)—这一步就是去创建代理对象,map是所有的服务参数配置。这里会判断是否是本地jvm服务,是的话直接生成对应的代理对象调用(本地服务,提供+消费都在一个jvm)。
- 开始循环所有的注册中心,如果协议有p1,p2多个,就会循环多次。主要目的是:循环查找服务,如果服务不在p1中提供,或者p1失效了,则去p2中查找。同时对于多订阅场景,默认情况下使用“区域感知”策略,简而言之就是对服务打上区域标签,选择就近区域加速网络请求。调用程序包装关系如下:ZonewareClusterInvoker(StaticDirectory)->FailoverClusterInvokeer(RegistryDirectory,路由发生在这里)->invoker。最后跟单个注册中心一样,还是会走到invoker = REF_PROTOCOL.refer(interfaceClass, urls.get(x));方法。
- 开始进行refer执行,因为Protocol默认有两个Wrapper。
ProtocolFilterWrapper
public class ProtocolFilterWrapper implements Protocol {
	....
	public <T> Invoker<T> refer(Class<T> type, URL url) throws RpcException {
	     if (UrlUtils.isRegistry(url)) {
	         return protocol.refer(type, url);
	     }
	     // 如果是dubbo协议,其实也就是服务,就会走这里,加载一个调用链
	     // 默认构建了三个
	     // 0 = {ConsumerContextFilter@8306} 为RPC设置上下文
	     // 1 = {FutureFilter@8307}  支持异步实现
	     // 2 = {MonitorFilter@8308}  收集服务统计信息
	     return buildInvokerChain(protocol.refer(type, url), REFERENCE_FILTER_KEY, CommonConstants.CONSUMER);
	 }
}
ProtocolListenerWrapper
public class ProtocolListenerWrapper implements Protocol {
	......
	@Override
    public <T> Exporter<T> export(Invoker<T> invoker) throws RpcException {
   		// 如果注册中心的url,放行
        if (UrlUtils.isRegistry(invoker.getUrl())) {
            return protocol.export(invoker);
        }
        // 如果是服务的url,处理。主要目的是:在服务完成导入的时候,发布一个事件,如果需要在此之后进行处理,即可实现ExporterListener。
        return new ListenerExporterWrapper<T>(protocol.export(invoker),
                Collections.unmodifiableList(ExtensionLoader.getExtensionLoader(ExporterListener.class)
                        .getActivateExtension(invoker.getUrl(), EXPORTER_LISTENER_KEY)));
    }
}
执行完了这两个默认Wrapper,开始来到Protocol SPI的具体实现。
比如注册中心(协议),采用RegistryProtocol实现。
协议地址转换:
registry://192.168.0.1:2181/org.apache.dubbo.registry.RegistryService?application=dubbo-consumer-demoxxx
转换成具体注册中心,如zk
zookeeper://192.168.0.1:2181/org.apache.dubbo.registry.RegistryService?application=dubbo-consumer-demoxxx
public class RegistryProtocol implements Protocol {
	......
	private <T> Invoker<T> doRefer(Cluster cluster, Registry registry, Class<T> type, URL url) {
	    // 通过配置的注册中心类型,生成对应的注册中心连接器,比如zk,这里拿到registry就是
	    // result = {ListenerRegistryWrapper@6297} 里面包装了 registry = {ZookeeperRegistry@7416}
        RegistryDirectory<T> directory = new RegistryDirectory<T>(type, url);
        // 把注册中心放进来,以后存取数据要用的
        directory.setRegistry(registry);
        directory.setProtocol(protocol);
        // all attributes of REFER_KEY
        Map<String, String> parameters = new HashMap<String, String>(directory.getUrl().getParameters());
        URL subscribeUrl = new URL(CONSUMER_PROTOCOL, parameters.remove(REGISTER_IP_KEY), 0, type.getName(), parameters);
        if (!ANY_VALUE.equals(url.getServiceInterface()) && url.getParameter(REGISTER_KEY, true)) {
            // 拼凑出消费者的URL
            directory.setRegisteredConsumerUrl(getRegisteredConsumerUrl(subscribeUrl, url));
            // 然后把拼凑出来的消费者URL,发布到注册中心上面去,也就是走完这行,consumer下面就会有node节点了。
            registry.register(directory.getRegisteredConsumerUrl());
        }
        // 路由选择器,在这里实现标签路由,条件路由。到时候就会根据这里的条件,去过滤掉不能调用的服务。
        // 默认实现:0 = {MockInvokersSelector@7481}
        // 1 = {TagRouter@7482}
        // 2 = {AppRouter@7483} 3 = {ServiceRouter@7484}
        directory.buildRouterChain(subscribeUrl);
        // 订阅注册中心的,动态配置+服务提供者+路由配置的清单变化,具体目录详见下方流程图
        // 注意:这个时候是订阅,但也同时把注册中心所有的配置都获取了一遍下来,比如providers。
        directory.subscribe(subscribeUrl.addParameter(CATEGORY_KEY,
                PROVIDERS_CATEGORY + "," + CONFIGURATORS_CATEGORY + "," + ROUTERS_CATEGORY));
		// 把服务路由(本地缓存)丢进去,创建出完整调用链路的Invoker。
        Invoker invoker = cluster.join(directory);
        return invoker;
    }
    ......
}
接上述cluster.join方法:
public class MockClusterWrapper implements Cluster {

    private Cluster cluster;

    public MockClusterWrapper(Cluster cluster) {
        this.cluster = cluster;
    }

    @Override
    public <T> Invoker<T> join(Directory<T> directory) throws RpcException {
    	// mock的逻辑就是在这进行的处理,
        return new MockClusterInvoker<T>(directory,
        // 创建了一个ConsumerContextClusterInterceptor
                this.cluster.join(directory));
    }

}
4.3、流程图

5、服务调用
消费到服务整体流程图

5.1、消费端-发起请求
- 首先是从消费者发起,以多注册中心为例,在ReferenceConfig之前的步骤这里不再阐述,可参考服务导入环节。
public class ReferenceConfig<T> extends ReferenceConfigBase<T> {
	private T createProxy(Map<String, String> map) {
		// 如果是单注册中心,就走这一步,但是最终里面还是会去调用cluster.join
		if (urls.size() == 1) {
            invoker = REF_PROTOCOL.refer(interfaceClass, urls.get(0));
        else {
        	for (URL url : urls) {
        		// 这个地方其实就已经创建好了Invoker的链路了,只不过到下面再会包装一层,同时也是如果仅但注册中心,拿到Invoker就返回了
        		// 多注册中心的返回值如:invokers = {ArrayList@6741}  size = 2
        		//  0 = {MockClusterInvoker@7877} "invoker :interface com.zengame.ldc.dubbo.common.api.DemoService -> zookeeper://192.168.0.1:2181/org.apache.dubbo.registry.RegistryService?xxx
        		//  1 = {MockClusterInvoker@7877} "invoker :interface com.zengame.ldc.dubbo.common.api.DemoService -> zookeeper://192.168.1.1:2181/org.apache.dubbo.registry.RegistryService?xxx
                invokers.add(REF_PROTOCOL.refer(interfaceClass, url));
                if (UrlUtils.isRegistry(url)) {
                    registryURL = url; // use last registry url
                }
            }
            if (registryURL != null) { // registry url is available
                // for multi-subscription scenario, use 'zone-aware' policy by default
                URL u = registryURL.addParameterIfAbsent(CLUSTER_KEY, ZoneAwareCluster.NAME);
                // The invoker wrap relation would be like: ZoneAwareClusterInvoker(StaticDirectory) -> FailoverClusterInvoker(RegistryDirectory, routing happens here) -> Invoker
                // 多注册中心,多构建一层,例如默认会创建一个ZoneAwareCluster,设置区域标识过滤机器。
                invoker = CLUSTER.join(new StaticDirectory(u, invokers));
            } else { // not a registry url, must be direct invoke.
                invoker = CLUSTER.join(new StaticDirectory(invokers));
            }
		}
	}
}
- 此时开始发起一次真正的服务调用
@Reference(version = "default", timeout = 3333,registry = {"re1", "r22"}, mock = "true")
private DemoService demoService;
......
String result = demoService.sayHello("123456");
因为demoService本身就是代理对象,所以先走到:
- InvokerInvocationHandler.invoke(Object proxy, Method method, Object[] args)
参数:代理对象,执行的服务方法,以及参数
作用:主要目的创建RpcInvocation对象,同时把ServiceKey也放进去,然后继续
invoker.invoke(rpcInvocation).recreate();
- MockClusterInvoker.invoke
作用:服务伪装,也可以理解为本地降级,用于屏蔽接口错误,所以判断有没有配置mock,配置了如果失败就会走降级。
注意:如果配置了force就直接强制返回了,不会再发起请求了。同时这里的失败已经是各种负载,各种重试之后的失败,最后一级了。然后继续invoke - AbstractCluster.InterceptorInvokerNode
作用:这个invoke还是比较有意思的,在这里执行了所有的拦截器,这里的拦截器都是导入的时候就默认创建好了。
@Override
public Result invoke(Invocation invocation) throws RpcException {
    Result asyncResult;
    try {
    	// 拦截前执行
        interceptor.before(next, invocation);
        // 执行方法
        asyncResult = interceptor.intercept(next, invocation);
    } catch (Exception e) {
        // onError callback
        if (interceptor instanceof ClusterInterceptor.Listener) {
            ClusterInterceptor.Listener listener = (ClusterInterceptor.Listener) interceptor;
            listener.onError(e, clusterInvoker, invocation);
        }
        throw e;
    } finally {
    	// 后置处理
        interceptor.after(next, invocation);
    }
    return asyncResult.whenCompleteWithContext((r, t) -> {
        // onResponse callback
        if (interceptor instanceof ClusterInterceptor.Listener) {
            ClusterInterceptor.Listener listener = (ClusterInterceptor.Listener) interceptor;
       	    // 这里获取监听器有哪些,在这回调
            if (t == null) {
                listener.onMessage(r, clusterInvoker, invocation);
            } else {
                listener.onError(t, clusterInvoker, invocation);
            }
        }
    });
}
-
ConsumerContextClusterInterceptor.before&intercept-invoke
作用:在消费者端的集群调用中设置和清理上下文信息。在 Dubbo 中,每个 RPC 调用都有一些相关的上下文信息,例如调用的服务名,方法名,参数等。这些信息在调用过程中可能会被用到,例如在日志记录,监控,路由等功能中。 -
ZoneAwareClusterInterceptor.before&invoke
作用:默认情况下使用“区域感知”策略,可参考上文描述。判断请求参数里面是否配置了,registry_zone或者registry_zone_force,有的话就附加到请求的Invocation invocation对象上。会在ZoneAwareClusterInvoker.doInvoke中过滤服务列表。
public abstract class AbstractClusterInvoker<T> implements Invoker<T> {
	......
	@Override
    public Result invoke(final Invocation invocation) throws RpcException {
        checkWhetherDestroyed();

        // binding attachments into invocation.
        Map<String, String> contextAttachments = RpcContext.getContext().getAttachments();
        if (contextAttachments != null && contextAttachments.size() != 0) {
            ((RpcInvocation) invocation).addAttachments(contextAttachments);
        }
		// 开始获取所有的服务列表集合
        List<Invoker<T>> invokers = list(invocation);
        // 得到负载均衡的配置
        LoadBalance loadbalance = initLoadBalance(invokers, invocation);
        RpcUtils.attachInvocationIdIfAsync(getUrl(), invocation);
        // 开始选定最终的执行器以及执行
        // 内部大致包含:
        // 1、判断是否配置了registry.preferred,即注册中心优先属性,如果没有直接下一步,有的话直接返回。
        // 2、如果配置registry_zone,开始过滤出符合的服务列表。
        // 3、通过负载均衡算法+服务列表,算出最后的服务执行者。
        // 4、对拿到的执行者校验是否可用,不可用的话,又循环整个服务列表,从第一个开始查找,可用立刻返回。
        return doInvoke(invocation, invokers, loadbalance);
    }
}
选出最终执行者,继续invoke…
@Override
@SuppressWarnings({"unchecked", "rawtypes"})
public Result doInvoke(Invocation invocation, final List<Invoker<T>> invokers, LoadBalance loadbalance) throws RpcException {
    // First, pick the invoker (XXXClusterInvoker) that comes from the local registry, distinguish by a 'preferred' key.
    for (Invoker<T> invoker : invokers) {
        if (invoker.isAvailable() && invoker.getUrl().getParameter(REGISTRY_KEY + "." + PREFERRED_KEY, false)) {
            return invoker.invoke(invocation);
        }
    }

    // providers in the registry with the same
    String zone = (String) invocation.getAttachment(REGISTRY_ZONE);
    if (StringUtils.isNotEmpty(zone)) {
        for (Invoker<T> invoker : invokers) {
            if (invoker.isAvailable() && zone.equals(invoker.getUrl().getParameter(REGISTRY_KEY + "." + ZONE_KEY))) {
                return invoker.invoke(invocation);
            }
        }
        String force = (String) invocation.getAttachment(REGISTRY_ZONE_FORCE);
        if (StringUtils.isNotEmpty(force) && "true".equalsIgnoreCase(force)) {
            throw new IllegalStateException("No registry instance in zone or no available providers in the registry, zone: "
                    + zone
                    + ", registries: " + invokers.stream().map(i -> i.getUrl().toString()).collect(Collectors.joining(",")));
        }
    }


    // load balance among all registries, with registry weight count in.
    Invoker<T> balancedInvoker = select(loadbalance, invocation, invokers, null);
    if (balancedInvoker.isAvailable()) {
        return balancedInvoker.invoke(invocation);
    }

    // If none of the invokers has a preferred signal or is picked by the loadbalancer, pick the first one available.
    for (Invoker<T> invoker : invokers) {
        if (invoker.isAvailable()) {
            return invoker.invoke(invocation);
        }
    }
    throw new RpcException("No provider available in " + invokers);
}
- FailoverClusterInvoker.doInvoke
目的:服务容错,可有多种实现,这里不展开。
public class FailoverClusterInvoker<T> extends AbstractClusterInvoker<T> {

    private static final Logger logger = LoggerFactory.getLogger(FailoverClusterInvoker.class);

    public FailoverClusterInvoker(Directory<T> directory) {
        super(directory);
    }

    @Override
    @SuppressWarnings({"unchecked", "rawtypes"})
    public Result doInvoke(Invocation invocation, final List<Invoker<T>> invokers, LoadBalance loadbalance) throws RpcException {
        List<Invoker<T>> copyInvokers = invokers;
        // 如果为空,直接报错结束
        checkInvokers(copyInvokers, invocation);
        String methodName = RpcUtils.getMethodName(invocation);
        // 获取默认的retries重试次数配置,默认是2,加1
        int len = getUrl().getMethodParameter(methodName, RETRIES_KEY, DEFAULT_RETRIES) + 1;
        // 假设失误配置成了0或复数,改为1次
        if (len <= 0) {
            len = 1;
        }
        // retry loop.
        RpcException le = null; // last exception.
        List<Invoker<T>> invoked = new ArrayList<Invoker<T>>(copyInvokers.size()); // invoked invokers.
        Set<String> providers = new HashSet<String>(len);
        // 也就是这里,支持的Dubbo重试机制。
        for (int i = 0; i < len; i++) {
            // 官方备注:重试前重新选择,以避免更改候选“调用者”。
            // 官方备注:注意:如果“invokers”发生了变化,那么“called”也会失去准确性。
            // 个人理解是,每次重试都要重新去注册中心拉取一遍list列表,因为注册中心有订阅机制会更新,所以重试时可以拿到最新可用的服务列表,然后进行检查是否可用,没有可用报错
            if (i > 0) {
                checkWhetherDestroyed();
                copyInvokers = list(invocation);
                // check again
                checkInvokers(copyInvokers, invocation);
            }
            // 继续用负载均衡器,选择出具体的执行者
            Invoker<T> invoker = select(loadbalance, invocation, copyInvokers, invoked);
            invoked.add(invoker);
            // 执行器设置到上下文
            RpcContext.getContext().setInvokers((List) invoked);
            try {
            	// 执行调用
                Result result = invoker.invoke(invocation);
                if (le != null && logger.isWarnEnabled()) {
                    logger.warn("Although retry the method " + methodName
                            + " in the service " + getInterface().getName()
                            + " was successful by the provider " + invoker.getUrl().getAddress()
                            + ", but there have been failed providers " + providers
                            + " (" + providers.size() + "/" + copyInvokers.size()
                            + ") from the registry " + directory.getUrl().getAddress()
                            + " on the consumer " + NetUtils.getLocalHost()
                            + " using the dubbo version " + Version.getVersion() + ". Last error is: "
                            + le.getMessage(), le);
                }
                return result;
            } catch (RpcException e) {
            	// 注意:如果是RpcException异常(该异常只有是Dubbo框架自己跑出来的,会重试)
            	// 如果手动throw RpcException 抛出来,且设置了是业务异常的话,就会结束流程了,不会在重试。
                if (e.isBiz()) { // biz exception.
                    throw e;
                }
                // 这个地方非常关键,不满足这里就不会重试了。
                le = e;
            } catch (Throwable e) {
                le = new RpcException(e.getMessage(), e);
            } finally {
                providers.add(invoker.getUrl().getAddress());
            }
        }
        throw new RpcException(le.getCode(), "Failed to invoke the method "
                + methodName + " in the service " + getInterface().getName()
                + ". Tried " + len + " times of the providers " + providers
                + " (" + providers.size() + "/" + copyInvokers.size()
                + ") from the registry " + directory.getUrl().getAddress()
                + " on the consumer " + NetUtils.getLocalHost() + " using the dubbo version "
                + Version.getVersion() + ". Last error is: "
                + le.getMessage(), le.getCause() != null ? le.getCause() : le);
    }

}
-
ListenerInvokerWrapper.invoke
作用:创建的时候调用了InvokerListener的referred方法,也就是触发事件,invoke里面没有逻辑,直接调下一层invoke。 -
ProtocolFilterWrapper.invoke
作用:filter.invoke(next, invocation);执行后,不管是否异常或正常返回,根据结果触发Filter.Listener事件,onMessage(正常时)跟onError(异常时)。 -
ConsumerContextFilter.invoke
作用:在服务消费者端为每个 RPC 调用创建和初始化 RpcContext。RpcContext 是 Dubbo 提供的一个上下文对象,用于存储一次 RPC 调用的相关信息,例如调用参数、调用元数据、调用结果等。 -
FutureFilter.invoke
作用:在异步调用场景中,处理ResponseFuture的上下文存储和获取。 -
MonitorFilter.invoke
作用:收集服务调用的监控数据,并将这些数据发送到监控中心。 -
AsyncToSyncInvoker.invoke
作用:异步转同步,比如Dubbo协议用的netty发送消息的时候是异步的,这时如果是同步请求,需要等有结果执行才进行下一步。所以这里会把当前业务线程无期限休眠,直到收到结果或调用异常时唤醒。
@Override
public Result invoke(Invocation invocation) throws RpcException {
    Result asyncResult = invoker.invoke(invocation);

    try {
        if (InvokeMode.SYNC == ((RpcInvocation) invocation).getInvokeMode()) {
            /**
             * NOTICE!
             * must call {@link java.util.concurrent.CompletableFuture#get(long, TimeUnit)} because
             * {@link java.util.concurrent.CompletableFuture#get()} was proved to have serious performance drop.
             */
            asyncResult.get(Integer.MAX_VALUE, TimeUnit.MILLISECONDS);
        }
    } catch (InterruptedException e) {
        throw new RpcException("Interrupted unexpectedly while waiting for remoting result to return!  method: " + invocation.getMethodName() + ", provider: " + getUrl() + ", cause: " + e.getMessage(), e);
    } catch (ExecutionException e) {
        Throwable t = e.getCause();
        if (t instanceof TimeoutException) {
            throw new RpcException(RpcException.TIMEOUT_EXCEPTION, "Invoke remote method timeout. method: " + invocation.getMethodName() + ", provider: " + getUrl() + ", cause: " + e.getMessage(), e);
        } else if (t instanceof RemotingException) {
            throw new RpcException(RpcException.NETWORK_EXCEPTION, "Failed to invoke remote method: " + invocation.getMethodName() + ", provider: " + getUrl() + ", cause: " + e.getMessage(), e);
        }
    } catch (Throwable e) {
        throw new RpcException(e.getMessage(), e);
    }
    return asyncResult;
}
- AbstractInvoker.invoke -> DubboInvoker.doInvoke
作用:获取启动时服务导入已经提前创建好的connection连接,从里面轮询取一个出来发起连接,最终调用。
public class DubboInvoker<T> extends AbstractInvoker<T> {
	......
	@Override
    protected Result doInvoke(final Invocation invocation) throws Throwable {
        RpcInvocation inv = (RpcInvocation) invocation;
        final String methodName = RpcUtils.getMethodName(invocation);
        inv.setAttachment(PATH_KEY, getUrl().getPath());
        inv.setAttachment(VERSION_KEY, version);

        ExchangeClient currentClient;
        if (clients.length == 1) {
            currentClient = clients[0];
        } else {
        // 如果可用连接数大于1,则:currentClient = clients[index.getAndIncrement() % clients.length];
            currentClient = clients[index.getAndIncrement() % clients.length];
        }
        try {
            boolean isOneway = RpcUtils.isOneway(getUrl(), invocation);
            int timeout = getUrl().getMethodPositiveParameter(methodName, TIMEOUT_KEY, DEFAULT_TIMEOUT);
            // 判断是不是一个只需要发起,不关注结果的请求,如果是这时候调用send就直接结束了。
            if (isOneway) {
                boolean isSent = getUrl().getMethodParameter(methodName, Constants.SENT_KEY, false);
                currentClient.send(inv, isSent);
                return AsyncRpcResult.newDefaultAsyncResult(invocation);
            } else {
                ExecutorService executor = getCallbackExecutor(getUrl(), inv);
                // 真正的发起服务调用
                // request方法进去ReferenceCountExchangeClient.request
                // 然后--->HeaderExchangeClient.request
                // ---> 见下方调用
                CompletableFuture<AppResponse> appResponseFuture =
                        currentClient.request(inv, timeout, executor).thenApply(obj -> (AppResponse) obj);
                // save for 2.6.x compatibility, for example, TraceFilter in Zipkin uses com.alibaba.xxx.FutureAdapter
                FutureContext.getContext().setCompatibleFuture(appResponseFuture);
                AsyncRpcResult result = new AsyncRpcResult(appResponseFuture, inv);
                result.setExecutor(executor);
                return result;
            }
        } catch (TimeoutException e) {
            throw new RpcException(RpcException.TIMEOUT_EXCEPTION, "Invoke remote method timeout. method: " + invocation.getMethodName() + ", provider: " + getUrl() + ", cause: " + e.getMessage(), e);
        } catch (RemotingException e) {
            throw new RpcException(RpcException.NETWORK_EXCEPTION, "Failed to invoke remote method: " + invocation.getMethodName() + ", provider: " + getUrl() + ", cause: " + e.getMessage(), e);
        }
    }
}
- HeaderExchangeChannel.send
作用:发起对应连接的数据。
final class HeaderExchangeChannel implements ExchangeChannel {
	@Override
    public CompletableFuture<Object> request(Object request, int timeout, ExecutorService executor) throws RemotingException {
        if (closed) {
            throw new RemotingException(this.getLocalAddress(), null, "Failed to send request " + request + ", cause: The channel " + this + " is closed!");
        }
        // create request.
        Request req = new Request();
        req.setVersion(Version.getProtocolVersion());
        req.setTwoWay(true);
        req.setData(request);
        // 无论是同步还是异步调用,封装到DefaultFuture对象中。
        // 注意,这个里面创建了一个根据传入的超时时间的定时任务,比如timeout 3000ms,这里就会3s后执行Timer。
        // 如果这个地方超时了,会在后续进行判断
        DefaultFuture future = DefaultFuture.newFuture(channel, req, timeout, executor);
        try {
        	// 调用具体的channel 通信管道发送数据,这里是netty,接下来会走netty的链路,即channelHandler编解码等。
        	// NettyChannel.send真正的发起数据请求,channel.writeAndFlush(message);
        	// 同时判断是否开启sent,默认false,代表不关注是否具体发送成功,如果配置true,需要等到netty flush确认消息写入时才会返回。
            channel.send(req);
        } catch (RemotingException e) {
            future.cancel();
            throw e;
        }
        // 这个地方很快返回了,同步是依赖 异步转 同步的invoker卡住的,这里不再阐述。
        return future;
    }
}
- Netty的ChannelHandler处理链
public class NettyClient extends AbstractClient {
    ......
	protected void doOpen() throws Throwable {
		 ch.pipeline()//.addLast("logging",new LoggingHandler(LogLevel.INFO))//for debug
		 // 编解码
		 .addLast("decoder", adapter.getDecoder())
		 .addLast("encoder", adapter.getEncoder())
		 .addLast("client-idle-handler", new IdleStateHandler(heartbeatInterval, 0, 0, MILLISECONDS))
		 // 下方请求链路,构造的地方
		 .addLast("handler", nettyClientHandler);
     }
}
-
NettyClientHandler.channelRead
作用:将接收到的数据解码成 Dubbo 的响应对象,并将这个响应对象传递给相应的处理器进行处理。 -
MultiMessageHandler.received
作用:会判断消息是否是批量消息格式,即:instanceof MultiMessage。主要用来处理和分发由多个消息组成的批量消息。 -
HeartbeatHandler.received
作用:负责处理心跳消息,以维持服务消费者和服务提供者之间的连接。
注意:Dubbo其实自己也有心跳机制,但是!!由于Netty本身也是自带了心跳机制,所以Dubbo的心跳机制不会进行!!! -
AllChannelHandler.received
作用:线程模型,默认all,大致为:将netty 的boss(如有)跟work group都会看成IO线程,即只管channel的数据读取跟写入,其它称为业务线程,进行其它编解码数据业务处理等等实现,其它线程模型详情6.4章节。 -
DecodeHandler.received
作用:对消息的类型进行不同的处理,这不是拿到Netty消息的解码,这是把Netty自带的ByteToMessage…解码后走的,把消息封装为Dubbo对象,进行判断,是请求对象还是响应对象。 -
HeaderExchangeHandler.received
作用:接收到一个请求时,它会根据请求的类型(是普通请求还是心跳请求)和请求的方向(是请求还是响应),调用相应的处理方法。通过 HeaderExchangeHandler,Dubbo 可以实现请求和响应的交换,从而支持 Dubbo 的 RPC 调用。
发起的请求是否超时,就是在这里判断的,通过HeaderExchangeHandler.handleResponse调用DefaultFuture.received。
public static void received(Channel channel, Response response, boolean timeout) {
   try {
        DefaultFuture future = FUTURES.remove(response.getId());
        if (future != null) {
            Timeout t = future.timeoutCheckTask;
        	// 拿到之前创建的超时检测Timer,如果没有超时
            if (!timeout) {
                // decrease Time
                // 取消掉任务
                t.cancel();
            }
            // 开始判断结果如何
            future.doReceived(response);
        } else {
            logger.warn("The timeout response finally returned at "
                    + (new SimpleDateFormat("yyyy-MM-dd HH:mm:ss.SSS").format(new Date()))
                    + ", response " + response
                    + (channel == null ? "" : ", channel: " + channel.getLocalAddress()
                    + " -> " + channel.getRemoteAddress()));
        }
    } finally {
        CHANNELS.remove(response.getId());
    }
}
...
private void doReceived(Response res) {
    if (res == null) {
        throw new IllegalStateException("response cannot be null");
    }
    // 如果成功,直接返回结果
    if (res.getStatus() == Response.OK) {
        this.complete(res.etResult());
    } else if (res.getStatus() == Response.CLIENT_TIMEOUT || res.getStatus() == Response.SERVER_TIMEOUT) {
    // 如果超时了,创建异常返回
        this.completeExceptionally(new TimeoutException(res.getStatus() == Response.SERVER_TIMEOUT, channel, res.getErrorMessage()));
    } else {
    // 否则也返回异常错误
        this.completeExceptionally(new RemotingException(channel, res.getErrorMessage()));
    }

    // the result is returning, but the caller thread may still waiting
    // to avoid endless waiting for whatever reason, notify caller thread to return.
    if (executor != null && executor instanceof ThreadlessExecutor) {
        ThreadlessExecutor threadlessExecutor = (ThreadlessExecutor) executor;
        if (threadlessExecutor.isWaiting()) {
            threadlessExecutor.notifyReturn(new IllegalStateException("The result has returned, but the biz thread is still waiting" +
                    " which is not an expected state, interrupt the thread manually by returning an exception."));
        }
    }
}
- 等待Netty数据返回,然后依旧走完所有的ChannelHandler,在HeaderExchangeHandler进行结果返回,调用结束。
5.2、服务端-接收请求
- 接上方的Netty请求链路,最后链路为HeaderExchangeHandler。当HeaderExchangeHandler接收到请求后,来到
received方法,判断message instanceof Request符合,接着来到handleRequest。
public class HeaderExchangeHandler implements ChannelHandlerDelegate {
	......
	void handleRequest(final ExchangeChannel channel, Request req) throws RemotingException {
        Response res = new Response(req.getId(), req.getVersion());
        // 这里默认不符合
        if (req.isBroken()) {
            Object data = req.getData();

            String msg;
            if (data == null) {
                msg = null;
            } else if (data instanceof Throwable) {
                msg = StringUtils.toString((Throwable) data);
            } else {
                msg = data.toString();
            }
            res.setErrorMessage("Fail to decode request due to: " + msg);
            res.setStatus(Response.BAD_REQUEST);

            channel.send(res);
            return;
        }
        // find handler by message class.
        // 拿到请求所有参数,其实是
        Object msg = req.getData();
        try {
        	// 开始调用Duboo.invoke,执行业务逻辑,同时这里会有一系列filter的执行
            CompletionStage<Object> future = handler.reply(channel, msg);
            // 完成事件
            future.whenComplete((appResult, t) -> {
                try {
                	// 成功
                    if (t == null) {
                        res.setStatus(Response.OK);
                        res.setResult(appResult);
                    } else {
                    // 报错,错误合并成String类型发出
                        res.setStatus(Response.SERVICE_ERROR);
                        res.setErrorMessage(StringUtils.toString(t));
                    }
                    // 推送给消费者,依旧走Netty的ChannelHandler,然后流程结束。
                    channel.send(res);
                } catch (RemotingException e) {
                    logger.warn("Send result to consumer failed, channel is " + channel + ", msg is " + e);
                }
            });
        } catch (Throwable e) {
            res.setStatus(Response.SERVICE_ERROR);
            res.setErrorMessage(StringUtils.toString(e));
            // 报错,也是推送
            channel.send(res);
        }
    }
}
- 执行业务逻辑
public class DubboProtocol extends AbstractProtocol {
	private ExchangeHandler requestHandler = new ExchangeHandlerAdapter() {

        @Override
        public CompletableFuture<Object> reply(ExchangeChannel channel, Object message) throws RemotingException {

            if (!(message instanceof Invocation)) {
                throw new RemotingException(channel, "Unsupported request: "
                        + (message == null ? null : (message.getClass().getName() + ": " + message))
                        + ", channel: consumer: " + channel.getRemoteAddress() + " --> provider: " + channel.getLocalAddress());
            }

            Invocation inv = (Invocation) message;
            // 获取要执行的Invoker链路,也就是拼凑serviceKey,然后从exporterMap缓存里面获取服务单例代理对象
            Invoker<?> invoker = getInvoker(channel, inv);
            // need to consider backward-compatibility if it's a callback
            if (Boolean.TRUE.toString().equals(inv.getAttachments().get(IS_CALLBACK_SERVICE_INVOKE))) {
                String methodsStr = invoker.getUrl().getParameters().get("methods");
                boolean hasMethod = false;
                if (methodsStr == null || !methodsStr.contains(",")) {
                    hasMethod = inv.getMethodName().equals(methodsStr);
                } else {
                    String[] methods = methodsStr.split(",");
                    for (String method : methods) {
                        if (inv.getMethodName().equals(method)) {
                            hasMethod = true;
                            break;
                        }
                    }
                }
                if (!hasMethod) {
                    logger.warn(new IllegalStateException("The methodName " + inv.getMethodName()
                            + " not found in callback service interface ,invoke will be ignored."
                            + " please update the api interface. url is:"
                            + invoker.getUrl()) + " ,invocation is :" + inv);
                    return null;
                }
            }
            RpcContext.getContext().setRemoteAddress(channel.getRemoteAddress());
            // 又开始整个链路的调用,但是注意这里有一系列的filter要执行,个数跟消费者不同的。
            Result result = invoker.invoke(inv);
            return result.thenApply(Function.identity());
        }
    }
}
-
执行链路
ProtocolFilterWrapper new Invoker—> filter.invoke(next, invocation); 这里是把参数invocation放进去,主要是为了执行整个filter链条。完事之后触发Filter.Listener的onMessage或者onError事件。 -
EchoFilter.invoke
作用:测试服务是否可用的,比如任何一个服务都可以转换为EchoService,然后$echo测试方法是否可用。这里会判断方法名是$echo的话直接创建一个结果返回了。 -
ClassLoaderFilter.invoke
作用:负责处理 Java 类加载器的上下文 -
GenericFilter.invoke
作用:处理泛化调用,泛化的意思指服务端跟消费端可以不依赖中间的接口包,通过固定参数的形式,结合序列化和反序列化实现的调用过程,可以避免引入接口包过多过大的情况。
启用泛化:
- generic =true:对参数使用PojoUtils进行序列化
- generic = bean: 对参数使用JavaBean 方式进行序列化
- generic = nativejava:对参数使用nativejava方式进行序列化
主要实现分为:
① 泛化调用。即:客户端按照$invoke 或 $invokeAsync 方式请求,服务端与正常提供服务一样,无需改动。原理通过GenericImplFilter实现,判断比如客户端请求sayHello方法,但服务端是泛化$invoke,此时需要把参数等序列化为统一Map<Object, Object>进行请求。
② 泛化实现。即:客户端与正常调用服务一样,无需改动,服务端为实现了GenericServer接口及$invoke 或$invokeAsync那样,完成的调用。原理是通过GenericFilter实现,判断比如客户端请求$invoke方法,但是服务端实现为sayHello,需要将参数解析后添加到Map<Object, Object>,再执行目标方法。同时,在结果返回后对其进行反序列化传递给消费者。
参考链接:Dubbo泛化
-
ContextFilter.invoke
作用:负责管理和设置 RPC 上下文信息 -
TraceFilter.invoke
作用:负责追踪服务调用的过程。通过追踪,我们可以了解到服务调用的路径、耗时、结果等信息,从而对系统的性能和问题进行分析。比如开始处理一个请求时,它会创建一个新的追踪记录,并将其添加到追踪上下文中。在调用过程中一直往下传递。当请求处理完成后,TraceFilter 会更新追踪记录的状态和耗时,然后将其从追踪上下文中移除。 -
TimeoutFilter.invoke
作用:超时记录而已,只是记录,不拦截。invoke只是记录下调用时间。因为TimeoutFilter implements Filter, Filter.Listener,所以等到onMessage事件被触发,看是否超时了,超时了就打印一个日志而已。
@Override
public Result invoke(Invoker<?> invoker, Invocation invocation) throws RpcException {
   invocation.put(TIMEOUT_FILTER_START_TIME, System.currentTimeMillis());
   return invoker.invoke(invocation);
}

@Override
public void onMessage(Result appResponse, Invoker<?> invoker, Invocation invocation) {
    Object startTime = invocation.get(TIMEOUT_FILTER_START_TIME);
    if (startTime != null) {
        long elapsed = System.currentTimeMillis() - (Long) startTime;
        // 从调试里面看这里的获取timeout都是int max。
        if (invoker.getUrl() != null && elapsed > invoker.getUrl().getMethodParameter(invocation.getMethodName(), "timeout", Integer.MAX_VALUE)) {
            if (logger.isWarnEnabled()) {
                logger.warn("invoke time out. method: " + invocation.getMethodName() + " arguments: " + Arrays.toString(invocation.getArguments()) + " , url is " + invoker.getUrl() + ", invoke elapsed " + elapsed + " ms.");
            }
        }
    }
}
-
MonitorFilter.invoke
作用:负责收集和记录服务调用的监控数据。通过监控,我们可以了解到系统的运行状态,例如服务调用的次数、耗时、成功率等等。这些数据对于我们分析系统性能、定位问题、进行容量规划等都非常有用。 -
ExceptionFilter.invoke
作用:负责处理服务调用过程中出现的异常。当 ExceptionFilter 开始处理一个请求时,它会尝试调用下一个 Filter 或者服务提供者,处理这个请求。如果在处理请求的过程中出现了异常,ExceptionFilter 会捕获这个异常。捕获到异常后,ExceptionFilter 会根据异常的类型和信息,进行相应的处理。例如,对于网络异常,ExceptionFilter 可能会尝试重新发送请求;对于服务错误,ExceptionFilter 可能会记录错误信息,并返回一个错误响应。 -
DelegateProviderMetaDataInvoker.invoke
作用:负责管理和提供元数据信息。 -
JavassistProxyFactory.invoke
作用:这里就是最终通过代理对象,调用了业务方法。
注意:在其父类AbstractProxyFactory的invoke会对同步和异步调用的结果做统一的CompletableFuture封装。
public abstract class AbstractProxyInvoker<T> implements Invoker<T> {

	 private CompletableFuture<Object> wrapWithFuture (Object value, Invocation invocation) {
	 // 因为要同时返回同步或异步的请求结果。异步的返回值是CompletableFuture<?>,同时JavassistProxyFactory的getInvoker.doInvoer返回的是Object,如果是异步调用正好是CompletableFuture直接返回,如果是同步,就创建一个CompletableFuture,并且把Object结果放进去进行返回。
        if (RpcContext.getContext().isAsyncStarted()) {
            return ((AsyncContextImpl)(RpcContext.getContext().getAsyncContext())).getInternalFuture();
        } else if (value instanceof CompletableFuture) {
        	// 这里是异步的
            return (CompletableFuture<Object>) value;
        }
        // 这里对同步结果进行封装
        return CompletableFuture.completedFuture(value);
    }
}
- 最后将结果通过netty及ChannelHandler一层层返回,至此,请求调用全流程结束。
6、常见疑问
6.1、请求接口后,结果什么时候由什么组件返回的?
各事件在DefaultFuture内部处理。
同步请求:
因为默认发送netty走的是异步,所以要卡住,不然代码就到后面了,但此时并没有获取到结果。所以在AsyncToSyncInvoker.invoke中通过asyncResult.get(Integer.MAX_VALUE, TimeUnit.MILLISECONDS);阻塞。
异步请求:
没有上面get一步,直接逻辑结束了,走业务的下一行代码。等待Netty的HeaderExchangeHandler回调DefaultFuture.doReceived进行事件通知。
超时情况:
这是单独的异步执行,不管同步还是异步都会走。
DefaultFuture.newFuture在创建时,会在timeoutCheck获取超时的时间,并且创建出Timer。
@Override
public void run(Timeout timeout) {
    DefaultFuture future = DefaultFuture.getFuture(requestID);
    // 时间到了,判断任务正常完成,就跳过
    if (future == null || future.isDone()) {
        return;
    }
    // 异常走下面的逻辑
    if (future.getExecutor() != null) {
        future.getExecutor().execute(() -> notifyTimeout(future));
    } else {
        notifyTimeout(future);
    }
}

private void notifyTimeout(DefaultFuture future) {
    // 获取请求ID,得到响应对象
    Response timeoutResponse = new Response(future.getId());
    //  设置状态
    timeoutResponse.setStatus(future.isSent() ? Response.SERVER_TIMEOUT : Response.CLIENT_TIMEOUT);
    // 设置报错信息
    timeoutResponse.setErrorMessage(future.getTimeoutMessage(true));
    // handle response.  在这里触发CompletableFuture的结果通知。所以请求的逻辑事件就被执行了。
    //
    DefaultFuture.received(future.getChannel(), timeoutResponse, true);
}


private void doReceived(Response res) {
    if (res == null) {
        throw new IllegalStateException("response cannot be null");
    }
    // 注意:同步虽然被get(MAX)卡住了,但还是会走这里的这是netty channelhandler的逻辑,因此同步也是走着判断结果。
    // 正常走这里,触发正常完成事件,调用结束。
    if (res.getStatus() == Response.OK) {
        this.complete(res.getResult());
    } else if (res.getStatus() == Response.CLIENT_TIMEOUT || res.getStatus() == Response.SERVER_TIMEOUT) {
    // 如果超时了。不管是那边的超时,也算完成,只不过是异常完成,调用结束。
        this.completeExceptionally(new TimeoutException(res.getStatus() == Response.SERVER_TIMEOUT, channel, res.getErrorMessage()));
    } else {
    // 其它异常,同上。
        this.completeExceptionally(new RemotingException(channel, res.getErrorMessage()));
    }

    // the result is returning, but the caller thread may still waiting
    // to avoid endless waiting for whatever reason, notify caller thread to return.
    if (executor != null && executor instanceof ThreadlessExecutor) {
        ThreadlessExecutor threadlessExecutor = (ThreadlessExecutor) executor;
        if (threadlessExecutor.isWaiting()) {
            threadlessExecutor.notifyReturn(new IllegalStateException("The result has returned, but the biz thread is still waiting" +
                    " which is not an expected state, interrupt the thread manually by returning an exception."));
        }
    }
}
6.2、元数据
元数据是什么?元数据定义为描述数据的数据,在服务治理中,例如服务接口名,重试次数,版本号等等都可以理解为元数据。在 2.7 之前,元数据一股脑丢在了注册中心之中,这造成了一系列的问题。
比如存在很多没必要的参数,在每次更新时,消耗比较大,且有大部分是无意义的。
简单来说:推送量大 -> 存储数据量大 -> 网络传输量大 -> 延迟严重。
从2.7之后,2.7.5之前,在提供者跟消费者进行服务导出跟消费注册时,对拼凑好的URL信息(元数据)进行了简化处理,只保留一些用得上的参数到元数据中心,同时根据SPI机制,默认是redis实现,其它还有zookeeper。
从调试2.7.5版本发现,确实还是有简化URL参数操作,也有根据配置去创建配置中心实例,但是注册的代码变了。
public class ServiceConfig<T> extends ServiceConfigBase<T> {
	......
	private void doExportUrlsFor1Protocol(ProtocolConfig protocolConfig, List<URL> registryURLs) {
		......
		WritableMetadataService metadataService = 							  WritableMetadataService.getExtension(url.getParameter(METADATA_KEY, DEFAULT_METADATA_STORAGE_TYPE));
		// 2.7.5默认获取到的是InMemoryWritableMetadataService
        if (metadataService != null) {
         	// 注册url,其实是 往serviceDefinitions = new ConcurrentSkipListMap<>();进行注册,是个安全并选跳表
         	// 然后就结束了。这是默认配置了配置+注册+元数据中心都为zk:127.0.0.1:2181的情况。
            metadataService.publishServiceDefinition(url);
        }
	}
}
参考链接:https://blog.youkuaiyun.com/qq_36882793/article/details/119953526
6.3、RpcContext 原理
RpcContext内部有一个临时状态存储器,基于ThreadLocal的实现。可以从中获取请求,响应,URL等信息,当然也可以自己存储获取。关于上下文的维护跟管理,主要是居于两个拦截器实现,分布是:ContextFilter、ConsumerContextFilter。前者处理提供者,后置处理消费者。因为Dubbo可以涉及多层级调用,比如服务A->服务B->服务C,在没有拦截器的干预下,会将A->B的RpcContext向下传递,比如A->B有异步async=true配置,就算服务C配置了async=false,也会被覆盖,最后也变成异步调用。所以这两个拦截器的目的就是为了解决这一系列问题,同时也会在调用结束后自动对getContext进行清理,避免内存泄漏。
临时存储器:
// FIXME REQUEST_CONTEXT
// 说白了是消费者端请求时,设置的。 服务端获取出来做处理。
private static final InternalThreadLocal<RpcContext> LOCAL = new InternalThreadLocal<RpcContext>() {
    @Override
    protected RpcContext initialValue() {
        return new RpcContext();
    }
};

// FIXME RESPONSE_CONTEXT
// 服务端处理的时候,设置的,消费端响应完后取出来。
private static final InternalThreadLocal<RpcContext> SERVER_LOCAL = new InternalThreadLocal<RpcContext>() {
     @Override
     protected RpcContext initialValue() {
         return new RpcContext();
     }
 };
RpcContext.getContext() 与 getServerContext()的区别:
getContext:主要用于消费端,发起请求后,设置的值就被清空了。服务端可以获取消费者设置的值进行处理。
getServerContext:主要用户服务端设置,这样请求结束的时候,消费者依然可以获取服务端设置进去的值,方便做处理。
注意:两者混用设置,会导致获取无效。
服务端清理策略:
在ContextFilter中,调用完finally进行处理。
@Override
public Result invoke(Invoker<?> invoker, Invocation invocation) throws RpcException {
    Map<String, String> attachments = invocation.getAttachments();
    // 删除这些特殊参数,避免覆盖往下传递
    if (attachments != null) {
        attachments = new HashMap<>(attachments);
        attachments.remove(PATH_KEY);
        attachments.remove(INTERFACE_KEY);
        attachments.remove(GROUP_KEY);
        attachments.remove(VERSION_KEY);
        attachments.remove(DUBBO_VERSION_KEY);
        attachments.remove(TOKEN_KEY);
        attachments.remove(TIMEOUT_KEY);
        // Remove async property to avoid being passed to the following invoke chain.
        attachments.remove(ASYNC_KEY);
        attachments.remove(TAG_KEY);
        attachments.remove(FORCE_USE_TAG);
    }
   ......
    try {
        RpcContext.getContext().clearAfterEachInvoke(false);
        // 调用方法
        return invoker.invoke(invocation);
    } finally {
        RpcContext.getContext().clearAfterEachInvoke(true);
        // IMPORTANT! For async scenario, we must remove context from current thread, so we always create a new RpcContext for the next invoke for the same thread. 翻译为:重要!对于异步场景,我们必须从当前线程中删除上下文,因此我们总是为同一线程的下一次调用创建一个新的RpcContext。
        // 调用完了,进行清理,避免内存泄漏。
        // 同时假设一个线程调用多次,每次都是一次新的Context跟ServerContext。
        RpcContext.removeContext();
        RpcContext.removeServerContext();
    }
}
客户端清理策略:
ConsumerContextClusterInterceptor实现了ClusterInterceptor接口,在请求执行后清理。
但是要注意的是RpcContext.removeServerContext();是在before的时候调用的,如果服务端进行了设置,但是after没有清理,这样消费者才能拿到服务端设置的参数。并且通过调试发现,下次进入时,会在调用removeServerContext()方法时把上次请求的线程内容删除掉,解决了没有清理ServerContext内存泄漏的问题。
public class ConsumerContextClusterInterceptor implements ClusterInterceptor, ClusterInterceptor.Listener {

    @Override
    public void before(AbstractClusterInvoker<?> invoker, Invocation invocation) {
        RpcContext.getContext()
                .setInvocation(invocation)
                .setLocalAddress(NetUtils.getHostAddress(), 0);
        if (invocation instanceof RpcInvocation) {
            ((RpcInvocation) invocation).setInvoker(invoker);
        }
        RpcContext.removeServerContext();
    }

    @Override
    public void after(AbstractClusterInvoker<?> clusterInvoker, Invocation invocation) {
        RpcContext.removeContext();
    }

    @Override
    public void onMessage(Result appResponse, AbstractClusterInvoker<?> invoker, Invocation invocation) {
        RpcContext.getServerContext().setAttachments(appResponse.getAttachments());
    }

    @Override
    public void onError(Throwable t, AbstractClusterInvoker<?> invoker, Invocation invocation) {

    }
}
RpcContext中InternalThraedLocal跟ThreadLocal的区别:
总结:性能差异。
首先关于ThreadLocal,是JDK自带的线程状态临时记录器,内部的GC依赖引用关系自动回收。这里不过多阐述,主要分析前者。InternalThraedLocal内部使用了InternalThread,因为ThreadLocal依赖的threadLocals在Thread类中,所以需要InternalThread继承Thread,才能获取threadLocals的控制。其次内部根据线程的类型不同,判断走快手获取,还是慢速获取。
主要目的还是为了避开ThreadLocal的hash冲突以及查询时可能出现的性能问题。
参考链接:https://blog.youkuaiyun.com/shumeizwb/article/details/140241785
例如Dubbo自带的业务线程池中,所有的都是用的NamedInternalThreadFactory进行线程工厂创建,主要是将Thread包装在了InternalThread里面。
public class NamedInternalThreadFactory extends NamedThreadFactory {

    public NamedInternalThreadFactory() {
        super();
    }

    public NamedInternalThreadFactory(String prefix) {
        super(prefix, false);
    }

    public NamedInternalThreadFactory(String prefix, boolean daemon) {
        super(prefix, daemon);
    }

    @Override
    public Thread newThread(Runnable runnable) {
        String name = mPrefix + mThreadNum.getAndIncrement();
        // 后面通过这个对象,来结合InternalThreadLocal进行临时状态管理+提速。
        InternalThread ret = new InternalThread(mGroup, runnable, name, 0);
        ret.setDaemon(mDaemon);
        return ret;
    }
}
public final class InternalThreadLocalMap {
	public static InternalThreadLocalMap get() {
		// 获取当前线程
        Thread thread = Thread.currentThread();
        // 如果是Dubbo自带的业务线程池,这里走快速获取,其实说白了就是没有走ThreadLocal那一套
        // 通过内部初始化的Object[] array = new Object[32]; 以及通过index进行自增(覆盖同下标的值)来达到读写的目的。
        // 这里暂不涉及GC,因为操作来操作去还是那几个对象,不会太大。
        if (thread instanceof InternalThread) {
            return fastGet((InternalThread) thread);
        }
        return slowGet();
    }

	public boolean setIndexedVariable(int index, Object value) {
        Object[] lookup = indexedVariables;
        // 判断是否够写
        if (index < lookup.length) {
            Object oldValue = lookup[index];
            // 赋值一次写入(也有可能是覆盖原有值)
            lookup[index] = value;
            return oldValue == UNSET;
        } else {
            expandIndexedVariableTableAndSet(index, value);
            return true;
        }
    }
}
参考链接:https://developer.aliyun.com/article/1058292
6.4、线程模型
根据请求的消息是被I/O线程处理还是被业务线程池处理,Dubbo提供了以下几种线程模型(或称线程调度模型)。其中 all 模型是默认的线程模型。
设计精髓:如all,将当前Channel、事件类型、接收到的数据封装为ChannelEventRunnable提交给ThreadPool线程异步进行处理,随后io线程继续处理其他io事件。
- all 所有消息都派发到线程池,包括请求,响应,连接事件,断开事件,心跳等。(等于netty线程只做读取跟写入,其它都交由业务线程)
- direct 所有消息都不派发到线程池,全部在IO 线程上直接执行。(会比较影响收发效率)
- message 只有请求响应消息派发到线程池,其它连接断开事件,心跳等消息直接在IO线程上执行。
- execution 只有请求消息派发到连接池,不含响应,响应和其它连接断开事件,心跳等消息,直接在IO线程上执行。
- connection 在IO线程上,将连接断开事件放入队列,有序逐个执行,其它消息派发到线程池。
6.5、线程池种类
- fixed 固定大小线程池,启动时建立线程,不关闭,一直持有。(默认)需要注意的是corePoolSize=maximumPoolSize,核心等于最大线程数。
- cache 缓存线程池,空闲一分钟自动删除,需要时重建。
- limited 可伸缩线程池,但池中的线程数只会增长不会收缩。只增长不收缩的目的是为了避免收缩时突然来了大流量引起的性能问题。
- eager 优先创建Worker线程池。在任务数量大于corePoolSize但是小于maximumPoolSize时,优先创建Worker来处理任务。当任务数量大于maximumPoolSize时,将任务放入阻塞队列中。阻塞队列充满时抛出RejectedExecutionException。(相比于cache:cached在任务数量超过maximumPoolSize时直接抛出异常而不是将任务放入阻塞队列)。
- 注:dubbo在3.x版本,当queues<0时引入了MemorySafeLinkedBlockingQueue队列,目的为了提升内存利用率,把队列长度维持在jvm剩余内存可以分配得最大程度。
public class FixedThreadPool implements ThreadPool {

    @Override
    public Executor getExecutor(URL url) {
        String name =
                url.getParameter(THREAD_NAME_KEY, (String) url.getAttribute(THREAD_NAME_KEY, DEFAULT_THREAD_NAME));
        int threads = url.getParameter(THREADS_KEY, DEFAULT_THREADS);
        int queues = url.getParameter(QUEUES_KEY, DEFAULT_QUEUES);

        BlockingQueue<Runnable> blockingQueue;

        if (queues == 0) {
            blockingQueue = new SynchronousQueue<>();
        } else if (queues < 0) {
       		// 引入根据jvm剩余内存容量来自动创建最大可用队列的长度,压榨内存,提升内存利用率。
            blockingQueue = new MemorySafeLinkedBlockingQueue<>();
        } else {
            blockingQueue = new LinkedBlockingQueue<>(queues);
        }
        ......
    }
}
over。


 1666
1666

 被折叠的 条评论
为什么被折叠?
被折叠的 条评论
为什么被折叠?
 到【灌水乐园】发言


