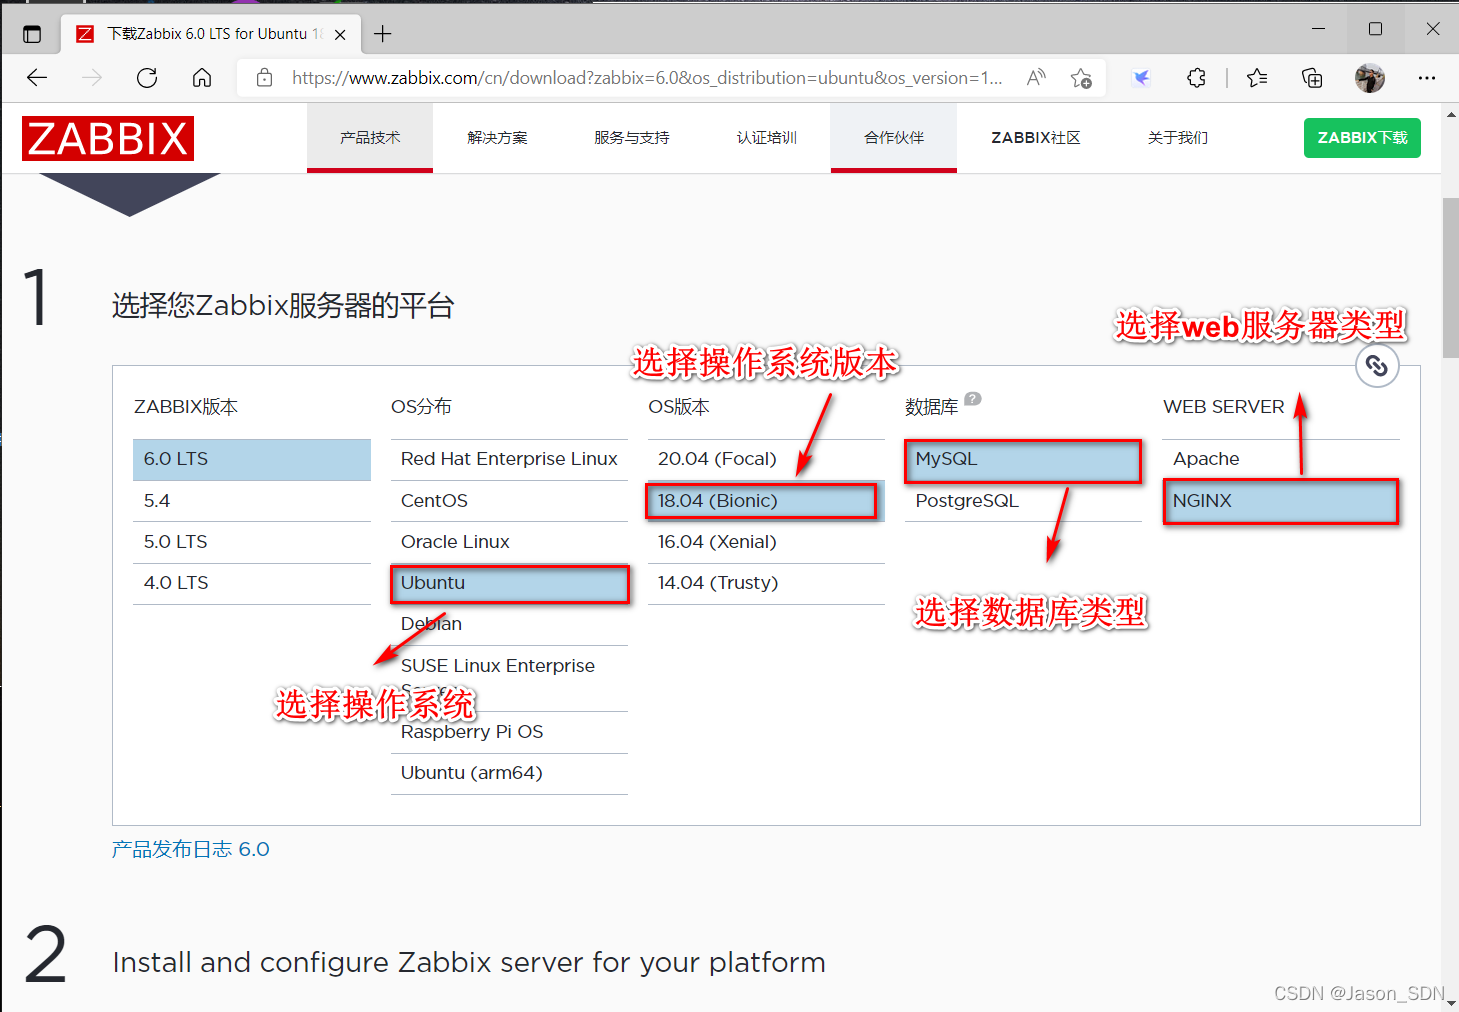
zabbix6.0安装基于Ubuntu20.04版本

Ubuntu上安装与配置Zabbix监控系统
本文档详细介绍了在Ubuntu系统中安装和配置Zabbix监控服务器的过程,包括安装MariasDB数据库,设置数据库安全,安装Zabbix软件,创建Zabbix数据库,导入数据,配置Zabbix Server和Agent,以及调整PHP和Nginx服务。同时,针对可能出现的数据库版本不匹配问题给出了解决方案。

官方网址

https://www.zabbix.com/cn/download

1.选择相关配置(这里我选择Ubuntu安装)

 2.zabbix部署根据官方文档

配置数据库(我安装的数据库为mariadb)

#安装数据库
[root@zabbix ~]#apt -y install mariadb-server
#配置数据库
[root@zabbix ~]#vim /etc/mysql/mariadb.conf.d/50-server.cnf
#skip-external-locking

# Instead of skip-networking the default is now to listen only on
# localhost which is more compatible and is not less secure.
bind-address            = 0.0.0.0
#重启数据库
[root@zabbix ~]#systemctl restart mariadb.service
#基本安全配置

[root@zabbix ~]#mysql_secure_installation

NOTE: RUNNING ALL PARTS OF THIS SCRIPT IS RECOMMENDED FOR ALL MariaDB
      SERVERS IN PRODUCTION USE!  PLEASE READ EACH STEP CAREFULLY!

In order to log into MariaDB to secure it, we'll need the current
password for the root user.  If you've just installed MariaDB, and
you haven't set the root password yet, the password will be blank,
so you should just press enter here.

Enter current password for root (enter for none):
OK, successfully used password, moving on...

Setting the root password ensures that nobody can log into the MariaDB
root user without the proper authorisation.

Set root password? [Y/n] y
New password:
Re-enter new password:
Password updated successfully!
Reloading privilege tables..
 ... Success!


By default, a MariaDB installation has an anonymous user, allowing anyone
to log into MariaDB 
### 安装 Zabbix 6.0 的详细步骤(基于 Ubuntu 20.04) #### 1. 配置 Zabbix 软件源 首先,确保系统已更新到最新状态,并安装必要的依赖项。根据选择的 Zabbix 版本Ubuntu 系统版本,配置 Zabbix 的官方软件源。 ```bash # 更新系统包列表 sudo apt update # 下载并安装 Zabbix 官方软件源配置包 wget https://repo.zabbix.com/zabbix/6.0/ubuntu/pool/main/z/zabbix-release/zabbix-release_6.0-4+ubuntu20.04_all.deb sudo dpkg -i zabbix-release_6.0-4+ubuntu20.04_all.deb # 再次更新包列表 sudo apt update ``` #### 2. 安装 Zabbix Server、Frontend 和 Agent Zabbix Server 是核心组件,负责数据收集和告警处理;Zabbix Frontend 提供 Web 界面;Zabbix Agent 用于监控主机上的数据采集。 ```bash # 安装 Zabbix Server、Frontend 和 Agent sudo apt install -y zabbix-server-mysql zabbix-frontend-php zabbix-apache-conf zabbix-agent ``` #### 3. 配置 MySQL 数据库 Zabbix 需要一个数据库来存储配置和监控数据。推荐使用 MySQL 或 MariaDB。 ```bash # 安装 MySQL 服务器 sudo apt install -y mysql-server # 启动 MySQL 服务并设置开机自启 sudo systemctl start mysql sudo systemctl enable mysql # 登录 MySQL 并创建 Zabbix 数据库和用户 mysql -u root -p ``` 在 MySQL 中执行以下 SQL 命令: ```sql -- 创建 Zabbix 数据库 CREATE DATABASE zabbix CHARACTER SET utf8mb4 COLLATE utf8mb4_bin; -- 创建 Zabbix 用户并授权 CREATE USER 'zabbix'@'localhost' IDENTIFIED BY 'your_password'; GRANT ALL PRIVILEGES ON zabbix.* TO 'zabbix'@'localhost'; -- 刷新权限 FLUSH PRIVILEGES; -- 退出 MySQL exit; ``` #### 4. 导入 Zabbix 数据库结构 Zabbix 提供了预定义的 SQL 文件,用于初始化数据库结构。 ```bash # 导入 Zabbix 数据库结构 zcat /usr/share/doc/zabbix-server-mysql*/create.sql.gz | mysql -u zabbix -p zabbix ``` #### 5. 配置 Zabbix Server 编辑 Zabbix Server 的配置文件,确保数据库连接信息正确。 ```bash sudo nano /etc/zabbix/zabbix_server.conf ``` 修改以下配置项(根据实际情况调整): ```ini DBHost=localhost DBName=zabbix DBUser=zabbix DBPassword=your_password ``` #### 6. 配置 Apache Web 服务器 Zabbix Frontend 使用 Apache 作为 Web 服务器。需要调整一些 PHP 配置以满足 Zabbix 的要求。 ```bash sudo nano /etc/apache2/conf-enabled/zabbix.conf ``` 确保以下 PHP 配置符合要求(通常默认值已满足,但需要检查): ```php php_value date.timezone Asia/Shanghai ``` 重启 Apache 服务以应用更改: ```bash sudo systemctl restart apache2 ``` #### 7. 启动 Zabbix Server 和 Agent 启动 Zabbix Server 和 Agent 服务,并设置为开机自启。 ```bash # 启动 Zabbix Server 和 Agent sudo systemctl start zabbix-server zabbix-agent sudo systemctl enable zabbix-server zabbix-agent # 检查服务状态 sudo systemctl status zabbix-server sudo systemctl status zabbix-agent ``` #### 8. 配置 Zabbix Frontend 打开浏览器,访问 `http://<your_server_ip>/zabbix`,进入 Zabbix Web 安装向导。 1. **欢迎页面**:点击 "Next step"。 2. **检查预配置**:确保所有检查项都通过。 3. **数据库配置**:输入数据库连接信息(数据库类型选择 MySQL,用户名为 `zabbix`,密码为之前设置的密码)。 4. **Zabbix Server 信息**:保持默认值(Zabbix server 的主机名为 `localhost`)。 5. **安装完成**:点击 "Next step",最后点击 "Finish" 完成安装。 #### 9. 配置 Zabbix Agent(可选) 如果需要监控本地主机,可以配置 Zabbix Agent。 ```bash sudo nano /etc/zabbix/zabbix_agentd.conf ``` 修改以下配置项: ```ini Server=127.0.0.1 ServerActive=127.0.0.1 Hostname=Zabbix server ``` 重启 Zabbix Agent 服务: ```bash sudo systemctl restart zabbix-agent ``` #### 10. 验证安装 登录 Zabbix Web 界面,使用默认凭据 `Admin` / `zabbix` 登录。首次登录后建议立即更改密码。 --- ###
评论 6
添加红包

请填写红包祝福语或标题

红包个数最小为10个

红包金额最低5元

当前余额3.43前往充值 >
需支付:10.00
成就一亿技术人!
领取后你会自动成为博主和红包主的粉丝 规则
hope_wisdom
发出的红包

打赏作者

zhu1241jie

你的鼓励将是我创作的最大动力

¥1 ¥2 ¥4 ¥6 ¥10 ¥20
扫码支付:¥1
获取中
扫码支付

您的余额不足,请更换扫码支付或充值

打赏作者

实付
使用余额支付
点击重新获取
扫码支付
钱包余额 0

抵扣说明:

1.余额是钱包充值的虚拟货币,按照1:1的比例进行支付金额的抵扣。
2.余额无法直接购买下载,可以购买VIP、付费专栏及课程。

余额充值