


 本文从源码层面详细分析了Spring的注解自动装配机制,包括@Autowired、@Qualifier、@Primary的使用和原理,以及@Resource和@Inject的差异。同时介绍了方法、构造器的自动装配,Aware接口注入Spring底层组件的工作流程,@Profile环境的搭建和根据环境注册bean的逻辑。
从源码角度分析Spring注解方式的自动装配
自动装配:
Spring 利用依赖注入(DI),完成对 IOC 容器中各个组件的依赖关系赋值
1. @Autowired&@Qualifier&@Primary
1、@Autowired:自动注入
- 默认优先按照类型去容器中找相对应的组件:applicationContext.getBean(XXX.class)
- 如果找到多个相同类型的组件,再将属性的名称作为组件的 id 去容器中查找
测试:
//配置类
package com.jiker.config;

import org.springframework.context.annotation.ComponentScan;
import org.springframework.context.annotation.Configuration;

@Configuration
@ComponentScan({"com.jiker.service","com.jiker.dao"})
public class MainConfigOfAutowired {

}
//service类,自动装配dao类
package com.jiker.service;

import org.springframework.beans.factory.annotation.Autowired;
import org.springframework.stereotype.Service;

import com.jiker.dao.MyDao;

@Service
public class MyService {

	@Autowired
	private MyDao myDao;

	@Override
	public String toString() {
		return "MyService [myDao=" + myDao + "]";
	}

}
//dao类
package com.jiker.dao;

import org.springframework.stereotype.Repository;

@Repository
public class MyDao {

	@Override
	public String toString() {
		return "MyDao []" + this.hashCode();
	}

}
//测试类
package com.jiker.test;

import org.junit.Test;
import org.springframework.context.annotation.AnnotationConfigApplicationContext;

import com.jiker.config.MainConfigOfAutowired;
import com.jiker.dao.MyDao;
import com.jiker.service.MyService;

public class MainConfigOfAutowiredTest {

	@Test
	public void m01() {
		AnnotationConfigApplicationContext applicationContext =  new AnnotationConfigApplicationContext(MainConfigOfAutowired.class);

		MyService myService = applicationContext.getBean(MyService.class);
		System.out.println(myService);

		MyDao myDao = applicationContext.getBean(MyDao.class);
		System.out.println(myDao);

		applicationContext.close();
	}
}
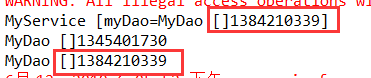
测试结果:

service以自动装配dao,且该dao对象和容器中注册的dao对象哈希值相等
若容器中有多个相同类型的组件,则自动装配时再通过属性名进行装配,如:
@Configuration
@ComponentScan({"com.jiker.service","com.jiker.dao"})
public class MainConfigOfAutowired {

	@Bean("myDao2")
	public MyDao myDao() {
		return new MyDao();
	}
}
此时,容器中则存在两个 MyDao 类型的组件,则通过需要自动装配的组件名进行装配
2、使用 @Qualifier 注解,指定需要装配的组件 id
@Service
public class MyService {

	@Qualifier("myDao2")
	@Autowired
	private MyDao myDao;
此时,自动装配的组件将变成 id 名为 “myDao2” 的组件
	@Test
	public void m01() {
		AnnotationConfigApplicationContext applicationContext =  new AnnotationConfigApplicationContext(MainConfigOfAutowired.class);

		MyService myService = applicationContext.getBean(MyService.class);
		System.out.println(myService);

		MyDao myDao = applicationContext.getBean("myDao",MyDao.class);
		MyDao myDao2 = applicationContext.getBean("myDao2",MyDao.class);

		System.out.println(myDao);
		System.out.println(myDao2);

		applicationContext.close();
	}
若容器中不存在需要自动装配的组件,即:使用 @Autowired 注解找不到组件
此时,容器会报错。则可以结合 @Autowired 注解源码中的一个属性 required ,表示非必须
源码:
@Target({ElementType.CONSTRUCTOR, ElementType.METHOD, ElementType.PARAMETER, ElementType.FIELD, ElementType.ANNOTATION_TYPE})
@Retention(RetentionPolicy.RUNTIME)
@Documented
public @interface Autowired {

	/**
	 * Declares whether the annotated dependency is required.
	 * <p>Defaults to {@code true}.
	 */
	boolean required() default true;

}
通过源码可以看出,boolean required() default true,默认值为 true,则可以修改 required 的值为 false,表示该属性不是必须
@Service
public class MyService {

	@Qualifier("myDao2")
	@Autowired(required=false)
	private MyDao myDao;
3、使用 @Primary 注解
源码
@Target({ElementType.TYPE, ElementType.METHOD})
@Retention(RetentionPolicy.RUNTIME)
@Inherited
@Documented
public @interface Primary {

}
Target 可以为 类型 和 方法,即通过该注解标注的 Bean,可以指定 Spring 进行装配时的默认 Bean
@Configuration
@ComponentScan({"com.jiker.service","com.jiker.dao"})
public class MainConfigOfAutowired {

	@Primary
	@Bean("myDao2")
	public MyDao myDao() {
		return new MyDao();
	}
}
注:@Qualifier注解优先级比@Primary优先级高
2. @Resource&@Inject
Spring 中还支持使用 @Resource(JSR250)和 @Inject(JSR330 [JAVA 规范的注解]
1、使用 @Resource
可以和 @Autowired 一样实现自动装配功能,默认是按照组件名进行装配
不支持 @Primary 等 Spring 注解的功能
@Service
public class MyService {

	/*@Qualifier("myDao2")
	@Autowired(required=false)*/
	@Resource
	private MyDao myDao;
可以使用 @Resource 中的 name 属性指定需要装配的组件名称
	@Resource(name="myDao2")
	private MyDao myDao;
2、使用 @Inject
支持 @Primary 等注解的特性,需要导入 javax.inject 的包
导入依赖
<dependency>
 <groupId>javax.inject</groupId>
 <artifactId>javax.inject</artifactId>
 <version>1</version>
</dependency>
使用
@Service
public class MyService {

	@Inject
	private MyDao myDao;
3. 方法、构造器位置的自动装配
@Autowired 注解源码
@Target({ElementType.CONSTRUCTOR, ElementType.METHOD, ElementType.PARAMETER, ElementType.FIELD, ElementType.ANNOTATION_TYPE})
@Retention(RetentionPolicy.RUNTIME)
@Documented
public @interface Autowired {

	/**
	 * Declares whether the annotated dependency is required.
	 * <p>Defaults to {@code true}.
	 */
	boolean required() default true;

}
@Autowired能够标注的位置:构造器、方法、参数、属性、类型
ElementType.CONSTRUCTOR
ElementType.METHOD
ElementType.PARAMETER
ElementType.FIELD
ElementType.ANNOTATION_TYPE
1、标注方法
	@Autowired
	public void setMyDao(MyDao myDao) {
		this.myDao = myDao;
	}
Spring 容器创建当前对象时,就会调用方法完成赋值
方法中使用的参数:自定义类型的值将从 IOC 容器中获取
2、标注构造器
	@Autowired
	public MyService(MyDao myDao) {
		super();
		this.myDao = myDao;
	}
注:若当前类只有一个有参构造器时,则 @Autowired 注解可以省略
3、标注参数
public MyService(@Autowired MyDao myDao) {
		super();
		this.myDao = myDao;
	}
4、使用 @Bean 注解创建组件
@Configuration
@ComponentScan({"com.jiker.service","com.jiker.dao"})
public class MainConfigOfAutowired {

	@Bean
	public MyService myService(MyDao myDao) {
		MyService myService = new MyService();
		myService.setMyDao(myDao);
		return myService;
	}
}
@Bean 注解标记的方法创建对象时,方法的参数值从 IOC 容器中获取
4. Aware注入Spring底层组件&原理
若自定义的组件中想要使用 Spring 容器底层的一些组件,如:ApplicationContext 、BeanFactory 等,
则自定义组件需要实现 xxxAware 接口,在创建对象时,会调用接口规定的方法注入相关组件
Aware:把 Spring 底层一些组件注入到自定义 Bean 中
自定义 Bean:实现 ApplicationContextAware 和 BeanNameAware
package com.jiker.bean;

import org.springframework.beans.BeansException;
import org.springframework.beans.factory.BeanNameAware;
import org.springframework.context.ApplicationContext;
import org.springframework.context.ApplicationContextAware;
import org.springframework.stereotype.Component;

@Component
public class AwareBean implements ApplicationContextAware,BeanNameAware {

	private ApplicationContext applicationContext;

	public void setApplicationContext(ApplicationContext applicationContext) throws BeansException {
		// TODO Auto-generated method stub
		System.out.println("传入的IOC容器:" + applicationContext);
		this.applicationContext = applicationContext;
	}

	public void setBeanName(String name) {
		// TODO Auto-generated method stub
		System.out.println("当前Bean的名字:" + name);
	}

}
测试:
	@Test
	public void m01() {
		AnnotationConfigApplicationContext applicationContext =  new AnnotationConfigApplicationContext(MainConfigOfAutowired.class);

		AwareBean awareBean = applicationContext.getBean(AwareBean.class);

		System.out.println(awareBean);

		applicationContext.close();
	}

实现原理:后置处理器 XXXAwareProcessor 类中调用 postProcessBeforeInitialization 方法
	@Override
	public Object postProcessBeforeInitialization(final Object bean, String beanName) throws BeansException {
		AccessControlContext acc = null;

		if (System.getSecurityManager() != null &&
				(bean instanceof EnvironmentAware || bean instanceof EmbeddedValueResolverAware ||
						bean instanceof ResourceLoaderAware || bean instanceof ApplicationEventPublisherAware ||
						bean instanceof MessageSourceAware || bean instanceof ApplicationContextAware)) {
			acc = this.applicationContext.getBeanFactory().getAccessControlContext();
		}
查看传入的 Bean 中包含哪些 Aware,接着调用 invokeAwareInterfaces(bean) 方法
	private void invokeAwareInterfaces(Object bean) {
		if (bean instanceof Aware) {
			if (bean instanceof EnvironmentAware) {
				((EnvironmentAware) bean).setEnvironment(this.applicationContext.getEnvironment());
			}
			if (bean instanceof EmbeddedValueResolverAware) {
				((EmbeddedValueResolverAware) bean).setEmbeddedValueResolver(this.embeddedValueResolver);
			}
			if (bean instanceof ResourceLoaderAware) {
				((ResourceLoaderAware) bean).setResourceLoader(this.applicationContext);
			}
			if (bean instanceof ApplicationEventPublisherAware) {
				((ApplicationEventPublisherAware) bean).setApplicationEventPublisher(this.applicationContext);
			}
			if (bean instanceof MessageSourceAware) {
				((MessageSourceAware) bean).setMessageSource(this.applicationContext);
			}
			if (bean instanceof ApplicationContextAware) {
				((ApplicationContextAware) bean).setApplicationContext(this.applicationContext);
			}
		}
	}
通过不同的判断条件判断传入的 bean 含有哪些 xxxxAware 接口,给传入的 bean 加上不同的 Spring 底层组件
5. @Profile环境搭建
Profile :Spring 为我们提供可以根据当前环境,动态激活和切换一系列组件的功能;
如不同的环境(开发环境、测试环境、生产环境)注册不同的组件,连接不同的数据源
在 pom.xml 文件中引入数据源(C3P0)
	<dependency>
    	<groupId>c3p0</groupId>
    	<artifactId>c3p0</artifactId>
    	<version>0.9.1.2</version>
    </dependency>
引入数据源驱动
	<dependency>
    	<groupId>mysql</groupId>
    	<artifactId>mysql-connector-java</artifactId>
    	<version>5.1.44</version>
    </dependency>
新建配置文件
db.user=root
db.password=xxxxxxx
db.driverClass=com.mysql.jdbc.Driver
新建配置类 MainConfigOfProfile,注册多个数据源
package com.jiker.config;

import javax.sql.DataSource;

import org.springframework.beans.factory.annotation.Value;
import org.springframework.context.EmbeddedValueResolverAware;
import org.springframework.context.annotation.Bean;
import org.springframework.context.annotation.Configuration;
import org.springframework.context.annotation.PropertySource;
import org.springframework.util.StringValueResolver;

import com.mchange.v2.c3p0.ComboPooledDataSource;

@PropertySource("classpath:/dbconfig.properties")
@Configuration
public class MainConfigOfProfile implements EmbeddedValueResolverAware {

	@Value("${db.user}")
	private String user;

	private StringValueResolver valueResolver;

	private String driverClass;

	@Bean("testDataSource")
	public DataSource dataSourceTest(@Value("${db.password}")String pwd) throws Exception {
		ComboPooledDataSource dataSource = new ComboPooledDataSource();
		dataSource.setUser(user);
		dataSource.setPassword(pwd);
		dataSource.setJdbcUrl("jdbc:mysql://localhost:3306/test");
		dataSource.setDriverClass(driverClass);
		return dataSource;
	}

	@Bean("devDataSource")
	public DataSource dataSourceDev(@Value("${db.password}")String pwd) throws Exception {
		ComboPooledDataSource dataSource = new ComboPooledDataSource();
		dataSource.setUser(user);
		dataSource.setPassword(pwd);
		dataSource.setJdbcUrl("jdbc:mysql://localhost:3306/world");
		dataSource.setDriverClass(driverClass);
		return dataSource;
	}

	@Bean("prodDataSource")
	public DataSource dataSourceProd(@Value("${db.password}")String pwd) throws Exception {
		ComboPooledDataSource dataSource = new ComboPooledDataSource();
		dataSource.setUser(user);
		dataSource.setPassword(pwd);
		dataSource.setJdbcUrl("jdbc:mysql://localhost:3306/music");
		dataSource.setDriverClass(driverClass);
		return dataSource;
	}

	public void setEmbeddedValueResolver(StringValueResolver resolver) {
		// TODO Auto-generated method stub
		this.valueResolver = resolver;
		driverClass = valueResolver.resolveStringValue("${db.driverClass}");
	}

}
测试 Bean 是否装配
package com.jiker.test;

import javax.sql.DataSource;

import org.junit.Test;
import org.springframework.context.annotation.AnnotationConfigApplicationContext;

import com.jiker.config.MainConfigOfProfile;

public class MainConfigOfProfileTest {

	@Test
	public void m0() {
		AnnotationConfigApplicationContext applicationContext =
				new AnnotationConfigApplicationContext(MainConfigOfProfile.class);

		String[] namesForType = applicationContext.getBeanNamesForType(DataSource.class);
		for(String name : namesForType) {
			System.out.println(name);
		}
		applicationContext.close();
	}
}

6. @Profile根据环境注册bean
@Profile 注解源码
@Target({ElementType.TYPE, ElementType.METHOD})
@Retention(RetentionPolicy.RUNTIME)
@Documented
@Conditional(ProfileCondition.class)
public @interface Profile {

	/**
	 * The set of profiles for which the annotated component should be registered.
	 */
	String[] value();

}
Target:可以作用于 类型上 和 方法上
Value属性指定环境标识,只有当当前环境被激活时,才注册被@Profile标注的bean
给三个数据源定义环境标识
	@Profile("test")
	@Bean("testDataSource")
	public DataSource dataSourceTest(@Value("${db.password}")String pwd) throws Exception {
	... ...

	@Profile("dev")
	@Bean("devDataSource")
	public DataSource dataSourceDev(@Value("${db.password}")String pwd) throws Exception {
	... ...

	@Profile("prod")
	@Bean("prodDataSource")
	public DataSource dataSourceProd(@Value("${db.password}")String pwd) throws Exception {
	... ...
此时若再次启动容器,该三个组件都不会被注册,
加了环境标识的 bean ,只有这个环境被激活的时候才能注册到容器中
可以指定 @Profile 中的值为 “default”,即默认环境,此时bean可被注册
切换环境:
1、使用命令行动态参数方式激活环境
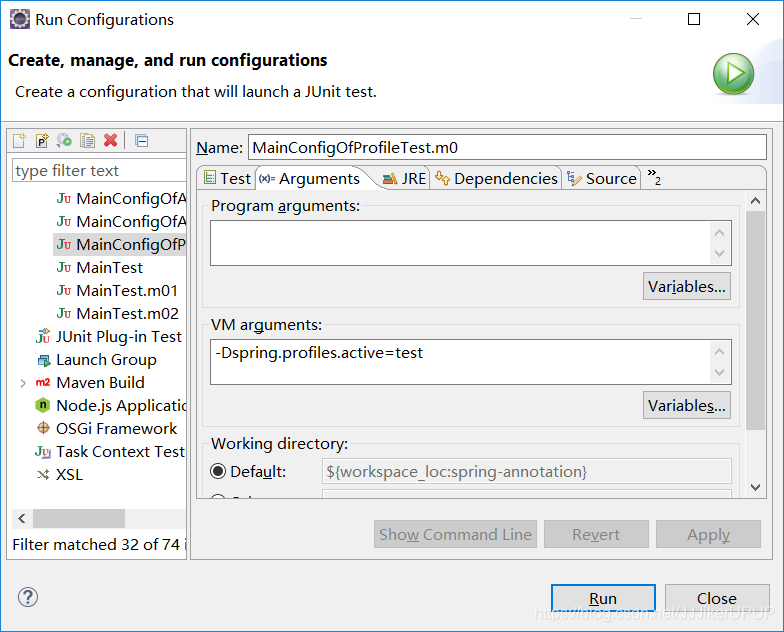
此时 test 环境被激活

test数据源被注册
2、使用代码方式激活环境
AnnotationConfigApplicationContext()无参构造器创建容器
package com.jiker.test;

import javax.sql.DataSource;

import org.junit.Test;
import org.springframework.context.annotation.AnnotationConfigApplicationContext;

import com.jiker.config.MainConfigOfProfile;

public class MainConfigOfProfileTest {

	@Test
	public void m0() {
		//1.创建一个applicationContext
		AnnotationConfigApplicationContext applicationContext =
				new AnnotationConfigApplicationContext();

		//2.设置要激活的环境
		applicationContext.getEnvironment().setActiveProfiles("test","dev");

		//3.注册主配置类
		applicationContext.register(MainConfigOfProfile.class);

		//4.刷新启动容器
		applicationContext.refresh();

		String[] namesForType = applicationContext.getBeanNamesForType(DataSource.class);
		for(String name : namesForType) {
			System.out.println(name);
		}
		applicationContext.close();
	}
}

@Profile注解写在配置类上:
@Profile("prod")
@PropertySource("classpath:/dbconfig.properties")
@Configuration
public class MainConfigOfProfile implements EmbeddedValueResolverAware {
此时,只有是指定激活环境时,整个配置类里的所有配置才能生效
时间:2019.6.12 19:38


 1574
1574

 被折叠的 条评论
为什么被折叠?
被折叠的 条评论
为什么被折叠?
 到【灌水乐园】发言


