


 本文详细介绍了如何在C++程序中调用Python文件,特别是包含第三方库如PyTorch的神经网络模型。首先配置C++环境,包括包含目录和库目录设置。接着在C++代码中,通过`Py_Initialize`和`Py_Finalize`初始化和结束Python环境,使用`PyImport_ImportModule`导入Python模块,通过`PyObject_CallObject`调用Python函数,并将C++的一维list传递给Python,最后从Python返回结果并处理。在Python端,加载模型并进行预测,将结果转换为一维list返回。文章还提到了在不同设备间测试时遇到的问题及其解决方案。
参考:
C++调用python文件(包含第三方库) - 知乎 (zhihu.com)
奇巧:C++ 调用python方法 - 知乎 (zhihu.com)
(31条消息) C调用Python(传递数字、字符串、list数组(一维、二维),结构体)_sunshine_9990的博客-优快云博客
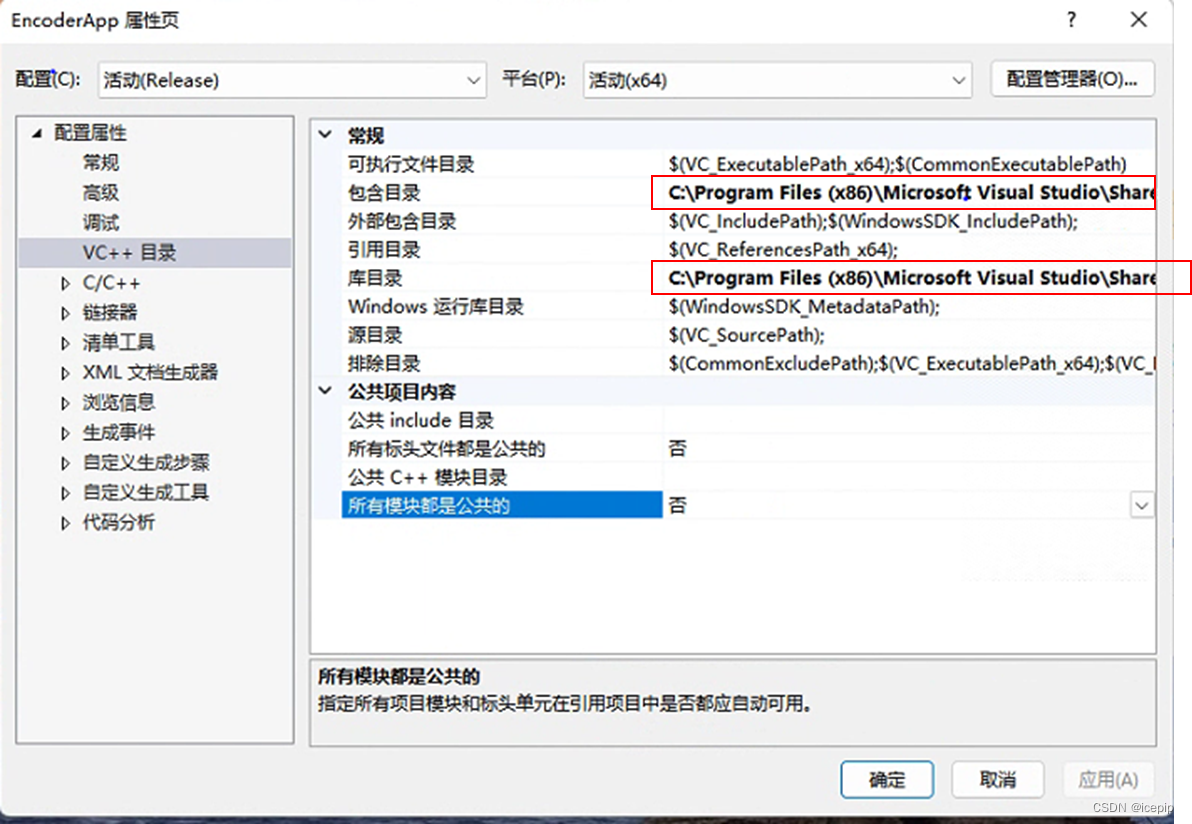
一、环境配置:
一、VC++目录:
1、包含目录:python所在文件夹下include文件夹“C:\Program Files (x86)\Microsoft Visual Studio\Shared\Python37_64\include”
2、库目录:python所在文件夹下libs文件夹“C:\Program Files (x86)\Microsoft Visual Studio\Shared\Python37_64\libs”
二、链接器输入
附加依赖项:python37.lib
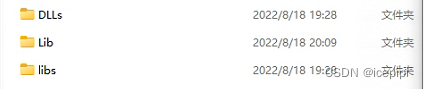
三、release文件夹(同EncoderApp.exe文件夹)
复制python文件夹下DLLs、libs、Lib文件夹、所调用的python文件、python37.lib到该文件夹下
测试所用的.bat、.cfg也放在该文件夹下
二、C++代码,传递一维list[[list0],[list1],[list2]],返回值一维list
int main(int argc, char* argv[])
{
  //add
  Py_Initialize();
  //end
  // print information
  fprintf( stdout, "\n" );
  fprintf( stdout, "VVCSoftware: VTM Encoder Version %s ", VTM_VERSION );
  fprintf( stdout, NVM_ONOS );
  fprintf( stdout, NVM_COMPILEDBY );
  fprintf( stdout, NVM_BITS );
      ....
      ....
      ....
  return 0;
  //add
  Py_Finalize();
  //end
}
void EncCu::python()
{
//初始化使用的变量
PyObject* pModule = NULL;
PyObject* pFunc = NULL;
PyObject* pName = NULL;
PyObject* pReturn = NULL;
int wh = width * height;
//2、初始化python系统文件路径,保证可以访问到 .py文件
PyRun_SimpleString("import sys");
PyRun_SimpleString("sys.path.append('./')");
//3、导入所调用的python文件
pModule = PyImport_ImportModule("GEAPI");
//4、调用python文件函数
pFunc = PyObject_GetAttrString(pModule, "out");
//5、定义三个Pylist列表
PyObject* PyListP0 = PyList_New(wh);
PyObject* PyListP1 = PyList_New(wh);
PyObject* PyListP2 = PyList_New(wh);
int num = 0;
for (unsigned y = 0; y < height; y++)
{
for (unsigned x = 0; x < width; x++)
{
Pel pixel = (pcYuvSrc0.bufs[0].at(x, y) + IF_INTERNAL_OFFS) >> IF_INTERNAL_FRAC_BITS(ClipBD);
float pixelL0 = float(round(float(pixel) / 4.0));
//向列表中添加元素
PyList_SetItem(PyListP0, num, PyFloat_FromDouble(pixelL0));
num++;
}
//cout << endl;
}
//PylistP1、PylistP2同理
//...
//6、三个list添加到一个新list中
PyObject* PyList = PyList_New(0);
PyList_Append(PyList, PyListP0);
PyList_Append(PyList,PyListP1);
PyList_Append(PyList, PyListP2);
//7、定义一个Tuple对象,Tuple对象的长度与Python函数参数个数一致
PyObject* ArgList = PyTuple_New(1);
//8、传递list到python函数中
PyTuple_SetItem(ArgList, 0, PyList);
//9、接收返回值list
pReturn = PyObject_CallObject(pFunc, ArgList);
for (unsigned y = 0; y < height; y++)
{
for (unsigned x = 0; x < width; x++)
{
PyObject* Item = PyList_GetItem(pReturn, num);//获取List对象中的每一个元素
num++;
float result;
PyArg_Parse(Item, "f", &result);//f表示转换成float型变量
Pel pixel = round(result);
pcYuvdst.bufs[0].at(x, y) = Pel(pixel * 4);
Py_DECREF(Item);
}
//cout << endl;
}
}三、c++调用python完整代码,神经网络pytorch模型
import sys
import torch
import torch.nn as nn
import torch.nn.functional as F
import os
import numpy as np
from pure_network import DetailEnhance
def out(inputorg):
  #inputorg = [[list0],[list1],[list2]]
  inputP0 = inputorg[0]
  inputP1 = inputorg[1]
  inputP2 = inputorg[2]
  #模型加载
  model = DetailEnhance()
  model = torch.load("",map_location='cpu')
  model.eval()
  #输入转tensor,转数组
  P0 = torch.as_tensor(inputP0,dtype=torch.float32)
  P1 = torch.as_tensor(inputP1,dtype=torch.float32)
  P2 = torch.as_tensor(inputP2,dtype=torch.float32)

  refP0 = np.array(P0).reshape(height,width)
  refP1 = np.array(P1).reshape(height, width)
  refP2 = np.array(P2).reshape(height, width)
  input0 = np.array([[refP0], [refP1], [refP2]])

  #增减维度,确保与模型输入维度一致
  input = (torch.from_numpy(input0).unsqueeze(0) / 255)
  output = model(input)*255
  #输出转list,返回一维list[]
  out = output.detach().numpy().reshape(1,width*height).tolist()
  dst = out[0]
  return dst
踩坑记录:
1、c++中调用python
//PyObject* Item 写在循环外,否则无法调用大块
PyObject* Item = NULL;
for (unsigned y = 0; y < height; y++)
    {
      for (unsigned x = 0; x < width; x++)
      {
        Item = PyList_GetItem(pReturn, num);//获取List对象中的每一个元素
        num++;
        float result;
        PyArg_Parse(Item, "f", &result);//f表示转换成float型变量
        Pel pixel = round(result);
        pcYuvdst.bufs[0].at(x, y) = Pel(pixel * 4);


      }
      //cout << endl;
    }
Py_DECREF(Item);
2、换设备测试,复制release文件,其中Lib文件夹使用新设备环境下Lib文件夹


 240
240

 被折叠的 条评论
为什么被折叠?
被折叠的 条评论
为什么被折叠?
 到【灌水乐园】发言


