


 本文介绍了Shell脚本的基础,包括脚本格式、HelloWorld示例及执行方法,重点展示了如何处理多个命令。通过创建文件并赋予执行权限,读者将学会基本的Shell编程实践。
Shell脚本入门
开始记录shell入门脚本的学习,本博主的记录保持着容易弄懂的原则,刚入门的同学可以观看,不足之处望君指出!
1、Shell脚本格式
脚本以#! /bin/bash 开头(指定解析器为bash)
2、第一个shell脚本(HelloWorld)
-
1)需求:
创建一个Shell脚本,并在shell脚本中输出helloworld -
2)实例:
[root@bigdata01 centos-shell]# touch helloworld.sh 在hellowrold.sh中输入一下内容 [root@bigdata01 centos-shell]# vi helloworld.sh #! /bin/bash echo "HelloWorld" -
3) 执行shell脚本的两种方式
第一种方式:使用bash/sh+shell脚本的相对路径/绝对路径
bash+相对路径[root@bigdata01 centos-shell]# bash ./helloworld.sh
HelloWorldbash+绝对路径
[root@bigdata01 centos-shell]# bash /opt/data/centos-shell/helloworld.sh
HelloWorldsh+相对路径
[root@bigdata01 centos-shell]# sh ./helloworld.sh
HelloWorldsh+绝对路径
[root@bigdata01 centos-shell]# sh /opt/data/centos-shell/helloworld.sh
HelloWorld第二种方式:采用输入脚本的绝对路径或相对路径执行脚本
注意:此方法执行shell脚本的使用是建立在shell脚本具有+x(execute执行)权限之上的,因此我们需要先对shell脚本授权。chmod +x helloworld.sh
执行脚本
相对路径
[root@bigdata01 centos-shell]# ./helloworld.sh–
HelloWorld绝对路径
[root@bigdata01 centos-shell]# /opt/data/centos-shell/helloworld.sh
HelloWorld
注意:注意:第一种执行方法,本质是bash解析器帮你执行脚本,所以脚本本身不需要执行权限。第二种执行方法,本质是脚本需要自己执行,所以需要执行权限。
3、第二个Shell脚本:多命令处理
(1)需求:
在/opt/data/centos-目录下创建一个banzhang.txt,在banzhang.txt文件中增加“I love cls”。
(2)案例实操:
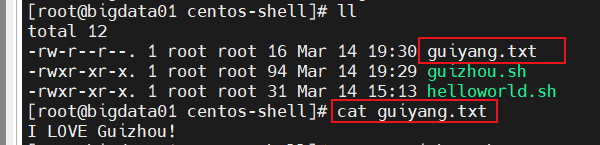
[root@bigdata01 centos-shell]# touch guizhou.sh
[root@bigdata01 centos-shell]# vi guizhou.sh
-
在guizhou.sh中输入如下内容
#! /bin/bash
cd /opt/data/centos-shell
touch guiyang.txt
echo “I LOVE Guizhou!”>>guiyang.txt -
为guizhou.sh添加+x(可执行)权限:
[root@bigdata01 centos-shell]# chmod +x guizhou.sh
-
执行shell脚本
[root@bigdata01 centos-shell]# ./guizhou.sh
-
查看结果
曾经我也为shell命令感到非常困惑,甚至在学习的时候还觉得不如C、Java这些编程语言写起来方便。可经过了大学两年多的学习,目前用shell脚本可以对我们的大数据集群带来更多的便利。加油,不断向前走!我将继续将Shell的部分相关内容记录下来。谢君祥阅!


 33万+
33万+

 被折叠的 条评论
为什么被折叠?
被折叠的 条评论
为什么被折叠?
 到【灌水乐园】发言


