


 本文深入探讨了Spring的核心容器BeanFactory和ApplicationContext,讲解了它们的功能、接口体系以及其实现。BeanFactory主要负责控制反转和依赖注入,而ApplicationContext增加了国际化、资源处理等功能。重点分析了Bean的生命周期,包括创建、依赖注入、初始化、使用和销毁阶段,以及在这些阶段如何进行增强。此外,还讨论了Bean后处理器的作用,如@Autowired和@Value的解析,以及如何模拟这些过程。最后,文章提到了Aware接口和InitializingBean接口,以及在Java配置类中使用BeanFactoryPostProcessor可能导致的@Autowired失效问题,并给出了解决方案。
注意:这个笔记很少提到Spring源码,都是基于源码对功能的模拟实现。
容器接口
接口体系图
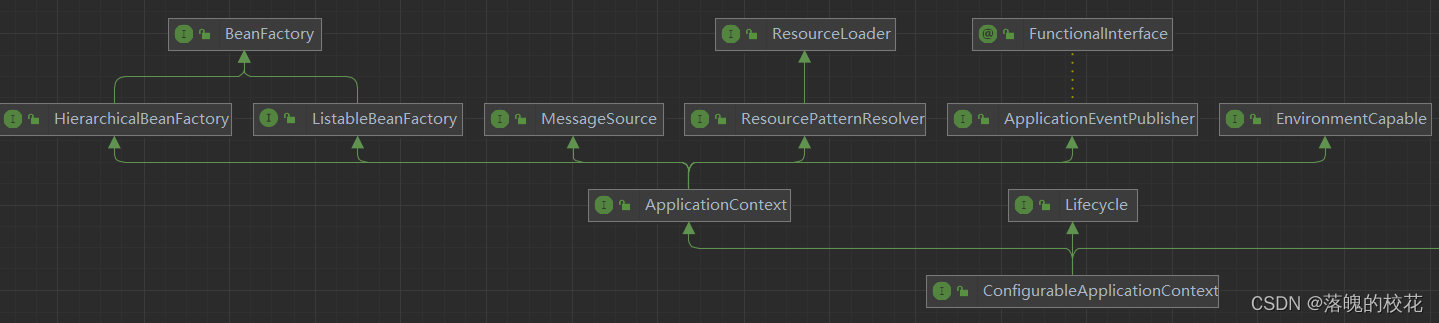
容器接口的主要功能是:getBean
这里主要研究 BeanFactory 和 ApplicationContext 两个接口,ApplicationContext 扩展了 BeanFactory 的功能。
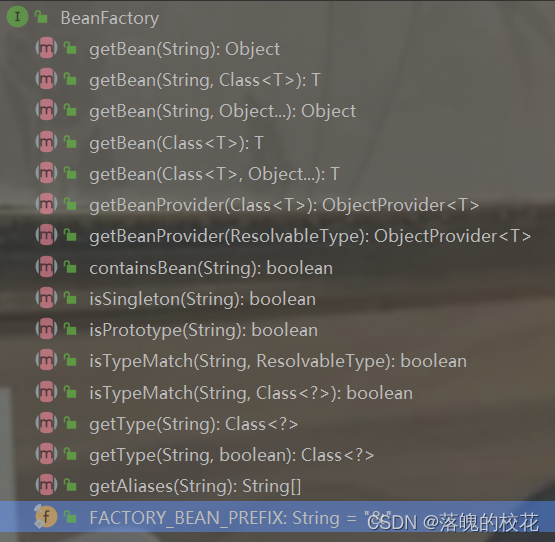
BeanFactory
- Spring 的核心容器
- 你以为只有 getBean
- 实际上控制反转、基本的依赖注入、直至 Bean 的生命周期的各种功能,都由它的实现类(或实现类的父类)提供
以 DefaultSingletonBeanRegistry 为例:
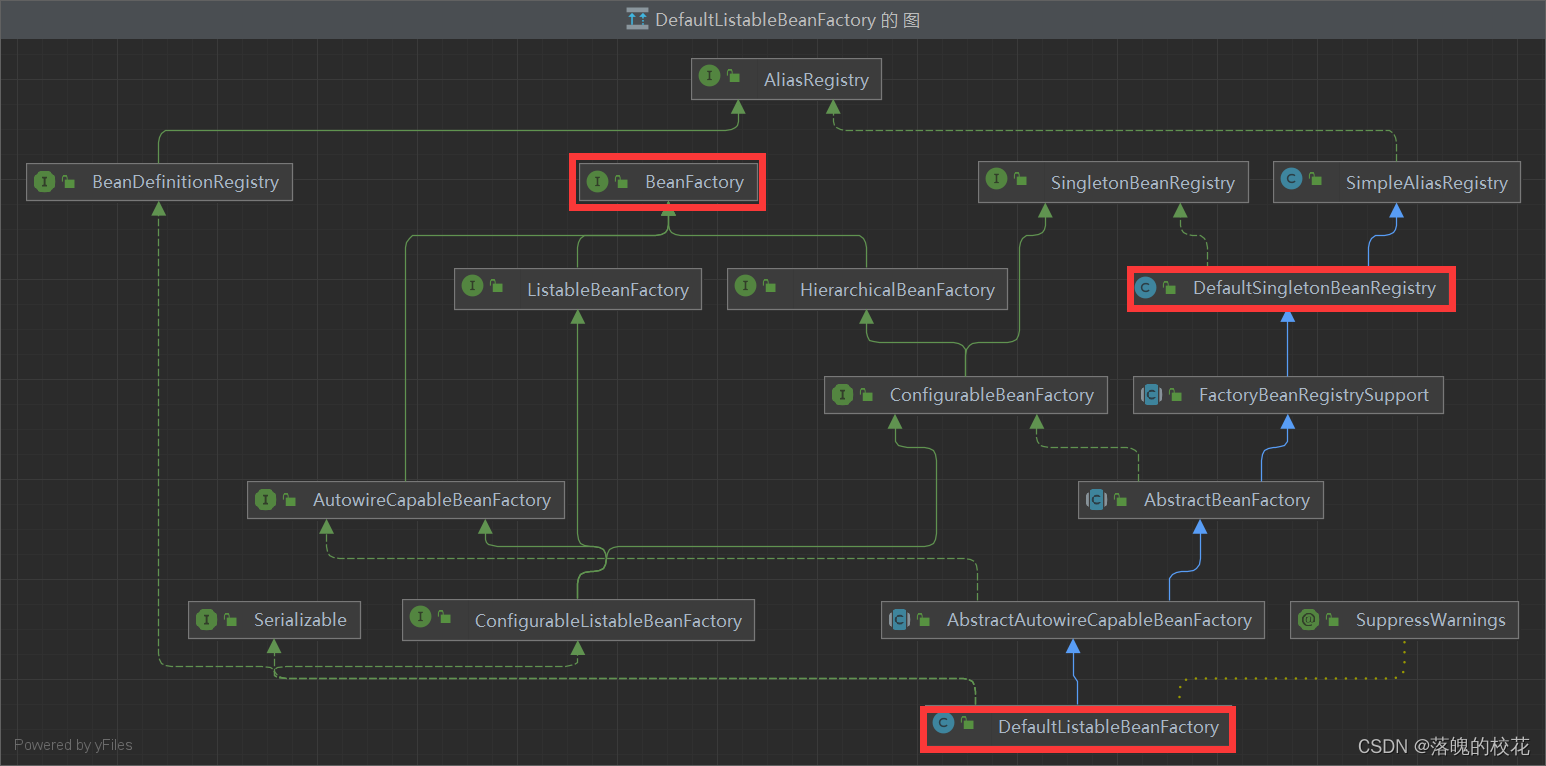
DefaultSingletonBeanRegistry:DefaultListableBeanFactory 的父类,DefaultListableBeanFactory 实现了BeanFactory
通过反射查看 DefaultSingletonBeanRegistry 的成员变量 singletonObjects,内部包含了所有的单例 bean
ConfigurableApplicationContext context = SpringApplication.run(A01.class, args);
Field singletonObjects = DefaultSingletonBeanRegistry.class.getDeclaredField("singletonObjects");
singletonObjects.setAccessible(true);
//属性调用方法
ConfigurableListableBeanFactory beanFactory = context.getBeanFactory();
Map<String, Object> map = (Map<String, Object>) singletonObjects.get(beanFactory);
map.forEach((k, v) -> {
    System.out.println(k + "=" + v); //输出所有单例bean
});
ApplicationContext
ApplicationContext组合了BeanFactory的功能,组合是指ApplicationContext的一个重要成员变量就是BeanFactory- 扩展了国际化、通配符方式获取一组 Resource 资源、获取 Environment 环境、事件发布与监听的功能
容器实现
- DefaultListableBeanFactory,是 BeanFactory 最重要的实现,像控制反转和依赖注入功能,都是它来实现
- AnnotationConfigApplicationContext,Spring boot 中非 web 环境容器
- AnnotationConfigServletWebServerApplicationContext,Spring boot 中 servlet web 环境容器
- AnnotationConfigReactiveWebServerApplicationContext,Spring boot 中 reactive web 环境容器
注意:后面这些带有 ApplicationContext 的类都是 ApplicationContext 接口的实现,但它们是组合了 DefaultListableBeanFactory 的功能,并非继承而来。
⛽知识加油站
组合为“has-a”关系,即整体和部分的关系。比如类 X 作为类 Y 的成员,则 X 是部分,Y 是整体,可以实现多个类之间的松耦合。
DefaultListableBeanFactory
DefaultListableBeanFactory 是 BeanFactory 接口最重要的实现,像控制反转和依赖注入功能,都是它来实现,但是他比较原始,体现在:
- 不会主动调用 BeanFactory 后处理器(补充 bean 的定义,例如
@Bean、@ComponentScan) - 不会主动添加 Bean 后处理器(针对 bean 的生命周期,例如
@Autowired、@Resource) - 不会主动初始化单例 bean
- 不会解析 ${ } 与 #{ }
需要手动添加方法来完成上述不能实现的功能。
beanFactory 可以通过
registerBeanDefinition()注册一个 bean definition 对象:
- 我们平时使用的配置类、xml、组件扫描等方式都是生成 bean definition 对象注册到 beanFactory 当中
- bean definition 描述了这个 bean 的创建蓝图:scope 是什么、用构造还是工厂创建、初始化销毁方法是什么,等等
⛽知识加油站
@Bean 和 @Autowired 在方法上面的区别:
@Bean:把方法返回值交给 Spring 容器管理,方法名就是 bean 的名称。@Autowired:Spring 容器创建当前对象时,会调用这个方法完成赋值;
相同点:从容器中根据方法的参数类型进行依赖注入。
ApplicationContext 实现
-
两个老旧的 ApplicationContext 实现,区别在于查找 XML 配置文件时的路径不同:
-
ClassPathXmlApplicationContext
-
FileSystemXmlApplicationContext
-
-
基于指定配置类的容器 AnnotationConfigApplicationContext,会主动添加和调用 BeanFactory 和 Bean 的后处理器
-
支持配置类和 ServletWeb 容器的实现 AnnotationConfigServletWebServerApplicationContext
Bean 生命周期
在各个阶段都能对 bean 进行增强:
-
创建前后的增强
- postProcessBeforeInstantiation
- 这里返回的对象若不为 null 会替换掉原本的 bean,并且仅会走 postProcessAfterInitialization 流程,不会再走 postProcessBeforeInstantiation 这个方法的流程了
- postProcessAfterInstantiation
- 这里如果返回 false 会跳过依赖注入阶段
- postProcessBeforeInstantiation
-
依赖注入前的增强
- postProcessProperties
- 如 @Autowired、@Value、@Resource
- postProcessProperties
-
初始化前后的增强
- postProcessBeforeInitialization
- 这里返回的对象会替换掉原本的 bean
- 如 @PostConstruct、@ConfigurationProperties
- postProcessAfterInitialization
- 这里返回的对象会替换掉原本的 bean
- 如代理增强
- postProcessBeforeInitialization
-
销毁之前的增强
- postProcessBeforeDestruction
- 如 @PreDestroy
- postProcessBeforeDestruction
模板方法
设计模式的一种,把不确定的方法抽象为接口方法,在特定的时机再来调用这些抽象方法
public class TestMethodTemplate {

    public static void main(String[] args) {
        MyBeanFactory beanFactory = new MyBeanFactory();
        beanFactory.addBeanPostProcessor(bean -> System.out.println("模拟 @Autowired"));
        beanFactory.addBeanPostProcessor(bean -> System.out.println("模拟 @Resource"));
        beanFactory.getBean();
    }

    // 模板方法  Template Method Pattern
    static class MyBeanFactory {
        public Object getBean() {
            Object bean = new Object();
            System.out.println("构造 " + bean);
            System.out.println("依赖注入 " + bean);
            for (BeanPostProcessor processor : processors) {
                processor.inject(bean);
            }
            System.out.println("初始化 " + bean);
            return bean;
        }

        private List<BeanPostProcessor> processors = new ArrayList<>();

        public void addBeanPostProcessor(BeanPostProcessor processor) {
            processors.add(processor);
        }
    }

    static interface BeanPostProcessor {
        void inject(Object bean); //对依赖注入阶段的扩展
    }
}
Bean 后处理器
后处理器作用
@Autowired 等注解的解析属于 bean 生命周期阶段(依赖注入, 初始化)的扩展功能,这些扩展功能由 bean 后处理器来完成。
- AutowiredAnnotationBeanPostProcessor 解析初始化的
@Autowired与@Value - CommonAnnotationBeanPostProcessor 解析初始化的
@Resource、@PostConstruct、@PreDestroy - ConfigurationPropertiesBindingPostProcessor 解析初始化的
@ConfigurationProperties - ContextAnnotationAutowireCandidateResolver 解析方法参数里面的
@Autowired、@Qualifier、@Resource、@Value等
// 解析初始化的 @Autowired、@Value
context.registerBean(AutowiredAnnotationBeanPostProcessor.class);

// 解析初始化的@Resource、@PostConstruct、@PreDestroy
context.registerBean(CommonAnnotationBeanPostProcessor.class);

// 解析初始化的@ConfigurationProperties
ConfigurationPropertiesBindingPostProcessor.register(context.getDefaultListableBeanFactory());

// 解析依赖注入时的 @Autowired、@Qualifier、@Resource、@Value等
context.getDefaultListableBeanFactory().
    setAutowireCandidateResolver(new ContextAnnotationAutowireCandidateResolver());
后处理器排序
- 实现了 PriorityOrdered 接口的优先级最高
- 实现了 Ordered 接口与加了
@Order注解的平级, 按数字升序 - 其它的排在最后
AutowiredAnnotationBeanPostProcessor 运行分析
分析思路:
AutowiredAnnotationBeanPostProcessor 是在 beanFactory 内部被调用的,这里直接创建 AutowiredAnnotationBeanPostProcessor
对象来模拟他的运行。
AutowiredAnnotationBeanPostProcessor processor = new AutowiredAnnotationBeanPostProcessor();
processor.setBeanFactory(beanFactory);
processor.postProcessProperties(null, bean1, "bean1");// 把 bean1 对象放到spring容器里面,取名叫 bean1,并执行依赖注入的 @AutoWired 和 @Value
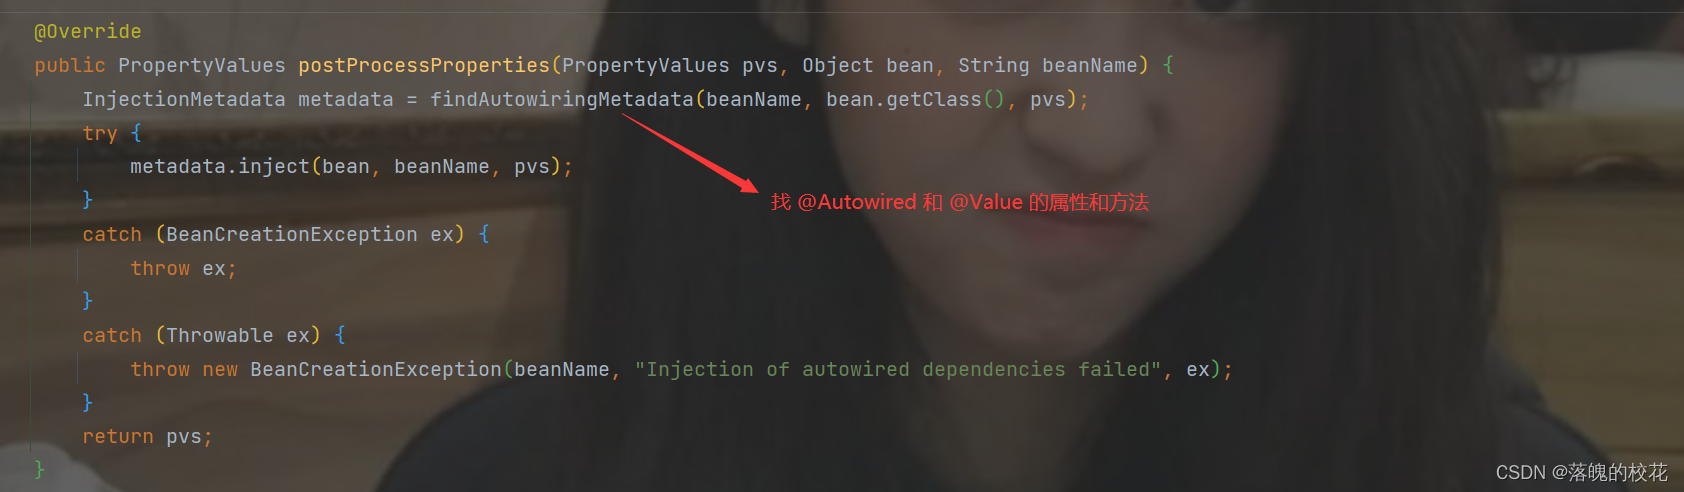
重点分析 postProcessProperties 方法,分为两步骤:
- 获取加了
@Autowired和@Value的成员,findAutowiringMetadata方法 - 调用
InjectionMetadata对象的inject方法完成依赖注入。
由于 findAutowiringMetadata 方法是私有的,无法直接获取 InjectionMetadata 对象,因此用反射来获取。
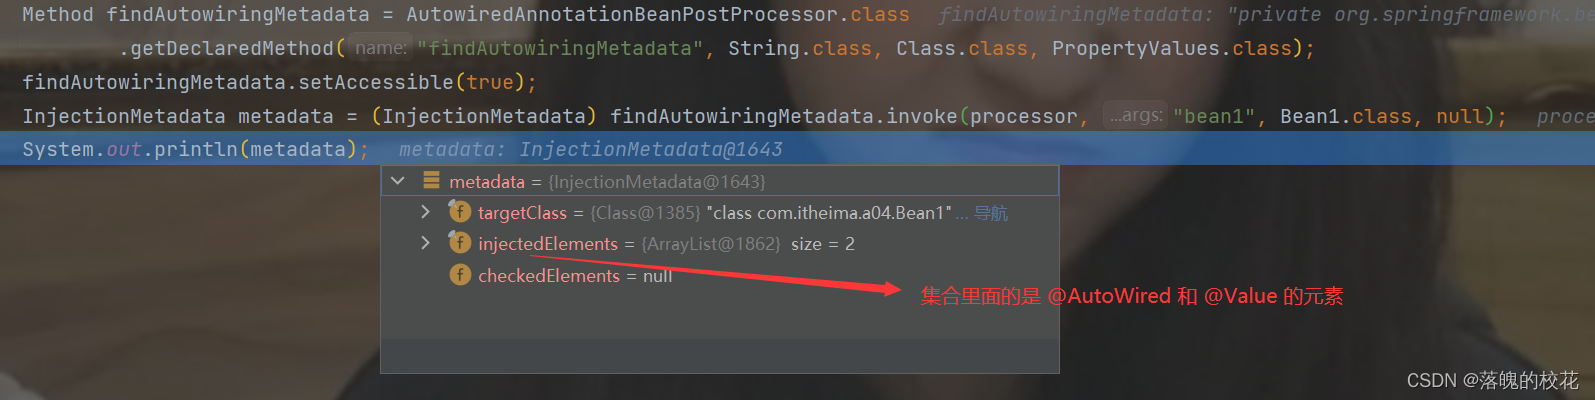
模拟processor.postProcessProperties(null, bean1, "bean1")方法:
public static void main(String[] args) throws Throwable {
    DefaultListableBeanFactory beanFactory = new DefaultListableBeanFactory();
    beanFactory.registerSingleton("bean2", new Bean2()); // 和 registerBean 的区别:不会再进行创建 bean ,依赖注入,初始化
    beanFactory.registerSingleton("bean3", new Bean3());
    beanFactory.setAutowireCandidateResolver(new ContextAnnotationAutowireCandidateResolver()); // 只解析方法参数里面的注解

    // 1. 查找哪些属性、方法加了 @Autowired

    //创建后处理器对象
    AutowiredAnnotationBeanPostProcessor processor = new AutowiredAnnotationBeanPostProcessor();
    processor.setBeanFactory(beanFactory);

    Bean1 bean1 = new Bean1();

    //模拟上面的 processor.postProcessProperties(null, bean1, "bean1") 方法
    Method findAutowiringMetadata = AutowiredAnnotationBeanPostProcessor.class
          .getDeclaredMethod("findAutowiringMetadata", String.class, Class.class, PropertyValues.class);
    findAutowiringMetadata.setAccessible(true);

    // 获取 bean1 上加了 @Value @AutoWired 的成员
    InjectionMetadata metadata = (InjectionMetadata) findAutowiringMetadata
       	.invoke(processor, "bean1", Bean1.class, null);
    System.out.println(metadata);

    // 2. 把 bean1 对象放到spring容器里面,并调用 InjectionMetadata 来进行依赖注入, 注入时按类型查找容器中的 bean
    metadata.inject(bean1, "bean1", null);
    System.out.println(bean1);
    // 3. 如何按类型查找容器中的 bean(以 @Autowired 为例)
    // 查找属性
    Field bean3 = Bean1.class.getDeclaredField("bean3"); //通过反射拿到字段对象
    //包装成员到依赖描述器(DependencyDescriptor对象)
    DependencyDescriptor dd1 = new DependencyDescriptor(bean3, false);
    Object o1 = beanFactory.doResolveDependency(dd1, null, null, null); //根据依赖描述器返回容器中的对象
    System.out.println(o1);

    //查找方法参数
    Method setBean2 = Bean1.class.getDeclaredMethod("setBean2", Bean2.class);
    DependencyDescriptor dd2 =
        new DependencyDescriptor(new MethodParameter(setBean2,0 ), false);
    Object o2 = beanFactory.doResolveDependency(dd2, null, null, null);
    System.out.println(o2);

    //按类型查找容器中的 bean(以 @Value 为例)
    Method setHome = Bean1.class.getDeclaredMethod("setHome", String.class);
    DependencyDescriptor dd3 =
        new DependencyDescriptor(new MethodParameter(setHome, 0), false);
    Object o3 = beanFactory.doResolveDependency(dd3, null, null, null);
    System.out.println(o3);
}
注意:ContextAnnotationAutowireCandidateResolver 只是解析方法参数里面的注解,而 AutowiredAnnotationBeanPostProcessor 才是解析属性和方法的 @AV 注解。
总结:
AutowiredAnnotationBeanPostProcessor.findAutowiringMetadata用来获取某个 bean 上加了@Value和@Autowired的成员的信息,表示为InjectionMetadataInjectionMetadata可以完成依赖注入InjectionMetadata内部根据成员,方法参数封装为DependencyDescriptor类型(依赖描述器)- 有了
DependencyDescriptor,就可以利用beanFactory.doResolveDependency方法进行基于类型的查找
BeanFactory 后处理器
作用
-
context.registerBean(ConfigurationClassPostProcessor.class);ConfigurationClassPostProcessor 可以解析:
@ComponentScan@Bean@Import@ImportResource
-
context.registerBean(MapperScannerConfigurer.class, bd -> {
    bd.getPropertyValues().add("basePackage", "com/itheima/a05/mapper");
});
MapperScannerConfigurer 可以解析 @MapperScanner
模拟组件扫描
流程如下:
- 拿到
@ComponentScan对象 - 通过
@ComponentScan注解拿到包名 - 包名转换为路径名再进行扫描
getResources(path)扫描 classes 目录拿到 class 字节码文件数组- 从 class 字节码文件中找加了
@Component或@Component的派生注解 - 通过
BeanDefinitionBuilder创建 bean - 加入到
BeanFactory中,需要创建 beanName- 通过
AnnotationBeanNameGenerator对象生成 beanName - 调用
BeanFactory的registerBeanDefinition()完成注册
- 通过
模拟代码如下:
    public static void main(String[] args) throws IOException {

        // GenericApplicationContext 是一个 "干净" 的容器
        GenericApplicationContext context = new GenericApplicationContext();
        context.registerBean("config", Config.class);

        // 1.拿到 @ComponentScan 对象
        ComponentScan componentScan = AnnotationUtils.findAnnotation(Config.class, ComponentScan.class);
        if (componentScan != null) {
            // 2.通过 @ComponentScan 注解拿到包名
            for (String packName : componentScan.basePackages()) {
                System.out.println(packName);
                // 3.包名转换为路径名再进行扫描
                String path = "classpath*:" + packName.replace(".", "/") + "/**/*.class";
                System.out.println(path);
                CachingMetadataReaderFactory factory = new CachingMetadataReaderFactory(); // 读取类的元数据并缓存的工厂类
                // 4.扫描 classes 目录拿到 class 字节码文件数组
                Resource[] resources = context.getResources(path);
                AnnotationBeanNameGenerator generator = new AnnotationBeanNameGenerator();
                for (Resource resource : resources) {
                    // 读取路径下类的元信息
                    MetadataReader reader = factory.getMetadataReader(resource);

                    // 5.从 class 字节码文件中找加了 @Component 或 @Component 的派生注解
                    if (reader.getAnnotationMetadata().hasAnnotation(Component.class.getName())
                            || reader.getAnnotationMetadata().hasMetaAnnotation(Component.class.getName())) {
                        // 6.通过 BeanDefinitionBuilder 创建 bean
                        AbstractBeanDefinition bd = BeanDefinitionBuilder
                                .genericBeanDefinition(reader.getClassMetadata().getClassName())
                                .getBeanDefinition();
                        // 7.1 通过 AnnotationBeanNameGenerator 对象生成 beanName
                        String name = generator.generateBeanName(bd, context.getDefaultListableBeanFactory());
                        // 7.2 调用 BeanFactory 的 registerBeanDefinition() 完成注册
                        context.getDefaultListableBeanFactory().registerBeanDefinition(name, bd);
                    }
                }
            }
        }
    }
将以上代码封装为 BeanFactory 后处理器:
- 新建类实现
BeanDefinitionRegistryPostProcessor接口 - 在
postProcessBeanDefinitionRegistry(BeanDefinitionRegistry beanFactory)实现以上代码,该方法会在context.refresh()后回调 - 注册该类:
context.registerBean(新建类.class)
总结如下:
- Spring 操作元数据的工具类
CachingMetadataReaderFactory- 通过注解元数据(
AnnotationMetadata)获取直接或间接标注的注解信息- 通过类元数据(
ClassMetadata)获取类名,AnnotationBeanNameGenerator生成 bean 名- 解析元数据是基于 ASM( Java 字节码操控框架) 技术
⛽知识加油站
hasMetaAnnotation() :得到 @Component 的派生注解
派生注解:是在一个注解的基础上,通过元注解的方式,派生出新的注解,具有继承性。
元注解:标注 注解 的 注解,例如 @Target、@Retention、@Documented 等
模拟 @Bean
流程如下:
- 拿到 BeanFactory 中的元数据对象
- 从元数据对象中拿到跟注解相关的元数据,获取被
@Bean注解标注的方法- 获取
@Bean注解的属性值
- 获取
- 通过
BeanDefinitionBuilder创建 bean,并设置他的工厂方法名和工厂对象名(调用工厂方法的 bean 名字)- 指定 bean 的装配模式为自动装配,装配 @Bean 方法的形参对象
- 判断 2.1 中是否有属性值
- 有属性值,设置初始化方法名称为属性值
- 把 bean 加入到
BeanFactory中,beanName 就是方法名
模拟代码如下:
public static void main(String[] args) throws IOException {

    // GenericApplicationContext 是一个 "干净" 的容器
    GenericApplicationContext context = new GenericApplicationContext();
    context.registerBean("config", Config.class);

    CachingMetadataReaderFactory factory = new CachingMetadataReaderFactory();
    // 1.拿到 BeanFactory 中的元数据对象
    MetadataReader reader = factory.getMetadataReader(new ClassPathResource("com/itheima/a05/Config.class"));
    // 2.从元数据对象中拿到跟注解相关的元数据,获取被 @Bean 注解标注的方法
    Set<MethodMetadata> methods = reader.getAnnotationMetadata().getAnnotatedMethods(Bean.class.getName());
    for (MethodMetadata method : methods) {
        System.out.println(method);
        // 2.1 获取 @Bean 注解的属性值
        String initMethod = method.getAnnotationAttributes(Bean.class.getName()).get("initMethod").toString();

        // 3.通过 BeanDefinitionBuilder 创建 bean,并设置他的工厂方法名和工厂对象名(调用工厂方法的 bean 名字)
        BeanDefinitionBuilder builder = BeanDefinitionBuilder.genericBeanDefinition();
        builder.setFactoryMethodOnBean(method.getMethodName(), "config");
        // 3.1 指定 bean 的装配模式为自动装配,装配 @Bean 方法的形参对象
        builder.setAutowireMode(AbstractBeanDefinition.AUTOWIRE_CONSTRUCTOR);
        // 3.2 判断 2.1 中是否有属性值
        if (initMethod.length() > 0) {
            // 3.3 有属性值,设置初始化方法名称为属性值
            builder.setInitMethodName(initMethod);
        }
        AbstractBeanDefinition bd = builder.getBeanDefinition();
        // 4.把 bean 加入到 BeanFactory 中,beanName 就是方法名
        context.getDefaultListableBeanFactory().registerBeanDefinition(method.getMethodName(), bd);
    }
}
总结如下:
进一步熟悉通过注解元数据(
AnnotationMetadata)来获取方法上的注解信息
Aware 接口
作用
Aware 接口提供了一种内置的注入手段,通过实现各种 Aware 接口注入不同信息,例如:
BeanNameAware注入 bean 的名字BeanFactoryAware注入 BeanFactory 容器ApplicationContextAware注入 ApplicationContext 容器EmbeddedValueResolverAware注入 ${} 解析器
InitializingBean 接口提供了一种内置的初始化手段
对比
Aware接口 和@Autowired:
@Autowired的解析需要用到 bean 后处理器, 属于扩展功能
Aware接口属于内置功能, 不加任何扩展, Spring 就能识别内置的注入和初始化不受扩展功能的影响,总会被执行,而扩展功能受某些情况影响可能会失效
Spring 框架内部的类常用内置注入和初始化
@Autowired 失效分析
@Configuration
public class MyConfig {

    @Autowired
    public void setApplicationContext(ApplicationContext applicationContext) {
        log.debug("注入 ApplicationContext");
    }

    @Bean // beanFactory 后处理器
    public BeanFactoryPostProcessor processor1() {
        return beanFactory -> {
            log.debug("执行 processor1");
        };
    }
}
在配置类添加 BeanFactoryPostProcessor 会导致 @Autowired 等(Bean 后处理器)失效,
分析如下:
context.refresh() 执行顺序:beanFactory 后处理器 --> 添加 bean 后处理器 --> 初始化单例
- Java 配置类不包含 BeanFactoryPostProcessor 的执行流程:
配置类 bean 在 3.4 创建成功。
- Java 配置类包含 BeanFactoryPostProcessor,因此要创建其中的 BeanFactoryPostProcessor 必须提前创建 Java 配置类,而此时的 BeanPostProcessor 还未准备好,导致
@Autowired等注解失效,流程如下:
配置类 bean 在第 1. 2 的时候就创建好了,还未执行 BeanPostProcessor 导致配置类中的 @Autowired 等注解失效
解决方法:
- 用内置依赖注入和初始化取代扩展依赖注入和初始化
- 用静态工厂方法代替实例工厂方法,避免工厂对象提前被创建
Bean 的初始化与销毁
初始化顺序
@PostConstruct标注的初始化方法Aware接口的注入方法InitializingBean接口的初始化方法@Bean(initMethod)指定的初始化方法
销毁顺序
@PreDestroy标注的销毁方法DisposableBean接口的销毁方法@Bean(destroyMethod)指定的销毁方法
Scope
在 Spring5 中,支持五种 @Scope
- singleton(默认单例),容器启动时创建(未设置延迟),容器关闭时销毁
- prototype(多例),每次使用时创建,不会自动销毁,需要调用
DefaultListableBeanFactory.destroyBean(bean)销毁 - request,每次请求用到此 bean 时创建,请求结束时销毁
- session,每个会话用到此 bean 时创建,会话结束时销毁
- application,web 容器用到此 bean 时创建,容器停止时销毁
Scope 失效问题
singleton 注入其它 scope 都会有问题,原因如下:
对于单例对象来讲,依赖注入仅发生了一次,后续再没有用到多例的 bean,因此单例对象用的始终是第一次依赖注入的 bean
解决(以单例注入多例为例):
@Lazy@Scope(value = "prototype", proxyMode = ScopedProxyMode.TARGET_CLASS)- 注入 ObjectFactory
- 注入 ApplicationContext
本质上都是推迟其他 scope bean 的获取。


 213
213

 被折叠的 条评论
为什么被折叠?
被折叠的 条评论
为什么被折叠?
 到【灌水乐园】发言


