


论文题目:
Few-shot medical image segmentation with high-fidelity prototypes
基于高保真原型的少样本医学图像分割
作者:Song Tang, Shaxu Yan, Xiaozhi Qi, Jianxin Gao, Mao Ye, Jianwei Zhang, Xiatian Zhu
源码:https://github.com/tntek/DSPNet
1 了解 conda 环境
1.1 查看Anaconda 下的文件
anaconda 是一个python的发行版,包括了python和很多常见的软件库,和一个包管理器
condaconda -v //查看当前版本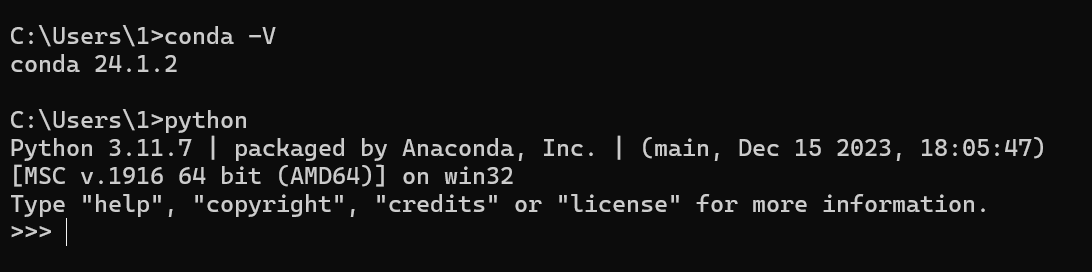
PKGS包:C:\Users\1\.conda\pkgs
dir //查看该文件下的所有目录C:\Users\1\.conda\pkgs>dir
驱动器 C 中的卷是 OS
卷的序列号是 8CA0-A2C3
C:\Users\1\.conda\pkgs 的目录
2025/10/28 16:50 <DIR> .
2025/10/28 18:13 <DIR> ..
2025/10/28 11:17 <DIR> bzip2-1.0.8-h0ad9c76_8
2025/10/28 11:17 55,977 bzip2-1.0.8-h0ad9c76_8.conda
2025/01/20 10:55 <DIR> ca-certificates-2024.12.14-h56e8100_0
2025/01/20 10:55 157,422 ca-certificates-2024.12.14-h56e8100_0.conda
2025/10/28 11:17 <DIR> ca-certificates-2025.10.5-h4c7d964_0
2025/10/28 11:17 156,354 ca-certificates-2025.10.5-h4c7d964_0.conda
2025/10/28 16:45 <DIR> cache
2025/10/28 16:50 <DIR> libexpat-2.7.1-hac47afa_0
2025/10/28 16:50 141,322 libexpat-2.7.1-hac47afa_0.conda
2025/10/28 11:17 <DIR> libffi-3.5.2-h52bdfb6_0
2025/10/28 11:17 44,866 libffi-3.5.2-h52bdfb6_0.conda
2025/10/28 11:17 <DIR> liblzma-5.8.1-h2466b09_2
2025/10/28 11:17 104,935 liblzma-5.8.1-h2466b09_2.conda
2025/10/28 11:17 <DIR> liblzma-devel-5.8.1-h2466b09_2
2025/10/28 11:17 129,344 liblzma-devel-5.8.1-h2466b09_2.conda
2025/01/20 10:55 <DIR> libsqlite-3.48.0-h67fdade_0
2025/01/20 10:55 897,200 libsqlite-3.48.0-h67fdade_0.conda
2025/10/28 11:17 <DIR> libsqlite-3.50.4-hf5d6505_0
2025/10/28 11:17 1,288,499 libsqlite-3.50.4-hf5d6505_0.conda
2025/10/28 11:17 <DIR> libzlib-1.3.1-h2466b09_2
2025/10/28 11:17 55,476 libzlib-1.3.1-h2466b09_2.conda
2025/01/20 10:55 <DIR> openssl-3.4.0-ha4e3fda_1
2025/01/20 10:55 8,462,960 openssl-3.4.0-ha4e3fda_1.conda
2025/10/28 11:17 <DIR> openssl-3.5.4-h725018a_0
2025/10/28 11:17 9,218,823 openssl-3.5.4-h725018a_0.conda
2025/01/20 10:55 <DIR> pip-24.0-pyhd8ed1ab_0
2025/01/20 10:55 1,398,245 pip-24.0-pyhd8ed1ab_0.conda
2025/10/28 11:17 <DIR> pip-24.3.1-pyh8b19718_0
2025/10/28 11:17 1,243,168 pip-24.3.1-pyh8b19718_0.conda
2025/10/28 16:50 <DIR> pip-25.2-pyh8b19718_0
2025/10/28 16:50 1,177,168 pip-25.2-pyh8b19718_0.conda
2025/01/20 10:56 <DIR> python-3.7.12-h900ac77_100_cpython
2025/01/20 10:55 18,887,718 python-3.7.12-h900ac77_100_cpython.tar.bz2
2025/10/28 11:18 <DIR> python-3.8.20-hfaddaf0_2_cpython
2025/10/28 11:17 16,152,994 python-3.8.20-hfaddaf0_2_cpython.conda
2025/10/28 16:51 <DIR> python-3.9.23-h8c5b53a_0_cpython
2025/10/28 16:50 16,971,365 python-3.9.23-h8c5b53a_0_cpython.conda
2025/01/20 10:55 <DIR> setuptools-69.0.3-pyhd8ed1ab_0
2025/01/20 10:55 470,548 setuptools-69.0.3-pyhd8ed1ab_0.conda
2025/10/28 11:17 <DIR> setuptools-75.3.0-pyhd8ed1ab_0
2025/10/28 11:17 779,561 setuptools-75.3.0-pyhd8ed1ab_0.conda
2025/10/28 16:50 <DIR> setuptools-80.9.0-pyhff2d567_0
2025/10/28 16:50 748,788 setuptools-80.9.0-pyhff2d567_0.conda
2025/01/20 10:55 <DIR> sqlite-3.48.0-h2466b09_0
2025/01/20 10:55 922,845 sqlite-3.48.0-h2466b09_0.conda
2025/10/28 11:17 <DIR> tk-8.6.13-h2c6b04d_2
2025/10/28 11:17 3,466,348 tk-8.6.13-h2c6b04d_2.conda
2025/10/28 16:50 <DIR> tzdata-2025b-h78e105d_0
2025/10/28 16:50 122,968 tzdata-2025b-h78e105d_0.conda
2025/01/20 10:56 <DIR> ucrt-10.0.22621.0-h57928b3_1
2025/01/20 10:55 559,710 ucrt-10.0.22621.0-h57928b3_1.conda
2025/10/28 11:18 <DIR> ucrt-10.0.26100.0-h57928b3_0
2025/10/28 11:17 694,692 ucrt-10.0.26100.0-h57928b3_0.conda
2025/01/05 10:12 0 urls
2025/10/28 16:50 2,997 urls.txt
2025/10/28 11:17 <DIR> vc-14.3-h2b53caa_32
2025/10/28 11:17 18,861 vc-14.3-h2b53caa_32.conda
2025/01/20 10:55 <DIR> vc-14.3-ha32ba9b_23
2025/01/20 10:55 17,479 vc-14.3-ha32ba9b_23.conda
2025/01/20 10:55 <DIR> vc14_runtime-14.42.34433-he29a5d6_23
2025/01/20 10:55 754,247 vc14_runtime-14.42.34433-he29a5d6_23.conda
2025/10/28 11:17 <DIR> vc14_runtime-14.44.35208-h818238b_32
2025/10/28 11:17 682,706 vc14_runtime-14.44.35208-h818238b_32.conda
2025/10/28 11:17 <DIR> vcomp14-14.44.35208-h818238b_32
2025/10/28 11:17 114,846 vcomp14-14.44.35208-h818238b_32.conda
2025/01/20 10:55 <DIR> vs2015_runtime-14.42.34433-hdffcdeb_23
2025/01/20 10:55 17,572 vs2015_runtime-14.42.34433-hdffcdeb_23.conda
2025/01/20 10:55 <DIR> wheel-0.42.0-pyhd8ed1ab_0
2025/01/20 10:55 57,553 wheel-0.42.0-pyhd8ed1ab_0.conda
2025/10/28 11:17 <DIR> wheel-0.45.1-pyhd8ed1ab_0
2025/10/28 11:17 62,998 wheel-0.45.1-pyhd8ed1ab_0.conda
2025/10/28 16:50 <DIR> wheel-0.45.1-pyhd8ed1ab_1
2025/10/28 16:50 62,931 wheel-0.45.1-pyhd8ed1ab_1.conda
2025/10/28 11:17 <DIR> xz-5.8.1-h208afaa_2
2025/10/28 11:17 24,430 xz-5.8.1-h208afaa_2.conda
2025/10/28 11:17 <DIR> xz-tools-5.8.1-h2466b09_2
2025/10/28 11:17 67,419 xz-tools-5.8.1-h2466b09_2.conda
39 个文件 86,193,335 字节
40 个目录 85,135,060,992 可用字节当你使用 conda install 命令安装任何包时,Conda 会做两件事:
-
下载包文件: 它会将 .conda 或 .tar.bz2 格式的包文件从 Conda 仓库(或你配置的镜像源)下载到 pkgs 目录。
-
解压和链接: 下载完成后,Conda 会将这些包文件解压,并将其内容(如 Python 模块、可执行文件、库文件等)链接到你当前激活的虚拟环境(或 base 环境)。
pkgs包在其中的作用:
1. 包的源头: pkgs 目录是所有 Conda 环境中安装的包的原始下载文件。
2. 重复利用: 如果你在不同的虚拟环境中安装同一个包(比如 python-3.9),Conda 不会再次下载这个包。它会直接从 pkgs 目录中找到已经下载好的文件,然后将其链接到新的环境中。这大大节省了下载时间和磁盘空间。
3. 不影响已安装的环境: 即使你清除了 pkgs 目录,你已经安装在虚拟环境中的包仍然可以正常运行,因为它们已经被解压并链接到各自的环境目录中了。但是,如果你想在未来创建新的环境,或者更新/安装新的包,Conda 将需要重新下载这些包到 pkgs 目录。
1.2 让 CMD 也能识别 conda
如果想在普通 CMD(或 VSCode 终端)里使用 conda,可以手动执行一次初始化。
在 Anaconda Prompt 中运行:
conda init cmd.exe (base) C:\Users\1>conda init cmd.exe
no change D:\xue\ANA\Scripts\conda.exe
no change D:\xue\ANA\Scripts\conda-env.exe
no change D:\xue\ANA\Scripts\conda-script.py
no change D:\xue\ANA\Scripts\conda-env-script.py
no change D:\xue\ANA\condabin\conda.bat
no change D:\xue\ANA\Library\bin\conda.bat
no change D:\xue\ANA\condabin\_conda_activate.bat
no change D:\xue\ANA\condabin\rename_tmp.bat
no change D:\xue\ANA\condabin\conda_auto_activate.bat
no change D:\xue\ANA\condabin\conda_hook.bat
no change D:\xue\ANA\Scripts\activate.bat
no change D:\xue\ANA\condabin\activate.bat
no change D:\xue\ANA\condabin\deactivate.bat
modified D:\xue\ANA\Scripts\activate
modified D:\xue\ANA\Scripts\deactivate
modified D:\xue\ANA\etc\profile.d\conda.sh
modified D:\xue\ANA\etc\fish\conf.d\conda.fish
no change D:\xue\ANA\shell\condabin\Conda.psm1
modified D:\xue\ANA\shell\condabin\conda-hook.ps1
no change D:\xue\ANA\Lib\site-packages\xontrib\conda.xsh
modified D:\xue\ANA\etc\profile.d\conda.csh
modified HKEY_CURRENT_USER\Software\Microsoft\Command Processor\AutoRun
==> For changes to take effect, close and re-open your current shell. <==执行完后关闭窗口,重新打开 CMD,然后输入:
conda activate dspnet //测试激活一个环境
C:\Users\1>D:

D:\>conda activate dspnet

(dspnet) D:\>
这时 CMD 也能识别 conda 了
2 将配置环境地址设置到D盘下:
2.1 配置envs_dirs文件
导航到你的用户主目录:C:\Users\1
创建或打开 .condarc 文件:
envs_dirs:
  - D:\Anaconda_envs
  - C:\Users\1\anaconda3\envs  # 这通常是默认安装路径,你可以选择保留或删除
查看当前 Conda 识别的 envs_dirs: 确保你的自定义路径被 Conda 正确识别了:
conda config --show-sourcesD:\>conda config --show-sources
==> C:\Users\1\.condarc <==
envs_dirs:
- D:\xue\ANAconda\envs
ssl_verify: False
channels:
- conda-forge
- https://mirrors.tuna.tsinghua.edu.cn/anaconda/pkgs/main
- defaults
show_channel_urls: True问题:虽然系统已经识别 D:\xue\ANAconda\envs,但 Conda 自动又把两个默认路径追加回来了。
查看Yaml文件:发现的确被追加回来了
conda config --show env_dirsconda config --show envs_dirs
envs_dirs:
- D:\xue\ANAconda\envs
- C:\Users\1\.conda\envs
- C:\Users\1\AppData\Local\conda\conda\envs
2.2 最终彻底清除方法(安全且有效)
1.删除默认目录(防止 Conda 自动检测)
执行以下命令(确保以管理员身份运行 CMD 或 PowerShell)
首先清除所有缓存和默认目录:clean / rmdir
C:\Windows\System32>conda clean --all -y
Will remove 491 (879.8 MB) tarball(s).
Will remove 1 index cache(s).
Will remove 12 (1017 KB) package(s).
There are no tempfile(s) to remove.
There are no logfile(s) to remove.

C:\Windows\System32>rmdir /s /q "%USERPROFILE%\.conda"

C:\Windows\System32>rmdir /s /q "%USERPROFILE%\AppData\Local\conda"
2.创建 D 盘下目录并确认存在
setx CONDA_ENVS_PATH "envs的文件路径"
setx CONDA_PKGS_DIRS "pkgs的文件路径"
猜测因为类似于上面介绍的pkgs这样的包在C盘,所以在创建新环境时,系统会自动创建到C盘目录下。所以现在要把相关配置文件转移到D盘下。
C:\Windows\System32>setx CONDA_ENVS_PATH "D:\xue\ANAconda\envs"

成功: 指定的值已得到保存。

C:\Windows\System32>setx CONDA_PKGS_DIRS "D:\xue\ANAconda\pkgs"

成功: 指定的值已得到保存。
//可选方法:永久设置环境变量
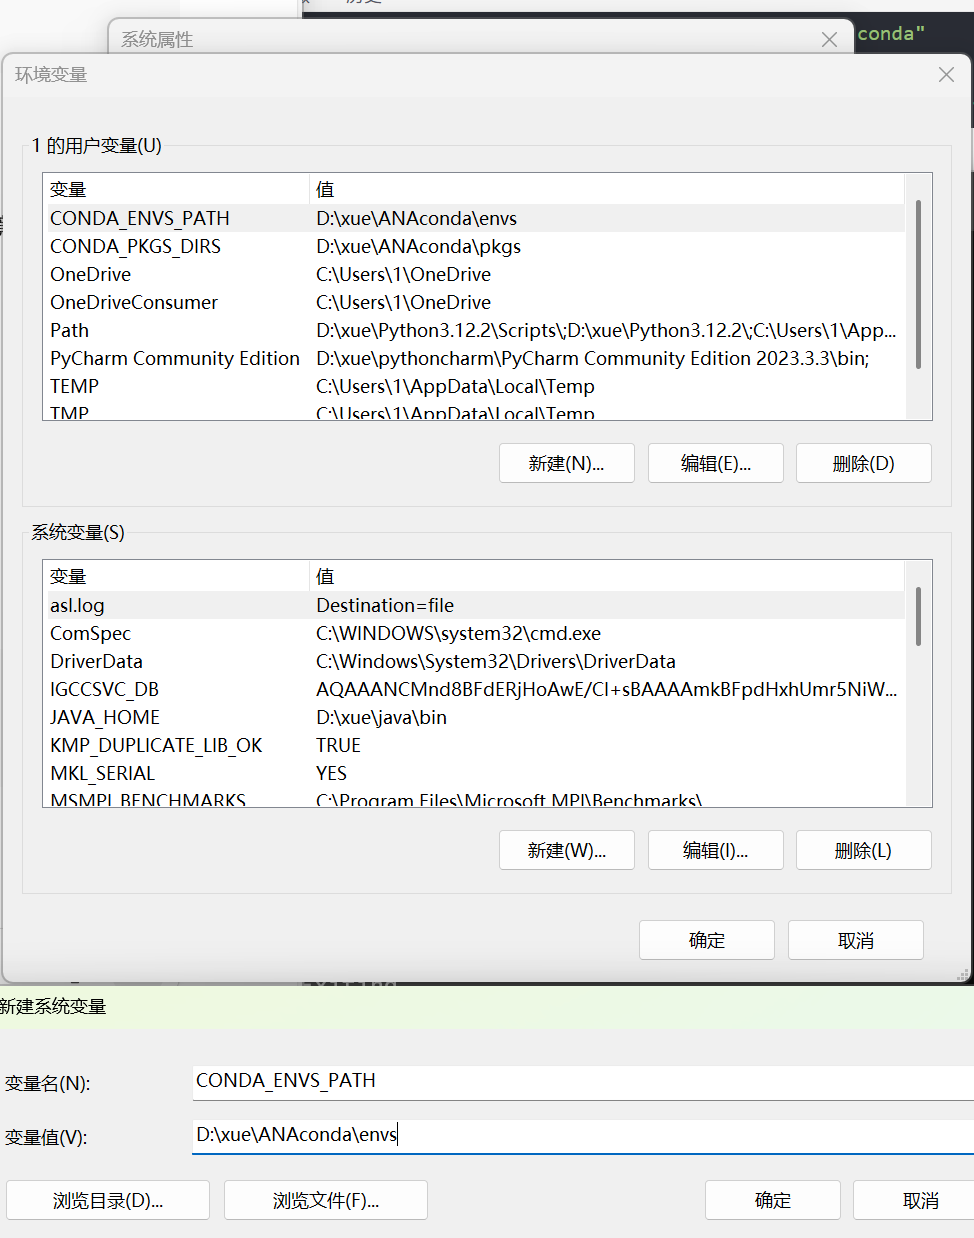
-
在开始菜单中搜索“环境变量”,并选择“编辑系统环境变量”。
-
在系统属性窗口中点击“环境变量(N)...”。
-
在系统变量部分点击“新建(N)...”。
-
设置变量名为
CONDA_ENVS_PATH,变量值为 “每次都自动使用的目录路径”。 -
点击“确定”,并关闭所有窗口。
然后,conda创建的环境将默认存放在这个目录下。
3.确认环境变量已永久生效
在新的命令行窗口中检查配置的环境路径(环境变量已生效)
C:\Users\1>echo %CONDA_ENVS_PATH%
D:\xue\ANAconda\envs

C:\Users\1>echo %CONDA_PKGS_DIRS%
D:\xue\ANAconda\pkgs
4.检查 Conda 配置来源
C:\Users\1>conda config --show-sources
==> C:\Users\1\.condarc <==
auto_activate_base: False
envs_dirs:
  - D:\xue\ANAconda\envs
pkgs_dirs:
  - D:\xue\ANAconda\pkgs
channels:
  - https://mirrors.tuna.tsinghua.edu.cn/anaconda/pkgs/main/
  - https://mirrors.tuna.tsinghua.edu.cn/anaconda/pkgs/free/
show_channel_urls: True

==> envvars <==
envs_path:
  - D:\xue\ANAconda\envs
pkgs_dirs:
  - D:\xue\ANAconda\pkgs
输出中应看到 .condarc 文件路径为:==> C:\Users\1\.condarc <==
确认它的内容为:
envs_dirs:
- D:\xue\ANAconda\envs
pkgs_dirs:
- D:\xue\ANAconda\pkgs
auto_activate_base: false
5.重启终端后验证
关闭所有 CMD/Anaconda Prompt,重新打开新的命令行后执行:
C:\Users\1>conda info --envs
# conda environments:
#
base                     D:\xue\ANAconda


C:\Users\1>conda config --show envs_dirs
envs_dirs:
  - D:\xue\ANAconda\envs
  - C:\Users\1\.conda\envs
- C:\Users\1\AppData\Local\conda\conda\envs`conda config --show envs_dirs 显示的是 Conda 在所有配置文件中找到并合并后的环境路径列表。 这个列表会按照优先级排序,但它并不代表所有这些路径都包含实际的环境,或者 Conda 在创建新环境时一定会选择第一个。
`conda info --envs 显示的是 Conda 实际检测到其中ssou有已创建环境的目录。
3. 关于pgks包报错解决
-如果再次创建新的conda环境,报错如下:
C:\Users\1>conda create -n dspnet python=3.8 -y
Channels:
 - https://mirrors.tuna.tsinghua.edu.cn/anaconda/pkgs/main
 - https://mirrors.tuna.tsinghua.edu.cn/anaconda/pkgs/free
Platform: win-64
Collecting package metadata (repodata.json): failed

NoWritablePkgsDirError: No writeable pkgs directories configured.
  - D:\xue\ANAconda\pkgs
核心报错为:
NoWritablePkgsDirError: No writeable pkgs directories configured.
  - D:\xue\ANAconda\pkgs
意思是:Conda 发现包缓存目录 D:\xue\ANAconda\pkgs 存在访问权限问题(没有写入权限,或者目录不存在)。
3.1 在D盘目录下,创建pkgs包
1.确保目录存在
手动或命令行创建这个目录:
mkdir D:\xue\ANAconda\pkgsC:\Users\1>mkdir D:\xue\ANAconda\pkgs
子目录或文件 D:\xue\ANAconda\pkgs 已经存在。2.给 Conda 目录写入权限
以管理员身份打开命令提示符(很重要),然后执行:
icacls D:\xue\ANAconda /grant %USERNAME%:F /T
这条命令会递归地给当前用户对 D:\xue\ANAconda 目录完全控制权限。
3.再次验证环境变量
C:\Users\1>echo %CONDA_PKGS_DIRS%
D:\xue\ANAconda\pkgs
4.清理旧的 Conda 缓存(防止路径残留)
C:\Users\1>conda clean --all -y
There are no unused tarball(s) to remove.
There are no index cache(s) to remove.
There are no unused package(s) to remove.
There are no tempfile(s) to remove.
There are no logfile(s) to remove.
5.再次创建环境验证
C:\Users\1>conda create -n dspnet python=3.8 -y
Channels:
 - https://mirrors.tuna.tsinghua.edu.cn/anaconda/pkgs/main
 - https://mirrors.tuna.tsinghua.edu.cn/anaconda/pkgs/free
Platform: win-64
Collecting package metadata (repodata.json): failed

# >>>>>>>>>>>>>>>>>>>>>> ERROR REPORT <<<<<<<<<<<<<<<<<<<<<<

    Traceback (most recent call last):
      File "D:\xue\ANAconda\Lib\site-packages\conda\exception_handler.py", line 17, in __call__
        return func(*args, **kwargs)
               ^^^^^^^^^^^^^^^^^^^^^
      File "D:\xue\ANAconda\Lib\site-packages\conda\cli\main.py", line 83, in main_subshell
        exit_code = do_call(args, parser)
                    ^^^^^^^^^^^^^^^^^^^^^
      File "D:\xue\ANAconda\Lib\site-packages\conda\cli\conda_argparse.py", line 196, in do_call
        result = getattr(module, func_name)(args, parser)
                 ^^^^^^^^^^^^^^^^^^^^^^^^^^^^^^^^^^^^^^^^
      File "D:\xue\ANAconda\Lib\site-packages\conda\notices\core.py", line 124, in wrapper
        return func(*args, **kwargs)
               ^^^^^^^^^^^^^^^^^^^^^
      File "D:\xue\ANAconda\Lib\site-packages\conda\cli\main_create.py", line 125, in execute
        return install(args, parser, "create")
               ^^^^^^^^^^^^^^^^^^^^^^^^^^^^^^^
      File "D:\xue\ANAconda\Lib\site-packages\conda\cli\install.py", line 360, in install
        unlink_link_transaction = solver.solve_for_transaction(
                                  ^^^^^^^^^^^^^^^^^^^^^^^^^^^^^
      File "D:\xue\ANAconda\Lib\site-packages\conda\core\solve.py", line 148, in solve_for_transaction
        unlink_precs, link_precs = self.solve_for_diff(
                                   ^^^^^^^^^^^^^^^^^^^^
      File "D:\xue\ANAconda\Lib\site-packages\conda\core\solve.py", line 217, in solve_for_diff
        final_precs = self.solve_final_state(
                      ^^^^^^^^^^^^^^^^^^^^^^^
      File "D:\xue\ANAconda\Lib\site-packages\conda_libmamba_solver\solver.py", line 207, in solve_final_state
        index = IndexHelper(
                ^^^^^^^^^^^^
      File "D:\xue\ANAconda\Lib\site-packages\conda_libmamba_solver\index.py", line 136, in __init__
        self._index = self._load_channels()
                      ^^^^^^^^^^^^^^^^^^^^^
      File "D:\xue\ANAconda\Lib\site-packages\conda_libmamba_solver\index.py", line 332, in _load_channels
        jsons = {url: str(path) for (url, path) in executor.map(self._fetch_channel, urls)}
                ^^^^^^^^^^^^^^^^^^^^^^^^^^^^^^^^^^^^^^^^^^^^^^^^^^^^^^^^^^^^^^^^^^^^^^^^^^^
      File "D:\xue\ANAconda\Lib\site-packages\conda_libmamba_solver\index.py", line 332, in <dictcomp>
        jsons = {url: str(path) for (url, path) in executor.map(self._fetch_channel, urls)}
                ^^^^^^^^^^^^^^^^^^^^^^^^^^^^^^^^^^^^^^^^^^^^^^^^^^^^^^^^^^^^^^^^^^^^^^^^^^^
      File "D:\xue\ANAconda\Lib\concurrent\futures\_base.py", line 619, in result_iterator
        yield _result_or_cancel(fs.pop())
              ^^^^^^^^^^^^^^^^^^^^^^^^^^^
      File "D:\xue\ANAconda\Lib\concurrent\futures\_base.py", line 317, in _result_or_cancel
        return fut.result(timeout)
               ^^^^^^^^^^^^^^^^^^^
      File "D:\xue\ANAconda\Lib\concurrent\futures\_base.py", line 456, in result
        return self.__get_result()
               ^^^^^^^^^^^^^^^^^^^
      File "D:\xue\ANAconda\Lib\concurrent\futures\_base.py", line 401, in __get_result
        raise self._exception
      File "D:\xue\ANAconda\Lib\concurrent\futures\thread.py", line 58, in run
        result = self.fn(*self.args, **self.kwargs)
                 ^^^^^^^^^^^^^^^^^^^^^^^^^^^^^^^^^^
      File "D:\xue\ANAconda\Lib\site-packages\conda_libmamba_solver\index.py", line 254, in _fetch_channel
        json_path, _ = subdir_data.repo_fetch.fetch_latest_path()
                       ^^^^^^^^^^^^^^^^^^^^^^^^^^^^^^^^^^^^^^^^^^
      File "D:\xue\ANAconda\Lib\site-packages\conda\gateways\repodata\__init__.py", line 734, in fetch_latest_path
        _, state = self.fetch_latest()
                   ^^^^^^^^^^^^^^^^^^^
      File "D:\xue\ANAconda\Lib\site-packages\conda\gateways\repodata\__init__.py", line 832, in fetch_latest
        raw_repodata = repo.repodata_parsed(cache.state)  # type: ignore
                       ^^^^^^^^^^^^^^^^^^^^^^^^^^^^^^^^^
      File "D:\xue\ANAconda\Lib\site-packages\conda\gateways\repodata\jlap\interface.py", line 83, in repodata_parsed
        repodata_json_or_none = fetch.request_url_jlap_state(
                                ^^^^^^^^^^^^^^^^^^^^^^^^^^^^^
      File "D:\xue\ANAconda\Lib\site-packages\conda\gateways\repodata\jlap\fetch.py", line 308, in request_url_jlap_state
        response = download_and_hash(
                   ^^^^^^^^^^^^^^^^^^
      File "D:\xue\ANAconda\Lib\site-packages\conda\gateways\repodata\jlap\fetch.py", line 251, in download_and_hash
        HashWriter(dest_path.open("wb"), hasher),  # type: ignore
                   ^^^^^^^^^^^^^^^^^^^^
      File "D:\xue\ANAconda\Lib\pathlib.py", line 1044, in open
        return io.open(self, mode, buffering, encoding, errors, newline)
               ^^^^^^^^^^^^^^^^^^^^^^^^^^^^^^^^^^^^^^^^^^^^^^^^^^^^^^^^^
    PermissionError: [Errno 13] Permission denied: 'D:\\xue\\ANAconda\\pkgs\\cache\\82f3c828.f6fb.tmp'

`$ D:\xue\ANAconda\Scripts\conda-script.py create -n dspnet python=3.8 -y`

  environment variables:
                 CIO_TEST=<not set>
                CONDA_BAT=D:\xue\ANAconda\condabin\conda.bat
          CONDA_ENVS_PATH=D:\xue\ANAconda\envs
                CONDA_EXE=D:\xue\ANAconda\condabin\..\Scripts\conda.exe
               CONDA_EXES="D:\xue\ANAconda\condabin\..\Scripts\conda.exe"
          CONDA_PKGS_DIRS=D:\xue\ANAconda\pkgs
               CONDA_ROOT=D:\xue\ANAconda
              CONDA_SHLVL=0
           CURL_CA_BUNDLE=<not set>
                 HOMEPATH=\Users\1
               LD_PRELOAD=<not set>
                     PATH=D:\xue\ANAconda\condabin;C:\Program Files (x86)\Common
                          Files\Oracle\Java\java8path;C:\Program Files (x86)\Common
                          Files\Oracle\Java\javapath;D:\xue\openeuler\bin\;C:\Program
                          Files\Microsoft MPI\Bin\;C:\WINDOWS\system32;C:\WINDOWS;C:\WINDOWS\Sys
                          tem32\Wbem;C:\WINDOWS\System32\WindowsPowerShell\v1.0\;C:\WINDOWS\Syst
                          em32\OpenSSH\;C:\Program Files\dotnet\;D:\xue\ffmpeg\ffmpeg-6.1.1-
                          essentials_build\ffmpeg-6.1.1-
                          essentials_build\bin;D:\xue\ANACONDA;D:\xue\ANACONDA\Scripts;D:\xue\AN
                          ACONDA\Library\mingw-w64\bin;D:\xue\ANACONDA\Library\bin;D:\Windows
                          Kits\10\Windows Performance
                          Toolkit\;D:\xue\matlab\runtime\win64;D:\xue\matlab\bin;C:\Program
                          Files (x86)\Microsoft SQL Server\160\Tools\Binn\;C:\Program
                          Files\Microsoft SQL Server\160\Tools\Binn\;C:\Program Files\Microsoft
                          SQL Server\Client SDK\ODBC\170\Tools\Binn\;C:\Program Files\Microsoft
                          SQL Server\160\DTS\Binn\;C:\Program Files (x86)\Microsoft SQL Server\1
                          60\DTS\Binn\;D:\xue\git\Git\cmd;D:\xue\java\bin;D:\xue\Python3.12.2\Sc
                          ripts\;D:\xue\Python3.12.2\;C:\Users\1\AppData\Local\Programs\Python\L
                          auncher\;C:\Users\1\AppData\Local\Microsoft\WindowsApps;;D:\xue\python
                          charm\PyCharm Community Edition 2023.3.3\bin;;D:\xue\VScode\Microsoft
                          VS Code\bin;D:\xue\qoder\Qoder\bin
             PSMODULEPATH=C:\Program Files\WindowsPowerShell\Modules;C:\WINDOWS\system32\Windows
                          PowerShell\v1.0\Modules;C:\Program Files (x86)\Microsoft SQL
                          Server\160\Tools\PowerShell\Modules\
       REQUESTS_CA_BUNDLE=<not set>
            SSL_CERT_FILE=<not set>

     active environment : None
            shell level : 0
       user config file : C:\Users\1\.condarc
 populated config files : C:\Users\1\.condarc
          conda version : 24.1.2
    conda-build version : 24.1.2
         python version : 3.11.7.final.0
                 solver : libmamba (default)
       virtual packages : __archspec=1=x86_64
                          __conda=24.1.2=0
                          __win=0=0
       base environment : D:\xue\ANAconda  (writable)
      conda av data dir : D:\xue\ANAconda\etc\conda
  conda av metadata url : None
           channel URLs : https://mirrors.tuna.tsinghua.edu.cn/anaconda/pkgs/main/win-64
                          https://mirrors.tuna.tsinghua.edu.cn/anaconda/pkgs/main/noarch
                          https://mirrors.tuna.tsinghua.edu.cn/anaconda/pkgs/free/win-64
                          https://mirrors.tuna.tsinghua.edu.cn/anaconda/pkgs/free/noarch
          package cache : D:\xue\ANAconda\pkgs
       envs directories : D:\xue\ANAconda\envs
                          C:\Users\1\.conda\envs
                          C:\Users\1\AppData\Local\conda\conda\envs
               platform : win-64
             user-agent : conda/24.1.2 requests/2.31.0 CPython/3.11.7 Windows/10 Windows/10.0.26100 solver/libmamba conda-libmamba-solver/24.1.0 libmambapy/1.5.6 aau/0.4.3 c/q2kI0t9LX9XHM47MhEv61Q s/Y2vuHHo0lvBi4d9CfgmEsQ e/_4EcZ-QkkmzY0yv1MAYdUQ
          administrator : False
             netrc file : None
           offline mode : False


An unexpected error has occurred. Conda has prepared the above report.
If you suspect this error is being caused by a malfunctioning plugin,
consider using the --no-plugins option to turn off plugins.

Example: conda --no-plugins install <package>

Alternatively, you can set the CONDA_NO_PLUGINS environment variable on
the command line to run the command without plugins enabled.

Example: CONDA_NO_PLUGINS=true conda install <package>

Upload did not complete.
核心报错为:
PermissionError: [Errno 13] Permission denied: 'D:\\xue\\ANAconda\\pkgs\\cache\\82f3c828.f6fb.tmp'这说明 Anaconda 没有权限在 D:\xue\ANAconda\pkgs\cache 写入文件。即使路径正确,Windows 权限系统或残留锁文件会导致 conda 无法下载包。
3.2 打开Anaconda在D盘的权限
关闭所有终端,重新以管理员身份打开 Anaconda Prompt
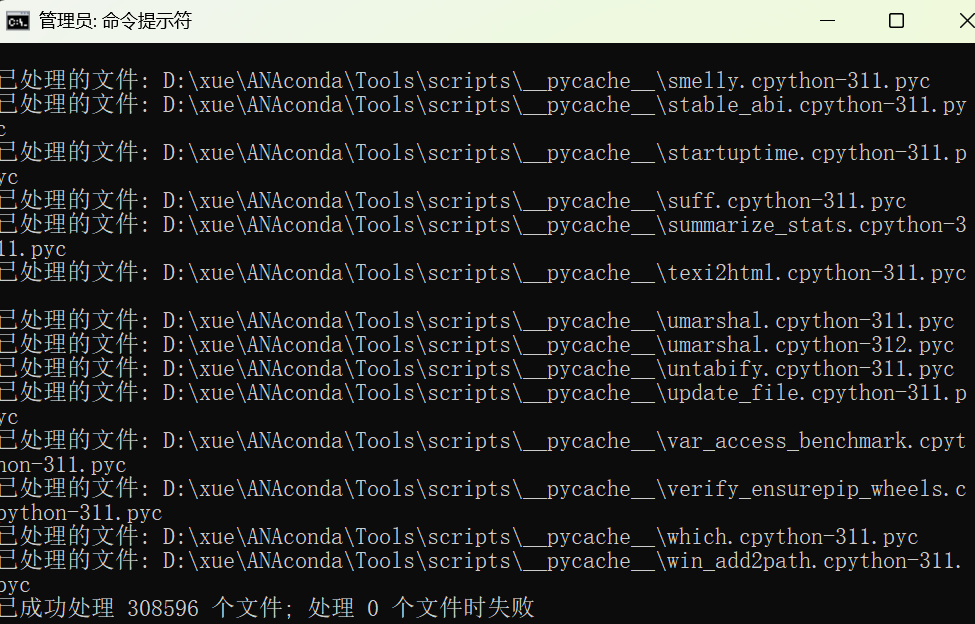
1. 清除所有的缓存和目录:
conda clean --all -y(base) C:\Windows\System32>conda clean --all -y
There are no unused tarball(s) to remove.
Will remove 1 index cache(s).
There are no unused package(s) to remove.
There are no tempfile(s) to remove.
There are no logfile(s) to remove.
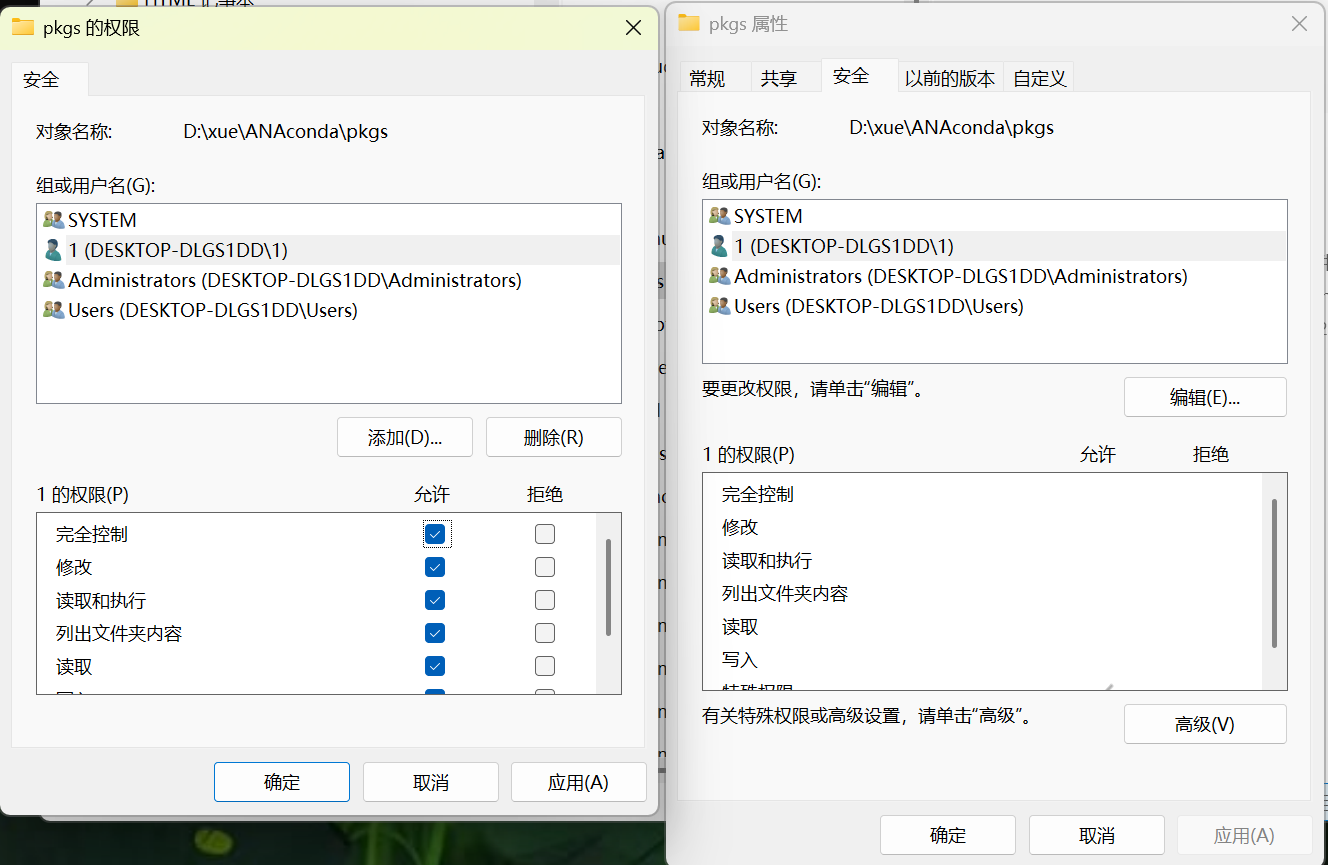
2. 检查并修复 pkgs 缓存文件夹权限
1.打开文件夹:D:\xue\ANAconda\pkgs
2.右键 → 属性 → “安全” 选项卡
3.点击 “编辑” → 选中你的 Windows 用户(如 1)
4.勾选 完全控制(Full Control) ✅
5.点击 “确定” 保存。

6.然后删除其中的 cache 子目录:(我没有该文件)
rmdir /s /q "D:\xue\ANAconda\pkgs\cache"
(base) C:\Windows\System32>rmdir /s /q "D:\xue\ANAconda\pkgs\cache"
系统找不到指定的文件。
3. 重新执行创建环境(仍用管理员模式)血泪教训,不然环境又会到C盘下
解压代码包后首先打开“RADME.md”,查看需要的环境。然后新建配置环境:
conda create -n dspnet python=3.8 -y(base) C:\Windows\System32>conda create -n dspnet python=3.8 -y
Channels:
- https://mirrors.tuna.tsinghua.edu.cn/anaconda/pkgs/main
- https://mirrors.tuna.tsinghua.edu.cn/anaconda/pkgs/free
Platform: win-64
Collecting package metadata (repodata.json): done
Solving environment: done
## Package Plan ##
environment location: D:\xue\ANAconda\envs\dspnet
added / updated specs:
- python=3.8
The following packages will be downloaded:
package | build
---------------------------|-----------------
ca-certificates-2025.9.9 | haa95532_0 127 KB https://mirrors.tuna.tsinghua.edu.cn/anaconda/pkgs/man
libffi-3.4.4 | hd77b12b_1 122 KB https://mirrors.tuna.tsinghua.edu.cn/anaconda/pkgs/man
openssl-3.0.18 | h543e019_0 6.8 MB https://mirrors.tuna.tsinghua.edu.cn/anaconda/pkgs/man
pip-24.2 | py38haa95532_0 2.4 MB https://mirrors.tuna.tsinghua.edu.cn/anaconda/pkgs/man
python-3.8.20 | h8205438_0 19.4 MB https://mirrors.tuna.tsinghua.edu.cn/anaconda/pkgs/man
setuptools-75.1.0 | py38haa95532_0 1.6 MB https://mirrors.tuna.tsinghua.edu.cn/anaconda/pkgs/man
sqlite-3.50.2 | hda9a48d_1 1017 KB https://mirrors.tuna.tsinghua.edu.cn/anaconda/pkgs/man
ucrt-10.0.22621.0 | haa95532_0 620 KB https://mirrors.tuna.tsinghua.edu.cn/anaconda/pkgs/man
vc-14.3 | h2df5915_10 19 KB https://mirrors.tuna.tsinghua.edu.cn/anaconda/pkgs/man
vc14_runtime-14.44.35208 | h4927774_10 825 KB https://mirrors.tuna.tsinghua.edu.cn/anaconda/pkgs/man
vs2015_runtime-14.44.35208 | ha6b5a95_10 19 KB https://mirrors.tuna.tsinghua.edu.cn/anaconda/pkgs/man
wheel-0.44.0 | py38haa95532_0 137 KB https://mirrors.tuna.tsinghua.edu.cn/anaconda/pkgs/man
------------------------------------------------------------
Total: 33.0 MB
The following NEW packages will be INSTALLED:
ca-certificates anaconda/pkgs/main/win-64::ca-certificates-2025.9.9-haa95532_0
libffi anaconda/pkgs/main/win-64::libffi-3.4.4-hd77b12b_1
openssl anaconda/pkgs/main/win-64::openssl-3.0.18-h543e019_0
pip anaconda/pkgs/main/win-64::pip-24.2-py38haa95532_0
python anaconda/pkgs/main/win-64::python-3.8.20-h8205438_0
setuptools anaconda/pkgs/main/win-64::setuptools-75.1.0-py38haa95532_0
sqlite anaconda/pkgs/main/win-64::sqlite-3.50.2-hda9a48d_1
ucrt anaconda/pkgs/main/win-64::ucrt-10.0.22621.0-haa95532_0
vc anaconda/pkgs/main/win-64::vc-14.3-h2df5915_10
vc14_runtime anaconda/pkgs/main/win-64::vc14_runtime-14.44.35208-h4927774_10
vs2015_runtime anaconda/pkgs/main/win-64::vs2015_runtime-14.44.35208-ha6b5a95_10
wheel anaconda/pkgs/main/win-64::wheel-0.44.0-py38haa95532_0
Downloading and Extracting Packages:
Preparing transaction: done
Verifying transaction: done
Executing transaction: done
#
# To activate this environment, use
#
# $ conda activate dspnet
#
# To deactivate an active environment, use
#
# $ conda deactivate如果你仍然遇到权限报错,请尝试强制使用非缓存安装
(我没有遇到这个问题,不确定是否有用)
conda create -n dspnet python=3.8 --no-cache-dir -y
4.验证成功
(base) C:\Windows\System32>conda info --envs
# conda environments:
#
base                  *  D:\xue\ANAconda
dspnet                   D:\xue\ANAconda\envs\dspnet
4 配置项目环境
激活环境
conda activate dspnet4.1 验证python环境
进入项目目录 cd DSPNet
安装依赖:pip install -r requirements.txt
此时出现问题:NumPy 1.19.5 与 Python 3.11 不兼容。可我们在创建dspnet环境时配置的明明是python=3.11版本,说明可能是pkgs包里没有python=3.8版本,导致配置错误。
1. 验证猜想
进入新的Anaconda Prompt,激活dspnet,查看Python版本,果然是3.11
>conda activate dspnet

(dspnet) C:\Users\1>python --version
Python 3.11.7
检查conda环境里是否有python3.8版本,以找到python环境配置错误原因。
核心问题:我的 Conda 配置的 channels (镜像源) 中,没有 Python 3.8 的包。
因此,当执行 conda create -n dspnet python=3.8 时,Conda 实际上无法创建一个 Python 3.8 的环境。它要么报错,要么(如果它有回退机制或你中途取消)就会导致环境创建失败或不完整。
(dspnet) C:\Users\1>conda search python=3,8
Loading channels: done
No match found for: python[version='=3,8']. Search: *python*[version='=3,8']

PackagesNotFoundError: The following packages are not available from current channels:

  - python[version='=3,8']

Current channels:

  - https://mirrors.tuna.tsinghua.edu.cn/anaconda/pkgs/main/win-64
  - https://mirrors.tuna.tsinghua.edu.cn/anaconda/pkgs/main/noarch
  - https://mirrors.tuna.tsinghua.edu.cn/anaconda/pkgs/free/win-64
  - https://mirrors.tuna.tsinghua.edu.cn/anaconda/pkgs/free/noarch

To search for alternate channels that may provide the conda package you're
looking for, navigate to

    https://anaconda.org

and use the search bar at the top of the page.
2. 解决方案:添加 Conda Forge 频道或使用官方源
为了找到 Python 3.8,需要添加一个包含更广泛包的频道,最常用的就是 Conda Forge。
(1)修改.condarc文件
(dspnet) C:\Users\1>.condarc在 channels: 列表的顶部添加 conda-forge。
注意顺序非常重要:将 conda-forge 放在最前面,这样它会优先查找其中的包。
ssl_verify: False
channels:- defaults
- conda-forge
- https://mirrors.tuna.tsinghua.edu.cn/anaconda/pkgs/main/
- https://mirrors.tuna.tsinghua.edu.cn/anaconda/pkgs/free/
show_channel_urls: trueenvs_dirs:
- D:\xue\ANAconda\envspkgs_dirs:
- D:\xue\ANAconda\pkgs
auto_activate_base: false
注意:在 channels 中添加了 defaults,它代表 Conda 官方默认的频道。清华源是 main 和 free 的镜像。通常 defaults 应该在,因为它提供了最基础的包。
(2)验证conda-forge已识别(打开一个新的Anaconda Prompt)
查看conda配置源
(base) C:\Users\1>conda config --show channels
channels:
  - conda-forge
  - https://mirrors.tuna.tsinghua.edu.cn/anaconda/pkgs/main/
  - https://mirrors.tuna.tsinghua.edu.cn/anaconda/pkgs/free/
  - defaults
(3)重新创建dspnet环境
删除任何旧的dspnet环境
(base) C:\Users\1>conda deactivate

C:\Users\1>conda env remove -n dspnet

Remove all packages in environment D:\xue\ANAconda\envs\dspnet:
指定Python版本并手动安装依赖
conda create -n dspnet
conda activate dspnet
conda install python=3.8
(dspnet) C:\Windows\System32>conda activate dspnet
(dspnet) C:\Windows\System32>python --version
Python 3.8.204.2 安装环境依赖
进入项目目录 cd DSPNet
1.安装依赖:pip install -r requirements.txt
此时出现问题:
1.SimpleITK==1.2.3 太老了,PyPI 已经删除 Windows 的这个版本。
-
可用的第一个版本是
1.2.4。
2.scikit-image==0.14.0 依赖太旧,要求旧版 numpy(1.15),与当前环境冲突。
-
可用方案是升级它,比如
0.17.2(和 torch 1.8 兼容)。
3.其他库(如 numpy、opencv、nibabel)新旧兼容问题也需要稍微调整。
ERROR: Ignored the following versions that require a different python version: 0.22.0 Requires-Python >=3.9; 0.22.0rc1 Requires-Python >=3.9; 0.23.0 Requires-Python >=3.10; 0.23.0rc0 Requires-Python >=3.10; 0.23.0rc2 Requires-Python >=3.10; 0.23.1 Requires-Python >=3.10; 0.23.2 Requires-Python >=3.10; 0.23.2rc1 Requires-Python >=3.10; 0.24.0 Requires-Python >=3.9; 0.24.0rc1 Requires-Python >=3.9; 0.25.0 Requires-Python >=3.10; 0.25.0rc0 Requires-Python >=3.10; 0.25.0rc1 Requires-Python >=3.10; 0.25.0rc2 Requires-Python >=3.10; 0.25.1 Requires-Python >=3.10; 0.25.2 Requires-Python >=3.10; 0.25.2rc0 Requires-Python >=3.10; 1.25.0 Requires-Python >=3.9; 1.25.1 Requires-Python >=3.9; 1.25.2 Requires-Python >=3.9; 1.26.0 Requires-Python <3.13,>=3.9; 1.26.1 Requires-Python <3.13,>=3.9; 1.26.2 Requires-Python >=3.9; 1.26.3 Requires-Python >=3.9; 1.26.4 Requires-Python >=3.9; 11.0.0 Requires-Python >=3.9; 11.1.0 Requires-Python >=3.9; 11.2.1 Requires-Python >=3.9; 11.3.0 Requires-Python >=3.9; 12.0.0 Requires-Python >=3.10; 2.0.0 Requires-Python >=3.9; 2.0.1 Requires-Python >=3.9; 2.0.2 Requires-Python >=3.9; 2.1.0 Requires-Python >=3.10; 2.1.1 Requires-Python >=3.10; 2.1.2 Requires-Python >=3.10; 2.1.3 Requires-Python >=3.10; 2.2.0 Requires-Python >=3.10; 2.2.1 Requires-Python >=3.10; 2.2.2 Requires-Python >=3.10; 2.2.3 Requires-Python >=3.10; 2.2.4 Requires-Python >=3.10; 2.2.5 Requires-Python >=3.10; 2.2.6 Requires-Python >=3.10; 2.3.0 Requires-Python >=3.11; 2.3.1 Requires-Python >=3.11; 2.3.2 Requires-Python >=3.11; 2.3.3 Requires-Python >=3.11; 2.3.4 Requires-Python >=3.11; 5.3.0 Requires-Python >=3.9; 5.3.1 Requires-Python >=3.9; 5.3.2 Requires-Python >=3.9
ERROR: Could not find a version that satisfies the requirement SimpleITK==1.2.3 (from versions: 1.0.1, 1.2.0, 1.2.4, 2.0.0, 2.0.1, 2.0.2, 2.1.0, 2.1.1, 2.1.1.2, 2.2.0, 2.2.1, 2.3.0, 2.3.1, 2.4.0, 2.4.1, 2.5.0)
ERROR: No matching distribution found for SimpleITK==1.2.3
解决方法:手动调整依赖并重新安装
1.编辑 requirements.txt
原配置包
json5==0.8.5
jupyter==1.0.0
nibabel==2.5.1
numpy==1.15.1
opencv-python==4.2.0.32
Pillow>=8.1.1
sacred==0.7.5
scikit-image==0.14.0
SimpleITK==1.2.3
torch==1.3.0
torchvision==0.4.1
tqdm==4.32.2
dcm2nii
修改后配置文件
json5==0.8.5
jupyter==1.0.0
nibabel==2.5.1
numpy==1.19.5 //numpy==1.19.5是最后一个支持 PyTorch 1.8 + Python 3.8 的稳定版本。
opencv-python==4.2.0.32
Pillow==10.4.0
sacred==0.7.5
scikit-image==0.17.2 //scikit-image==0.17.2是 PyTorch 1.x 时代常用的版本。
SimpleITK==1.2.4 //SimpleITK==1.2.4是最接近原作者指定版本、并且兼容 Windows 的版本。
torch==1.8.1
torchvision==0.9.1
2. 更换国内镜像源(提升安装速度)
pip config set global.index-url https://pypi.tuna.tsinghua.edu.cn/simple3. 手动安装关键依赖(推荐按顺序)
pip install torch==1.8.1+cu111 torchvision==0.9.1+cu111 torchaudio==0.8.1 -f https://download.pytorch.org/whl/torch_stable.html
4. 安装其他依赖(在cmd里用^)
pip install json5==0.8.5 jupyter==1.0.0 nibabel==2.5.1 ^
numpy==1.19.5 opencv-python==4.2.0.32 Pillow==10.4.0 ^
sacred==0.7.5 scikit-image==0.17.2 SimpleITK==1.2.4
核心报错:
ERROR: Could not find a version that satisfies the requirement puccinialin
ERROR: No matching distribution found for puccinialin
当前环境的python版本太低(小于3.9)或 依赖包 puccinialin 根本不存在于 PyPI(或者拼写错误、私有包),但是经检查发现requirements.txt里没有puccinialin .
报错却显示在 “Installing backend dependencies ...” 阶段出现,那说明这个错误并不是直接安装 requirements.txt 引起的,而是某个包(比如 sacred、SimpleITK、或某个 setup.py 过程中的依赖)在安装时调用了 setuptools 的“后端构建依赖安装机制”(也就是 pyproject.toml 的 [build-system] 部分)。在这个过程中,它尝试去安装一个叫 puccinialin 的依赖,但 PyPI 上根本没有这个包。
确认是谁在拉取puccinialin
pip install -v json5==0.8.5 jupyter==1.0.0 nibabel==2.5.1 numpy==1.19.5 opencv-python==4.2.0.32 Pillow==10.4.0 sacred==0.7.5 scikit-image==0.17.2 SimpleITK==1.2.4
这次多加了 -v(verbose)参数,会打印出 是哪一个包触发了 backend dependency install。
确认触发错误的关键行是:
Installing backend dependencies ... error
ERROR: Could not find a version that satisfies the requirement puccinialin
并且它出现在 SimpleITK==1.2.4 的安装阶段。这说明问题不是出在requirements.txt,而是 pip 在安装 SimpleITK 时自动调用了新版 build backend(基于 pyproject.toml)机制,在新版 pip 中错误地尝试拉取不存在的 puccinialin 包
新版 pip(>=24)在安装旧包时会默认启用“构建隔离环境”,即在临时环境里重新安装 setuptools、wheel、Cython 等。
SimpleITK 1.2.4 的pyproject.toml结构不兼容新 pip,因此误触发一个叫puccinialin的 phantom 依赖。
--only-binary :all:或--no-build-isolation都能绕过这一步。
解决方法:
pip install SimpleITK==1.2.4 --only-binary :all:报错:
scikit-build is required to build from source.
Please run:
  python -m pip install scikit-build
pip 试图从源码编译 SimpleITK==1.2.0,但因为没有 wheel(预编译包),所以提示要安装 scikit-build
由于在 Windows + Python 3.8 环境下,而且使用的是清华镜像源,
清华镜像上的 SimpleITK 有时 缺失 Windows 平台的 wheel 文件,
导致 pip 自动回退到源码安装,从而出现这个错误。
解决方法:
1.强制使用官方 PyPI 源安装 SimpleITK 的二进制包
pip install SimpleITK==1.2.4 --only-binary :all: -i https://pypi.org/simple
但我失败了,原因:接到了 PyPI 官方源,但下载 SimpleITK-1.2.4-cp38-win_amd64.whl (28MB) 时超时了。
这是因为 PyPI 官方服务器在国外,下载大文件(尤其是 SimpleITK 这种 28MB 的 whl)经常被防火墙或网络延迟中断。
2.手动下载wheel文件(这样直接安装本地文件,不经过网络下载。)
打开浏览器访问:🔗 https://pypi.org/project/SimpleITK/1.2.4/#files

pip install D:\Class\lunwen1\DSPNet\SimpleITK-1.2.4-cp38-cp38-win_amd64.whl5.验证是否安装成功
(dspnet) C:\Windows\System32>python -c "import SimpleITK; print(SimpleITK.Version_VersionString())"
1.2.4

(dspnet) C:\Windows\System32>python -c "import torch; import numpy; print(torch.__version__, numpy.__version__)"
1.8.1+cu111 1.24.4
验证是否安装成功:pip list
Package Version
----------------- -----------
numpy 1.24.4
pillow 10.4.0
pip 24.2
setuptools 75.1.0
SimpleITK 1.2.4
torch 1.8.1+cu111
torchaudio 0.8.1
torchvision 0.9.1+cu111
typing_extensions 4.13.2
wheel 0.44.0


 到【灌水乐园】发言


