


一、vueRouter
1.1 简介
Vue Routr 是 Vue.js (opens new window) 官方的路由管理器。它和 Vue.js 的核心深度集成,让构建单页面应用变得易如反掌。
CDN地址:
https://unpkg.com/vue-router/dist/vue-router.js
路由分为前端路由和后端路由。
- 后端路由:根据前端请求的URL不同,返回不同的资源内容。
比如:
app.get('/list',(req,res)=>{
  res.send(‘响应列表信息’)
})

app.post('/add',(req,res)=>{
  res.send(‘实现添加内容’)
})
- 前端路由:根据不同的用户事件,显示不同的页面内容。
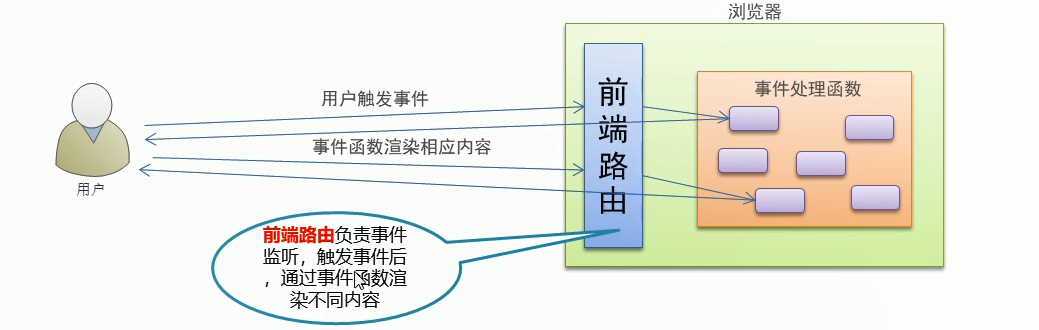
前端路由可以实现整个网站只有一个页面,内容的变化通过路由切换实现,这种叫SPA(单页面应用程序)
1.2 vueRouter使用步骤
1.2.1引入文件
    <script src="vue.js"></script>
    <script src="VueRouter.js"></script>
1.2.2 添加路由链接
<!-- router-link会默认渲染成a标签,to默认就是href属性 -->
      <router-link to="/index">首页</router-link>
      <router-link to="/detail">详情页</router-link>
1.2.3添加路由占位符
<router-view></router-view>
1.2.4 添加路由组件
      let Index = {
        template: `<div>首页</div>`
      };
      let Detail = {
        template: `<div>详情</div>`
      };
1.2.5创建路由实例配置规格
 let router = new VueRouter({
        routes: [
          { path: "/index", component: Index },
          { path: "/detail", component: Detail }
        ]
      });

 备注:path表示匹配的hash地址,component表示调用指定的组件
1.2.6挂载路由实例对象
     let vue = new Vue({
        el: "#app",
        data: {},
        // 挂载路由实例对象
        router: router
      });

备注:上面的router:router可以简写成router
01.html完整代码如下:
  <head>
    。。。
    <script src="vue.js"></script>
    <script src="VueRouter.js"></script>
  </head>
  <body>
    <div id="app">
      <!-- router-link会默认渲染成a标签,to默认就是href属性 -->
      <router-link to="/index">首页</router-link>
      <router-link to="/detail">详情页</router-link>

      <!-- 添加路由占位符 -->
      <router-view></router-view>
    </div>
    <script>
      let Index = {
        template: `<div>首页</div>`
      };
      let Detail = {
        template: `<div>详情</div>`
      };
      let router = new VueRouter({
        routes: [
          { path: "/index", component: Index },
          { path: "/detail", component: Detail }
        ]
      });
      let vue = new Vue({
        el: "#app",
        data: {},
        // 挂载路由实例对象
        router: router
      });
    </script>
  </body>
显示效果如下:

单击2个路由可以自由切换。
1.3 路由重定向
1.3.2定义
用户访问地址A,强制用户跳转到地址C,显示特定的组件页面。
  let router = new VueRouter({
        routes: [
          { path: "/", redirect: "/index" },
          { path: "/index", component: Index },
          { path: "/detail", component: Detail }
        ]
      });
说明
redirect指向的是重定向的地址,用户在访问根目录/的时候,页面会自动跳转到首页页面。
1.4嵌套路由
- 添加路由跳转链接
    <template id="detail">
       <div>
           <div>详情</div>
           <router-link to="/detail/tab1">菜单1</router-link>
           <router-link to="/detail/tab2">菜单2</router-link>
           <router-view></router-view>
        </div>
      </template>

    <script>

      let Detail = {
        template: "#detail"
      };

    </script>
- 添加子路由占位符
  <router-link to="/detail/tab1">菜单1</router-link>
  <router-link to="/detail/tab2">菜单2</router-link>
  <router-view></router-view>
-添加子组件模板对象
  let tab1 = {
     template: `<div>子组件的菜单1</div>`
  };
  let tab2 = {
      template: `<div>子组件的菜单2</div>`
  };
- 添加路由规则
let router = new VueRouter({
        routes: [
          { path: "/", redirect: "/index" },
          { path: "/index", component: Index },
          {
            path: "/detail",
            component: Detail,
            children: [
              { path: "/detail/tab1", component: tab1 },
              { path: "/detail/tab2", component: tab2 }
            ]
          }
        ]
      });
完整代码如下:
 <head>
    <meta charset="UTF-8" />
    <meta name="viewport" content="width=device-width, initial-scale=1.0" />
    <meta http-equiv="X-UA-Compatible" content="ie=edge" />
    <title>Document</title>
    <script src="vue.js"></script>
    <script src="VueRouter.js"></script>
  </head>
  <body>
    <div id="app">
      <!-- router-link会默认渲染成a标签,to默认就是href属性 -->
      <router-link to="/index">首页</router-link>
      <router-link to="/detail">详情页</router-link>

      <!-- 添加路由占位符 -->
      <router-view></router-view>
    </div>
    <script>
      let Index = {
        template: `<div>首页</div>`
      };
      let Detail = {
        template: `
        <div>
           <div>详情</div>
           <router-link to="/detail/tab1">菜单1</router-link>
           <router-link to="/detail/tab2">菜单2</router-link>
           <router-view></router-view>
        </div>
        `
      };
      let tab1 = {
        template: `<div>子组件的菜单1</div>`
      };
      let tab2 = {
        template: `<div>子组件的菜单2</div>`
      };
      let router = new VueRouter({
        routes: [
          { path: "/", redirect: "/index" },
          { path: "/index", component: Index },
          {
            path: "/detail",
            component: Detail,
            children: [
              { path: "/detail/tab1", component: tab1 },
              { path: "/detail/tab2", component: tab2 }
            ]
          }
        ]
      });
      let vue = new Vue({
        el: "#app",
        data: {},
        // 挂载路由实例对象
        router: router
      });
    </script>
  </body>
显示效果如下:
点击首页和详情页可以切换,详情页里面又嵌套一个二级的切换路由。
1.5动态路由
1.5.1传参方式1
<head>
  <meta charset="UTF-8" />
  <meta name="viewport" content="width=device-width, initial-scale=1.0" />
  <meta http-equiv="X-UA-Compatible" content="ie=edge" />
  <title>Document</title>
  <script src="vue.js"></script>
  <script src="VueRouter.js"></script>
</head>
<body>
  <div id="app">
    <!-- router-link会默认渲染成a标签,to默认就是href属性 -->
    <router-link to="/user/1">用户1</router-link>
    <router-link to="/user/2">用户2</router-link>

    <!-- 添加路由占位符 -->
    <router-view></router-view>
  </div>
  <script>
    let Index = {
      template: `<div>用户的id是 {{$route.params.id}}</div>`
    };
    let router = new VueRouter({
      routes: [{ path: "/user/:id", component: Index }]
    });
    let vue = new Vue({
      el: "#app",
      data: {},
      // 挂载路由实例对象
      router: router
    });
  </script>
</body>
显示效果如下:

1.5.2传参方式2
<head>
  <script src="vue.js"></script>
  <script src="VueRouter.js"></script>
</head>
<body>
  <div id="app">
    <!-- router-link会默认渲染成a标签,to默认就是href属性 -->
    <router-link to="/user/1">用户1</router-link>
    <router-link to="/user/2">用户2</router-link>

    <!-- 添加路由占位符 -->
    <router-view></router-view>
  </div>
  <script>
    let Index = {
      props: ["id"],
      template: `<div>用户的id是 {{id}}</div>`
    };
    let router = new VueRouter({
      // 通过props属性设置传递id
      routes: [{ path: "/user/:id", component: Index, props: true }]
    });
    let vue = new Vue({
      el: "#app",
      data: {},
      // 挂载路由实例对象
      router: router
    });
  </script>
</body>
1.6命名路由
 <head>
    <script src="vue.js"></script>
    <script src="vue-router.js"></script>
  </head>
  <body>
    <div id="app">
      <!-- 定义路由链接 -->
      <router-link :to="{name:'detail',params:{id:1}}">首页</router-link>
      <router-link :to="{name:'index',params:{id:2}}">详情</router-link>
      <!-- 定义路由占位符 -->
      <router-view></router-view>
    </div>
    <template id="index">
      <div>
        <h3>首页内容{{ id }}</h3>
      </div>
    </template>
    <template id="detail">
      <div>
        <h3>详情页内容{{ id }}</h3>
      </div>
    </template>
    <script>
      //  定义路由组件模板
      let Index = {
        template: "#index",
        props: ["id"]
      };
      let Detail = {
        template: "#detail",
        props: ["id"]
      };

      //   定义路由规则
      let router = new VueRouter({
        routes: [
          {
            name: "index",
            path: "/index",
            component: Index,
            props: true
          },
          {
            name: "detail",
            path: "/detail",
            component: Detail,
            props: true
          }
        ]
      });
      let vue = new Vue({
        el: "#app",
        data: {},
        methods: {},
        // 挂载路由实例
        router: router
      });
    </script>
  </body>
1.7编程式导航
vue中的导航分为:
- 1、声明式导航
<a>链接</a>
<router-link></router-link>
- 2、编程式导航
this.$router.push('hash地址')
this.$router.go()
代码示例:
<head>
    <script src="vue.js"></script>
    <script src="vue-router.js"></script>
  </head>
  <body>
    <div id="app">
      <router-link to="/index">首页</router-link>
      <router-link to="/detail">详情</router-link>

      <router-view></router-view>
    </div>
    <template id="index">
      <div>
        <h3>首页内容</h3>
        <button @click="handle">前进</button>
      </div>
    </template>
    <template id="detail">
      <div>
        <h3>详情页内容</h3>
        <button @click="handle2">回退</button>
      </div>
    </template>
    <script>
      //  定义路由组件模板
      let Index = {
        template: "#index",
        methods: {
          handle: function() {
            this.$router.push("/detail");
          }
        }
      };
      let Detail = {
        template: "#detail",
        methods: {
          handle2: function() {
            this.$router.go("-1");
          }
        }
      };

      //   定义路由规则
      let router = new VueRouter({
        routes: [
          {
            name: "index",
            path: "/index",
            component: Index
          },
          {
            name: "detail",
            path: "/detail",
            component: Detail
          }
        ]
      });
      let vue = new Vue({
        el: "#app",
        data: {},
        methods: {},
        // 挂载路由实例
        router: router
      });
    </script>
  </body>
二、路由案例练习
<head>
    <meta charset="UTF-8" />
    <meta name="viewport" content="width=device-width, initial-scale=1.0" />
    <meta http-equiv="X-UA-Compatible" content="ie=edge" />
    <title>Document</title>
    <script src="vue.js"></script>
    <script src="vue-router_3.0.2.js"></script>
    <style>
      * {
        margin: 0;
        padding: 0;
      }
      ul {
        list-style: none;
      }
      .main {
        width: 100%;
        height: 400px;
        background-color: #ccc;
        display: flex;
      }
      .main-left {
        width: 200px;
        height: 400px;
        background-color: pink;
      }
      .main-right {
        flex: 1;
        background-color: yellow;
      }
    </style>
  </head>
  <body>
    <div id="app">
      <!-- 定义路由渲染 -->
      <router-view></router-view>
    </div>
    <!-- 定义首页模板 -->
    <template id="index">
      <div>
        <div class="header">首页头部</div>
        <div class="main">
          <!-- 首页主体  -->
          <div class="main-left">
            <ul>
              <!-- 设置左侧的路由跳转链接 -->
              <li><router-link to="/users">用户管理</router-link></li>
              <li><router-link to="/goods">商品管理</router-link></li>
              <li><router-link to="/roles">角色管理</router-link></li>
              <li><router-link to="/rights">权限管理</router-link></li>
              <li><router-link to="/settings">设置管理</router-link></li>
            </ul>
          </div>
          <div class="main-right">
            <!-- 设置右侧的路由显示占位符 -->
            <router-view></router-view>
          </div>
        </div>
        <div class="footer">首页底部</div>
      </div>
    </template>
    <!-- 定义右侧的用户模板 -->
    <template id="users">
      <div>
        <h3>用户信息列表</h3>
        <table>
          <tr>
            <th>编号</th>
            <th>用户名</th>
            <th>密码</th>
            <th>操作</th>
          </tr>
          <tr v-for="(item,index) in usersList">
            <td>{{ item.id }}</td>
            <td>{{ item.name }}</td>
            <td>{{ item.password }}</td>
            <td>
              <a href="">详情</a>
            </td>
          </tr>
        </table>
      </div>
    </template>
    <script>
      // 定义首页模板对象
      let Index = {
        template: "#index"
      };
      //   设置5个菜单对应的路由模板对象
      let Users = {
        template: "#users",
        data: function() {
          // 模拟右侧显示的虚拟数据
          return {
            usersList: [
              { id: 1, name: "admin", password: "111" },
              { id: 2, name: "tom", password: "222" },
              { id: 3, name: "jim", password: "333" },
              { id: 4, name: "jack", password: "444" },
              { id: 5, name: "jerry", password: "555" }
            ]
          };
        }
      };
      let Goods = {
        template: "<div>商品管理部分的内容</div>"
      };
      let Roles = {
        template: "<div>角色管理部分的内容</div>"
      };
      let Rights = {
        template: "<div>权限管理部分的内容</div>"
      };
      let Settings = {
        template: "<div>设置管理部分的内容</div>"
      };
      //   定义路由规则
      let router = new VueRouter({
        routes: [
          {
            path: "/",
            // 设置访问根路径下面的默认跳转路径
            redirect: "/users",
            component: Index,
            children: [
              { path: "/users", component: Users },
              { path: "/goods", component: Goods },
              { path: "/roles", component: Roles },
              { path: "/rights", component: Rights },
              { path: "/settings", component: Settings }
            ]
          }
        ]
      });
      let vue = new Vue({
        el: "#app",
        data: {},
        // 挂载路由
        router: router
      });
    </script>
  </body>


 2098
2098

 被折叠的 条评论
为什么被折叠?
被折叠的 条评论
为什么被折叠?
 到【灌水乐园】发言


