 Vue2.0 Axios基础实战与拦截器详解


 本文详细介绍了Vue框架下的Axios请求配置,包括GET、POST、PUT、DELETE等操作,并展示了如何使用拦截器处理请求和响应。同时,通过实例演示了创建实例对象和并发请求的用法。

Vue 相关知识梳理系列文章将在本号持续发布,一起查漏补缺学个痛快!若您有遇到其它相关问题,非常欢迎在评论中留言讨论,达到帮助更多人的目的。若感本文对您有所帮助请点个赞吧!
从1989年 Tim 发明了超文本标记语言 HTML 开始,前端的发展就此开始了。从开始的静态网页,再到 ASP、JSP 和 PHP 等创建动态 HTML 方式的诞生,之后是 JavaScript的加入,JavaScript 操作 HTML,JQuery 的诞生。从 MVC 模式演变到 MVVM框架模式等等,前端在悄无声息间茁壮成长。
2013年,在 Google 工作的尤雨溪,受到 Angular 的启发,开发出了一款轻量框架,最初命名为 Seed。2013年12月,更名为 Vue,图标颜色是代表勃勃生机的绿色,版本号是 0.6.0。2014.01.24,Vue 正式对外发布,版本号是 0.8.0。
2015.10.26,vue-router、vuex、vue-cli 相继发布,标志着 Vue 从一个视图层库发展为一个渐进式框架。2016.10.01,Vue 2.0 发布,它吸收了 React 的虚拟 Dom 方案,还支持服务端渲染。2019.12.05,在万众期待中,尤雨溪公布了 Vue 3 源代码,目前 Vue 3 处于 Alpha 版本。
本系列旨在梳理 Vue 2.0 相关知识,接下来让我们一起Vue的旅途吧!
一、Axios 的介绍及其配置
介绍:Axios 就是通过 promise 把 Ajax(对网页的数据局部刷新)进行封装。
配置:首先搭建本地的数据接口 json-server( json-server 是一个 Node 模块,运行 Express 服务器,能够快速的搭建一个后台服务,模拟后端数据)。
1.全局安装 json-server
npm install -g json-server
2.创建 db.json 文件,写上后台数据
{
  "posts": [
    {
      "id": 1,
      "title": "我是第一",
      "author": "第一"
    },
    {
      "id": 2,
      "title": "这里是标题",
      "author": "葛媛"
    }
  ],
  "comments": [
    {
      "id": 1,
      "body": "comment",
      "postId": 1
    },
    {
      "body": "这是body",
      "postId": 2,
      "id": 2
    }
  ],
  "profile": {
    "name": "我的名字"
  }
}
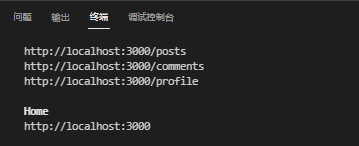
3.启动 json-server 并显示出相关链接
json-server --watch db.json
4.创建一个 html
<!DOCTYPE html>
<html lang="en">


<head>
    <meta charset="UTF-8">
    <meta http-equiv="X-UA-Compatible" content="IE=edge">
    <meta name="viewport" content="width=device-width, initial-scale=1.0">
    <title>Document</title>
    <!--使用CDN命令,HTML文件中必须包含这个 -->
    <script src="https://cdn.jsdelivr.net/npm/axios/dist/axios.min.js"></script>
</head>


<body>
    <script>
        console.log(axios);
</script>
</body>


</html>
二、Axios 请求的基本配置与使用
基本使用
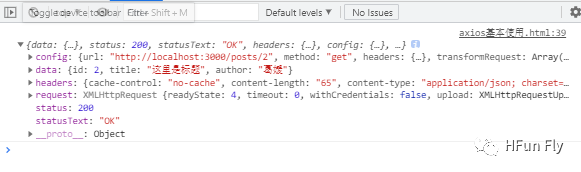
1、发送GET请求类型从服务器端读取posts的数据
<!DOCTYPE html>
<html lang="en">


<head>
    <meta charset="UTF-8">
    <meta http-equiv="X-UA-Compatible" content="IE=edge">
    <meta name="viewport" content="width=device-width, initial-scale=1.0">
    <title>Document</title>
    <script src="https://cdn.jsdelivr.net/npm/axios/dist/axios.min.js"></script>
</head>


<body>
    <div class="container">
        <h2 class="page-header">基本使用</h2>
        <button class="btn btn-primary">发送GET请求</button>
        <button class="btn btn-warning">发送POST请求</button>
        <button class="btn btn-success">发送PUT请求</button>
        <button class="btn btn-danger">发送DELETE请求</button>
    </div>
    <script>
        //获取按钮
        const btns = document.querySelectorAll('button');


        //第一个
        btns[0].onclick = function () {
            //发送AJAX请求
            axios({
                //请求类型
                method: 'GET',
                //URL
                url: 'http://localhost:3000/posts/2',
            }).then(response => {
                console.log(response);
            });
        }
</script>
</body>


</html>
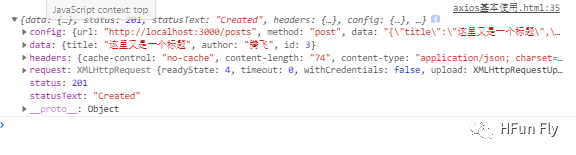
2、发送POST请求类型向服务器端添加posts新数据
<!DOCTYPE html>
<html lang="en">


<head>
    <meta charset="UTF-8">
    <meta http-equiv="X-UA-Compatible" content="IE=edge">
    <meta name="viewport" content="width=device-width, initial-scale=1.0">
    <title>Document</title>
    <script src="https://cdn.jsdelivr.net/npm/axios/dist/axios.min.js"></script>
</head>


<body>
    <div class="container">
        <h2 class="page-header">基本使用</h2>
        <button class="btn btn-primary">发送GET请求</button>
        <button class="btn btn-warning">发送POST请求</button>
        <button class="btn btn-success">发送PUT请求</button>
        <button class="btn btn-danger">发送DELETE请求</button>
    </div>
    <script>
        //获取按钮
        const btns = document.querySelectorAll('button');


        //添加一篇新的文章
        btns[1].onclick = function () {
            //发送AJAX请求
            axios({
                //请求类型
                method: 'POST',
                //URL
                url: 'http://localhost:3000/posts',
                //设置请求体
                data: {
                    title: "这里又是一个标题",
                    author: "腾飞"
                }
            }).then(response => {
                console.log(response);
            });
        }
</script>
</body>


</html>
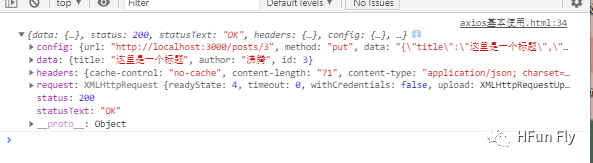
3、发送PUT请求类型更新服务器端已有posts的数据
<!DOCTYPE html>
<html lang="en">


<head>
    <meta charset="UTF-8">
    <meta http-equiv="X-UA-Compatible" content="IE=edge">
    <meta name="viewport" content="width=device-width, initial-scale=1.0">
    <title>Document</title>
    <script src="https://cdn.jsdelivr.net/npm/axios/dist/axios.min.js"></script>
</head>


<body>
    <div class="container">
        <h2 class="page-header">基本使用</h2>
        <button class="btn btn-primary">发送GET请求</button>
        <button class="btn btn-warning">发送POST请求</button>
        <button class="btn btn-success">发送PUT请求</button>
        <button class="btn btn-danger">发送DELETE请求</button>
    </div>
    <script>
        //获取按钮
        const btns = document.querySelectorAll('button');


        //更新数据
        btns[2].onclick = function () {
            //发送AJAX请求
            axios({
                //请求类型
                method: 'PUT',
                //URL
                url: 'http://localhost:3000/posts/3',
                data: {
                    "title": "这里又是一个标题",
                    "author": "沸腾"
                }
            }).then(response => {
                console.log(response);
            });
        }
</script>
</body>


</html>
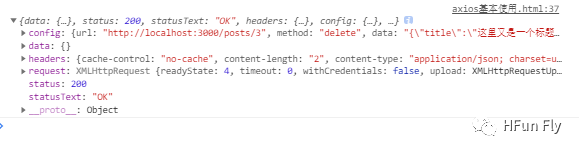
4、发送delete请求类型删除服务器端posts数据
<!DOCTYPE html>
<html lang="en">


<head>
    <meta charset="UTF-8">
    <meta http-equiv="X-UA-Compatible" content="IE=edge">
    <meta name="viewport" content="width=device-width, initial-scale=1.0">
    <title>Document</title>
    <script src="https://cdn.jsdelivr.net/npm/axios/dist/axios.min.js"></script>
</head>


<body>
    <div class="container">
        <h2 class="page-header">基本使用</h2>
        <button class="btn btn-primary">发送GET请求</button>
        <button class="btn btn-warning">发送POST请求</button>
        <button class="btn btn-success">发送PUT请求</button>
        <button class="btn btn-danger">发送DELETE请求</button>
    </div>
    <script>
        //获取按钮
        const btns = document.querySelectorAll('button');


        //删除数据
        btns[3].onclick = function () {
            //发送AJAX请求
            axios({
                //请求类型
                method: 'delete',
                //URL
                url: 'http://localhost:3000/posts/3',
                data: {
                    "title": "这里又是一个标题",
                    "author": "沸腾"
                }
            }).then(response => {
                console.log(response);
            });
        }
</script>
</body>


</html>
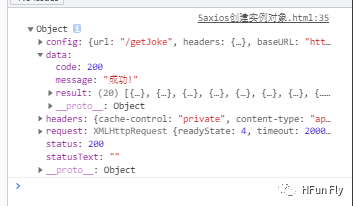
5、创建实例对象发送请求
<!DOCTYPE html>
<html lang="en">


<head>
    <meta charset="UTF-8">
    <meta http-equiv="X-UA-Compatible" content="IE=edge">
    <meta name="viewport" content="width=device-width, initial-scale=1.0">
    <title>Document</title>
    <script src="https://cdn.jsdelivr.net/npm/axios/dist/axios.min.js"></script>
</head>


<body>
    <div class="container">
        <h2 class="page-header">创建实例对象</h2>
    </div>
    <script>
        //获取按钮
        const btns = document.querySelectorAll('button');


        //创建实例对象
        const sun = axios.create({
            baseURL: 'https://api.apiopen.top',
            timeout: 2000
        });
        // 实例对象发送请求
        sun({
            url: '/getJoke',
        }).then(response => {
            console.log(response);
        })
        //借助封装好的方法发送请求
        // sun.get('/getJoke').then(response => {
        //     console.log(response);
        // })
</script>
</body>


</html>
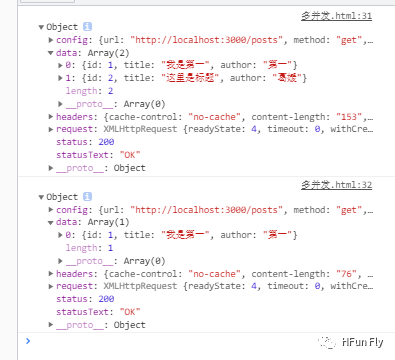
6、同时发送多个请求(多并发请求)
<!DOCTYPE html>
<html lang="en">


<head>
    <meta charset="UTF-8">
    <meta http-equiv="X-UA-Compatible" content="IE=edge">
    <meta name="viewport" content="width=device-width, initial-scale=1.0">
    <title>多并发</title>
    <script src="https://cdn.jsdelivr.net/npm/axios/dist/axios.min.js"></script>
</head>


<body>
    <script>
        //发送多个请求(并发请求),若一个请求出错,那就会停止请求
        axios.all([
                axios.get('http://localhost:3000/posts'),
                axios.get('http://localhost:3000/posts', {
                    params: {
                        id: 1
                    }
                })
            ])
            .then(
                axios.spread((res1, res2) => {
                    console.log(res1);
                    console.log(res2);
                })
            ).catch(err => {
                console.log(err)
            })
</script>
</body>


</html>
三、axios拦截器
分为请求拦截器和响应拦截器,用于在发送请求或得到响应后进行响应处理。
request请求拦截器:
发送请求前统一处理,设置用户登录请求等。
response响应拦截器:
根据响应的状态码来进行下一步操作,从而跳转不同的提示页面。
<!DOCTYPE html>
<html lang="en">


<head>
    <meta charset="UTF-8">
    <meta http-equiv="X-UA-Compatible" content="IE=edge">
    <meta name="viewport" content="width=device-width, initial-scale=1.0">
    <title>Document</title>
    <script src="https://cdn.jsdelivr.net/npm/axios/dist/axios.min.js"></script>
</head>


<body>
    <script>
        //Promise
        // 设置请求拦截器 (config 配置对象)
        axios.interceptors.request.use(function (config) {
        // 在发送请求之前做什么(例如要求用户登录判断是否有token)
            console.log('请求拦截器 成功');
            return config;//放行请求
        }, function (error) {
        //  对请求错误做什么(例如请求超时,跳转其他页面)
            console.log('请求拦截器 失败');
            return Promise.reject(error);
        });


        // 设置响应拦截器
        axios.interceptors.response.use(function (response) {
        //对响应数据做什么(对数据进行过滤)
            console.log('响应拦截器 成功');
            return response;
        }, function (error) {
        //对响应错误做什么(根据错误码跳转不同的错误提示)
            console.log('响应拦截器 失败');
            return Promise.reject(error);
        });
        //发送请求
        axios({
            method: 'GET',
            url: 'http://localhost:3000/posts'
        }).then(response => {
            console.log('自定义回调处理成功结果');
        }).catch(reason => {
            console.log('自定义失败回调');
        })
</script>
</body>


</html>
Vue 相关知识梳理系列文章将在本号持续发布,一起查漏补缺学个痛快!若您有遇到其它相关问题,非常欢迎在评论中留言讨论,达到帮助更多人的目的。若感本文对您有所帮助请点个赞吧!

葛媛
HFun 前端攻城狮


 5073
5073

 被折叠的 条评论
为什么被折叠?
被折叠的 条评论
为什么被折叠?
 到【灌水乐园】发言


