


 本文介绍了如何在SpringBoot项目中集成Swagger工具,包括添加依赖、配置Swagger2、解决版本冲突及静态资源问题,最后展示了如何通过浏览器访问SwaggerUI进行API测试。
Swagger是一套用于创建、描述和测试RESTful风格的Web服务的工具和框架。它能够自动生成详尽的API文档,并在后台代码更新时自动同步更新文档内容。此外,Swagger还提供了一个完整的测试页面,可用于调试API。
配置Swagger有以下步骤:
1、在pom文件中添加依赖
    <dependency>
            <groupId>io.springfox</groupId>
            <artifactId>springfox-swagger2</artifactId>
            <version>2.9.2</version>
        </dependency>

        <dependency>
            <groupId>io.springfox</groupId>
            <artifactId>springfox-swagger-ui</artifactId>
            <version>2.9.2</version>
        </dependency>
2、添加config配置类
//Swagger配置


package com.example.helloword.config;

import org.springframework.context.annotation.Bean;
import org.springframework.context.annotation.Configuration;
import springfox.documentation.builders.ApiInfoBuilder;
import springfox.documentation.builders.PathSelectors;
import springfox.documentation.builders.RequestHandlerSelectors;
import springfox.documentation.service.ApiInfo;
import springfox.documentation.spi.DocumentationType;
import springfox.documentation.spring.web.plugins.Docket;
import springfox.documentation.swagger2.annotations.EnableSwagger2;

@Configuration //告诉Spring 容器,这个类是一个配置类
@EnableSwagger2 //启用Swagger2功能
public class SwaggerConfig {
    @Bean
    public Docket createRestApi() {
        return new Docket(DocumentationType.SWAGGER_2)
                .apiInfo(apiInfo())
                .select()
                .apis(RequestHandlerSelectors.basePackage("com"))   //扫描哪个包
                .paths(PathSelectors.any()).build();
    }

    private ApiInfo apiInfo() {
        return new ApiInfoBuilder()
                .title("演示项目API")//标题
                .description("学习Swagger2的演示项目")//描述
                .version("1.0")//版本
                .build();
    }
}
3、在application.properties中添加
#Springboot2.6.x后与Swagger有版本冲突问题,需要在application.properties中加入以下配置
spring.mvc.pathmatch-startegy=ant_path_matter
注意:在application.properties中如果有设置静态资源目录的需注释下,之前我就是因为静态资源过滤的原因导致在服务器打不开swagger
#spring.mvc.static-path-pattern=/images/**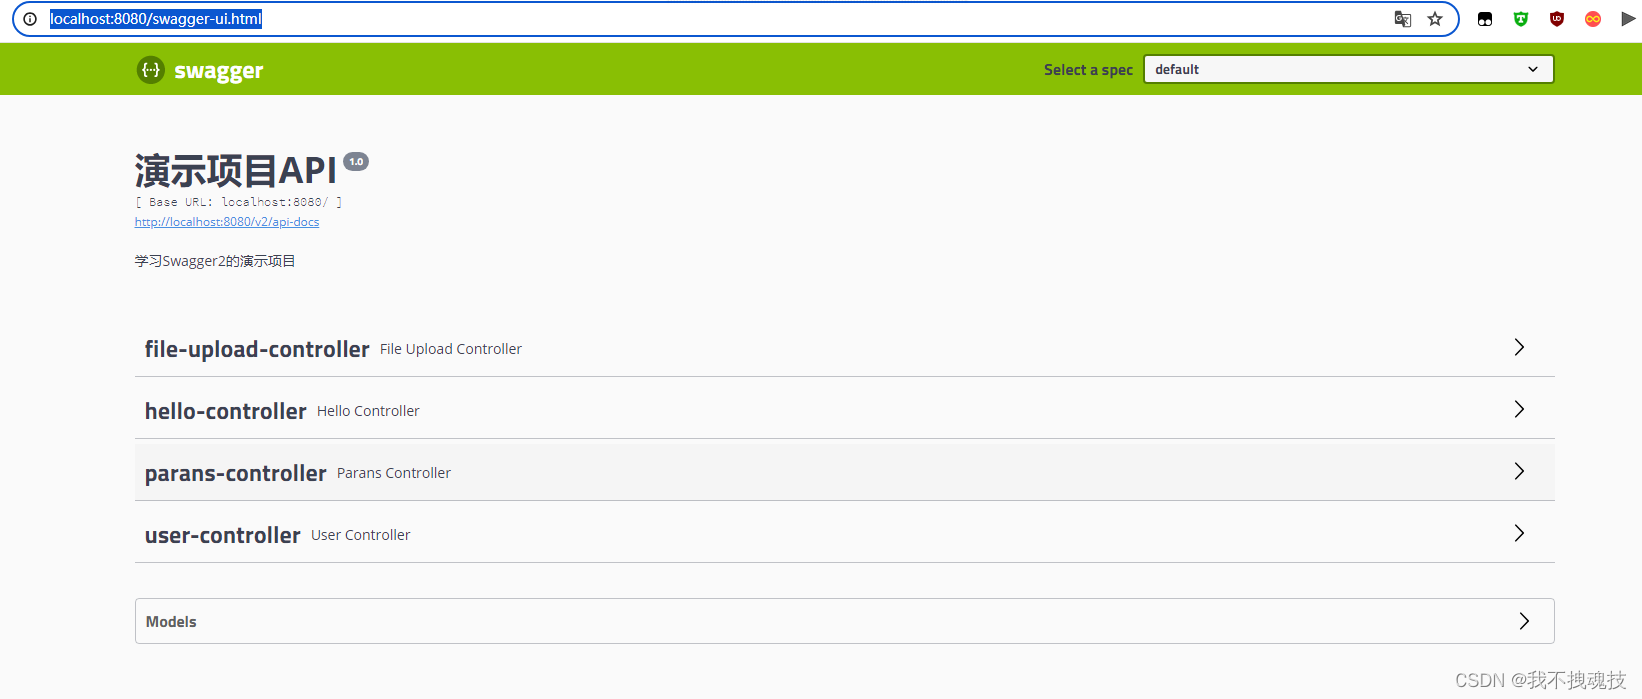
#spring.web.resources.static-locations = classpath:/css4、在浏览器输入http://localhost:8080/swagger-ui.html,即可访问swagger的ui界面(我的服务器端口是8080,一般springboot默认为8080端口),在ui界面可以查看自己的controller接口


 1589
1589


 到【灌水乐园】发言


