


 文章详细介绍了Go语言中slice的结构,包括其包含的数组指针、长度和容量。讨论了unsafe.Pointer在类型系统中的作用,以及slice的扩容策略,如何根据不同的容量需求平滑地调整增长速度。此外,文章还展示了如何使用slice实现一个简单的线性表,并提供了插入、删除、修改和查找数据的方法。最后提到了内存分配函数mallocgc和内存移动函数memmove在slice操作中的作用。
探索slice的原理
说明
- 本篇博客基于Go1.18的源码
- 本人也是刚开始学习,能力有限,理解不对的地方,请评论区指正
主要内容
- 结构体定义
- 扩容原理与规则
- 利用slice实现一个简单的线性表
- mallocgc
- memmove
slice结构定义
type slice struct {
	array unsafe.Pointer
	len   int
	cap   int
}
从源码中可以看出,slice是一个结构体定义,包含了三部分,一个指向底层数组的指针、两个整型变量,len表示slice的长度,cap表示容量。
What’s unsafe.Pointer??
type Pointer *ArbitraryType
这是Pointer的定义,发现它是一个指针类型的别名,又出现了一个新的名词ArbitraryType,中文翻译过来就是任意类型,此时可以推断出,这是一个指向任意类型的指针。如果去查看源码,会发现:
type ArbitraryType int
居然是一个int,这自然是很容易理解的,不管是什么类型,存放他们的地址都是一个int类型的整数,只不过我们怎么解释这段地址存放的是字符串还是浮点数。
对于Pointer,看官方的解释:
- A pointer value of any type can be converted to a Pointer.
- A Pointer can be converted to a pointer value of any type.
- A uintptr can be converted to a Pointer.
- A Pointer can be converted to a uintptr.
Pointer therefore allows a program to defeat the type system and read and write arbitrary memory. It should be used with extreme care.
简而言之,Pointer可以绕过Go语言的类型系统,并且可以读取和写入任意的内存。相当危险不是吗?
slice的扩容机制
slice的扩容操作主要由appen调用slice.go中的growslice方法来实现的。
// growslice handles slice growth during append.
// It is passed the slice element type, the old slice, and the desired new minimum capacity,
// and it returns a new slice with at least that capacity, with the old data
// copied into it.
// The new slice's length is set to the old slice's length,
// NOT to the new requested capacity.
// This is for codegen convenience. The old slice's length is used immediately
// to calculate where to write new values during an append.
// TODO: When the old backend is gone, reconsider this decision.
// The SSA backend might prefer the new length or to return only ptr/cap and save stack space.
func growslice(et *_type, old slice, cap int) slice {
	if raceenabled {
		callerpc := getcallerpc()
		racereadrangepc(old.array, uintptr(old.len*int(et.size)), callerpc, abi.FuncPCABIInternal(growslice))
	}
	if msanenabled {
		msanread(old.array, uintptr(old.len*int(et.size)))
	}
	if asanenabled {
		asanread(old.array, uintptr(old.len*int(et.size)))
	}

	if cap < old.cap {
		panic(errorString("growslice: cap out of range"))
	}

	if et.size == 0 {
		// append should not create a slice with nil pointer but non-zero len.
		// We assume that append doesn't need to preserve old.array in this case.
		return slice{unsafe.Pointer(&zerobase), old.len, cap}
	}

	newcap := old.cap
	doublecap := newcap + newcap
	if cap > doublecap {
		newcap = cap
	} else {
		const threshold = 256
		if old.cap < threshold {
			newcap = doublecap
		} else {
			// Check 0 < newcap to detect overflow
			// and prevent an infinite loop.
			for 0 < newcap && newcap < cap {
				// Transition from growing 2x for small slices
				// to growing 1.25x for large slices. This formula
				// gives a smooth-ish transition between the two.
				newcap += (newcap + 3*threshold) / 4
			}
			// Set newcap to the requested cap when
			// the newcap calculation overflowed.
			if newcap <= 0 {
				newcap = cap
			}
		}
	}

	var overflow bool
	var lenmem, newlenmem, capmem uintptr
	// Specialize for common values of et.size.
	// For 1 we don't need any division/multiplication.
	// For goarch.PtrSize, compiler will optimize division/multiplication into a shift by a constant.
	// For powers of 2, use a variable shift.
	switch {
	case et.size == 1:
		lenmem = uintptr(old.len)
		newlenmem = uintptr(cap)
		capmem = roundupsize(uintptr(newcap))
		overflow = uintptr(newcap) > maxAlloc
		newcap = int(capmem)
	case et.size == goarch.PtrSize:
		lenmem = uintptr(old.len) * goarch.PtrSize
		newlenmem = uintptr(cap) * goarch.PtrSize
		capmem = roundupsize(uintptr(newcap) * goarch.PtrSize)
		overflow = uintptr(newcap) > maxAlloc/goarch.PtrSize
		newcap = int(capmem / goarch.PtrSize)
	case isPowerOfTwo(et.size):
		var shift uintptr
		if goarch.PtrSize == 8 {
			// Mask shift for better code generation.
			shift = uintptr(sys.Ctz64(uint64(et.size))) & 63
		} else {
			shift = uintptr(sys.Ctz32(uint32(et.size))) & 31
		}
		lenmem = uintptr(old.len) << shift
		newlenmem = uintptr(cap) << shift
		capmem = roundupsize(uintptr(newcap) << shift)
		overflow = uintptr(newcap) > (maxAlloc >> shift)
		newcap = int(capmem >> shift)
	default:
		lenmem = uintptr(old.len) * et.size
		newlenmem = uintptr(cap) * et.size
		capmem, overflow = math.MulUintptr(et.size, uintptr(newcap))
		capmem = roundupsize(capmem)
		newcap = int(capmem / et.size)
	}

	// The check of overflow in addition to capmem > maxAlloc is needed
	// to prevent an overflow which can be used to trigger a segfault
	// on 32bit architectures with this example program:
	//
	// type T [1<<27 + 1]int64
	//
	// var d T
	// var s []T
	//
	// func main() {
	//   s = append(s, d, d, d, d)
	//   print(len(s), "\n")
	// }
	if overflow || capmem > maxAlloc {
		panic(errorString("growslice: cap out of range"))
	}

	var p unsafe.Pointer
	if et.ptrdata == 0 {
		p = mallocgc(capmem, nil, false)
		// The append() that calls growslice is going to overwrite from old.len to cap (which will be the new length).
		// Only clear the part that will not be overwritten.
		memclrNoHeapPointers(add(p, newlenmem), capmem-newlenmem)
	} else {
		// Note: can't use rawmem (which avoids zeroing of memory), because then GC can scan uninitialized memory.
		p = mallocgc(capmem, et, true)
		if lenmem > 0 && writeBarrier.enabled {
			// Only shade the pointers in old.array since we know the destination slice p
			// only contains nil pointers because it has been cleared during alloc.
			bulkBarrierPreWriteSrcOnly(uintptr(p), uintptr(old.array), lenmem-et.size+et.ptrdata)
		}
	}
	memmove(p, old.array, lenmem)

	return slice{p, old.len, newcap}
}
可以看到,代码还是很长的,做了很多的工作,首先进行容量的计算,然后根据元素的类型进行实际内存容量的计算,最后调用memmove方法实现内存申请并返回一个新的slice对象。结合其中主要的代码来分析Go的开发者们在进行slice扩容实现时,思想是什么样的。
	newcap := old.cap
	doublecap := newcap + newcap
	if cap > doublecap {
		newcap = cap
	} else {
		const threshold = 256
		if old.cap < threshold {
			newcap = doublecap
		} else {
			// Check 0 < newcap to detect overflow
			// and prevent an infinite loop.
			for 0 < newcap && newcap < cap {
				// Transition from growing 2x for small slices
				// to growing 1.25x for large slices. This formula
				// gives a smooth-ish transition between the two.
				newcap += (newcap + 3*threshold) / 4
			}
			// Set newcap to the requested cap when
			// the newcap calculation overflowed.
			if newcap <= 0 {
				newcap = cap
			}
		}
	}
对于新的slice的容量的计算就是上面这段代码。总结如下:
- 如果新的要求的容量大于旧容量的两倍,则新的容量就是要求的容量大小
- 如果旧的slice的容量小于一个阈值(go1.18中是256),则将新的容量设置为旧容量的两倍
- 否则,就是大于阈值的情况,循环累加
(newcap + 3 * threshold)/4,直到新的容量不小于要求的容量(最后做了一个累加溢出的判断),这个速度是按照原来的1.25倍扩容
整个过程就是这样的,当小于阈值时,就两倍扩容,否则就降低增长的速度,以防浪费。
不知道你会不会有疑问,按照1.25倍为啥不直接写成newcap += newcap / 4
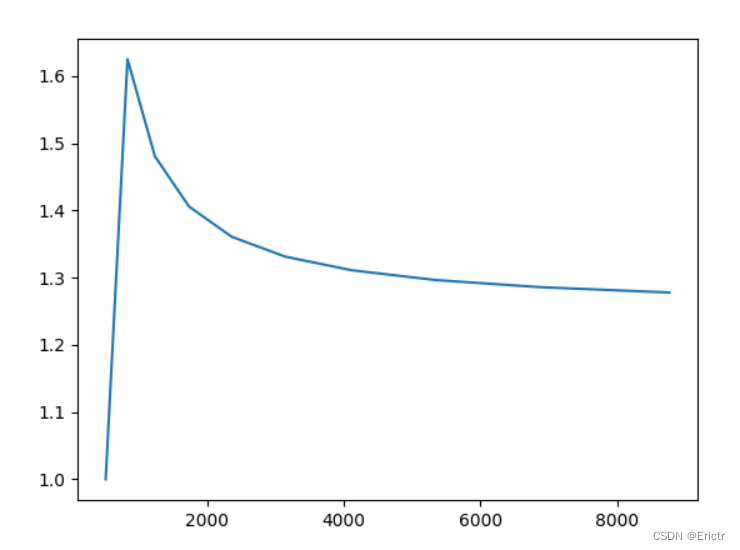
首先,按照这个公式进行1.25倍的速度扩容并不准确,按照官方文档给出的公式可以实现更加平滑的过渡到1.25倍,更多的是按照经验得出的。
使用python写一段仿真程序模拟这个增长过程,得出的增长曲线:
使用slice实现一个线性表
线性表定义
type Any interface {
	~int | ~int8 | ~int16 | ~int32 | ~int64 | ~uint | ~uint8 | ~uint16 | ~uint32 | ~uint64 | ~float32 | ~float64 | ~string | ~bool
}

type List[T Any] struct {
	arr  []T
	size int
}
插入数据
func (self *List[T]) Insert(element T) {
	self.arr = append(self.arr, element)
	self.size += 1
}
删除数据
func (self *List[T]) DeleteAt(pos int) {
	if pos < 0 || pos >= self.size {
		panic("out of range")
	}
	self.arr = append(self.arr[:pos], self.arr[pos+1:]...)
	self.size--
}
修改数据
func (self *List[T]) ModifyAt(pos int, element T) {
	if pos < 0 || pos > self.size {
		panic("out of range err")
	}
	self.arr[pos] = element
}
查找数据
func (self *List[T]) At(pos int) T {
	if pos >= self.size || pos < 0 {
		panic("out of range error")
	}
	return self.arr[pos]
}
以上代码只是一个小的demo,目的是熟悉slice的操作。
对于slice的原理探索暂时到这,从代码中也可以看出,还有很多和垃圾回收相关的操作,所以实际情况下要考虑的事情有很多,也更加复杂。
mallocgc
上面的代码中计算过新的容量之后要根据元素的类型大小计算实际的内存分配,而内存分配使用的函数正是mallocgc,这个函数不同于malloc,mallocgc可以对分配的内存进行垃圾回收标记,方便后序的垃圾回收。
memmove
最后返回新的slice前执行的操作,就是将一块内存区域中的数据复制到另一块区域,不同于memcpy,memmove提供了对内存区域重叠的检查,可以安全的进行内存的复制。
之所以为什么会出现申请的新内存与就内存发生重叠,和Go语言的内存模型有关系,Go语言会将内存以“代”的形式进行划分,每一次内存申请都会选择一个合适的代进行分配,分配的内存可能是已经分配过的,也可能是没有分配过的。具体更详细的解释,如果感兴趣可以了解一下。


 539
539

 被折叠的 条评论
为什么被折叠?
被折叠的 条评论
为什么被折叠?
 到【灌水乐园】发言


