


#自己在实习期间接触了音频识别相关项目,于是便写了一个用于处理音频的二分类算法,算法主要思想是通过预处理将其转换为类似于图像的三通道特征,经过预处理后的音频特征主要为梅尔特征(MELL),梅尔频谱倒数(MFCC),Chroma特征,频谱对比度,零交叉率等,将其作为输入,输入到网络中进行训练,所搭建的网络主要由残差结构组成,同时加入了通道注意力,以求更好的融合不同通道的特征,
首先是数据加载部分:
    def _load_dataset(self, class_dir, label):


        features = []
        labels = []

        # 获取目录下所有文件列表
        file_list = [f for f in os.listdir(class_dir) if f.endswith('.wav')]

        #  加入进度条,更加直观的查看数据处理
        for file_name in tqdm(file_list,
                            desc=f"Loading {os.path.basename(class_dir)} files",
                            unit= 'file'):

            file_path = os.path.join(class_dir,file_name)


        #for file_name in os.listdir(class_dir):
        #file_path = os.path.join(class_dir, file_name)
            spec = self.preprocessor.process_file(file_path)

            if spec is not None:
                features.append(spec)
                labels.append(label)
            #print("特征矩阵为:",features)
            #print("特征矩阵size:",len(features))
            #print("特征矩阵shape:",len(features[0]))

            #print("labels为:",labels)
        if features:

            tqdm.write(f"Finish Loading files from {os.path.basename(class_dir)}")

            tqdm.write(f"Final features shape: {len(features)}")

        else:
            tqdm.write(f"\nWarning: Noe valid files found in {class_dir}")


        #print("features为:",features)
        #print("labels为:",labels)
        return features, labels
其中,spec = self.preprocessor.process_file(file_path),这里是进行数据的预处理,也就是将音频特征提取为梅尔特征(MELL),梅尔频谱倒数(MFCC),Chroma特征,频谱对比度,零交叉率等特征,以供网络输入,下面放上预处理代码:
    def extract_features(self,pre_audio, sr=22050, n_fft=2048, hop_length=512, n_mels=128, n_mfcc=20):
        """
        从WAV文件中提取多种音频特征

        参数:
            pre_audio:经过采样后的audio数组
            sr: 采样率
            n_fft: FFT窗口大小
            hop_length: 帧移
            n_mels: 梅尔带数量
            n_mfcc: MFCC系数数量

        返回:
            features: 提取的特征字典
        """

        y,sr_ = pre_audio,sr
        #print("yyyyy:",y)


        features = {}

        # 短时傅里叶变换
        stft = librosa.stft(y, n_fft=n_fft, hop_length=hop_length)
        stft_magnitude = np.abs(stft)

        # 梅尔频谱图
        mel_spec = librosa.feature.melspectrogram(S=stft_magnitude**2, sr=sr_, n_mels=n_mels)

        features['mel'] = librosa.power_to_db(mel_spec, ref=np.max)

        # MFCC
        features['mfcc'] = librosa.feature.mfcc(S=librosa.power_to_db(mel_spec), n_mfcc=n_mfcc)

        # Chroma特征
        features['chroma'] = librosa.feature.chroma_stft(S=stft_magnitude, sr=sr_)

        # 频谱对比度
        features['contrast'] = librosa.feature.spectral_contrast(S=stft_magnitude, sr=sr_)

        # 零交叉率
        features['zcr'] = librosa.feature.zero_crossing_rate(y, frame_length=n_fft, hop_length=hop_length)


        return features

    def normalize_features(self,features):
        """
        归一化特征

        参数:
            features: 特征字典

        返回:
            normalized_features: 归一化后的特征字典
        """
        normalized_features = {}
        for key in features:

            scaler = StandardScaler()
            normalized = scaler.fit_transform(features[key])
            normalized_features[key] = normalized

        return normalized_features
然后这里经过处理后的维度并不匹配,需要使用dim函数来添加维度,这里建议在调试的时候多用shape来查看维度变化,从而适配网络,当然在处理特征时也进行了归一化和正则化,用来加速收敛同时避免梯度爆炸。
最后是网络的搭建,我选择的输入形状是(1,128,128,5),其中5为通道维度,128为提取到的特征图大小,因为处理的是音频数据,所以会有一个采样率,这个会在Config里面进行设置,具体采样多少是根据你的数据集中音频段的长度来选择的,最后附上网络代码
    def model_Binary_Classification(input_shape):

        inputs = layers.Input(shape=input_shape)

        # 初始卷积块,注意维度匹配,第一个维度要128,所搭建的网络整体维度变化为128,128,64,64,32,32,16
        # 但其实128,128,96,64,64,32,32,16,这样的搭建方式更柔和,效果会更好
        x = layers.Conv2D(128, (5, 5), padding='same',)(inputs)
        x = layers.BatchNormalization()(x)
        x = layers.Activation('relu')(x)
        x = layers.MaxPooling2D((2, 2), strides=(2, 2))(x)
        print("X_shape_1:",x.shape)


        residual_1 = x

        x = layers.SeparableConv2D(128, (3, 3), padding='same')(x)
        print("X_shape_2:",x.shape)
        x = layers.BatchNormalization()(x)
        x = layers.Activation('relu')(x)

        x = layers.SeparableConv2D(64, (3, 3), padding='same')(x)
        print("X_shape_3:",x.shape)
        x = layers.BatchNormalization()(x)

        residual_1 = layers.Conv2D(64,(1,1),padding = 'same')(residual_1)

        x = layers.Add()([x, residual_1])
        x = layers.Activation('relu')(x)
        x = layers.MaxPooling2D((2, 2))(x)

        residual_2 = x
        x = layers.SeparableConv2D(64,(3,3),padding = 'same')(x)
        x = layers.BatchNormalization()(x)
        print("X_shape_4:",x.shape)
        residual_2 = layers.Conv2D(64,(1,1),padding = 'same')(residual_2)

        x = layers.Add()([x, residual_2])
        x = layers.Activation('relu')(x)
        x = layers.MaxPooling2D((2, 2))(x)


        residual_3 = x
        x = layers.SeparableConv2D(32,(3,3),padding = 'same')(x)
        x = layers.BatchNormalization()(x)
        print("X_shape_5:",x.shape)
        residual_3 = layers.Conv2D(32,(1,1),padding = 'same')(residual_3)

        x = layers.Add()([x, residual_3])
        x = layers.Activation('relu')(x)
        x = layers.MaxPooling2D((2, 2))(x)


        residual_4 = x
        x = layers.SeparableConv2D(32,(3,3),padding = 'same')(x)
        x = layers.BatchNormalization()(x)
        print("X_shape_6:",x.shape)
        residual_4 = layers.Conv2D(32,(1,1),padding = 'same')(residual_4)

        x = layers.Add()([x, residual_4])
        x = layers.Activation('relu')(x)
        x = layers.MaxPooling2D((2, 2))(x)


        residual_5 = x
        x = layers.SeparableConv2D(16,(3,3),padding = 'same')(x)
        x = layers.BatchNormalization()(x)
        print("X_shape_6:",x.shape)
        residual_5 = layers.Conv2D(16,(1,1),padding = 'same')(residual_5)

        x = layers.Add()([x, residual_5])
        x = layers.Activation('relu')(x)
        x = layers.MaxPooling2D((2, 2))(x)


        # 通道注意力模块
        channel_axis = -1
        avg_pool = layers.GlobalAveragePooling2D()(x)
        max_pool = layers.GlobalMaxPooling2D()(x)

        attention = layers.Add()([avg_pool, max_pool])
        attention = layers.Dense(16//4, activation='relu')(attention)
        attention = layers.Dense(16,activation='sigmoid')(attention)

        x = layers.Multiply()([x, attention])
        print("X_shape_7:",x.shape)

        x = layers.SeparableConv2D(16, (3, 3), padding='same')(x)
        print("X_shape_8:",x.shape)
        x = layers.BatchNormalization()(x)
        x = layers.Activation('swish')(x)
        x = layers.SpatialDropout2D(0.3)(x)
        x = layers.MaxPooling2D((2, 2))(x)
        print("X_shape_9:",x.shape)


        gap = layers.GlobalAveragePooling2D()(x)
        gmp = layers.GlobalMaxPooling2D()(x)
        combined = layers.Concatenate()([gap, gmp])

        # 全连接层
        x = layers.Dense(128, activation='swish',
                        kernel_regularizer=regularizers.l2(0.001))(combined)

        x = layers.Dropout(0.5)(x)

        print("X_shape_10:",x.shape)

        outputs = layers.Dense(1, activation='sigmoid')(x)

        model = models.Model(inputs=inputs, outputs=outputs)

        model.compile(
            optimizer=tf.keras.optimizers.Adam(learning_rate=1e-4),
            loss='binary_crossentropy',
            metrics=['accuracy',
                    tf.keras.metrics.Precision(name='precision'),
                    tf.keras.metrics.Recall(name='recall')]
        )

        return model
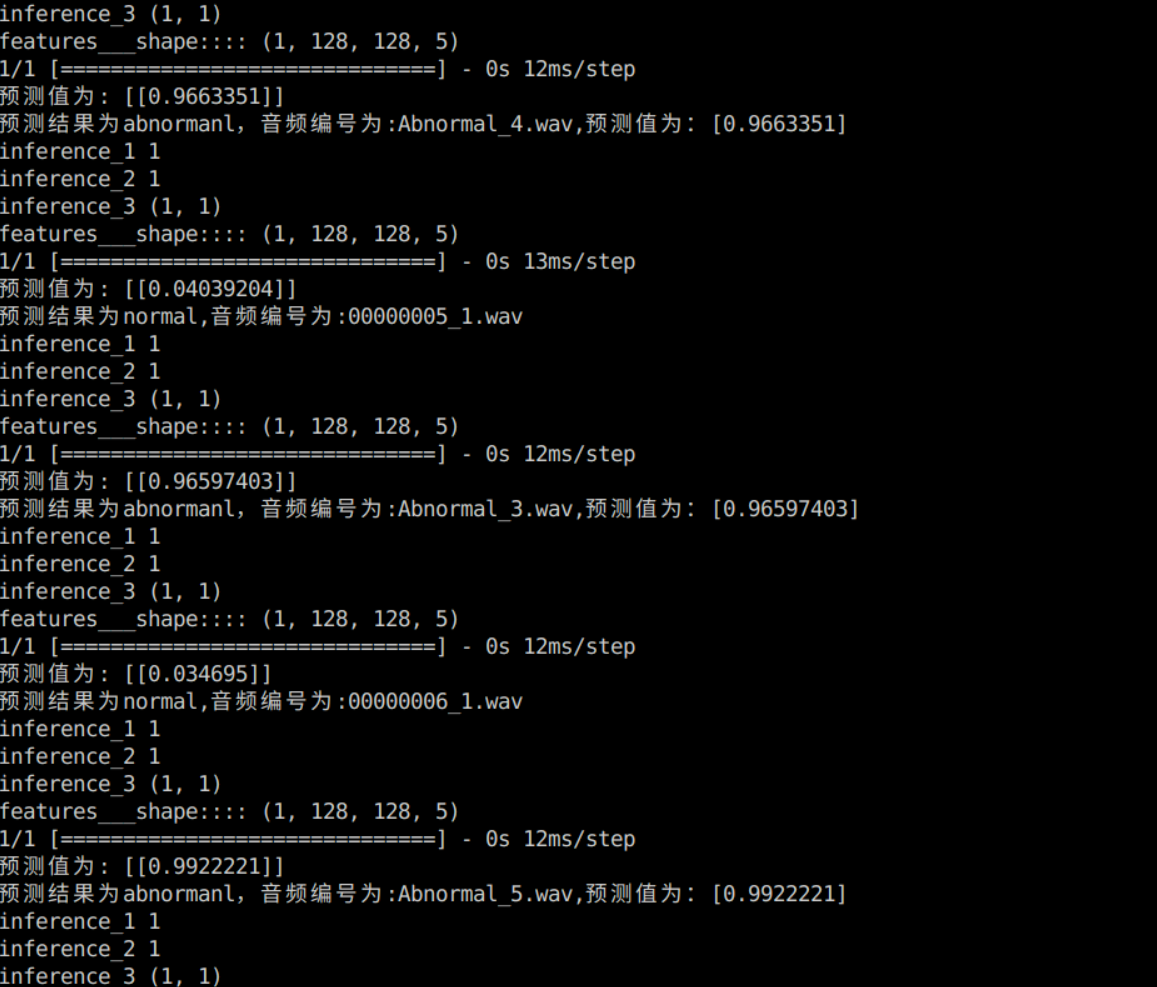
这样,一个简单的音频识别网络就搭建好啦~~~,最后的最后,作者自己写了一个推理用的代码来测试训练模型的效果,下面是推理结果图,可以看到分类的准确率还是很高的,不过毕竟是一个二分类任务,也不会低到那里去,这篇文章所做的主要是识别异常音频,这与自己的实习工作内容相符,后续自己会拓展到多分类任务来查看其效果,需要对数据的加载和预处理部分进行修改,所以这次分享就到这里啦~~


 被折叠的 条评论
为什么被折叠?
被折叠的 条评论
为什么被折叠?
 到【灌水乐园】发言


