


 本文详细解析Webpack如何从入口配置开始,逐步找到并转换所有相关文件为模块。介绍了Semaphore在编译队列控制中的作用,以及SingleEntryPlugin、MultiEntryPlugin和DynamicEntryPlugin在处理不同类型的入口配置时的工作原理。

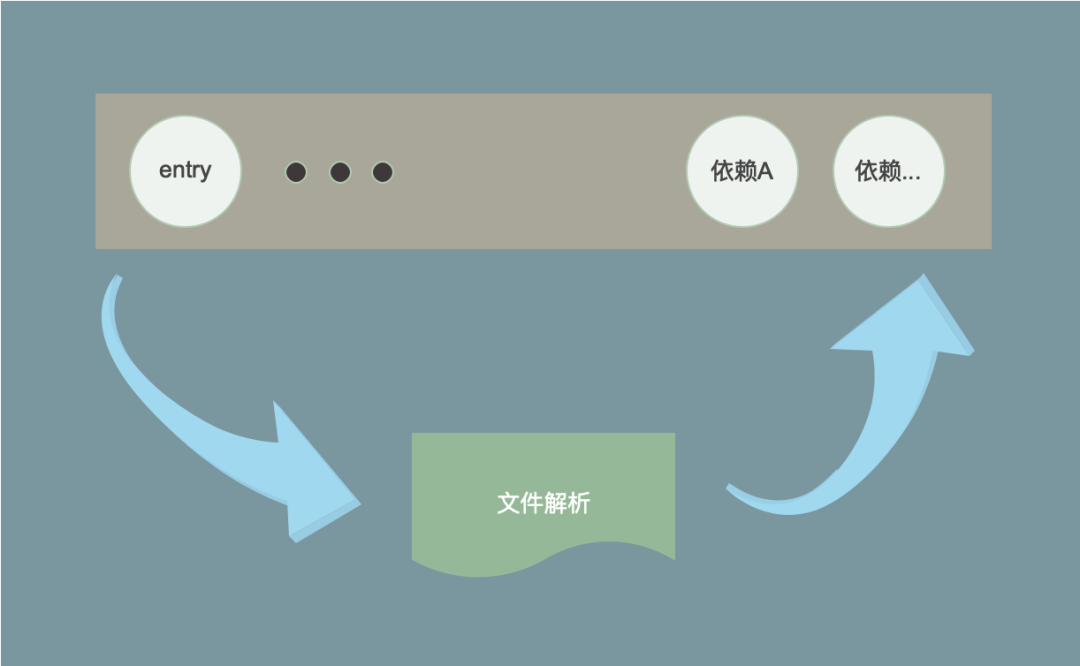
桔妹导读:对于 webpack 来说每个文件都是一个 module,这篇文章带你来看 webpack 如何从配置中 entry 的定义开始,顺藤摸瓜找到全部的文件,并转化为 module。
1.
总览
webpack 入口 entry,entry 参数是单入口字符串、单入口数组、多入口对象还是动态函数,无论是什么都会调用 compilation.addEntry 方法,这个方法会执行 _addModuleChain,将入口文件加入需要编译的队列中。然后队列中的文件被一个一个处理,文件中的 import 引入了其他的文件又会通过 addModuleDependencies 加入到编译队列中。最终当这个编译队列中的内容完成被处理完时,就完成了文件到 module 的转化。
上面是一个粗略的轮廓,接下来我们将细节一一补充进这个轮廓中。首先看编译的总流程控制——编译队列的控制。
2.
编译队列控制 —— Semaphore
_addModuleChain 和 addModuleDependencies 函数中都会调用 this.semaphore.acquire 这个函数的具体实现在 lib/util/Semaphore.js 文件中。看一下具体的实现:
class Semaphore {
  constructor(available) {
     // available 为最大的并发数量
    this.available = available;
    this.waiters = [];
    this._continue = this._continue.bind(this);
  }


  acquire(callback) {
    if (this.available > 0) {
      this.available--;
      callback();
    } else {
      this.waiters.push(callback);
    }
  }


  release() {
    this.available++;
    if (this.waiters.length > 0) {
      process.nextTick(this._continue);
    }
  }


  _continue() {
    if (this.available > 0) {
      if (this.waiters.length > 0) {
        this.available--;
        const callback = this.waiters.pop();
        callback();
      }
    }
  }
}
对外暴露的只有两个个方法:
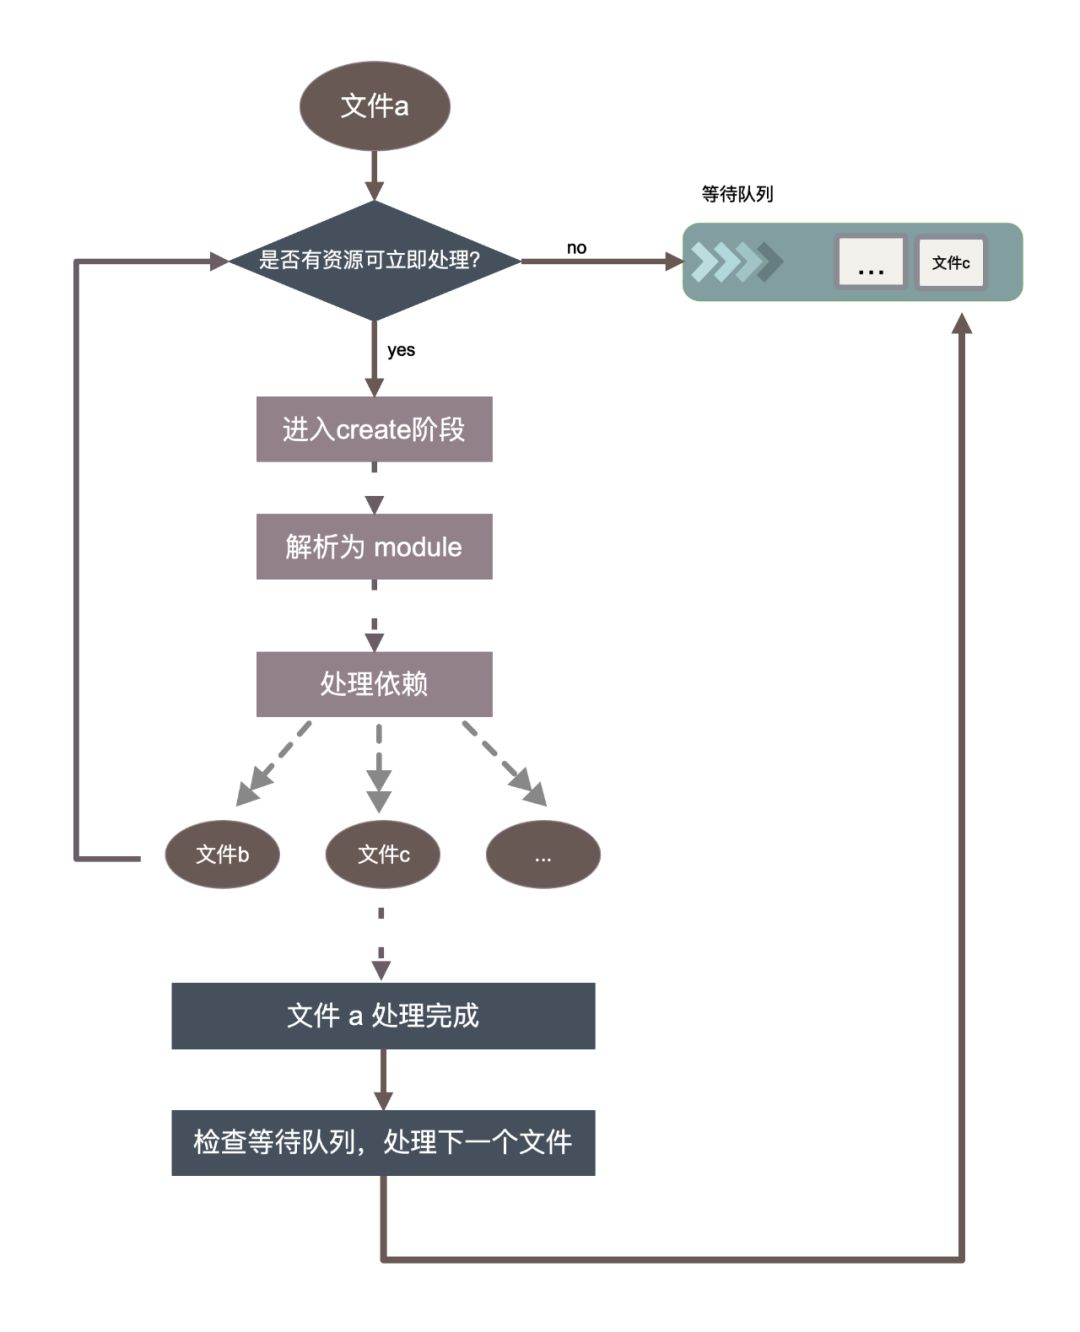
acquire: 申请处理资源,如果有闲置资源(即并发数量)则立即执行处理,并且闲置的资源减1;否则存入等待队列中。
release: 释放资源。在 acquire 中会调用 callback 方法,在这里需要使用 release 释放资源,将闲置资源加1。同时会检查是否还有待处理内容,如果有则继续处理。
这个 Semaphore 类借鉴了在多线程环境中,对使用资源进行控制的 Semaphore(信号量)的概念。其中并发个数通过 available 来定义,那么默认值是多少呢?在 Compilation.js 中可以找到。
this.semaphore = new Semaphore(options.parallelism || 100);
默认的并发数是 100,注意这里说的并发只是代码设计中的并发,不要和js的单线程特性搞混了。总的来看编译流程如下图:
3.
从入口到 _addModuleChain
webpack 官网配置指南中 entry 可以有下面几种形式:
string: 字符串,例如
{
  entry: './demo.js'
}、
[string]: string 类型的数组,例如
{
  entry: ['./demo1.js', './demo2.js']
}、
对象,例如
{
  entry: {
    app: './demo.js'
  }
}
函数,动态返回入口,例如
{
  entry: () => './demo.js'
}
// 或者
{
  entry: () => new Promise((resolve) => resolve('./demo.js'))
}
这些是哪里处理的呢?webpack 的启动文件 webpack.js 中, 会先对 options 进行处理,有如下一句:
compiler.options = new WebpackOptionsApply().process(options, compiler);
在 process 的过程中会对 entry 的配置做处理
// WebpackOptionsApply.js 文件中
new EntryOptionPlugin().apply(compiler);
compiler.hooks.entryOption.call(options.context, options.entry);
先看 EntryOptionsPlugin 做了什么
const SingleEntryPlugin = require("./SingleEntryPlugin");
const MultiEntryPlugin = require("./MultiEntryPlugin");
const DynamicEntryPlugin = require("./DynamicEntryPlugin");


const itemToPlugin = (context, item, name) => {
  if (Array.isArray(item)) {
    return new MultiEntryPlugin(context, item, name);
  }
  return new SingleEntryPlugin(context, item, name);
};


module.exports = class EntryOptionPlugin {
  apply(compiler) {
    compiler.hooks.entryOption.tap("EntryOptionPlugin", (context, entry) => {
       // string 类型则为 new SingleEntryPlugin
       // array 类型则为 new MultiEntryPlugin
      if (typeof entry === "string" || Array.isArray(entry)) {
        itemToPlugin(context, entry, "main").apply(compiler);
      } else if (typeof entry === "object") {
          // 对于 object 类型,遍历其中每一项
        for (const name of Object.keys(entry)) {
          itemToPlugin(context, entry[name], name).apply(compiler);
        }
      } else if (typeof entry === "function") {
          // function 类型则为 DynamicEntryPlugin
        new DynamicEntryPlugin(context, entry).apply(compiler);
      }
      return true;
    });
  }
};
在 EntryOptionsPlugin 中注册了 entryOption 的事件处理函数,根据 entry 值的不同类型( string/array/object 中每一项/functioin)实例化和执行不同的 EntryPlugin:string 对应 SingleEntryPlugin;array 对应 MultiEntryPlugin;function 对应 DynamicEntryPlugin。而对于 object 类型来说遍历其中的每一个 key,将每一个 key 当做一个入口,并根据类型 string/array 的不同选择 SingleEntryPlugin 或 MultiEntryPlugin。下面我们主要分析:SingleEntryPlugin,MultiEntryPlugin,DynamicEntryPlugin
横向对比一下这三个 Plugin,都做了两件事:
注册了 compilation 事件回调(这个事件会在下面 make 事件之前会触发),在 compilation 阶段设置 dependencyFactories
compiler.hooks.compilation.tap('xxEntryPlugin', (compilation, { normalModuleFactory }) => {
  //...
  compilation.dependencyFactories.set(...)
})
注册了 make 事件回调,在 make 阶段的时候调用 addEntry 方法,然后进入 _addModuleChain 进入正式的编译阶段。
compiler.hooks.make.tapAsync('xxEntryPlugin',(compilation, callback) => {
  // ...
  compilation.addEntry(...)
})
结合 webpack 的打包流程,我们从 Compiler.js 中的 compile 方法开始,看一下 compilation 事件和 make 事件回调起了什么作用
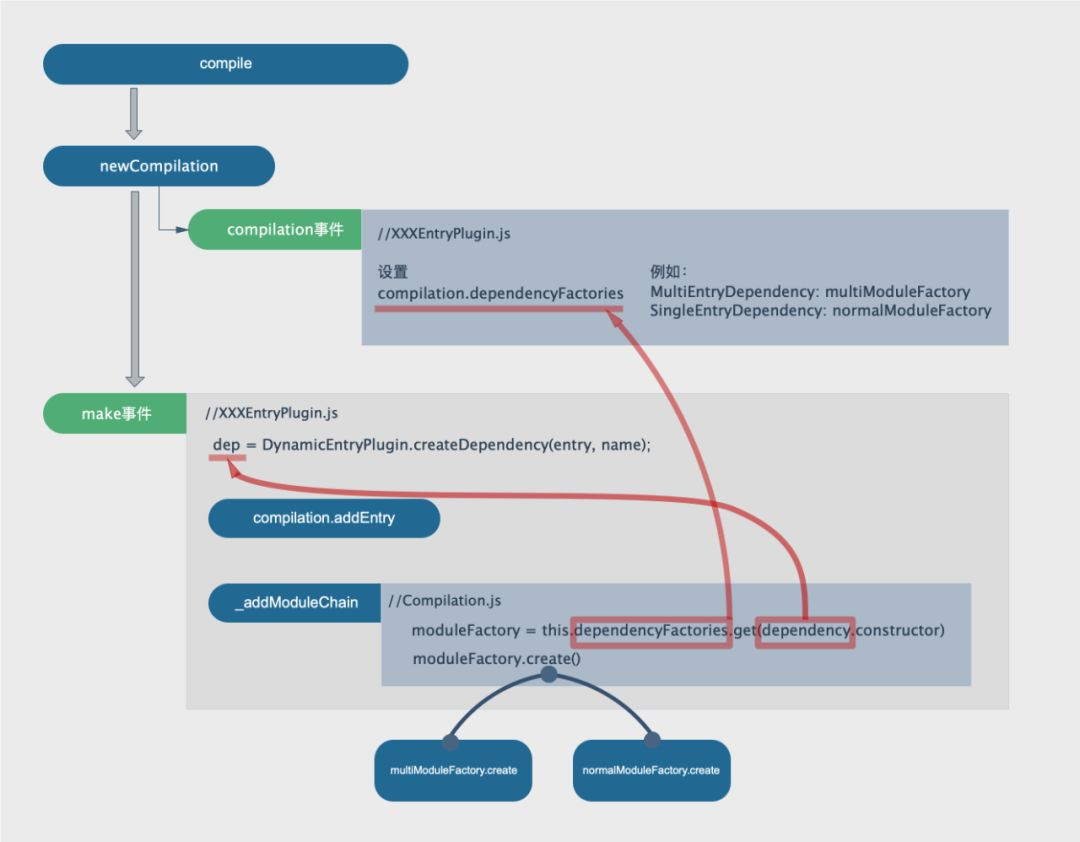
xxxEntryPlugin 在compilation 事件中回调用来设置compilation.dependencyFactories,保证在后面 _addModuleChain 回调阶段可以根据 dependency 获取到对应的 moduleFactory。
make 事件回调中根据不同的 entry 配置,生成 dependency,然后调用addEntry,并将 dependency 传入。
在 _addModuleChain 回调中根据不同 dependency 类型,然后执行 multiModuleFactory.create 或者 normalModuleFacotry.create。
上面的步骤中不停的提到 dependency,在接下来的文章中将会出现各种 dependency。可见,dependency 是 webpack 中一个很关键的东西,在 webpack/lib/dependencies 文件夹下,你会看到各种各样的 dependency。dependency 和 module 的关系结构如下:
module: {
  denpendencies: [
    dependency: {
      //...
      module: // 依赖的 module,也可能为 null
    }
  ]
}
}
webpack 中将入口文件也当成入口的依赖来处理,所以上面 xxEntryPlugin 中生成的是 xxEntryDependency。module 中的 dependency 保存了这个 module 对其他文件的依赖信息、自身 export 出去的内容等。后面的文章中,你会看到在生成 chunk 时会依靠 dependency 来得到依赖关系图,生成最终文件时会依赖 dependency 中方法和保存的信息将源文件中的 import 等语句替换成最终输出的可执行的 js 语句。
看完了各个 entryPlugin 的共同点之后,我们纵向深入每个 plugin,对比一下不同之处。
▌SingleEntryPlugin
SingleEntryPlugin 逻辑很简单:将 SingleEntryDependency 和 normalModuleFactory 关联起来,所以后续的 create 方法会执行 normalModuleFactory.create 方法。
apply(compiler) {
  compiler.hooks.compilation.tap(
    "SingleEntryPlugin",
    (compilation, { normalModuleFactory }) => {
       // SingleEntryDependency 对应的是 normalModuleFactory
      compilation.dependencyFactories.set(
        SingleEntryDependency,
        normalModuleFactory
      );
    }
  );


  compiler.hooks.make.tapAsync(
    "SingleEntryPlugin",
    (compilation, callback) => {
      const { entry, name, context } = this;


      const dep = SingleEntryPlugin.createDependency(entry, name);
      // dep 的 constructor 为 SingleEntryDependency
      compilation.addEntry(context, dep, name, callback);
    }
  );
}


static createDependency(entry, name) {
  const dep = new SingleEntryDependency(entry);
  dep.loc = name;
  return dep;
}
▌MultiEntryPlugin
与上面 SingleEntryPlugin 相比,
1. 在 compilation 中,dependencyFactories 设置了两个对应值
MultiEntryDependency: multiModuleFactory
SingleEntryDependency: normalModuleFactory
2. createDependency:将 entry 中每一个值作为一个 SingleEntryDependency 处理。
static createDependency(entries, name) {
  return new MultiEntryDependency(
    entries.map((e, idx) => {
      const dep = new SingleEntryDependency(e);
      // Because entrypoints are not dependencies found in an
      // existing module, we give it a synthetic id
      dep.loc = `${name}:${100000 + idx}`;
      return dep;
    }),
    name
  );
}
3. multiModuleFactory.create
在第二步中,由 MultiEntryPlugin.createDependency 生成的 dep,结构如下:
{
  dependencies:[]
  module: MultiModule
  //...
}
dependencies 是一个数组,包含多个 SingleEntryDependency。这个 dep 会当做参数传给 multiModuleFactory.create 方法,即下面代码中 data.dependencies[0]
// multiModuleFactory.create
create(data, callback) {
  const dependency = data.dependencies[0];
  callback(
    null,
    new MultiModule(data.context, dependency.dependencies, dependency.name)
  );
}
create 中生成了 new MultiModule,在 callback 中会执行 MultiModule 中 build 方法
build(options, compilation, resolver, fs, callback) {
  this.built = true; // 标记编译已经完成
  this.buildMeta = {};
  this.buildInfo = {};
  return callback();
}
这个方法中将编译是否完成的变量值设置为 true,然后直接进入的成功的回调。此时,入口已经完成了编译被转化为一个 module, 并且是一个只有 dependencies 的 module。由于在 createDependency 中每一项都作为一个 SingleEntryDependency 处理,所以 dependencies 中每一项都是一个 SingleEntryDependency。随后进入对这个 module 的依赖处理阶段,我们配置在 entry 中的多个文件就被当做依赖加入到编译链中,被作为 SingleEntryDependency 处理。
总的来看,对于多文件的入口,可以简单理解为 webpack 内部先把入口转化为一个下面的形式:
import './demo1.js'
import './demo2.js'
然后对其做处理。
▌DynamicEntryPlugin
动态的 entry 配置中同时支持同步方式和返回值为 Promise 类型的异步方式,所以在处理 addEntry 的时候首先调用 entry 函数,然后根据返回的结果类型的不同,进入 string/array/object 的逻辑。
compiler.hooks.make.tapAsync(
  "DynamicEntryPlugin",
  (compilation, callback) => {
    const addEntry = (entry, name) => {
      const dep = DynamicEntryPlugin.createDependency(entry, name);
      return new Promise((resolve, reject) => {
        compilation.addEntry(this.context, dep, name, err => {
          if (err) return reject(err);
          resolve();
        });
      });
    };
    Promise.resolve(this.entry()).then(entry => {
      if (typeof entry === "string" || Array.isArray(entry)) {
        addEntry(entry, "main").then(() => callback(), callback);
      } else if (typeof entry === "object") {
        Promise.all(
          Object.keys(entry).map(name => {
            return addEntry(entry[name], name);
          })
        ).then(() => callback(), callback);
      }
    });
  }
);
所以动态入口与其他的差别仅在于多了一层函数的调用。
入口找到了之后,就是将文件转为 module 了。接下来的文章中,将详细介绍转 module 的过程。

本文作者

▬

崔 静
滴滴 | 高级软件开发工程师
2015年,因为颜控,掉入前端深坑无法自拔,也是同年加入滴滴,正式踏上前端之路。喜欢技术和挑战,爱潜水,要做一条徜徉大海的前端鱼。
同时,我们的团队正在招聘高级/资深前端开发工程师,欢迎投递简历至:cuijing@didiglobal.com。
推荐阅读
▬


更多推荐
▬
滴滴开源 / Open Source
Levin | AoE | Delta | Mpx | Booster | Chameleon | DDMQ | DroidAssist | Rdebug | Doraemonkit | Kemon | Mand Moblie | virtualApk | 获取更多项目


技术干货 / Recommended article
重磅!滴滴跨端框架Chameleon 1.0正式发布 | Android 性能优化之 Activity 启动耗时分析 | HDFS 源码解读:HadoopRPC 实现细节的探究| 阅读更多内容


 1011
1011

 被折叠的 条评论
为什么被折叠?
被折叠的 条评论
为什么被折叠?
 到【灌水乐园】发言


