文章目录
一 前言
在前面的文章中我们简单讲了讲如何使用SRNet网络实现图像隐写分析,文章地址如下:SRNet隐写分析网络模型 (pytorch实现) ,感兴趣的朋友可以点击查看。本文我们主要讲一讲隐写去除 Steganography Removal,隐写去除采用的网络是DDSP网络模型,论文地址如下:Destruction of Image Steganography using Generative Adversarial Networks,作者没有开源自己的代码,于是小编自己复现了一版,效果比不上论文中的描述,但最终去隐写后的图像的视觉质量还不错,代码地址如下:https://github.com/Uranium-Deng/Steganalysis-StegoRemoval/tree/main/2.DDSP。
本文首先简要介绍论文大致内容(更建议看论文原文),之后着重说明代码复现。
二 论文内容
2.1 Abstract
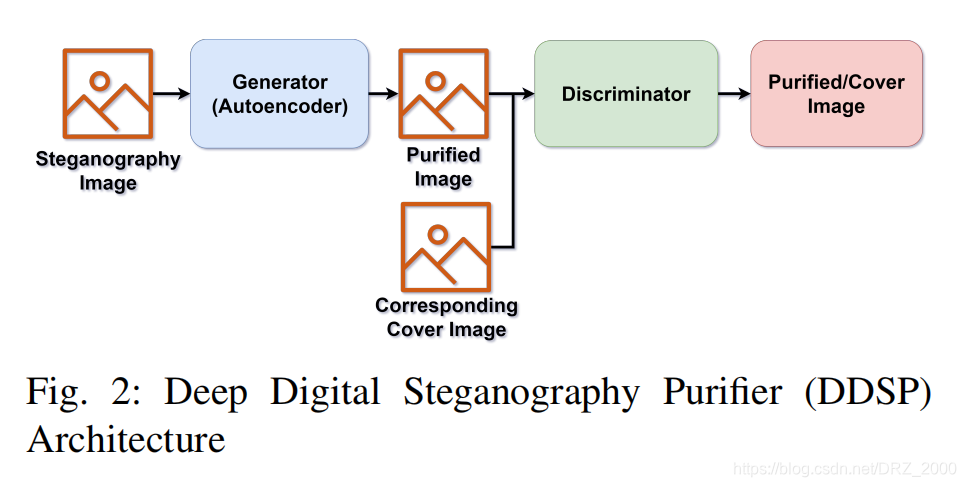
作者提出了一个去隐写的模型 DDSP (Deep Digitial Steganagraphy Purifier),其本质是一个GAN网络,该网络能够很好的去除图像中的隐写内容同时保证了图像的质量 (destory staganographic content without compromising the perceptual quality of the original image)。最后测试了模型迁移学习的能力。
2.2 Introduction
点出隐写分析面临的局限性,对图像的大小、编码格式、隐写嵌入比特率等都要求,并且只可以检测传统的隐写术,但很难检测出先进的隐写术 (Hower, these methods struggle to detect advanced steganography algorithms) ,隐写术和隐写分析的关系是矛和盾的关系,作为防守方的隐写分析,其发展肯定是滞后于隐写分析的。既然隐写分析效果不好,不能有效的检测并阻止含密信图片的传播,不如换一个思路,使用一个filter去消除图片中的隐写内容 ,但是传统的方法虽然去除了隐写信息,但却降低了图像的质量。
接着提出了自己的DDSP隐写去除模型,该模型在实现图像隐写去除的基础上可以保证隐写去除后图像依旧保持较高的视觉质量。这里小编需要强调的是:现阶段已经有一些办法能很好的实现隐写去除,但是这些办法对图像本身的内容同样破坏很大,无法保证图像的视觉质量,因此本文中如何很好的保证图像视觉质量不退化更是我们需要重点关注的。
之后简单介绍了文章内容框架。
- 第二部分:回顾了在steganography purification 领域中之前的研究成功,并介绍了GAN网络的一些背景信息。
- 第三部分:介绍模型使用的数据集。
- 第四部分:详细介绍了自己的模型 DDSP。
- 第五部分: 讨论和分析了实验结果
- 最后一部分: conclusion 和 feature works
2.3 Background
2.3.1 Prior Work
去除隐写内容有两个不同的目标:一个是完全的去除隐秘信息,另一个是轻微的模糊隐秘信息,使其无法被使用,这样还可以避免图像质量的退化。接着介绍了三种采用深度学习的网络结构 PixelCNN++、Deep Steganography、ISGAN。剩下的方法大多是基于非机器学习的传统方法,比如使用数字滤波核 digital filters和小波变换 wavelet transforms,这些方法实现较为简单也不需要在数据集上训练,这些方法的主旨就是过滤掉图片的高频部分,但是这样会降低图像的质量。
2.3.2 Super Resolution GAN 超分辨率GAN
使用GAN网络去除隐写信息同时保证图片质量,其灵感来自于:将GAN网络应用于单图像超分辨率(single imgae super resolution),其实就是GAN领域中大名鼎鼎的SRGAN网络,SRGAN网络模型论文的地址如下:Photo-Realistic Single Image Super-Resolution Using a Generative Adversarial Network。
2.4 Data
使用的数据集是BOSSBase,将原PGM格式的图片转为JPEG格式的图片,JPEG压缩因子为95%,再将图片缩小到256 x 256大小。选用了四种隐写术:HUGO、HILL、S-UNIWARD、WOW,每一种隐写算法按照 10%、 20%、30%、 40%、 50% 五种嵌入率。最终得到 4 x 5 x 10000 = 200,000 张含密图片,10,000 张原始图片。训练集和测试集按照75 : 25的比例分配。
2.5 Deep Digital Steganography Puricication (重头戏)
DDSP和SRGAN的结构很类似,但是DDSP并没有使用大型的ResNet作为generator,而是使用了一个预训练好的自编码器 (pretrained autoencoder ), 去除图像中的秘密信息。DDSP网络结构和其中Generator的结构如下:
![]() |
![]() |
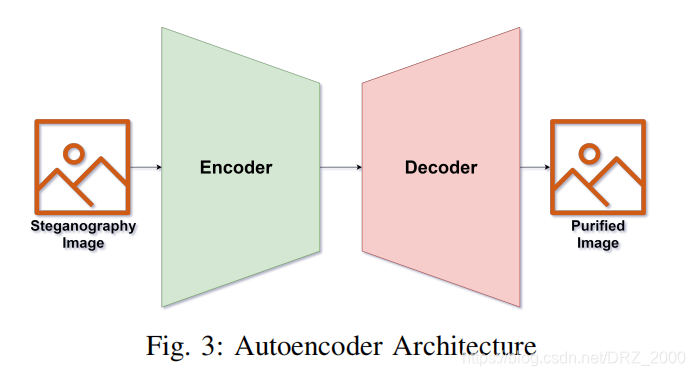
2.5.1 Autoencoder Architecture
自编码器分为Encoder和Decoder,其中Encoder 的作用就是进行特征提取,Decoder作用是将encoder提取压缩后的图片缩放为原来的大小,同时去除其中的含密信息。我们先来看Encoder编码器的网络结构。
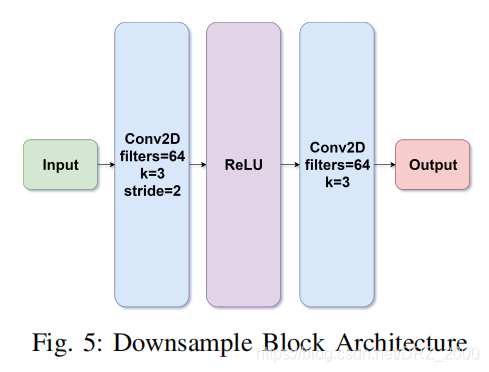
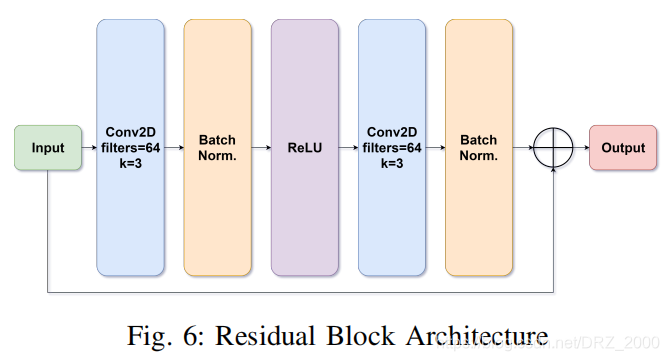
其中Down-sample模块和ResBlock模块的网络结构如下:
![]() |
![]() |
- 输入含密图像,首先经过Min-Max Norm标准化,将每个pixel的值变换到 [0-1]之间。
- 经历一个Conv2d 卷积 filters=64, kernel_size=9,后接ReLU激活函数。
- 进行Down-sample模块 进行下采样,Down-sample模块结构如上图5,包含两层卷积和一个ReLU激活函数, 第一次卷积移动的步长为2。这里采用卷积而不是池化进行下采样只要是处于对图像质量的考虑,下采样后的输出有两个流向。
- 下采样的后的一个输出作为接下来 16个残差模块的输入,不细说。
- 经历过残差模块后再经历一次Conv2d 和 BN,将BN后的结果和之前Down-sample后的另一个结果相加得到最后的Encoder输出。
接下来我们说说解码器Decoder的网络结构,其网络结构如下:
其中Decoder将Encoder的输出作为输入,首先进行upsample,上采样的方法为 临近插入法 nearest interpolation with a factor of 2,这样得到的结果和原始encoder 输入的图片大小相同,之后经历 Conv2d、ReLU、Conv2d、Tanh 层, Tanh输入的结果在 [-1, 1] 之间,之后通过 Tanh Denorm 将像素值还原到 [0, 255]之间即得到最终的输出,也就是去除秘密信息后的图像。
这里的最后两层是Tanh和Tanh Denormalization,其作用是将每个像素点的值的范围重新变换为[0, 255],但是在代码复现的时候,这一部分出现了BUG,小编一时无法解决(还是太菜,pytorch还是不够了解),于是将最后两层替换为Sigmoid激活函数。Generator部分代码实现如下:
import torch
import torch.nn as nn
from .utils import ResBlock_Encoder, DownSample_Encoder, MinMax_Norm
class Encoder(nn.Module):
def __init__(self, in_channels=1, n_residual_blocks=16):
super(Encoder, self).__init__()
self.conv1 = nn.Sequential(
# encoder的第一层是Min-Max Normalization, 此处舍去 在forward中实现
# 公式为: x = (x - x_min) / (x_max - x_min), sklearn.preprocess 模块实现
nn.Conv2d(in_channels, out_channels=64, kernel_size=9, stride=1, padding=4),
nn.ReLU(inplace=True),
)
self.down_sample_block = DownSample_Encoder(in_channels=64)
# 16个残差模块
res_blocks = []
for _ in range(n_residual_blocks):
res_blocks.append(ResBlock_Encoder(in_channels=64))
self.residual_blocks = nn.Sequential(*res_blocks)
self.conv2 = nn.Sequential(
nn.Conv2d(64, out_channels=64, kernel_size=3, stride=1, padding=1),
nn.BatchNorm2d(64)
)
def forward(self, x):
# print('Encoder input shape: ', x.shape) # [n, 1, 256, 256]
x = MinMax_Norm(x)
# print('encoder min_max_scale: ', x)
# print('encoder min_max_scale shape: ', x.shape)
x = self.conv1(x)
down_sample = self.down_sample_block(x)
x = self.residual_blocks(down_sample)
x = self.conv2(x)
ret = x + down_sample
# print('Encoder output shape: ', ret.shape) # [n, 64, 128, 128]
return ret
# model = Encoder(1, 16)
# print(model)
class Decoder(nn.Module):
def __init__(self, in_channels=64):
super(Decoder, self).__init__()
'''
self.block1 = nn.Sequential(
nn.Upsample(scale_factor=2),
nn.Conv2d(in_channels, out_channels=256, kernel_size=3, stride=1, padding=1),
nn.ReLU(),
nn.Conv2d(256, out_channels=1, kernel_size=9, stride=1, padding=4),
nn.Tanh(),
# 最后还需要将图片从[-1, 1] 转换成为 [0, 255], 在forward()中实现
# 计划先用minmax_scale将数据范围转换到[0, 1] 之后乘以255 转换为[0, 255]
)
'''
# 将上面的tanh()输出的值域[-1, 1]变成[0, 1] 出现了问题,故将文章使用的tanh()函数修改为sigmoid()函数
self.block2 = nn.Sequential(
nn.Upsample(scale_factor=2),
nn.Conv2d(in_channels, out_channels=256, kernel_size=3, stride=1, padding=1),
nn.ReLU(inplace=True),
nn.Conv2d(256, out_channels=1, kernel_size=9, stride=1, padding=4),
nn.Sigmoid(),
# 最后还需要将图片从[0, 1] 转换成为 [0, 255], 在forward()中实现
# 计划先用minmax_scale将数据范围转换到[0, 1] 之后乘以255 转换为[0, 255]
)
def forward(self, x):
# print('Decoder input shape: ', x.shape) # [n, 64, 128, 128]
# ret = self.block1(x)
# ret = MinMax_Norm(ret, require_grad=True).mul(255.0).add(0.5).clamp(0, 255)
ret = self.block2(x)
ret = ret.mul(255.0).add(0.5).clamp(0, 255) # 将sigmoid函数输出值域从[0, 1] -> [0, 255]
# print('Encoder output shape: ', ret.shape) # [n, 1, 256, 256]
return ret
class Generator(nn.Module):
def __init__(self, init_weights=True):
super(Generator, self).__init__()
self.encoder = Encoder(1, 16)
self.decoder = Decoder(64)
if init_weights:
self._init_weights()
def forward(self, x):
encoder_output = self.encoder(x)
decoder_output = self.decoder(encoder_output)
return decoder_output
def _init_weights(self):
for m in self.modules():
if isinstance(m, nn.Conv2d):
nn.init.kaiming_normal_(m.weight, mode='fan_out', nonlinearity='relu')
if m.bias is not None:
nn.init.constant_(m.bias, 0)
if isinstance(m, nn.BatchNorm2d):
nn.init.constant_(m.weight, 1)
nn.init.constant_(m.bias, 0)
if isinstance(m, nn.Linear):
nn.init.normal_(m.weight, 0, 0.01)
nn.init.constant_(m.bias, 0)
2.5.1 GAN Training
和SRGAN网络结构很类似,我们使用预训练好的模型去初始化 Generator Network (就是我们之前的autoencoder) ,Descriminator 和 SRGAN的Descriminator 也很相似,只是Descriminator Blocks 的结构有一些变化。其网络结构如下:
其中Discriminator Block模块的网络结构如下:
Discriminator部分代码实现如下:
import torch
import torch.nn as nn
from .utils import ResBlock_Discriminator, MaxAbs_Norm
# maxabs_scale() 具体实现公式为 x / max(|x|) 最终结果在[-1, 1]之间
class Discriminator(nn.Module):
def __init__(self, in_channels=1, required_grad=False):
super(Discriminator, self).__init__()
self.conv1 = nn.Sequential(
nn.Conv2d(in_channels, out_channels=512, kernel_size=3, stride=1, padding=1),
nn.ReLU(inplace=True)
)
residual_block_params = [
[512, 512, 2], [512, 256, 1], [256, 256, 2],
[256, 128, 1], [128, 128, 2], [128, 64, 1], [64, 64, 2]
]
residual_blocks_list = []
for param in residual_block_params:
residual_blocks_list.append(ResBlock_Discriminator(*param))
self.residual_blocks = nn.Sequential(*residual_blocks_list)
self.classifier = nn.Sequential(
nn.Linear(64 * 16 * 16, 1024),
nn.ReLU(inplace=True),
nn.Linear(1024, 1),
nn.Sigmoid(),
)
def forward(self, x):
input_shape = x.shape
# print('discriminator input shape: ', input_shape)
x = MaxAbs_Norm(x)
# print('after maxabs_scale x:', x)
# print('x.shape: ', x.shape)
x = self.conv1(x)
x = self.residual_blocks(x)
x = x.reshape(shape=(input_shape[0], -1)) # flatten 转换为[n, -1] 每一行就是一个feature map
x = self.classifier(x)
# print('discriminator output shape: ', x.shape)
return x
# model = Discriminator(in_channels=1)
# print(model)
2.6 Result
论文不愿翻了。。。。。这一部分主要是模型的测试结果。总的来说,从两个方面测试DDSP网络模型的性能:(1) 对输入图像修改的程度,本文用误码率 bit error rate 来衡量,我们认为误码率大,输入图像受到的破坏越大,图像中嵌入的隐秘信息受到的破坏越大,隐写去除的越彻底。(2)去隐写后图像的视觉质量,此处使用MSE (Mean Squared Error 均方差)、PSNR (Peak Signal-to-Noise Ratio 峰值信噪比)、SSIM (Structural Similarity Index 结构相似性)、 UQI (Universal Quality Index 统一质量指标) 四个指数衡量修改前后图像的相似度,其中MSE和PSNR是从像素级别pixel wise 进行衡量,后两个参数是从图像整体进行衡量。
其中图像的误码率如何计算小编还真不太确定,在网络上找了很久也没找到。误码率一般针对的是字符串,统计发送前后字符串中出错字符的个数,之后除以字符串的长度即可。图像误码率小编是这样算的:图像中每个像素点的像素值在0-255之间,即每个像素值占8个比特位,将输入图片和去隐写后图片对应像素点的像素值分别变为一个8位的01比特串,统计两字符串中不同比特的个数,之后每一个像素点都如此操作,累加,算出图像中不同比特的总个数,再除以图像中所有比特的个数即可 (height * wdith * 8)。若这样计算有问题,还请各位看官指正。
之后进行了对比实验,对比的方法分别为:Bicubic Interpolation (双立方插值) 、Denoising WaveletFilter (去噪小波滤波器)、Autodecoder、DDSP 共四种,对比结果显示自己提出的DDSP模型效果是最好的。(在自己写的论文里面,谁不是呢:)
再往后就是测试DDSP模型迁移学习的能力,此处不赘述。
import torch
import torch.nn as nn
from sklearn.preprocessing import maxabs_scale, minmax_scale
class ResBlock_Encoder(nn.Module):
def __init__(self, in_channels=64):
super(ResBlock_Encoder, self).__init__()
self.residual_block_encoder = nn.Sequential(
nn.Conv2d(in_channels, out_channels=64, kernel_size=3, stride=1, padding=1),
nn.BatchNorm2d(64),
nn.ReLU(inplace=True),
nn.Conv2d(in_channels=64, out_channels=64, kernel_size=3, stride=1, padding=1),
nn.BatchNorm2d(64)
)
def forward(self, x):
return x + self.residual_block_encoder(x)
class DownSample_Encoder(nn.Module):
def __init__(self, in_channels=64):
super(DownSample_Encoder, self).__init__()
self.down_sample_encoder = nn.Sequential(
nn.Conv2d(in_channels, out_channels=64, kernel_size=3, stride=2, padding=1),
nn.ReLU(inplace=True),
nn.Conv2d(in_channels=64, out_channels=64, kernel_size=3, stride=1, padding=1),
)
def forward(self, x):
return self.down_sample_encoder(x)
class ResBlock_Discriminator(nn.Module):
def __init__(self, in_channels, out_channels, stride):
super(ResBlock_Discriminator, self).__init__()
self.block = nn.Sequential(
nn.Conv2d(in_channels, out_channels=out_channels, kernel_size=3, stride=stride, padding=1),
nn.BatchNorm2d(out_channels),
nn.ReLU(inplace=True)
)
def forward(self, x):
return self.block(x)
def MinMax_Norm(x, require_grad=False, batch_size=2):
# 输入格式 x: [N, C, H, W] 对图片进行min_max标准化
# x = x.cpu() # 将向x从cuda中转换到cpu中只是为了得到其形状
# input_shape = x.shape
# x = x.reshape(shape=(input_shape[0] * input_shape[1], -1))
# if require_grad:
# # x = torch.from_numpy(minmax_scale(x.t().detach().numpy())).t()
# # 禁止使用detach()函数,for循环手动实现minmax Norm标准化
# for row in range(x.shape[0]):
# temp_min, temp_max = x[row].min(), x[row].max()
# x[row] = (x[row] - temp_min) / (temp_max - temp_min)
# else:
# x = torch.from_numpy(minmax_scale(x.t())).t()
# x = x.reshape(shape=input_shape).float()
# return x.cuda()
if require_grad:
# decoder 最后将cuda中的数据进行标准化
temp_x = x.cpu() # 将向x从cuda中转换到cpu中只是为了得到其形状
input_shape = temp_x.shape
x = x.reshape(shape=(input_shape[0] * input_shape[1], -1))
mid_x = x.cpu() # 将向x从cuda中转换到cpu中只是为了得到其形状
mid_shape = mid_x.shape
# 这里的for循环会造成梯度backward 反向传播时,由于inline内联操作出现问题
for row in range(mid_shape[0]):
temp_min, temp_max = x[row].min(), x[row].max()
x[row] = (x[row] - temp_min) / (temp_max - temp_min)
x = x.reshape(shape=input_shape)
print('required_grad x: ', x)
print('required_grad x.shape: ', x.shape)
return x
else:
# encoder 一开始调用min_max_scale进行标准化
# x = x.cpu()
input_shape = x.shape
x = x.reshape(shape=(input_shape[0] * input_shape[1], -1))
x = torch.from_numpy(minmax_scale(x.t())).t()
x = x.reshape(shape=input_shape).float()
return x.cuda()
def MaxAbs_Norm(x):
# 输入格式 x: [N, C, H, W] 对图片进行max_abs标准化
# temp_x = x.cpu()
input_shape = x.shape
x = x.reshape(shape=(input_shape[0] * input_shape[1], -1))
x = torch.from_numpy(maxabs_scale(x.t())).t()
x = x.reshape(shape=input_shape).float()
return x.cuda()
三 训练结果
训练的结果不论是误码率还是生成图像的MSE,都不如论文中描述的那样,但是肉眼观察生成的去隐写后的图片,发现图像的视觉质量还是很不错的。(这里插一句题外话,小编在训练的时候,从tensorboard中可以看到随着iteration的进行,loss值确实在不断下降,但是训练完后,加载模型生成去隐写后的图片,图片视觉质量不能说是不好,简直就看不出来这是一张图片,视觉质量太烂了,到处找代码的BUG,最后发现模型没问题,原来测试的时候没加 torch.eval() 。。。。)
关于代码和测试结果,这里就不赘述,咱们来看看去隐写后的图像,其视觉质量是不是还可以。
上图中展出了三张图片,从左到右分别是原始图像 cover image、含密图像 stego image、模型生成的去隐写图像generated image。观察去隐写后的图像,肉眼几乎看不出和前两张图片的区别。说明模型去隐写的同时能够保证图像具有较好的视觉质量。
四 结语
路漫漫其修远兮,吾将上下而求索,这里引用《鸡毛飞上天》中的一句话——“一分钱能撑死人,一毛钱能饿死人”。对挑货郎而言,最重要的就是积少成多,不要过于纠结于单件货物的利润,薄利多销。面对一毛钱和一分钱,谁都想一件货物挣一毛钱而不是一分钱,但是利益总是多方相互矛盾的,一方多另一方就少了,不要以为就自己聪明,别人都是傻子,现在什么都要抓在手里,什么都要赢,什么都不能输,但是往往赢了现在,输了未来,做生意讲究的是诚信,是拜四方的码头,广交朋友。《鸡毛飞上天》挺好看的,张译和殷桃的演技真好(就是演老年阶段,个人觉得有些出戏,毕竟演员比较年轻)。
啊啊啊,我也要积少成多,一直坚持,愿坚韧不拔之志常驻我心。